RetroSound HERMOSA User manual

MODERN SOUND FOR YOUR CLASSIC
www.retromanufacturing.com
USER’S MANUAL

TABLE OF CONTENTS
WELCOME 3
WHAT’S IN THE BOX 4
PRECAUTIONS 5
INSTALLATION INSTRUCTIONS 8
WIRING DIAGRAM 11
OPERATING YOUR HERMOSA
BASIC OPERATION 14
TONE CONTROLS 17
SYSTEM SETTINGS 19
USB DEVICE INSTRUCTIONS 24
BLUETOOTH®INSTRUCTIONS 27
TROUBLESHOOTING 29
FREQUENTLY ASKED QUESTIONS 30
SPECIFICATIONS 33
LIMITED WARRANTY 34
REPLACEMENT PARTS 35
INSTALLATION NOTES 36

2
NOTES

WELCOME
The Bluetooth®word mark and logos are owned by the Bluetooth®SIG, Inc.
Any use of such marks by Retro Manufacturing, LLC are under license.
Other trademarks and trade names are those of their respective owners.
Thank you for purchasing a RetroSound® Hermosa radio.
Hermosa combines classic styling with the advanced features
you expect from a modern car stereo. Hermosa consists of two
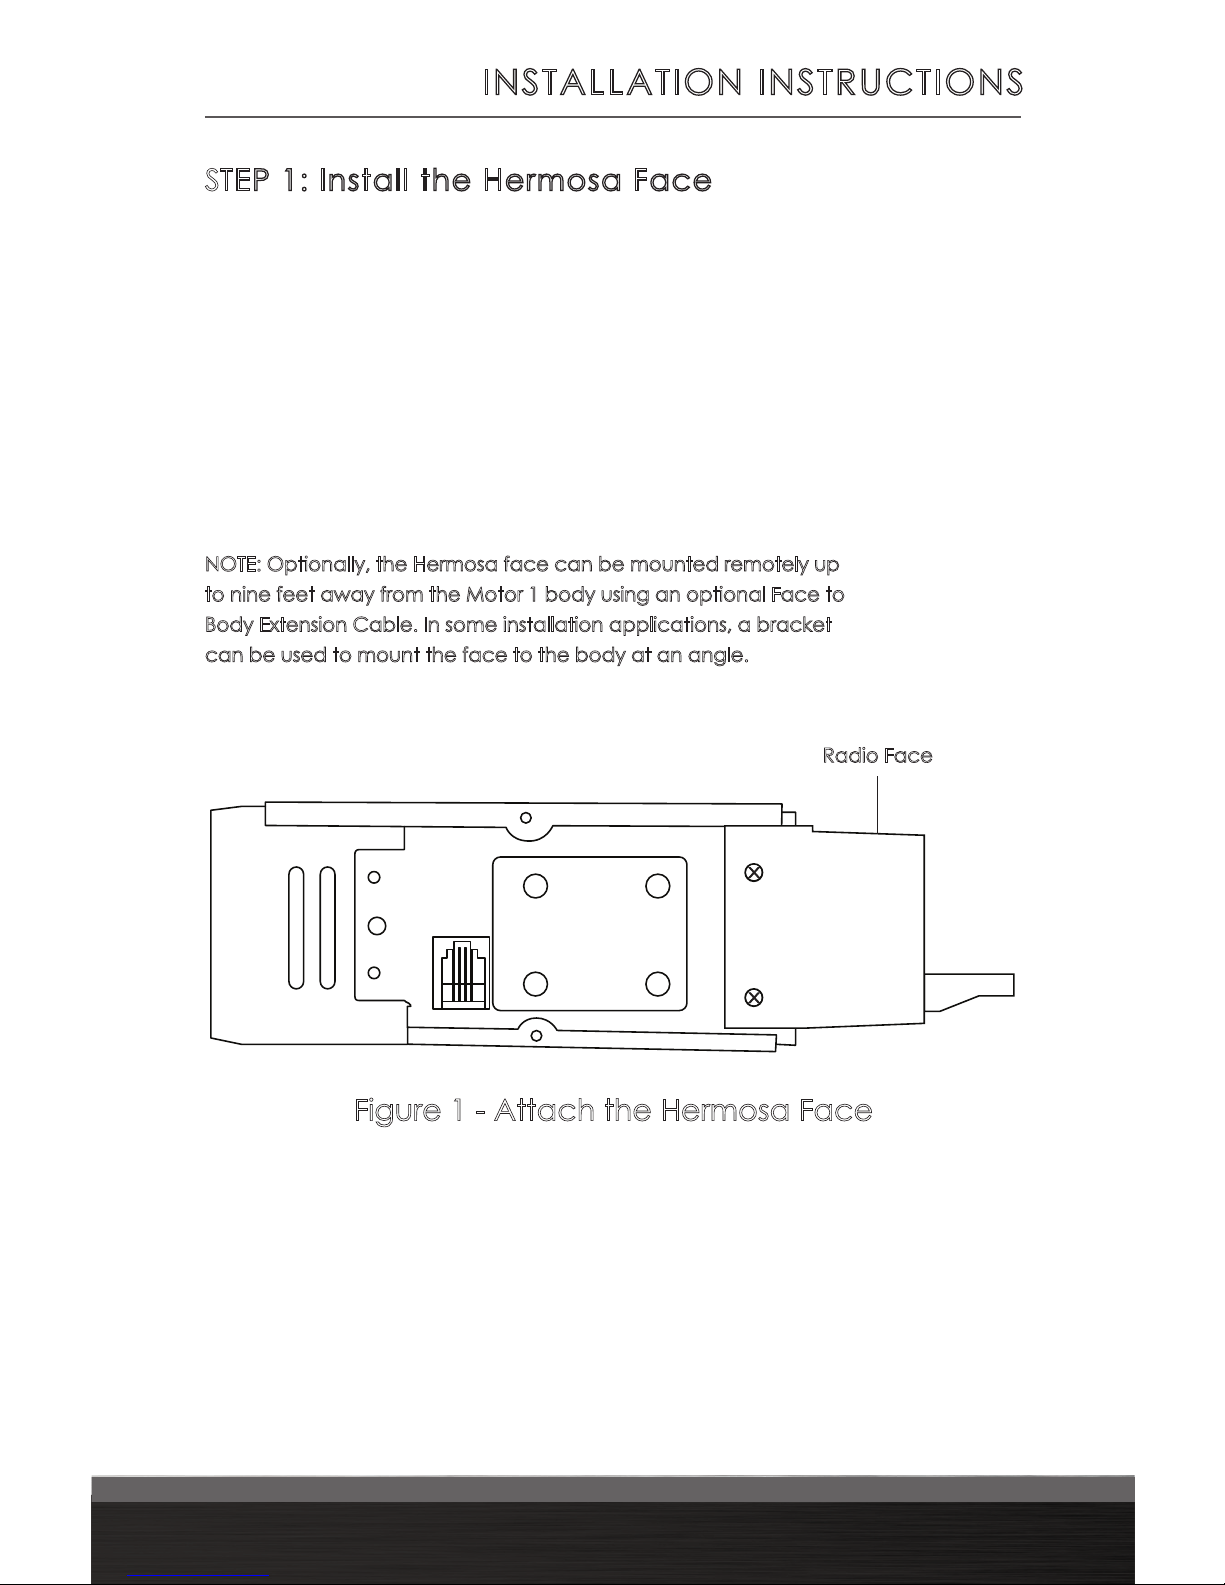
main parts: the Hermosa radio face and the Motor 1 body.
General Features
• Built-in Bluetooth®for hands-free calling and audio streaming
• Plays MP3 and WMA les via USB input
• Selectable dual color (white or green) LCD illumination
• AM/FM tuner with 30 presets and RDS
• Selectable USA/EU/JAP/AUS/RUS tuner frequencies
• Built-in amplier (25 watts RMS/45 watts peak x 4 channels)
• 3 EQ presets plus user-controlled bass, mid-range,
treble, fader, and balance adjustment
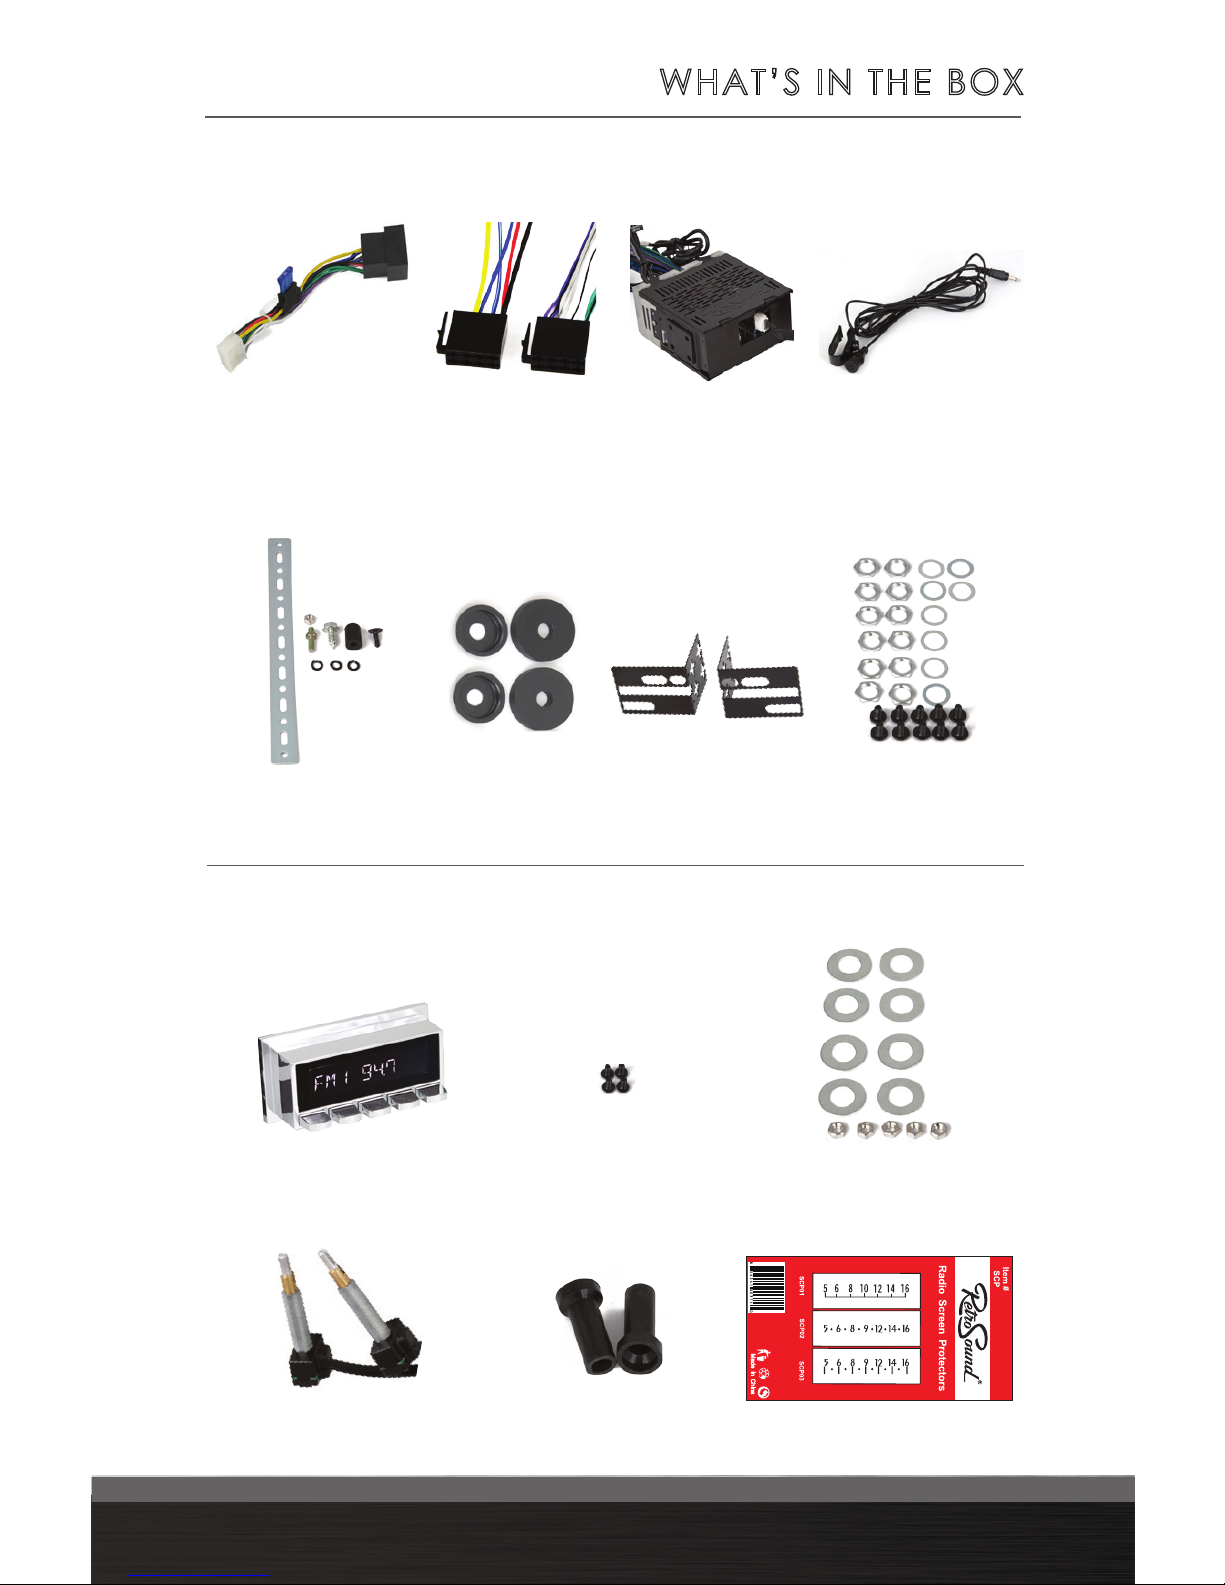
• InniMount shaft/bracket system for maximum installation exibility
• Available with period-correct knobs, bezel and/or faceplate
• Inputs: 1 rear-mounted standard USB port and 2 rear auxiliary inputs
• Outputs: 4-channel pre-amp outputs (front, rear)
• Separate power antenna and amplier turn-on lead(s)
• 1 year parts and labor warranty
The information enclosed in this user’s manual is to be used as a guide to assist
you with installation and operation of your radio. This guide does not cover
every installation possibility, vehicle, or every aspect of the installation process.
Retro Manufacturing, LLC, RetroSound®, or its subsidiaries, assume no
responsibility for any installation. This manual may be updated from time to time.
Visit our website for the latest updates: www.retrosound.com.

4
WHAT’S IN THE BOX
The items shown below are packaged with your Motor 1 box.
The items shown below are packaged with your Hermosa face box.
Main Wiring Harness
(plugs into back of radio)
InniMount Brackets
Model Two Radio Face
Shaft Covers
Power and Speaker
Wiring Harnesses
(both plug into Main
Wiring Harness)
Motor 1 Radio Body Bluetooth
®
Microphone
Metal Mounting Back Strap
and Hardware
Plastic Washer Kit
Shaft Mounting Hardware
Vintage Radio Dial
Screen Protectors
Bracket Mounting Hardware
Radio Face
Mounting Screws
InniMount Shafts

PRECAUTIONS
PLEASE OBSERVE THESE PRECAUTIONS WHEN INSTALLING
AND USING THIS UNIT:
This user’s manual does not cover all possible installation scenarios.
If you feel you can’t install this unit yourself, take it to a local car
audio professional. If you have questions about installing your
at 888.325.1555.
• Do not disassemble or modify the unit or attempt to
repair the unit yourself. If the unit needs to be repaired,
consult your dealer or Retro Manufacturing, LLC.
• Do not use the unit when it is out of order. If the unit is out of
order or is in an abnormal state (has foreign objects in it, is
exposed to water, is smoking or smells), turn it off immediately
and consult your dealer or Retro Manufacturing, LLC.
• Refer fuse replacement to qualied service personnel.
When the fuse blows, eliminate the cause and have it
replaced by a qualied service technician with the fuse
prescribed for this unit. Incorrect replacement of the fuse
may lead to smoke, re and damage to the unit.
• If the unit does not turn on, check the connections rst. Then
check the fuse in your vehicle’s fuse box and the fuse at
the unit’s wiring harness. Do not expose the unit to direct
sunlight or excessive heat. Excessive heat will raise the
interior temperature of the unit, which may damage it.
• Do not use the unit where it is exposed to moisture or dust.
Exposure of the unit to moisture or dust may lead to smoke, re
or other damage to the unit and will void your warranty. Make
sure the unit does not get wet in car washes or on rainy days.

6
PRECAUTIONS
• Refer wiring and installation to qualied service personnel.
Installation of this unit requires special skills and experience.
For maximum safety, have it installed by your dealer or
qualied service professional. Retro Manufacturing, LLC
is not liable for any problems resulting from improper
installation of the unit. Please be sure to follow the
instructions carefully while attempting installation.
• Follow instructions to wire the unit. Failure to follow the instructions
could cause damage to the unit, re, injury or death.
• Be careful not to damage the leads. Prevent them from
being caught in the vehicle chassis or from being damaged
by screws or moving parts such as seat rails. Do not scratch,
pull, bend or twist the leads. Do not install them near heat
sources or place heavy objects on them. If leads must
be routed around sharp metal edges, protect them by
wrapping them with vinyl tape or similar protections.
NOTE: Cutting the main wire harness, antenna lead, USB cable or auxiliary cables
will void the warranty of your radio.
• Use the designated parts and appropriate tools
to install this unit. The use of parts other than those
supplied may result in internal damage to the unit.
• Do not interfere with safety-related vehicle components.
Do not wire or afx this unit to the fuel tank, brakes,
suspension, steering wheel, pedals, etc. Check for electric
wiring, piping and other items before installing the unit.
• Never install the unit in a location where it
interferes with your eld of vision.

PRECAUTIONS
• Never splice into the power lead to supply
other equipment with power.
• After installation and wiring, always check the normal
operation of other electrical equipment.
• Make sure that no wires interfere with driving
or getting in and out of the vehicle.
• Insulate all exposed wires to prevent short-circuiting or electric shock.
• Do not operate the unit for prolonged periods
with the engine off. Prolonged operation with the
engine turned off will drain the battery.
• To prevent accidents, keep the volume of your radio at a level
that allows you to hear outside noises such as emergency
sirens and train crossing warnings. Prolonged exposure
to high volume levels may also result in hearing loss.
• This unit requires 12 volts to both the red and yellow power leads.
The unit will not work without power to both of these leads.
• Disconnect the negative (-) battery cable before beginning
installation. Verify the battery ground by checking that one
wire is connected to the vehicle’s starter mounting bolt or
engine block and the other to the vehicle’s chassis using at
least 8 gauge wire. Make sure the alternator or generator
connections are secure and free from corrosion, rust or dirt.
• This unit is designed for operation with a negative ground
12 volt DC battery system. Do not operate this unit with
other battery systems, especially an 18 or 24 volt DC or a
positive ground system. If you have a 6 volt system, you
need to either convert to 12 volt DC or purchase a separate
inverter that would increase the voltage to 12 volts.
NOTE: The inverter needs to be rated at 8 amps or higher in order
for the radio to operate properly.

8
STEP 1: Install the Hermosa Face
Plug the ribbon cable included with the Motor 1 body into
the Hermosa radio face. After plugging in the face, attach
it to the body and tighten with the 4 radio face mounting
screws provided in the radio face box (the screws are very
small and are in the hardware bag with the shaft nuts).
The RetroSound®logo on the Motor 1 body
should be facing upwards. Take care to not
install the face to the body upside down.
NOTE: Optionally, the Hermosa face can be mounted remotely up
to nine feet away from the Motor 1 body using an optional Face to
Body Extension Cable. In some installation applications, a bracket
can be used to mount the face to the body at an angle.
INSTALLATION INSTRUCTIONS
Figure 1 - Attach the Hermosa Face
Radio Face

INSTALLATION INSTRUCTIONS
STEP 2: Install InfiniMount Brackets
Attach each InniMount bracket to the correct side of the radio
using the supplied screws. Before tightening the screws, you need
to adjust the brackets up, down, forward or backward. You may
also rotate, cut, or bend the brackets to achieve the perfect t
(See Figure 2). Complete the assembly with at least two screws
tightened on each side.
NOTE: In some installations the brackets must be moved far enough forward or
backwards or rotated so that only two screws will align with the threaded screw holes
on the radio. Two screws are sufcient to hold the brackets in place.
NOTE: You may need to cut, trim or bend the brackets to achieve a perfect t. You
can even drill new mounting holes into the bracket if you need to. The InniMount
system is designed to be modied. Modifying your brackets will NOT void your warranty.
Figure 2 - Attach InniMount Brackets
R

10
INSTALLATION INSTRUCTIONS
STEP 3: Mount InfiniMount Shafts to Brackets
To match the location of your shafts to the proper width of your
vehicle’s dash, rst measure the distance between your existing shaft
holes from center to center.
Mount a shaft to each bracket using the supplied shaft nuts
and washers. Finger tighten the shaft nuts to prepare for the nal
installation (See Figure 3). Once you ensure proper width, tighten
the screws and nuts (DO NOT OVERTIGHTEN).
DAMAGE FROM OVERTIGHTENING WILL VOID YOUR WARRANTY.
Finally, plug the shafts into each side of the main unit (See Figure 4).
Figure 3 - Mount Shafts to Brackets
Shaft Washers
Shaft Nuts
Figure 4 - Plug Shafts into the Body

INSTALLATION INSTRUCTIONS
Figure 5 - Wiring Diagram
NOTE: Cutting the wiring harness, antenna lead or auxiliary cable
will void your warranty.
STEP 4: Complete Wiring Connections

12
NOTE: This unit requires +12 volts to both the red and yellow wires to operate properly.
Locate the three wire harnesses: main wire harness, power wire
harness and speaker wire harness (See “What’s in the Box”
on page 4). First connect the main wire harness to the back
of the radio. Then connect both the power and speaker wire
harnesses to the black female plug of the main wire harness.
After doing this, connect the bare wire ends of your power and
speaker wires to the appropriate power and speaker locations in your
vehicle (See Figure 5). Have your radio installed by a professional if this
part of the install is too difcult, or contact us if you have questions.
Installation Notes
• To prevent damage to the unit, do not connect the power
connector until you have completed the wiring process.
• This is a 12 volt negative ground ONLY radio. If you
have a positive ground, or a 6 volt system, you need
to either convert to 12 volts or purchase a separate
inverter that would increase the voltage to 12 volts.
• Please note that any inverter must be rated at 8 amps
or higher in order for the radio to operate properly.
Rear AUX Inputs
Two AUX inputs are located at the rear of the Motor 1 radio body.
These auxiliary inputs allow you to listen to any external source with
a standard headphone output. An example of an external source
would be a MP3 player, iPod®or iPhone®, portable CD player
or portable satellite radio receiver. To use this input, the auxiliary
cable must be routed to an accessible area during installation.
INSTALLATION INSTRUCTIONS

INSTALLATION INSTRUCTIONS
Rear USB Input
A USB connector cable is located at the rear of the Motor 1 radio
body. During installation, you must route the cable to a convenient
and accessible location for plugging in USB devices. If the cable
provided is not long enough (40 inches), you may use our optional
USB/AUX Extension Cable to extend the reach of the cable. This
cable also allows you to install the USB/AUX port into the factory
location for the cigarette lighter for a factory look and easy access.
STEP 5: Finish the Installation
IF USING A BEZEL, Place the bezel on the face of the radio. Install the
assembled radio from behind the dash until the bezel and radio face
are ush with the front of the dash and the radio shafts protrude through
the shaft openings in the dash. Using the supplied washers and shaft
nuts (see “What’s In the Box” on page 4), secure the radio to the dash.
IF USING A FACEPLATE, slide the radio into the hole from behind the
dash, then align the faceplate over the radio shafts from the front.
Using the supplied washers and shaft nuts (see “What’s In the Box” on
page 4), secure the faceplate to the dash and the radio.
DAMAGE RESULTING FROM OVERTIGHTENING THE SHAFT NUTS
WILL VOID YOUR WARRANTY.
Finally, you’ll need to secure the rear of the radio using the supplied
back strap and hardware (See “What’s in the Box” on page 4). The
back strap mounts using the threads in the rear of the radio body and
can be bent and adjusted to align with the mounting point of the
original factory radio behind the dash. Now you can install your knobs
by placing them onto the shafts.

14
OPERATING YOUR RADIO
Basic Operation
Figure 6 - Front Panel Controls
Figure 7 - Left Shaft with Knobs
1
2
1. Left Front Knob
2. Left Rear Knob
3. Push-Button
4. Push-Button
5. Push-Button
6. Push-Button
7. Push-Button
8. Right Front Knob
9. Right Rear Knob
123 4 5 6 7 8 9

OPERATING YOUR RADIO
General Operation
Power On/Off
Press the left front knob (#1) to turn the unit on.
RETROSOUND will appear on the screen.
Press and hold the left front knob (#1) to turn the unit off.
GOODBYE will appear on the screen to conrm that it has turned off.
Volume
Turn the left front knob (#1) to adjust the volume between 0-46.
Mode
Turn the left rear knob (#2) clockwise to select from available
listening sources: RADIO, AUX 1, AUX 2, USB 1, Bluetooth.
(The USB source mode will not appear unless a USB device is
plugged in).
The auxiliary and USB inputs are located at the back of the radio
body. The auxiliary inputs may be used to play music from any
portable device with a standard headphone output, such as
a MP3 player, iPod®or iPhone®, portable CD player or portable
satellite radio receiver. The USB input allows you to play music from
a ash drive. To use these inputs, the cables must be routed to an
accessible area during installation.
Radio Tuning
Turn the right front knob (#8) to tune to the next or previous
AM/FM frequency.
NOTE: When the radio is tuned to a strong stereo FM station, the stereo indicator will
appear on the upper right corner of the LCD screen (two oval circles).

16
OPERATING YOUR RADIO
Radio Bands
Turn the right rear knob (#9) counter-clockwise to toggle through
the ve radio bands (two AM and three FM).
Storing Radio Pre-sets
There are six radio pre-sets for each radio band. For pre-sets one
through ve, tune to the desired radio station and then press and
hold the push-button (#3-7) to store into memory. To store pre-set
number six, tune to the station you want to store, then turn and hold
right rear knob clockwise to store.
Selecting Radio Pre-sets
To recall radio pre-sets, press the appropriate pre-set button (#3-7) in
the selected radio band. To recall pre-set six, turn the right rear knob
(#9) clockwise and release it.
Mute
Press the right front knob (#8) to mute or unmute.

OPERATING YOUR RADIO
Tone Controls
This sub-menu allows advanced tonal adjustments, balance and
fader controls and the pre-set equalizer options. To access this sub-
menu, press the left front knob (#1). Repeatedly press the left front
knob to scroll through the available options. To adjust within the sub-
menu, turn the left front knob clockwise or counter-clockwise.
Digital Signal Processor (DSP)
This sub-menu allows you to turn the Digital Signal Processor (DSP)
on and off. Factory default is DSP OFF. When set to DSP ON, you can
choose one of three pre-set equalization settings:
• CLASSIC This setting offers subtle sonic adjustments
that lend themselves to classical music.
• POP This setting accentuates bass and treble
frequencies and is suitable for popular music.
• ROCK This setting accentuates treble frequencies
and is suitable for rock music.
Bass
This sub-menu (bass) allows bass tone adjustments.
You may boost or cut low frequencies from +7 to -7.
Middle
This sub-menu (MIDDLE) allows mid tone adjustments.
You may boost or cut mid frequencies from +7 to -7.
Treble
This sub-menu (treble) allows treble tone adjustments.
You may boost or cut high frequencies from +7 to -7.

18
OPERATING YOUR RADIO
Balance
This sub-menu (bal) allows adjustment of stereo sound to left or right.
This may be helpful in compensating for the position of the driver
in relation to the vehicle’s speakers. Adjustment range is from 0-12
between left and right speakers.
Fader
This sub-menu (fader) allows you to adjust the sound between the
front and rear speakers. Adjustment range is from 0-12 between front
and rear speakers.
XBAS
This sub-menu (XBAS) boosts bass and treble for listening at low
volumes. This should only be used at low volume levels and should be
set to XBAS OFF at high volumes.
Bass Crossover Frequency
This sub-menu (BAS 80H) allows adjustment of the frequency crossover
of the bass signals between 60Hz, 80Hz, 100Hz or 200Hz.
Middle Crossover Frequency
This sub-menu (Mid 1.0K) allows adjustment of the frequency
crossover of the mid signals between 0.5KHz, 1.0KHz, 1.5KHz
or 2.5KHz.
Treble Crossover Frequency
This sub-menu (TRE 10.0K) allows adjustment of the
frequency crossover of the treble signals between
10.0KHz, 12.5KHz, 15.0KHz or 17.5KHz.

OPERATING YOUR RADIO
System Settings
The System Settings sub-menu system enables access to the numerous
additional features of your radio. Press and hold the right front
knob (#8) for three seconds to access the sub-menu system. Then
repeatedly press the right front knob (#8) to scroll through the available
sub-menu options. Once in a specic sub-menu, turn the right front
knob either clockwise or counter-clockwise to change options.
Auto Seek/Manual
This sub-menu allows you to select either Auto Seek or Manual tuning
when listening to the radio. In Auto Seek mode the radio will tune to
the next available station when tuning.
A Store
This sub-menu will automatically ll FM pre-sets on all three FM bands
of six pre-sets each (eighteen total pre-sets) with the strongest stations.
To activate this feature, once in the system settings, press the right
front knob (#1) until A STORE appears on the screen, then press the left
front knob to activate. This process can take up to one minute.
Local/Distant
This sub-menu changes the sensitivity of the FM tuner. When
listening to the FM tuner, selecting between LOCAL and DISTANT can
aid in listening to weak FM stations or compensate for stations that
have too strong a signal.
Clock
This sub-menu allows you to set the clock. To adjust hours, turn the
right front knob (#8) clockwise. Adjusting past 12 will toggle the AM/
PM indicators. Once the hour is set, press the right front knob to adjust
minutes. Once minutes are set, press the right front knob to access
the 12/24 menu.
Other manuals for HERMOSA
1
Table of contents
Other RetroSound Radio manuals

RetroSound
RetroSound Santa Cruz User manual

RetroSound
RetroSound HERMOSA User manual

RetroSound
RetroSound Zuma Radio Installation instructions

RetroSound
RetroSound New York User manual

RetroSound
RetroSound Motor 1A User manual

RetroSound
RetroSound Redondo User manual

RetroSound
RetroSound Redonodo User manual

RetroSound
RetroSound Santa Cruz Troubleshooting guide

RetroSound
RetroSound Santa Cruz User manual

RetroSound
RetroSound Europa User manual