RIB STOPPER T 275 A User manual

STOPPER T 275 A
RETRACTABLE BOLLARD
Operator Material Painting Shock resistance Breaking resistance Code
STOPPER T 275 A
Steel Fe37 Polyester powder grey
antracite RAL7021
40.000 Joule 250.000 Joule
AA51213
STOPPER T 275 A
with blinker AA51226
STOPPER T 275 A INOX S
Steel stainless
AISI 304 Glazed
AA51225
STOPPER T 275 A INOX S
with blinker AA51237

TABLE OF CONTENTS
1
Notes on installation 3
General Safety Regulations 3
Waste disposal 3
Product description 4
Bollard datasheet 4
Bollard components 5
Installation procedure 6
Inspection and preparation 6
Ground permeability 6
Digging the pit 7
Inserting the bollard on slab 10
Inserting the bollard 12
Laying of inductive loops 14
Electrical connections 16
Bollard wiring 16
Control unit datasheet 18
Housing dimensions 18
Control unit fitting 19
Control unit 20
MASTER and SLAVE circuit 20
Protection fuses 20
MASTER push buttons 20
MASTER circuit board connections 21
MASTER circuit board LEDs 22
SLAVE circuit board connection 23
SLAVE circuit board LEDs 23
DIP SWITCH function 24
Operation modes 25
Manual lowering 25
Step mode 26
Automatic rising mode 27
Maintenance 29
Specific operations 32
Malfunction and Troubleshooting 35
CE Conformity 40
2

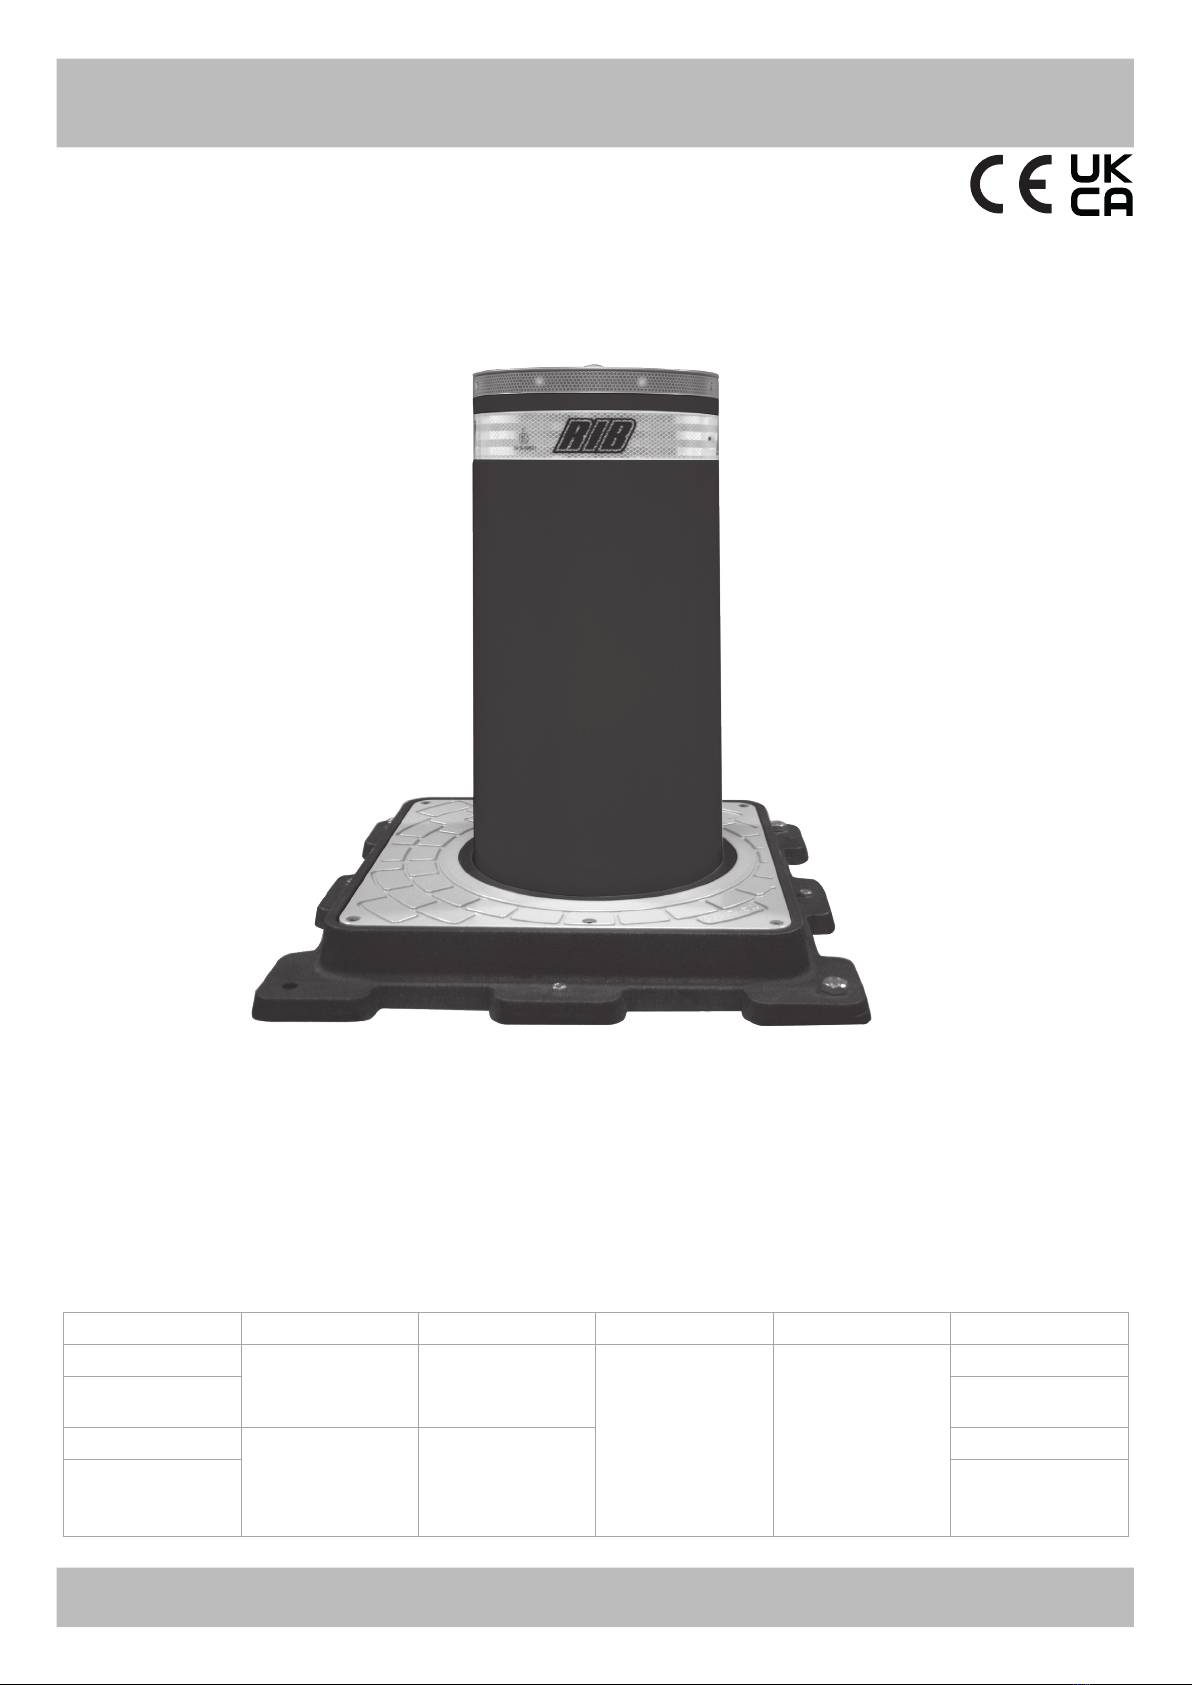
NOTES ON INSTALLATION
General Safety Regulations
WARNING! It is important to follow these instructions carefully to ensure safety of persons and belongings. A faulty installation or an incorrect
operation of the product may cause serious damages to people and belongings.
These instructions are for experts only, for someone who is able to complete fitting, operation and maintenance in full safety conditions.
3
1. Read carefully this manual before starting the installation and save it for
future reference.
2. Packaging materials (plastic, polystyrene, etc…) must be kept out of reach
of children, because potentially dangerous.
3. This product have been designed and manufactured only for the use shown
in this documentation. Any other use, different from what expressly
indicated could damage the integrity of the product and/or be potentially
dangerous.
4. RIB S.r.l. is not responsible for any damage caused by improper or different
use than that for which the automated system was intended.
5. Do not install the device in an explosive area: the presence of gas or
inflammable fumes is a serious danger for safety.
6. The installation must be performed in compliance with the law in force.
7. In the extra-UE countries make also reference to the national law.
8. RIB S.r.l. is not responsible for any non-compliance with the correct
installation procedure of RIB products and accessories, as well as for any
deformation that can occur while using.
9. Before carrying out any work on the system, it is advisable to wear suitable
personal protective equipment (eg safety shoes, gloves, goggles, etc..)
10. Before performing any operation on the installation, disconnect the main
power supply.
11. Place a 0.03A magnetothermic differential switch with an opening
distance between contacts equal to or greater than 3 mm to power the
control unit.
12. The main power supply line of the control unit must be directly connected
to the main switch set inside the control unit. Use approved anti-flame
cable. The dimension of the main power supply line must be evaluated
by the installer according to the quantity of bollards (500W each bollard)
and the distance from the output place, in order to grant a proper supply
(230V +/-10% per each moving bollard).
13. Check that there is a suitable earthing and place/connect an earthing line
to the terminal PE in the control unit.
14. Every bollard is equipped with a safety pressure switch. The pressure
switch operates the inversion every time it detects a mass of at least 40
Kg on the head of the bollard while rising. In any case it is recommended
to check the activation level every six months.
15. Each installation should have: a light signaling such as the flashing light
integrated in the head of the bollard – an acoustic buzzer that signals the
bollard in movement – a traffic light (red – green) for each direction
of transit – a signpost for each direction of transit.
16. For the maintenance use only original RIB spare parts.
17. RIB S.r.l is not responsible in terms of safety and good operation of RIB
products, in case of use of non-original RIB spare parts.
18. Do not perform any modification to the parts composing RIB system.
19. The installer must provide to the customer all the information related to
the manual lowering of the bollards in case of need.
20. Do not allow people and children to stop close to the bollards during
operation.
21. Keep radio transmitters and any other control devices out of the reach
of children in order to avoid any unintentional operating of the bollards.
22. The transit is allowed only with the bollards completely down.
23. The customer must avoid any repair or direct intervention and must
address to qualify and authorized personnel.
24. Do not throw the exhausted batteries in the garbage but dispose them
in the proper containers to allow recycling.
25. The bollards are packed on pallet. Use specific equipment or forklift for
movement; handle with care.
26. RIB bollards are manufactured with IP 66 or superior protection class and
can be stocked everywhere, also outdoor. It is however recommended to
stocked the bollards in close or covered places.
27. RIB bollards are designed to resist to transport and stocking effects in a
range between -25°C and +55°C and for a determined time (less than 24
hours) at +70°C.
28. The bollards do not require any availability of spare parts: RIB S.r.l
warehouse can send any spare parts in quick times.
29. In case of maintenance or repair of the bollards, be sure to avoid any
inappropriate rising control. To avoid problems, disconnect the controls
through the appropriate switch set in the control unit.
Waste Disposal
The trash container symbol shown on the product label, on the product or in the instructions indicates that the product, at the end of its life, must be
disposed separately from other waste products.
The end user must therefore bring the item to an authorised electronic waste disposal centre, or return it to the dealer when new equivalent product is
purchased.
Proper separate collection for recycling, treatment or compatible environmental disposal contributes to avoid negative effects on the environment and
health, moreover it favours reuse and recycling of the materials the product is made of.
Improper disposal of the product is subject to fines.

Bollard datasheet
PRODUCT DESCRIPTION
4
CYLINDER MATERIAL S235JR NORMAL STEEL - X5CrNi18-10 (AISI 304) STAINLESS STEEL -
X5CrNiMo 17-12-2 (AISI 316) STAINLESS STEEL
CYLINDER DIAMETER 273mm
CYLINDER HEIGHT 600mm
CYLINDER NORMAL STEEL THICKNESS 6mm
CYLINDER STAINLESS STEEL THICKNESS AISI 304: 6mm - AISI 316: 4mm
CYLINDER NORMAL STEEL FINISH ANTI-CORROSION TREATMENT - GREY ANTHRACITE STANDARD PAINTING
(OPTIONAL: OTHER RAL COLOUR ON REQUEST)
CYLINDER STAINLESS STEEL FINISH GREY ANTHRACITE STANDARD PAINTING OR BRUSHED
OTHER CYLINDER FINISH RIBS ON CYLINDER’S SURFACE (OPTIONAL)
REFLECTING ADHESIVE STRIP STANDARD - HEIGHT 55mm
RISING SPEED 16cm/s
LOWERING SPEED 30cm/s
MANUAL EMERGENCY LOWERING STANDARD (OPTIONAL: AUTOMATIC LOWERING IF POWER FAILED)
SAFETY REVERSAL PRESSURE SWITCH STANDARD
CONNECTION LINE TO CONTROL UNIT STANDARD 10m (MAX. LENGTH 80m - WITH HEATING RESISTANCE MAX. 50m)
HYDRAULIC PUMP FOR MOVEMENT BUILT-IN INTO THE BOLLARD
HYDRAULIC PUMP ABSORPTION 230V +/-10% - 2,2A (MAX. 3,4A)
HYDRAULIC PUMP THERMAL PROTECTION STANDARD - INTERVENTION THRESHOLD 120°C - AUTOMATIC RECOVERY 80°C
PROTECTION CLASS IP67
TYPE OF USE INTENSIVE - 2.000 CYCLES/DAY
LIFE AVERAGE 3.000.000 CYCLES
IMPACT RESISTANCE (WITHOUT DEFORMATION) 40.000 J
BREAKOUT RESISTANCE 250.000 J
PERM. AMBIENT TEMPERATURE -40 °C +70 °C (FOR TEMPERATURES LOWER THAN -10 °C USE THE HEATING RESISTANCE)
RELATIVE HUMIDITY FUNCTION RANGE 10% - 80%
MAX. ALTITUDE IN OPERATION ≤ 1500m s.l.m.
MAX. AIRBORNE SOUND EMISSION IN OPERATION 60dB
WEIGHT INCLUDED 10M CONNECTION CABLE AND FOUNDATION BOX 162Kg
FOUNDATION BOX WEIGHT 44Kg
560
560
600940
273
40
150

PRODUCT DESCRIPTION
Bollard components
5
HEAD
FLASHING LIGHT
REFLECTING STRIP
MOVING
CYLINDER
HYDRAULIC
PUMP
PISTON
SOLENOID
VALVE
RISING
SIDEBLOCK
LOWER
SUPPORT BASE
LOWER
LIMIT SWITCH
PASSIVE BOX
FRAME

6
Checking ground permeability
INSTALLATION PROCEDURE
Inspection and preparation
Premise
The bollards and the corresponding foundation boxes may be delivered pre-assembled.
The bollards, control unit and required accessories are packaged on pallet.
Use appropriate lifting equipment or a forklift for transport.
Checking the subsurface
Before inserting the foundation box, make sure that the location where the bollard is to be fitted meetshe following requirement:
1. Water-bearing layers must not be present in the subsurface.
2. Lines or electrical cables must be not present.
3. a ground connection system corresponding with the directives must be available.
If the bollard is positioned on a gradient, the slope can cause rainwater to penetrate the foundation box. You must provide a drainage
channel with a cover grille in front of the bollard and in its immediate vicinity to prevent rainwater from penetrating the system.
An important factor when inserting the bollard is prior assessment of the ground permeability to drain rainwater.
Make sure that the ground permeability in the fitting area meets the following requirements in advance:
Perform a test to check the ground permeability before inserting the foundation box.
• Pour approx. 40 litres of water per m2into the pit.
• Check whether the water seeps into the ground within approx. 30 minutes.
If the test is negative:
• Drain off the rainwater via a Ø 50 mm drainage pipe.
• Connect the drainage pipe to the sewer system.
Alternatively, the drainage pipe can be connected to a rainwater collection tank under the foundation box
equipped with an immersion pump and a float for automatic drainage. Or connect the drainage pipe to the sewer system.
6

7
INSTALLATION PROCEDURE
1. Dig a 1000 x 1000mm pit with a depth of 1230mm (pic. 1).
If the foundation box is equipped with immersion pump, dig a pit with a depth of 1530mm (see drawings a page 9).
2. Ensure that the ground for inserting a bollard has good permeability (Note section at page 6).
Note: read the paragraph “inspection and preparation” at page 6.
3. Fill with gravel up to approx. 300mm high (grain size 8 – 20 mm). Compact the gravel to prevent the bollard from settling later on (pic. 2).
4. Fix the foundation anchors properly to the foundation box ( pic. 2 and 4)
5. Place the foundation box in the pit, together with counterframe and foundation anchor:
• Align the foundation box in accordance with the passage direction, as stated on the frame ( pic. 5).
• Position the foundation box exactly vertical ( pic. 2).
• In order to position the foundation box at the right height, backfill the foundation box with gravel o remove gravel. Make sure that the frame is
10mm higher than the road. This will restrict rainwater penetration into the foundation box ( pic. 3).
• When fitting several foundation boxes, ensure that they are all turned in the same direction and precisely aligned (see page 10).
• 6. Fill the space around the foundation box with gravel up to approx. 200mm to avoid any obstruction of the drainage holes, placed at the bottom
of the pit, during the concrete casting. (pic. 2).
• 7. Lay a flexible Ø 50 mm tube from each foundation box to carry the connecting cable from the bollard to the control unit (pic. 2 and 4).
Warning! If the foundation boxes and the control unit are more than 10m apart, please order the bollard with extended connecting cable (Standard
length 10m – optional up to max. 80 m).
8. When fitting foundation boxes with immersion pump, connect a flexible ø25mm tube from each foundation box to the sewer system or similar
(page 9).
9. Cast the concrete up to approx. 100mm under the ground surface (the height depends on the type of road surface).
Note: Cast the concrete in two working steps to prevent the liquid concrete from pushing the foundation box up. Compact the concrete.
10. When using accessories (e.g. induction loops, traffic lights, key switch post), lay a flexible ø50mm tube from the control unit to the correspon-
ding fitting position of the accessory.
11. Apply the road surface once the concrete has dried.
Digging the pit
All the pipelines shall be laid in full compliance with the regulations in force.
7

8
Digging the standard pit
INSTALLATION PROCEDURE
IF THE FOUNDATION BOX IS EQUIPPED WITH IMMERSION PUMP, READ POINTS 1 AND 8 AT PAGE 8
8
10mm
1230mm
1000mm
300mm 200mm 140mm
Ø5Omm
Walking level
1
23
45
1000mm
1
3
5
2
4
8

9
INSTALLATION PROCEDURE
Digging several pits
9
max. 1600mm max. 1600mm
FOUNDATION ANCHOR
CONTROL UNIT
JUNCTION BOX
mm 400x400
FLEXIBLE SHEATH
diameter 50mm
9

10
Inserting the bollard on slab
In case of laying on slab ( see page 11) it is necessary to purchase the specific “kit for installation on slab”. The instructions are as follows.
1. Mark the laying point of each bollard, then remove the road surface/concrete casting for about mm 1000 x 1000. Remove the waterproofing sheath in
the middle of the laying point for about mm 500 x 500; take into consideration the consecutive restoration.
2. At the moment of purchasing, communicate the thickness of the slab in order to let the manufacturer produce a stainless steel waterproof pit of a
suitable length (see ref. A and B at page 11).
3. In the center of the laying point remove the slab by drilling a through hole of about mm 450 x 450mm.
4. Place the counterframes equipped with anchoring plate in the center of the through hole. Secure it by means of 12 M16 chemical anchors (supplied by
the building contractor) complete with supplementary nuts for the proper leveling of the counterframe/anchoring plate with respect to the walking level
(to limit rainwater infiltrations into the pit, arrange the counterframe approx. 10mm higher than the walking level).
5. Restore the waterproofing sheath, the additional concrete casting and the road surface.
6. By means of 8 M8 chemical anchors (supplied by the contractor), secure the stainless steel waterproof pits to the ceiling of the basement.
7. Lay the pipes for the electrical cables from the bollards to the control unit.
8. Lay the pipes for rainwater drainage from the waterproof pits to the drainage area.
9. Lay the additional pipes from the control unit to the installation point of the accessories (i.e. inductive loops, traffic lights, consolle, etc.). Prearrange
the electrical connection and the earthing to the control unit.
INSTALLATION PROCEDURE
Any procedure not explicitly stated in these instructions is forbbiden.
10

11
INSTALLATION PROCEDURE
Inserting the bollard on slab
“A” quota is the sum of the thicknesses of which the slab is made of.
ROAD SURFACE
ADDITIONAL
CONCRETE CASTING
600mm
275mm
50mm
10mm
WATERPROOFING
SHEATH
SUPPORTING
SLAB
925mm
B A
450mm
500mm
WATERPROOF PIT
IN STAINLESS STEEL
M8 CHEMICAL
ANCHORS
M16 CHEMICAL
ANCHORS
WATER
DRAINAGE
50mm SHEATH
FOR ELECTRICAL
CABLES
WALKING
LEVEL
450mm
450mm
700mm
700mm
BOLLARD
COUNTERFRAME
ANCHORING
PLATE
TRAFFIC WAY
11

12
Inserting the bollard
1. Keep the bollard ready in the immediate vicinity of the foundation box.
2. Completely extend the cables on the ground to avoid possible twisting.
3. Lay the connecting cable for each bollard through the tube to the control unit.
Attention! The function of the bollard may be impaired if the connecting cable is twisted.
4. Lay the connecting cable in the foundation box through the strain relief provided (pic. 1).
Attention! The function of the bollard may be impaired if the connecting cable is attached at a different point.
5. Screw the four M16 eye bolts (not included in the bollard scope of delivery) into the prepared threaded holes (pic. 2).
6. Fasten the strap, chains etc. onto the eye bolts and raise the bollard. Please observe the min. carrying capacity! Gently place the
bollard in the foundation box ( pic. 3).
7. While inserting the bollard into the foundation box, avoid tight winding when laying the connecting cable in the foundation box.
Make sure that the lines are not clamped (pic. 4).
Attention! While inserting the bollard into foundation box, make sure not to twist the cables nor to crush them.
8. Remove the eye bolts as soon as the bollard is positioned. Screw the bollard tight with the nuts supplied then apply the plastic caps
supplied on the top of the screws.
9. Carry out the basic electrical connections of the control unit.
Warning! When connecting the bollard to the control unit carefully read the wiring diagrams contained in the scope of delivery.
10. The control unit, configured according to the customer’s needs as described in the order sheet, is supplied with all the necessary
wiring diagrams, including the electrical connections of the bollard.
INSTALLATION PROCEDURE
12

13
1
3
2
4
INSTALLATION PROCEDURE
Inserting the bollard
M16
M16
13

14
Laying the induction loops
INSTALLATION PROCEDURE
If the system is used in the automatic operating mode (extension of bollard after a vehicle has driven through), induction loops must be laid to detect
metal masses (vehicles).
1. Induction loops are suitable for two different applications:
• “Limited” protection of the bollards (pic. 1 – pic. 2). In this case a single inductive loop is installed around the bollards, it avoids the raising in case a
vehicle is over the bollards or in the immediate surroundings.
• “Extended” protection of the bollards (pic. 3). Two induction loops, one before and one after the bollards, are laid for added protection. A passing
vehicle is identified approx. 3000 mm in front of the bollards and detected to approx. 3000 mm behind the bollards. This allows the following vehicles
to be identified in advance and thus to prevent possible collisions.
Notes on laying the induction loops
2. Standard induction loops are 9.60m long (1800 × 3000 mm). Other lengths are also available.
3. Induction loops consist of a special cable with approx. Ø 9mm. These are suitable for direct laying in the ground without sheathing or other protective
equipment.
4. Ensure that there is no reinforcing steel mesh when laying the induction loop. If a reinforcing steel mesh is present, remove it up to approx. 25cm
above the circumference of the induction loop (pic. 5).
5. Make sure that the corners are rounded when laying the induction loop (pic. 5 and 6).
6. Lay the induction loop 7 cm beneath the ground surface. In case of paving stones with a thickness of at least 10 cm, the material must be adjusted
to permit laying at the specified depth. Alternatively, you can lay the induction loop between paving stones in a diagonal join.
7. Induction loops are equipped with a connection box (pic. 4) to which the connecting cable for signa transmission to the control is connected. The
connecting cable consists of a strong, special cable with a standard length of 15m. (you can also order induction loops with a longer connecting cable).
8. You can also use induction loops to detect an exiting vehicle and for automatic requests to lower the bollard.
14

95 cm
95 cm
95 cm
95 cm
300 cm
90cm
90cm
max. 160cm
70 cm 70 cm
280 cm
200 cm
80 cm
80 cm
15 c m
9 cm
5,5 cm
~15 cm
~20 cm
~15
cm
Co ntrol Unit
Min. 25cm
15
1
3
5
INSTALLATION PROCEDURE
Laying the induction loops
2
4
6
15

16
Bollard wiring
ELECTRICAL CONNECTIONS
In order to connect all the electrical devices, a passive box with six connections is installed on the bollard frame.
The wires of these devices are marked out by different colours. For the correspondence see the wiring diagram at page 17.
NO. COLOUR DEVICE
1 BLUE FLASHING LIGHT – BUZZER (OPTIONAL)
2 GREY SOLENOID VALVE FOR LOWERING
3 YELLOW SAFETY PRESSURE SWITCH*
4 BLACK LIMIT SWITCH BOLLARD DOWN
5 WHITE LIMIT SWITCH BOLLARD UP (OPTIONAL)
6 RED HEATING RESISTANCE (OPTIONAL)
*Standard solenoid valve: N.C. = in absence of power supply the bollard remains in up position
Optional solenoid valve: N.O. = in absence of power supply the bollard automatically lowers (gravity
White
Yellow
Blue
Red
Black
Grey
16

17
ELECTRICAL CONNECTIONS
This diagram is for illustration purposes only.
When connecting the bollard to the control unit carefully read the wiring diagrams contained in the scope of delivery.
Bollard wiring
Shield=PE
*interchange is possible
*Brown
*Black
Yellow
Blue
Purple= Heating resistance 80W
Blue = 0v Buzzer
Grey = Sensor for detecting bollard up position (c)
Green= Pressure sensor
Purple= Heating resistance 80W
Red= Solenoid valve 24Vdc
Brown= DOWN position
Black= UP position
Yellow/Green= Grounding
Grey= Common for motor
Red = + 24V common
White= Sensor for detecting bollard downposition
Grey=Sensor for detecting bollard up position (nc)
Red= Solenoid valve 24Vdc
1
3
2
4
2
4
2
4
4
2
1
2
4
2
1
4
Hydraulic unit
2 GREY
1 BLUE
4 BLACK
6 BROWN
3 YELLOW
M12
J12T6B5-PG135-WL-PIL
2
1
3
4
2
1
3
4
2
1
3
4
2
1
3
4
2
1
3
4
2
1
3
4
M11 9 M2
5 WHITE
M4
M14 M6
13 115 1416 10
x11 2
x9
+
M19
M
M20
M1M3
M13 M5
+
M18
8764
1243
M17 M10
5 WHITE Sensor for detecting
bollard up position
3 YELLOW Safety pressure switch
1 BLUE Flashing light and
buzzer
6 RED Heating resistance
4 BLACK Sensor for detecting
bollard down position
2 GREY Lowering solenoid valve
PASSIVE BOX
17

18
Control unit datasheet
ELECTRICAL CONNECTIONS
Control unit
The control is supplied in metal housing (protection category IP56 or IP66) for wall fitting as standard. Fit the control preferably in:
• a covered place,
• a place protected from poor weather conditions,
• a place protected from direct sunlight.
The size of the housing depends on the system configuration (see section “Housing size”).
Further housings for the control unit are available on request, e.g. rectangular switch cabinets for floor fitting, key switch posts with
∅275mm with lockable maintenance flap and 1-sided traffic lights, 2-sided traffic lights and /or control elements.
Note 1: The dimensions stated in the table relate to the control with standard configurations. The use of optional accessories such as a timer
or a transformer for the heating resistances etc. may require larger dimensions.
Note 2: please Contact your specialist dealer to find out the control dimensions for more than 5 bollards (e.g.control for 8 bollards).
Housing dimension
18
CIRCUIT BOARD WITH MICROPROCESSOR WITH SPECIFIC CONTROL PROGRAM
STANDARD HOUSING FOR WALL FITTING
PROTECTION CATEGORY IP66
SUPPLY STANDARD: 230VAC +/- 10% - 50/60Hz
CONTROL UNIT PROTECTION THERMAL-MAGNETIC CIRCUIT BREAKER 1P + N - 6KA
SERVICE TRANSFORMER 24VAC - STANDARD POWER 100VAC
MAX. NUMBER OF BOLLARDS THAT CAN BE CONNECTED
(ALL BOLLARDS CONNECTED TO ONE CONTROL ALWAYS MOVE
SIMULTANEOUSLY. CONTROLLING INDIVIDUAL BOLLARDS IS NOT
POSSIBLE)
NO RESTRICTIONS.
EACH CONTROL CONTAINS: 1 MASTER CIRCUIT BOARD ONTO WHICH THE 1ST BOLLARD IS
CONNECTED, AS MANY SLAVE CIRCUIT BOARDS AS THERE ARE ADDITIONAL BOLLARDS AVAILABLE
PERM. AMBIENT TEMPERATURE - 15°C + 60°C
RELATIVE HUMIDITY FUNCTION RANGE 10% - 80%
CONFIGURATION MATERIAL IP CLASS DIMENSION (H X W X D)
SP1 – SYSTEM WITH 1 BOLLARD ABS IP 56 mm 400 x 300 x 130
SP2 - SYSTEM WITH 2 BOLLARDS STEEL IP 66 mm 500 x 400 x 200
SP3 – SYSTEM WITH 3 BOLLARDS STEEL IP 66 mm 600 x 400 x 200
SP4 – SYSTEM WITH 4 BOLLARDS STEEL IP 66 mm 700 x 500 x 200
SP5 – SYSTEM WITH 5 BOLLARDS STEEL IP 66 mm 700 x 500 x 200

19
ELECTRICAL CONNECTIONS
1. Lay the wall box.
2. Pull the main electrical supply line (230 Vac) into the control. Connect the line directly to the main switch.*
3. Pull the ground connection line into the control. Connect the line directly to the PE terminal.
4. Pull the connecting cable for each bollard into the control. Connect the lines as follows: 1st bollard to the master circuit board; each
additional bollard to the corresponding slave circuit board..
5. Pull the additional lines for the accessories into the control. Connect the lines to the master circuit board according to the connection
tables.
6. Before running a functional test consult the instructions related to the electric connections provided with the system.
The main power supply line of the control unit must be directly connected to the main switch set inside the control unit. Installation of the
*
Example of control unit
main supply line depends on the number of bollards (500W each bollard) and the distance of the bollards to the control unit to ensure
sufficient supply (230V/400V +/10% on the moving bollard).
Fitting the control unit
TRANSFORMER
100VA 230V 0-24V
AUTOMATIC SWITCH
1P + N 6kA C2 16A
SLAVE CIRCUITS
EXAMPLE OF CONTROL UNIT FOR 3 STOPPER T 275 A BOLLARDS
MASTER CIRCUIT
UNIPOLAR EARTHING TERMINAL
BOARD - 16 mm 2
METALLIC BOX IP66
mm 600 x 400 x 200
19

MASTER push buttons
20
MASTER and SLAVE circuit
CONTROL UNIT
Protection fuses MASTER - SLAVE
SLAVE CIRCUIT
MASTER CIRCUIT
F1 2AT
F2 1AT
F3 2AT
F5 5AT
F6 1AT
F7 2AT
F1 5AT
F2 2AT
20
MASTER SLAVE TYPOLOGY CONNECTED COMPONENTS
F1 2AT 230VAC - 24VAC POWER SUPPLY UNIT SUPPLY FUSE
F2 1AT TIMER SUPPLY FUSE
F3 2AT TRAFFIC LIGHT SUPPLY FUSE
F5 F1 5AT SUPPLY TO ACCESSORIES CONNECTED TO TERMINALS 1-2-3/31-32-33
F6 1AT SAFETY DEVICES SUPPLY FUSE
F7 F2 2AT LOGIC FUSE
BUTTON FUNCTION
RESET PERFORMS PROGRAM RECOVERY (IN CASE OF BLOCKING)
START STARTS EXTENDING AND LOWERING (DEPENDING ON THE SETTINGS OF DIL SWITCH 1)
PROG PROGRAMMING THE SYSTEM ADJUSTMENT PARAMETERS
SERVICE ENTER THE MAINTENANCE MODE
Other manuals for STOPPER T 275 A
1
Table of contents
Other RIB Automatic Barrier manuals