| 7
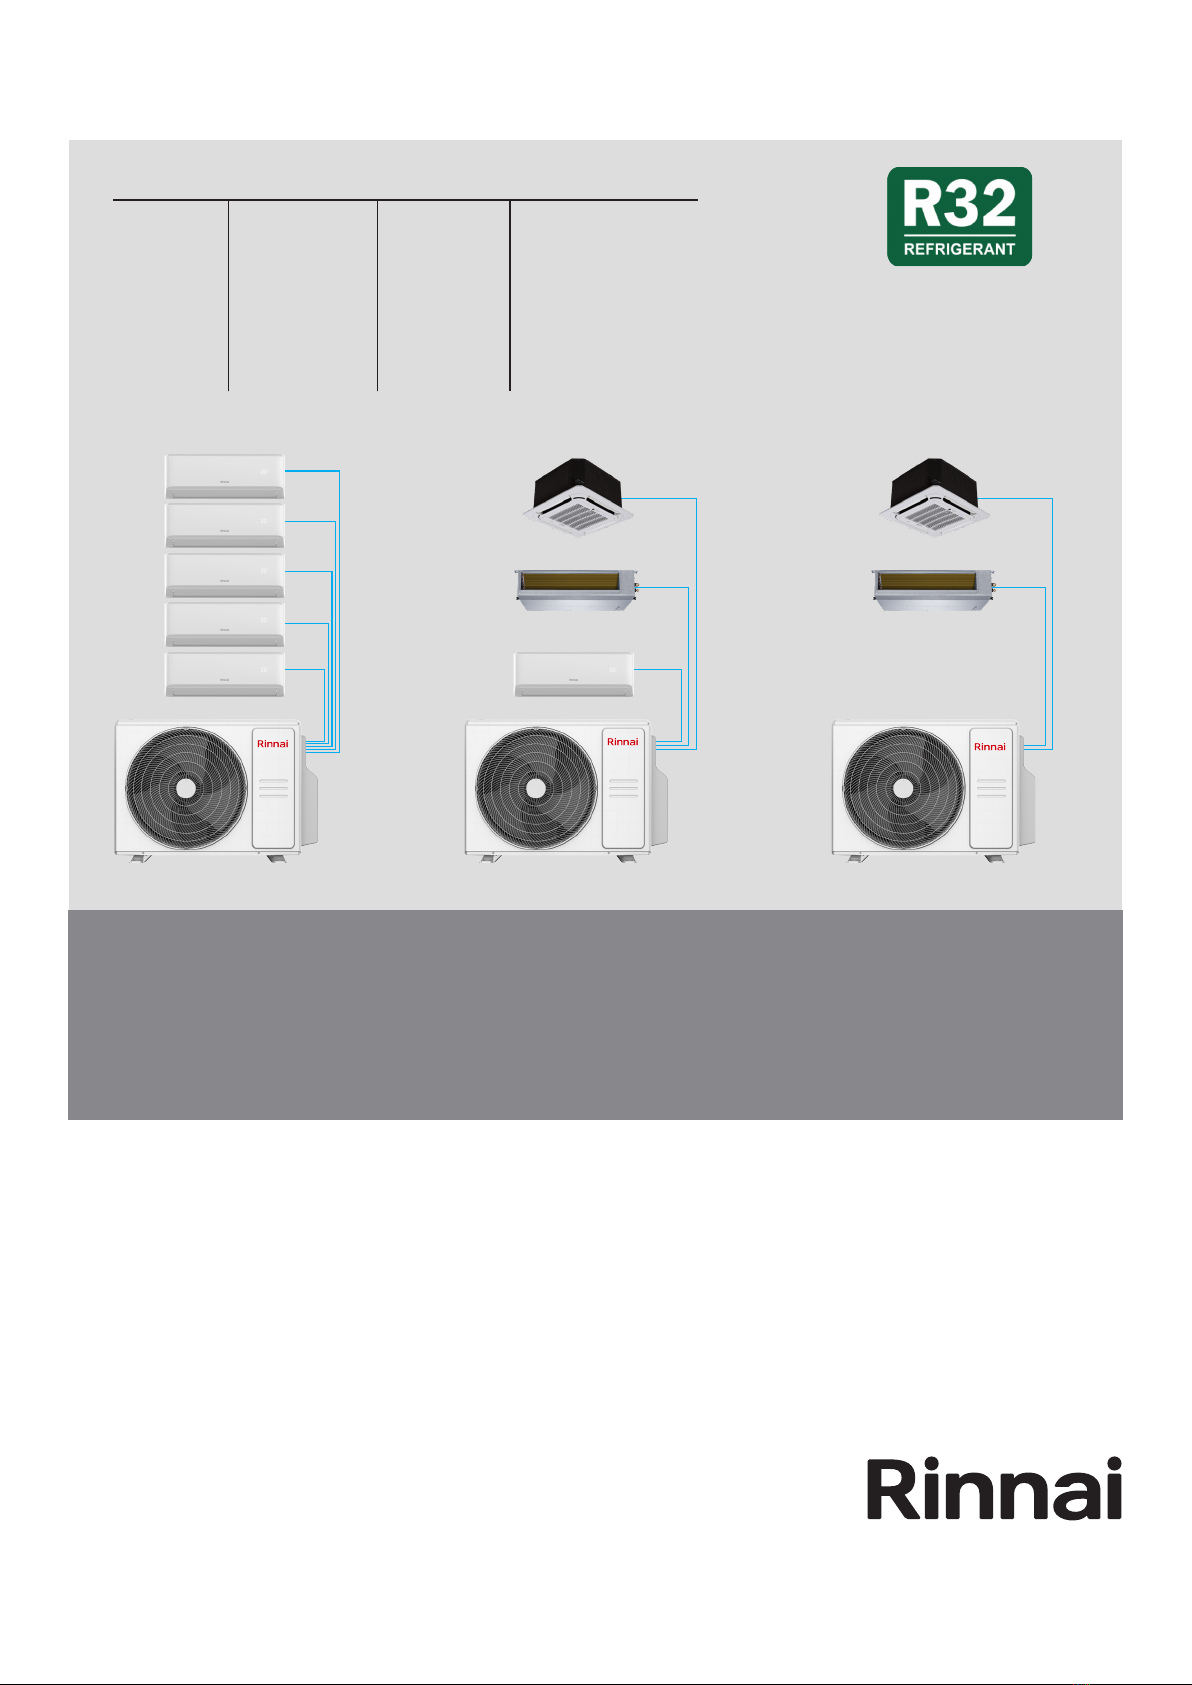
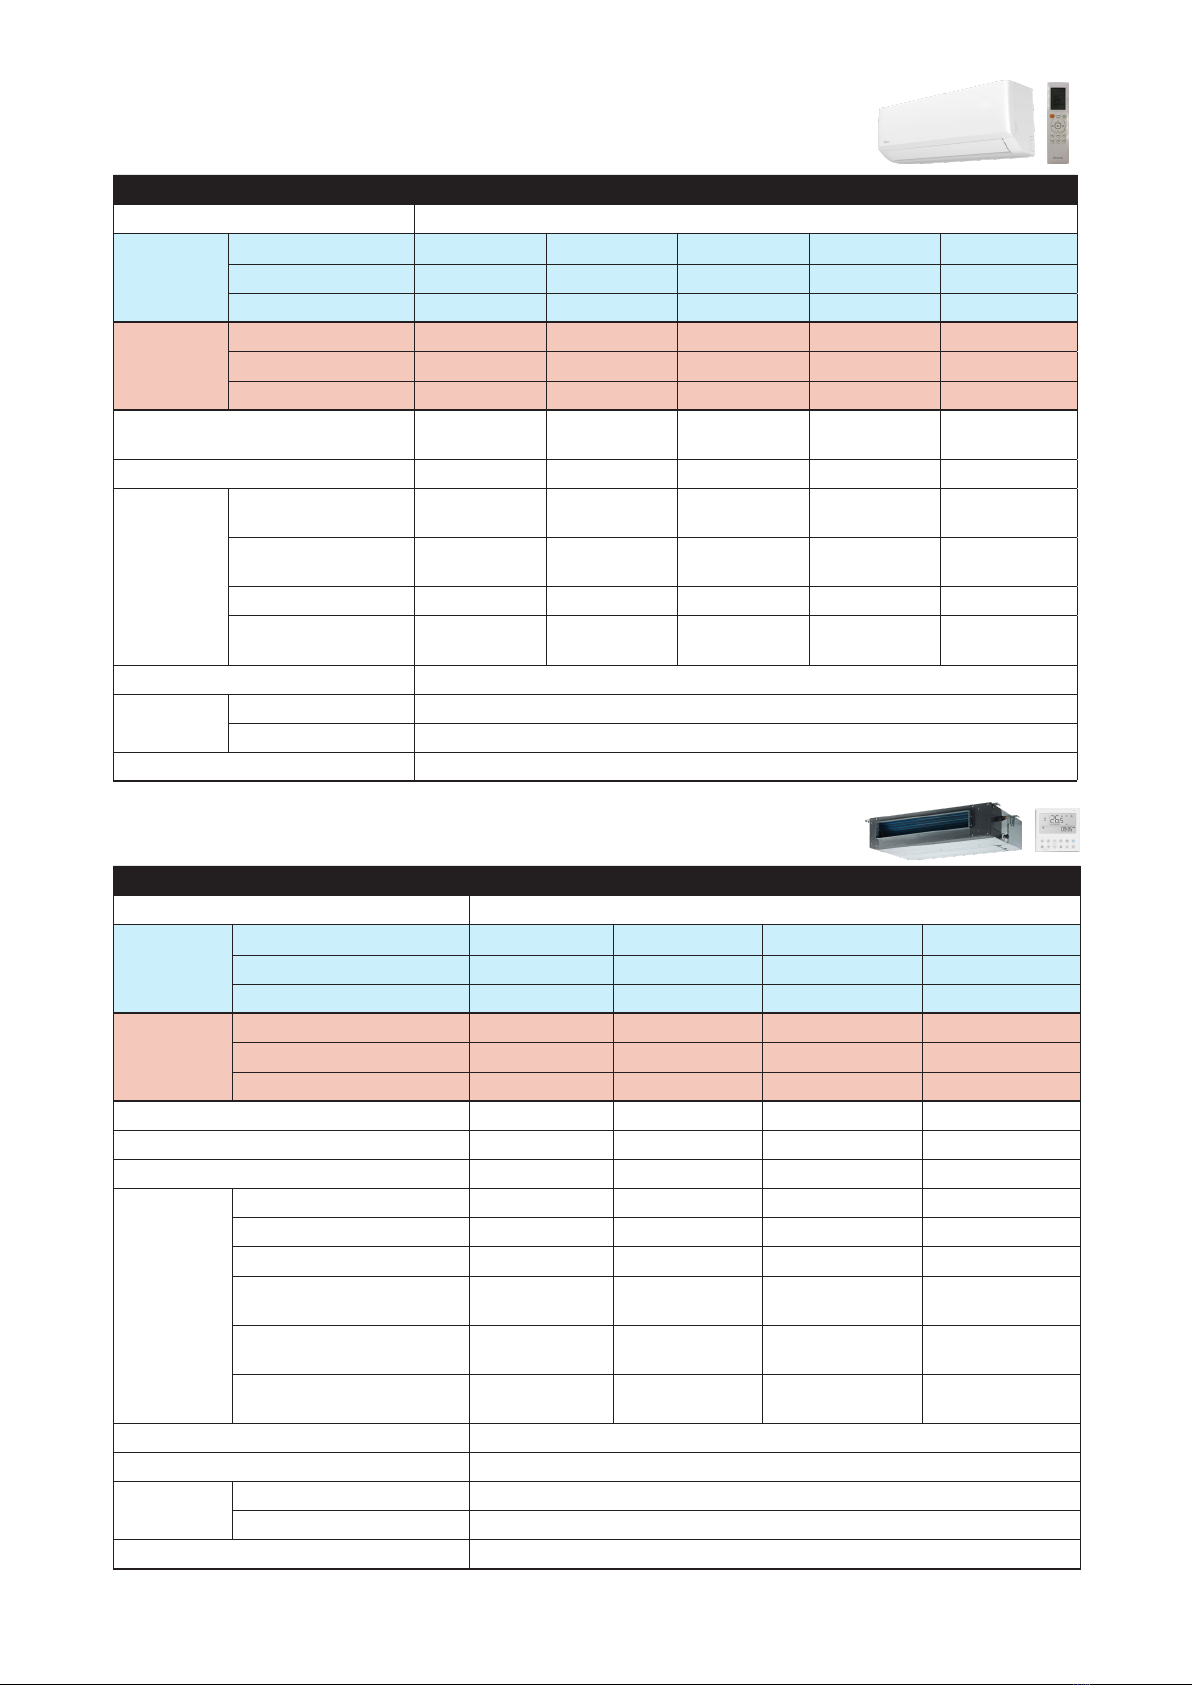
Pro Series High Wall Indoor HINRP26MB HINRP35MB HINRP50MB HINRP60MB HINRP70MB
Power supply 220-240 V 1 Ph 50 Hz
Cooling Rated capacity 2.65 kW 3.5 kW 5.0 kW 6.0 kW 7.15 kW
Rated input power 530 W 790 W 1280 W 1750 W 1920 W
Rated input current 2.5 A 3.8 A 5.8 A 8.0 A 10.5 A
Heating Rated capacity 2.7 kW 3.8 kW 5.4 kW 6.5 kW 7.8 kW
Rated input power 510 W 830 W 1340 W 1686 W 1990 W
Rated input current 2.5 A 5 A 6 A 8.2 A 10.8 A
Airo (turbo, hi, med, lo, min) L/s 175 / 139 /
100 / 85 / 56
183 / 147 /
106 / 86 / 58
264 / 222 /
167 / 139 / 89
264 / 222 /
167 / 139 / 89
382 / 303 / 250
/ 229 / 147
Sound power level 55.3 dB(A) 56.4 dB(A) 59.8 dB(A) 59.8 dB(A) 62.2 dB(A)
Dimensions Net (WxDxH) mm 802 x 200 x
295
802 x 200 x
295
971 x 228 x
321
971 x 228 x
321
1082 x 234 x
337
Gross (WxDxH) mm 965 x 370 x
282
1010 x 385 x
307
1067 x 385 x
312
1205 x 400 x
317
1082 x 234 x
337
Net / gross weight 8.5 / 11.1 kg 8.5 / 11.1 kg 11.1 / 14.4 kg 11.1 / 14.4 kg 13.5 / 17.1 kg
Refrig. pipe size:
Liq. / gas (mm)
Ø6.35 / Ø9.52 Ø6.35 / Ø9.52 Ø6.35 / Ø12.7 Ø6.35 / Ø12.7 Ø6.35 / Ø15.9
Controller Wireless remote controller
Operating
range
Cooling 16~32 °C
Heating 0~30 °C
Wireless compatibility Standard
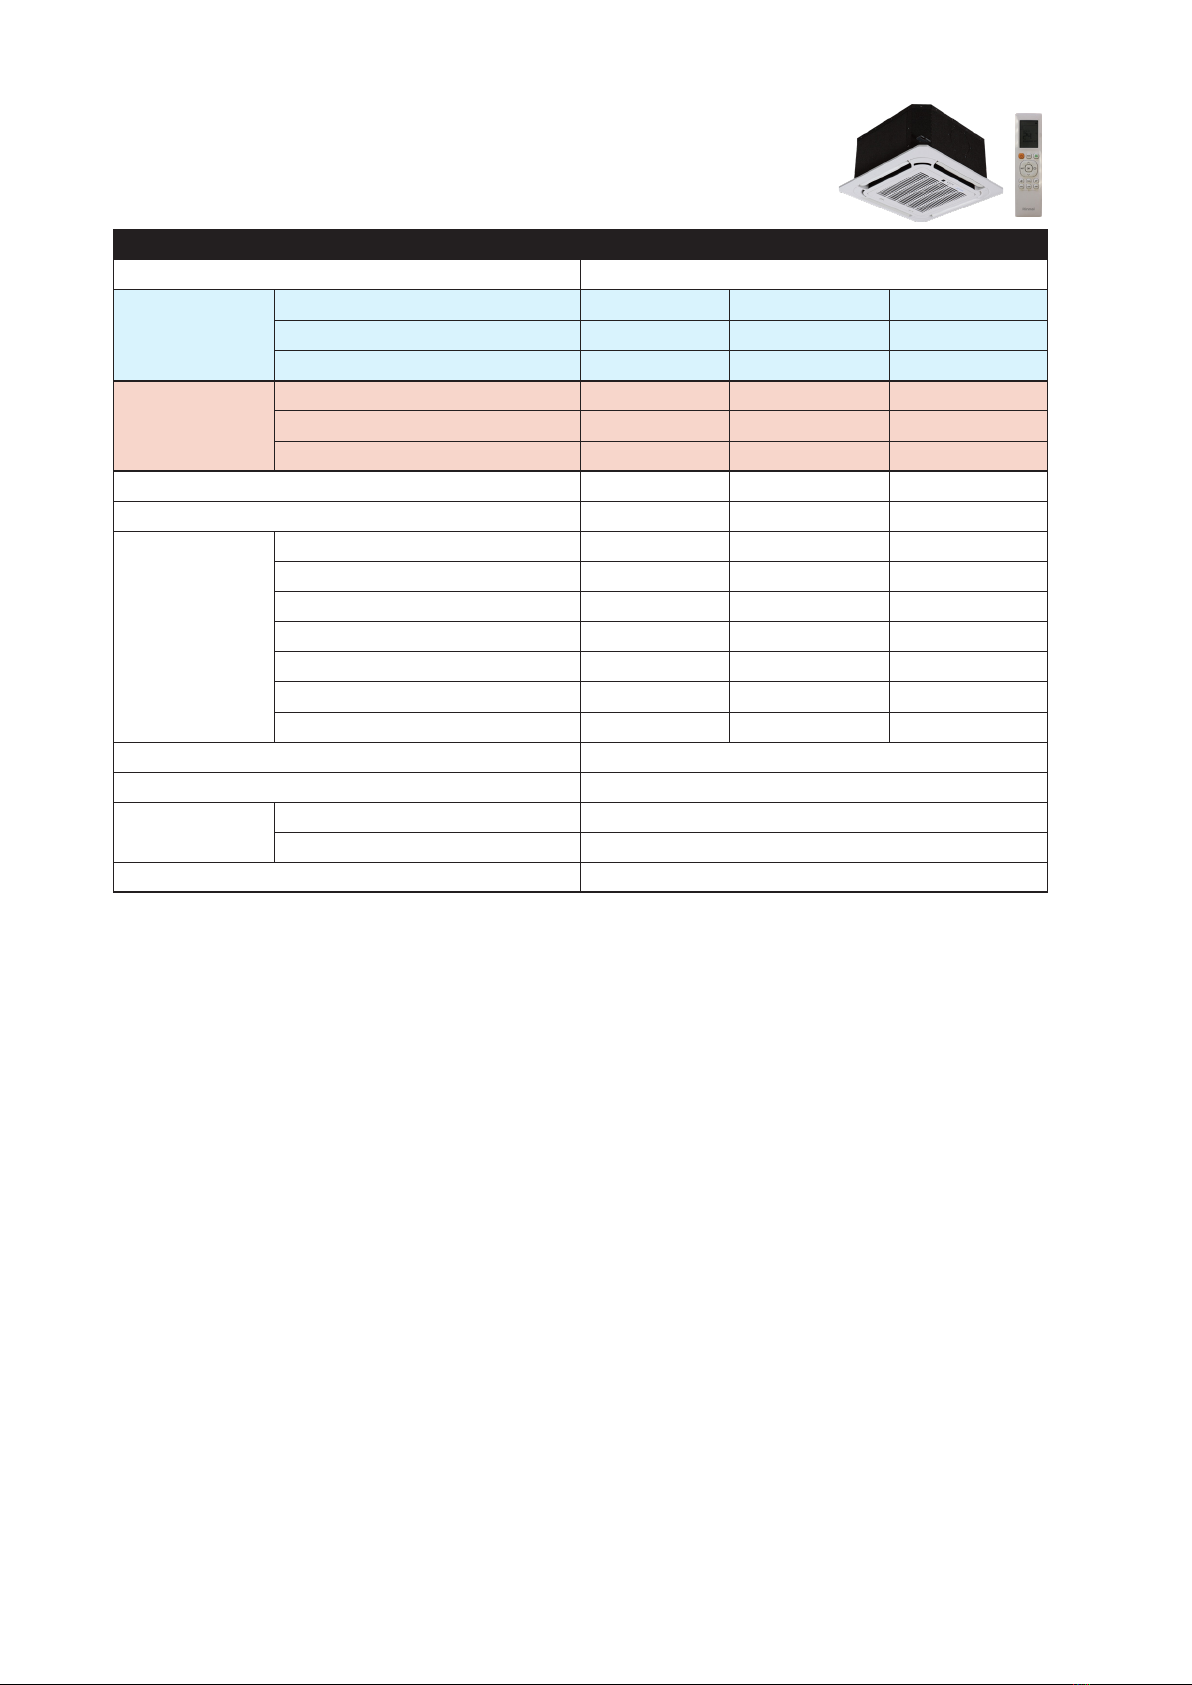
Slim Ducted Indoor DINSD26MB DINSD35MB DINSD50MB DINSD70MB
Power supply 220-240 V 1 Ph 50 Hz
Cooling Rated capacity 2.6 kW 3.5 kW 5.2 kW 7.1 kW
Rated input power 180 W 185 W 200 W 200 W
Rated input current 1.1 A 1.1 A 1.3 A 1.3 A
Heating Rated capacity 2.9 kW 3.8 kW 5.5 kW 7.3 kW
Rated input power 180 W 185 W 200 W 200 W
Rated input current 1.1 A 1.1 A 1.3 A 1.3 A
Airo (hi, med, lo) L/s 500 / 340 / 230 500 / 340 / 230 600 / 480 / 300 880 / 650 / 350
Max. external static pressure (hi) 60 Pa 60 Pa 100 Pa 160 Pa
Sound pressure (hi, med, lo) @ 1 m dB(A)
40 / 34 /27 40 / 34 /27 40 / 34 /27 41 / 38 /33
Dimensions Net (WxDxH) mm 700 x 506 x 200 700 x 506 x 200 880 x 674 x 200 1100 x 774 x 249
Gross (WxDxH) mm 860 x 540 x 285 860 x 540 x 285 1070 x 725 x 280 1305 x 805 x 315
Net / gross weight 18 / 22 kg 18 / 22 kg 24 / 29 kg 32 / 39 kg
Supply air duct connection
(WxH) mm
537 x 152 537 x 152 706 x 136 926 x 175
Return air duct connection
(WxH) mm
599 x 186 599 x 186 782 x 190 1001 x 228
Refrig. pipe size:
Liq. / gas (mm)
Ø6.35 / Ø9.52 Ø6.35 / Ø12.7 Ø6.35 / Ø9.52 Ø9.52 / Ø15.9
Condensate drain pump connection OD Ø25 mm
Controller Wired controller
Operating
range
Cooling 17~32 °C
Heating 0~30 °C
Wireless compatibility Standard


 null")