manuals.online logo
Brands
  1. Home
  2. •
  3. Brands
  4. •
  5. Robern
  6. •
  7. Indoor Furnishing
  8. •
  9. Robern MT20D4MD User manual

Robern MT20D4MD User manual

SS550 Métallique 30” High Cabinet
Robern
701 N. Wilson Ave.
Bristol, PA 19007
800.877.2376
MÉTALLIQUE 30” HIGH CABINET
General Notes
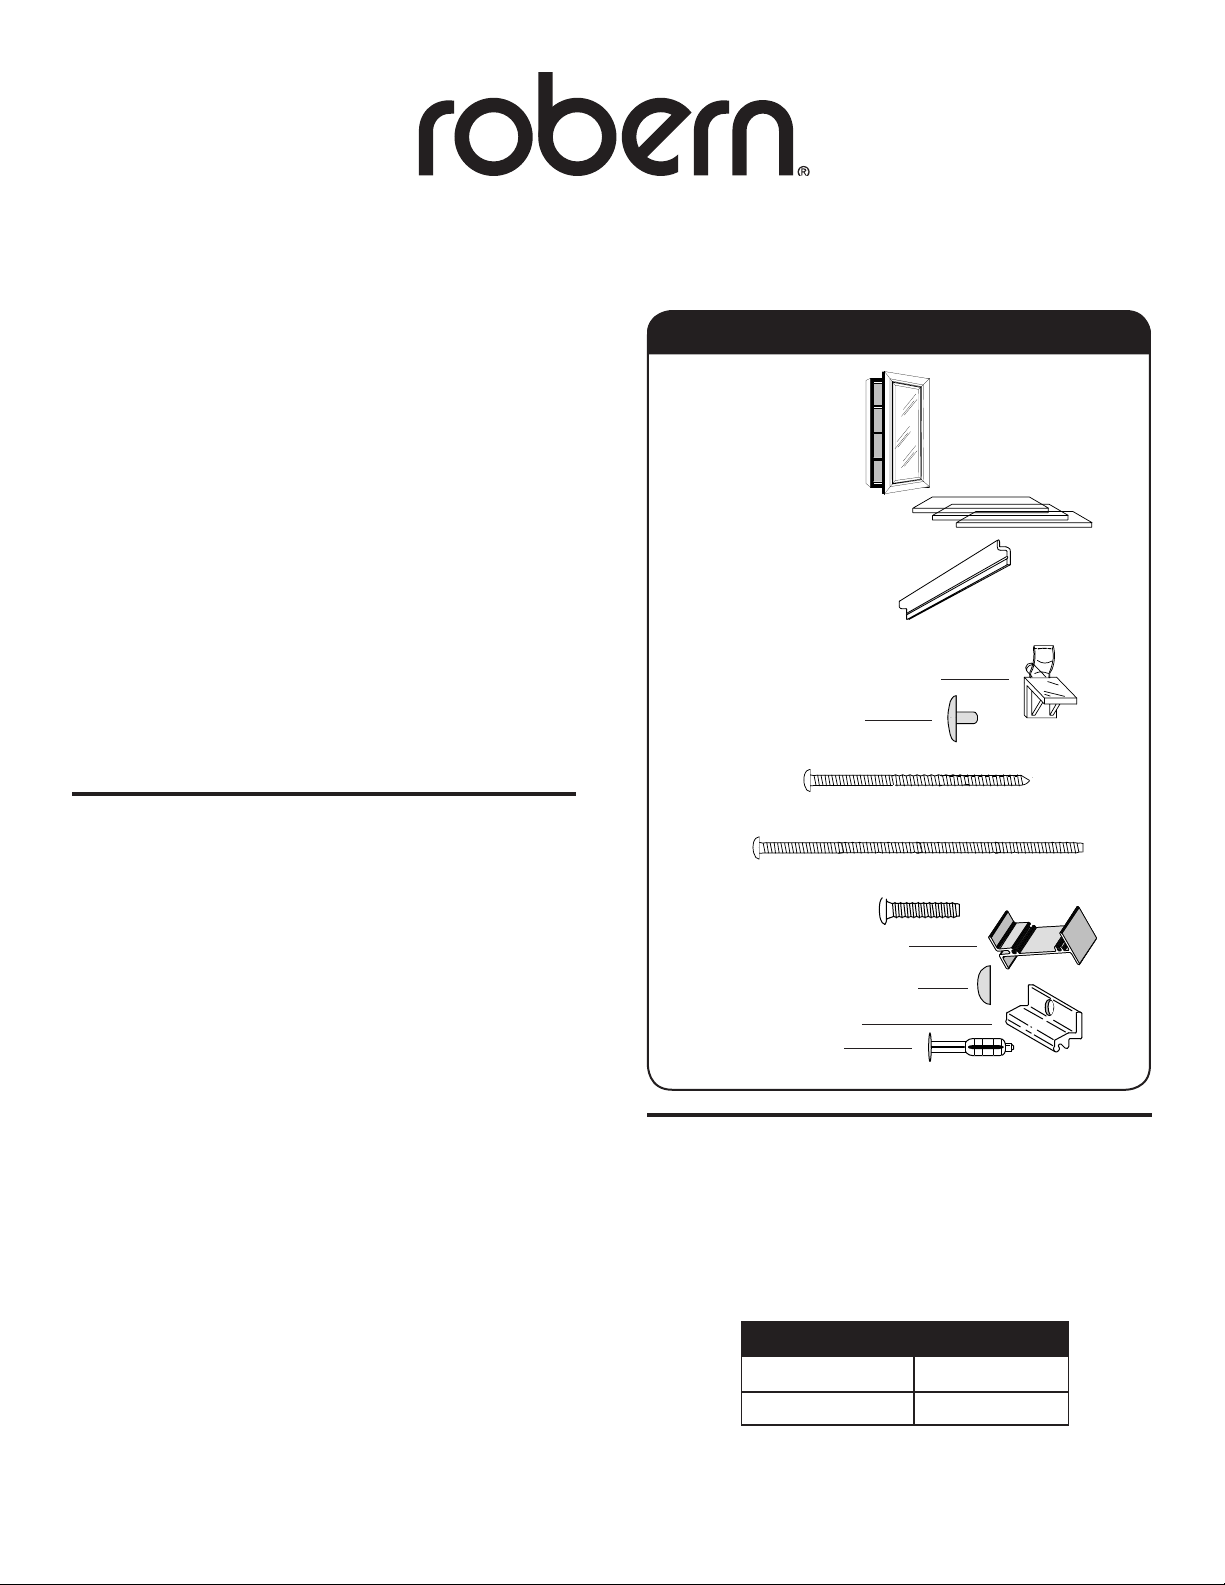
1. Unpack the cabinet. Check the box thoroughly
for all hardware and loose parts as follows:
A. Cabinet B. Hardware Bag C. Shelving
D. “Z’ Bracket E. SOMM Magnifying Mirror
2. Remove the doors from the cabinet and store the
doors in the cabinet box. Be sure edges of the doors
are protected. Removing the doors allow for easy and
fast installation of the cabinet system.
3. A square and plumb installation insures proper door
operation. A square and level are necessary for
proper installation.
4. Improper installation voids the warranty. Installed
cabinets cannot be returned.
5. If you experience any problems with your Métallique
cabinet contact your dealer or Robern directly.
Robern • 701 N Wilson Ave • Bristol, PA 19007
800 877 2376 • FAX 215 826 9633
1. MT20D4 Cabinet
or MT24D4 Cabinet
2. Glass Shelves
– 3 Shelves are provided
with each cabinet
3. “Z” Mounting Brackets
– Bracket used for surface
mounted cabinets.
4. Hardware Bag • Contains the Following
A. 12 Clear Snap-In Shelf Clips
B. 46 Shelf Hole Plugs
C. 6 SMS/WOOD Screws #10 X 2”
D. 5 SMS/Wood Screws #10 X 3”
E. 8 Connector Block Screws #10 X 1/2”
F. 2 MP65 Connector Blocks
G. 15 Grey Screw Head Caps
H. 3 Top Mount “Z’ Clip
I. 6 Plastic Anchors
Limited Warranty One Year Term
ROBERN warrants to the original purchaser that, it will, at its elec-
tion repair, replace, or make appropriate adjustment to products
made by this company shown to have signicant defects in mate-
rial or workmanship which are reported to ROBERN in writing
within one (1) year from the date of delivery. ROBERN is not
responsible for installation costs.
The warranty is void in the event the product is damaged in transit,
or if damage or failure is caused by abuse, misuse, abnormal
usage, faulty installation, damage in an accident, improper mainte-
nance, or any repairs other than those authorized by ROBERN.
At the expiration of the one year warranty period, ROBERN shall
be under no further obligation under any warranty, expressed or
implied, including the implied warranty of merchantability.
ROBERN shall not be liable for any consequential damages aris-
ing out of or in connection with the use or performance of its
products. Some states do not allow limitations on how long an
implied warranty lasts or do not allow the exclusion or limitation
of incidental or consequential damages, so the above limitation or
exclusion may not apply to you.
Any liability against ROBERN under any implied warranty, includ-
ing the warranty of merchantability, is expressly limited to the
terms of this warranty. Permission to return any merchandise
under this warranty must be authorized by ROBERN and returned
prepaid by the purchaser. Claims under this warranty should be
sent directly to your dealer.
Part List – Métallique Cabinet
1. Dimensions of Cabinets
1. The MT-30 Series is a modular system allowing you
to install cabinets in different combinations. Overall
size of the cabinet is determined by the overall
dimensions of the assembled units.
Model No. Overall
MT20D4MD 19 1/4” X 30”
MT24D4MD 23 1/4” x 30”
MT System is patented.
PAT NO. 5,355,627
©2003 Robern
All rights reserved. REV.3 3/03
SS550 Métallique 30” High Cabinet
2. Selecting Location • Surface or Recess
Carefully select the cabinet location, keeping in mind
the following:
A. Clearance from the faucet must be determined.
B. When recessing be sure clearance is provided
above the rough opening for the top of the door.
C. Depth of recess must be 4”.
SURFACE
INSTALLATION
1" CLEARANCE
1" CLEARANCE
RECESSED
INSTALLATION
SINK AND
FAUCET SINK AND
FAUCET
3. Surface Mount Cabinet (See page 3 for Recessed Instructions.)
1. Each cabinet is shipped with an aluminum “Z”
mounting bar.
2. It is strongly recommended that a support similar to
that used for a wall mounted sink be framed in the
wall during construction as shown in gure B.
3. Drill a 7/32” hole through the indent line on the
mounting bracket (See gure B.) at the stud or
furring strip location. Use the plastic anchors
supplied if no furring strip has been installed,
making sure each cabinet is supported by at
least three anchors.
Follow the Poly-set Anchor instructions on this
page for anchors supplied. Be sure mounting
bar is level.
4. Three “Z” clips are supplied for the top of each
cabinet. These clips slide into the screw channel
on the top of the cabinet. Holes for the clips can be
pre-drilled per dimensions shown in gure C.
5. The MTSK30 side kit is used to nish the sides of
the surface mount installation.
1. Attach bracket to cabinet using
#10 X 1/2” Screws. Be sure you do not over
tighten. (See gure D.)
2. Cap screw heads with covers provided.
LOCATE BRACKET
TO CLEAR SINK
FAUCETS BY AT LEAST
ONE INCH.
MOUNTING BRACKET
#10 X 2"
SMS/WOOD SCREW
1 X 3 FURRING STRIP
BEHIND WALLBOARD
OR TILE. LOCATED
AT CENTER OF BOTTOM
EDGE OF CABINET.
Poly-set Anchor Instructions for Hollow Walls
1. Drill 9/32” hole and insert anchor
until ange is ush.
2. Insert #10 X 2” SMS/wood screw
through bracket and anchor.
Continue to turn screw to fully
expand the anchor according to
the chart below.
Total Wall
Thickness
1/2”
5/8”
3/4”
Turns after screw head
is against bracket
8-9 Turns
6-7 Turns
4-5 Turns
WALL
1.325
29 1/8"
30"
Fig. B
Fig. C
Fig. D
Fig. A
CABINET
#10 X 1/2" screws
MTSK30
Side Kit
Mirror
SS550 Métallique 30” High Cabinet
4. Recess Cabinet
1. The rough opening must be at least 4” deep cabinets
when fully recessed and must be framed on all 4
sides important!
2. The chart shown below is the overall size and rough
openings for recessed installations.
3. Place the single or connected boxes into the rough
opening. Be sure the bottom is level. Install a #10 X
3” pan head screw through the top hole shown
in gure J on page 4.
4. Be sure cabinet is square. Install bottom screws.
Do not over tighten screws.
5. Place grey caps over screw heads.
6. Install doors following the instructions supplied with
the hinge and shown in gure J on page 4.
7. Open and close doors to check operation. On
installation of the cabinets in combinations of three
or more the center door when open may cause the
cabinet to bow from the wall. If this occurs install a
#10 X 2” Or 3” SMS/Wood screw and cap through
a hole drilled at the location shown in gure F.
#10 X 3"
SMS/ WOOD
SCREW
CABINET
Snap-in Shelf Clips
A. Push one side of the
shelf into the left or
right clips.
B. Snap the shelf down
into the opposite
side. If the shelf is
too tight, repeat the
process from the
other side.
5. Assembly of Ganged Cabinets
1. Each cabinet and side kit contains special connectors
to allow combinations of cabinets. Both surface
mounted using the SK Side Kits as well as recessed
into the wall. (See gure H.)
2. With the doors off, combine the boxes with the proper
connectors to assemble the units per your layout. Use
the #10 X 1/2” thread cut screws. (See gure H and I.)
Assemble on a convenient at surface. Not on or in wall.
Do not attach lights, doors or side kits until boxes are
secured to wall.
Note location of holes in the cabinets which are used to
secure connectors and side kits in gure J on page 4.
MT20D4MDMT20D4MD
#10 X 1/2"
SCREWS
USE MTSK30
SIDE KIT FOR
SURFACE MOUNT.
TWO CABINET COMBINATION FOR RECESS INSTALLATION.
CABINET CABINET
MP65 CONNECTOR
Shelf Installation
Model No. Overall Wall Opening
MT20D4MD 19 1/4” X 30” 18 1/2” x 29 1/4”
MT24D4MD 23 1/4” x 30” 22 1/2” x 29 1/4”
Fig. E
Fig. F
Fig. H
DRILL 7/32" THRU TOP
OF MIDDLE CABINET
3/4" FROM BACK AND
HINGE SIDE AS SHOWN
WHEN THREE OR MORE
CABINETS ARE RECESSED.
3/4"
3/4"
Fig. G
Fig. I
SS550 Métallique 30” High Cabinet
Checklist • Care & Maintenance
1. Doors
A. The doors are provided with a three way adjustment feature.
Height, level, and t to frame gasket can be adjusted. The use
of a #2 Posidrive screwdriver is recommended.
If the door is out of level or too close to one side, adjust door left
and right with screw 1 shown on page 3, gure E.
If door is too high or low, adjust door down or up with screw 2
shown on page 3, gure E.
If door opens stify, squeaks, or rubs against gasket, adjust door
outwards with screw 3 shown on page 3, gure E.
B. Check the swing of the door. The hinges are provided with a
110° black plastic stop so that they will not swing and hit
frame.
2. Cleaning
A. The cabinet door and interior are constructed of mirror and
anodized aluminum. Use only a damp cloth to clean. Mirrors are
damaged by the use of ammonia or vinegar based cleaning
agents. Use rubbing alcohol for stubborn marks.
B. Use no abrasive cleansers on any part of the cabinet.
C. To clean metal door frame, use only a damp cloth.
MT CABINET
HINGE
MT CABINET
1 2 3
BOTTOM OF CABINET
HINGE
TOP OF CABINET
DOOR
Fig. J
Rev. 3 3/03

This manual suits for next models

1

Other Robern Indoor Furnishing manuals

Robern UPLIFT CABINET UC3627FPE Quick start guide

Robern

Robern UPLIFT CABINET UC3627FPE Quick start guide

Robern 209-1375 06 User manual

Robern

Robern 209-1375 06 User manual

Robern PL PORTRAY Series User manual

Robern

Robern PL PORTRAY Series User manual

Robern balletto User manual

Robern

Robern balletto User manual

Robern PL PORTRAY CABINET User manual

Robern

Robern PL PORTRAY CABINET User manual

Robern UPLIFT UC3027 User manual

Robern

Robern UPLIFT UC3027 User manual

Robern MP Series User manual

Robern

Robern MP Series User manual

Robern CRAFT CM2436H84 User manual

Robern

Robern CRAFT CM2436H84 User manual

Robern 7M0008WUFN76S User manual

Robern

Robern 7M0008WUFN76S User manual

Robern UPLIFT CABINET UC4827FPL Quick start guide

Robern

Robern UPLIFT CABINET UC4827FPL Quick start guide

Robern YC2430D4P1L3 User manual

Robern

Robern YC2430D4P1L3 User manual

Robern MAIN LINE CABINET Series User manual

Robern

Robern MAIN LINE CABINET Series User manual

Robern FAIRHAVEN User manual

Robern

Robern FAIRHAVEN User manual

Robern M Series User manual

Robern

Robern M Series User manual

Robern VANITY Series User manual

Robern

Robern VANITY Series User manual

Robern UPLIFT CABINET UC4827FPE Quick start guide

Robern

Robern UPLIFT CABINET UC4827FPE Quick start guide

Robern CB-MODM1230FP User manual

Robern

Robern CB-MODM1230FP User manual

Robern R3 CB-RC1620D4FP1 User manual

Robern

Robern R3 CB-RC1620D4FP1 User manual

Robern CRAFT Series User manual

Robern

Robern CRAFT Series User manual

Robern PC1230D4T Series User manual

Robern

Robern PC1230D4T Series User manual

Robern UPLIFT CABINET UC3627FPL Quick start guide

Robern

Robern UPLIFT CABINET UC3627FPL Quick start guide

Robern Entice M Series User manual

Robern

Robern Entice M Series User manual

Robern SS476 MP User manual

Robern

Robern SS476 MP User manual

Robern AIO Series User manual

Robern

Robern AIO Series User manual

Popular Indoor Furnishing manuals by other brands

Richelieu 701DH153260 Series quick start guide

Richelieu

Richelieu 701DH153260 Series quick start guide

Walker Edison Addison AF30ADD Assembly instructions

Walker Edison

Walker Edison Addison AF30ADD Assembly instructions

Coaster 801304 Assembly instructions

Coaster

Coaster 801304 Assembly instructions

Trinity TBFLNA-24032 owner's manual

Trinity

Trinity TBFLNA-24032 owner's manual

Otto SANTO 1071/5010/3300 Assembly Instructions Instruction Manual

Otto

Otto SANTO 1071/5010/3300 Assembly Instructions Instruction Manual

kupper 12050 Assembly instruction

kupper

kupper 12050 Assembly instruction

Rize NOVA owner's manual

Rize

Rize NOVA owner's manual

Birlea WOOB6GRY Assembly instructions

Birlea

Birlea WOOB6GRY Assembly instructions

Allen + Roth 2026VB-48-200 manual

Allen + Roth

Allen + Roth 2026VB-48-200 manual

HearthPro SP6554 user manual

HearthPro

HearthPro SP6554 user manual

Universal Furniture Explore Home 995-633 instruction sheet

Universal Furniture

Universal Furniture Explore Home 995-633 instruction sheet

modway MOD-5427 manual

modway

modway MOD-5427 manual

Inspire 201-695REC Assembly instructions

Inspire

Inspire 201-695REC Assembly instructions

Finori SH1/016 Assembly instructions

Finori

Finori SH1/016 Assembly instructions

Brevi Soft & Play My Little Bear Instructions for use

Brevi

Brevi Soft & Play My Little Bear Instructions for use

Germania 1133 Assembly instruction

Germania

Germania 1133 Assembly instruction

Walker Edison Grant W48FPSMD Assembly instructions

Walker Edison

Walker Edison Grant W48FPSMD Assembly instructions

Ameriwood HOME 8733339COM Instruction booklet

Ameriwood HOME

Ameriwood HOME 8733339COM Instruction booklet

manuals.online logo
manuals.online logoBrands
  • About & Mission
  • Contact us
  • Privacy Policy
  • Terms and Conditions

Copyright 2025 Manuals.Online. All Rights Reserved.