Roche Accu-Chek Insight User manual

User’s Manual
Accu-Chek®Insight Diabetes Therapy System
This file may not print or view at 100%.
Die lines and color breaks do not print.
Roche USA – 73591
V4/1 – 07046553001/F – Black
Roche USA – 73591
V4/2 – 07046553001/F – Cyan
Roche USA – 73591
V4/3 – 07046553001/F – Magenta
Roche USA – 73591
V4/4 – 07046553001/F – Yellow
73591_07046553001_F.indb 1 2/19/2018 8:51:06 AM

73591_07046553001_F.indb 2 2/19/2018 8:51:06 AM

Contents
1 Overview 1
1.1 Understanding Differences When Paired with the Pump 4
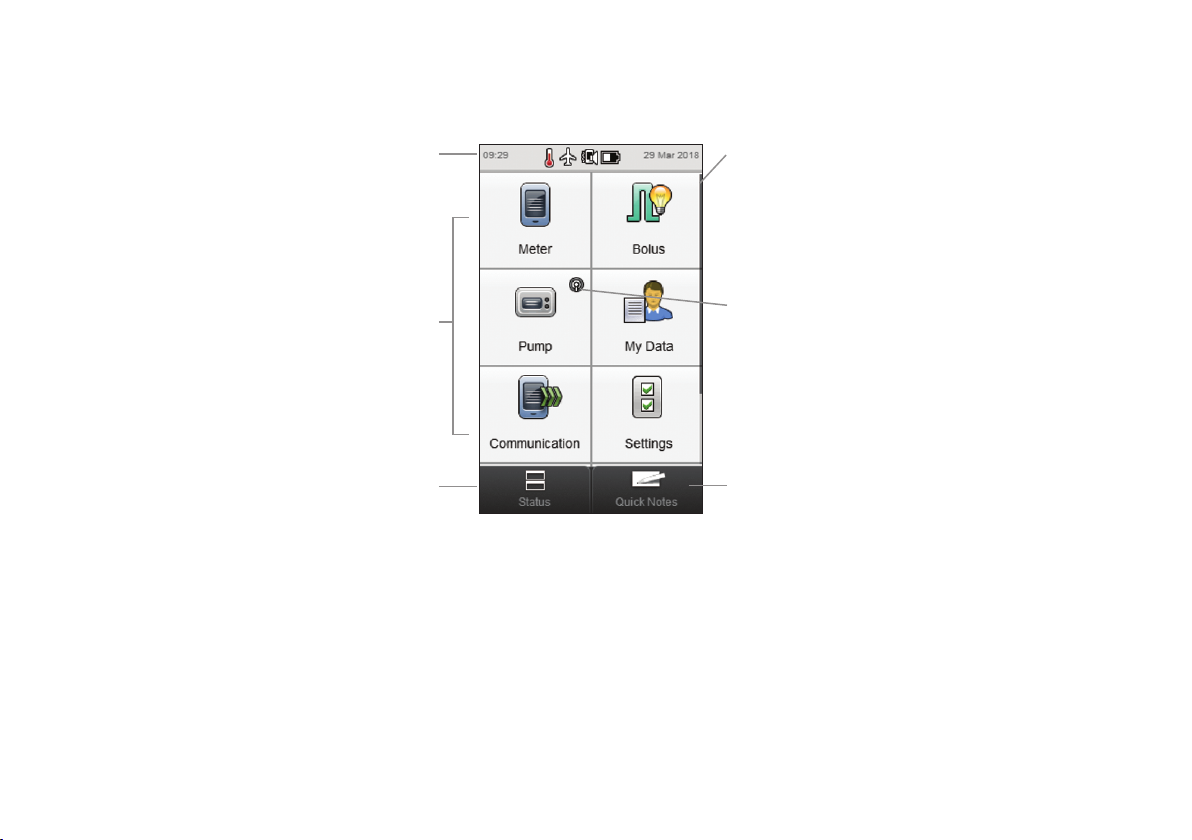
1.2 Home Screen 5
2 Startup 9
2.1 Charging the Battery 9
2.2 Setup Wizard 14
2.3 Completing the Setup Wizard 16
2.4 Important Information 22
3 Meter and Pump Communication 31
3.1 Pairing the Meter and Pump 31
3.2 Unpairing the Meter and Pump 38
4 Controlling the Pump with the Meter 41
4.1 Accessing the Pump Menu 42
4.2 Understanding the Pump Menu Screens on the Meter 43
4.3 Stopping the Pump 45
4.4 Starting the Pump 46
5 Testing Your Blood Glucose 47
5.1 Performing a Blood Glucose Test 47
5.2 Adding Information to a Blood Glucose Result 52
5.3 Delivering a Bolus Without Bolus Advice 55
6 Administering Boluses 69
6.1 Programming and Delivering a Standard Bolus 70
6.2 Programming and Delivering an Extended Bolus 72
6.3 Programming and Delivering a Multiwave Bolus 74
6.4 Creating and Delivering a Customised Bolus 76
6.5 Deleting a Customised Bolus 80
6.6 Cancelling a Bolus 82
6.7 Delivering a Bolus Using Bolus Advice 86
7 Temporary Basal Rates 93
7.1 Programming a Basic Temporary Basal Rate (TBR) 93
7.2 Programming or Editing a Customised TBR 95
7.3 Cancelling an Active TBR 98
7.4 Deleting a Customised TBR 100
7.5 Additional TBR Function Information 102
This file may not print or view at 100%.
Die lines and color breaks do not print.
Roche USA – 73591
V4/1 – 07046553001/F – Black
Roche USA – 73591
V4/2 – 07046553001/F – Cyan
Roche USA – 73591
V4/3 – 07046553001/F – Magenta
Roche USA – 73591
V4/4 – 07046553001/F – Yellow
73591_07046553001_F.indb 1 2/19/2018 8:51:06 AM

8 Basal Profiles 103
8.1 Programming a Basal Profile 103
8.2 Activating a Basal Profile 107
8.3 Clearing a Basal Profile 109
9 Using Modes 111
9.1 Changing the Signal Mode of the Pump 111
9.2 Turning On Flight Mode 113
9.3 Turning Off Flight Mode 114
10 Pump Settings 115
10.1 Pump Reminders 116
10.2 Therapy Settings 127
10.3 Device Settings 141
10.4 Setting the Pump Date and Time 150
11 My Data 153
11.1 Overview 153
11.2 The Logbook 154
11.3 The Trend Graph 170
11.4 The Standard Week 176
11.5 The Standard Day 182
11.6 Target Data 188
11.7 The bG Averages Table 193
12 Technical Information 199
12.1 Explanation of Symbols 200
12.2 List of Icons 201
13 Troubleshooting 205
14 Glossary 209
Index 223
73591_07046553001_F.indb 2 2/19/2018 8:51:06 AM

1
1
1Overview
With the Accu-Chek Aviva Insight diabetes manager (hereafter
referred to as the meter), you can remotely control the Accu-Chek
Insight insulin pump using Bluetooth®wireless technology.
If you experience any communication problems between the
pump and meter, operate the pump manually.
With the meter, you can remotely control the following pump
functions:
jDelivering boluses
jSetting basal rates
jStarting and stopping the pump
jChanging pump modes
jChanging pump settings
jSetting pump reminders
With the meter, you cannot remotely control the following pump
functions:
jChanging the cartridge
jPriming the infusion set
jRewinding the piston rod
jControlling settings within the Bluetooth wireless technology
menu on the pump
jChanging the pump display settings
jSelecting user profiles
73591_07046553001_F.indb 1 2/19/2018 8:51:06 AM

2
NOTE
jWhen the meter and pump are connected, you can still program and deliver a bolus manually with the pump without using the
meter’s commands.
jWhen the meter and pump are connected, the pump automatically transfers bolus information to the meter.
jIf bolus advice is set up, it is important that you enter carbohydrate information and/or health events into the meter for boluses
you have delivered manually on the pump so that future bolus advice recommendations are appropriate.
jThe pump display must be o in order for the meter to connect to the pump.
jIf you unlock the keys on your pump while Bluetooth communication is active, the pump asks if you would like to disconnect the
Bluetooth connection. Select “no” to keep the Bluetooth connection intact and continue operating your pump through the meter.
Select “yes” to disconnect and operate the pump using the pump display.
jYou can cancel any bolus that is being delivered by the pump either by manually using the pump or remotely through the Pump
Menu on the meter.
73591_07046553001_F.indb 2 2/19/2018 8:51:06 AM

1
3
NOTE
jThe meter and pump can communicate within a 2 metre range.
jWhen the meter and pump are communicating, the meter displays maintenance screens that would otherwise display on the
pump. When a pump maintenance screen displays on the meter, press OK to acknowledge and dismiss the message. You must
still take any actions recommended by the maintenance message.
73591_07046553001_F.indb 3 2/19/2018 8:51:06 AM

4
1.1 Understanding Dierences When Paired with the Pump
If you have used the meter or pump on its own before pairing, you
should be aware that the paired system behaves differently as
follows:
jBolus advice can be used to immediately deliver the
recommended bolus.
jWhen the meter calculates bolus advice, the maximum bolus
value is taken from pump settings.
jBoluses can be adjusted by much smaller amounts. For boluses
of 10 units or more, the insulin increment is 0.1 U. For boluses
of less than 10 units, the insulin increment is 0.05 U. This also
applies to manually-entered bolus information in new logbook
records.
jBecause insulin increment and maximum bolus settings are
taken from the pump, these settings are not available in the
meter settings menu.
jBasal appears on the Pump Menu and not the Bolus Input or
Detailed bG Result screen.
jThe Basal Injection reminder is no longer available.
jBasal no longer appears when manually entering logbook
records.
73591_07046553001_F.indb 4 2/19/2018 8:51:06 AM

1
5
1.2 Home Screen
Home screen refers to the screen that is displayed when the
meter is powered on. Home screen can be either the Main Menu
or Status screen. To change the Home screen default, see the
Home Screen Default section in the Changing Meter Settings
chapter of the Accu‑Chek Aviva Insight Diabetes Manager
User’s Manual.
73591_07046553001_F.indb 5 2/19/2018 8:51:06 AM

6
1.2.1 Main Menu Screen
Title Bar
Displays meter information.
Menu Selections
Scroll Bar
Appears when there is more information than
fits on the screen.
Go to Status Screen
See the Status Screen section in this
chapter.
Go to Quick Notes Screen
Pump Communication Icon
Appears when the meter and pump are
communicating.
The Title Bar shows the time of day and date. For explanations of
the icons that are displayed in the Title Bar, see the
Understanding Your Diabetes Manager chapter of the
Accu‑Chek Aviva Insight Diabetes Manager User’s Manual.
73591_07046553001_F.indb 6 2/19/2018 8:51:06 AM

1
7
1.2.2 Status Screen
When the meter is paired with the pump, the Status screen
displays the pump status, as well as information for the most
recent valid blood glucose test.
For a detailed description of the bG Status portion of the Status
screen, refer to the Understanding Your Diabetes Manager
chapter of the Accu‑Chek Aviva Insight Diabetes Manager
User’s Manual.
To view a fullscreen version of either the Pump Status or bG
Status, touch that portion of the Status screen.
8 9
A
5
6
3
4
C
1
2B
7
73591_07046553001_F.indb 7 2/19/2018 8:51:07 AM

8
1Cartridge level
Shows units of insulin remaining in the cartridge.
2
Bolus progress bar
Visually represents amount and duration of the active
bolus (not visible if no bolus is being delivered).
3Bolus type icon
Indicates bolus type of the active bolus.
4
TBR progress bar
Visually represents amount and duration of the active
temporary basal rate.
5
Basal icon
Indicates an active basal profile or temporary basal
rate (TBR) .
6
Basal rate
Shows basal rate in units per hour (U/h). For temporary
basal rates, also shows percentage value of the active
basal profile time block.
7
Bolus insulin remaining
Shows units of bolus insulin remaining of the active
bolus.
8
TBR time remaining
Shows the time remaining of the active temporary basal
rate.
9
Pump status
Indicates whether the pump is running or is stopped
.
10 Communication icon
Indicates that the meter and pump are communicating.
11
Bolus time remaining
Shows amount of time remaining of an extended or
multiwave bolus.
12 Pump battery level
Shows remaining charge of pump battery.
73591_07046553001_F.indb 8 2/19/2018 8:51:07 AM

2
9
2Startup
NOTE
jAllowing the battery to fully drain reduces the ability of
the battery to hold its charge. It is recommended that you
recharge the battery on a regular basis, for example once
every day. Keeping the meter plugged in to charge does
not harm the battery.
jA blood glucose test cannot be performed while the meter
is plugged in.
2.1 Charging the Battery
Charge the battery by plugging the USB cable into either a power
outlet or a computer. Use the USB cable and USB power adapter
supplied with the meter to avoid problems when charging the
battery. The preferred charging method is to use a power outlet
since this is faster and takes about 3.5hours to charge a fully
drained battery. Charging the meter from a computer takes much
longer. Use a power outlet if the battery is extremely low on
power or has not been charged for a while.
73591_07046553001_F.indb 9 2/19/2018 8:51:07 AM

10
Plug the larger end of the
USB cable into the power
adapter.
Plug the smaller end of the
USB cable into the meter.
1234
Charging the Battery Using a Power Outlet
If the power adapter is
already assembled, proceed
to Step4. To assemble the
power adapter, remove the
clear plastic cover by
pressing the centre of the
release button. Slide the clear
plastic cover off in the
direction of the arrow.
Slide on the pronged plug
where the clear plastic cover
was located until it firmly
clicks into place. Do not try to
force the pronged plug. It only
goes on one way.
Release Button
Clear Plastic Cover
73591_07046553001_F.indb 10 2/19/2018 8:51:09 AM

2
11
Plug the power adapter into a
power outlet. If the battery is
extremely low on power, the
meter does not turn on for a
number of minutes.
When the connection is
successful, the meter
displays the battery charging
screen for 3seconds.
The next screen (either the
Main Menu or Status screen)
displays the battery icon
in charging mode.
When the battery icon is
shown as fully charged ,
you can unplug the meter.
5 6
73591_07046553001_F.indb 11 2/19/2018 8:51:09 AM

12
Plug the smaller end of the
USB cable into the meter.
Plug the larger end of the
USB cable into an available
USB port on the PC. If the
battery is extremely low on
power, the meter does not
turn on. Charge the battery
using a power outlet.
Choose Charge only. As an
option, choose Set as default
to keep this screen from
appearing each time you
connect the USB cable to a
PC. Select OK.
123
Charging the Battery Using a Computer
NOTE
jThe Connection Options
screen does not appear
if Set as default was
chosen previously.
jTo remove the default,
go to the Main Menu and
select Communication >
Settings. Choose Prompt
upon USB connect.
Select Save.
73591_07046553001_F.indb 12 2/19/2018 8:51:11 AM

2
13
When the connection is
successful, the meter
displays the battery charging
screen for 3seconds.
The next screen (either the
Main Menu or Status screen)
displays the battery icon
in charging mode.
When the battery icon is
shown as fully charged ,
you can unplug the meter.
4
NOTE
The PC must be turned on
and not in sleep or standby
mode to charge the battery.
NOTE
The computer is not
charging the battery if the
meter does not display the
battery charging screen or
the battery charging icon, or
if the Information screen
Recharge meter soon is
displayed. Charge the
battery using a power
outlet.
73591_07046553001_F.indb 13 2/19/2018 8:51:11 AM

14
2.2 Setup Wizard
w WARNING
It is important to discuss your individual settings for warning
limits, time blocks, bolus advice and bG test reminders with
your healthcare professional.
The first time you turn the meter on, the Setup Wizard is
activated. You must complete the Setup Wizard before performing
a blood glucose test for the first time.
The Setup Wizard assists you in selecting settings for:
jMeter language
jTime and date
jUnits (carbohydrate)
jWarning limits for hypo (low) and hyper (high) blood glucose
levels
jTime blocks
jBolus advice (optional)
jbG test reminders (optional)
73591_07046553001_F.indb 14 2/19/2018 8:51:11 AM

2
15
NOTE
jThe Setup Wizard is activated every time you turn the meter on until you complete the
process.
jIf you turn the meter o during the Setup Wizard, you must reconfirm all of the settings in
order to complete the Setup Wizard.
jTo return to a previous screen in the Setup Wizard, select Back.
jIf you choose not to set up bolus advice and bG test reminders as part of the Setup Wizard,
these features can be set up later. For information on how to set up these features after
completion of the Setup Wizard, see Setting Up Bolus Advice under the Changing Bolus
Advice Settings chapter of the Accu‑Chek Aviva Insight Diabetes Manager User’s Manual.
jThe default settings in the meter and the settings illustrated in this User’s Manual are for
example only.
73591_07046553001_F.indb 15 2/19/2018 8:51:11 AM

16
2.3 Completing the Setup Wizard
Refer to the Important Information section of this User’s Manual
for detailed explanations of the various settings in the Setup
Wizard.
Power Button
Starting with the meter
turned off, press the power
button to turn on the meter.
The meter vibrates, beeps
and displays this splash
screen for a short period of
time (this screen appears
each time the meter is turned
on).
1 2
73591_07046553001_F.indb 16 2/19/2018 8:51:12 AM
Other manuals for Accu-Chek Insight
4
Table of contents
Other Roche Personal Care Product manuals
Popular Personal Care Product manuals by other brands

Otto Bock
Otto Bock Genu Carezza 8360 Instructions for use

Graham Field
Graham Field Lumex HT9007 Instructions for use

Lucimed
Lucimed luminette user manual

REH4MAT
REH4MAT FIX-KG-03 quick start guide

Helite
Helite HIP'SAFE user guide

Pretika
Pretika Power Cleanser ST148 Instructions for use & warranty information