ROOF GLAZE SKYWAY Assembly instructions

Motorised Blind Fitting
Guide (V.1)
Fitting Guide (V.1) | 1 of 6
Step 1
1. Unbox all the components. Leave the Blind wrapped in the protective plastic for tting later.
2. Assemble the aluminium Blind frame. Please note side Aof the frame is where the Blind motor will sit. (This is the side
it will retract to when the Blind is fully opened).
3. The 2 x Support Blocks provided will need to tted rst to the Motor side of the reveal (side A). To do this, measure
70mm across from the upstand and 30mm down from the top of the upstand. Mark the points and screw in the 2 x
Support Blocks to the OSB board as per the diagram below. Please do this for side A only.
•This product and all its components must be tted by a qualied professional.
•Ensure the electrical power is o before tting this product.
•Ensure the product is securely fastened before releasing.
•The power supply intended for this product is 12v.
•This product is not intended for use by children.
•Do not install it with small children or pets around.
•Do not use this product externally or in wet / moist conditions.
•It should be used only indoors in a dry suitable environment.
•Keep the handset out of reach of children.
•Never drop, knock, puncture or immerse the handset in liquid.
Safety Instructions:

4. Now that the 2 x Support Blocks have been securely tted to side A, lift in the Blind frame and rest it on the Support
Blocks. Then lift up the frame for side B, once in position get assistance to screw in the remaining 2 x Supports Blocks
into the OSB board as per the diagram below.
Step 2
1. Using the screws provided, locate the predrilled holes on all 4 x sides of the frame and screw the frame securely
in place (try and avoid bending the frame, packers may also be required to keep it square). Make sure the frame is
completely level with the top of the upstand. Remove ALL the Support Blocks holding up the frame on side
A & B once it is secure.
MEASUREMENT CHECK: Now the frame has been fully tted ensure the measurements across the frame are equal (measure
both ends
and the centre of the frame, all measurements should be equal - a maximum of 2mm tolerance is allowed).
2. Plasterboard up to the frame and skim ush. Only t the Blind after this has been done to avoid damage.
3. Clean all the frame to remove all the plaster dust and any lumps of plaster and ensure the surface of the frame
is free from dirt, dust and debris.
Step 3
1. Unwrap the Blind and lay it out on a clean surface under the
Lantern. Check that the motor side is positioned under side Aof the
lantern and the Blind is the correct way up (indicated by the stickers).
Fitting Guide (V.1) | 2 of 6

Step 4
1. Clip in side A(the motor side) of the Blind to side Aof the reveal. This
will require some force to clip it in the Blind securely to the frame. Start
at one end moving across to the opposing end.
Clip in the Blind as per the diagram - a loud ‘clicking noise’ will be heard
when pushed into the top of the bracket securely.
2. Move to the opposite side of the lantern (side B) and prepare to t the static side as per below.
This side requires moderate force to clip in the bracket securely. It will seem short on the length (80mm) but this is normal.
Start in the middle and work your way outwards making sure each time it clips into the bracket securely.
3. The Blind will now be under the correct tension. Ensure the power is o and get a qualied electrician to connect
the power to the Blind. Once the power is active the Blind will jog once and is ready to be operated
N.B. to immediately change the direction of the blind i.e. opening to closing, 'STOP' must be pressed,
after approximately 5 minutes, this is no longer necessary.
Fitting Guide (V.1) | 3 of 6

4. Calibrate the Blind by pressing the down arrow on the handset or switch to fully close, then the middle 'STOP' button, then
the up arrow to fully open. This may need to be done several times to calibrate. The blind is now ready for normal use.
Fitting Guide (V.1) | 4 of 6
Troubleshooting
Q.1) When the Blind is operating it is making a scraping / juddering sound?
A: Check the Railing edges, they may require cleaning off any debris, dust or grit with a damp cloth / baby wipes.
Q.2) The Blind is not opening / closing straight?
A: Check the Railing edges, they may require cleaning off any debris, dust or grit with a damp cloth / baby wipes.
Q.3) The Blind is not fitting to Side A (Motor side)?
The Blind is being fit upside down – look at the directional sticker and fit accordingly.
Q.4) The Blind is not fitting to Side B (Static Side)?
This side requires moderate force to clip in the bracket securely. It will seem short on the length (80mm) but this is normal. Start
in the middle and work your way outwards making sure each time it clips into the bracket securely.
Q.5) The Screws & Support Blocks are missing from the package.
Please contact customer support to re-order.
Q.6) The Fabric of the Blind is damaged.
Please contact Roofglaze customer support.
Q.7) The Handset or switch is missing from the box.
Please contact Roofglaze to re-order.

Q.8) The Blind is getting stuck in operation?
The frame has been installed incorrectly. Measure both ends and the centre of the frame, all measurements should be equal - a
maximum of 2mm tolerance is allowed. Reduce the packers from either side is this is an option, if not please contact customer
support.
Q.9) One of the tension Cords has snapped?
Please contact Roofglaze.
Q.10) There is a burning smell / smoke coming from the Motor side of the blind?
Turn o Power to the Blind immediately. Ensure nothing is smouldering / has caught re. Get a qualied electrician to check
cabling – the likely cause is the supply to the blind is wrong (Motor requires a 12v supply).
Q.11) The Blind has fallen down?
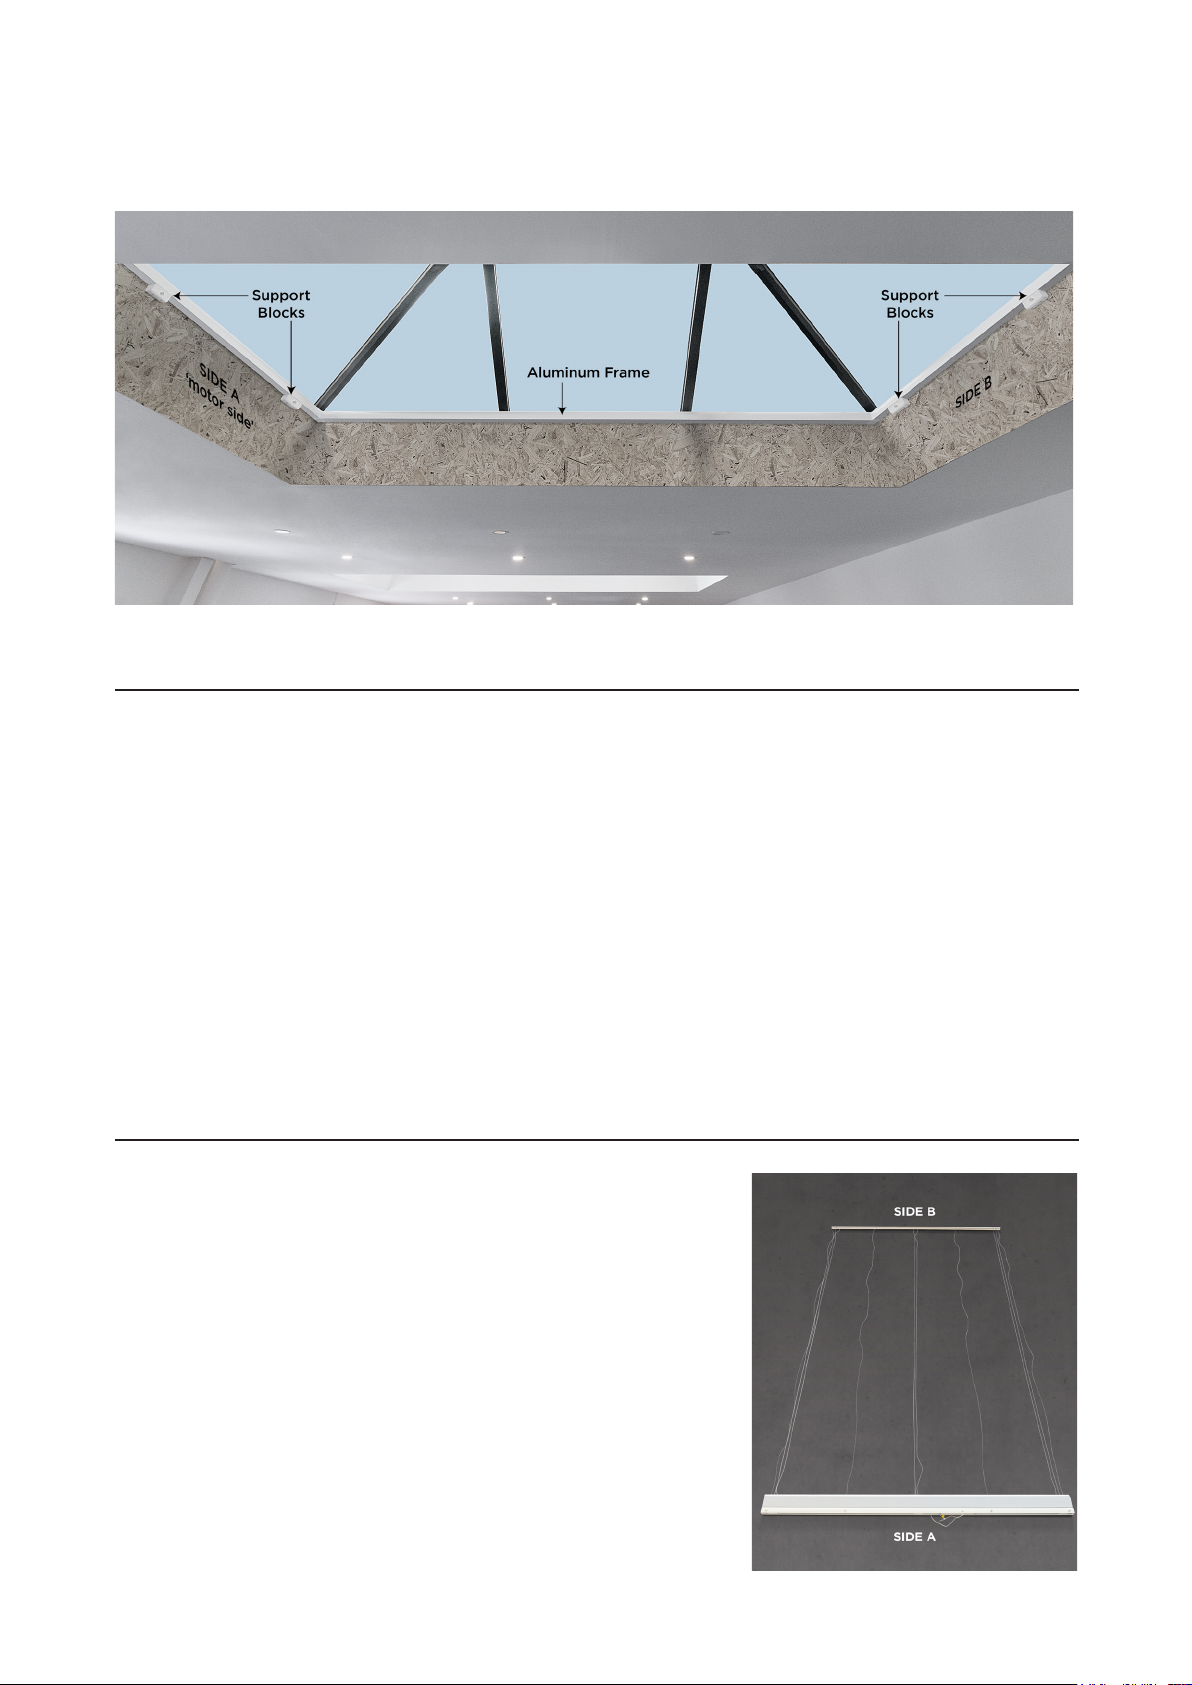
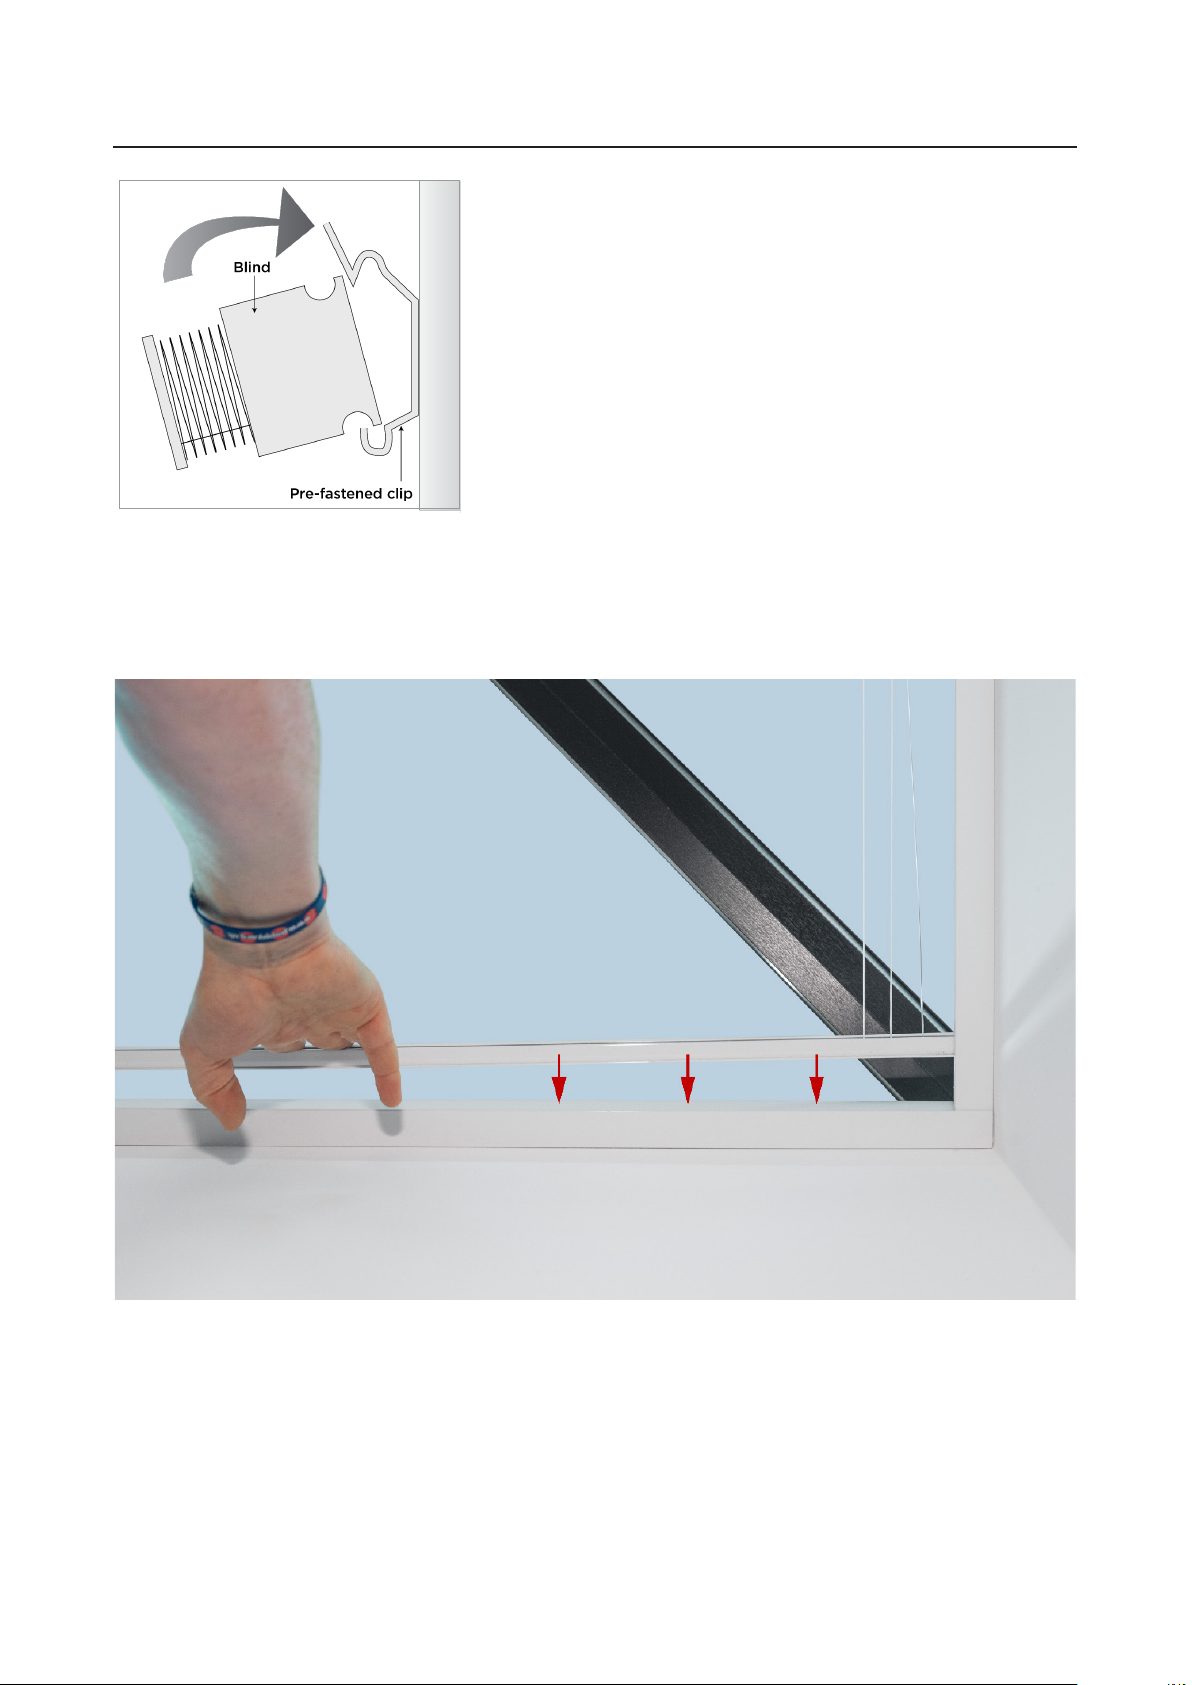
The Blind was not clipped in securely on Side A & Side B and needs re-fastening. Please see Step 4 above for more details.
Safety & Liability
Warning : Read the instruction guide to become familiar with the features of this product (Blind & Fittings) before
operating it. Failure to operate and fit this product in a safe and responsible manner could result in damage to the
product, personal property and cause serious injury. A qualified electrician / professional is needed for full installation.
Furthermore, the installer must comply with standards and legislation in the country in which the product is being installed,
and inform their customers of the operating and maintenance conditions of the product. They must give them this
guide. Any use outside the sphere of application defined by Roofglaze is forbidden. Doing so will void the warranty
and release Roofglaze of all its liability, as would a failure to comply with the instructions given herein. Never begin
installing without first checking the compatibility of this product with associated equipment and accessories. This
product is not intended for use by children. Do not install it with small children or pets around. Do not use this product
externally or in wet / moist conditions. It should be used only indoors in a dry suitable environment. Keep the
Handset out of reach of children. Never drop, knock, puncture or immerse the Handset in liquid. It is essential to read
and follow all of the instructions and warnings in this fitting guide prior to assembly and setup or use, in order to operate
the product correctly and avoid damage or serious injury. The imagery used are indicative of style only and are not
contractually binding.
Fitting Guide (V.1) | 5of 6

Addendum
Wall Switch / Remote Control Operation
Due to time delay protection in-built into the blind actuation, to reverse the direction of the blind
travel while in motion, the stop button must be pressed on either the remote control or the wall
switch. When the blind has stopped, reversal of the direction of travel can take place without the
need to press the stop button after approximately 5 minutes.
Table of contents
Popular Window Blind manuals by other brands

IKEA
IKEA KADRILJ 100 manual

Isotra
Isotra SR1S Assembly manual

MHZ
MHZ 17-8250 Installation and operating instructions

Lafayette
Lafayette Heartland Woods Woodland Harvest Series installation instructions

Rollos
Rollos XL Basis Assembly and operating instructions

Swiss Sonnenschutz
Swiss Sonnenschutz Deluxe Series Assembly and operating instructions