EMC guidance and manufacturer’s declaration
Guidance and manufacturer’s declaration-electromagnetic emissions
The AX356f is intended for use in the electromagnetic environment specied below.
The customer or the user of the AX356f should assure that it is used in such an environment.
Emission test Compliance Electromagnetic environment-guidance
RF emissions CISPR 11 Group 1 The AX356f uses RF energy only for its internal function. Therefore, its RF emissions are
very low and are not likely to cause any interference in nearby electronic equipment.
RF emissions CISPR 11 Class B The AX356f is suitable for use in all establishments, including domestic establishments
and those directly connected to the public low-voltage power supply network that
supplies buildings used for domestic purposes.
Harmonic emissions IEC 61000-3-2 Class A
Voltage uctuations/icker emissions IEC 61000-3-3 Compliance
Guidance and manufacturer’s declaration-electromagnetic immunity.The AX356f is intended for use in the electromagnetic environment specied below.
The customer or the user of the AX356f should assure that it is used in such an environment.
Immunity test IEC 60601 test level Compliance level Electromagnetic environment-guidance
Electrostatic discharge
(ESD) IEC 61000-4-2 ± 6 kV contact
± 8 kV air ± 6 kV contact
± 8 kV air Floors should be wood, concrete or ceramic tile.
If oors are covered with synthetic material, the
relative humidity should be at least 30%
Electrical fast transient/
burst IEC 61000-4-4
± 2kV for power supply lines
± 1kV for input / output lines ± 2kV for power supply lines
Not applicable Mains power quality should be that of a typical
commercial or hospital environment.
Surge IEC 61000-4-5 ± 1kV line(s) to line(s)
± 2kV line(s) to earth ± 1kV dierential mode
Not applicable Mains power quality should be that of a typical
commercial or hospital environment.
Voltage Dips, short
interruptions and
voltage variations on
power supply input
lines IEC 61000-4-11
<5% UT(>95% dip in UT) for 0,5 cycle
40% UT(60% dip in UT) for 5 cycles
70% UT(30% dip in UT) for 25 cycles
<5% UT(>95% dip in UT) for 5 s
<5% UT(>95% dip in UT) for 0,5 cycle
40% UT(60% dip in UT) for 5 cycles
70% UT(30% dip in UT) for 25 cycles
<5% UT(>95% dip in UT) for 5 s
Mains power quality should be that of a typical
commercial or hospital environment. If the user
of the AX356f requires continued operation
during power mains interruptions, it is recom-
mended that the AX356f be powered from an
uninterruptible power supply or a battery.
Power frequency
(50/60 Hz) magnetic
eld IEC 61000-4-8
3 A/m 3 A/m Power frequency magnetic elds should be at
levels characteristics of a typical location in a
typical commercial or hospital environment.
NOTE: UT is the a.c. mains voltage prior to application of the test level.
Guidance and manufacturer’s declaration-electromagnetic immunity
The AX356f is intended for use in the electromagnetic environment specied below.The customer or the user of the AX356f should assure that is used in such and environment.
Immunity test IEC 60601 test level Compliance level Electromagnetic environment-guidance
Conducted RF IEC
61000-4-6
Radiated RF IEC
61000-4-3
3Vrms
150 KHz to 80 MHz
3V/m
80MHz to 2,5 GHz
3Vrms
3V/m
Portable and mobile RF communications equipment should be used no closer to any part of the
AX356f including cables, than the recommended separation distance calculated from the equation
applicable to the frequency of the transmitter. Recommended separation distance:
d = 1,2 √P; d = 1,2 √P 80MHz to 800 MHz; d = 2,3 √P 800MHz to 2,5 GHz
Where P is the maximum output power rating of the transmitter in watts (W) according to the trans-
mitter manufacturer and d is the recommended separation distance in metres (m). Field strengths
from xed RF transmitters, as determined by an electromagnetic site survey, ashould be less than
the compliance level in each frequency range. bInterference may occur in the vicinity of equipment
marked with the following symbol:
NOTE 1: At 80 MHz and 800 MHz, the higher frequency range applies.
NOTE 2: These guidelines may not apply in all situations. Electromagnetic propagation is aected by absorption and reection from structures, objects and people.
a: Field strengths from xed transmitters, such as base stations for radio (cellular/cordless) telephones and land mobile radios, amateur radio, AM and FM
radio broadcast and TV broadcast cannot be predicted theoretically with accuracy. To assess the electromagnetic environment due to xed RF transmitters, an
electromagnetic site survey should be considered. If the measured eld strength in the location in which the AX356f is used exceeds the applicable RF com-
pliance level above, the AX356f should be observed to verify normal operation. If abnormal performance is observed, additional measures may be necessary,
such as re-orienting or relocating the AX356f.
b: Over the frequency range 150 kHz to 80 MHz, eld strengths should be less than 3 V/m.
Recommended separation distance between portable and mobile RF communications equipment and the AX356f
The AX356f is intended for use in an electromagnetic environment in which radiated RF disturbances are controlled.The customer or the user of the AX356f can
help prevent electromagnetic interference by maintaining a minimum distance between portable and mobile RF communications equipment (transmitters) and
the AX356f as recommended below, according to the maximum output power of the communications equipment.
Rated maximum output power of
transmitter /W
Separation distance according to frequency of transmitter / m
150 kHz to 80 MHz / d=1,2√P 80 MHz to 800 MHz / d=1,2√P 800 MHz to 2,5 GHz / d=2,3√P
0,01 0,12 0,12 0,23
0,1 0,38 0,38 0,73
11,2 1,2 2,3
10 3,8 3,8 7,3
100 12 12 23
For transmitters rated at a maximum output power not listed above, the recommended separation distance d in metres (m) can be estimated using the equation applicable to the
frequency of the transmitter, where P is the maximum output power rating of the transmitter in watts (W) according to the transmitter manufacturer.
NOTE 1: At 80 MHz and 800 MHz, the separation distance for the higher frequency range applies.
NOTE 2: These guidelines may not apply in all situations. Electromagnetic propagation is aected by absorption and reection from structures, objects and people.
WARNING: The symbol on this product means that it's an electronic product and following the European directive 2012/19/EU the
electronic products have to be dispose on your local recycling centre for safe treatment.
ACHTUNG: Das Symbol auf diesem Produkt bedeutet, dass es sich um ein elektronisches Gerät entsprechend der europäischen Richtlinie
2012/19/EU handelt, und dass das elektronische Gerät über das lokale Recyclingzentrum sicher entsorgt werden muss.
OSTRZEŻENIE: Symbol umieszczony na urządzeniu oznacza, że stanowi ono produkt elektroniczny spełniający wszystkie wymogi europejskiej
Dyrektywy 2012/19/EU. Dla zapewnienia odpowiedniej utylizacji, produkty elektroniczne muszą być przekazywane do miejscowych punktów zbiórki
w celu przeznaczenia ich do recyklingu.
ADVERTENCIA: Este símbolo en el producto signica que se trata de un producto electrónico y, en conformidad con la Directiva Europea 2012/19/
EU, los productos electrónicos deberán desecharse en su centro de reciclaje local para un tratamiento seguro.
ПРЕДУПРЕЖДЕНИЕ: Данный символ на изделии означает, что это электронный продукт и, в соответствии с европейской директивой
2012/19/EU, должен быть утилизирован в местном центре утилизации.
AVERTISSEMENT: le symbole gurant sur ce produit signie qu’il s’agit d’un produit électronique et, conformément à la directive européenne
2012/19/EU, les produits électroniques usagés doivent être apportés dans un point de collecte pour leur recyclage.
//EU :
.
EU// :
.
1. Indicador de fecha/hora
2. Marca de movimiento
3. Marca de pila baja
4. Indicador de riesgo de
hipertensión
5. Tecla promedio mañana
tarde
6. Memoria Promedio
7. Número consecutivo de
memoria
8. Marca del pulso
9. Presión sistólica
10. Presión diastólica
11. Frecuencia del pulso
12. Detector de arritmia
cardiaca
1. Datums / Uhrzeit Anzeige
2. Bewegungs-Markierung
3. Symbol für erschöpfte
Batterie
4. Hypertonie-Risikoanzeige
5. Morgen- und Nachtzeit
Symbol
6. Mittelwert des Speichers
7. Speicher / Datum Mark
8. Pulsmarkierung
9. Systolischer Druck
10. Diastolischer Druck
11. Pulsfrequenz
12. Indikator für unregelmä-
ssigen Herzschlag (IHB)
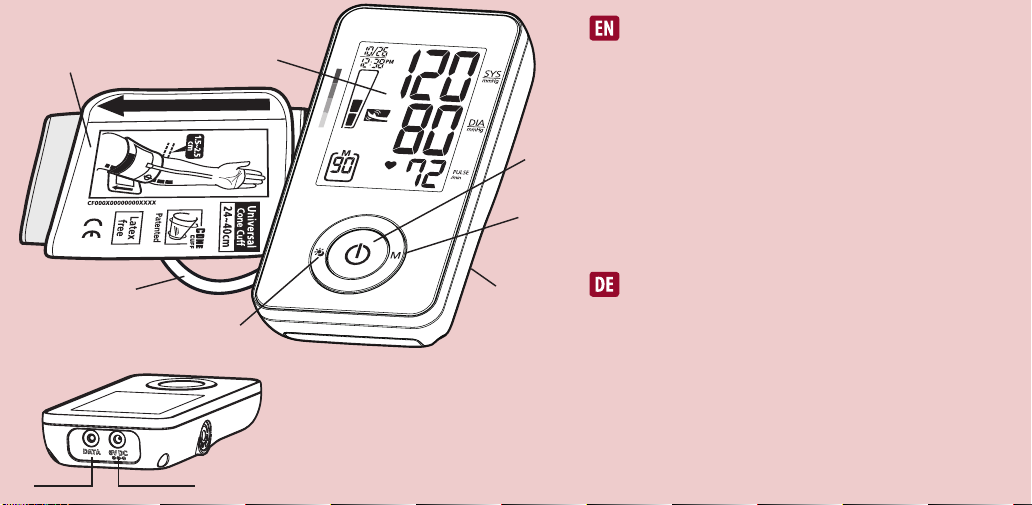
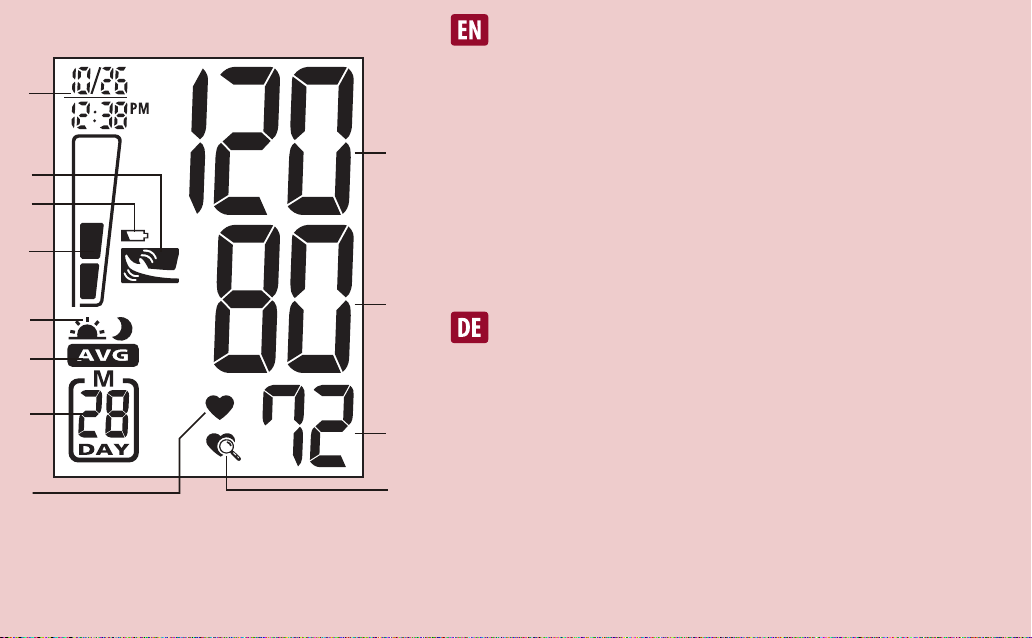
1. Date/Time Indicator
2. Movement Mark
3. Weak Battery Mark
4. Hypertension Risk
Indicator
5. Morning and Nighttime
Mark
6. Memory Average Mark
7. Memory/Date Mark
8. Pulse Mark
9. Systolic Pressure
10. Diastolic Pressure
11. Pulse Rate
12. Irregular Heartbeat
Detector (IHB)
1. Arm Cu
2. LCD Display
3. Air Tube and
Connector
4. Morning and
Nighttime Average
key
5. ON/OFF/START key
6. Memory Key
7. Battery Cover
8. Data Link Socket
9. AC Adaptor Jack
1. Oberarmmanschette
2. LCD-Anzeige
3. Luftschlauch und
Anschluss
4. Matin et nuit touche
Moyenne
5. Taste ON/OFF/START
6. Speicher-Taste
7. Batteriefachdeckel
8. Datenübertragungs-
buchse
9. Netzteilbuchse
1. Brazalete
2. Pantalla LCD
3. Tubo de aire y conector
4. Tecla promedio mañana
tarde
5. Botón de ENCENDIDO/
APAGADO/INICIO
6. Botón de memoria
7. Tapa de pilas
8. Jack para enlace de
datos
9. Jack para adaptador AC
Blood Pressure Standard
(JNC7: 2003, unit: mmHg)
Systolic
Pressure
Diastolic
Pressure
Normal
<120 and <80
Suspected
Hypertension
120~139 or 80~89
Suspected
Stage 1
Hypertension
140~159 or 90~99
Suspected
Stage 2
Hypertension
≥160 or ≥100
Deutsch
Einführung
Mit dem Gerät AX356f ermittelte Blutdruckmesswerte sind mit denen vergleichbar, die ein
geschulter Beobachter mit der auskultatorischen Blutdruckmessmethode mit Manschette
und Stethoskop ermittelt. Dabei gelten die Grenzwerte des amerikanischen nationalen
Standardisierungsinstituts für elektronische bzw. automatische Sphygmomanometer.
Dieses Gerät ist für erwachsene Verbraucher in häuslicher Umgebung vorgesehen. Das
Gerät nicht bei Neugeborenen oder Kleinkindern anwenden. Das Modell AX356f ist durch
ein etabliertes internationales Garantieprogramm gegen Herstellungsfehler geschützt. Für
Garantieinformationen wenden Sie sich bitte an den Hersteller Rossmax International Ltd.
Achtung: Beachten Sie die beiliegenden Dokumente. Lesen Sie diese Bedienanleitung
vor Verwendung sorgfältig durch. Spezische Informationen zu Ihrem eigenen Blut-
druck erhalten Sie von Ihrem Arzt. Bitte bewahren Sie diese Bedienanleitung auf.
Real-Fuzzy-Messtechnologie
Dieses Gerät nutzt zur Erkennung Ihres Blutdrucks die oszillometrische Methode. Bevor
die Manschette aufgepumpt wird, ermittelt das Gerät ein Manschettendruckäquivalent
für den Luftdruck. Das Gerät entscheidet anhand der Druckschwankungen über den Auf-
pumpdruck und führt danach eine Druckentlastung der Manschette durch.
Während der Druckentlastung erkennt das Gerät Amplitude und Flanken der Druck-
schwankungen und ermittelt daraus für Sie den systolischen Blutdruck, den diastolischen
Blutdruck und den Puls.
Vorläuge Anmerkungen
Dieses Blutdruckmessgerät erfüllt die europäischen Vorschriften und trägt das CE-Kennzei-
chen „CE 0120“. Die Qualität des Geräts wurde überprüft und entspricht den Forderungen
der Richtlinie des EU-Rates 93/42/EEC (Medizingeräterichtlinie) Anhang I, wesentliche An-
forderungen, sowie den entsprechend harmonisierten Normen.
EN 1060-1: 1995/A2: 2009 Nichtinvasive Blutdruckmessgeräte - Teil 1 – Allgemeine Anfor-
derungen
EN 1060-3: 1997/A2: 2009 Nichtinvasive Blutdruckmessgeräte - Teil 3 – Zusätzliche Anfor-
derungen für elektromechanische Blutdruckmesssysteme
EN 1060-4: 2004 Nichtinvasive Blutdruckmessgeräte - Teil 4: Testprozeduren zur Bestim-
mung der Gesamtsystemverlässlichkeit automatischer, nichtinvasiver Blutdruckmessgerä-
te
Dieses Blutdruckmessgerät ist für eine lange Nutzungsdauer ausgelegt. Um die ständige
Verlässlichkeit zu gewährleisten, empfehlen wir, alle digitalen Blutdruckmessgeräte regel-
mässig zu kalibrieren. Dieses Messgerät erfordert nach 2 Jahren (bei normaler Nutzung,
das heisst, etwa 3 Messungen pro Tag) eine Neukalibrierung. Wenn das Gerät neu kalib-
riert werden sollte, zeigt das Gerät Folgendes an: . Das Gerät sollte auch neu kalibriert
werden, wenn das Messgerät aufgrund grober Gewalt beschädigt wurde (beispielsweise
herunterel) oder Flüssigkeiten bzw. extrem hoher oder tiefer Temperatur bzw. Änderun-
gen der Luftfeuchtigkeit ausgesetzt war. Wenn erscheint, bringen Sie es einfach zur
Neukalibrierung zu Ihrem Händler.
Blutdruck-Standard
Der Koordinationsausschuss des nationalen Schulungsprogramms zu Bluthochdruck hat
eine Blutdrucknorm entwickelt und den Blutdruckanzeigebereich in vier Kategorien einge-
teilt. (Siehe «The Seventh Report of the Joint National Committee on Prevention, Detec-
tion, Evaluation, and Treatment of High Blood Pressure-Complete Report JNC-7» (7. Bericht
des gemeinsamen nationalen Ausschusses zur Vermeidung, Erkennung, Bewertung und
Behandlung von Bluthochdruck – vollständiger Bericht JNC-7, 2003).Diese Blutdruckklas-
sikation stützt sich auf Daten der Vergangenheit und muss nicht in jedem Fall für jeden
Patienten zutreen. Es ist wichtig, dass Sie Ihren Arzt regelmässig konsultieren. Ihr Arzt wird
Ihnen Ihren normalen Blutdruckschwankungsbereich sowie den Punkt mitteilen, an dem
für Sie ein Risiko besteht. Zur zuverlässigen Überwachung und Bezugnahme auf den Blut-
druck empfehlen wir, langfristig Protokoll zu führen. Laden Sie das Blutdruckprotokoll von
unserer Website www.rossmax.com herunter.
Anzeigeerklärungen
EE / Messfehler: Prüfen Sie, ob der Winkelstecker sicher mit dem Druckluftanschluss ver-
bunden ist, und führen Sie erneut eine Messung durch. Ziehen Sie die Manschette korrekt
stra, und halten Sie den Arm während der Messung ruhig. Sollte der Fehler wiederholt
vorkommen, bringen Sie das Gerät zu Ihrem lokalen Händler oder Service-Center.
Störung E1/Störung des Druckluftkreises: Prüfen Sie, ob der Winkelstecker sicher an
dem Druckluftanschluss an der Seite des Messgeräts angeschlossen ist, und führen Sie er-
neut eine Messung durch. Sollte der Fehler wiederholt vorkommen, bringen Sie das Gerät
zu Ihrem lokalen Händler oder Service-Center.
E2 / Druck übersteigt 300 mmHg: Schalten Sie das Messgerät aus, und messen Sie
danach erneut. Sollte der Fehler wiederholt vorkommen, bringen Sie das Gerät zu Ihrem
lokalen Händler oder Service-Center.
E3 / Datenfehler: Nehmen Sie die Batterien heraus, warten Sie 60 Sekunden, und legen
Sie diese wieder ein. Sollte der Fehler wiederholt vorkommen, bringen Sie das Gerät zu
Ihrem lokalen Händler oder Service-Center.
Er / Überschrittener Messbereich: Führen Sie erneut eine Messung durch. Sollte der
Fehler wiederholt vorkommen, bringen Sie das Gerät zu Ihrem lokalen Händler oder Ser-
vice-Center.
Bewegungs-Anzeiger
Der “Bewegungs-Anzeiger” hilft den Benutzer daran zu erinnern, dass er sich während der
Blutdruck-Messung nicht bewegen darf. Das dazu gehörige Logo erscheint, sobald eine
Körper-Bewegung während oder nach jeder Messung festgestellt worden ist.
Achtung: Es empehlt sich, die Messung zu wiederholen, falls das Logo angezeigt
wurde.
Hypertonie-Risikoanzeige
Das National High Blood Pressure Education Program Coordinating Committee (Koor-
dinationsausschuss des US-Schulungsprogramms zum Bluthochdruck) hat eine Blut-
drucknorm entwickelt und den Blutdruckanzeigebereich in vier Kategorien eingeteilt. Die-
ses Gerät besitzt eine innovative Blutdruckrisikoanzeige, die optisch darauf hinweist, dass
wahrscheinlich ein Risiko besteht (Normal / Prähypertonie / Hypertonie Stadium
1 / Hypertonie Stadium 2 ). Dieser Zustand wird nach jeder Messung angezeigt.
Indikator für unregelmässigen Herzschlag (IHB)
Dieses Gerät ist mit einem Indikator für unregelmässigen Herzschlag (IHB) ausgestattet,
so dass auch Personen mit unregelmässigem Herzschlag exakte Messergebnisse erhalten,
da das Gerät den Benutzer warnt, wenn während der Messung ein unregelmässiger Herz-
schlag festgestellt wird.
Hinweis: Wenn das IHB-Symbol ( ) häug angezeigt wird, sollten Sie unbedingt Ihren
Arzt aufsuchen.
Verwendung des Netzadapters (optional)
1.Schliessen Sie den Netzadapter an der Netzadapterbuchse auf der rechten Seite des Ge-
räts an.
2.Stecken Sie den Netzadapter in eine Steckdose. (Bei Netzadaptern sind die Netzspan-
nung und der Strom neben der Buchse des Netzadapters angegeben).
Vorsicht:
1. Nehmen Sie die Batterien heraus, wenn Sie längere Zeit im Netzbetrieb arbeiten.
Werden die Batterien lange Zeit nicht aus dem Batteriefach entfernt, kann es zum
Austritt von Batterieüssigkeit kommen, welche das Gerät beschädigen kann.
2. Bei Netzbetrieb sind keine Batterien erforderlich.
3. Netzteiladapter sind optional. Wenden Sie sich wegen kompatibler Netzadapter an den
Vertriebspartner.
4. Verwenden Sie nur den für dieses Blutdruckmessgerät zugelassenen Netzadapter.
Einlegen der Batterien
1. Drücken Sie auf den Batteriefachdeckel in Pfeilrichtung, um den Deckel abzunehmen
und das Batteriefach zu önen.
2. Legen Sie 4 Batterien der Grösse “AAA” wie im Batteriefach angegeben in das Batterie-
fach ein bzw. ersetzen Sie diese.
3. Setzen Sie den Batteriefachdeckel wieder auf, lassen Sie zuerst die unteren Haken einras-
ten, und drücken Sie dann auf das obere Ende des Batteriefachdeckels.
4. Ersetzen Sie die Batterien paarweise. Nehmen Sie die Batterien heraus, wenn Sie das
Gerät längere Zeit nicht verwenden.
Sie müssen die Batterien ersetzen, wenn:
1. Das Symbol für niedrigen Batteriestand auf der Anzeige erscheint.
2. Sie die Taste ON/OFF/START drücken und auf dem Display nichts angezeigt wird.
Vorsicht
1. Batterien sind Sondermüll. Nicht gemeinsam mit dem Haushaltsmüll entsorgen.
2. In dem Gerät benden sich keine vom Benutzer reparierbaren Teile. Batterien oder Schä-
den, die durch alte Batterien verursacht werden, sind nicht durch die Garantie abge-
deckt.
3. Verwenden Sie nur Markenbatterien. Wechseln Sie neue Batterien immer gemeinsam.
Verwenden Sie Batterien der gleichen Marke und des gleichen Typs.
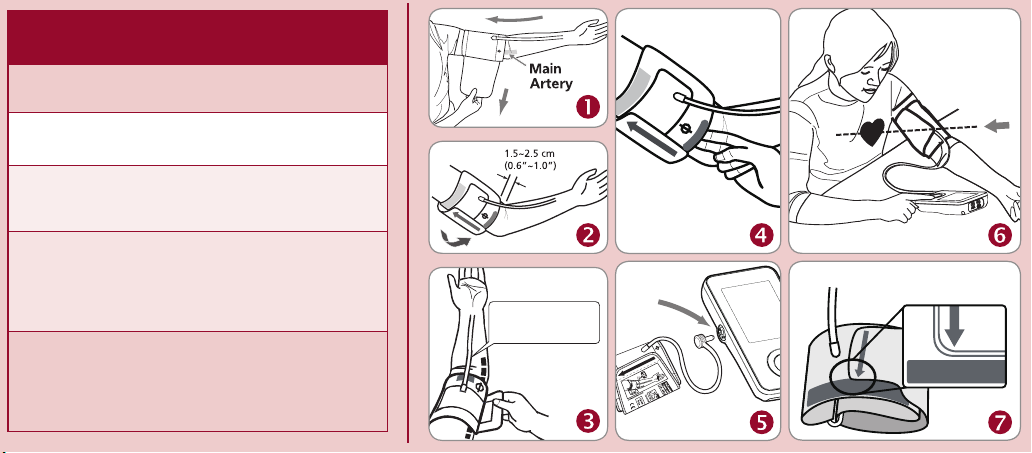
Anlegen der Manschette
1. Packen Sie die Oberarmmanschette aus, und führen Sie das Ende der Manschette durch
den D-Ring der Manschette.
2. Legen Sie Ihren linken Arm in die Manschettenschlaufe. Der Farbstreifen sollte zu Ihrem
Körper zeigen und der Schlauch in Richtung Ihres Armes (siehe Abbildung ). Drehen
Sie Ihre linke Handäche nach oben, und legen Sie den Rand der Oberarmmanschette
etwa 1,5 bis 2,5 cm über der Innenseite des Ellbogengelenks an (siehe Abbildung ).
Ziehen Sie die Oberarmmanschette fest, indem Sie am Ende der Manschette ziehen.
3. Zentrieren Sie den Schlauch über der Mitte des Armes. Drücken Sie den Haken und das
Schlaufenmaterial fest zusammen. Zwischen Manschette und Arm müssen noch zwei
Finger Platz haben. Positionieren Sie die Arterienmarkierung über der Hauptarterie (an
der Arminnenseite) (siehe Abbildung ,). Hinweis: Suchen Sie die Hauptarterie, in-
dem Sie mit zwei Fingern etwa zwei Zentimeter über dem Ellbogengelenk an der linken
Arminnenseite drücken. Suchen Sie die Stelle, wo der Puls am stärksten fühlbar ist. Dies
ist Ihre Hauptarterie.
4. Schliessen Sie den Verbindungsschlauch der Manschette an dem Gerät an (siehe Abbildung
).
5. Legen Sie Ihren Arm auf einen Tisch mit der Handäche nach oben ab, so dass die Manschette
sich in Herzhöhe bendet. Stellen Sie sicher, dass der Schlauch nicht abgeknickt ist (Abbildung
).
6. Die Manschette ist für Sie geeignet, wenn der Pfeil, wie auf der rechten Abbildung
rechts, innerhalb der durchgehenden Farblinie liegt. Wenn der Pfeil ausserhalb der
durchgehenden Farblinie liegt, benötigen Sie eine Oberarmmanschette mit anderem
Umfang. Wenden Sie sich für Manschetten in anderen Grössen an Ihren lokalen Händler.
Messverfahren
Hier einige Hinweise für genauere Messungen:
• Der Blutdruck ändert sich mit jedem Herzschlag und schwankt während des Tages lau-
fend.
• Die Blutdruckmessung kann durch die Körperhaltung des Benutzers, seinen physiolo-
gischen Zustand und andere Faktoren beeinträchtigt werden. Um die grösstmögliche
Verlässlichkeit zu erzielen, warten Sie nach dem Sport, Baden, Essen, dem Genuss alko-
holischer oder koeinhaltiger Getränke, sowie dem Rauchen eine Stunde, bevor Sie mit
der Messung beginnen.
• Vor der Messung sollten Sie sich mindestens fünf Minuten ruhig hinsetzen, da Messun-
gen in entspanntem Zustand genauer sind. Sie sollten nicht körperlich ermüdet oder
erschöpft sein, wenn Sie eine Messung durchführen.
• Führen Sie keine Messungen durch, wenn sie angespannt sind oder unter Stress stehen.
• Sprechen und beanspruchen Sie die Arm- oder Handmuskeln während der Messung
nicht.
• Messen Sie Ihren Blutdruck bei normaler Körpertemperatur. Wenn Ihnen warm oder kalt
ist, warten sie noch etwas, bevor Sie die Messung durchführen.
• Wenn das Blutdruckmessgerät bei sehr niedriger Temperatur (nahe des Gefrierpunkts)
gelagert wurde, bringen Sie es mindestens eine Stunde vor Verwendung an einen war-
men Ort.
• Warten Sie fünf Minuten, bevor Sie die nächste Messung durchführen.
1. Drücken Sie die Taste ON/OFF/START. Alle Anzeigen erscheinen für etwa eine Sekunde,
bevor das Display wieder auf „0“ umschaltet.
2. Das Messgerät pumpt die Manschette automatisch mit einem geeigneten Druck in
Abhängigkeit von den Pulsschwankungen des Benutzers auf. Danach beginnt die Mes-
sung. Sitzen Sie während der Messung still und verhalten Sie sich ruhig. Bewegungen
können die Messergebnisse verfälschen.
3. Wenn die Messung abgeschlossen ist, werden gleichzeitig der systolische und der dias-
tolische Druck sowie der Puls angezeigt und automatisch im Speicher gesichert. Es kön-
nen bis zu 90 Speichereinträge gesichert werden.
4. Die Messung ist damit abgeschlossen. Drücken Sie die Taste ON/OFF/START, um das
Gerät auszuschalten. Wird keine Taste gedrückt, schaltet sich das Gerät nach 1 Minute
selbstständig aus.
Dieses Messgerät pumpt automatisch bis zu einem Druck von etwa 220 mmHg auf, wenn
das System erkennt, dass zur Messung Ihres Blutdrucks ein höherer Druck erforderlich ist.
Hinweis: 1. Dieses Messgerät schaltet eine Minute nach dem letzten Tastendruck automa-
tisch ab.
2. Drücken Sie zur Unterbrechung des Messvorgangs einfach die “Speicher”-Taste oder die
Taste ON/OFF/START: Die Manschette wird sofort entlastet.
3. Sprechen und beanspruchen Sie die Arm- oder Handmuskeln während der Messung
nicht.
Abrufen von Werten aus dem Speicher
1. Drücken Sie zum Aufruf gespeicherter Blutdruckmesswerte aus dem Speicher einfach
die „Speicher“-Taste. Die erste Anzeige ist der Mittelwert der letzten drei im Speicher ge-
speicherten Messwerte. Der letzte Satz gespeicherter Messwerte wird angezeigt.
2. Wenn Sie nochmals die „Speicher“-Taste drücken, wird der vorhergehende Messwertsatz
aufgerufen.
3. Alle im Speicher abgelegten Messwerte werden mit ihrer fortlaufenden Nummer an-
gezeigt.
Hinweis auf den Mittelwert von Morgen- und Abendwerte
1. Dieses Gerät verfügt über einen 7, 14, 21 oder 28 tägigen Mittelwertmodus für Morgen-
und Abendwerte
2. Drücken Sie die Morgen- und Nachtzeit Mittelwert-Taste. Die erste angezeigte Messung
ist der Mittelwert Ihrer Morgen-Messungen der letzten 7 Tage.
3. Halten Sie die Morgen- und Nachtzeit Mittelwert-Taste gedrückt, um den Mittelwert der
Morgen-Messungen der letzten 14, 28 und 28 Tage zu erhalten. Danach erscheint der
Mittelwert der Abend-Messungen der letzten 7, 14, 21 und 28 Tagen. Jeder Mittelwert
wird mit einer Tag-Nummer, einem Morgen- und Nachtzeit Symbol sowie einem Durch-
schnittsnote angezeigt.
Hinweis: AM ist als 4:00 AM deniert - 11:59
Hinweis: Uhr als 6:00 Uhr deniert - 2:00 AM
Löschen der Werte aus dem Speicher
Halten Sie die„Speicher“-Taste 5 Sekunden lang gedrückt: Daraufhin können die Daten im
Speicherbereich automatisch gelöscht werden.
Zeiteinstellung
1. Nach der Installation bzw. Beim Ersetzen der Batterien wird auf dem Display eine Num-
mer angezeigt die für den Tag steht.
2. Wechseln Sie den Tag in dem Sie die Memory-Taste drücken, jedes erneute Drücken
erhöht die Tageszahl. Drücken Sie die ON/OFF/START-Taste zur Bestätigung und auf der
Anzeige erscheint eine blinkende Nummer für den Monat.
3. Wechseln Sie das Monat, die Stunde und Minute wie beschrieben im Schritt 2 wie oben
erklärt, benutzen Sie dazu die Memory-Taste und danach die ON/OFF/START-Taste zur
Bestätigung.
4. “0” erscheint im Display wenn das Blutdruckmessgerät bereit zur Messung ist.
Datentransfer zum PC
Rossmax bietet eine kostenlose integrierte und benutzerfreundliche Blutdruckmanage-
mentsoftware, die Sie herunterladen und auf Ihrem Computer installieren können. Um das
Blutdruckmessgerät von Rossmax mit Ihrem PC zu verbinden, können Sie ein spezielles
USB-Kabel erwerben. Informationen zum Herunterladen und zur Installation nden Sie auf
der Website http://www.rossmax.com.
Fehlerbehebung
Wenn während der Verwendung Störungen auftreten, prüfen Sie bitte die folgenden
Punkte.
Symptome Prüfpunkte Berichtigung
Keine Anzeige bei
Betätigung der Taste
ON/OFF/START
Sind die Batterien leer? Ersetzen Sie die Batterien durch
zwei neue Batterien.
Sind die Batterien mit falscher Pola-
rität eingesetzt? Setzen Sie die Batterien mit der
richtigen Polarität wieder ein.
Auf dem Display er-
scheint das Symbol
EE oder es wird ein
besonders niedriger
(hoher) Blutdruck-
wert angezeigt.
Wurde die Manschette korrekt
angelegt?
Legen Sie die Manschette
richtig an, so dass sie korrekt
positioniert ist.
Haben Sie während der Messung
gesprochen oder sich bewegt? Führen Sie erneut eine Mes-
sung durch.
Halten Sie während der Mes-
sung ihr Handgelenk ruhig.
Haben Sie das Handgelegt mit an-
gelegter Manschette geschüttelt?
Hinweis: Wenn das Gerät nicht funktioniert, bringen Sie es zu Ihrem Händler zurück. Das
Messgerät sollten Sie unter keinen Umständen zerlegen und selbst reparieren.
Sicherheitshinweise
1. Das Messgerät enthält hoch genaue Bauteile. Vermeiden Sie daher extreme Tempera-
turen, extreme Luftfeuchtigkeit und direkte Sonneneinstrahlung. Lassen Sie das Gerät
nicht herunterfallen, und vermeiden Sie starke Stossbelastungen des Grundgeräts und
schützen Sie es vor Staub.
2. Reinigen Sie das Gehäuse des Blutdruckmessgeräts und die Manschette vorsichtig mit
einem feuchten, weichen Tuch. Üben Sie keinen Druck aus. Waschen Sie die Manschet-
te nicht und behandeln Sie sie nicht mit chemischen Reinigern. Verwenden Sie niemals
Verdünnungsmittel, Alkohol oder Benzin als Reinigungsmittel.
3. Ausgelaufene Batterien können das Gerät beschädigen. Nehmen Sie die Batterien her-
aus, wenn Sie das Gerät längere Zeit nicht verwenden.
4. Um Gefahren zu vermeiden, sollte das Gerät nicht von Kindern bedient werden.
5. Wenn das Gerät bei einer Temperatur nahe des Gefrierpunkts gelagert wurde, warten
Sie vor Verwendung bis das Gerät sich an die Zimmertemperatur angepasst hat.
6. Dieses Gerät kann nicht vor Ort gewartet werden. Sie sollten das Gerät weder mit Werk-
zeugen önen, noch versuchen, etwas in dem Gerät selbst einzustellen. Wenn Proble-
me auftreten, wenden Sie sich bitte an den Händler oder Arzt, von dem Sie dieses Gerät
gekauft haben, oder an Rossmax International Ltd.
7. Ein häuges Problem bei allen Blutdruckmessgeräten mit oszillometrischer Messung ist
die Bestimmung des korrekten Blutdrucks bei Benutzern, bei denen eine normale Ar-
rhythmie (atriale oder ventrikuläre vorzeitige Herzschläge oder Herzkammerimmern),
Diabetes, schlechter Blutkreislauf oder Nierenprobleme diagnostiziert wurden oder bei
Benutzern, die einen Schlaganfall hatten oder bewusstlos sind.
8. Sie können mit der Taste ON/OFF/START die Funktion jederzeit stoppen, der Druck in
der Manschette wird dann schnell abgelassen.
9. Sobald der Druck der Druckluft 300 mmHg erreicht, beginnt das Messgerät aus Sicher-
heitsgründen mit einer schnellen Druckentlastung.
10. Bitte beachten Sie, dass dieses Blutdruckmessgerät nur für den Heimgebrauch vor-
gesehen ist und kein Ersatz für die Beratung durch einen Arzt oder eine medizinische
Fachkraft ist.
11. Verwenden Sie dieses Gerät nicht zur Diagnose oder Behandlung von Gesundheitspro-
blemen und Erkrankungen. Die Messergebnisse dienen nur der Orientierung. Konsul-
tieren Sie bei der Interpretation von Blutdruckmessungen einen Gesundheitsexperten.
Gehen Sie zum Arzt, wenn Sie ein medizinisches Problem haben oder vermuten! Än-
dern Sie Ihre Medikation nicht ohne Konsultation Ihres Arztes bzw. Mediziners.
12. Elektromagnetische Störungen: Das Gerät enthält empndliche elektronische Kom-
ponenten. Vermeiden Sie starke elektrische oder elektromagnetische Felder in direkter
Nähe des Geräts (beispielsweise durch Mobiltelefone und Mikrowellengeräte). Diese
können zur zeitweiligen Beeinträchtigung der Messgenauigkeit führen.
13. Entsorgen Sie das Gerät, die Batterien, Komponenten und Zubehörteile entsprechend
den lokalen Bestimmungen.
14. Die technischen Daten dieses Blutdruckmessgeräts sind nur gewährleistet, wenn es
innerhalb der in den technischen Daten angegebenen Grenzwerte für Temperatur und
Luftfeuchtigkeit gelagert bzw. verwendet wird.
Technische Daten
Messmethode Oszillometrisch
Messbereich Druck: 30 - 260 mmHg; Puls: 40~199 Schläge/ Minute
Drucksensor Halbleiter
Messgenauigkeit Druck: ± 3 mmHg; Puls: ± 5 % des Messwerts
Ination Durch Pumpe
Deation Automatisches Entlastungsventil
Speicherkapazität 90 Speicherplätze
Auto-Abschaltfunk-
tion 1 Minute nach dem letzten Tastendruck
Einsatzbedingungen 10° C ~ 40° C (50° F ~ 104° F); 40 % ~85% RH; 700~1060hPa
Aufbewahrungs- &
Transportkonditionen -10° C~60° C (14° F~140° F); 10 % ~90 % RH; 700~1060hPa
Gleichstromquelle Vier Batterien 6 V (AAA)
Netzteil
DC6 V, ≥600 mA (Steckergrösse: AussenØ (-) 4,0 mm; InnenØ (+)
1,7 mm
Abmessungen 147 (L) X 75 (B) X 29.5 (H) mm
Gewicht 310g (Bruttogewicht ohne Batterien)
Armumfang Erwachsene: 24~40 cm (9,4”~15,7”)
Benutzergruppe Erwachsene Anwender
: Typ BF: Gerät und Manschette sollen einen besonderen konst-
ruktiven Schutz gegen elektrische Schläge gewährleisten.
IP Klassizierung IP21, Schutz gegen schädliches Eindringen von Wasser und
Staub
*Bei technischen Daten sind Änderungen jederzeit vorbehalten.
Française
Introduction
Les mesures de pression artérielle réalisées avec l’AX356f sont équivalentes à celles
obtenues par un observateur expérimenté utilisant un brassard/stéthoscope, dans
les limites prescrites par la norme nationale américaine sur les sphygmomanomètres
électroniques ou automatiques. Cet instrument est réservé à un usage domestique par
des adultes. Ne l’utilisez pas pour relever la pression artérielle d’enfants ou de bébés.
L’AX356f est garanti contre les défauts de fabrication par un programme de garantie
internationale. Pour plus d’informations sur la garantie, contactez le fabricant: Rossmax
International Ltd.
Attention: Consultez les documents d’accompagnement. Veuillez lire ce manuel
attentivement avant l’emploi. Pour obtenir des informations spéciques sur la pres-
sion artérielle, contactez votre médecin. Veillez à conserver ce manuel.
Technologie de mesure Real Fuzzy
Cet instrument utilise la méthode oscillométrique pour détecter la pression artérielle.
Avant le gonage du brassard, l’instrument établit une pression de base équivalente à la
pression de l’air. Il détermine le niveau de gonage approprié sur la base des oscillations
de pression, puis le dégonage du brassard.
Pendant le dégonage, l’instrument détecte l’amplitude et la pente des oscillations de
pression. Ce faisant, il détermine les pressions artérielles systolique et diastolique, et le
pouls.
Remarques préliminaires
Ce tensiomètre est conforme aux réglementations européennes et présente le mar-
quage CE «CE0120». La qualité de l’instrument a été contrôlée et est conforme aux
dispositions de la directive européenne 93/42/CEE (appareils médicaux), annexe 1, exi-
gences fondamentales et normes harmonisées appliquées:
EN 1060-1: 1995/A2: 2009 Sphygmomanomètres pour mesures non invasives - Partie
1 - Exigences générales
EN 1060-3: 1997/A2: 2009 Sphygmomanomètres pour mesures non invasives - Partie
3 - Exigences supplémentaires pour systèmes de mesure de pression artérielle électro-
mécaniques
EN 1060-4: 2004 Sphygmomanomètres pour mesures non invasives - Partie 4: Procé-
dures d’essai pour déterminer la précision système globale de sphygmomanomètres
automatiques à mesure non invasive.
Ce tensiomètre a été conçu pour une utilisation de longue durée. Pour maintenir la pré-
cision spéciée, prévoyez un réétalonnage de tous les tensiomètres numériques. Ce ten-
siomètre n’exige pas de réétalonnage avant 2 ans (dans un cas d’utilisation normale avec
env. 3 mesures par jour). Quand un réétalonnage est nécessaire, l’instrument ache .
Un réétalonnage est aussi nécessaire si l’instrument subit des dommages dus à un choc
violent (chute) ou à une exposition aux liquides ou à des variations d’humidité ou de
température basses ou élevées extrêmes. Quand s’ache, renvoyez l’instrument au
revendeur local en vue du réétalonnage.
Norme relative à la pression artérielle
Le Comité national de coordination de programme éducatif sur l’hypertension aux
Etats-Unis a élaboré une norme relative à la pression artérielle, classant les plages de
tension en 4 niveaux. (Réf.: le 7e rapport du Comité national mixte sur la prévention, la
détection, l’évaluation et le traitement de l’hypertension, rapport complet JNC-7, 2003).
Cette classication de la pression artérielle se base sur des données historiques et ne
peut être appliquée telle quelle à un patient donné. Veuillez consulter votre médecin
régulièrement. Il vous indiquera votre plage de pression artérielle normale de même
que les valeurs considérées comme un risque. Pour une surveillance et une documenta-
tion ables de la pression artérielle, conservez des enregistrements à long terme. Veuillez
télécharger votre carnet de pression artérielle sur le site www.rossmax.com.
Description de l’écran
EE / Erreur de mesure: Assurez-vous que la che L est bien branchée sur la prise d’air
et refaites la mesure. Ajustez correctement le brassard et gardez votre bras immobile
pendant la mesure. Si l’erreur persiste, renvoyez l’instrument au distributeur ou centre
SAV local.
E1 / Défaut du circuit d’air: Assurez-vous que la che L est bien branchée sur la prise
d’air sur le côté de l’instrument et refaites la mesure. Si l’erreur persiste, renvoyez l’instru-
ment au distributeur ou centre SAV local.
E2 / Pression dépassant 300 mmHg: Enlevez les piles, attendez 60 secondes, puis
réinsérez-les. Si l’erreur persiste, renvoyez l’instrument au distributeur ou centre SAV
local.
E3 / Erreur de données: Refaites la mesure. Si l’erreur persiste, renvoyez l’instrument au
distributeur ou centre SAV local.
Er / Mesure hors plage: Refaites la mesure. Si l’erreur persiste, renvoyez l’instrument au
distributeur ou centre SAV local.
Détecteur de mouvement
Le “Détecteur de mouvement” permet de rappeler à l’utilisateur de rester immobile et
indique tout mouvement du corps pendant la mesure. L’icône spéciée s’ache une fois
“le mouvement du corps” a été détectée pendant et après chaque mesure.
Remarque: Il est fortement recommandé que vous mesure à nouveau si l’icône appa-
raît.
Indicateur de risque d’hypertension
Le Comité national de coordination de programme éducatif sur l’hypertension aux États-
Unis a développé une norme relative à la pression artérielle, classant les plages de tension
en 4 niveaux. Cet instrument est équipé d’un indicateur de risque d’hypertension novateur
qui signale de façon optique le niveau de risque présumé (normal / pré-hypertension
/ hypertension de niveau 1 / hypertension de niveau 2 ) du résultat après chaque
mesure.
Détecteur de trouble du rythme cardiaque (IHB)
Cet instrument est équipé d’un détecteur de trouble du rythme cardiaque (IHB) per-
mettant aux personnes qui sourent de battements de cœur irréguliers d’obtenir une
indication précise sur une éventuelle arythmie cardiaque pendant la mesure.
Remarque: Nous vous recommandons vivement de consulter votre médecin si l’icône
IHB ( ) apparaît souvent.
Utilisation du bloc secteur CA (en option)
1.Raccordez le bloc secteur CA à la prise jack CA sur le côté droit l’instrument.
2.Branchez le bloc secteur CA sur la prise. (Les blocs secteur CA nécessaires sont indiqués
à côté de la prise jack CA.)
Attention:
1. Veuillez enlever les piles si vous opérez en mode CA pendant une longue période.
Un long séjour des piles dans le logement peut provoquer des fuites susceptibles
d’endommager l’instrument.
2. Pas de piles nécessaires en mode CA.
3. Les blocs secteur CA sont optionnels. Contactez le distributeur pour plus d’informa-
tions sur les blocs secteur CA compatibles.
4. Utilisez seulement le bloc secteur CA autorisé avec ce tensiomètre. Pour plus d’infor-
mations sur le bloc secteur CA autorisé, référez-vous à l’ANNEXE 1.
Insertion des piles
1. Pressez et relevez le couvercle du logement des piles dans le sens de la èche pour
ouvrir le logement.
2. Insérez ou remplacez 4 piles «AAA» dans le logement conformément aux indications
situées à l’intérieur.
3. Reposez le couvercle du logement en engageant d’abord les crochets du bas, puis
l’extrémité supérieure.
4. Remplacez les piles par paire. Enlevez les piles avant une longue période d’inutilisation
de l’instrument.
Vous devez remplacer les piles quand
1. l’icône «Faible état de charge» s’ache
2. vous pressez la Touche ON/OFF/DEMARRAGE et que l’écran reste noir.
Attention: 1. Les piles font partie des déchets spéciaux. Ne les jetez pas avec les ordures
ménagères.
2. L’instrument ne contient pas de pièces réparables par l’utilisateur. Les piles ou dom-
mages résultant de piles usagées sont exclus de la garantie.
3. Utilisez exclusivement des piles de marque. Remplacez toujours les piles en bloc. Uti-
lisez des piles de même marque et de même type.
Mise en place du brassard
1. Déroulez le brassard en laissant l’extrémité du brassard passer à travers la bague D.
2. Passez votre bras gauche à travers le brassard. Orientez le repère de couleur vers vous,
le tuyau suivant la direction du bras (g. ). Votre paume gauche étant en haut, placez
le bord du brassard environ 1,5 à 2,5 cm au-dessus du creux du coude (g. ). Serrez
le brassard en tirant sur son extrémité.
3. Centrez le tuyau sur le bras. Appuyez sur le crochet et xez l’ensemble. Vous devez
pouvoir placer 2 doigts entre le brassard et votre bras. Placez le repère de l’artère (Ø)
sur l’artère principale (à l’intérieur du bras) (g. .). Remarque: Localisez l’artère prin-
cipale en appuyant avec 2 doigts environ 2 cm au-dessus du coude, à l’intérieur du
bras gauche. Repérez l’endroit où le pouls est le plus fort. C’est l’artère principale.
4. Branchez le tuyau de connexion du brassard sur le tensiomètre (g. ).
5. Posez le bras sur une table (paume en haut) de sorte que le brassard se trouve à hau-
teur du cœur. Assurez-vous que le tuyau n’est pas plié (g. ).
6. Ce brassard convient à votre bras si la èche coïncide avec la ligne continue en cou-
leur illustrée à droite (g. ). Si la èche se trouve en dehors de cette ligne, vous avez
besoin d’un brassard d’un autre périmètre. Contactez le revendeur local pour obtenir
des brassards d’autres tailles.
Procédures de mesure
Voici quelques conseils utiles pour obtenir des mesures plus précises:
• La pression artérielle change à chaque battement de cœur et varie constamment pen-
dant la journée.
• La mesure de la pression artérielle peut être aectée par la position de l’utilisateur, son
état physiologique et d’autres facteurs. En vue d’une précision maximale, ne mesu-
rez pas la pression artérielle moins d’une heure après avoir fait du sport, pris un bain,
mangé, bu des boissons alcoolisées ou de la caféine, ou fumé.
• Nous vous recommandons de vous asseoir au moins 5 minutes dans un lieu calme,
étant donné qu’un état détendu augmente la précision. Vous ne devriez pas être épui-
sé pendant la prise d’une mesure.
• Ne faites pas de mesures quand vous êtes stressé ou tendu.
• Evitez de parler et de bouger les muscles de votre main ou bras pendant la mesure.
• Mesurez la pression artérielle à une température corporelle normale. Si vous avez froid
ou chaud, attendez un peu avant de faire une mesure.
• Si le tensiomètre est stocké à très basse température (près de 0°), mettez-le dans un
endroit tempéré au moins une heure avant de l’utiliser.
• Attendez 5 minutes avant de prendre la prochaine mesure.
1. Pressez la touche ON/OFF/DEMARRAGE. Tous les achages apparaissent pendant
une seconde avant le retour à «0».
2. L’instrument gone automatiquement le brassard au niveau approprié, en fonction
des oscillations du pouls de l’utilisateur. La mesure commence alors. Il est important
de rester immobile et calme durant la mesure. Tout mouvement sensible peut aecter
les résultats de mesure.
3. A la n de la mesure, la pression systolique, la pression diastolique et le pouls sont a-
chés simultanément et mémorisés automatiquement. Jusqu’à 90 mémoires peuvent
être enregistrées.
4. La mesure est maintenant achevée. Appuyez sur la touche ON/OFF/DEMARRAGE
pour mettre l’instrument hors tension. Si aucune touche n’est pressée, l’instrument
s’arrête au bout de 1 minute.
Ce tensiomètre regone automatiquement le brassard à une pression d’env. 220 mmHg
si le système détecte que votre corps a besoin de plus de pression pour les mesures.
Remarque:1. Ce tensiomètre s’arrête automatiquement 1 minute après la dernière pres-
sion de touche.
2. Pour interrompre la mesure, pressez la touche Mémoire ou ON/OFF/DEMARRAGE. Le
brassard se dégone tout de suite.
3. Evitez de parler ou de bouger les muscles de votre bras ou main pendant la mesure.
Rappel de valeurs enregistrées
1. Pour réacher les mesures de pression artérielle enregistrées, pressez la touche Mé-
moire. La première lecture achée est la moyenne des 3 dernières mesures mémori-
sées. Le dernier jeu de mesures enregistré sera aché.
Español
Introducción
Las mediciones de presión arterial determinadas con AX356f son equivalentes con aque-
llas obtenidas por un observador entrenado usando el método de auscultación con bra-
zalete/estetoscopio dentro de los límites especicados en la norma ANSI para esgmo-
manómetros electrónicos o automatizados. Esta unidad se ha concebido para ser usada
por adultos en un entorno doméstico. No use este aparato para niños o recién nacidos. El
AX356f está protegido contra defectos de fabricación mediante un programa de garantía
internacional. Para una información acerca de la garantía, usted puede contactar al fabri-
cante, Rossmax International Ltd.
Atención: Consulte los documentos anexos. Por favor, lea este manual cuidadosa-
mente antes del uso. Para una información especíca acerca de su propia presión
arterial, contacte a su médico. Por favor, fíjese en guardar este manual.
Tecnología de medición real fuzzy
Esta unidad usa el método oscilométrico para detectar su presión arterial. Antes de que
el brazalete comience con el inado, el aparato establecerá una presión de referencia del
brazalete equivalente a la presión del aire. Esta unidad determinará el nivel de inado
apropiado basándose en oscilaciones de la presión seguida por el desinado del brazale-
te. Durante el desinado, el aparato detectará la amplitud y la pendiente de las oscilacio-
nes de presión y, de este modo, determinará su presión arterial sistólica, la presión arterial
diastólica y el pulso.
Notas preliminares
El monitor de presión arterial está conforme con las disposiciones europeas y lleva la mar-
ca CE “CE 0120”. La calidad del aparato ha sido vericada y está conforme con la Directiva
93/42/CEE (Directiva de Productos Sanitarios) del Consejo de la CE, Anexo I requerimien-
tos esenciales y normas armonizadas aplicadas.
EN 1060-1: 1995/A2: 2009 Esgmomanómetros no invasivos - Parte 1 - Requisitos ge-
nerales
EN 1060-3: 1997/A2: 2009 Esgmomanómetros no invasivos - Parte 3 - Requisitos suple-
mentarios aplicables a los sistemas electromecánicos de medición de la presión sanguí-
nea
EN 1060-4: 2004 Esgmomanómetros no invasivos - Parte 4: Procedimientos de ensayo
para determinar la exactitud del sistema total de esgmomanómetros no invasivos au-
tomatizados.
Este monitor de presión arterial ha sido diseñado para una larga vida útil. Para garantizar
una exactitud permanente, se recomienda que todos los monitores digitales de presión
arterial requieran recalibraciones. Este monitor (con un uso normal de aprox. 3 medicio-
nes al día) no requerirá ninguna recalibración durante 2 años. En el momento en el que
la unidad debería ser recalibrada, el aparato visualizará . La unidad también debería
ser recalibrada si el monitor es dañado por algún golpe (como una caída) o la exposición
a líquidos y / o temperaturas extremadamente calientes o frías / cambios de humedad.
Si aparece , simplemente devuélvalo al distribuidor más cercano para el servicio de
recalibración.
Norma de presión arterial
El National High Blood Pressure Education Program Coordinating Committee (comité
nacional coordinador de programas de educación en hipertensión de los EE.UU.) ha de-
sarrollado una norma de presión arterial clasicando los rangos de presión arterial en 4
niveles. (Ref: “The Seventh Report of the Joint National Committee on Prevention, De-
tection, Evaluation, and Treatment of High Blood Pressure-Complete Report JNC7:2003”).
Esta clasicación de la presión arterial está basada en datos históricos, y es posible que no
se pueda emplear directamente para cualquier paciente individual. Es importante que
consulte a su médico periódicamente. Su médico le informará acerca de su rango de
presión arterial personal normal, así como acerca del límite a partir del cual representará
un riesgo para usted. Para un monitoreo y una referencia ables de la presión arterial,
recomendamos que mantenga registros a largo plazo. Por favor, descargue el diario de
presión arterial de nuestro Sitio Web www.rossmax.com.
Explicación de la pantalla
EE / Error de medición: Asegúrese de que el conector L esté conectado rmemente en
la toma de aire. Enrolle el brazalete correctamente y mantenga el brazo inmóvil durante
la medición. Si el error sigue ocurriendo, devuelva el aparato a su distribuidor o centro de
servicio posventa locales.
E1 / Anomalía del circuito de aire: Asegúrese de que el conector L esté conectado
rmemente en la toma de aire en el lado de la unidad y vuelva a medir. Si el error sigue
ocurriendo, devuelva el aparato a su distribuidor o centro de servicio posventa locales.
E2 / Presión sobrepasa 300 mmHg: Apague la unidad y vuelva a medir. Si el error sigue
ocurriendo, devuelva el aparato a su distribuidor o centro de servicio posventa locales.
E3 / Error de datos: Saque y vuelva a meter las pilas. Si el error sigue ocurriendo, devuel-
va el aparato a su distribuidor o centro de servicio posventa locales.
Er / Exceso del rango de medición: Vuelva a medir. Si el error sigue ocurriendo, devuel-
va el aparato a su distribuidor o centro de servicio posventa locales.
Detector de movimiento
El “detector de movimiento” recuerda al usuario que debe permanecer quieto ya que
indicará cualquier movimiento realizado durante la medición.
El ícono especicado aparece cuando se ha detectado movimiento corporal durante y
después de cada medición.
NOTA:. Es muy recomendable que rse repita la medición si el icono aparece .
Indicador de riesgo de hipertensión
El National High Blood Pressure Education Program Coordinating Committee (comité
nacional coordinador de programas de educación en hipertensión de los EE.UU.) ha
desarrollado una norma de presión arterial clasicando los rangos de presión arterial en
4 niveles. Esta unidad está equipada con un innovativo indicador de riesgo de presión
arterial, el cual visualizará el supuesto nivel de riesgo (normal / pre-hipertensión
/ hipertensión de etapa 1 / hipertensión de etapa 2 ) del resultado después de
cada medición.
Detector de arritmia cardiaca
Esta unidad está equipada con un detector de arritmia cardiaca, el cual permite que las
personas con una arritmia cardiaca obtengan mediciones exactas advirtiéndoles la pre-
sencia de una arritmia cardiaca durante la medición.
Nota: Le recomendamos encarecidamente que consulte a su médico si el icono de arrit-
mia cardiaca ( ) aparece frecuentemente.
Uso del adaptador AC (opcional)
1.Conectar el adaptador AC en el jack para adaptador AC en el lado derecho de la unidad.
2.Enchufar el adaptador AC en la toma de corriente. (Los adaptadores AC requieren el
voltaje y la corriente indicados cerca del jack para adaptador AC.)
Precaución:
1. Por favor saque las pilas al operar en el modo AC por un período de tiempo pro-
longado. Dejando las pilas en el compartimiento por un tiempo prolongado podrá
causar fugas, las cuales podrán dañar la unidad.
2. No se necesitan pilas al estar operando en el modo AC.
3. Los adaptadores AC son opcionales. Por favor, contacte al distribuidor con respecto a
adaptadores AC compatibles.
4. Use sólo el adaptador AC autorizado con este monitor de presión arterial. Para informar-
se acerca del adaptador AC autorizado, por favor consulte ANEXO 1.
Instalación de las pilas
1. Presione la tapa de pilas hacia abajo y levántela en dirección de la echa para abrir el
compartimiento de pilas.
2. Meta o sustituya 4 pilas “AAA” en el compartimiento de baterías conforme a las indica-
ciones en el interior del compartimiento.
3. Vuelva a poner la tapa de pilas engatillando primero los ganchos inferiores y después
empujando el borde superior de la tapa de pilas.
4. Sustituya pares de pilas. Saque las pilas si la unidad va a estar fuera de uso por períodos
prolongados.
Deberá sustituir las pilas si:
1. Aparece el icono de pila baja en la pantalla.
2. Se aprieta el botón de ENCENDIDO/APAGADO/INICIO y no aparece nada en la pantalla.
Precaución
1. Las pilas son residuos peligrosos. No las tire junto con la basura doméstica.
2. En el interior no existe ninguna pieza que requiera mantenimiento. La garantía no cu-
bre las pilas o los daños causados por pilas viejas.
3. Use únicamente pilas de marca. Sustituya siempre todas las pilas juntas. Use pilas de la
misma marca y del mismo tipo.
Empleo de la muñequera
1. Desenrolle el brazalete, dejando el extremo del brazalete dentro del anillo en D del
brazalete.
2. Pase el brazo izquierdo a través del ojal del brazalete. El indicador de cinta de color de-
berá estar posicionado más cerca de usted, con el tubo mostrando hacia el brazo (Fig.
). Gire su brazo izquierdo hacia arriba y posicione el borde del brazalete a aprox. 1,5 a
2,5 cm encima del lado interior de la articulación del codo (Fig. ). Apriete el brazalete
tirando del extremo del brazalete.
3. Centre el tubo sobre el centro del brazo. Presione el material del gancho rmemente
contra el del ojal. Provea suciente espacio para 2 dedos entre el brazalete y su brazo.
Posicione la marca de arteria (Ø) sobre la arteria principal (en el interior de su brazo)
Fig. ,). Nota: Localice la arteria principal presionando con 2 dedos en el interior del
brazo izquierdo a aprox. 2 cm encima del codo doblado. Identique el lugar en el que
el pulso se puede percibir más intensamente. Ésta es su arteria principal.
4. Conecte el tubo de conexión de brazalete en la unidad (Fig. ).
5. Ponga su brazo sobre una mesa (con la palma de la mano hacia arriba) de tal modo
que el brazalete esté a la misma altura que su corazón. Fíjese en que el tubo no esté
retorcido (Fig. ).
6. Este brazalete será apropiado para usted si la echa se encuentra dentro de la línea
sólida de color del modo mostrado a la derecha (Fig. ). Si la echa se queda afuera
de la línea sólida de color, necesitará un brazalete de otra circunferencia. Contacte a su
distribuidor local para brazaletes de tamaños adicionales.
Procedimientos de medición
Algunas sugerencias útiles para ayudarle a obtener lecturas más exactas:
• La presión arterial cambia con cada latido y está sometida a una constante uctuación
durante el día.
• El registro de la presión arterial puede ser afectado por la posición del usuario, su con-
dición siológica y otros factores. Para máxima exactitud, espere una hora después de
hacer ejercicio, bañarse, comer, tomar bebidas con alcohol o cafeína, o fumar, antes de
medir la presión arterial.
1. Indication de date/d’heure
2. Mouvement marque
3. Icône “faible état de charge”
4. Indicateur de risque
d’hypertension
5. Mémoire / date d’marquez
6. Mémoire mark moyenne
7. Matin et nuit Note
8. Icône du pouls
9. Pression systolique
10. Pression diastolique
11. Pouls
12. Détecteur de trouble du
rythme cardiaque (IHB)
1. Brassard pour bras
2. Ecran LCD
3. Tuyau d’air et connecteur
4. Matin et nuit touche
Moyenne
5. Touche ON/OFF/
DEMARRAGE
6. Touche Mémoire
7. Couvercle du logement
des piles
8. Prise pour connexion
données
9. Prise jack pour bloc
secteur CA
• Antes de la medición, se recomienda que esté sentado tranquilamente por un mínimo
de 5 minutos, ya que una medición realizada en un estado relajado será más exacta. No
debería estar físicamente cansado o exhausto al realizar una medición.
• No realice mediciones si está estresado o bajo tensión.
• Durante la medición, no hable ni mueva los músculos del brazo o la mano.
• Mida su presión arterial a una temperatura corporal normal. Si tiene frío o calor, espere
antes de realizar una medición.
• Si el monitor es guardado a temperaturas muy bajas (cerca de congelación), colóquelo
en un lugar caliente por lo menos una hora antes de usarlo.
• Espere 5 minutos antes de realizar la siguiente medición.
1. Pulse el botón de ENCENDIDO/APAGADO/INICIO. Todas las visualizaciones aparecerán
por aprox. un segundo antes de regresar a “0”.
2. La unidad inará automáticamente hasta el nivel de inado apropiado basándose en
las oscilaciones del pulso del usuario. A continuación, comenzará la medición. Es im-
portante que permanezca inmóvil y quieto durante la medición. Cualquier movimien-
to signicante podría afectar el resultado de medición.
3. Al haber acabado la medición, se mostrarán la sistólica, la diastólica y el pulso simultá-
neamente, y éstos serán guardados automáticamente en el sistema de memoria. Se
puede guardar hasta un máximo de 90 memorias.
4. Ahora, la medición ha acabado. Pulse el botón de ENCENDIDO/APAGADO/INICIO pa-
ra apagar. Si no se pulsa ningún botón, la unidad se apagará automáticamente en 1
minuto.
Este monitor volverá a inarse automáticamente a aprox. 220 mmHG si el sistema detecta
que su cuerpo necesita más presión para medir su presión arterial.
Nota:1. Este monitor se apagará automáticamente después de 1 minuto después de la
última operación de algún botón.
2. Para interrumpir la medición, simplemente pulse el botón de ENCENDIDO/APAGADO/
INICIO. El brazalete se desinará inmediatamente.
3. Durante la medición, no hable ni mueva los músculos del brazo o la mano.
Revisión de los valores en la memoria
1. Para revisar las lecturas de presión arterial guardadas en la memoria, simplemente pul-
se el botón de memoria. La primera lectura visualizada es el promedio de las últimas
3 mediciones guardadas en la memoria. Se visualizará el último conjunto de lecturas
memorizadas.
2. Otra pulsación del botón de memoria llamará el conjunto de lecturas previo.
3. Todas las lecturas guardadas en la memoria se visualizarán junto con su respectivo
número consecutivo.
Recuperación de valores medios de mañana o tarde
1. Función promedio de 7, 14, 21, 28 días diferenciando promedios matutinos o vesper-
tinos
2. Presione la tecla mañana o tarde. La primera lectura mostrará el promedio de las medi-
ciones matutinas de los últimos siete días
3. Continúe presionando la tecla promedio mañana o tarde para ver los promedios de
todas las mediciones matutinas de los últimos 14, 21 y 28 días. Todos los valores pro-
medios muestran el número de días, si es matutino y vespertino y marca de promedio
Nota: AM se dene como 4 a.m.-11:59 AM
Nota: PM se dene las 6:00 - 2:00
Eliminación de los valores en la memoria
Pulse y mantenga el botón de memoria pulsado por aprox. 5 segundos. A continuación,
los datos en la zona de memoria podrán ser borrados automáticamente.
Ajuste de fecha/hora
1. Para ajustar el día y la hora en el monitor después de instalar o reemplazar las baterías.
La pantalla mostrará el número del día parpadeando.
2. Cambie el día presionando la tecla de memoria, cada pulsación incrementará el núme-
ro Presione la para conrmar las entradas tecla ENCENDIDO/APAGADO/INICIO para
conrmar el valor y la pantalla mostrará el número del mes parpadeando
3. Utilice los pasos descritos en el punto 2 anteriormente, usando la tecla de memoria
para cambiar y la tecla ENCENDIDO/APAGADO/INICIO para conrmar las entradas
4. “0” aparecerá en la pantalla cuando el monitor de presión este preparado para realizar
mediciones
Transferencia de datos al PC
Rossmax ofrece un software de administración de presión arterial gratuito, integrado y
amigable para el usuario, que se puede descargar e instalar en su computadora. Usted
podrá comprar un cable USB de diseño especial para conectar el monitor de presión
arterial Rossmax en su PC. Por favor, visite el Sitio Web http://www.rossmax.com para el
proceso de descarga e instalación.
Localización de fallas
Si se presenta cualquier anomalía durante el uso, por favor compruebe los siguientes
puntos.
Síntomas Puntos de verificación Corrección
Ninguna visualización
al pulsar el botón de
ENCENDIDO/APAGADO/
INICIO
¿Están vacías las pilas? Sustitúyalas con cuatro pilas
nuevas.
¿Están lo polos de las pilas en la
posición correcta? Vuelva a meter las pilas en las posi-
ciones correctas.
Se muestra la marca EE
en la pantalla o el valor
de presión arterial es
visualizado extremada-
mente bajo (alto)
¿Está correctamente el brazalete
la muñequera?
Enrolle la muñequera adecuada-
mente, de modo que esté posicio-
nada correctamente.
¿Habló durante la medición? Vuelva a medir.
Permanezca quieto durante la
medición.
¿movió el brazo teniendo puesto
el brazalete?
Nota: Si la unidad todavía no funciona, devuélvala a su distribuidor. De ninguna manera
deberá desensamblar o reparar la unidad usted mismo.
Notas de precaución
1. La unidad contiene ensambles de alta precisión. Por lo tanto, evite temperaturas y
humedad extremas, y la exposición directa al sol. Evite caídas y golpes intensos de la
unidad principal, y protéjala de polvo.
2. Limpie el cuerpo del monitor de presión arterial y el brazalete cuidadosamente con
un trapo suave ligeramente húmedo. No ejerza presión. No lave el brazalete ni use
productos de limpieza químicos. Nunca use diluyentes, alcohol o petróleo (gasolina)
para limpiar.
3. Pilas con fugas pueden dañar la unidad. Saque las pilas si la unidad va a estar fuera de
uso durante un tiempo prolongado.
4. La unidad no deberá ser operada por niños para evitar situaciones peligrosas.
5. Si la unidad estará guardada a temperaturas muy bajas, deberá poder aclimatizarse
antes del uso.
6. Esta unidad no es reparable in situ. No deberá usar ninguna herramienta para abrir
el aparato ni deberá tratar de ajustar alguna cosa en el interior del aparato. Si tiene
problemas, por favor contacte a la tienda o al doctor del que ha adquirido esta unidad,
o por favor contacte a Rossmax International Ltd.
7. Un asunto común de todos los monitores de presión arterial que usan la función de
medición oscilométrica es que el aparato podrá tener dicultades determinando la
presión arterial correcta de usuarios con un diagnóstico de arritmia (latidos auriculares
o ventriculares prematuros o brilación auricular), diabetes, escasa circulación sanguí-
nea, problemas renales, o usuarios apopléjicos o inconscientes.
8. Para parar el funcionamiento en cualquier momento, pulse el botón de ENCENDIDO/
APAGADO/INICIO, y el aire dentro del brazalete será purgado rápidamente.
9. Una vez que el inado alcance 300 mmHg, la unidad comenzará a desinarse rápida-
mente por razones de seguridad.
10. Por favor observe que éste es un producto sanitario doméstico, y no se ha concebido
para sustituir el consejo de un médico o servicio médico profesional.
11. No use este aparato para el diagnóstico o el tratamiento de algún problema de salud
o alguna enfermedad. Los resultados de medición sólo sirven de referencia. Consulte
a un profesional de atención a la salud para la interpretación de las mediciones de pre-
sión. Contacte a su médico si tiene o sospecha algún problema médico. No cambie su
medicación sin consultar a su médico o profesional de atención a la salud.
12. Interferencia electromagnética: El aparato contiene componentes electrónicos sensi-
bles. Evite campos eléctricos o electromagnéticos intensos en las inmediaciones del
aparato (p. ej. teléfonos celulares, hornos microondas). Podrían afectar temporalmen-
te la exactitud de la medición.
13. Deseche el aparato, las pilas, los componentes y accesorios conforme a las disposi-
ciones locales.
14. Es posible que este monitor no cumpla con las especicaciones de funcionamiento
si es guardado o usado fuera de los rangos de temperatura o humedad especicados
en Especicaciones.
Especicaciones
Método de medición Oscilométrico
Rango de medición Presión: 30 - 260 mmHg; pulso: 40 - 199 latidos/
minuto
Sensor de presión Semiconductor
Exactitud Presión: ± 3mmHg; pulso: ± 5% de la lectura
Inflado: Accionado por bomba
Desinflado Válvula de purga de aire automática
Capacidad de memoria 90 memorias
Apagado automático 1 minuto después de última operación de botón
Ambiente de operación 10°C - 40°C (50°F - 104°F); 40% - 85% HR; 700~1060
hPa
Almacenamiento y Trans-
porte Medio Ambiente -10°C - 60°C (14°F - 140°F); 10% - 90% HR; 700~1060
hPa
Fuente de alimentación DC DC 6V, cuatro pilas AAA
Fuente de alimentación AC DC6V, >600mA(tamaño de conector: exterior(-) es
Ø4.0, interior(+) es Ø1.7)
Dimensiones 147 (L) X 75 (A) X 29.5 (H) mm
Peso 310g (P.B.) (sin pilas)
Circunferencia del brazo Adulto: 24 - 40 cm (9.4” - 15.7”)
Usuarios limitados Usuarios adultos
: Tipo BF: el diseño del aparato y del brazalete propor-
cionan protección especial contra choques eléctricos.
Clasificación IP IP21: Protección contra proyecciones de agua y
partículas
*Las especificaciones están sujetas a cambios sin notificación.
2. Une autre pression de la touche Mémoire rappelle le jeu de mesures précédent.
3. Toutes les mesures mémorisées sont achées avec le numéro d’enregistrement.
Chaque mesure est identiée par un numéro d’enregistrement.
Rappelant les valeurs moyennes du matin et la nuit
1. Ce moniteur est doté 7, 14, 21, 28 jours en moyenne en fonction de matin et la nuit.
2. Appuyez sur la touche moyenne de matin et de nuit, la première lecture achée est
la moyenne de toutes les lectures du matin des 7 derniers jours.
3. Continuer à appuyer sur la touche moyenne du matin et de nuit pour acher la
moyenne de toutes les lectures du matin du 14 dernier, 21 et 28 jours, puis toutes les
lectures nocturnes de 7, 14, 21 et 28 jours. Chaque valeur moyenne est livrée avec un
numéro de jour, matin et de nuit et de marque Note moyenne.
Remarque: AM correspond à la plage horaire 4:00 – 11:59
Remarque: PM correspond à la plage horaire 18:00 – 02:00
Suppression de valeurs enregistrées
Maintenez la touche Mémoire enfoncée pendant 5 secondes environ. Les données
seront automatiquement supprimées dans la zone de mémoire prédénie.
Réglage de l'heure
1. Pour régler la date / heure sur l’écran après l’installation ou rem place les batteries.
L’écran ache un chire clignotant indiquant le jour.
2. Changer le jour en appuyant sur la touche mémoire, chaque pression va augmenter
le nombre. Appuie sur la touche ON/OFF/START pour conrmer la saisie et l’écran
ache un chire clignotant représentant le mois.
3. Changer la date, l’heure et les minutes comme décrit à l’étape 2 ci-dessus, en utili-
sant la touche mémoire à changer et le bouton ON/OFF/START pour conrmer les
entrées..
4. “0” réapparaît comme le tensiomètre est prêt pour la mesure.
Transfert de données au PC
Rossmax procure un logiciel de gestion de pression artérielle gratuit, intégré et convi-
vial, que vous pouvez télécharger et installer sur votre ordinateur. Vous avez la possibi-
lité d'acheter un câble USB spécial pour raccorder le tensiomètre Rossmax au PC. Veuil-
lez consulter le site http://www.rossmax.com pour le téléchargement et l'installation.
Dépannage
En cas d’anomalie pendant l’utilisation, veuillez contrôler les points suivants.
Symptôme Points à contrôler Correction
Pas d'affichage à la
pression de la touche
ON/OFF/DEMARRAGE
Les piles sont-elles déchargées? Remplacez-les par des piles
neuves.
Les polarités de pile ont-elles
été inversées? Réinsérez les piles correctement.
Le texte EE est affiché
ou la valeur de pres-
sion artérielle affichée
est excessivement
basse (élevée)
Le brassard a-t-il été mis correctement?
Ajustez le brassard correctement.
Avez-vous parlé ou bougé pen-
dant la mesure? Refaites la mesure.
Gardez le poignet immobile
pendant la mesure.
Avez-vous agité le poignet
pourvu du brassard?
Remarque: Si l’instrument ne fonctionne toujours pas, renvoyez-le au revendeur. Ne
démontez et ne réparez en aucun cas vous-même l’instrument.
Précautions
1. L'instrument contient des éléments de haute précision. Evitez par conséquent des
températures extrêmes, l'humidité et un rayonnement solaire direct. Evitez de faire
tomber l'instrument ou de l'exposer à des chocs violents et protégez-le de la poussière.
2. Nettoyez le boîtier du tensiomètre et le brassard avec précaution avec un chion doux
légèrement humide. N'appuyez pas. Ne lavez pas le brassard et ne le nettoyez pas avec
un détergent chimique. N'utilisez jamais de diluant, d'alcool ou d'essence comme net-
toyant.
3. Les coulures de piles peuvent endommager l'instrument. Enlevez les piles avant une
longue période d'inutilisation de l'instrument.
4. Conservez l'instrument hors de portée des enfants pour éviter des situations dange-
reuses.
5. Si l'instrument est stocké dans un endroit proche de 0°, prévoyez une période d'accli-
matation à la température ambiante avant l'emploi.
6. Cet instrument n'est pas réparable par l'utilisateur. N'ouvrez pas l'instrument avec un
outil et n'essayez pas de le réparer. Si vous rencontrez des problèmes, contactez le
magasin ou le médecin chez qui vous avez acheté cet instrument ou Rossmax Inter-
national Ltd.
7. Comme tous les tensiomètres utilisant la fonction de mesure oscillométrique, l'instru-
ment peut avoir des dicultés à mesurer correctement la pression artérielle d'utilisa-
teurs sourant d'une arythmie cardiaque courante (battements atriaux ou ventricu-
laires prématurés ou brillation atriale), de diabète, d'une faible circulation sanguine, de
problèmes rénaux ou ayant eu une attaque ou étant inconscients.
8. Vous pouvez arrêter la mesure à tout moment avec la Touche ON/OFF/DEMARRAGE.
L'air du brassard sera rapidement évacué.
9. Une fois que le gonage a atteint 300 mmHg, le brassard se dégone rapidement par
mesure de sécurité.
10. Veuillez noter qu'il s'agit d'un produit de surveillance médicale à usage domestique
qui ne se substitue pas à l'avis d'un médecin ou d'un professionnel de la santé.
11. N'utilisez pas cet instrument pour le diagnostic ou le traitement d'un problème de
santé ou d'une maladie. Les résultats de mesure sont une simple référence. Consultez
un professionnel de la santé pour l'interprétation des mesures de pression. Contactez
votre médecin si vous avez ou supposez avoir un problème de santé. Ne modiez
pas vos médicaments sans recueillir l'avis de votre médecin ou d'un professionnel de
la santé.
12. Interférences électromagnétiques: L'appareil contient des éléments électroniques
sensibles. Evitez des champs électriques ou électromagnétiques intenses près de
l'instrument (téléphones mobiles, fours micro-ondes, etc.). Ces interférences peuvent
altérer temporairement la précision des mesures.
13. Eliminez l'instrument, les piles, les composants et les accessoires selon la réglementation
locale.
14. Ce tensiomètre ne fournit pas la performance spéciée s'il est stocké ou utilisé en
dehors des plages de température et d'humidité spéciées.
Caractéristiques
Méthode de mesure Oscillométrique
Plage de mesure Pression: 30-260 mmHg; pouls: 40~199 batt./minute
Capteur de pression Semi-conducteur
Précision Pression: ± 3 mmHg; pouls: ± 5 % de la lecture
Gonflage A pompe
Dégonflage Valve de libération d’air automatique
Capacité de stockage 90 mémoires
Arrêt automatique 1 minute après la dernière pression de touche
Environnement de
travail 10°C~40°C (50°F~104°F); 40%~85% HR; 700~1060 hPa
Stockage et transport
Environnement -10°C~60°C(14°F~140°F); 10%~90% HR; 700~1060 hPa
Alimentation CC Quatre piles CC (AAA) de 6 V
Alimentation CA CC 6V, ≥600 mA (taille de fiche: (-) Ø 4,0 ext., (+) Ø 1,7int.)
Dimensions 147 (L) X 75 (W) X 29.5 (H) mm
Poids 310g (P.B.) (sans piles)
Périmètre du bras Adulte: 24~40 cm (9.4”~15.7“)
Utilisateurs autorisés Adultes
: Type BF: instrument et brassard procurant une protection
spéciale contre l’électrocution.
Classification IP IP21: Protection contre la pénétration nuisible de l’eau et
les matières particulaires
*Caractéristiques modifiables sans préavis.
English
Introduction
Blood pressure measurements determined with AX356f are equivalent to those
obtained by a trained observer using cu/stethoscope auscultation method,
within the limits prescribed by the American National Standard, Electronic or
Automated Sphygmomanometers. This unit is to be used by adult consumers
in a home environment. Do not use this device on infants or neonates. AX356f
is protected against manufacturing defects by an established International War-
ranty Program. For warranty information, you can contact the manufacturer,
Rossmax International Ltd.
Attention: Consult the accompanying documents. Please read this manual
carefully before use. For specic information on your own blood pressure,
contact your physician. Please be sure to keep this manual.
Real Fuzzy Measuring Technology
This unit uses the oscillometric method to detect your blood pressure. Before
the cu starts inating, the device will establish a baseline cu pressure equiva-
lent to the air pressure. This unit will determine the appropriate ination level
based on pressure oscillations, followed by cu deation.
During the deation, the device will detect the amplitude and slope of the pres-
sure oscillations and thereby determine for you the systolic blood pressure, di-
astolic blood pressure, and pulse.
Preliminary Remarks
This Blood Pressure Monitor complies with the European regulations and bears
the CE mark “CE 0120”. The quality of the device has been veried and conforms
to the provisions of the EC council directive 93/42/EEC (Medical Device Direc-
tive), Annex I essential requirements and applied harmonized standards.
EN 1060-1: 1995/A2: 2009 Non-invasive sphygmomanometers - Part 1 - General
requirements
EN 1060-3: 1997/A2: 2009 Non -invasive sphygmomanometers - Part 3 - Sup-
plementary requirements for electro-mechanical blood pressure measuring
systems
EN 1060-4: 2004 Non-invasive sphygmomanometers - Part 4: Test Procedures
to determine the overall system accuracy of automated non-invasive sphyg-
momanometers.
This blood pressure monitor was designed for long service time. Ensure contin-
ued accuracy, it’s recommended that all digital blood pressure monitors require
re-calibration. This monitor (under normal usage with approx. 3 measurements
a day) does not require re-calibration for 2 years. Once the unit should be re-
calibrated the device will display . The unit should also be re-calibrated if the
monitor sustains damage due to blunt force (such as dropping) or exposure to
uids and / or extreme hot or cold temperature / humidity changes. When
appears, simply return to your nearest dealer for re-calibration service.
Blood Pressure Standard
The National High Blood Pressure Education Program Coordinating Committee
has developed a blood pressure standard, classifying blood pressure ranges into
4 stages. (Ref. The Seventh Report of the Joint National Committee on Preven-
tion, Detection, Evaluation, and Treatment of High Blood Pressure-Complete
Report JNC-7, 2003). This blood pressure classication are based on historical
data, and may not be directly applicable to any particular patient. It is important
that you consult with your physician regularly. Your physician will tell you your
normal blood pressure range as well as the point at which you will be consid-
ered at risk. For reliable monitoring and reference of blood pressure, keeping
long- term records is recommended. Please download the blood pressure log
at our website www.rossmax.com.
Display Explanations
EE / Measurement Error: Make sure the L-plug is securely connected to the air
socket and measure again quietly. Wrap the cu correctly and keep arm steady
during measurement. If the error keeps occurring, return the device to your lo-
cal distributor or service center.
E1 / Air Circuit Abnormality: Make sure the L-Plug is securely connected to
the air socket on the side of the unit and measure again quietly. If the errors
still occur, return the device to your local distributor or service center for help.
E2 / Pressure Exceeding 300 mmHg: Switch the unit o and measure again
quietly. If the error keeps occurring, return the device to your local distributor
or service center.
E3 / Data Error: Remove the batteries, wait for 60 seconds, and reload. If the er-
ror keeps occurring, return the device to your local distributor or service center.
Er / Exceeding Measurement Range: Measure again quietly. If the error
keeps occurring, return the device to your local distributor or service center.
Movement Detector
The “Movement Detector” helps reminding the user to remain still and is indi-
cating any body movement during measurement. The specied icon appears
once a “body movement” has been detected during and after each measure-
ment.
Note: It’s highly recommended that you measure again if the icon appears.
Hypertension Risk Indicator
The National High Blood Pressure Education Program Coordinating Commit-
tee has developed a blood pressure standard, classifying blood pressure ranges
into 4 stages. This unit is equipped with innovative blood pressure risk indicator,
which visually indicates the assumed risk level (normal / prehypertension
/ stage 1 hypertension / stage 2 hypertension ) of the result after each
measurement.
Irregualr Heartbeat (IHB) Detector
This unit is equipped with an Irregular Heartbeat (IHB) Detector which allows
those who have an irregular heartbeat to obtain accurate measurements alert-
ing the user of the presence of an irregular heart beat during the measurement.
Note: It is strongly recommended that you consult your physician if the IHB icon
( ) appears often.
Using the AC Adaptor (Optional)
1.Connect the AC adaptor with the AC adaptor jack on the right side of the unit.
2.Plug the AC adaptor into the socket. (AC adaptors with required voltage and
current indicated near the AC adaptor jack.)
Caution:
1. Please unload the batteries when operating with the AC mode for a long-
er period of time . Leaving the batteries in the compartment for a long
time may cause leakage, which may lead to damage of the unit.
2. No batteries are needed when operating with the AC mode.
3. AC adaptors are optional. Please contact the distributor for the compatible
AC adaptors.
4. Use only the authorized AC Adaptor with this blood pressure monitor. Infor-
mation for the authorized AC adaptor, please refer to APPENDIX 1.
Installing Batteries
1. Press down and lift the battery cover in the direction of the arrow to open the
battery compartment.
2. Install or replace 4 “AAA” sized batteries in the battery compartment accord-
ing to the indications inside the compartment.
3. Replace the battery cover by clicking in the bottom hooks rst, then push in
the top end of the battery cover.
4. Replace the batteries in pairs. Remove batteries when unit is not in use for
extended periods of time.
You need to replace the batteries when
1. low battery icon appears on display.
2. the ON/OFF/START key is pressed and nothing appears on display.
Caution:
1. Batteries are hazardous waste. Do not dispose them together with the house-
hold garbage.
2. There are no user serviceable parts inside. Batteries or damage from old bat-
teries are not covered by warranty.
3. Use exclusively brand batteries. Always replace with new batteries together.
Use batteries of the same brand and same type.
Applying the Cu
1. Unwrap the arm cu, leaving the end of the cu through the D-ring of the
cu.
2. Put your left arm through the cu loop. The color strip indication should be
positioned closer to you with the tube pointing in the direction of your arm
(Fig. ). Turn your left palm upward and place the edge of the arm cu at
approximately 1.5 to 2.5 cm above the inner side of the elbow joint (Fig. ).
Tighten the cu by pulling the end of the cu.
3. Centerthe tubeoverthe middleofthe arm.Press the hookand loopmaterialto-
gethersecurely.Allowroomfor2ngerstotbetweenthecuandyourarm.Po-
sitionthearterymark(Ø)overthemainartery(ontheinsideofyourarm)(Fig.,).
Note: Locate the main artery by pressing with 2 ngers approximately 2 cm
above the bend of your elbow on the inside of your left arm. Identify where
the pulse can be felt the strongest. This is your main artery.
4. Plug in the cu connecting tube into the unit (Fig. ).
5. Lay your arm on a table (palm upward) so the cu is at the same height as
your heart. Make sure the tube is not kinked (Fig. ).
6. This cu is suitable for your use if the arrow falls within the solid color line as
shown on the right (Fig. ). If the arrow falls outside the solid color line, you
will need a cu with other circumferences. Contact your local dealer for ad-
ditional size cus.
Measurement Procedures
Here are a few helpful tips to help you obtain more accurate readings:
• Blood pressure changes with every heartbeat and is in constant uctuation
throughout the day.
• Blood pressure recording can be aected by the position of the user, his or her
physiological condition and other factors. For greatest accuracy, wait one hour
after exercising, bathing, eating, drinking beverages with alcohol or caeine, or
smoking to measure blood pressure.
• Before measurement, it’s suggested that you sit quietly for at least 5 minutes
as measurement taken during a relaxed state will have greater accuracy. You
should not be physically tired or exhausted while taking a measurement.
• Do not take measurements if you are under stress or tension.
• During measurement, do not talk or move your arm or hand muscles.
• Take your blood pressure at normal body temperature. If you are feeling cold or
hot, wait a while before taking a measurement.
• If the monitor is stored at very low temperature (near freezing), have it placed at
a warm location for at least one hour before using it.
• Wait 5 minutes before taking the next measurement.
1. Press the ON/OFF/START key. All displays will appear for approximately one
second before returning to “0”.
2. The unit will automatically inate to the appropriate ination level based on
the user’s pulse oscillations. Measurement will then begin. It is important to
remain still and quiet during measurement. Any signicant movement may
aect measurement results.
3. When the measurement is completed, systolic, diastolic and pulse will be
shown simultaneously and be saved automatically in memory system. Up to
90 memories can be saved.
4. Measurement is now completed. Press the ON/OFF/START key to turn o the
power. If no key is pressed, the unit will shut o automatically in 1 minute.
This monitor will re-inate automatically to approximately 220 mmHg if the sys-
tem detects that your body needs more pressure to measure your blood pres-
sure.
Note: 1. This monitor automatically switches o approximately 1 minute after
last key operation.
2. To interrupt the measurement, simply press the Memory or ON/OFF/START
key; the cu will deate immediately.
3. During the measurement, do not talk or move your arm or hand muscles.
Recalling Values from Memory
1. To recall stored blood pressure readings from memory, simply press the
Memory key, the rst reading displayed is the average of the last 3 measure-
ments stored in memory, and then the last set of memorized readings will be
displayed.
2. Another press of the Memory key will recall the previous set of readings.
3. All readings stored in memory will be displayed with its sequence number.
Every measurement comes with an assigned memory sequence number.
Recalling average values of morning and nighttime
1. This monitor has 7, 14, 21, 28 days averaging function of morning and night-
time.
2. Press the Morning and Nighttime Average key, the rst reading displayed is the
average of all morning readings from the last 7 days.
3. Continue to press the Morning and Nighttime Average key to view the average
of all morning readings of last 14, 21, and 28 days, then all nighttime readings
of last 7, 14, 21, and 28 days. Every average value comes with a day number,
Morning and Nighttime mark and Average mark.
Note: AM is dened as 4:00 AM – 11:59 AM
Note: PM is dened as 6:00 PM – 2:00 AM
Clearing Values from Memory
Press and hold the Memory key for approximately 5 seconds, then the data in the
memory zone can be erased automatically.
Time Adjustment
1. To adjust the date/time in the monitor after installing or replaces batteries. The
display will show a blinking number showing the date.
2. Change the date by pressing the Memory key, each press will increase the
number. Press the ON/OFF/START key to conrm the entry and the screen will
show a blinking number representing the month.
3. Change the month, the hour and the minute as described in Step 2 above,
using the Memory key to change and the ON/OFF/START key to conrm the
entries.
4. “0” will reappear as the Blood Pressure Monitor is ready for measurement again.
Data Transfer to PC
Rossmax provides a free, integrated and user-friendly blood pressure manage-
ment software which can be downloaded and installed on your computer. You
may purchase a special designed USB cable in order to connect Rossmax’s blood
pressure monitor and your PC. Please visit the website at http://www.rossmax.
com for proceeding the downloading and installation process.
Troubleshooting
If any abnormality will arise during use, please check the following points.
Symptoms Check Points Correction
No display when
the ON/OFF/START
key is pressed
Have the batteries run down? Replace them with four new batteries.
Have the batteries' polarities
been positioned incorrectly? Re-insert the batteries in the correct
positions.
EE mark shown on
display or the blood
pressure value is
displayed exces-
sively low (high)
Is the cuff placed correctly? Wrap the cuff properly so that it is
positioned correctly.
Did you talk or move during
measurement? Measure again. Keep wrist steady dur-
ing measurement.
Did you vigorously shake the
cuff during measurement?
Note: If the unit still does not work, return it to your dealer. Under no circum-
stance should you disassemble and repair the unit by yourself.
Cautionary Notes
1. The unit contains high-precision assemblies. Therefore, avoid extreme tem-
peratures, humidity, and direct sunlight. Avoid dropping or strongly shocking
the main unit, and protect it from dust.
2. Clean the blood pressure monitor body and the cu carefully with a slightly
damp, soft cloth. Do not press. Do not wash the cu or use chemical cleaner
on it. Never use thinner, alcohol or petrol (gasoline) as cleaner.
3. Leaky batteries can damage the unit. Remove the batteries when the unit is
not used for a long time.
4. The unit should not be operated by children so to avoid hazardous situations.
5. If the unit is stored near freezing, allow it to acclimate at room temperature before
use.
6. This unit is not eld serviceable. You should not use any tool to open the
device nor should you attempt to adjust anything inside the device. If you
have any problems, please contact the store or the doctor from whom you
purchased this unit or please contact Rossmax International Ltd.
7. As a common issue for all blood pressure monitors using the oscillometric
measurement function, the device may have diculty in determining the
proper blood pressure for users diagnosed with common arrhythmia (atrial or
ventricular premature beats or atrial brillation), diabetes, poor circulation of
blood, kidney problems, or for users suered from stroke, or for unconscious
users.
8. To stop operation at any time, press the ON/OFF/START key, and the air in the
cu will be rapidly exhausted.
9. Once the ination reaches 300 mmHg, the unit will start deating rapidly for safety
reasons.
10. Please note that this is a home healthcare product only and it is not intended
to serve as a substitute for the advice of a physician or medical professional.
11. Do not use this device for diagnosis or treatment of any health problem or
disease. Measurement results are for reference only. Consult a healthcare
professional for interpretation of pressure measurements. Contact your
physician if you have or suspect any medical problem. Do not change your
medications without the advice of your physician or healthcare professional.
12. Electromagnetic interference: The device contains sensitive electronic com-
ponents. Avoid strong electrical or electromagnetic elds in the direct vicinity
of the device (e.g. mobile telephones, microwave ovens). These may lead to
temporary impairment of measurement accuracy.
13. Dispose of device, batteries, components and accessories according to local regula-
tions.
14. This monitor may not meet its performance specication if stored or used
outside temperature and humidity ranges specied in Specications.
Specications
Measurement Method Oscillometric
Measurement Range Pressure: 30~260 mmHg; Pulse: 40~199 beats/ minute
Pressure Sensor Semi conductor
Accuracy Pressure: ± 3mmHg; Pulse: ± 5% of reading
Inflation Pump Driven
Deflation Automatic Air Release Valve
Memory capacity 90 memories
Auto-shut-off 1 minute after last key operation
Operation Environment 10°C~40°C (50°F~104°F); 40%~85% RH; 700~1060 hPa
Storage and Transporta-
tion Environment
-10°C~60°C (14°F~140°F); 10%~90% RH; 700~1060 hPa
DC Power Source DC 6V four AAA Batteries
AC Power Source DC 6V, ≥600mA (Plug size: outer(-) is Ø4.0, inner(+) is
Ø1.7)
Dimensions 147 (L) X 75 (W) X 29.5 (H) mm
Weight 310g (G.W.) (w/o Batteries)
Arm circumference Adult: 24~40 cm (9.4”~15.7”)
Limited Users Adult users
: Type BF: Device and cuff are designed to provide spe-
cial protection against electrical shocks.
IP Classification IP21: Protection against harmful ingress of water and
particulate matter
*Specifications are subject to change without notice.
2
3
9
10
11
1
5
4
6
7
812
2
1
3
6
5
4
7
8 9