manuals.online logo
Brands
  1. Home
  2. •
  3. Brands
  4. •
  5. Roswell
  6. •
  7. Marine Equipment
  8. •
  9. Roswell NAUTIQUE Series Setup guide

Roswell NAUTIQUE Series Setup guide

www.roswellmarine.com
Deluxe Mirror
Installation & Usage Instructions
Information: info@roswellmarine.com
If you have any questions please call : 1-321-638-1331
Rev.16-Nov-17
Part #s: C917-150002 or
C917-150001 & C917-180300
Nautique Deluxe Mirror Assembly and Installation Instructions www.roswellmarine.com
2
THREADLOCKER
PARTS HARDWARE TOOLS REQUIRED
A
B C
Place each half of the mirror clamp insert set into the exterior clamp and interior clamp.
Exterior Clamp Interior Clamp
Locate the interior clamp and insert on the starboard
windshield header, where you would like the mirror to
be. Hold the interior clamp in place with one hand.
Locate the exterior clamp and insert it above the interi-
or clamp. To ensure a good t, anchor the bottom edge
of the exterior clamp on the header rubber and pivot
the exterior clamp towards you. Hold the two clamp
sections in place with one hand.
Header
Rubber
Exterior Clamp
C917-140002S
Exterior Clamp
C917-180300
Interior Clamp Mirror Clamp
Insert
Hand Knob
Rubber Disk
OR
x3
Note: Your deluxe mirror assembly will include C917-114002S or C917-180300.
3/16”
Allen Key
1/4-20” x 0.75”
(exterior clamp shown upside-down)
Mirror
C917-150001
Nautique Deluxe Mirror Assembly and Installation Instructions www.roswellmarine.com
THREADLOCKER
F
G
1
2 3
D E
3
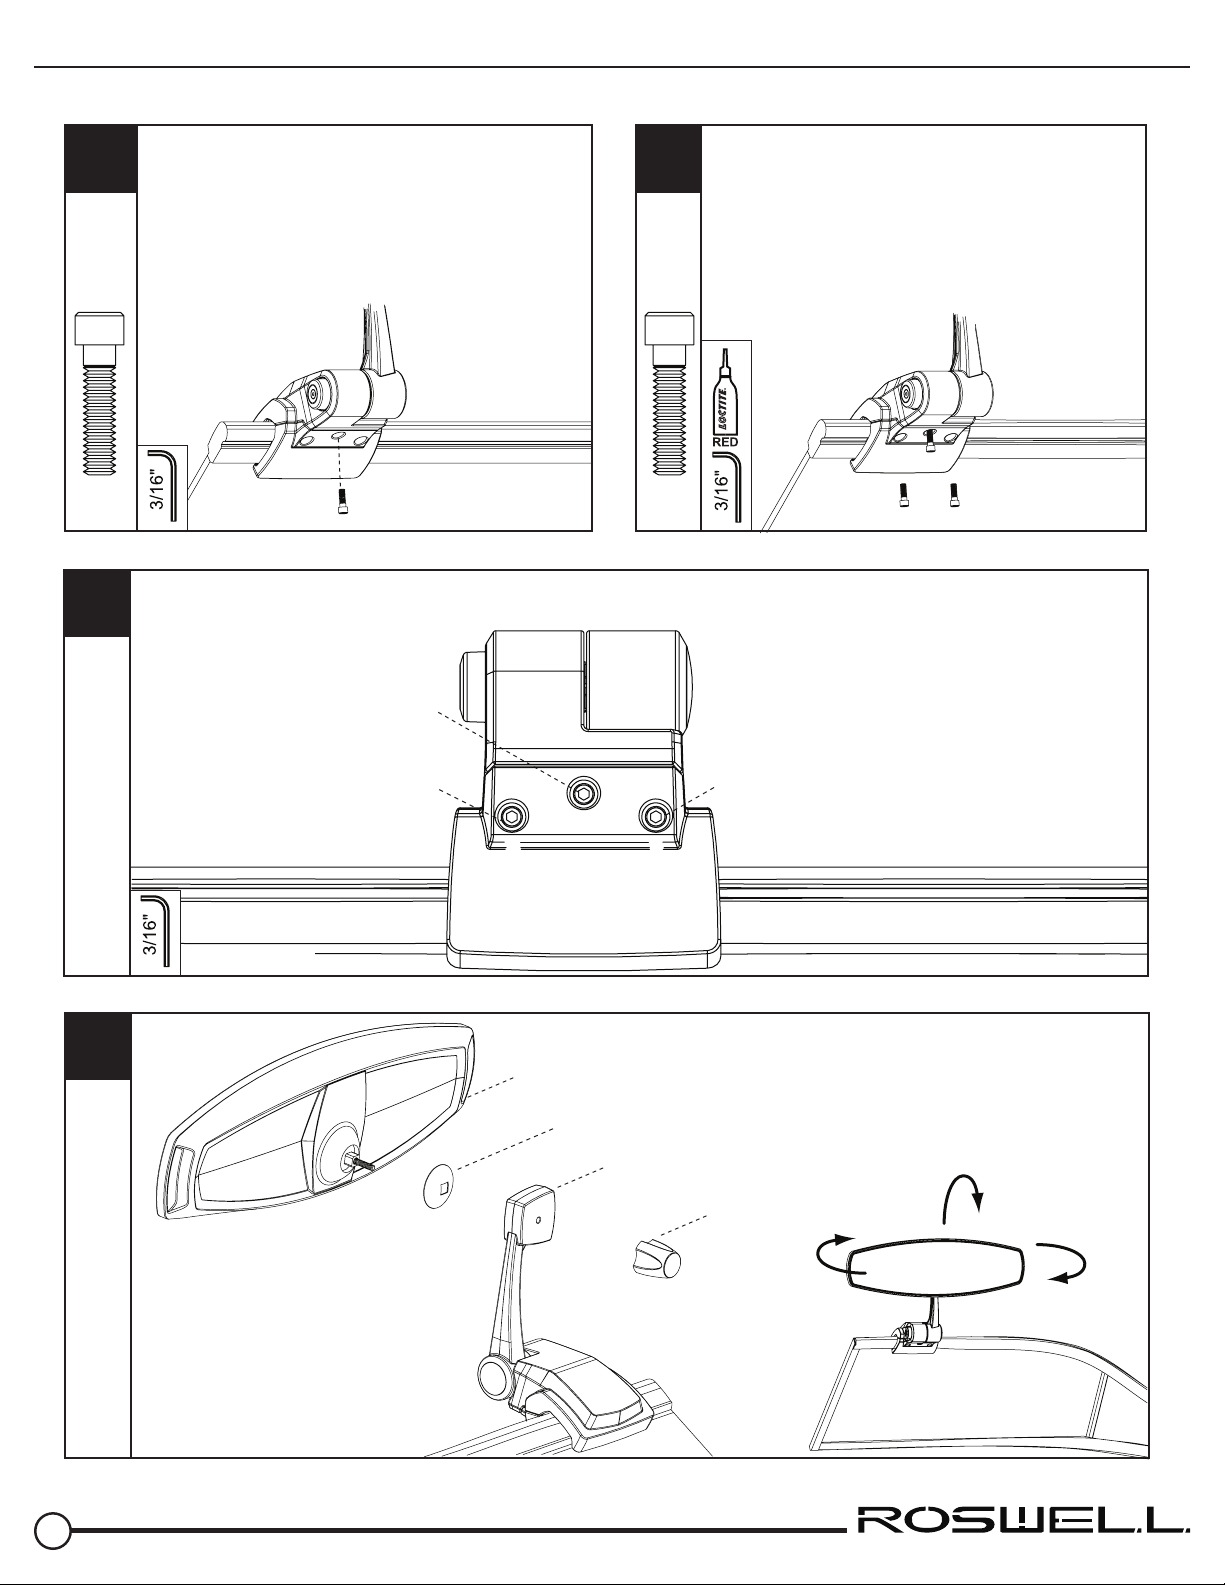
Thread one of the bolts provided with your mirror arm
into the center hole through the two clamps sections,
just enough to hold them in place. Do not fully tighten
yet.
Apply RED Loctite to the other two bolts provided and
thread the bolts in the remaining two holes. Remove
the center bolt from step D, apply Loctite, and re-fas-
ten. Do not fully tighten these three bolts yet.
To properly tighten the clamp sections together it is important to follow a tightening sequence. Start by tightening the center bolt
two turns, then tighten each of the side bolts two turns. Repeat until the two clamp halves are touching and no gap is apparent.
Make sure all bolts the are tight.
Assemble the mirror to the mirror clamp.
Make sure the rubber disc is assembled
between the mirror housing and the
mirror clamp. (Make sure to align the
square tting on the back of the mirror
with the one on the clamp.) Tighten the
mirror in place by threading the hand
knob on to the mirror bolt.
By loosening the hand knob, you are able
to adjust the mirror in all directions. Simply
re-tighten the handle once the mirror is at
your preferred angle.
If any excessive resistance is felt during tightening, do
not force the bolt(s). This could strip the threads on
your part. Try loosening the bolt(s) and repeating the
tightening sequence.
Tighten 3rd
Two turns at a time
Tighten 1st
Two turns at a time
Tighten 2nd
Two turns at a time
Mirror
Rubber Disc
Mirror Clamp
Hand Knob
x1 x2
Torque: 15 ft-lbs
Nautique Deluxe Mirror Assembly and Installation Instructions www.roswellmarine.com
H
4
A
B
C
D
To move the mirror out of the way for trailering or to have it
out of the driver’s eld of view: First, grab the mirror extension
with your right hand and push the black button on the left
side of the mirror with your left hand.
2) Push button
1) Grab mirror extension
3) Rotate then lock
Second, rotate the mirror to one of the four locking positions.
Third, lock the mirror by releasing the button, the mirror exten-
sion will move back into the lock position. Make sure the mirror
becomes completely seated prior to letting go of the extension
with your right hand.

This manual suits for next models

3

Other Roswell Marine Equipment manuals

Roswell Area 53 Bimini Series Setup guide

Roswell

Roswell Area 53 Bimini Series Setup guide

Roswell Classic Unison Speaker User manual

Roswell

Roswell Classic Unison Speaker User manual

Roswell Wakezsledz User manual

Roswell

Roswell Wakezsledz User manual

Popular Marine Equipment manuals by other brands

POWERWINCH 825 Operation manual

POWERWINCH

POWERWINCH 825 Operation manual

JRC JLN-628 brochure

JRC

JRC JLN-628 brochure

DIGITAL YACHT PilotLink2 Product handbook

DIGITAL YACHT

DIGITAL YACHT PilotLink2 Product handbook

Clarion CMS2 Owner's manual & installation manual

Clarion

Clarion CMS2 Owner's manual & installation manual

EBS M7000 installation manual

EBS

EBS M7000 installation manual

Kongsberg M3 Bathy installation manual

Kongsberg

Kongsberg M3 Bathy installation manual

NPK SCS-1002 operating manual

NPK

NPK SCS-1002 operating manual

Furuno FE-800 installation manual

Furuno

Furuno FE-800 installation manual

Harken 1561 instructions

Harken

Harken 1561 instructions

Simrad DD15 manual

Simrad

Simrad DD15 manual

Notifier FS-BSO Installation and maintenance instructions

Notifier

Notifier FS-BSO Installation and maintenance instructions

Raymarine ST40 Quick reference guide

Raymarine

Raymarine ST40 Quick reference guide

Raymarine Maxiview ST80 Owner's handbook

Raymarine

Raymarine Maxiview ST80 Owner's handbook

E2S E2XS112UL Instructions/service manual

E2S

E2S E2XS112UL Instructions/service manual

GUIDANCE MARINE 20- Series Installer's guide

GUIDANCE MARINE

GUIDANCE MARINE 20- Series Installer's guide

R2Sonic 2026 Operation manual

R2Sonic

R2Sonic 2026 Operation manual

COBHAM SAILOR 6000 installation manual

COBHAM

COBHAM SAILOR 6000 installation manual

Raymarine ST60 Tridata Owner's handbook

Raymarine

Raymarine ST60 Tridata Owner's handbook

manuals.online logo
manuals.online logoBrands
  • About & Mission
  • Contact us
  • Privacy Policy
  • Terms and Conditions

Copyright 2025 Manuals.Online. All Rights Reserved.