ROTONDI MINI 4 Instructions for use

MINI 4 p. 1 MARCH 2011
INSTRUCTIONS AND MAINTENANCE
MOD.MINI 4
Read these directions carefully before operating.
Don’t use the machine differently from the following description.
1. SPECIFICATIONS
MODEL: MINI 4
POWER SUPPLY: 230 V
TOTAL INSTALLED POWER: W 2300
IRON POWER: W 800
BOILER POWER: W 1500
BOILER CAPACITY: L. 2,7 ( INO )
IRONING ENDURANCE: about 3/4 hours
OPERATING STEAM PRESSURE:
2,7-2,8 BAR
MA IMUM PRESSURE: 5 BAR
WEIGHT: KG. 15
OVERALL DIMENSIONS: cm 25x29x89 h.
MADE IN ITALY
2. IMPORTANT
Before installing MINI 4, it is necessary to set up
the following facilities:
-electrical plug protected and suitable to MINI 4
power (it is better to use an earth protector
thermo magnetic switch 16 A ld 30mA).
3.
OPENING OF PACKAGE
1. Open the box containing MINI 4, take the
manual of instructions and read it carefully.
2. Remove MINI 4 from the box, insert the cable
support deep into the special hole (fig. 1) placed
on the back side of the generator.
3. Fix the spring to the support hook, place the
iron rest on the table and put the iron over it
(fig. 1).
4.
CONNECTION AND STARTING
With MINI 4 switched off and disconnected plug:
1. Unscrew the security valve plug (fig. 1), fill the boiler with water till MA level (fig. 2-4).
Take the plug by the plastic part and screw it again: do not tighten too much or its gasket
might get spoilt. N.B. make sure the exhaust tap of the boiler is closed.
2. Insert the plug into a 220 V 16 A socket.
IRON
STEAM
TUBE
CABLE
SUPPORT
HOOK
SPRING
IRON REST
ELECTRIC WIRE
STEAM
TUBE
Fig. 1

MINI 4 p. 2 MARCH 2011
In case t e boiler is too muc filled, the iron might leak water. So unscrew the plug a bit,
let all the steam come out of the boiler and turn the exhaust tap in such a way that some
water goes out.
3. Switch on the boiler (fig. 2 B). Five minutes later switch on the iron (fig. 2 C) and adjust
the thermostat (fig. 5) on “cotton”.
4. Wait for the boiler lamp to switch off (fig. 2 A). Seize the iron by cork handle and press red
button 3 or 4 times (fig. 6), so that steam comes out. It is important to make sure it is a
saturated steam (by pressing the micro switch with the iron pointed downwards). You can
adjust steam flux by turning the hand-wheel placed on the solenoid valve (fig. 3). Now
everything is ready for ironing. During ironing operation, the boiler lamp switches on and
off (fig. 2 A).
Fig. 2
Fig. 3
5.
COMPULSORY
1. Use only normal water coming from the aqueduct.
2. Never add additives to water.
3. Empty the boiler only when it is switched off and
cold (not under pressure) taking care to open the exhaust tap
slowly (fig. 7). For carrying out this operation, wear gauntlets
against possible burns.
4. Never replace t e security valve plug (fig. 3) wit ot er
types of plug. N.B. t e security valve plug is set on 4,5 BAR
and it as t e function of a security valve.
5. Connect MINI 4 to suitable protected socket.
6. Always keep children away from MINI 4, both when it is on and
off.
7. Do not iron garments directly on persons or things.
8. Do not empty the boiler during the ironing operation, wait at least 1 hour after the
switching off.
6.
IRONING OPERATION
1. Run the iron on garments, pressing the iron micro switch for steam. For a better result, set
the thermostat (fig. 5) on “cotton”.
2. For delicate, blue and black garments, we advise you to use the anti-sheen shoe.
3. During ironing operation, always put the iron on its rubber rest (fig. 1) and pay attention to
the position of the wires: if they twine or get in touch with ironing board, they might cause
short circuits.
SECURITY
VALVE PLUG
SOLENOID VALVE
HAND-WHEEL
FOR
STEAM
ADJUSTMENT
Fig. 4

MINI 4 p. 3 MARCH 2011
4. For dry ironing it is possible to adjust the thermostat (fig. 5) on different positions
according to the type of fabric (look at garment label). For steam ironing, set the
thermostat on “cotton” or “flax”.
5. If you work on a non-vacuum board, some circular water spots might form because of
condensed steam. To get round this problem, put a felt under the usual padding and adjust
the hand-wheel for steam regulation on minimum (fig. 3).
7.
WATER FILLING
During the ironing, if steam flux decreases considerably and then ends definitely, it means that
there is no more water in the boiler. So MINI 4 has to be switched off by disconnecting the
plug; rotate the valve plug (fig. 3) of 360° and wait for steam to go out completely. Unscrew
the valve plug with care and wait some minutes. Then fill the boiler with water (fig. 4). Screw
the valve plug again, connect the plug and wait for the boiler lamp to switch off (fig. 2 A). Now
the iron is ready again.
Fig. 5 Fig. 6
8.
BOILER DISCHARGE
Carry out this operation when the machine is off and the plug disconnected.
Unscrew the valve plug (fig. 4). Open the front panel and empty the boiler by means of the
special tap (fig. 7). Once all the water has come out, remember to turn the tap off and to close
the panel. The tap might get blocked up: in this case, take an iron wire with a diameter of 3-4
mm or similar and put it into the conduit in order get it unblocked.
9.
GOOD FUNCTIONING
MINI 4 was projected for the ironing of domestic garments.
It can be used maximum 20 hrs. per week or 80 hrs. per
month (subdivided in many times).
10.
INTERVENTIONS AND SMALL REPAIRS
1. Empty the boiler every 2-3 times you work.
2. Replace the gasket of security valve plug (use only
original gaskets) every 1200 hrs. of lighting or maximum
2 years. For carrying out this operation, the machine has
to be switched off and cold.
3. Replace the security valve plug every 2500 hrs. of lighting or maximum 3 years (fig. 3).
11.
COMPULSORY PERIODICAL MAINTENANCE
(To be carried out exclusively by Assistance Centres or by t e Constructor)
ELECTRIC
WIRE
STEAM
TUBE
THERMOSTAT
Fig. 7

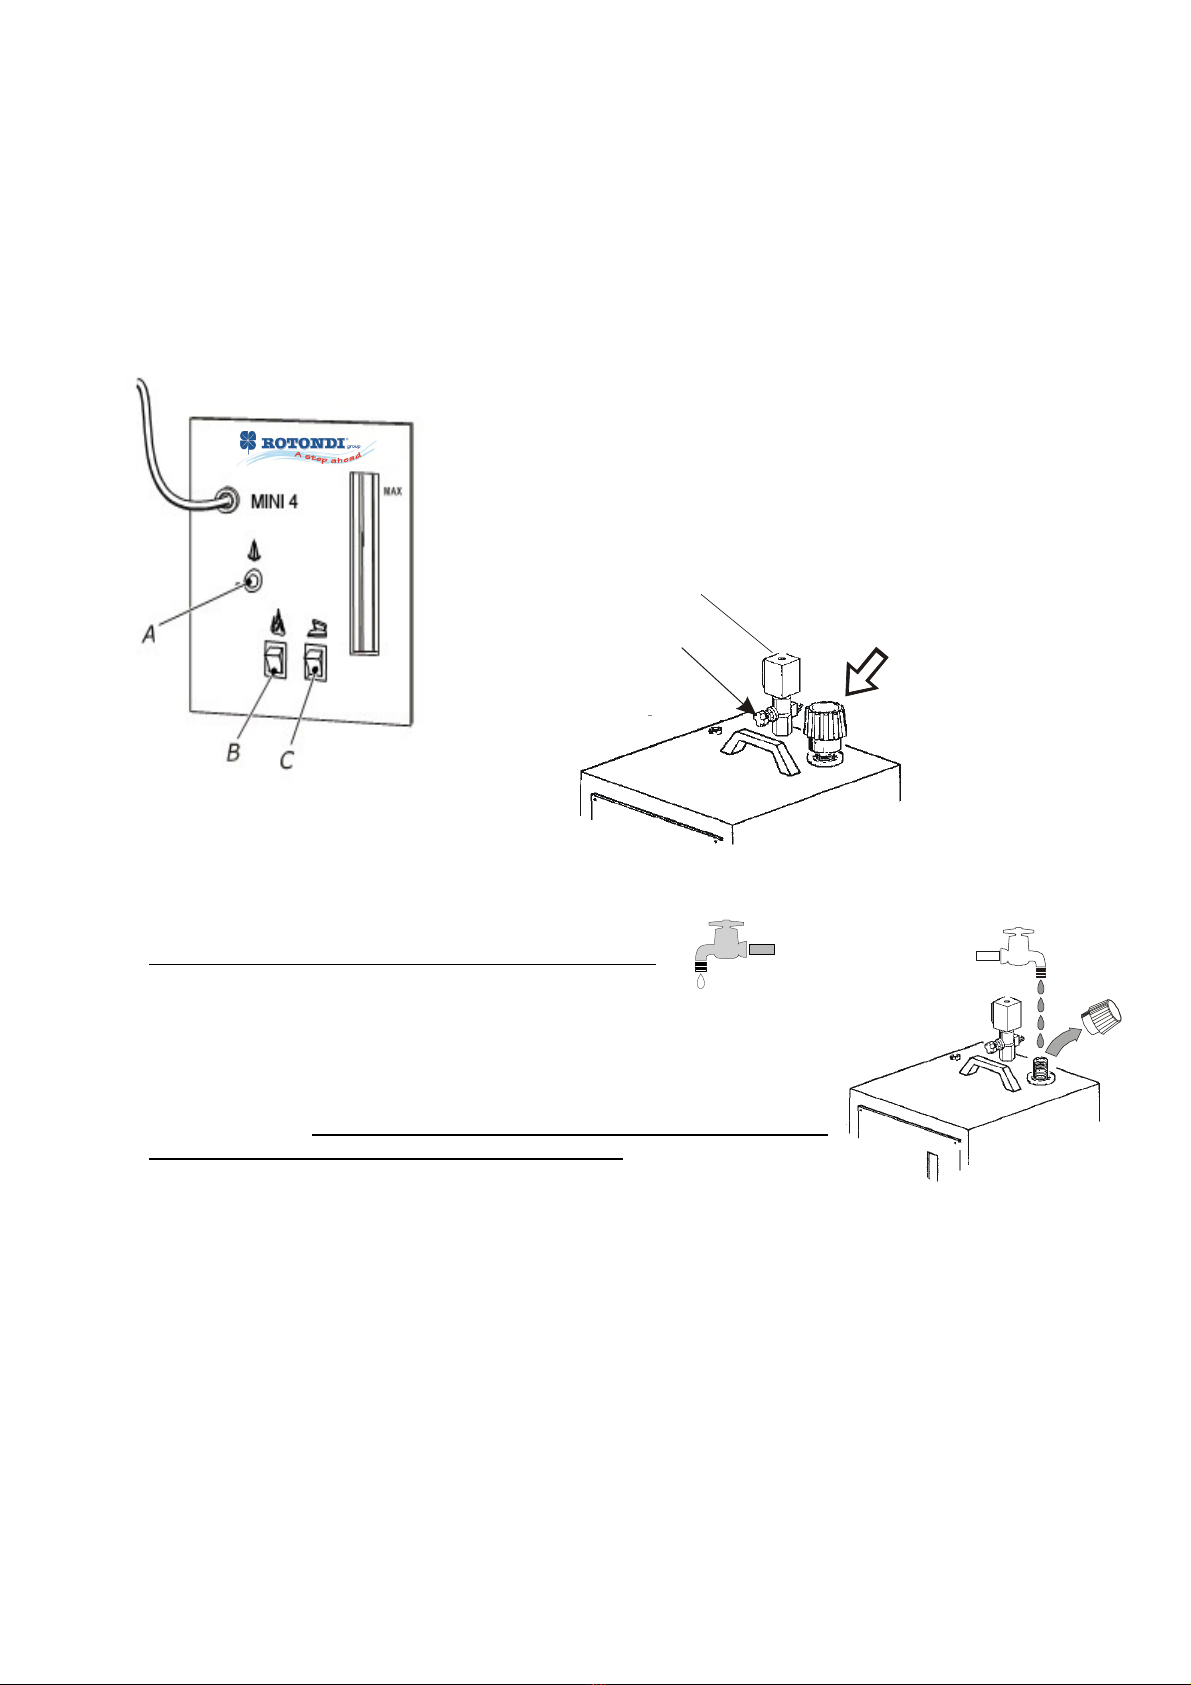
MINI 4 p. 4 MARCH 2011
It is recommended to replace:
1. the internal security valve every 2100 hrs. of ironing or maximum 3 years;
2. the internal thermostats every 2100 hrs. of ironing or maximum 3 years;
3. steam tube and iron cable once they seem spoilt (fig. 5).
It is recommended also to clean the boiler from limestone every 2500 hrs. of ironing or
maximum 3 years.
12.
ELECTRICAL RISKS
The following situations are considered dangerous for the operator:
1. earth protector switch is activated when turning on the main switch,
2. using MINI 4 during thunderstorms,
3. using MINI 4 without proper protection for feet (without shoes) or with wet feet,
4. damage of electric wires,
5. loss of water from iron,
6. iron overheating,
7. cleaning or washing the iron using water,
8. filling the boiler when the machine is on.
13.
MECHANICAL RISKS
The following situations are considered dangerous for the operator:
1. using MINI 4 for different purposes other than ironing,
2. replacing the valve plug gasket with non-original gaskets.
14.
THERMIC RISKS
The following situations are considered dangerous for the operator:
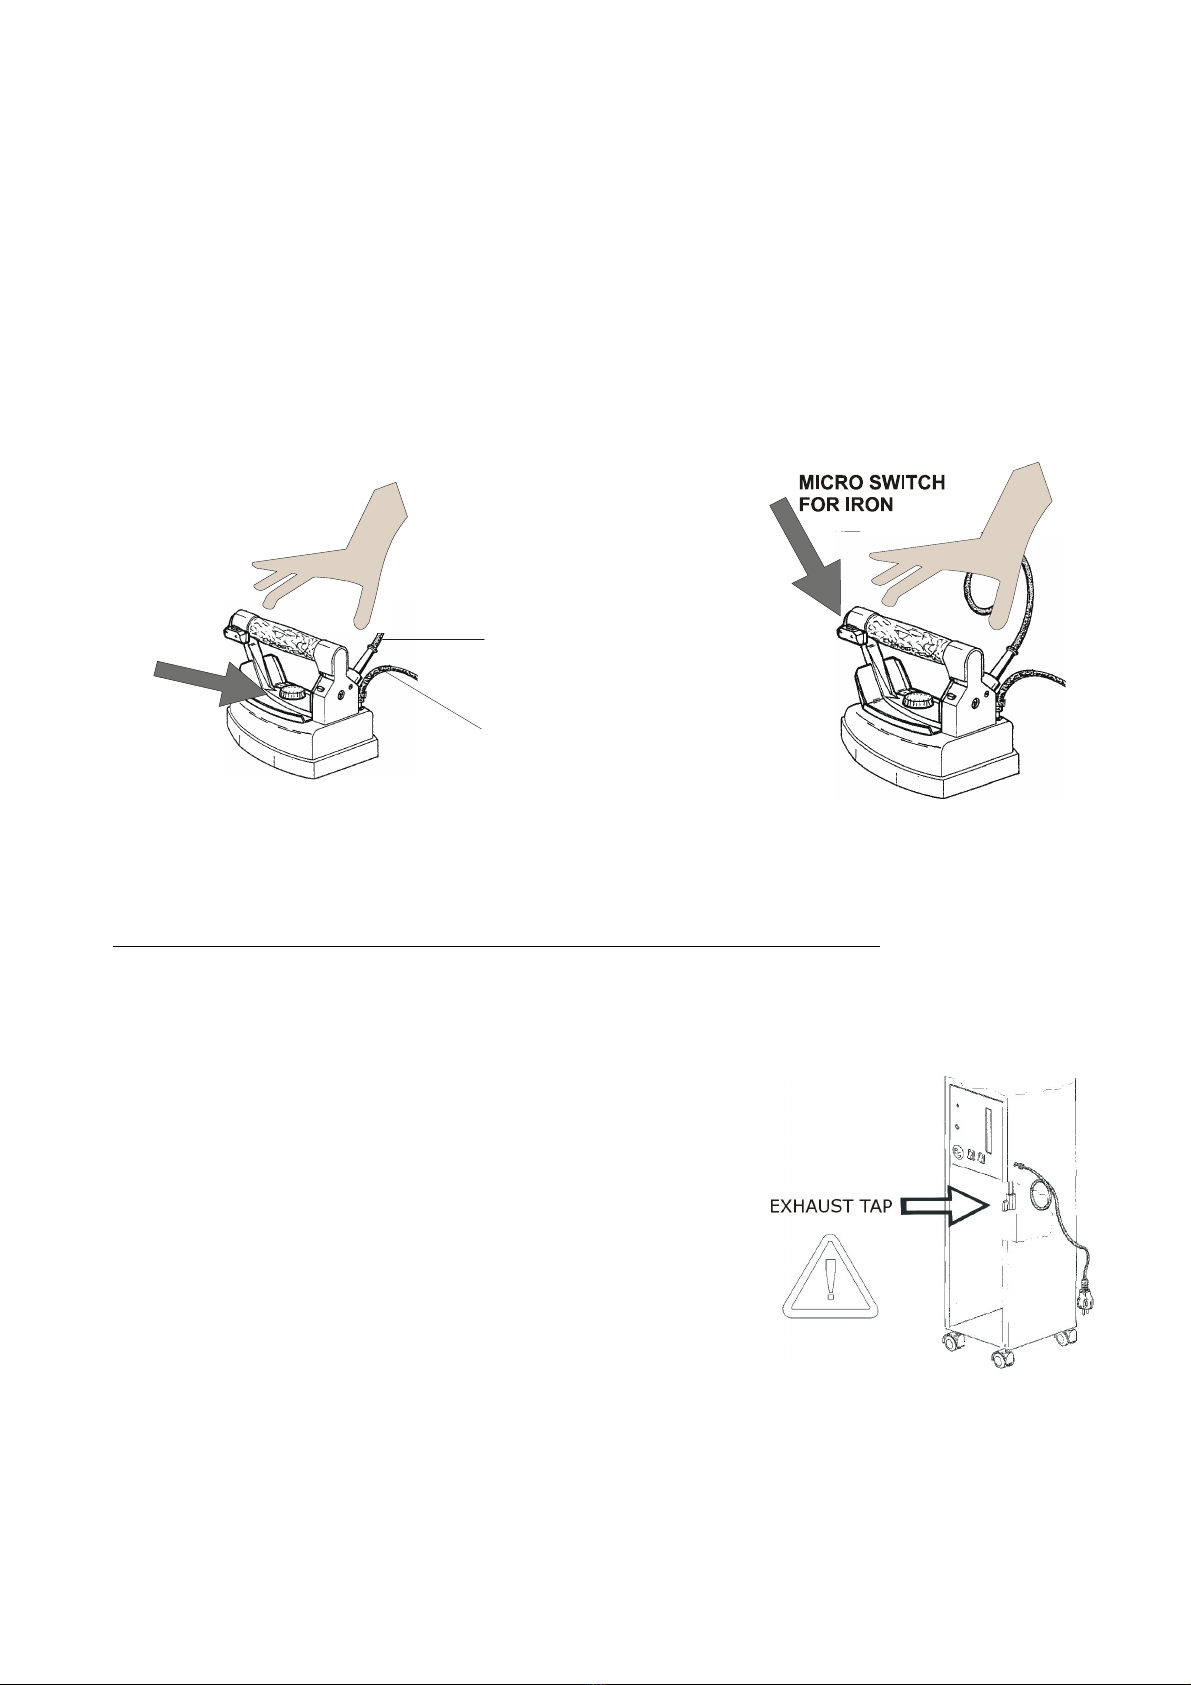
1. touching iron base when working,
2. touching the solenoid valve when the machine is under pressure,
3. emptying the boiler under pressure or touching the exhaust tap,
4. touching the valve plug when MINI 4 is under pressure.
- Do not iron garments directly on persons.
- Do not leave hot iron on garments.
- After use, always put iron on its iron rest.
15.
PACKING, STORAGE AND TRANSPORT
MINI 4 can be packed with cellophane and cardboard boxes. It is not a stiff package, therefore
it is not shock-resistant. We advise you to handle the box with maximum care. Do not use it as
stool or support. MINI 4 cannot be piled one on top of another (HANDLE WITH CARE).
16.
WASTE
MINI 4 is mainly made of iron and aluminium materials, therefore it must be discharged in
proper warehouses for used iron recovery. A smaller part consisting in gaskets and rubber
screws may be discharged in urban litterbins.
Every product manufactured by ROTONDI GROUP S.r.l. is sub ect to the following limitations:
ROTONDI GROUP S.r.l. guarantees that this machine, correctly installed and used, works
accordingly to this manual of instructions. Each implicit guarantee is limited by law as from purchase
date.
ATTENTION:
THERMIC DANGER
INCANDESCENT
IRON BASE

MINI 4 p. 5 MARCH 2011
Declination of responsibility for consequential damages: ROTONDI GROUP S.r.l. will never
take the responsibility for any damage (included, without any limitation, consequential damages due
to loss or no profit, cutback or any other economical loss) deriving form the use of a ROTONDI
machine, even in case the Company had been previously informed of such kind of possibility.
Should you need furt er information about this manual, please contact ROTONDI GROUP S.r.l. or the
person who sold you the machine.
Table of contents
Other ROTONDI Iron manuals

ROTONDI
ROTONDI MINI 5 Series Instructions for use

ROTONDI
ROTONDI PVT 30 Operating and maintenance manual

ROTONDI
ROTONDI MINI 6 User manual

ROTONDI
ROTONDI MINI 3 Instructions for use

ROTONDI
ROTONDI LG Series User manual

ROTONDI
ROTONDI MINI 5 Series Instructions for use

ROTONDI
ROTONDI EC-289 Series Operating and maintenance manual

ROTONDI
ROTONDI MINI 3 Instructions for use
Popular Iron manuals by other brands

glass 1989
glass 1989 steam plus Installation, operation & maintenance manual

ARIETE
ARIETE InstantPRO 5578 manual

Philips
Philips EasySpeed GC1029 series user manual

SEVERIN
SEVERIN BA 3299 - CENTRALE VAPEUR Instructions for use

Philips
Philips GC9635 user manual

Philips
Philips Azur Advanced GC4930 Series user manual