Royal Catering RCGS 155M User manual

expondo.de
BEDIENUNGSANLEITUNG
User manual | Manuel d´utilisation | Istruzioni per l‘uso | Manual de instrucciones | Instrukcja | Návod k použití
RCGS 155M

3
6
10
14
18
22
26
Inhalt | Contenu | Content | Contenuto | Contenido | Treść | Obsah
expondo.de
Deutsch
English
Polski
Italiano
Español
Français
Česky
NAZWA PRODUKTU KRAJALNICA DO WARZYW
PRODUKTNAME GEMÜSESCHNEIDER MANUELL
PRODUCT NAME VEGETABLE CUTTER MANUAL
NOM DU PRODUIT COUPE LÉGUME MANUEL
NOME DEL PRODOTTO AFFETTAVERDURE MANUALE
NOMBRE DEL PRODUCTO CORTAVERDURAS MANUAL
NÁZEV VÝROBKU KRÁJEČ ZELENINY MANUÁLNÍ
MODEL PRODUKTU
RCGS 155M
MODELL
PRODUCT MODEL
MODÈLE
MODELLO
MODELO
MODEL VÝROBKU
NAZWA PRODUCENTA
EXPONDO POLSKA SP. Z O.O. SP. K.
NAME DES HERSTELLERS
MANUFACTURER NAME
NOM DU FABRICANT
NOME DEL PRODUTTORE
NOMBRE DEL FABRICANTE
NÁZEV VÝROBCE
ADRES PRODUCENTA
UL. DEKORACYJNA 3, 65-155 ZIELONA GÓRA | POLAND, EU
ANSCHRIFT DES HERSTELLERS
MANUFACTURER ADDRESS
ADRESSE DU FABRICANT
INDIRIZZO DEL FORNITORE
DIRECCIÓN DEL FABRICANTE
ADRESA VÝROBCE
SYMBOLE
3
Lesen Sie die Bedienungsanleitung sorgfältig.
Vorsicht bei sich drehenden Komponenten! Es besteht die Gefahr von schweren Verletzungen!
In der vorliegenden Anleitung sind Beispielbilder vorhanden, die von dem tatsächlichen Aussehen der
Maschine abweichen können.
Die originale Anweisung ist die deutschsprachige Fassung. Sonstige Sprachfassungen sind Übersetzungen aus
der deutschen Sprache.
BEDIENUNGSANLEITUNG
SICHERHEITSHINWEISE
1. Lesen Sie diese Gebrauchsanweisung vor Inbetriebnahme des Gerätes sorgfältig durch! Beachten Sie
alle Sicherheitshinweise, um Schäden durch falschen Gebrauch zu vermeiden!
2. Bewahren Sie die Gebrauchsanleitung für den weiteren Gebrauch auf. Sollte dieses Gerät an Dritte
weitergegeben werden, muss die Gebrauchsanleitung mit ausgehändigt werden.
3. Verwenden Sie das Gerät nur für den vorgesehenen Zweck und nur in Innenräumen.
4. Im Falle von unsachgemäßem Gebrauch oder falscher Handhabung kann keine Haftung für eventuell
auftretende Schäden übernommen werden.
5. Dieses Gerät ist nicht für Personen, einschließlich Kindern, mit eingeschränkten physischen, sinnlichen
oder geistigen Fähigkeiten, sowie mangelnder Erfahrung und/oder mangelndem Wissen geeignet. Als
Ausnahme gilt, wenn diese durch eine für ihre Sicherheit zuständige Person beaufsichtigt werden, oder
Gebrauchsanweisungen erhalten haben.
6. Halten Sie während des Betriebs des Gerätes die Hände entfernt von der Klinge.
7. VORSICHT! Es besteht die Gefahr, dass lose Bekleidungsstücke in die Maschine gezogen werden und
Verletzungen verursachen.
8. Verwenden Sie das Gerät nicht ohne Abdeckung.
9. Verwenden Sie beim Schneiden den Schieber für die Produkte und niemals die bloßen Hände.
TECHNISCHE DETAILS
Produktname Gemüseschneider manuell
Modell RCGS 155M
Schneidedicke [mm] 1-12
Max. Dicke für gemüse[mm] 110
Gewicht(kg) 4
ANWENDUNGSGEBIET
Der Gemüseschneider ist zum Schneiden von rohem Gemüse geeignet.
Für alle Schäden bei nicht bestimmungsgemäßerVerwendung haftet allein der Betreiber.
Rev. 24.03.2017
HINWEIS!

4Rev. 24.03.2017 5
Rev. 24.03.2017
Montage des Schiebers:
Um den Schieber in dem Gerät zu montieren muss das Schiebeblech in der Rille mit der achen Seite
vom Schneider her eingelegt werden, danach die Schubstange durch die Öffnung führen, die Feder an der
Schubstange zwischen dem schiebeblech und der Öffnung anbringen und anschließend den Schiebegriff am
Schiebeblech wie oben gezeigt festdrehen.
AUFBAU DES GERÄTES
1. Basis
2. Fuß
3. Blockade
4. Regler für die Schneidestärke
5. Handgriff für den Schieber mit Feder und Schiebeblech
6. Behälter
7. Abdeckung
8. Handgriff mit Messer
1
2
3
4
5
6
7
8
PLATZIERUNG DES GERÄTES
Das Gerät muss auf einer Fläche installiert werden, die sauber, trocken, eben, stabil und feuerbeständig ist.
Heiße Flächen in der Nähe des Gerätes sollten vermieden werden.
Das Gerät muss außerdem von Kindern sowie Personen mit geistiger Einschränkung fern gehalten werden.
Vor der ersten Anwendung sollte das Gerät und alle seine Bestandteile auseinander gebaut und gereinigt
werden.
WIE FUNKTIONIERT DAS GERÄT? – DAS GRUNDPRINZIP
Den Deckel des Behälters öffnen und den Griff des Schiebers nach hinten ziehen, um das Gemüse in den
Behälter zu befördern. Dann den Griff des Schiebers loslassen und die Abdeckung des Behälters schließen.
Unter den Behälter ein Gefäß für das geschnittene Gemüse stellen. Vor dem Schneiden den Griff um ¼
Umdrehung zurückstellen, um so einen Anlauf zu schaffen, der das Schneiden erleichtert. Während des
Schneidens den Schieber nicht bewegen.
AUFBAU / AUSBAU DER EINZELNEN ELEMENTE DES GERÄTES:
Den Fuß für den Behälter mit den vier Schrauben festziehen.
1. Die Schneidemaschine sollte auf einer für den Bediener bequemen
und anwendungsfreundlichen Fläche untergebracht werden.
2. Den Sockel für den Fuß auf der Arbeitsäche vorzeichnen.
3. Den Fuß herausziehen und auf der vorgezeichneten Stelle der Fläche
unterbringen.
4. Markieren Sie 4 Löcher für die Öffnungen des Fußes. Anschließend
entfernen Sie bitte den Fuß von der Fläche.
5. Bohren Sie nun entsprechend der 4 markierten Stellen 4 Löcher in
die Fläche.
6. Den Sockel für den Fuß an der Arbeitsäche festschrauben, danach
den Fuß des Schneiders einsetzen und am Sockel befestigen.
Einstellung der Schneidedicke:
Um die Schneidedicke zu verstellen, muss die Blockade des Schneiders nach links bis zum Anschlag gedreht
werden (die Blockade des Schneiders ist mit dem Schneider und dem Griff integriert, daher muss alles
herausgenommen werden).
Um die gewünschte Dicke einzustellen, schieben Sie den Regler nach links (dünnere Scheiben) oder rechts
(dickere Scheiben). Danach alle Teile wieder in das Gerät einsetzen und die Blockade bis zum Anschlag nach
rechts zudrehen.
TRANSPORT UND LAGERUNG
Beim Transport sollte die Maschine vor Schütteln und Stürzen, sowie Hinstellen auf das obere Teil geschützt
werden. Lagern Sie es in einer gut durchlüfteten Umgebung mit trockener Luft und ohne korrosive Gase.
REINIGUNG UND WARTUNG
Vor der ersten Anwendung:
• Vor der ersten Anwendung soll das Gerät mit warmem Wasser mit wenig mildem Reinigungsmittel
gereinigt werden. Das Gerät mit sauberemWasser abspülen und mit einem weichen Tuch trocknen
Regelmäßig reinigen
• Verwenden Sie zum Reinigen der Oberäche ausschließlich Mittel ohne ätzende Inhaltsstoffe.
• Lassen Sie nach jeder Reinigung alle Teile gut trocknen, bevor das Gerät erneut verwendet wird.
• Bewahren Sie das Gerät an einem trockenen, kühlen, vor Feuchtigkeit und direkter Sonneneinstrahlung
geschütztem Ort auf.
Schmieren des Gerätes:
Die beweglichen Teile des Schneidegerätes müssen geschmiert werden, d.h. die Rillen in der Vertiefung, die
Kunststofager, die Halter an der Platte und die Fuge in der Welle des Schneidegerätes. Bitte nutzen Sie
Schmieröl, welches für den Kontakt mit Lebensmitteln zulässig ist (Öl, das zum Kochen usw. vorgesehen ist,
eignet sich nicht). Die Häugkeit richtet sich nach der Verwendungsintensität – schmieren Sie die Teile nach
Bedarf.

expondo.de
USER MANUAL
RCGS 155M
SYMBOLS
Operation manual must be reviewed.
Pay attention to the rotating components! There is a risk of injury!
Drawings in this manual are for illustration purposes only and in some details it may differ from the actual
machine.
The original operation manual is in German. Other language versions are translations from German.
USER MANUAL
SAFETY GUIDELINES
1. Please read and understand these instructions carefully before operating the device! Please observe the
safety guidelines carefully in order to prevent damages through improper use!
2. Please keep this manual available for future reference. If this device is passed on to third parties, the
manual must be passed on with it.
3. Only use this device indoors and for its intended use.
4. We do not offer any warranty for damages resulting from improper use or incorrect operation.
5. This device is not intended to be used by persons (including children) with limited physical, sensory
or mental aptitude or lack of experience and/or knowledge, unless they are supervised by a person
responsible for their safety or have received instruction from this person as to how the device is used.
6. When in use, keep your hands away from the blades.
7. WARNING!There is a risk of loose clothing being pulled into the machine, which might lead to injuries.
8. Do not use the machine without the cover.
9. When cutting, use the plunger to push products against the blade – never use your bare hands for this
purpose.
TECHNICAL DATA
Product name Vegetable Cutter manual
Model RCGS 155M
Slicing depth [mm] 1-12
Max. vegetable thickness [mm] 110
Weight [kg] 4
SCOPE OF APPLICATION
The vegetable cutter is designed to slice raw vegetables.
The user is liable for any damage resulting from non-intended use of the device!
PLEASE NOTE!
5
Rev. 24.03.2017

INSTALLING THE APPLIANCE
1
2
3
4
5
6
7
8
APPLIANCE LOCATION
Attach the machine securely onto a at and clean surface.
Keep the machine away from hot surfaces. The machine should always be used on an even, stable, clean, re-
resistant and dry surface, out of reach of the children and the mentally ill.
Before the rst use, remove all elements and clean them together with the entire device.
PRINCIPLE OF OPERATION
Open the container cover and pull the plunger handle far enough to insert the vegetable which is to be sliced
into the container.Then release the plunger handle and close the container cover. Place a dish for the sliced
vegetables under the container. Before cutting, turn the handle back by ¼ to allow the blade to gather speed
for smoother cutting. Do not move the plunger during cutting.
ASSEMBLY / DISASSEMBLY OF THE DEVICE’S ELEMENTS:
Use the four bolts to attach the foot to the container.
1. Foot base
2. Foot
3. Blade locking mechanism
4. Slicing depth adjustment knob
5. Plunger handle with a spring and the metal pushing face
6. Container
7. Cover
8. Handle with a blade
1. Place the cutter on a working surface or countertop to determine a
convenient and comfortable position for the operator
2. Outline the base of the foot in the working surface
3. Remove the foot from the base of the foot which should be placed
inside the outline
4. Mark out four circles on the working surface which are in the foot
base, remove the foot base from the working surface
5. Drill four holes (1/4˝ or slightly larger) in the working surface in the
marked locations
6. Attach the foot base to the working surface using screws and then
insert the cutter foot into it and fasten it to the foot
Assembling the plunger:
To assemble the plunger in the machine, rst insert the metal face into the grooves of the container, with
the at surface facing the blade, then insert the plunger handle into the opening, mount the spring onto
the plunger handle between the plunger face and the opening and then screw the plunger handle onto the
plunger face as shown on the photograph below.
Slicing depth adjustment:
In order to change the slicing depth, twist the blade locking mechanism anti-clockwise as far as it will go and
remove it (the blade locking mechanism is integrated with the handle and the knife, and the entire element
should be removed).
Then twist the slicing depth adjustment knob to anti-clockwise (thinner slices) or clockwise (thicker slices).
Then mount the element and turn the knife locking mechanism clockwise as far as possible.
TRANSPORTATION AND STORAGE
Shaking, crashing and turning upside down of the device should be prevented when transporting it. Store it
in a properly ventilated location with dry air and without any corrosive gas.
CLEANING AND MAINTENANCE
Before the rst use:
• Clean the device with warm water and mild detergent before the rst use. Rinse the device with clean
water and dry a soft cloth
Regular cleaning:
• Use cleaner without corrosive substances to clean surface.
• After cleaning, all parts should be fry before re-using the device.
• Store the unit in a dry, cool place, free from moisture and direct exposure to sunlight.
Lubrication:
Lubricate the moving parts of the cutter such as: grooves, plastic bearings, rams on the board, grooves in
the cutter shaft. For greasing use lubricant oil approved for contact with food (do not use food grade oil for
greasing). Lubricate the parts as often as required.
4Rev. 24.03.2017 5
Rev. 24.03.2017

expondo.de
INSTRUKCJA OBSŁUGI
RCGS 155M
SYMBOLE
Należy zapoznać się z instrukcją obsługi.
Uwaga na obracające się elementy tnące! Możliwość skaleczenia!
Ilustracje w niniejszej instrukcji obsługi mają charakter poglądowy i w niektórych szczegółach mogą różnić
się od rzeczywistego wyglądu maszyny.
Instrukcją oryginalną jest niemiecka wersja instrukcji. Pozostałe wersje językowe są tłumaczeniami z języka
niemieckiego.
INSTRUKCJA OBSŁUGI
WSKAZÓWKI BEZPIECZEŃSTWA
1. Przed przystąpieniem do uruchomienia prosimy o dokładne przeczytanie niniejszej instrukcji!
Należy przestrzegać wszystkich wskazówek bezpieczeństwa, aby unikać szkód powstałych na skutek
użytkowania niezgodnego z przeznaczeniem!
2. Zachowaj instrukcję użytkowania w celu jej późniejszego użycia. W razie gdyby urządzenie miało zostać
przekazane osobom trzecim, to wraz z nim należy przekazać również instrukcję użytkowania.
3. Urządzenie należy stosować wyłącznie zgodnie z przeznaczeniem i tylko wewnątrz pomieszczeń.
4. W przypadku użytkowania niezgodnego z przeznaczeniem lub nieprawidłowej obsługi wyklucza się
odpowiedzialność za powstałe ewentualnie szkody.
5. Urządzenie nie jest przeznaczone do tego, by było użytkowane przez osoby (w tym dzieci) o ograniczonych
funkcjach psychicznych, sensorycznych i umysłowych lub nieposiadające odpowiedniego doświadczenia
i/lub wiedzy, chyba że są one nadzorowane przez osobę odpowiedzialną za ich bezpieczeństwo lub
otrzymały od niej wskazówki dotyczące tego, jak należy obsługiwać urządzenie.
6. Podczas użytkowania urządzenia ręce należy trzymać z dala od ostrzy.
7. UWAGA! Możliwość wciągnięcia luźnych części ubrania podczas pracy urządzenia co może doprowadzić
do obrażeń ciała.
8. Nie należy używać urządzenia bez osłony.
9. Podczas krojenia należy używać popychacza do pchania produktów, nigdy nie wolno tego robić ręką.
DANE TECHNICZNE
Nazwa produktu Krajalnica do warzyw
Model RCGS 155M
Grubość cięcia [mm] 1-12
Maks. grubość warzywa [mm] 110
Waga [kg] 4
OBSZAR ZASTOSOWANIA
Krajalnica do warzyw przeznaczona jest do krojenia surowych warzyw.
Odpowiedzialność za wszelkie szkody powstałe w wyniku użytkowania niezgodnego z przeznaczeniem
ponosi użytkownik.
UWAGA!
13
Rev. 24.03.2017

MONTAŻ URZĄDZENIA
1
2
3
4
5
6
7
8
UMIEJSCOWIENIE URZĄDZENIA
Urządzenie należy solidnie zamontować na płaskiej i czystej powierzchni.
Urządzenie należy trzymać z dala od wszelkich gorących powierzchni. Urządzenie należy zawsze użytkować
na równej, stabilnej, czystej, ognioodpornej i suchej powierzchni i poza zasięgiem dzieci i osób chorych
umysłowo.
Przed pierwszym użyciem zdemontować wszystkie elementy i umyć je jak również umyć całe urządzenie.
JAK FUNKCJONUJE URZĄDZENIE – PODSTAWOWA ZASADA
Należy otworzyć pokrywkę pojemnika i odciągnąć rączkę popychacza na tyle, aby umieścić warzywo
przeznaczone do krojenia w pojemniku. Następnie należy puścić rączkę popychacza i zamknąć pokrywkę
pojemnika. Pod pojemnik należy podstawić naczynie na krojone warzywa. Przed rozpoczęciem cięcia
należy rączkę cofnąć o ¼ obrotu aby stworzyć rozbieg i cięcie było łatwiejsze. Podczas krojenia nie należy
dodatkowo dopychać popychacza.
MONTAŻ / DEMONTAŻ POSZCZEGÓLNYCH ELEMENTÓW URZĄDZENIA:
Należy przykręcić nogę do pojemnika przy pomocy czterech śrub.
14 Rev. 24.03.2017
1. Podstawa nogi
2. Noga
3. Blokada noża
4. Pokrętło regulacji grubości cięcia
5. Rączka popychacza ze sprężyną i blachą popychającą
6. Pojemnik
7. Osłona
8. Rączka z nożem
1. Krajalnicę należy ustawić na powierzchni roboczej lub blacie aby ustalić
wygodną i komfortową lokalizację dla operatora
2. Należy obrysować podstawę nogi na powierzchni roboczej
3. Wyjąć nogę z podstawy nogi, którą należy umieścić wewnątrz
obrysowanej powierzchni
4. Na powierzchni roboczej należy obrysować cztery okręgi znajdujące
się w podstawie nogi, usunąć podstawę nogi z powierzchni roboczej
5. Należy wywiercić cztery otwory(¼˝ lub nieznacznie większe) w
powierzchni roboczej na zaznaczonych wcześniej miejscach
6. Podstawę do nogi należy przykręcić wkrętami do powierzchni
roboczej, następnie umieścić w niej nogę krajalnicy i dokręcić ją do
podstawy nogi
15
Rev. 24.03.2017
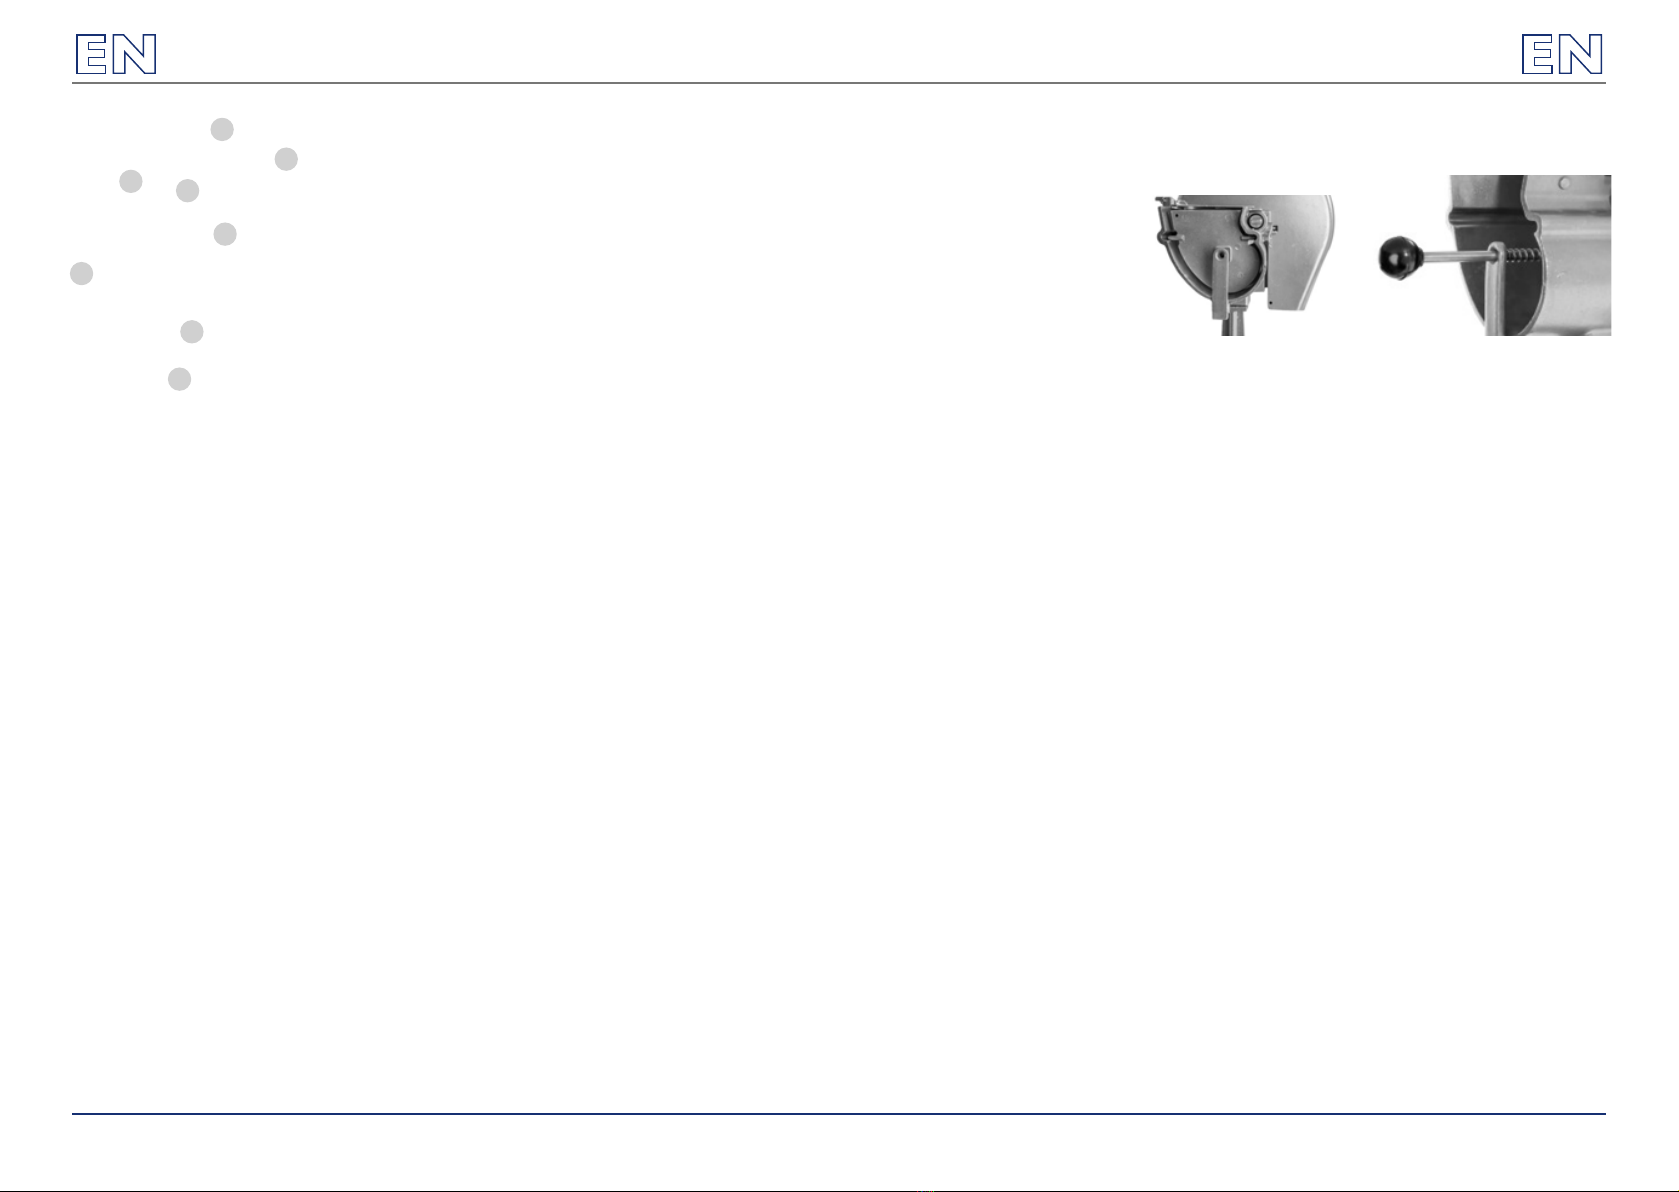
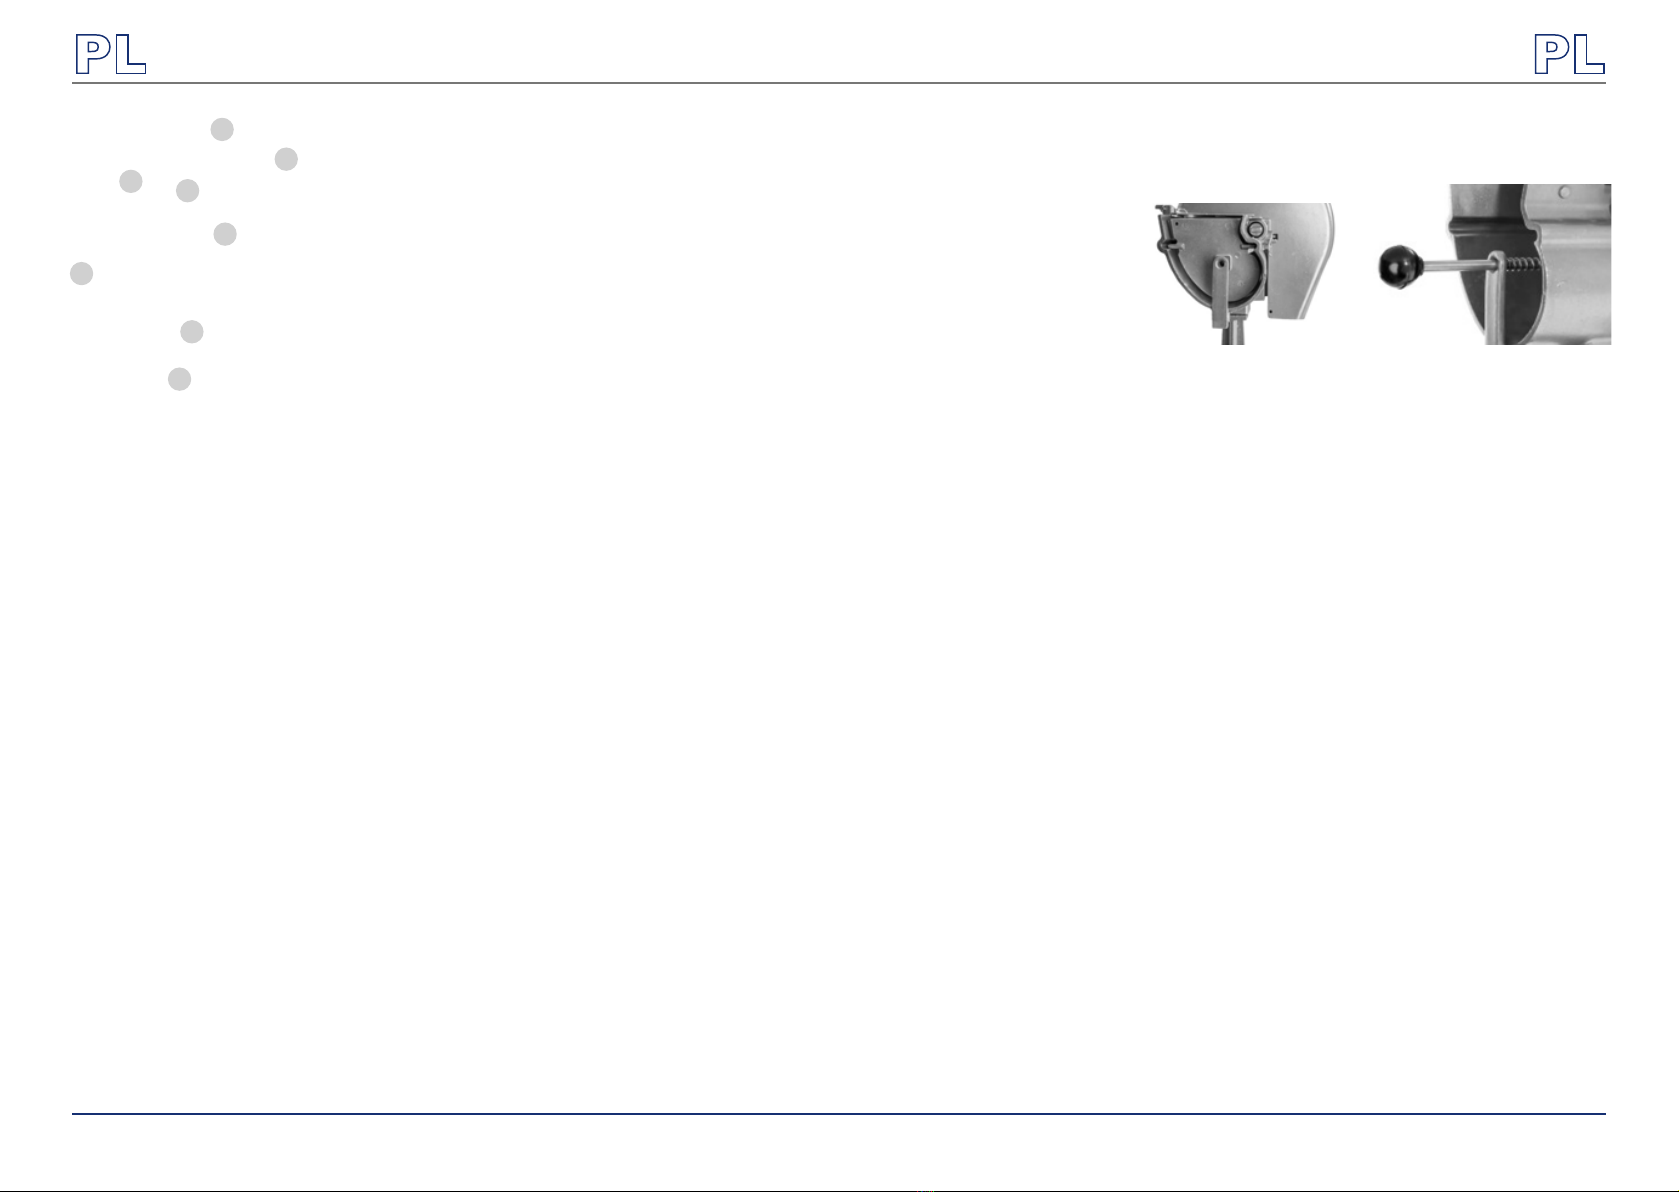
Montaż popychacza w urządzeniu:
Aby zamontować popychacz w urządzeniu należy włożyć blachę popychającą w rowki pojemnika płaską
stroną od noża, następnie przełożyć rączkę popychacza przez otwór, założyć sprężynę na rączkę popychacza
między blachą popychającą a otworem a następnie rączkę popychacza dokręcić do blachy popychającej jak
pokazano na zdjęciu poniżej.
Regulacja grubości krojenia:
Aby zmienić grubość krojenia należy przekręcić blokadę noża w lewo do oporu i ją wyjąć (blokada noża jest
zintegrowana z nożem i rączką, zatem należy wyjąć całość).
Następnie należy przekręcić pokrętło regulacji grubości cięcia w lewo(cieńsze plastry) lub w prawo(grubsze
plastry). Następnie całość należy z powrotem zamontować w urządzeniu i przekręcić blokadę noża w prawo
do oporu.
TRANSPORT I PRZECHOWYWANIE
Podczas transportu urządzenie należy zabezpieczyć przed wstrząsami i przewróceniem się oraz nie ustawiać
go „do góry nogami”. Urządzenie należy przechowywać w dobrze wentylowanym pomieszczeniu, w którym
obecne jest suche powietrze i nie występują gazy powodujące korozję.
CZYSZCZENIE I KONSERWACJA
Przed pierwszym użyciem:
• Przed pierwszym użyciem należy umyć urządzenie ciepłą wodą z odrobiną łagodnego środka myjącego.
Opłukać urządzenie czystą wodą i osuszyć miękką ściereczką
Regularne czyszczenie:
• Do czyszczenia powierzchni należy stosować wyłącznie środki niezawierające substancji żrących.
• Po każdym czyszczeniu wszystkie elementy należy dobrze wysuszyć, zanim urządzenie zostanie
ponownie użyte.
• Urządzenie należy przechowywać w suchym i chłodnym miejscu chronionym przed wilgocią
i bezpośrednim promieniowaniem słonecznym.
Smarowanie urządzenia:
Należy smarować ruchome części krajalnicy, takie jak: rowki w zagłębieniu, łożyska z tworzyw sztucznych,
ramiona na płycie, szczeliny w wałku krajalnicy. Do smarowania stosować olej smarujący dopuszczony do
kontaktu z żywnością (do smarowania nie należy używać oleju spożywczego), częstotliwość smarowania
zależy od ilości użytkowania, smarować zgodnie z potrzebami.

expondo.de
ISTRUZIONI PER L‘USO
RCGS 155M
SIMBOLI
Leggere attentamente le istruzioni d'uso.
Fare attenzione ai componenti rotanti. Sussiste il pericolo di lesioni gravi.
Le immagini contenute nel seguente manuale potrebbero differire dal prodotto.
La versione originale di questo manuale è in lingua tedesca.Altre versioni sono traduzioni dal tedesco.
ISTRUZIONI PER L‘USO
NORME DI SICUREZZA
1. Leggere attentamente le istruzioni d‘uso dell‘apparecchio prima di utilizzarlo! Per evitare che si
verichino danni causati da un uso improprio dell‘apparecchio, osservare attentamente tutte le norme
di sicurezza contenute in questo manuale!
2. Conservare il manuale per uso futuro. Qualora il dispositivo fosse afdato a terzi, assicurarsi di
consegnare anche questo manuale d‘uso.
3. Utilizzare l‘apparecchio soltanto per l‘uso a cui è stato preposto ed esclusivamente in ambienti chiusi.
4. In caso di uso improprio e inadeguato la garanzia decade.
5. Questo apparecchio non è progettato per essere utilizzato da persone (bambini compresi) con abilità
siche, sensoriali o mentali ridotte o senza esperienza e/o con scarse conoscenze. Fa eccezione il caso
in cui il dispositivo venga utilizzato sotto la supervisione di una persona esperta che abbia consultato
prima le seguenti istruzioni d‘uso.
6. Durante l‘utilizzo del dispositivo tenere le mani lontane dalla lama.
7. ATTENZIONE! Sussiste il pericolo che parti di vestiti possano essere tirate dal dispositivo e causare
così ferite.
8. Non utilizzare il dispositivo senza copertura.
9. Per spingere i prodotti alimentari verso la lama utilizzare l‘apposito supporto e mai usare le proprie
mani nude.
DETTAGLI TECNICI
Nome del prodotto Tagliaverdure manuale
Modello RCGS 155M
Spessore di taglio [mm] 1-12
Max. spessore per la verdura [mm] 110
Peso [kg] 4
CAMPO DI APPLICAZIONE
Il tagliaverdure è adatto per tagliare verdure crude.
L‘utente è il solo e unico responsabile dei danni causati da un utilizzo improprio del dispositivo.
IMPORTANTE!
15
Rev. 24.03.2017

MONTAGGIO DELL‘APPARECCHIO
1
2
3
4
5
6
7
8
POSIZIONAMENTO DELL‘APPARECCHIO
Il dispositivo deve essere posizionato su una supercie pulita, asciutta, dritta, stabile e ignifuga. Le superci
calde in prossimità dell‘apparecchiatura dovrebbero essere evitate.
Inoltre il dispositivo deve essere tenuto lontano dalla portata di bambini e persone con disturbi psichici.
Prima del primo utilizzo smontare l‘apparecchio e pulire tutti i componenti
COME FUNZIONA L‘APPARECCHIO? – PRINCIPIO BASE DI FUNZIONAMENTO
Aprire il coperchio del contenitore e tirare verso di sé la maniglia del cassetto per inserire la verdura nel
contenitore. Quindi lasciare la maniglia del contenitore e chiudere il coperchio del contenitore. posizionare
un raccoglitore sotto il contenitore per la verdura tagliata. Prima di tagliare posizionare la maniglia con una
rotazione di un quarto per creare una rincorsa per facilitare il taglio.Durante il taglio non muovere il cassetto.
MONTAGGIO / SMONTAGGIO DEGLI ELEMENTI SINGOLI DEL DISPOSITIVO:
Stringere il piede per il contenitore con le 4 viti.
1. Base
2. Piede
3. Blocco
4. Regolatore automatico per lo spessore del taglio
5. Maniglia per il cassetto con molla e piatto
6. Contenitore
7. Coperchio
8. Maniglia con coltello
1. Il tagliaverdure dovrebbe essere conservato su una supercie
confortevole per l‘utilizzo.
2. Tracciare la base per il piede sulla supercie di lavoro.
3. Rimuovere il piede e posizionare sulla supercie contrassegnata
4. Sulla supercie di lavoro segnare 4 aperture nella base per il
piede, rimuovere il piede dalla supercie.
5. Ora creare 4 fori (¼˝ o poco più) sulle parti contrassegnate
della supercie di lavoro.
6. Avvitare la base per il piede alla supercie di lavoro, quindi
inserire il piede del tagliaverdure e ssarlo alla base.
Montaggio del cassetto:
Per montare il cassetto al dispositivo inserire il vassoio nella scanalatura con la parte piatta dello strumento
di taglio, quindi la barra attraverso l‘apertura, applicare la molla alla barra tra il vassoio e l‘apertura e poi
avvitare la maniglia al vassoio come indicato sopra.
Impostazione dello spessore di taglio:
Per impostare lo spessore di taglio girare il blocco dello strumento di taglio verso sinistra no allo scatto (il
blocco dello strumento di taglio è integrato allo strumento di taglio e alla maniglia per cui tutto deve essere
rimosso).
Per impostare lo spessore desiderato spostare il regolatore verso sinistra (fette sottili) o a destra (fette
spesse). Inserire tutti i pezzi nel dispositivo e girare il blocco verso destra no allo scatto.
TRASPORTO E CONSERVAZIONE
Durante il trasporto proteggere l‘apparecchio da eventuali urti e possibili ribaltamenti, assicurandosi di
preservare maggiormente la parte superiore. Conservare l‘apparecchio in un luogo ben ventilato, asciutto e
privo di gas corrosivi.
PULIZIA E MANUTENZIONE
Prima della prima applicazione:
• Prima che la prima applicazione debba essere pulita l‘apparecchiatura con acqua calda con poco agente
di sgrassatura delicato. Pulire il dispositivo con acqua pulita e asciugare con un panno morbido
Pulire regolarmente
• Per la pulizia delle superci, impiegare solo sostanze non corrosive.
• Dopo aver compiuto le operazioni di pulizia, lasciare asciugare tutti i componenti prima di utilizzare
nuovamente il dispositivo.
• Conservare l‘apparecchio in un luogo fresco e asciutto, e lontano dall‘esposizione diretta ai raggi solari.
Lubricare il dispositivo:
Le parti mobili del dispositivo devono essere lubricate, quindi le scanalature, le rotelle, il sostegno sulla
piastra e le fessure nell‘albero del tagliaverdure. Usare olio lubricante adatto al contatto con alimenti (l‘olio
adatto alla cottura non è idoneo). La frequenza dipende dall‘intensità di utilizzo – lubricare i componenti a
seconda della necessità.
16 Rev. 24.03.2017 17
Rev. 24.03.2017

expondo.de
MANUAL DE USO
RCGS 155M
SIMBOLOS
Por favor, lea detenidamente este manual de instrucciones.
¡Preste atención a las piezas en movimiento! ¡Peligro de graves lesiones!
En este manual se incluyen fotos ilustrativas, que podrían no coincidir exactamente con la apariencia real
del dispositivo.
El texto en alemán corresponde a la versión original. Los textos en otras lenguas son traducciones de las
instrucciones en alemán.
MANUAL DE INSTRUCCIONES
MEDIDAS DE SEGURIDAD
1. ¡Lea detenidamente este manual de instrucciones antes de poner en marcha el dispositivo! ¡Respete
todas las medidas de seguridad para evitar daños derivados de un uso inadecuado del equipo!
2. Conserve el manual de instrucciones para futuras consultas. Este manual debe ser entregado a toda
persona que vaya a hacer uso del dispositivo.
3. Utilice el equipo solo para los nes previstos y únicamente en espacios interiores.
4. No nos hacemos responsables de los daños ocasionados por un uso indebido o un manejo incorrecto
del dispositivo.
5. Este aparato no debe ser utilizado por niños ni por personas con capacidades físicas, sensoriales
o mentales reducidas o con falta de experiencia y/o conocimiento, a menos que sean supervisadas por
un responsable de su seguridad.
6. Durante el uso, mantenga las manos alejadas de las cuchillas.
7. ¡PRECAUCIÓN!: la ropa podría engancharse en la máquina y ser absorbida, causando heridas.
8. No utilice el equipo sin cubierta.
9. Cuando corte rodajas, utilice siempre el pistón, bajo ningún concepto las manos.
DATOS TÉCNICOS
Nombre del producto Cortador de verduras manual
Modelo RCGS 155M
Grosor de corte [mm] 1-12
Máx. grosor de corte para verduras [mm] 110
Peso [kg] 4
ÁMBITO DE APLICACIÓN
El cortador vegetal es ideal para el corte de verduras crudas.
El usuario es responsable de los daños derivados de un uso inadecuado del aparato.
NOTA!
19
Rev. 24.03.2017

MONTAJE DE LA MÁQUINA
1
2
3
4
5
6
7
8
COLOCACIÓN DEL EQUIPO
El equipo debe instalarse sobre una supercie limpia, seca, equilibrada, estable y que sea resistente al fuego.
Deben evitarse elementos calientes en la cercanía de este utensilio.
Además, ha de mantenerse alejado de niños, así como de personas con capacidades físicas o mentales
reducidas.
Antes del primer uso, desmonte el equipo y limpie todos sus componentes.
¿CÓMO FUNCIONA EL APARATO? – PRINCIPIO BÁSICO
Abra la tapa del contenedor y empuje la manija del resorte hacia abajo, para introducir la verdura en el
contenedor. Tras esto, soltar la manija del resorte y cerrar la cubierta del contenedor. Coloque un envase
bajo el contenedor para la verdura ya cortada.Antes de comenzar el corte, girar la manija ¼, para dar inicio
al proceso, de forma sencilla. No realizar ningún movimiento de pistón durante el corte.
MONTAJE / DESMONTAJE DE LAS PIEZAS DEL APARATO:
El pie del contenedor debe jarse con cuatro tornillos.
20 Rev. 24.03.2017
1. Base
2. Pie
3. Bloqueo
4. Regulador automático para espesor de corte
5. Manija para el pistón con resorte y placa deslizadora
6. Contenedor
7. Cubierta
8. Manija con cuchillo
1. El cortador se debe colocar en una supercie que resulte cómoda al
usuario que ha de realizar el trabajo.
2. Trace sobre la supercie de trabajo el contorno de la base para el pie.
3. Extraiga el pie y coloque la base sobre el contorno marcado en la
supercie.
4. Marque las cuatro aperturas de del pie sobre la supercie de trabajo
y vuelva a retirar el pie.
5. Ahora taladre los cuatro oricios marcados en la supercie (¼“ o
levemente superiores)
6. Atornille rmemente la base para el pie y después fíjelo.
21
Rev. 24.03.2017
Montaje del pistón:
Para montar el pistón en el aparato, debe introducirse la placa deslizadora en la ranura del cortador. Tras
esto, introducir la vara de empujado en el oricio, colocar el resorte en la vara de empujado entre la placa
deslizadora y la abertura, y por último la manija.
Ajuste del grosor de corte:
Para ajustar el grueso del corte, el bloqueo del cortador debe girarse hacia la derecha hasta que haga tope
(el bloqueo del cortador está integrado en la manija, por lo que todo debe extraerse).
Para seleccionar el grosor deseado, desplace el regulador hacia la izquierda (rodajes nas) o hacia la derecha
(rodajas anchas). Inserte después todas las piezas de nuevo en el equipo y gire el bloqueo hacia la derecha
hasta que haga tope.
TRANSPORTEY ALMACENAJE
Para transportar la maquina, protéjala tanto de sacudidas como de caídas, y evite colocar objetos en la parte
superior.Almacenar en un espacio bien ventilado, seco y lejos de gases corrosivos.
LIMPIEZAY MANTENIMIENTO
Antes del primer uso:
• Antes del primer uso, limpie el aparato con agua caliente y un poco de detergente delicado. Enjuague
el aparato con agua limpia y seque con una toalla limpia.
Limpiar regularmente
• Para limpiar la supercie, utilice solo productos que no contengan sustancias corrosivas.
• Después de cada limpieza, deje secar bien todas las piezas antes de volver a utilizar el aparato.
• Guarde el aparato en un lugar seco, fresco y protegido de la humedad y la radiación solar directa.
Lubricado del equipo:
Las piezas móviles del equipo han de engrasarse: las ranuras profundas, los rodamientos plásticos, el soporte
en la placa y la junta en el eje del cortador. Por favor, utilice aceite lubricante, apropiado para el contacto
con alimentos (por ejemplo aceite alimentario). La frecuencia de lubricado dependerá de la intensidad de
uso – engrase conforme sea necesario.

MANUEL D´UTILISATION
RCGS 155M
SYMBOLES
Veuillez lire attentivement ces instructions d‘emploi.
Attention aux composants rotatifs et tournants! Le risque de gravement se blesser est présent!
Certaines illustrations, présentes dans cette notice, peuvent différer de la véritable apparence de l‘appareil.
La version originale de ce manuel a été rédigée en allemand. Les autres versions sont des traductions de
l‘allemand.
MANUEL D‘UTILISATION
CONSIGNES DE SÉCURITÉ
1. Veuillez lire attentivement ces instructions d‘emploi avant d‘utiliser l‘appareil. Veuillez respecter les
consignes de sécurité an d‘éviter tout incident lié à une utilisation non conforme!
2. Conservez le mode d‘emploi à disposition pour les utilisations à venir. Si cet appareil est utilisé par une
autre personne, celle ci doit impérativement être informée des conditions d‘utilisation et disposer du
manuel.
3. N‘utilisez cet appareil que pour l‘usage prescrit et seulement en intérieur.
4. Le constructeur décline toute responsabilité en cas de dommages résultant d‘un usage inapproprié ou
d‘une manipulation non conforme de l‘appareil.
5. Cet appareil ne doit pas être utilisé par des personnes (enfants compris) ayant des capacités physiques,
mentales ou sensorielles réduites. Sont considérées comme des exceptions les personnes ayant lu le
mode d‘emploi ou étant complétement responsables de leur propre sécurité.
6. Tenez les mains éloignées de la lame de l‘appareil lors de son fonctionnement.
7. PRUDENCE! Danger, des parties de vêtement pourraient se coincer, être tirées dans l‘appareil et vous
blesser.
8. Ne pas utiliser l‘appareil sans protection.
9. Pour découper avec l‘appareil, n‘utilisez que le poussoir prévu à cet effet et jamais vos mains nues.
DÉTAILS TECHNIQUES
Nom du produit Coupe légumes manuel
Modèle RCGS 155M
Épaisseur de coupe [mm] 1-12
Épaisseur max. des légumes [mm] 110
Poids [kg] 4
UTILISATION
Ce coupe-légumes a été conçu pour découper et trancher des légumes crus.
L‘utilisateur assume toute responsabilité en cas de dommages liés à un usage inapproprié de l‘appareil.
ATTENTION!
23
Rev. 24.03.2017

INSTALLATION DE L‘APPAREIL
1
2
3
4
5
6
7
8
INSTALLATION DE L‘APPAREIL
L‘appareil doit être placé sur une surface propre, sèche, égale, stable et réfractaire à la chaleur. L‘appareil ne
doit pas se trouver près de surfaces chaudes.
L‘appareil doit être tenu à distance des enfants ou des personnes aux capacités physiques et sensorielles
restreintes.
Avant la première utilisation, tous les éléments de l‘appareil doivent être démontés et nettoyés.
COMMENT FONCTIONNE L‘APPAREIL? – PRINCIPE DE BASE
Ouvrir le couvercle du récipient et tirer la poignée du poussoir en arrière an de remplir le récipient de
légumes. Relâcher alors la poignée du poussoir et refermer le couvercle du récipient. Placer sous le récipient
un plat pour accueillir les légumes coupés.Avant de commencer à découper,tourner la poignée d‘un quart de
tour pour la remettre en position de démarrage et pour faciliter la découpe. Ne pas vous déplacer pendant
la découpe de légume.
MONTAGE / DÉMONTAGE DES ÉLÉMENTS MOBILES DE L‘APPAREIL:
Fixer le pied du récipient avec les quatre vis.
1. Base
2. Pied
3. Verrouillage
4. Régulateur de l‘épaisseur de coupe
5. Poignée du poussoir avec ressort et dispositif coulissant
6. Récipient
7. Protection
8. Levier avec lame
1. Le coupe-légumes doit être placé sur une surface pratique
d‘utilisation et adaptée pour vous.
2. Positionner le socle pour le pied sur la surface de travail.
3. Placer le pied sur l‘emplacement prévu sur la surface de travail.
4. Marquer ensuite les quatre ouvertures, présentes sur le socle,
sur votre surface de travail puis retirer le pied.
5. Percer 4 trous (¼“ ou légèrement plus gros) dans les
emplacements marqués.
6. Visser le socle sur la surface de travail puis positionner le pied
dans le socle désormais xe.
Assemblage du poussoir:
Pour monter le poussoir dans l‘appareil, le dispositif coulissant doit être insérée dans la rainure du côté
plat de l‘appareil. Insérer ensuite la tige du poussoir dans l‘ouverture, placer le ressort dans la tige entre le
dispositif coulissant et l‘ouverture et xer la poignée du poussoir au dispositif comme illustré ci-dessous.
Réglage de l‘épaisseur de coupe:
Pour régler l‘épaisseur de découpe, le verrouillage doit être tourné vers la gauche jusqu‘à enclenchement (le
verrouillage de l‘appareil est intégré dans l‘appareil et la poignée, tout doit donc être retiré).
Pour ajuster l‘épaisseur, pousser le régulateur vers la gauche (tranches nes) ou vers la droite (tranches
épaisses). Remonter ensuite toutes les parties de l‘appareil et tourner le verrouillage vers la droite jusqu‘à
enclenchement.
TRANSPORT ET STOCKAGE
Si vous transportez cet appareil,veuillez-le protéger des secousses et des chutes. Ne posez rien sur la partie
supérieure de l‘appareil. Stockez-le dans un environnement sec et bien aéré, à l‘abri des gaz corrosifs.
NETTOYAGE ET ENTRETIEN
Avant la première utilisation:
• Avant toute première utilisation, l‘appareil doit être nettoyé avec de l‘eau chaude et avec un produit de
nettoyage doux. Rincer l‘appareil avec de l‘eau propre et le sécher avec un chiffon sec.
Nettoyer régulièrement
• N‘utilisez lors du nettoyage que des détergents doux sans substance corrosive.
• Après chaque nettoyage, laissez sécher soigneusement tous les éléments avant d‘utiliser à nouveau
l‘appareil.
• Conservez l‘appareil dans un endroit frais, sec, à l‘abri de l‘humidité et des rayons directs du soleil.
Lubrication de l‘appareil:
Les parties mobiles du coupe-légumes doivent être lubriées, c.-à-d., les rainures en profondeur, les parties
en plastique, les supports de maintien de la plaque et les joints de l‘appareil.Veuillez utiliser de l‘huile de
graissage qui peut être utilisée pour les parties en contact avec des denrées alimentaires (L‘huile de cuisson
est proscrite car non-adaptée). La fréquence de lubrication dépend de l‘utilisation. Lubrier en fonction
des besoins.
24 Rev. 24.03.2017 25
Rev. 24.03.2017

expondo.de
NÁVOD K POUŽITÍ
RCGS 155M
SYMBOLY
Seznamte se s návodem k obsluze.
Pozor na rotující řezné prvky! Nebezpečí pořezání!
Ilustrace v tomto návodu jsou orientační, a v některých detailech se od skutečného vzhledu stroje mohou
lišit.
Originálním návodem je německá verze návodu. Ostatní jazykové verze jsou překladem z německého jazyka.
NÁVOD K OBSLUZE
BEZPEČNOSTNÍ DOPORUČENÍ
1. Před uvedením do provozu si důkladně přečtěte tento návod! Dodržujte všechny bezpečnostní pokyny.
Vyhnete se tak škodám vzniklým v důsledku použi zařízení v rozporu s jeho určením!
2. Návod k obsluze uschovejte za účelem jeho pozdějšího použi. Pokud by zařízení mělo být předáno
třem osobám, spolu se zařízením jim předejte rovněž návod k obsluze.
3. Zařízení je možno používat výhradně v souladu s jeho určením a pouze v místnostech.
4. V případě použi zařízení v rozporu s jeho určením nebo nesprávné obsluhy je vyloučena odpovědnost
za případné vzniklé škody.
5. Zařízení není určeno k tomu, aby bylo používáno osobami (včetně dě) s omezenými psychickými,
senzorickými a mentálními funkcemi nebo osobami bez příslušných zkušenos a/nebo znalos, ledaže
jsou tyto osoby pod dohledem osoby zodpovědné za jejich bezpečí nebo od této osoby obdržely
pokyny týkající se toho, jak je zařízení nutno používat.
6. Při používání zařízení mějte ruce v bezpečné vzdálenos od čepelí.
7. UPOZORNĚNÍ! Možnost vtažení volných čás oděvu během provozu zařízení, což může způsobit tělesné
zranění.
8. Nepoužívejte zařízení bez krytu.
9. Při krájení používejte pěchovadlo pro posunování suroviny, nikdy to nedělejte holýma rukama.
TECHNICKÉ ÚDAJE
Název výrobku Kráječ zeleniny manuální
Model RCGS 155M
Síla řezu [mm] 1-12
Max. tloušťka zeleniny [mm] 110
Hmotnost [kg] 4
OBLAST POUŽITÍ
Kráječ zeleniny je určen ke krájení syrové zeleniny.
Odpovědnost za veškeré škody vzniklé v důsledku použi zařízení v rozporu s určením nese uživatel.
POZOR!
27
Rev. 24.03.2017

MONTÁŽ ZAŘÍZENÍ
1
2
3
4
5
6
7
8
UMÍSTĚNÍ ZAŘÍZENÍ
Zařízení je třeba řádně upevnit na rovném a čistém povrchu.
Zařízení pokládejte v bezpečné vzdálenos od všech horkých povrchů. Zařízení používejte vždy na rovném,
stabilním, čistém, ohnivzdorném a suchém povrchu, mimo dosah dě a duševně nemocných osob.
Před prvním použim demontujte všechny díly a umyjte je, a také umyjte celé zařízení.
JAK ZAŘÍZENÍ FUNGUJE – ZÁKLADNÍ PRAVIDLO
Otevřete víko nádoby a povytáhněte rukojeť pěchovadla tak, abyste mohli do nádoby vložit zeleninu určenou
ke krájení. Dále je nutné pust rukojeť pěchovadla a zavřít víko nádoby. Pod nádobu postavte další nádobu
na pokrájenou zeleninu. Před zahájením krájení je nutné rukojeť vrát o ¼ otočky zpět, aby byl umožněn
rozběh a krájení bylo snazší. Během krájení netlačte dodatečně na pěchovadlo.
MONTÁŽ / DEMONTÁŽ JEDNOTLIVÝCH DÍLŮ ZAŘÍZENÍ:
K nádobě přišroubujte nohu čtyřmi šrouby.
28 Rev. 24.03.2017
1. Základna nohy
2. Noha
3. Blokáda nože
4. Otočný knoík nastavení tloušťky řezání
5. Rukojeť pěchovadla s pružinou a pěchovacím plechem
6. Nádoba
7. Kryt
8. Rukojeť s nožem
1. Postavte kráječ na pracovní plochu nebo kuchyňskou linku tak, aby
jej bylo možné snadno obsluhovat
2. Obkreslete základnu nohy na pracovní ploše
3. vyjměte nohu ze základny, kterou je nutné upevnit uvnitř obkreslené
plochy
4. Na pracovní ploše obkreslete čtyři kruhy, které se nacházejí v
základně nohy, odstraňte základnu nohy z pracovní plochy
5. Vyvrtejte čtyři otvory (¼˝ nebo minimálně větší) do pracovní plochy
na dříve označených místech
6. Základnu nohy přišroubujte šrouby k pracovní ploše, pak v ní
umístěte nohu kráječe a přišroubujte ji k základně
29
Rev. 24.03.2017
Montáž pěchovadla v zařízení:
Pro montáž pěchovadla v zařízení je nutné vložit pěchovací plech do drážek nádrže plochou stranou od nože,
pak provléknout rukojeť pěchovadla otvorem, nasadit pružinu na rukojeť pěchovadla mezi pěchovací plech a
otvor a pak rukojeť pěchovadla dotáhnout k pěchovacímu plechu jak je zobrazeno na snímku níže.
Regulace tloušťky krájení:
Tloušťku krájení změníte tak, že otočíte blokádou nože doleva na doraz a vyjmete ji (blokáda nože je
integrovaná s nožem a rukoje, takže je nutné vyjmout celek).
Pak otočte knoíkem nastavení tloušťky krájení doleva (tenčí plátky) nebo doprava (silnější plátky). Pak
namontujte celek zpátky do zařízení a otočte blokádou nože doprava až na doraz.
PŘEPRAVA A USKLADNĚNÍ
Během přepravy je zařízení nutno zabezpečit pro otřesům a převrácení. Nepokládejte jej vzhůru nohama.
Zařízení skladujte v dobře venlované místnos, ve které je suchý vzduch, a nevyskytují se plyny způsobující
korozi.
ČIŠTĚNÍ A ÚDRŽBA
PŘED PRVNÍM POUŽITÍM:
• Před prvním použim by zařízení mělo být umyto teplou vodou s trochou čiscího prostředku. Poté by
mělo být opláchnuto čistou vodou a osušeno měkkým hadříkem.
Pravidelné čištění:
• K čištění povrchu používejte výhradně prostředky neobsahující žíravé látky.
• Po každém čištění je nutno všechny prvky dobře osušit, než bude zařízení opět použito.
• Zařízení skladujte na suchém a chladném místě, chráněném pro vlhkos a přímému slunečnímu svitu.
Mazání zařízení:
Mazání se týká pohyblivých čás kráječe, jako jsou: drážky v prohlubni, ložiska z umělé hmoty, ramena
na desce, štěrbiny ve válečku kráječe. K mazání používejte mazací olej určený pro náhodný kontakt s
potravinami (k mazání nepoužívejte konzumní olej), četnost mazání závisí na četnos používání, mazání je
nutné provádět podle potřeby.

30 Rev. 24.03.2017 31
Rev. 24.03.2017
Product name Vegetable Cuer manual
Model RCGS 155M
Producon year
Serial No.
Produktname Gemüseschneider manuell
Modell RCGS 155M
Ordnungsnummer
Produkonsjahr
Nazwa produktu Krajalnica do warzyw
Model RCGS 155M
Numer serii
Rok produkcji
Nombre del producto Cortaverduras manual
Modelo RCGS 155M
Número de serie
Año de producción
Nome del prodoo Aeaverdure manuale
Modello RCGS 155M
Numero di serie
Anno di produzione
Nom du produit Coupe légume manuel
Modéle RCGS 155M
Numéro de série
Année de producon
Název výrobku Kráječ zeleniny manuální
Model RCGS 155M
Sériové číslo
Rok výroby
NAMEPLATE TRANSLATIONS NAMEPLATE TRANSLATIONS

expondo.de
UNSER HAUPTZIEL IST DIE ZUFRIEDENHEIT UNSERER KUNDEN!
BEI FRAGEN KONTAKTIEREN SIE UNS BITTE UNTER:
OUR CUSTOMERS‘ SATISFACTION IS OUR MAIN GOAL!
PLEASE CONTACT US WITH QUESTIONS AT:
NASZYM GŁÓWNYM CELEM JEST SATYSFAKCJA KLIENTÓW
W PRZYPADKU PYTAŃ PROSIMY O KONTAKT Z PRZEDSTAWICIELEM
W DANYM KRAJU:
NOTRE BUT PREMIER ESTVOTRE SATISFACTION!
POUR TOUTE QUESTION, CONTACTEZ NOUS SUR:
NUESTRO OBJETIVO PRINCIPAL ES LA SATISFACCIÓN DE NUESTROS CLIENTES!
SI TIENE PREGUNTAS, POR FAVOR PÓNGANSE EN CONTACTO CON NOSTROS EN:
I NOSTRO PRINCIPALE OBIETTIVO È LA SODDISFAZIONE DEI NOSTRI CLIENTI!
PER EVENTUALI DOMANDE PER FAVORE, CI CONTATTINO SOTTO:
CONTACT
expondo Polska sp. z o.o. sp. k.
ul. Dekoracyjna 3
65-155 Zielona Góra | Poland, EU
e-mail: info@expondo.de
expondo.de
Table of contents
Languages:
Other Royal Catering Cutter manuals
Popular Cutter manuals by other brands

GMP
GMP Apollo Lasher Operation and maintenance

EINHELL
EINHELL FSM 920 NIRO operating instructions

Ariens
Ariens 915137 - 2042 Zoom XL Owner's/operator's manual

Genesis
Genesis Rail Breaker Safety & operator manual

D-CUT
D-CUT TC-230 Operation manual

Chennai Metco
Chennai Metco BAINCUT MEDIUM instruction manual