Technical Data Sheet
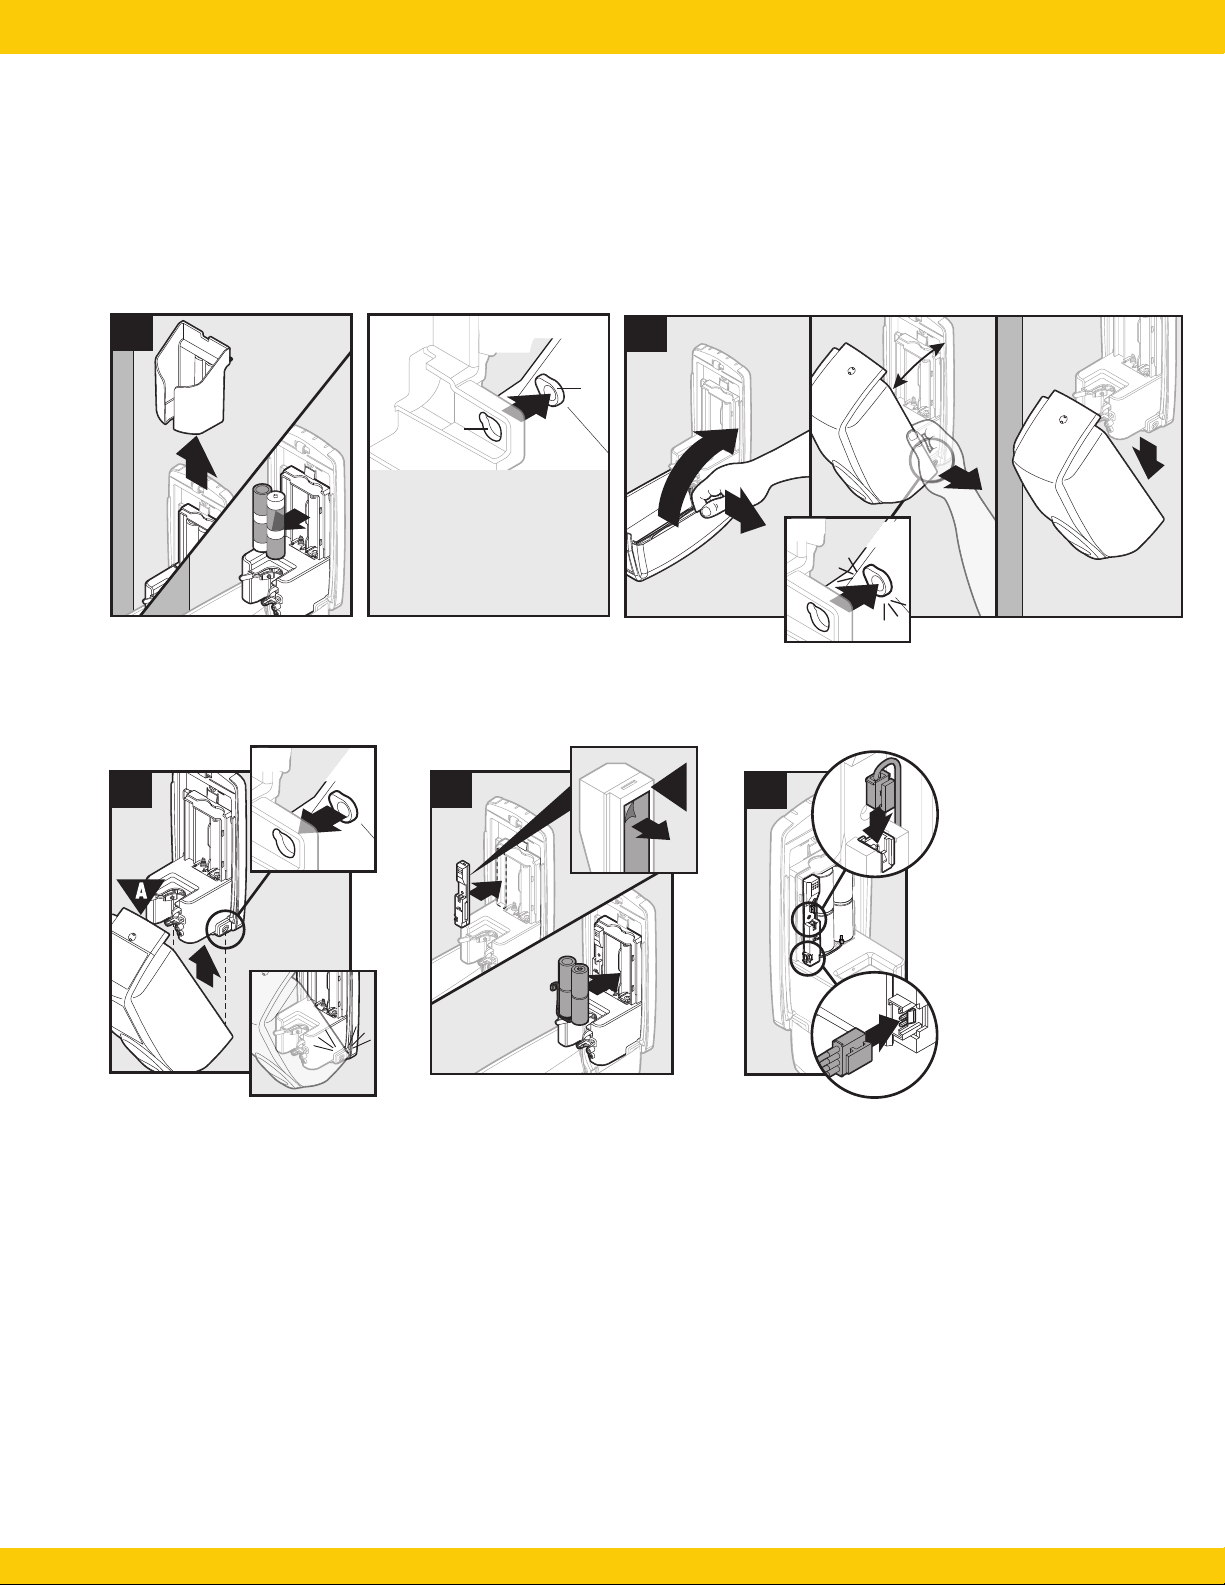
Retrofit Instructions
Instructions de modernisation
Instrucciones de la cubierta modernizada
LED Indicators
Indicateurs à DEL
Indicadores de LED
Lighting Information
Renseignements sur l’éclairage
Información de iluminación
Optimal Energy Cell Storage Temperature
Température optimale de stockage de la cellule énergétique
Temperatura de almacenamiento óptima de celda de energía
1
1
Cover is attached with pins (a). For
removal, pin must align with hole (b).
Le couvercle est fixé à l’aide de
tiges (a). La tige doit s’aligner avec le
trou (b) pour le retirer.
La tapa está sujetada con clavijas
(a). Para retirarla, la clavija debe
alinearse con el orificio (b).
a
b
IMPORTANT / IMPORTANT /
IMPORTANTE
1
3
2
Inside / Intérieur /
Interior
4
1
2
B
5C
1
1
2
3
2
2
30°30°
Inside / Intérieur /
Interior
A
B
C
1980786
1980787
1980788
1980789
1980790
1980882
Tone ON/OFF
Teinte ACTIVÉE/DÉSACTIVÉE
Tono ENCENDIDO/APAGADO
Refill Needed
Recharge nécessaire
Se necesita recarga
2 sec
8 sec
ON
ACTIVÉE
ENCENDIDO
OFF
DÉSACTIVÉE
APAGADO
Blocked Sensor
Capteur bloqué
Sensor bloqueado
10 sec
1 sec
1/2 sec
1980825
1980826
1980827
1980786
1980787
1980788
1980828
1980829
1980831
1980789
1980790
1980882
Hours of Light per Day
Heures d’éclairage
par jour
Horas de luz por día
Lux Level
Niveau de lux
Nivel de intensidad
lumínica (lx)
Max Shots per Year
Nombre maximal de
coups par an
Encendidos máximos
por año
12 200 13,000
12 300 16,500
* Not recommended for use under 200 lux.
* Non recommandé pour une utilisation à moins de 200 lux.
* No se recomienda para uso por debajo de los 200 lx.
Minimum
Minimum
Mínima
Maximum
Maximum
Máxima
41° F (5° C) 86° F (30° C)
1) Simultaneously pull out side of cover and rotate up until 2) notched pin pops out of hole.
1) Retirez simultanément le côté du couvercle et faites-le pivoter jusqu’à ce que 2) la tige sorte du trou.
1) Simultáneamente tire de un lado de la tapa y gire hacia arriba hasta que 2) la clavija dentada salga del orificio.
Products manufactured underquality
management system registered to
ISO 9001:2000
©2016 Rubbermaid Commercial Products LLC
3124 Valley Avenue. Winchester, VA 22602-2694
Phone: 540-667-8700 | Fax: 540-542-8770
Newell Europe Sàrl
Chemin de Blandonnet 10
CH-1214 Vernier / Geneva / Switzerland
Newell Poland Services Sp. z o.o.
Plac Andersa 7, 61-894 Poznan, Poland
www.rubbermaidcommercial.com
#1996941
Retrofit Instructions
Instructions de modernisation
Instrucciones de la cubierta modernizada
LED Indicators
Indicateurs à DEL
Indicadores de LED
Lighting Information
Renseignements sur l’éclairage
Información de iluminación
Optimal Energy Cell Storage Temperature
Température optimale de stockage de la cellule énergétique
Temperatura de almacenamiento óptima de celda de energía
1
1
Cover is attached with pins (a). For
removal, pin must align with hole (b).
Le couvercle est fixé à l’aide de
tiges (a). La tige doit s’aligner avec le
trou (b) pour le retirer.
La tapa está sujetada con clavijas
(a). Para retirarla, la clavija debe
alinearse con el orificio (b).
a
b
IMPORTANT / IMPORTANT /
IMPORTANTE
1
3
2
Inside / Intérieur /
Interior 4
1
2
B
5C
1
1
2
3
2
2
30°30°
Inside / Intérieur /
Interior
A
B
C
1980786
1980787
1980788
1980789
1980790
1980882
Tone ON/OFF
Teinte ACTIVÉE/DÉSACTIVÉE
Tono ENCENDIDO/APAGADO
Refill Needed
Recharge nécessaire
Se necesita recarga
2 sec
8 sec
ON
ACTIVÉE
ENCENDIDO
OFF
DÉSACTIVÉE
APAGADO
Blocked Sensor
Capteur bloqué
Sensor bloqueado
10 sec
1 sec
1/2 sec
1980825
1980826
1980827
1980786
1980787
1980788
1980828
1980829
1980831
1980789
1980790
1980882
Hours of Light per Day
Heures d’éclairage
par jour
Horas de luz por día
Lux Level
Niveau de lux
Nivel de intensidad
lumínica (lx)
Max Shots per Year
Nombre maximal de
coups par an
Encendidos máximos
por año
12 200 13,000
12 300 16,500
* Not recommended for use under 200 lux.
* Non recommandé pour une utilisation à moins de 200 lux.
* No se recomienda para uso por debajo de los 200 lx.
Minimum
Minimum
Mínima
Maximum
Maximum
Máxima
41° F (5° C) 86° F (30° C)
1) Simultaneously pull out side of cover and rotate up until 2) notched pin pops out of hole.
1) Retirez simultanément le côté du couvercle et faites-le pivoter jusqu’à ce que 2) la tige sorte du trou.
1) Simultáneamente tire de un lado de la tapa y gire hacia arriba hasta que 2) la clavija dentada salga del orificio.
Products manufactured underquality
management system registered to
ISO 9001:2000
©2016 Rubbermaid Commercial Products LLC
3124 Valley Avenue. Winchester, VA 22602-2694
Phone: 540-667-8700 | Fax: 540-542-8770
Newell Europe Sàrl
Chemin de Blandonnet 10
CH-1214 Vernier / Geneva / Switzerland
Newell Poland Services Sp. z o.o.
Plac Andersa 7, 61-894 Poznan, Poland
www.rubbermaidcommercial.com
#1996941
Retrofit Instructions
Instructions de modernisation
Instrucciones de la cubierta modernizada
LED Indicators
Indicateurs à DEL
Indicadores de LED
Lighting Information
Renseignements sur l’éclairage
Información de iluminación
Optimal Energy Cell Storage Temperature
Température optimale de stockage de la cellule énergétique
Temperatura de almacenamiento óptima de celda de energía
1
1
Cover is attached with pins (a). For
removal, pin must align with hole (b).
Le couvercle est fixé à l’aide de
tiges (a). La tige doit s’aligner avec le
trou (b) pour le retirer.
La tapa está sujetada con clavijas
(a). Para retirarla, la clavija debe
alinearse con el orificio (b).
a
b
IMPORTANT / IMPORTANT /
IMPORTANTE
1
3
2
Inside / Intérieur /
Interior
4
1
2
B
5C
1
1
2
3
2
2
30°30°
Inside / Intérieur /
Interior
A
B
C
1980786
1980787
1980788
1980789
1980790
1980882
Tone ON/OFF
Teinte ACTIVÉE/DÉSACTIVÉE
Tono ENCENDIDO/APAGADO
Refill Needed
Recharge nécessaire
Se necesita recarga
2 sec
8 sec
ON
ACTIVÉE
ENCENDIDO
OFF
DÉSACTIVÉE
APAGADO
Blocked Sensor
Capteur bloqué
Sensor bloqueado
10 sec
1 sec
1/2 sec
1980825
1980826
1980827
1980786
1980787
1980788
1980828
1980829
1980831
1980789
1980790
1980882
Hours of Light per Day
Heures d’éclairage
par jour
Horas de luz por día
Lux Level
Niveau de lux
Nivel de intensidad
lumínica (lx)
Max Shots per Year
Nombre maximal de
coups par an
Encendidos máximos
por año
12 200 13,000
12 300 16,500
* Not recommended for use under 200 lux.
* Non recommandé pour une utilisation à moins de 200 lux.
* No se recomienda para uso por debajo de los 200 lx.
Minimum
Minimum
Mínima
Maximum
Maximum
Máxima
41° F (5° C) 86° F (30° C)
1) Simultaneously pull out side of cover and rotate up until 2) notched pin pops out of hole.
1) Retirez simultanément le côté du couvercle et faites-le pivoter jusqu’à ce que 2) la tige sorte du trou.
1) Simultáneamente tire de un lado de la tapa y gire hacia arriba hasta que 2) la clavija dentada salga del orificio.
Products manufactured underquality
management system registered to
ISO 9001:2000
©2016 Rubbermaid Commercial Products LLC
3124 Valley Avenue. Winchester, VA 22602-2694
Phone: 540-667-8700 | Fax: 540-542-8770
Newell Europe Sàrl
Chemin de Blandonnet 10
CH-1214 Vernier / Geneva / Switzerland
Newell Poland Services Sp. z o.o.
Plac Andersa 7, 61-894 Poznan, Poland
www.rubbermaidcommercial.com
#1996941
Retrofit Instructions
Instructions de modernisation
Instrucciones de la cubierta modernizada
LED Indicators
Indicateurs à DEL
Indicadores de LED
Lighting Information
Renseignements sur l’éclairage
Información de iluminación
Optimal Energy Cell Storage Temperature
Température optimale de stockage de la cellule énergétique
Temperatura de almacenamiento óptima de celda de energía
1
1
Cover is attached with pins (a). For
removal, pin must align with hole (b).
Le couvercle est fixé à l’aide de
tiges (a). La tige doit s’aligner avec le
trou (b) pour le retirer.
La tapa está sujetada con clavijas
(a). Para retirarla, la clavija debe
alinearse con el orificio (b).
a
b
IMPORTANT / IMPORTANT /
IMPORTANTE
1
3
2
Inside / Intérieur /
Interior 4
1
2
B
5C
1
1
2
3
2
2
30°30°
Inside / Intérieur /
Interior
A
B
C
1980786
1980787
1980788
1980789
1980790
1980882
Tone ON/OFF
Teinte ACTIVÉE/DÉSACTIVÉE
Tono ENCENDIDO/APAGADO
Refill Needed
Recharge nécessaire
Se necesita recarga
2 sec
8 sec
ON
ACTIVÉE
ENCENDIDO
OFF
DÉSACTIVÉE
APAGADO
Blocked Sensor
Capteur bloqué
Sensor bloqueado
10 sec
1 sec
1/2 sec
1980825
1980826
1980827
1980786
1980787
1980788
1980828
1980829
1980831
1980789
1980790
1980882
Hours of Light per Day
Heures d’éclairage
par jour
Horas de luz por día
Lux Level
Niveau de lux
Nivel de intensidad
lumínica (lx)
Max Shots per Year
Nombre maximal de
coups par an
Encendidos máximos
por año
12 200 13,000
12 300 16,500
* Not recommended for use under 200 lux.
* Non recommandé pour une utilisation à moins de 200 lux.
* No se recomienda para uso por debajo de los 200 lx.
Minimum
Minimum
Mínima
Maximum
Maximum
Máxima
41° F (5° C) 86° F (30° C)
1) Simultaneously pull out side of cover and rotate up until 2) notched pin pops out of hole.
1) Retirez simultanément le côté du couvercle et faites-le pivoter jusqu’à ce que 2) la tige sorte du trou.
1) Simultáneamente tire de un lado de la tapa y gire hacia arriba hasta que 2) la clavija dentada salga del orificio.
Products manufactured underquality
management system registered to
ISO 9001:2000
©2016 Rubbermaid Commercial Products LLC
3124 Valley Avenue. Winchester, VA 22602-2694
Phone: 540-667-8700 | Fax: 540-542-8770
Newell Europe Sàrl
Chemin de Blandonnet 10
CH-1214 Vernier / Geneva / Switzerland
Newell Poland Services Sp. z o.o.
Plac Andersa 7, 61-894 Poznan, Poland
www.rubbermaidcommercial.com
#1996941
Retrofit Instructions
Instructions de modernisation
Instrucciones de la cubierta modernizada
LED Indicators
Indicateurs à DEL
Indicadores de LED
Lighting Information
Renseignements sur l’éclairage
Información de iluminación
Optimal Energy Cell Storage Temperature
Température optimale de stockage de la cellule énergétique
Temperatura de almacenamiento óptima de celda de energía
1
1
Cover is attached with pins (a). For
removal, pin must align with hole (b).
Le couvercle est fixé à l’aide de
tiges (a). La tige doit s’aligner avec le
trou (b) pour le retirer.
La tapa está sujetada con clavijas
(a). Para retirarla, la clavija debe
alinearse con el orificio (b).
a
b
IMPORTANT / IMPORTANT /
IMPORTANTE
1
3
2
Inside / Intérieur /
Interior
4
2
1
B
1
1
2
3
2
2
30°30°
Inside / Intérieur /
Interior
A
B
C
D
1980786
1980787
Tone ON/OFF
Teinte ACTIVÉE/DÉSACTIVÉE
Tono ENCENDIDO/APAGADO
Refill Needed
Recharge nécessaire
Se necesita recarga
2 sec
8 sec
ON
ACTIVÉE
ENCENDIDO
OFF
DÉSACTIVÉE
APAGADO
Blocked Sensor
Capteur bloqué
Sensor bloqueado
10 sec
1 sec
1/2 sec
1980825
1980826
1980827
1980828
1980829
1980831
1980786
1980787
Minimum Hours
of Light Per
Week
Nombre minimum
d’heures
d’éclairage par
semaine
Cantidad mínima
de horas de luz
por semana
Minimum Hours of
Light Per Day
(Based on a 5 day week)
Nombre minimum
d’heures d’éclairage par
jour (basé sur une période de 5
semaines)
Cantidad mínima de
horas de luz por día
(Sobre la base de 5 días por
semana)
Number of
Beeps
Nombre de
bips
Cantidad de
pitidos
Max Shots
per Year
Nombre
maximal de
coups par an
Encendidos
máximos
por año
67.5 hours
67.5 heures
67.5 horas
13.5 hours (x 5 days)*
13.5 heures (x 5 jours)*
13.5 horas (x 5 días)*
3 13,000
67.5 hours
67.5 heures
67.5 horas
13.5 hours (x 5 days)*
13.5 heures (x 5 jours)*
13.5 horas (x 5 días)*
4 16,500
67.5 hours
67.5 heures
67.5 horas
13.5 hours (x 5 days)*
13.5 heures (x 5 jours)*
13.5 horas (x 5 días)* 5 20,000
* 13.5 hours can be spread out over any time of the day or can be intermittent throughout a 7 day week
Minimum Requirement: 3 beeps.
* 13,5 heures peuvent être réparties à n’importe quel moment de la journée et de façon intermittente sur une
semaine de 7 jours.
Exigence minimale : 3 bips.
* Las 13,5 horas pueden ser continuas en cualquier momento del día o pueden ser distribuirse de manera
intermitente en los 7 días de la semana.
Requisito mínimo: 3 pitidos.
Minimum
Minimum
Mínima
Maximum
Maximum
Máxima
41° F (5° C) 86° F (30° C)
1) Simultaneously pull out side of cover and rotate up until 2) notched pin pops out of hole.
1) Retirez simultanément le côté du couvercle et faites-le pivoter jusqu’à ce que 2) la tige sorte du trou.
1) Simultáneamente tire de un lado de la tapa y gire hacia arriba hasta que 2) la clavija dentada salga del orificio.
5
1
2
6) Flip Lux Detector switch right to “Install Mode” to measure lighting.
6) Remettre le commutateur du détecteur de luminescence au « Mode
installation » pour mesurer le degré de luminescence.
6) Voltee el interruptor del detector de lux hacia la derecha para colocarlo en
el modo “Instalación” y medir la iluminación.
7a) If 3 beeps or more are heard, flip the switch left back to “Run Mode”
and continue to “Refill Installation”.
7a) Si 3 bips et plus sont entendus, remettre le commutateur à « Mode
fonctionnement » et continuer vers « Installation de la recharge ».
7a) Si escucha 3 pitidos o más, vuelva a colocar el interruptor hacia la
izquierda en el modo “Ejecución” y pase a “Instalación para recambio”.
7b) If 3 beeps or more are not heard, remounting is necessary in an area
with more light. Begin at step 4 of “Preparation” section and then
complete the “Screw Mount” and “Refill Installation” sections.
7b) I) Si 3 bips ou plus sont entendus, il est nécessaire de réinstaller celui-ci
dans un endroit plus éclairé. Commencez à l’étape 4 de la section «
Préparation » , puis complétez les sections « Fixation » et « Installation
de la recharge ».
7b) Si no escucha 3 pitidos o más, deberá volver a montarse el dispositivo
en una zona más iluminada. Comience por el paso 4 de la sección
“Preparación” y, a continuación, lleve a cabo las secciones “Soporte de
tornillos” e “Instalación para recambio”.
Note: Keep tone switch in factory default position
(tone off, to the right) for LumeCel™ AutoFoam.
Remarque : Maintenir le commutateur de tonalité à la
position réglée en usine (tonalité désactivée, sur la droite)
pour le LumeCel™ AutoFoam.
Nota: mantenga el interruptor de tono en la posición
predeterminada de fábrica (tono desactivado, hacia la derecha)
del dispositivo AutoFoam con tecnología LumeCel™.
As with all energy cells, rotate stock to use oldest product first.
Concernant les cellules énergétiques, faites tourner le stock
afin d’utiliser les produits les plus anciens en premier.
Así como con todas las células de energía, rote las existencias
para utilizar el producto más antiguo en primer lugar.
Products manufactured underquality
management system registered to
ISO 9001:2000
©2017 Rubbermaid Commercial Products LLC
3124 Valley Avenue. Winchester, VA 22601-2636
Phone: 540-667-8700 | Fax: 540-542-8770
Newell Europe Sàrl
Chemin de Blandonnet 10
CH-1214 Vernier / Geneva / Switzerland
Newell Poland Services Sp. z o.o.
Plac Andersa 7, 61-894 Poznan, Poland
www.rubbermaidcommercial.com
#1996941
Note: Product availability varies by region
Remarque : la disponibilité des produits
varie selon les régions
Nota: la disponibilidad de los productos
depende de la región.
RETROFIT INSTRUCTIONS
Retrofit Instructions
Instructions de modernisation
Instrucciones de la cubierta modernizada
LED Indicators
Indicateurs à DEL
Indicadores de LED
Lighting Information
Renseignements sur l’éclairage
Información de iluminación
Optimal Energy Cell Storage Temperature
Température optimale de stockage de la cellule énergétique
Temperatura de almacenamiento óptima de celda de energía
1
1
Cover is attached with pins (a). For
removal, pin must align with hole (b).
Le couvercle est fixé à l’aide de
tiges (a). La tige doit s’aligner avec le
trou (b) pour le retirer.
La tapa está sujetada con clavijas
(a). Para retirarla, la clavija debe
alinearse con el orificio (b).
a
b
IMPORTANT / IMPORTANT /
IMPORTANTE
1
3
2
Inside / Intérieur /
Interior
4
2
1
B
1
1
2
3
2
2
30°30°
Inside / Intérieur /
Interior
A
B
C
D
1980786
1980787
Tone ON/OFF
Teinte ACTIVÉE/DÉSACTIVÉE
Tono ENCENDIDO/APAGADO
Refill Needed
Recharge nécessaire
Se necesita recarga
2 sec
8 sec
ON
ACTIVÉE
ENCENDIDO
OFF
DÉSACTIVÉE
APAGADO
Blocked Sensor
Capteur bloqué
Sensor bloqueado
10 sec
1 sec
1/2 sec
1980825
1980826
1980827
1980828
1980829
1980831
1980786
1980787
Minimum Hours
of Light Per
Week
Nombre minimum
d’heures
d’éclairage par
semaine
Cantidad mínima
de horas de luz
por semana
Minimum Hours of
Light Per Day
(Based on a 5 day week)
Nombre minimum
d’heures d’éclairage par
jour (basé sur une période de 5
semaines)
Cantidad mínima de
horas de luz por día
(Sobre la base de 5 días por
semana)
Number of
Beeps
Nombre de
bips
Cantidad de
pitidos
Max Shots
per Year
Nombre
maximal de
coups par an
Encendidos
máximos
por año
67.5 hours
67.5 heures
67.5 horas
13.5 hours (x 5 days)*
13.5 heures (x 5 jours)*
13.5 horas (x 5 días)*
3 13,000
67.5 hours
67.5 heures
67.5 horas
13.5 hours (x 5 days)*
13.5 heures (x 5 jours)*
13.5 horas (x 5 días)*
4 16,500
67.5 hours
67.5 heures
67.5 horas
13.5 hours (x 5 days)*
13.5 heures (x 5 jours)*
13.5 horas (x 5 días)* 5 20,000
* 13.5 hours can be spread out over any time of the day or can be intermittent throughout a 7 day week
Minimum Requirement: 3 beeps.
* 13,5 heures peuvent être réparties à n’importe quel moment de la journée et de façon intermittente sur une
semaine de 7 jours.
Exigence minimale : 3 bips.
* Las 13,5 horas pueden ser continuas en cualquier momento del día o pueden ser distribuirse de manera
intermitente en los 7 días de la semana.
Requisito mínimo: 3 pitidos.
Minimum
Minimum
Mínima
Maximum
Maximum
Máxima
41° F (5° C) 86° F (30° C)
1) Simultaneously pull out side of cover and rotate up until 2) notched pin pops out of hole.
1) Retirez simultanément le côté du couvercle et faites-le pivoter jusqu’à ce que 2) la tige sorte du trou.
1) Simultáneamente tire de un lado de la tapa y gire hacia arriba hasta que 2) la clavija dentada salga del orificio.
5
1
2
6) Flip Lux Detector switch right to “Install Mode” to measure lighting.
6) Remettre le commutateur du détecteur de luminescence au « Mode
installation » pour mesurer le degré de luminescence.
6) Voltee el interruptor del detector de lux hacia la derecha para colocarlo en
el modo “Instalación” y medir la iluminación.
7a) If 3 beeps or more are heard, flip the switch left back to “Run Mode”
and continue to “Refill Installation”.
7a) Si 3 bips et plus sont entendus, remettre le commutateur à « Mode
fonctionnement » et continuer vers « Installation de la recharge ».
7a) Si escucha 3 pitidos o más, vuelva a colocar el interruptor hacia la
izquierda en el modo “Ejecución” y pase a “Instalación para recambio”.
7b) If 3 beeps or more are not heard, remounting is necessary in an area
with more light. Begin at step 4 of “Preparation” section and then
complete the “Screw Mount” and “Refill Installation” sections.
7b) I) Si 3 bips ou plus sont entendus, il est nécessaire de réinstaller celui-ci
dans un endroit plus éclairé. Commencez à l’étape 4 de la section «
Préparation » , puis complétez les sections « Fixation » et « Installation
de la recharge ».
7b) Si no escucha 3 pitidos o más, deberá volver a montarse el dispositivo
en una zona más iluminada. Comience por el paso 4 de la sección
“Preparación” y, a continuación, lleve a cabo las secciones “Soporte de
tornillos” e “Instalación para recambio”.
Note: Keep tone switch in factory default position
(tone off, to the right) for LumeCel™ AutoFoam.
Remarque : Maintenir le commutateur de tonalité à la
position réglée en usine (tonalité désactivée, sur la droite)
pour le LumeCel™ AutoFoam.
Nota: mantenga el interruptor de tono en la posición
predeterminada de fábrica (tono desactivado, hacia la derecha)
del dispositivo AutoFoam con tecnología LumeCel™.
As with all energy cells, rotate stock to use oldest product first.
Concernant les cellules énergétiques, faites tourner le stock
afin d’utiliser les produits les plus anciens en premier.
Así como con todas las células de energía, rote las existencias
para utilizar el producto más antiguo en primer lugar.
Products manufactured underquality
management system registered to
ISO 9001:2000
©2017 Rubbermaid Commercial Products LLC
3124 Valley Avenue. Winchester, VA 22601-2636
Phone: 540-667-8700 | Fax: 540-542-8770
Newell Europe Sàrl
Chemin de Blandonnet 10
CH-1214 Vernier / Geneva / Switzerland
Newell Poland Services Sp. z o.o.
Plac Andersa 7, 61-894 Poznan, Poland
www.rubbermaidcommercial.com
#1996941
Note: Product availability varies by region
Remarque : la disponibilité des produits
varie selon les régions
Nota: la disponibilidad de los productos
depende de la región.