RYNO WORX RK-SSY-0015 User manual

Portable Sealcoating Spray Systems
Operator's Manual
Aluminum Pump
Launtop Engine
RA-SSY-0005
RA-SSY-0011
RK-SSY-0015
Cast Iron Pump
Launtop Engine
RA-SSY-0003
RA-SSY-0004
RK-SSY-0016
Cast Iron Pump
Honda Engine
RA-SSY-0012
RA-SSY-0013
RK-SSY-0017
*RA-SSY-0013 Pictured Above
RC-SUM-0011 - Rev 2


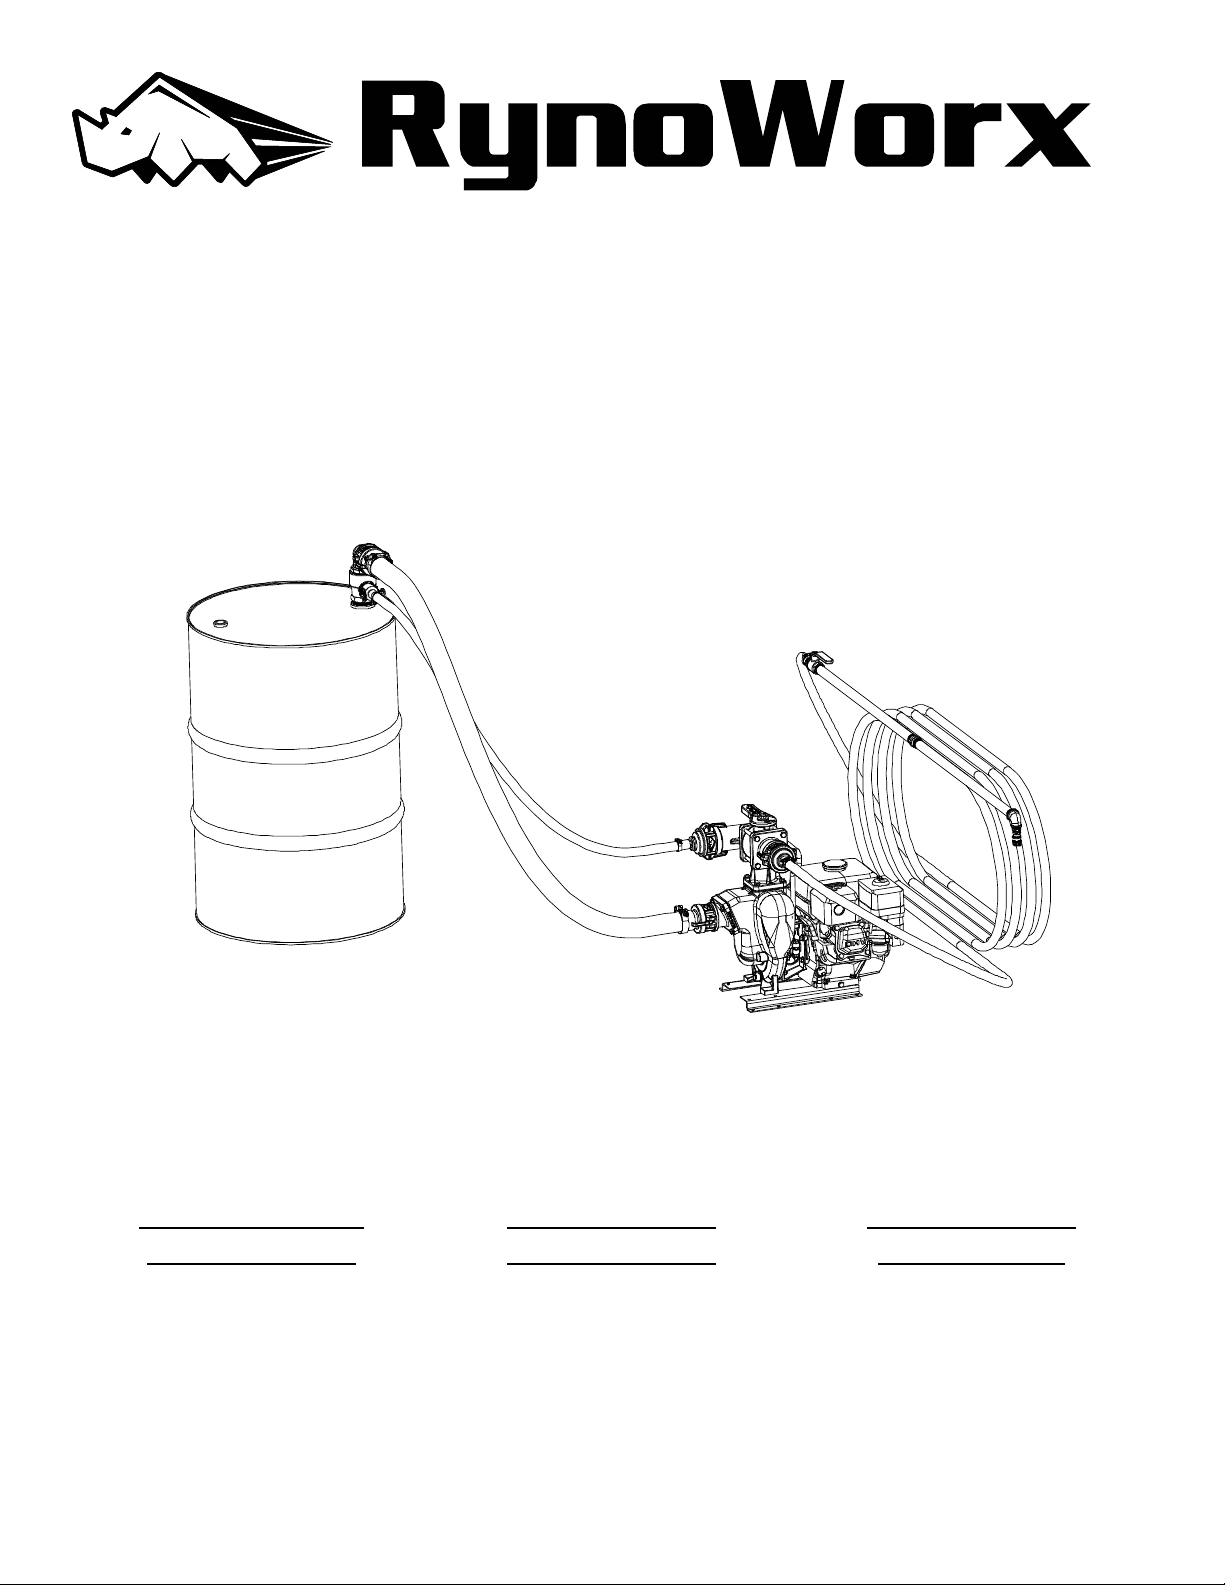
1SAFETY & GENERAL INFORMATION
Warning
⚠Failure to follow all safety precautions can result in serious injury or death
⚠RynoWorx Inc. assumes no liability for any accident or injury incurred through improper use of machine
⚠CHECK ENGINE OIL LEVELS BEFORE FIRST USE
⚠Read all instructions and warnings in this manual as well as the engine manufacturer's manual before
operating this equipment
⚠Verify all seals and clamps for all connections are tightened before each use of this equipment
⚠This equipment is designed for outdoor use only
⚠Be sure to always wear personal protective equipment when operating this equipment. Eyes, Gloves, Hearing
⚠Carefully read all Material Safety Data Sheets (SDS) for sealer products being used before operating this
equipment. Refined coal tar, and Asphalt Emulsion sealers can cause health risks if not properly handled
⚠Only genuine replacement parts should be used for any replacements or repairs. Do not attempt to modify or
alter this product in any way
⚠Observe all caution and warning signs on machine
⚠Do not leave unattended when running
⚠Never point the spray wand at another person
⚠Do not let any sealer freeze or dry inside the unit’s plumbing
⚠Replace any hoses that show wear, fraying or splits. Be sure all joints are leak proof
⚠Never operate near an open flame or use any type of flame to unclog the plumbing
⚠Check all operation manuals for warnings, cautions and to ensure proper maintenance procedures are
followed
⚠Always turn the gas off on the engine before transporting

Required Tools
Required:
Wrenches:
1 x 1/2" Wrench for Cast Iron systems
2 x 13 mm Wrenches for Aluminum Systems
10" Pipe Wrench (with 1.5" Jaw) or Vice
Adjustable Wrench (1.5")
Torque Wrench: Capable of tightening to 40-85 in-lbs
Optional:
Needle Nose Pliers
Ratchet set
Teflon Tape
Adjustable wrenches to substitute for any wrench above
Additional Tools Required if Hose Reel purchased with System:
5/16"/ 8 mm Socket or Flat Head Screwdriver
10 mm wrench or socket
2 x 13 mm wrenches or sockets
2 x 17 mm wrenches or sockets
Utility Knife
#2 Phillips Screwdriver

2ASSEMBLY
2.1 Spray Wand Assembly
Please refer to the below diagram for the assembly order of the spray wand. Teflon tape should be used on all
threaded connections to ensure a tight seal. Note that any of the three included spray tips can be used
depending on the Gallons Per Minute (GPM) of sealer required for the task.
Set of 3 spray tips:
2 GPM
3 GPM
4 GPM

2.2 Barrel System Assembly
1. Thread the barrel adapter assembly into the 2” NPT opening in the barrel
2. Connect the 2” and ¾” female camlocks to the appropriate connections on the barrel adapter.
Make sure to open the barrel vent
before starting. If the vent is closed a
vacuum will form inside the barrel.

3. Connect the 2” male camlock connection to the pump valve and the 2” female camlock connection to
the pump intake.
4. Connect the 2” male camlock connection from the spray wand assembly to the other side of the pump
valve.

2.3 Tote System Assembly
1. Thread the 90 ° 2” NPT to Male camlock fitting into the top of the tote lid.
2. Connect the female camlock on the 10’ hose to the male camlock on the top of the tote and the female
camlock on the 5’ hose to the male camlock on the tote outlet

3. Connect the 2” male camlock connection to the pump valve and the 2” female camlock connection to
the pump intake.
4. Connect the 2” male camlock connection from the spray wand assembly to the other side of the pump
valve

5. Open the valve on the tote outlet before beginning operation

Incorrect orientation
2.4 Connecting Filter Kit
The optional filter kit (RA-FIT-0002) is designed to connect inline with your spray hose with the angled portion
facing down.

3OPERATION
3.1 Portable System Operation
3.1.1 Operation Guidelines
-Test your system using WATER to ensure you do not have leaks before moving onto sealant
-Ensure the pump is primed before starting your job
-Flush clean water through the pump and hoses at the end of each day
-Place spray tips into a soapy water solution at the end of each day
-Do not let sealant dry onto your spray tips
-Put spray tips into a container with soapy water when finished with them
-Clean spray tips with soft nylon brushes only
-Have clean water available at the job site for emergency rinsing
-Clean strainer daily to ensure proper sealant flow (strainer optional on some systems)
-Check engine oil levels daily
-Change engine oil after every 50 hours of operation, or at the end of the season, whichever comes first
Warning
- The main seal is critical to the operation of your spray system. We suggest that you keep a spare seal at all
times. This part is a wear item and does need to be replaced during regular maintenance. Failure of this part
will result in unexpected downtime.
Aluminum pump: RC-GCM-0047
Cast Iron Pump: RC-GCM-0033
-Failure to prime the pump prior to engine operation will destroy the pump seals. NEVER run the pump dry for
longer than 10 seconds.
NOTE: FAILURE TO PRIME THE PUMP WILL VOID THE SEAL WARRANTY.
-Always start the pump in full recirculation mode
-Switch the pump to recirculate mode if you are not going to be spraying for more than 30 seconds.
NOTE: Failure to do so may result in excessive heating of the sealant, which will cause it to thicken and
reduce the lifespan of pump parts.
-Turn the engine off for extended work stoppages, such as breaks, lunches, or other work stoppages.
NOTE: Apart from wasting fuel, this may cause your sealant to become foamy, which can introduce excessive
air into the lines and cause your pump to lose its prime. Foamy sealant can take an hour or more to return to a
useable state.

3.1.2 System Priming
Your spray system uses a CENTRIFUGAL pump, commonly known as a "TRASH PUMP". This style of pump
requires priming before use. These pumps are NOT self priming and cannot move air.
To prevent damage to your pump, you must make sure that your pump and intake lines are full of water or
sealant before you use them. Running the pump dry will cause damage to the pump components.
The pump can lose their prime over time, and you may have to re-prime if you do not use the system regularly.
Barrel Systems
Cast Iron & Aluminum Pumps:
1. Disconnect the intake hose from the top of the barrel
2. Make sure the top of the hose is above the height of the pump
3. Fill the hose with water
4. Reconnect it to the barrel
5. Begin your work as usual
Tote Systems
Cast Iron Pumps:
1. Close the valve on the bottom of the tote
2. Remove the fill plug on the top of the pump
3. Fill the pump with water
4. Replace the fill plug
5. Open the valve on the bottom of the tote
6. Begin your work as usual
Aluminum Pumps:
1. Close the valve on the bottom of the tote
2. Place a container below the intake to catch any sealant drips
3. Remove the intake hose from the front of the pump
4. Poor water into the intake on the front of the pump until it is full
5. Poor water into the intake hose until it is full
6. Reconnect the intake hose to the front of the pump
7. Open the valve on the bottom of the tote
8. Begin your work as usual

3.1.3 System Modes
The spray system can be easily switched between Recirculation Mode and Spray Mode by rotating the yellow
handle on the pump valve. The yellow handle at the bottom tank outlet port should always be turned to the left
when the pump is running. To ensure a long pump seal life, keep the system in Recirculation Mode except
when spraying sealer. Please refer to the below diagrams for the valve handle position of the two operation
modes.
Recirculation Mode
Spray Mode

3.2 Spray Wand Operation
The spray wand included with this system has a ball valve handle to accurately control the flow of sealer.
Please refer to the following diagram for the valve positions.
Spray wand valve closed Spray wand valve open

4MAINTENANCE
Regular maintenance is crucial to ensure that this equipment will perform correctly on the job site. Please
follow Table A as well as the maintenance schedule laid out in your engine manufacturer’s manual to keep
your machine operating at peak efficiency.
4.1 Table A: Maintenance Schedule
Maintenance Procedure
Before
Each Use
After Each
Use
End of
Day
Every 50
Hours
Check all connections for all hoses, spray wands, and
transfer kits.
X
Check sealer consistency inside tank. Add water to
compensate for evaporation.
X
Use agitation cycle to circulate sealer for 2-3
minutes.
X
Clean spray tips
X
Remove filter kit and clean strainer.
X
Flush lines with water
X
Replace pump seals.
X
Change engine oil
X
4.2 Spray Tip Maintenance
It is important to keep the spray tips clean to insure even flow every time.
• DO NOT let the spray tips dry out after each use
• DO NOT use metal brush for cleaning.
Required Tools: Poly Brush, Bucket, Warm Water, Soap.
1. Disconnect the spray tip by pushing down the brass sleave at the end of quick connect fitting (See
picture below) and gently pulling the spray tip out.
2. Insert the spray tip(s) in warm soapy water bucket to loosen up any build-up residue. Leave the tips in
water for several minutes or more.
3. Once the build-up loosens up use the poly brush or nonmetal brush to remove any residue.
4. Rinse the spray tips with clean water.
5. Let them air dry.

4.3 Changing Engine Oil
Place the engine on a level surface and place a suitable container under the drain plug bolt
1. Remove the oil filler cap
2. Remove drain plug bolt and drain plug washer
3. Drain the oil into a suitable container.
Please dispose of used oil in a manner that is compatible with the environment. We suggest you take used oil
in a sealed container to your local recycling center or service station for reclamation. Do not throw it in the
trash, pour it on the ground, or pour it down a drain.
4. Install the drain plug bolt with a new drain plug washer and tighten it to the specified torque.
5. Add the specified amount of recommended oil into the engine.
a. Honda GX160: 0.58 Liter (0.61 US qt, 0.51 Imp qt). SAE 10W - 30 is recommended for general use.
b. Launtop LT210: 0.6 Liter (0.63 US qt, 0.52 Imp qt). SAE I5W-40 mineral oil is recommended for general
use.
*Do not add commercial additives to the oil*
*Do not mix gasoline into the oil*
6. After adding the oil, check the oil level on the dip stick.
7. Install and tighten the oil filler cap securely
8. Make sure there are no oil leaks.
9.
4.4 Winterize Spray System
Drain & clean the tank, hoses and pump:
1. Connect the spray system intake to a clean water source. (ie: a barrel or tote with clean water)
2. Run the pump in re-circulate mode until all sealant is expelled from the recirculate hoses
3. Run the pump in spay mode and spray into your main tank until all sealant is expelled from the spray
hoses
4. Connect the recirculate hoses to your clean water source from step 1
5. Run the system for a few minutes in recirculate mode to clean out as much residual sealant from the
recirculate hoses as possible
6. Run the system in spray mode, and spray into your clean water source from step 1 for a few minutes to
remove as much residual sealant from the spray hoses as possible.
7. Stop the engine
8. Disconnect and drain all your hoses, and spray wand.
9. Remove the drain plug from your pump and ensure that all water has been emptied
10. Replace drain plug
11. Drain any remaining sealant in your tank into a smaller container
12. Remove spray tip from spray wand
13. Submerge spray tip(s) and the quick connect end of the spray wand in soapy water for several minutes.
14. Clean the tips and quick connect fitting with a NYLON bristle brush (not brass or other metal brush)
Perform an oil change (see section 4.3)

Fog & Stabilize engine:
1. Add fuel stabilizer to the gas tank
2. Run engine for 10 minutes to circulate.
3. Turn off engine.
4. Remove the air filter cover
5. Start the engine
6. Spray engine fogger into the air intake until you see heavy smoke and the engine stalls.
a. If the engine does not stall on its own, turn the kill switch to off manually while spraying until the engine
completely stops
7. Re-install the air filter
8. Remove spark plug
9. Pull the pull cord gently until the piston is near the bottom
10. Spray engine fogging oil into the spark plug hole
11. Turn the crank 2 full revolutions by pulling the pull cord gently this is to assure even coating on cylinder
wall.
12. Replace the spark plug and spark plug wire
If possible, store equipment out of weather in a shed or garage.
If this is not possible, cover up with a tarp.
Store spare sealant in a place where it will not freeze.

5TROUBLESHOOTING
Please be sure to read the Operation and Maintenance sections of this manual. Some common questions are
covered in Table B below.
5.1 Table B: Troubleshooting Guide
Description of Problem
Possible Causes
Solution Procedure
Sealer is leaking from
connection of pump to engine.
Seals have worn out.
Disassemble pump housing
and replace main seal.
Pump is not circulating sealer.
Pump has lost prime due to low
volume of sealer in tank.
Settled sealer has created a
blockage at bottom of tank.
Add sealer or water to tank.
Add water and agitate sealer to
mix.
Low spray pressure.
Pump has lost prime due to low
volume of sealer in tank.
Settled sealer has created a
blockage at bottom of tank.
Filter kit has a blockage.
Spray wand or hose has a
blockage.
Incorrect type of sealer is being
used with the system.
Add sealer or water to tank.
Add water and agitate sealer to
mix.
Remove filter kit and clean
strainer.
Disconnect spray wand and
hose, flush both with water.
Verify that the sealer being
used has no additives or
polymers.
Sealer is foaming during
circulation.
Circulation cycle is too long.
Incorrect type of sealer is being
used with the system.
Reduce circulation time to 2-3
minutes.
Verify that the sealer being
used has no additives or
polymers.

No
P/N
Description
1
RK-FAS-0028
Fastener Kit - Aluminum Pump Intake Flange
2
RC-FIT-0045
2" Male Camlock to Aluminum Pump Flange
3
RC-GSK-0025
Aluminum Pump Intake Gasket
4
RA-EPA-0006
Engine Pump Assembly - Base
5
RC-GSK-0024
Aluminum Pump Outlet Gasket
6
RK-FAS-0029
Fastener Kit - Aluminum Pump Outlet Flange Adapter
7
RC-FIT-0046
Aluminum Pump To 3 Way Valve Flange Adapter
8
RC-GSK-0030
2" Custom Pump Flange Gasket - Red SBR Dur 80 Fabric Finish
9
RK-FAS-0038
Fastener Kit - Aluminum Pump Flange with Braces
10
RA-VLV-0010
3 Way 2" Straight-90° Female Camlock Flange Valve
MPN:
RA-EPF-0002
Model:
Engine Pump –Base
Description:
Engine: Launtop
Pump: Aluminum
*Note: This configuration is included with
Aluminum/ Launtop systems
(RA-SSY-0005, RA-SSY-0011, & RK-SSY-0015)
This manual suits for next models
8
Table of contents
Other RYNO WORX Paint Sprayer manuals