Ryobi BCL3617U User manual

BCL3617U
ORIGINAL INSTRUCTIONS
36 Volt
Lithium-ion
Battery Charger

Important!
The product is not intended to be used or cleaned by persons
with reduced physical, sensory or mental capabilities, or
lack of experience or knowledge, unless they have been
given instructions concerning the safe use of the appliance
by a person legally responsible for their safety. They should
be supervised whilst using the appliance. Children shall
not use, clean or play with this appliance, which when not
in use should be secured out of their reach.

2
1
2
3 42
7
5 6
1
Fig.2
Fig.1
1

2
4
31
23
1
Fig.3
Fig.4
2

1
2
3
5
4
Fig.5
3

4
Safety, performance, and dependability have been given
top priority in the design of your battery charger.
INTENDED USE
This charger is only intended to charge BPL3620D,
BPL3626D, BPL3626D2, BPL3640D, BPL3640D2,
BPL3650D, and BPL3650D2 battery packs listed in this
manual.
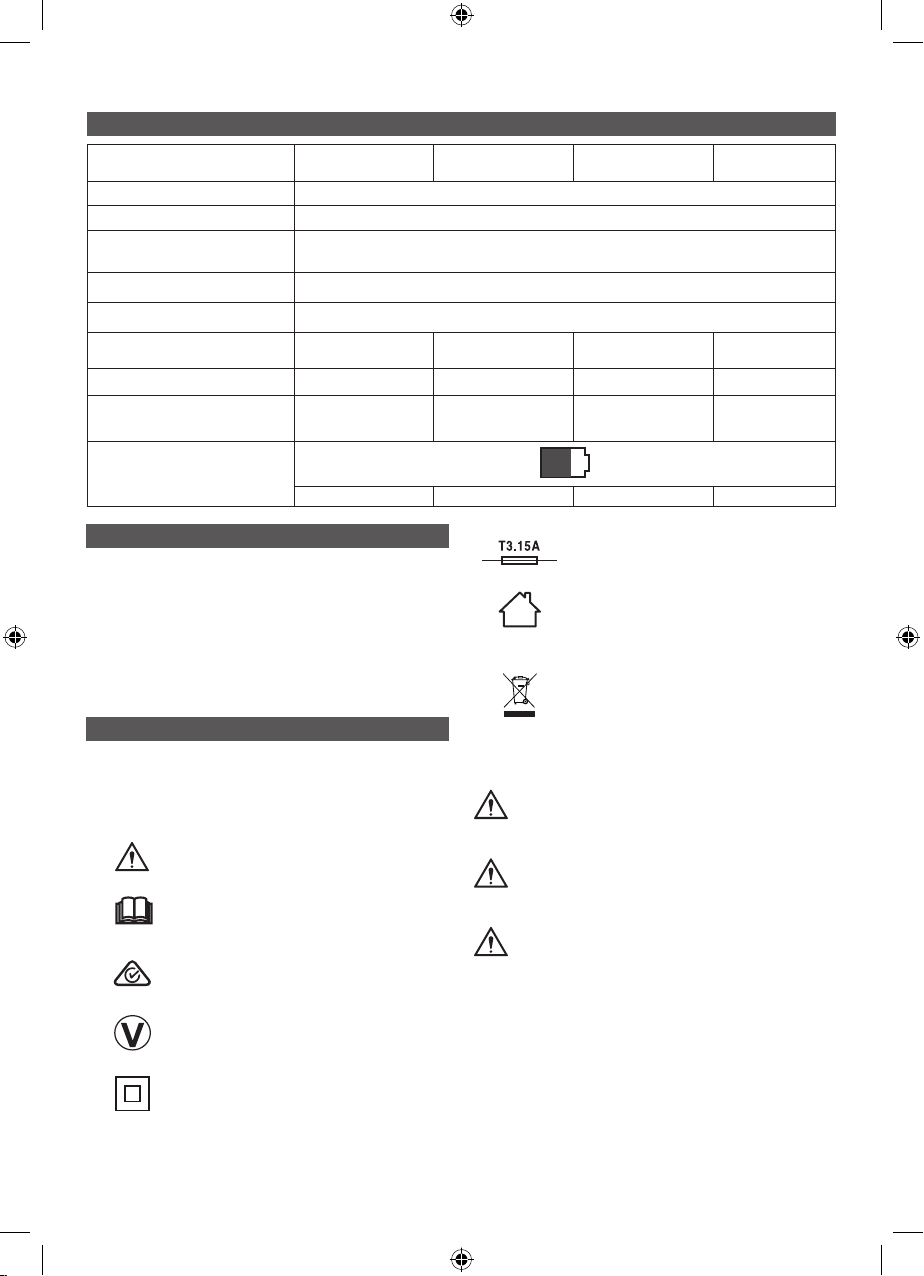
The product is only for use indoors in dry conditions.
The product is not intended to charge any other type of
battery or be used as a power supply or any other purpose.
It should never be used in explosive or inammable
environments.
Do not use the product for any other purpose.
CHARGER SAFETY WARNINGS
WARNING
Read all safety warnings and all instructions. Failure
to follow the warnings and instructions may result in
electric shock, fire, and/or serious injury.
WARNING
Do not recharge primary cells (non-
rechargeable).
WARNING
Mains voltage must correspond with the voltage
specifications on the product.
■Before using the product, check that the charger
enclosure, cable, and plug are not damaged. If damage
is found, do not use the product and bring it to an
authorised service centre for repair.
■The product must not be damp and should never be
used in a damp environment.
■The product is for indoor use only.
■Do not use the product if it has suffered any heavy
shock or jolting, or is damaged in any other way.
■When charging, do not expose the product to sunlight
or other heat source. The recommended temperature
range at charging vicinity is 10° to 25°C.
■Due to the heat generated during charging, do not use
the product on a combustible surface.
■Do not use the product near flammable materials,
such as cloth, packaging materials, paint, spray paint
or aerosols, lubricants, thinners, petrol containers, gas
containers, or gas appliances.
■Do not cover any ventilation slots and provide adequate
ventilation during operation.
■Never modify, disassemble, or attempt to repair the
product yourself.
■Do not allow the charger or battery packs to become
contaminated with any material that could be
conductive, such as, metallic particles from grinding,
cutting, or machining processes.
■Remove the plug of the product from the power socket
when it is not in use or when cleaning it.
■Only use extension cable that is approved and in good
condition.
■Do not charge battery packs that show signs of leaks.
Dispose of them properly.
■Never charge a damaged battery pack. If damaged,
replace immediately.
■Before every use, examine the supply cord for damage.
ADDITIONAL BATTERY SAFETY WARNINGS
WARNING
To reduce the risk of re, personal injury, and product
damage due to a short circuit, never immerse your
tool, battery pack or charger in uid or allow a uid to
ow inside them. Corrosive or conductive uids, such
as seawater, certain industrial chemicals, and bleach
or bleach-containing products, etc., can cause a short
circuit.
ENVIRONMENTAL PROTECTION
Recycle raw materials instead of
disposing of as waste. The machine,
accessories and packaging should
be stored for environmentally friendly
recycling.
OPERATION
CHARGING THE BATTERY PACK
Battery packs are shipped in a low charge condition.
Therefore, you should charge them before rst use. If the
charger does not charge your battery pack under normal
circumstances, bring both the battery pack and charger to
an authorised service centre.
Make sure that the power supply is normal
household voltage, 220 – 240V, 50Hz, AC
only. Make sure that the battery pack latch snaps into
place and the battery pack is secured in the charger before
beginning operation.
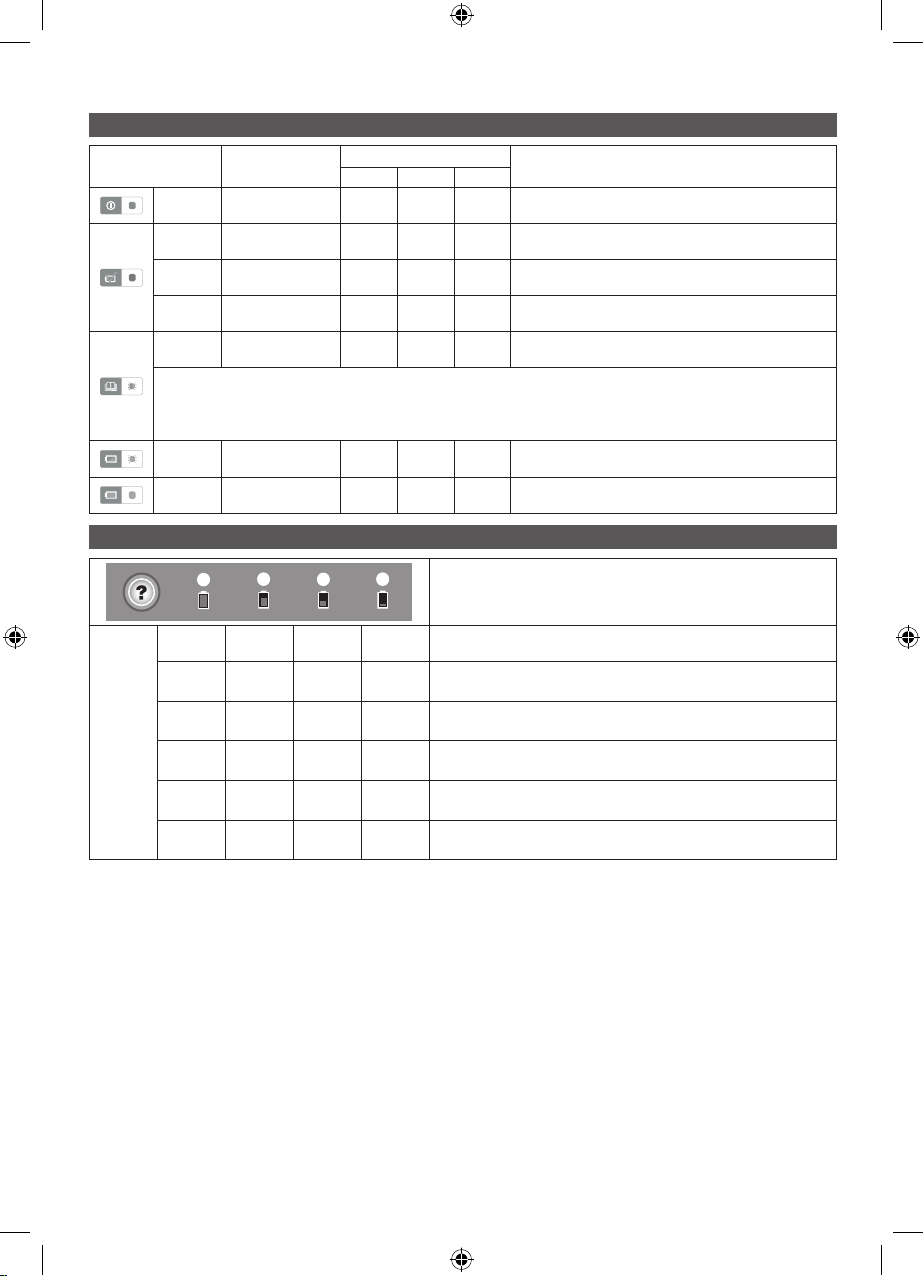
NOTE: When the battery becomes fully charged, the
green LED remains on for 10 minutes and then turns off.
The battery pack will become slightly warm to touch while
charging. This is normal and does not indicate a problem.
Do not place the charger and battery pack in an area of
extreme heat or cold. They work best at normal room
temperature.
NOTE: The charger and battery pack should be placed in
a location where the temperature is more than 10°C but
less than 25°C.
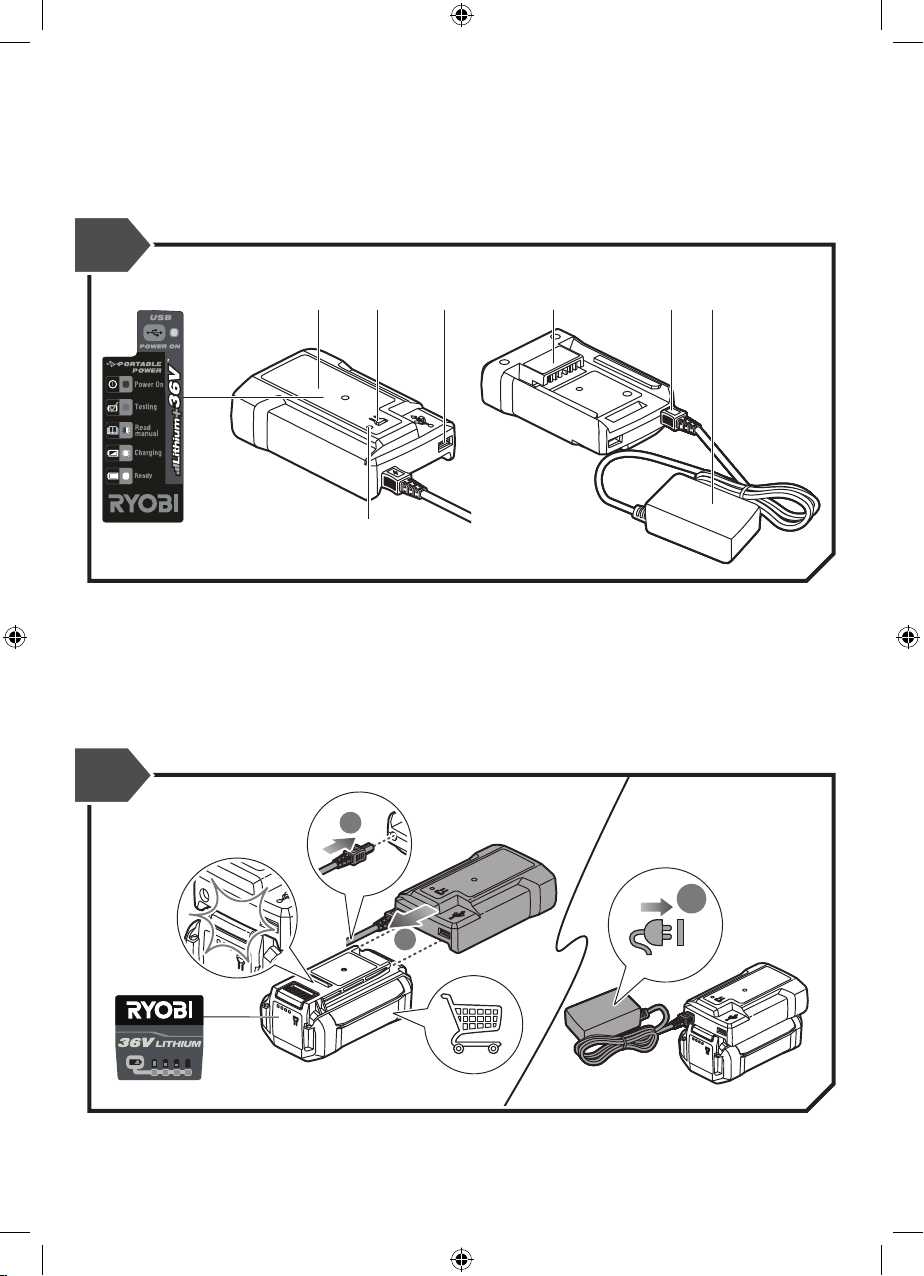
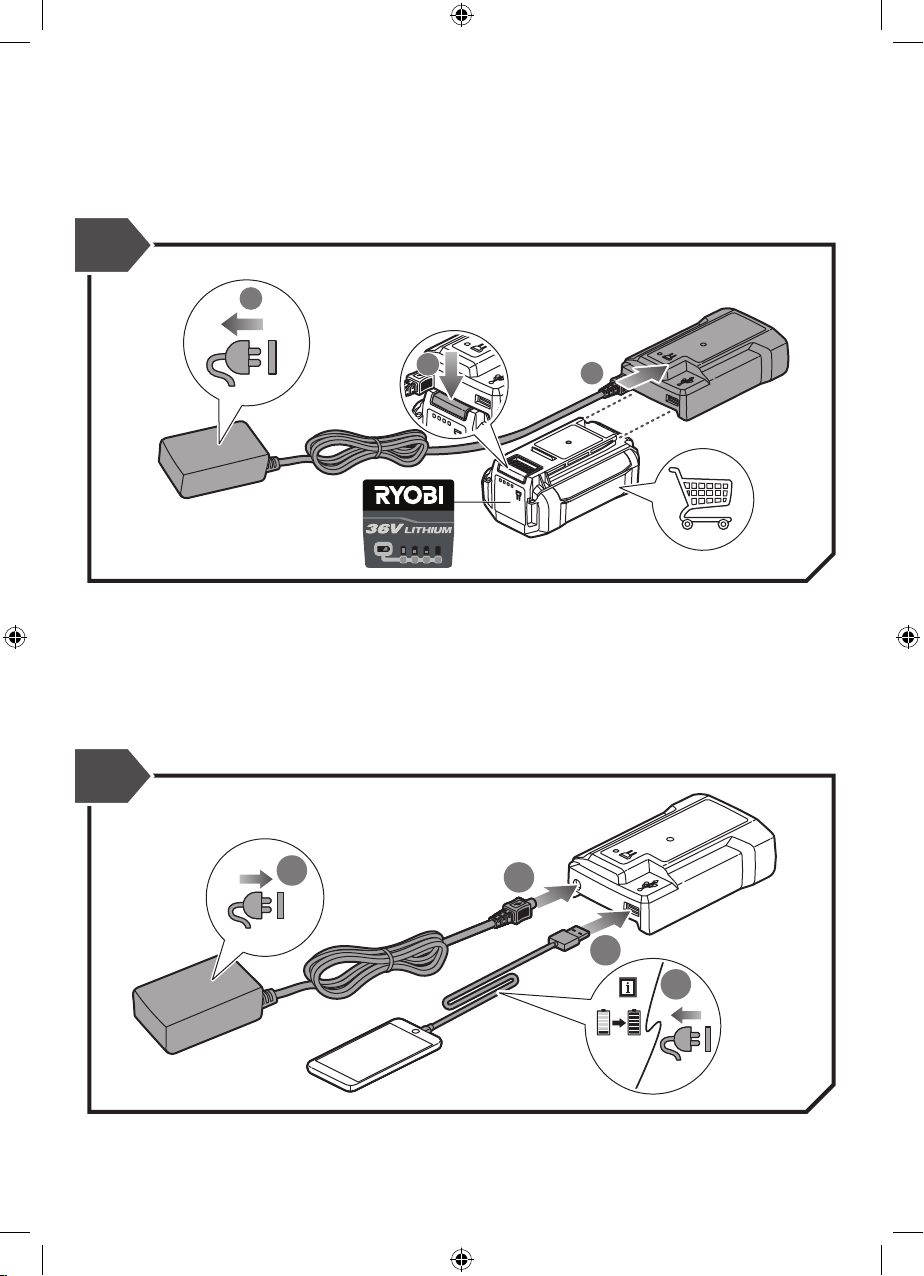
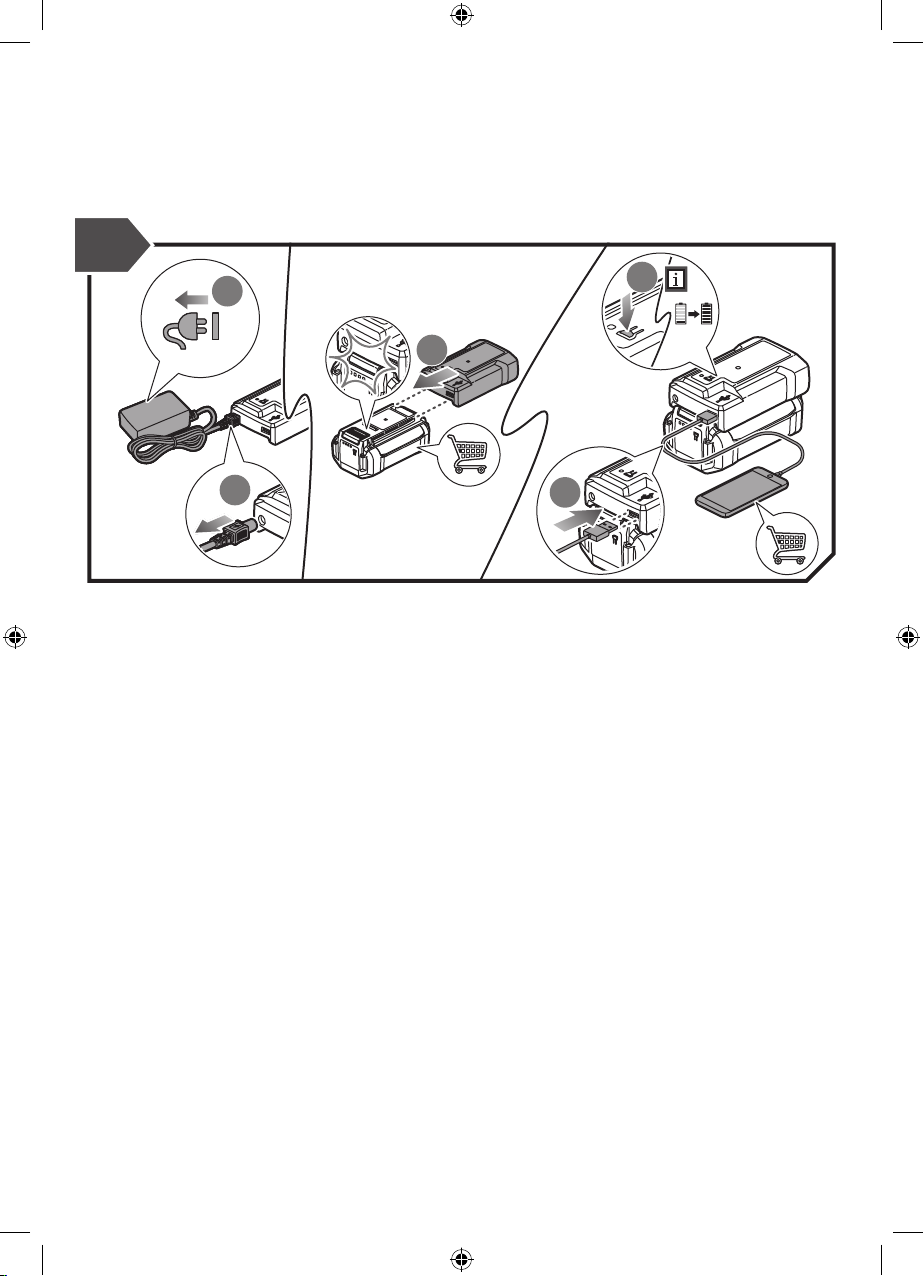
CHARGING A COOL BATTERY PACK
See Fig. 2
1. Connect the power cord to the product.
2. Align the raised rib on the battery pack with the groove
in the product, and slide the product to the battery pack.
Make sure that the battery pack latch clicks into place.
3. Connect the product to a power supply.

5
See Fig.3
4. Disconnect the product from the power supply when the
battery pack becomes fully charged.
5. Press the battery pack latch to unlock the battery pack
from the product.
6. Slide the product off the battery pack.
CHARGING A HOT BATTERY PACK
When using a tool continuously, the cells in the battery
pack becomes hot. A hot battery pack should be cooled
down for approximately 30 minutes before recharging.
CHARGING A USB DEVICE
When the product is connected to an AC power supply or
a battery pack, the USB port on the product supplies a 5
volt DC, up to 2.1 amp charging site for your phone, MP3
player, or other small (up to 2.1 amp) USB device.
Using an AC power supply
See Fig. 4
1. Connect the power cable to the charger. Plug the USB
cable into the product and into your USB device.
2. Connect the power adaptor to a power source.
NOTE: The LED will turn red and remain on for
approximately 5 minutes when the product is connected
to an AC power supply and not installed on a battery
pack.
NOTE: The USB port on the product is always active
when the device is connected to an AC power supply.
The USB device will begin charging as soon as it is
connected to the charger. It is not necessary to press
the ON button.
3. The product will provide continuous charging to the
USB device until the device is fully charged.
4. Remove the device when charging is complete.
Using a battery pack
See Fig. 5
1. Remove the cable from the product, then remove the
power adaptor from the power source and store in a
cool, dry location.
2. Connect the product to a charged battery pack.
NOTE: When the product is connected to a battery
pack only, the LED will remain off until the ON button
is pressed.
3. Plug the USB cable into the product and into your USB
device.
4. Press the ON button to start charging the USB device.
NOTE: If the product stops providing power to the USB
device before it is fully charged, the battery pack may
have entered “sleep mode”. Press the ON button to exit
“sleep mode” and resume operation.
NOTE: “Sleep mode” is a feature that protects the
battery from becoming fully drained. It stops charging
the USB device after 30 seconds if the charging current
is less than 30 mA.
NOTE: USB charging time is dependent upon the level
of charge in the USB device when it is connected to the
charger. When a USB device is charging, energy from
the battery pack is transferred to the USB device. If the
energy in the battery pack is depleted, USB charging
will stop.
NOTE: USB charging will stop once the device is fully
charged.
MAINTENANCE
■When not using or when cleaning the product,
disconnect it from the power supply and remove the
battery pack.
■Avoid using solvents when cleaning plastic parts. Most
plastics are susceptible to various types of commercial
solvents and may be damaged by their use. Use clean
cloth or soft brush to remove dirt and dust.
■Do not, at any time, let brake fluids, gasoline, petroleum-
based products, and penetrating oils come in contact
with plastic parts. They contain chemicals that can
damage, weaken, or destroy plastic.
■If you are experiencing any issues with this product or
any other RYOBI product, contact RYOBI Customer
Service.
WARNING
Hazardous voltages are present within the product; do
not disassemble.
■The supply cord cannot be replaced. If the
cord is damaged, the product should be
scrapped.
CLEANING THE CHARGER
WARNING
Unplug the charger power cord from power supply
before cleaning at any time to prevent serious personal
injury.
■Clean the charger surface (except labels) using a damp
cloth with a mild detergent.
■Do not use any strong detergents on the plastic housing.
They can be damaged by certain aromatic oil such as
pine and lemon, and by solvents such as kerosene.
■Moisture can cause a shock hazard. Wipe off any
moisture with a soft dry cloth. STORAGE
STORAGE
Store your charger in a cool dry place between 10 and
38°C.

6
SPECIFICATIONS
Battery pack BPL3620D BPL3626D
BPL3626D2 BPL3640D
BPL3640D2 BPL3650D
BPL3650D2
Type Lithium-ion
Voltage 36 V DC
Charger input 220 V–240 V,
50 Hz AC only
Charger input current 1.7 A
USB output current 5 V, 2.1 A Max
Battery pack capacity 2.0 Ah 2.6 Ah 4.0 Ah 5.0 Ah
No. of cell for battery 10 20 20 20
Maximum charging
time (BCL3617U)
80
minutes 105
minutes 160
minutes 200
minutes
Quick
recharge
60%
45 minutes 60 minutes 96 minutes 120 minutes
KNOW YOUR PRODUCT
See Fig. 1
1. BCL3617U Charger
2. ON button
3. USB port
4. Battery port
5. Power cord (from power adaptor BCL3617U)
6. Power adaptor
7. LED indicator
SYMBOLS ON THE PRODUCT
Some of the following symbols may be used on this
product. Please study them and learn their meaning.
Proper interpretation of these symbols will allow you to
operate the product better and safer.
Precautions that involve your safety.
To reduce the risk of injury, user must
read and understand user’s manual
before using this product.
Regulatory Compliance Mark (RCM).
Product meets applicable regulatory
requirements.
Efciency level V. The product meets
the requirements of efciency level V
of the “Minumum Energy Performance
Standards”
Class II: Protection against access to
live parts
Time-lag type fuse
Indoor use only
Waste electrical products should not
be disposed of with household waste.
Please recycle where facilities exist.
Check with your Local Authority or
retailer for recycling advice.
The following signal words and meanings are intended to
explain the levels of risk associated with this product.
DANGER
Indicates an imminently hazardous situation, which, if
not avoided, will result in death or serious injury.
WARNING
Indicates a potentially hazardous situation, which, if not
avoided, could result in death or serious injury.
CAUTION
Indicates a potentially hazardous situation, which, if not
avoided, may result in minor or moderate injury.
CAUTION
(Without Safety Alert Symbol) Indicates a situation that
may result in property damage.

7
CHARGER LED FUNCTIONS
LED indicator Battery pack LED Action
Red Orange Green
Power Without battery
pack On Ready to charge battery pack.
Evaluate Hot battery pack On When battery pack reaches cooled temperature, charger
begins fast charge mode.
Evaluate Cold battery pack On When battery pack reaches warmed temperature, charger
begins fast charge mode.
Evaluate Deeply discharged
Flashing
Charger pre-charges battery until normal voltage is
reached, then begins fast charge mode.
Defective Defective Flashing Flashing Battery pack or charger could be defective.
●If the LED status shows defective, try to reset the charger or replug the battery.
●If the LED status repeats a second time, try charging a different battery.
●If a different battery charges normally, dispose of the defective pack (see maintenance section). See warranty sheet if the
battery is still within warranty.
●If a different battery also indicates "defective," the charger may be defective.
Charging Fast charging Flashing —
Full — On Fast charging is complete; charger maintains charge mode.
BATTERY PACK LED INDICATION DESCRIPTIONS
Status
Off Off Off Flashing In charging process, battery pack capacity is lower than 25%
Off Off Flashing On In charging process, battery pack capacity is between 25% and 50%.
Off Flashing On On In charging process, battery pack capacity is between 50% and 75%.
Flashing On On On In charging process, battery pack capacity is between 75% and 100%.
On On On On Fully charged
Off Off Off Off One minute after full charge, all LEDs on the battery are off, charger LED
is on with green color.
20190529v1


If you are experiencing any issues with this product or any other RYOBI
product, please contact RYOBI customer service
or visit your local retailer.
AUS: 1300-697-9624 NZ: 0800-279-234
www.ryobi.com.au www.ryobi.co.nz

Techtronic Industries (Australia) Pty. Ltd.
31 Gilby Road, Mount Waverley,
VIC 3149, Australia
Techtronic Industries New Zealand Ltd.
Unit C, 70 Business Parade South,
Highbrook, Auckland, 2013, New Zealand
Imported by:
960324015-01
RYOBI is a trademark of Ryobi Limited,
and is used under license.
This manual suits for next models
1
Table of contents
Other Ryobi Batteries Charger manuals

Ryobi
Ryobi RC18640 User manual

Ryobi
Ryobi OP401 User manual

Ryobi
Ryobi BCL14181H Operation manual

Ryobi
Ryobi OP408 User manual

Ryobi
Ryobi BC-1800 User manual

Ryobi
Ryobi RYi150C User manual

Ryobi
Ryobi BC-1800 Operation manual

Ryobi
Ryobi BCL1418IV User manual

Ryobi
Ryobi P120 User manual

Ryobi
Ryobi P117 User manual

Ryobi
Ryobi RC18150 User manual

Ryobi
Ryobi ONE+ PCG008 User manual

Ryobi
Ryobi OP404 User manual

Ryobi
Ryobi P120 User manual

Ryobi
Ryobi RC18115 User manual

Ryobi
Ryobi P114B User manual

Ryobi
Ryobi RC18150U Operation instructions

Ryobi
Ryobi BCL3660F User manual

Ryobi
Ryobi RC18120 User manual

Ryobi
Ryobi P112 User manual