Ryobi RBV-3350 Operation manual


OWNER’S OPERATING MANUAL
BLOWER/VACUUM
MODEL RBV-3350
KEEP THI MANUAL FOR FUTURE REFERENCE
Your new blower/vacuum has been engineered and manufactured to Ryobi’s
high standard of dependability, ease of operation and operator safety. Properly
cared for, it will give you years of rugged, trouble free performance. If you use
your blower/vacuum properly and only for what it is intended, you will enjoy
years of safe, reliable service.
PECIFICATION
Voltage................................................................................................... 230V~50Hz
Rated input.................................................................................................... 3000W
No load speed.........................................................................................14000min-1
Max. air volume...................................................................................... 13.2m3/min
Max. air speed............................................................................................ 270km/h
Collection bag capacity....................................................................................... 35L
Mulching ratio.................................................................................................... 10:1
Cable length.....................................................................................................35cm
Sound pressure level..........................................................LpA 84.1dB(A),k=3dB(A)
Sound power level........................................................ LWA 95.8dB(A),k=2.21dB(A)
Vibration level........................................................................... 7.49m/s2, =1.5m/s2
Net weight........................................................................................................ 2.7kg
THANK YOU FOR BUYING A RYOBI
BLOWER/VACUUM
CAUTION: Carefully read through this entire owner’s
manual, paying close attention to the general
safety rules and rules for safe operation,
before using.
1

2
IMPORTANT AFETY IN TRUCTION
The purpose of safety rules is to attract your
attention to possible dangers. The safety symbols
and the explanations with them, require your
careful attention and understanding. The safety
warnings do not by themselves eliminate any
danger. The instruction or warnings they give are
not substitutes for proper accident prevention
measures.
AFETY ALERT YMBOL. Indicates
danger, caution or warning. May be used
in conjunction with other symbols or
pictures.
Failure to obey a safety warning can result in
serious injury to yourself or to others. Always follow
the safety precautions to reduce the risk of fire,
electric shock and personal injury.
Do not attempt to operate this tool until you have
read thoroughly and completely understood the
safety rules, etc. contained in this manual. Failure
to comply can result in accidents involving fire,
electric shock or serious personal injury. Save this
Owners Operating Manual and review it frequently
for continual safe operation and for instructing
others who may use this tool.
INTENDED U E
Your Ryobi blower/vacuum has been designed for
leaf clearing. This tool is intended for consumer
and outdoor use only.
WARNING
To reduce the risk of injury, the user must
read and understand the operator’s
manual.
WARNING
Do not attempt to operate this tool
until you have read thoroughly and
understood completely all instructions,
safety rules etc contained in this manual.
Failure to comply may result in accidents
involving fire, electric shock or serious
personal injury. Save operator’s manual
and review frequently for continuing safe
operation, and instructing others who
may use this tool.
IMPORTANT AFETY IN TRUCTION
Read all these instructions before attempting to
operate this product and save these instructions.
When using the unit, basic safety precaution,
including the following, should always be followed
to reduce the risk or serious personal injury and
damage to the unit. Read all these instructions
before operating this product and save these
instructions.
The device must not be used by people (including
children) with limited physical, sensory or mental
faculties or who lack the necessary experience
and/or knowledge - other than they are supervised
by a person responsible for safety or are being
instructed to operate the machine by such a
person.
eep children and pets at a safe distance away
from the device. Children must be supervised in
order to ensure that they do not play with the
equipment.
Never allow children or other persons unfamiliar
with the user manual to use the blower/vacuum.
Local regulations or bylaws may determine the
minimum age for using the machine.
Observe local noise and other regulations.
CAUTION! When using powered tools, observe the
following basic safety measures for the prevention
of electric shocks and the risk of injury and fire:
The safety rules must be observed during tool use.
Before starting the tool, read the instructions
regarding personal safety and the safety of
unauthorised persons.
eep the instructions in a good state for future use.
In order to reduce the risk, disconnect the plug
from the supply power, only use recommended
accessories as required, otherwise personal injury
may result.
Wear heavy long pants, long sleeves, boots, and
gloves. Avoid loose garments or jewelry that could
get caught in moving parts of the machine or its
motor.
Do not force tool. Use the correct tool for your
application. The correct tool will do the job better
and safer at the rate for which it is designed.
Do not operate the equipment while barefoot or
when wearing sandals or similar lightweight
footwear. Wear protective footwear that will protect
your feet and improve your footing on slippery
surfaces.

3
IMPORTANT AFETY IN TRUCTION
Do not use on steps, a ladder, roof top, tree, or
other unstable support. Stable footing on a solid
surface enables better control of the blower/vac in
unexpected situations.
Secure long hair so it is above shoulder level to
prevent entanglement in any moving parts.
eep firm footing and balance. Do not overreach.
Overreaching can result in loss of balance.
Turn off all controls before unplugging.
Do not allow to be used as a toy. Close attention is
necessary when used by or near children.
Avoid accidental starting. Be sure the power switch
is not on before plugging in. Turn off power switch
before unplugging.
Do not use tool if switch does not turn it on or off.
Any tool that cannot be controlled with the switch is
dangerous and must be repaired.
Do not leave the tool when plugged in. Unplug from
the power outlet when not in use, before servicing,
and before storing the tool. Such preventative
safety measures reduce the risk of starting the tool
accidentally.
eep all bystanders, children, and pets at least
50 ft. away.
Do not operate this unit when you are tired, ill,
upset, or under the influence of alcohol, drugs, or
medication.
Do not operate in poor lighting.
eep all parts of your body away from any moving
parts and all hot surfaces of the unit.
Check the work area before each use. Remove all
objects such as rocks, broken glass, nails, wire, or
string which can be thrown or become entangled in
the machine.
Never use blower/vacuum near fires, fireplaces, hot
ashes, barbecue pits, etc., which may cause fire to
spread.
Do not pull or carry by cord, use cord as a handle,
close a door on a cord, or pull cord around sharp
edges or corners. eep cord away from heated
surfaces.
Do not pick up flammable or combustible liquids
such as gasoline or use in areas where they may
be present.
Never use blower to spread chemicals, fertilizers,
or any other toxic substances. Spreading these
substances could result in serious injury to the
operator or bystanders
Do not pick up anything that is burning or smoking
such as cigarette matches or hot ashes.
Do not unplug by pulling on cord. To unplug, grasp
the plug, not the cord.
Do not put any object into openings. Do not use
with any opening blocked; keep free of dust, lint,
hair, and anything that may reduce air flow.
Use only identical manufacturer’s replacement
parts and accessories. Use of any other parts may
create a hazard or cause product damage.
Do not use with damaged cord or plug. If appliance
is not working as it should, has been dropped,
damaged, left outdoors, or dropped into water,
return it to a service center.
In a double insulated appliance, two systems of in-
sulation are provided instead of grounding. No
grounding means is provided on a double insulated
appliance, nor should a means for grounding be
added to the appliance. Servicing a double
insulated appliance requires extreme care and
knowledge of the system and should be done only
by qualified service personnel. Replacement parts
for a double insulated appliance must be identical
to the parts they replace.
For household use only.
PECIFIC AFETY IN TRUCTION
Do not point the blower nozzle in the direction of
people or pets.
Never place blower/vac on any surface, except a
hard, clean surface when motor is running. Gravel,
sand, and other debris can be picked up by the air
inlet and thrown at the operator or bystanders,
causing possible serious injuries.
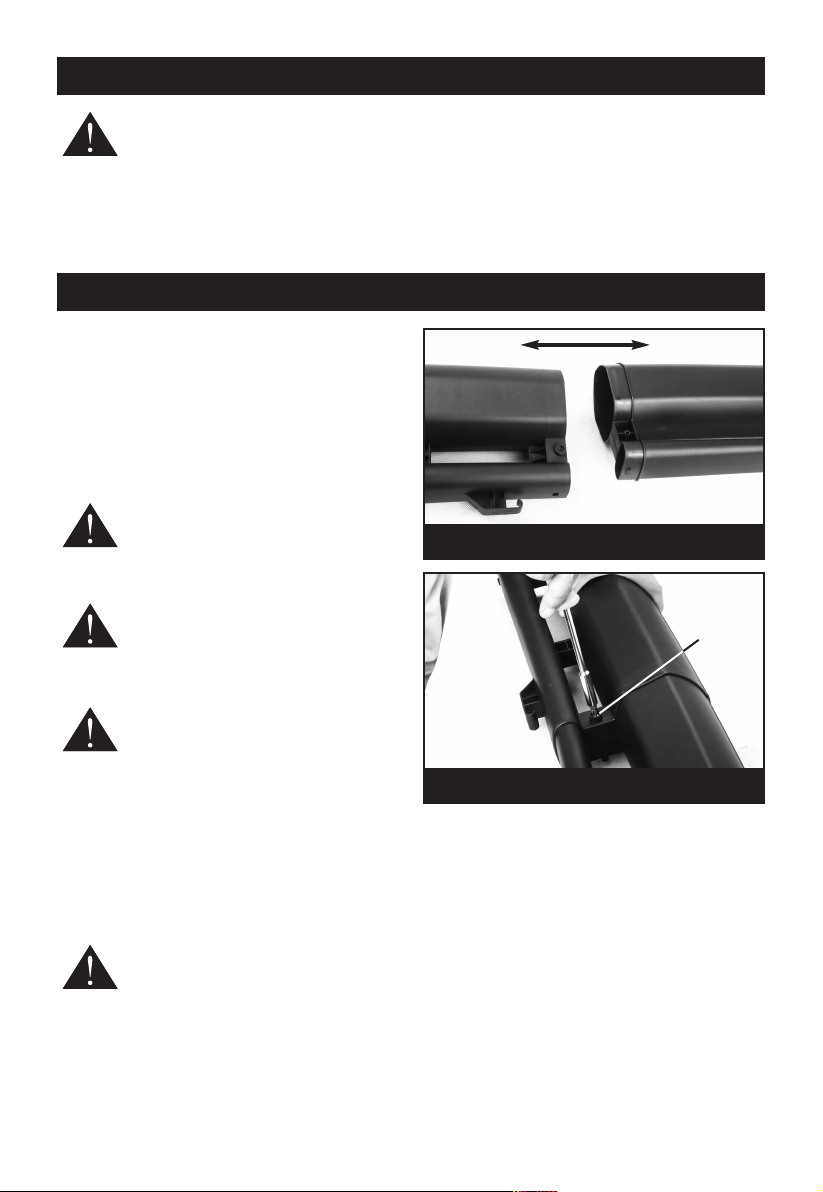
When used as a blower, always install the blower
tubes. When used as a vacuum, always install the
vacuum tubes and vacuum bag. Make sure the
vacuum bag is completely zipped when the unit is
running to avoid flying debris.
Do not operate vacuum without vacuum bag
installed; flying debris could cause serious injury.
Always close vacuum bag completely before
operating.

4
IMPORTANT AFETY IN TRUCTION
Rotating impeller blades can cause severe injury.
Stop the engine before opening the vacuum door
or installing/changing tubes. Do not put hands or
any other object into the vacuum tubes while they
are installed on the unit.
Avoid situations that could catch the vacuum bag
on fire. Do not operate near an open flame. Do not
vacuum warm ash from fireplaces, barbeque pits,
brush piles, etc. Do not vacuum discarded cigars or
cigarettes unless the cinders are completely cool.
When not in use, blower/vacuum should be stored
indoors in a dry, locked up place—out of the reach
of children.
Maintain tool with care. eep fan area clean for
best and safest performance. Follow instructions
for proper maintenance.
Do not attempt to clear clogs from tool without first
unplugging it.
If the power supply cord is damaged, it must be
replaced only by the manufacturer or by an
authorized service center to avoid risk.
Protect your lungs. Wear a face or dust mask if the
operation is dusty. Following this rule will reduce
the risk of serious personal injury.
Save these instructions. Refer to them frequently
and use them to instruct others who may use this
power tool. If you loan someone this power tool,
loan them these instructions also.
ELECTRICAL AFETY
CAUTION! The following states how damage to the
grass trimmer and possible injury to people can be
avoided:
Handle the unit with care. Clean the ventilation
slots regularly, follow the maintenance instructions.
Do not overload your device. Work only within the
indicated range of performance. Do not use low
power machines for heavy duty work. Do not use
your device for purposes for which it has not been
designed.
Do not attempt to repair the machine yourself
unless you are qualified to do so. Any work not
specified in this manual may only be carried out by
a qualified service centre.
Only use extension cables that have been
approved for outdoor use and are resistant to
splash water. The core diameter for extension
cables measuring up to 25m must be at least 1.5
mm2,and 2.5 mm2for cables longer than 25m.
Always roll the whole cable off the reel before use.
Check the cable for damage.
The supply voltage must correspond to the voltage
specified on the modelplate.
Do not abuse the cable. Never move the unit by the
cable or pull the cable to disconnect it from the
mains socket. eep the cable away from heat, oil
and sharp edges. Ensure that the cable is arranged
so that it cannot be tripped over, stepped on or
have heavy weights rested on it. Make sure the
cable will not be subjected to any damage.
Do not use the machine if the cables are damaged
or worn.
Do not connect a damaged cable to the mains
supply or touch a damaged cable before it is
disconnected from the mains supply. A damaged
cable can lead to an electric shock.
GENERAL AFETY RULE
WARNING! Read all instructions Failure to follow
all instructions listed below may result in electric
shock, fire and/or serious injury. The term "power
tool" in all of the warnings listed below refers to
your mains operated (corded) power tool or battery
operated (cordless) power tool.
AVE THE E IN TRUCTION
1) WORK AREA
a) eep work area clean and well lit. Cluttered and
dark areas invite accidents.
b) Do not operate power tools in explosive
atmospheres, such as in the presence of
flammable liquids, gases or dust. Power tools
create sparks which may ignite the dust or
fumes.
c) eep children and bystanders away while
operating a power tool. Distractions can cause
you to lose control.
2) ELECTRICAL AFETY
a) Power tool plugs must match the outlet. Never
modify the plug in any way. Do not use any
adapter plugs with earthed (grounded) power
tools. Unmodified plugs and matching outlets
will reduce risk of electric shock.

5
IMPORTANT AFETY IN TRUCTION
b) Avoid body contact with earthed or grounded
surfaces such as pipes, radiators, ranges and
refrigerators. There is an increased risk of
electric shock if your body is earthed or
grounded.
c) Do not expose power tools to rain or wet
conditions. Water entering a power tool will
increase the risk of electric shock.
d) Do not abuse the cord. Never use the cord for
carr ing, pulling or unplugging the power tool.
Keep cord awa from heat, oil, sharp edges or
moving parts. Damaged or entangled cords
increase the risk of electric shock.
e) When operating a power tool outdoors, use an
extension cord suitable for outdoor use. Use of
a cord suitable for outdoor use reduces the risk
of electric shock.
3) PER ONAL AFETY
a) Stay alert, watch what you are doing and use
common sense when operating a power tool.
Do not use a power tool while you are tired or
under the influence of drugs, alcohol or
medication. A moment of inattention while
operating power tools may result in serious
personal injury.
b) Use safety equipment. Always wear eye
protection. Safety equipment such as dust
mask, non-skid safety shoes, hard hat, or
hearing protection used for appropriate
conditions will reduce personal injuries.
c) Avoid accidental starting. Ensure the switch is
in the off position before plugging in. Carrying
power tools with your finger on the switch or
plugging in power tools that have the switch on
invites accidents.
d) Remove any adjusting key or wrench before
turning the power tool on.
A wrench or a key left attached to a rotating part
of the power tool may result in personal injury.
e) Do not overreach. eep proper footing and
balance at all times. This enables better control
of the power tool in unexpected situations.
f) Dress properly. Do not wear loose clothing or
jewellery. eep your hair, clothing and gloves
away from moving parts. Loose clothes,
jewellery or long hair can be caught in moving
parts.
g) If devices are provided for the connection of
dust extraction and collection facilities, ensure
these are connected and properly used. Use of
these devices can reduce dust related hazards.
4) POWER TOOL U E AND CARE
a) Do not force the power tool. Use the correct
power tool for your application. The correct
power tool will do the job better and safer at the
rate for which it was designed.
b) Do not use the power tool if the switch does not
turn it on and off. Any power tool that cannot be
controlled with the switch is dangerous and
must be repaired.
c) Disconnect the plug from the power source be-
fore making any adjustments, changing acces-
sories, or storing power tools. Such preventive
safety measures reduce the risk of starting the
power tool accidentally.
d) Store idle power tools out of the reach of
children and do not allow persons unfamiliar
with the power tool or these instructions to
operate the power tool. Power tools are
dangerous in the hands of untrained users.
e) Maintain power tools. Check for misalignment
or binding of moving parts, breakage of parts
and any other condition that may affect the
power tools operation. If damaged, have the
power tool repaired before use. Many accidents
are caused by poorly maintained power tools.
f) eep cutting tools sharp and clean. Properly
maintained cutting tools with sharp cutting
edges are less likely to bind and are easier to
control.
g) Use the power tool, accessories and tool bits
etc., in accordance with these instructions and
in the manner intended for the particular type of
power tool, taking into account the working
conditions and the work to be performed. Use of
the power tool for operations different from
intended could result in a hazardous situation.
5) ERVICE
a) Have your power tool serviced by a qualified
repair person using only identical replacement
parts. This will ensure that the safety of the
power tool is maintained.

6
DE CRIPTION
10
5
11
2
8 7
1. Harness hook
2. On/Off switch trigger
3. Rear handle
4. Power cable
5. Function change lever
6. Vacuum bag holder
7. Collection bag
8. Wheel
9. Lower blower/vacuum tube
10. Upper blower/vacuum tube
11. Front handle
4
1
6
9
3

7
UNPACKING
CAUTION. This packaging contains
sharp objects. Take care when
unpacking. Remove the machine,
together with the accessories supplied, from the
packaging. Check carefully to ensure that the
machine is in good condition and account for all the
accessories listed in this manual. Also make sure
that all the accessories are complete.
If any parts are found to be missing, the machine
and its accessories should be returned together in
their original packaging to the retailer. Do not throw
the packaging away, keep it safe throughout the
guarantee period, then recycle if possible,
otherwise dispose of it by the proper means. Do
not let children play with empty plastic bags due to
the risk of suffocation.
A EMBLY
PACKING CONTENT
• Blower/Vacuum Assembly
• Lower blower/vacuum tube
• Upper blower/vacuum tube
• Connection screw x 2
• Wheel
• Collection bag
• Harness
• Operator’s manual.
WARNING. If any parts are damaged or
missing, do not operate this product until
the parts are replaced. Use of this
product with damaged or missing parts
could result in serious personal injury.
WARNING. Do not connect to power
supply until assembly is complete.
Failure to comply could result in
accidental starting and possible serious
personal injury.
WARNING. Do not attempt to modify this
product or create accessories not
recommended for use with this product.
Any such alteration or modification is
misuse and could result in a hazardous
condition leading to possible serious
personal injury.
TOOL NEEDED
The following tools (not included) are needed for
assembly: Phillips Screwdriver
ATTACHING THE BLOWER/VACUUM TUBE
TOGETHER
WARNING. Never run the unit without
the blower/vacuum tube and collection
bag installed. Use of an improperly
assembled unit could result in serious
personal injury.
Fit guiding grooves on the lower blower/vacuum
tube into the upper section, Fig.1.
Push two sections firmly together until they click
into place. Use a connection screw in place A,
Fig.2, and fasten with a phillips screwdriver.
Fig. 1
Fig. 2
A

A EMBLY
ATTACHING THE BLOWER/VACUUM TUBE TO
THE MAIN BODY
Before installing the upper blower/vacuum tube
section remove the 2 screws in place B & C. Push
the upper blower/vacuum section firmly into the
main body until it clicks into place. Use a
connection screw in place D, Fig.3, reinstall the two
screws in place B & C and fasten with a phillips
screwdriver.
Note: Make sure all the connections between the
tubes and motor housing are properly secured prior
to operation.
ATTACHING THE WHEEL
Push the wheel section firmly onto the front end of
the blower/vacuum tube and fasten the screw with
a phillips screwdriver, Fig.4.
ATTACHING AND COLLECTION BAG
Slide the opening of the plastic bracket on the
collection bag over the discharge outlet on the
bottom of the motor housing.
Ensure the locking tabs, Fig.5 (5.1), locate onto the
two slots on the blower/vacuum body (5.2).
Attach the front of the collection bag to the
underside of the blower/vacuum tube using the clip
fitted to the debris collection bag, Fig.6.
ATTACHING THE HARNE
Clip the shoulder harness onto the harness hook
on top of the motor housing, Fig.7.
Adjust the shoulder strap so that it is in a
comfortable position for you.
Note: The shoulder harness is provided to reduce
fatigue and aid comfort when using the
blower/vacuum and can be worn in a position to
suit the operator.
Fig. 4
Fig. 5
8
Fig. 6
Fig. 7Fig. 3
B
C
D
5.1
5.2

OPERATION
WARNING. Do not allow familiarity with
products to make you careless.
Remember that a careless fraction of a
second is sufficient to inflict severe
injury.
WARNING. Always wear eye protection
with side shields marked to comply with
ANSI Z87.1. Failure to do so could result
in objects being thrown into your eyes,
resulting in possible serious injury.
WARNING.Never remove discharge
outlet elbow. Removal of elbow could
result in contact with moving fan blades
and cause serious personal injuries.
CONNECTING TO A POWER UPPLY
This product is designed with a power cable
retainer that prevents the extension cord from
being pulled loose while using.
Form a loop with the end of the extension cord.
Insert loop portion of extension cord through the
opening in the bottom of the rear handle and place
over power cable retainer, Fig.8.
Slowly pull loop against power cable retainer until
the slack is removed.
Plug product into extension cord.
NOTE: Failure to remove all excess cord slack
from extension cord retainer could result in plug
loosening from the receptacle.
NOTE: Use only approved outdoor extension
cords.
NOTICE: Always use cord retainer to properly
attach extension cord to string trimmer. Failure to
use cord retainer may result in damage to string
trimmer and/or extension cord.
APPLICATION
You may use this product for the purposes listed
below:
Clearing leaves and other debris from your lawn.
eeping decks and driveways free from leaves and
pine needles.
Vacuuming leaves from your lawn.
OPERATION
WITCHING BETWEEN BLOWER MODE AND
VACUUM MODE (FIG.9)
WARNING.Always ensure that your unit
is switched off and has fully stopped
before changing the mode of operation.
Do not force the quick change lever. It should move
smoothly without resistance. If you encounter
problems, disconnect from power supply and clean
the lever mechanism.
For blower mode:
Switch the quick change lever so it
points to the blow symbol.
For vacuum mode:
Switch the quick change lever so it
points to the vacuum symbol.
Fig. 8
Fig. 9
9

10
TARTING AND TOPPING
Connect the plug to main power supply. Squeeze
the On/Off trigger (Fig.10) to start the
blower/vacuum. To stop the blower/vacuum, simply
release the trigger.
OPERATING THE BLOWER
To keep from scattering debris, blow around the
outer edges of a debris pile. Never blow directly
into the center of a pile.
To reduce sound levels, limit the number of pieces
of equipment used at any one time.
Use rakes and brooms to loosen debris before
blowing. In dusty conditions, slightly dampen
surfaces when water is available.
Conserve water by using power blowers instead of
hoses for many lawn and garden applications, in-
cluding areas such as gutters, screens, patios,
grills, porches, and gardens.
Watch out for children, pets, open windows, or
freshly washed cars, and blow debris safely away.
Hold the blower with the handle in your right hand.
Operate power equipment at reasonable hours only
— not early in the morning or late at night when
people might be disturbed. Comply with the times
listed in local ordinances.
After using blowers or other equipment, CLEAN
UP! Dispose of debris properly.
OPERATING THE VACUUM
WARNING. Never run the unit without
the vacuum tube and vacuum bag
installed. Use of an improperly
assembled unit could result in serious
personal injury.
Switch the quick change lever so it points to the
vacuum symbol.
Start the blower/vacuum. Refer to Starting and
Stopping earlier in this manual.
Place the shoulder strap over your shoulder and
hold the handle knobs in your hands.
Move the unit from side to side along outer edge of
the debris. To avoid clogging, do not place the
vacuum tube directly into the debris pile.
Hold the motor higher than the inlet end of the
vacuum tube.
Always point vacuum tube downhill when working
on a hillside.
To avoid injury to the operator or unit, do not pick
up rocks, broken glass, bottles, any type of metal
objects, or other similar objects.
If the blower/vacuum tube should clog, stop the
motor, unplug the power cord, and wait for all
moving parts to stop before cleaning out the
obstruction. Remove the vacuum tube and clear
the debris from the blower fan housing. Remove
the vacuum bag and clear the tube. A small rod or
stick may be required to clear the entire tube
length. Ensure that all debris has been cleared
before reassembling the vacuum tubes.
EMPTYING THE COLLECTION BAG
When the collection bag is full, the vacuum power
will be greatly reduced. When this happens:
Disconnect the plug from the power supply
Open the zip fastener of the collection bag. Spread
out the opening and empty the bag of its contents.
If you have collected only leaves or vegetable
matter, they will already have been shredded and
will be ready for composting.
Zip up the waste collection bag and resume work.
NOTE: Before re-fitting the bag, first ensure the
machine is disconnected from the power supply
then clean the inside of the exhaust opening,
removing any shredded deposits. Pay special
attention to the cleaning of supporting edges of the
air flow deviator on the inside of the tube.
NOTE: It is not necessary to remove the vacuum
bag from the blower/vacuum when the bag needs
to be emptied. The rear side of the bag has a full
length zipper to open it for emptying.
OPERATION
Fig. 10

11
MAINTENANCE
WARNING. Before inspecting, cleaning,
or servicing the machine, shut off motor,
wait for all moving parts to stop, and
disconnect extension cord. Failure to
follow these instructions can result in
serious personal injury or property
damage.
GENERAL MAINTENANCE
Avoid using solvents when cleaning plastic parts.
Most plastics are susceptible to damage from
various types of commercial solvents and may be
damaged by their use. Use clean cloths to remove
dirt, dust, oil, grease, etc.
WARNING. Do not at any time let brake
fluids, gasoline, petroleum based
products, penetrating oils, etc., come in
contact with plastic parts. Chemicals can
damage, weaken or destroy plastic
which may result in serious personal
injury.
TORAGE (1 MONTH OR LONGER)
Clean all foreign material from the blower.
Store indoors in a place that is inaccessible to
children. eep away from corrosive agents such as
garden chemicals and de-icing salts.
TROUBLE HOOTING
PROBLEM CAUSE REMEDY
Motor won’t start Lower tube hasn’t been telescoped
out to its full length
No power (power failure)
Connection lead wire defect
Motor or switch defect
Pull the lower tube out to its full
length.
Check circuit breaker.
Check fuse
Check circuit breaker.
Replace lead or have lead checked
(electrician); never use defective lead.
Contact the authorized service center.
Material is not sucked in properly (re-
duced vacuuming power)
Machine is clogged or blocked
Vacuum bag too full
Speed setting too low
Clean tool
Empty bag
Adjust to higher speed
IF THESE SOLUTIONS DO NOT SOLVE THE PROBLEM, CONTACT YOUR AUTHORIZED SERVICING DEALER.

12
YMBOL
Safety Alert Symbol Indicates danger, warning or caution. It means attention!!!
Your safety is involved.
Read Your Operator's
Manual
Your manual contains special messages to bring attention
to potential safety concerns as well as operating and
servicing information. Please read all the information
carefully to ensure satisfaction and safe use.
Wear eye, hearing and
head protection
Wear eye, hearing and head protection when operating
this equipment.
Keep bystanders away Keep all bystanders at least 15 m away.
Ricochet Danger of Ricochet.
Damaged cable Remove cable from power if it is damaged.
Discharge oulet elbow Never remove discharge outlet elbow.
Rotating fans Keep hands and feet out of openings while the product is
running.
Recycle Symbol Waste electrical products should not be disposed of with
household waste. Please recycle where facilities exist.
Check with your Local Authority or retailer for recycling
advice.
CE Marking Conforms to relevant safety standards.
Wet conditions alert Do not expose to wet or damp conditions.
Insulation Symbol Double insulated for additional protection.
Switch off Remove plug from mains before cleaning or maintenance.

13
NOTE

14
NOTE

15
NOTE
Table of contents
Other Ryobi Blower manuals

Ryobi
Ryobi RY38BP User manual

Ryobi
Ryobi R18TB User manual

Ryobi
Ryobi 310r User manual

Ryobi
Ryobi RY09465 How to use

Ryobi
Ryobi RBL42BPN User manual

Ryobi
Ryobi 280r User manual

Ryobi
Ryobi RY09053 Quick setup guide

Ryobi
Ryobi 330B, 340BV User manual

Ryobi
Ryobi RY36BLA User manual

Ryobi
Ryobi RESV1300 User manual

Ryobi
Ryobi RY18BLXA User manual

Ryobi
Ryobi RY40402 User manual

Ryobi
Ryobi RY09550 User manual

Ryobi
Ryobi CBL1802 User manual

Ryobi
Ryobi RBV-2200 User manual

Ryobi
Ryobi RY08554 User manual

Ryobi
Ryobi ABE04G User manual

Ryobi
Ryobi 18 Volt One+ Series User manual

Ryobi
Ryobi 170r User manual

Ryobi
Ryobi RBV26G User manual