manuals.online logo
Brands
  1. Home
  2. •
  3. Brands
  4. •
  5. Ryobi
  6. •
  7. Lawn And Garden Equipment
  8. •
  9. Ryobi A184SBR User manual

Ryobi A184SBR User manual

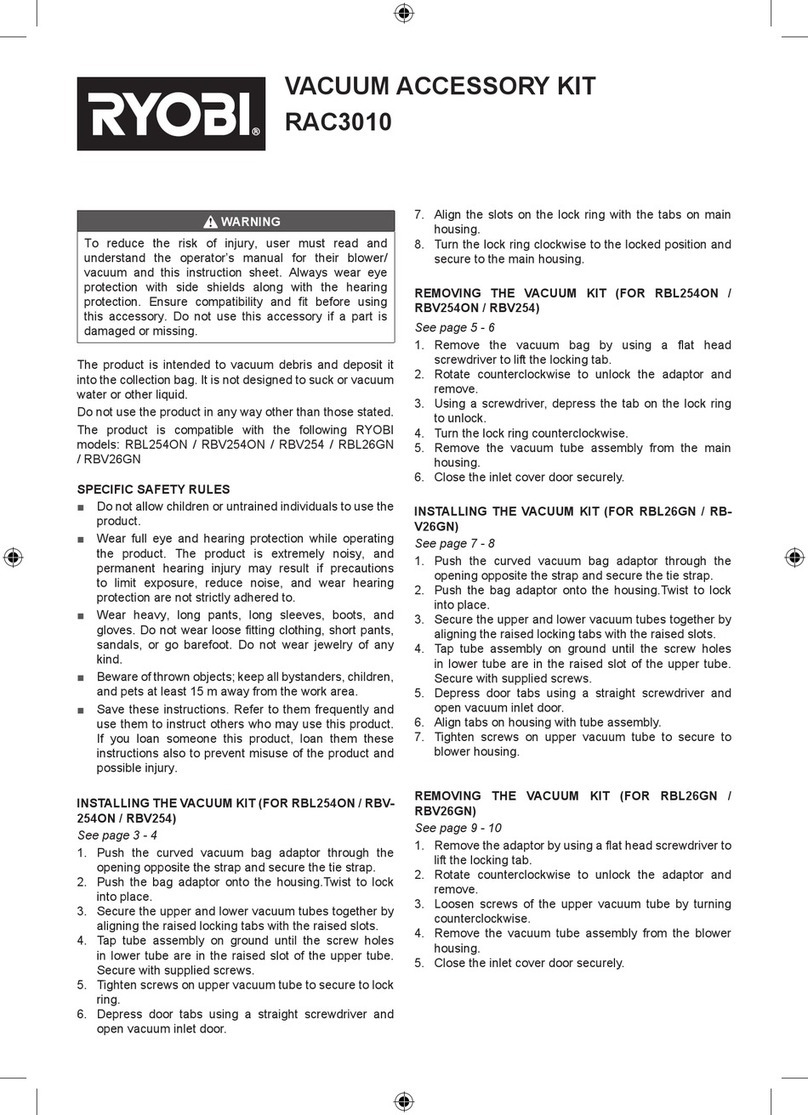
Fig. 1 Fig. 2
A - Lock nuts (écrous de blocage, tuercas de seguridad)
B - Bolts (boulons, pernos)
C - Cutter housing top (haut du boîtier des cisailles, parte superior de la
carcasa de corte)
A - Cutter housing (boîtier des cisailles, carcasa de corte)
B - Washer (rondelle, arandela)
C - Top blade (lame supérieure, hoja superior)
D - Bottom blade (lame inférieur, hoja inferior)
E - Spindle (broche, husillo)
F - Cam (came, leva)
A
B
C
A
B
C
E
D
F
REPLACEMENT BLADES FOR P591 18V SHEARS
LAMES DE RECHANGE POUR CISAILLES DE 18 V P591
HOJAS DE REEMPLAZO PARA CIZALLAS RECORTADORAS DE 18 V P591
A184SBR
WARNING:
To reduce the risk of injury, do not attempt to use this
product until you have read thoroughly and understand
completely this operator’s manual.
REPLACING THE CUTTING BLADES
See Figures 1 - 2.
When cutting blades become worn and dull, the cuts can
become jagged and uneven. Replace the blades to restore
cutting precision.
Remove the battery pack.
Remove the two bolts in the cutting head using the hex
wrench provided. Cover the lock nuts with your hand to
prevent them from falling when the bolts are removed.
Turn the tool over and lay it down on a flat surface so the
blades point downward.
Lift the top of the cutter housing from the unit and set
aside.
Remove the washer and both blades from the spindle.
Set washer aside and discard old blades.
Align the holes on the new bottom blade with the spindles
in the bottom half of the cutter housing.
NOTE: The holes are offset to allow the blade to install
correctly in only one position. If the blade does not fit
properly, turn it over and try inserting again.
Place the new top blade onto the spindle and align the
notched end with the cam.
Reinstall the washer onto the spindle.
Reinstall the top cutter housing by aligning the spindle
and the gap adjustment screw and pressing onto the
bottom cutter housing until completely seated.
Insert the lock nuts into the holes as shown; cover them
with your hand and turn the tool over.
Insert the bolts through the housing and into the lock
nuts. Using the hex wrench, tighten bolts securely.
Once the new blades are installed, refer to Adjusting the
Cutting Blades in the operator’s manual to properly set the
gap adjustment for the material to be cut.
AVERTISSEMENT :
Pour réduire les risques de blessures, ne pas tenter
d’utiliser ce produit avant d’avoir lu entièrement et bien
compris le présent manuel d’utilisation.
REMPLACER LES LAMES
Voir les figures 1 et 2.
Lorsque les lames sont usées et émoussées, les coupes
peuvent devenir dentelées et inégales. Remplacer les lames
pour retrouver une précision de coupe.
Retirer le bloc-piles.
Retirer les deux boulons de la tête de coupe grâce à la
clé hexagonale fournie. Couvrir les écrous de blocage
avec la main pour éviter qu’ils tombent lorsqu’on retire
les boulons.
Retourner l’outil et le déposer sur une surface plane afin
que les lames pointent vers le bas.
Soulever le haut du boîtier des cisailles de l’unité et dé-
poser.
Retirer la rondelle et les deux lames de l’axe.
Mettre la rondelle de côté et jeter les anciennes lames.
Aligner les trous sur la nouvelle lame du bas avec l’axe
dans la moitié inférieure du boîtier des cisailles.
NOTE : Les trous sont décalés afin de permettre à la
lame de bien s’installer en une seule position. Si la lame
ne rentre pas bien, la retourner et tenter de l’insérer de
nouveau.
Placer la nouvelle lame du dessus sur l’axe et aligner le
bout doté d’une coche avec l’arbre.
Réinstaller la rondelle sur l’axe.
Réinstaller le boîtier supérieur des cisailles en alignant
l’axe et la vis d’ajustement du jeu de coupe et en appuyant
le boîtier inférieur jusqu’à ce que tout s’ajuste.
Insérer les écrous de blocage dans les trous comme
illustré; les couvrir avec la main et retourner l’outil.
Insérer les boulons dans le boîtier jusque dans les écrous
de blocage. Utiliser la clé hexagonale pour bien serrer les
écrous.
Lorsque les nouvelles lames sont installées, consulter la
section Ajuster les lames en le manuel d’utilisation pour
bien ajuster le jeu de coupe au matériau à couper.
ADVERTENCIA:
A fin de reducir el riesgo de lesiones, no intente usar
este producto sin antes haber leído y comprendido por
completo este manual del operador.
CÓMO REEMPLAZAR LAS HOJAS DE CORTE
Vea las figuras 1 y 2.
Cuando las hojas de corte se hayan desgastado y estén
desafiladas, los cortes podrían ser dentados y desparejos.
Reemplace las hojas para volver a cortar con precisión.
Quite el paquete de baterías.
Quite los dos pernos de la cabeza de corte con la llave
hexagonal provista. Cubra las tuercas de seguridad con
la mano para evitar que se caigan al quitar los pernos.
Dé vuelta la herramienta y colóquela en una superficie
plana de modo que las hojas apunten hacia abajo.
Retire la parte superior de la carcasa de corte de la unidad
y déjela a un lado.
Quite la arandela y ambas hojas del husillo.
Deje la arandela a un lado y deseche las hojas viejas.
Alinee los orificios de la nueva hoja inferior con los husillos
de la mitad superior en la carcasa de corte.
NOTA: Los orificios están compensados para permitir
que la hoja se instale correctamente en una posición
únicamente. Si la hoja no encaja de forma apropiada,
dela vuelta e intente insertarla de nuevo.
Coloque la nueva hoja superior en el husillo y alinee el
extremo dentado con la leva.
Vuelva a colocar la arandela en el husillo.
Vuelva a colocar la carcasa de corte superior alineando el
husillo y el tornillo de ajuste de distancia, presionándola
contra la carcasa de corte inferior hasta que ambas partes
encajen correctamente.
Inserte las tuercas de seguridad en los orificios como se
muestra en la imagen; cúbralas con la mano y dé vuelta
la herramienta.
Inserte los pernos en la carcasa atravesando las tuercas
de seguridad. Con la llave hexagonal, ajuste los pernos
de forma segura.
Una vez que las nuevas hojas estén instaladas, consulte la
sección Cómo ajustar las hojas de corte en el manual del
operador para configurar el ajuste de distancia de forma
apropiada para el material que desee cortar.
ESPAÑOLFRANÇAIS
995000339
8-15-17 (REV:01)

Other Ryobi Lawn And Garden Equipment manuals

Ryobi OP40BP User manual

Ryobi

Ryobi OP40BP User manual

Ryobi R18BRU10 User manual

Ryobi

Ryobi R18BRU10 User manual

Ryobi RY15122 User manual

Ryobi

Ryobi RY15122 User manual

Ryobi 510r User manual

Ryobi

Ryobi 510r User manual

Ryobi RLT430CESD User manual

Ryobi

Ryobi RLT430CESD User manual

Ryobi RCP254 User manual

Ryobi

Ryobi RCP254 User manual

Ryobi OSF1835BL User manual

Ryobi

Ryobi OSF1835BL User manual

Ryobi RPP254FEJSO User manual

Ryobi

Ryobi RPP254FEJSO User manual

Ryobi EXPAND-IT RY40007VNM User manual

Ryobi

Ryobi EXPAND-IT RY40007VNM User manual

Ryobi P2900 User manual

Ryobi

Ryobi P2900 User manual

Ryobi P2906 User manual

Ryobi

Ryobi P2906 User manual

Ryobi R36PHD00 User manual

Ryobi

Ryobi R36PHD00 User manual

Ryobi AED04G User manual

Ryobi

Ryobi AED04G User manual

Ryobi CGS1820LBC User manual

Ryobi

Ryobi CGS1820LBC User manual

Ryobi RY18SFX35A User manual

Ryobi

Ryobi RY18SFX35A User manual

Ryobi OPP1850 User manual

Ryobi

Ryobi OPP1850 User manual

Ryobi RBC30SET User manual

Ryobi

Ryobi RBC30SET User manual

Ryobi RCP1000 User manual

Ryobi

Ryobi RCP1000 User manual

Ryobi RLT3640P User manual

Ryobi

Ryobi RLT3640P User manual

Ryobi RGS410 User manual

Ryobi

Ryobi RGS410 User manual

Ryobi RBR180013 User manual

Ryobi

Ryobi RBR180013 User manual

Ryobi AQTT03A User manual

Ryobi

Ryobi AQTT03A User manual

Ryobi P2908 User manual

Ryobi

Ryobi P2908 User manual

Ryobi RY28101 User manual

Ryobi

Ryobi RY28101 User manual

Popular Lawn And Garden Equipment manuals by other brands

Sunforce SOLAR user manual

Sunforce

Sunforce SOLAR user manual

GARDEN OF EDEN 55627 user manual

GARDEN OF EDEN

GARDEN OF EDEN 55627 user manual

Goizper Group MATABI POLMINOR instruction manual

Goizper Group

Goizper Group MATABI POLMINOR instruction manual

Rain Bird 11000 Series Operation & maintenance manual

Rain Bird

Rain Bird 11000 Series Operation & maintenance manual

Cub Cadet BB 230 brochure

Cub Cadet

Cub Cadet BB 230 brochure

EXTOL PREMIUM 8891590 Translation of the original user manual

EXTOL PREMIUM

EXTOL PREMIUM 8891590 Translation of the original user manual

Snapper 690179 installation instructions

Snapper

Snapper 690179 installation instructions

Exmark SAR481KA30 Operator's manual

Exmark

Exmark SAR481KA30 Operator's manual

Yazoo/Kees Z12 Operator's manual

Yazoo/Kees

Yazoo/Kees Z12 Operator's manual

Makita EM408MP Original instruction manual

Makita

Makita EM408MP Original instruction manual

Exmark Quest Bagger Setup instructions

Exmark

Exmark Quest Bagger Setup instructions

Manitou Systems AS960 Operator's manual

Manitou Systems

Manitou Systems AS960 Operator's manual

Vertex 1/3 HP Maintenance instructions

Vertex

Vertex 1/3 HP Maintenance instructions

GHE AeroFlo 80 manual

GHE

GHE AeroFlo 80 manual

Land Pride Post Hole Diggers HD25 Operator's manual

Land Pride

Land Pride Post Hole Diggers HD25 Operator's manual

Yazoo/Kees Z9 Commercial Collection System Z9A Operator's & parts manual

Yazoo/Kees

Yazoo/Kees Z9 Commercial Collection System Z9A Operator's & parts manual

Premier designs WindGarden 26829 Assembly instructions

Premier designs

Premier designs WindGarden 26829 Assembly instructions

Snapper 1691351 installation instructions

Snapper

Snapper 1691351 installation instructions

manuals.online logo
manuals.online logoBrands
  • About & Mission
  • Contact us
  • Privacy Policy
  • Terms and Conditions

Copyright 2025 Manuals.Online. All Rights Reserved.