Ryobi PowerPlus HT12V User manual

FOR QUESTIONS, CALL 1-800-345-8746 in U.S. or
1-800-265-6778 in CANADA
www.ryobi.com
IMPORTANT MANUAL DO NOT THROW AWAY
OPERATOR’S MANUAL
12 Volt - 18 Inch Battery Hedge Trimmer
HT12V
™

SERVICE INFORMATION
Service on this unit both within and after the
warranty period should be performed only by
an authorized and approved service dealer.
Dial 1-800-345-8746 in the United States
and 1-800-265-6778 in Canada to obtain
the listing of the authorized service dealer
nearest you.
Do not return the unit to the retailer.
2
TABLE OF CONTENTS
I. Safety Warnings . . . . . . . . . . . . . . . . . .3-5
II. Operating Instructions . . . . . . . . . . . . .6-10
A. Know Your Hedge Trimmer . . . . . . . . . 6
B. Battery and Charging Stand . . . . . . . . .6
C. Hanging Hedge Trimmer . . . . . . . . . . . .6
D. Charging Stand Mounting . . . . . . . . . . .7
E. To Charge Battery . . . . . . . . . . . . . . . .8
F. To Prepare for Opperation . . . . . . . . .8-9
G. To Install Battery . . . . . . . . . . . . . . . . . .9
H. To Remove Battery . . . . . . . . . . . . . . . .9
I. Lock Off Button . . . . . . . . . . . . . . . . . .9
J. To Start Hedge Trimmer . . . . . . . . . .9-10
K. To Trim a Hedge . . . . . . . . . . . . . . . . .10
III. Maintenance And Repair Instructions 11-12
A. To Lubricate Blade . . . . . . . . . . . . . . .11
B. To Remove Blade . . . . . . . . . . . . .11-12
C. To Install Blade . . . . . . . . . . . . . . . . .12
D. Hedge Trimmer Lubrication . . . . . . . . .12
E. Cleaning the Unit . . . . . . . . . . . . . . . .12
F. To Recycle Battery . . . . . . . . . . . . . . .12
IV. Replacement Parts . . . . . . . . . . . . . . . . .13
V. Specifications . . . . . . . . . . . . . . . . . . . . .13
VI. Warranty . . . . . . . . . . . . . . . . . . . . . . . . .14
CONTENTS OF CARTON
This unit includes the following:
•Rechargeable Hedge Trimmer
•Operator’s Manual
•Blade Cover
•12V Charger
•Product Registration Card
•12V Battery
•Charging Stand
•Wallspacers, Anchors and Screws
Examine all parts to make certain that nothing is
missing and no breakage has occurred during
shipping. Any damaged or missing part must be
replaced before using this product.
INTRODUCTION
WARNING: The operation of any power tool can result in foreign objects
being thrown into your eyes, which can result in severe eye damage. Before
commencing power tool operation, always wear safety goggles or safety
glasses with side shields and a full face shield when needed.
SAVE THESE INSTRUCTIONS!
THANK YOU
Thank you for purchasing this quality product.
This modern outdoor power tool has been
designed to provide many hours of useful
service. You will find it to be a great
labor-saving device.
This manual has been prepared to provide
you with common sense operating instructions
and to ensure that you will get maximum
satisfaction. To keep your unit in top operating
condition, use the maintenance and service
procedures in this manual.
PRODUCT REFERENCES,
ILLUSTRATIONS AND
SPECIFICATIONS
All information, illustrations and specifications
in this manual are based on the latest product
information available at the time of printing.
We reserve the right to make changes at any
time without notice.
NOTE: PROOF OF PURCHASE WILL BE
REQUIRED FOR WARRANTY
SERVICE.

•RISK OF CUT OR SHOCK. Keep hands away
from blades. Keep both hands on handles
when power is on. Do not attempt to remove
cut material or hold material to be cut when
blades are moving. Make sure battery is
removed and trigger is not engaged when
clearing jammed material from blades. Do
not grasp the exposed cutting blades or
edges of hedge trimmer.
WARNING: Blades coast after unit
is turned off.
•GUARD AGAINST ELECTRIC SHOCK
HAZARD —Do not use hedge trimmer in
rain, in wet locations, or on either wet
hedges or shrubbery.
•KEEP CHILDREN AWAY —Keep all
bystanders, especially children, at least 30
feet (9.2 meters) away from the work area.
THE PURPOSE OF SAFETY SYMBOLS IS TO
ATTRACT YOUR ATTENTION TO POSSIBLE
DANGERS. THE SAFETY SYMBOLS AND THE
EXPLANATIONS WITH THEM, DESERVE YOUR
CAREFUL ATTENTION AND UNDERSTANDING.
THE SAFETY WARNINGS DO NOT BY
THEMSELVES ELIMINATE ANY DANGER. THE
INSTRUCTIONS OR WARNINGS THEY GIVE
ARE NOT SUBSTITUTES FOR PROPER
ACCIDENT PREVENTION MEASURES.
SYMBOL MEANING
SAFETY ALERT SYMBOL:
Indicates caution or warning. May
be used in conjunction with other
symbols or pictographs
DANGER: Failure to obey a safety
warning will result in serious injury
to yourself or to others. Always
follow the safety precautions to
reduce the risk of fire, electric
shock, and personal injury.
WARNING: Failure to obey a safety
warning can result in serious injury
to yourself or to others. Always
follow the safety precautions to
reduce the risk of fire, electric
shock, and personal injury.
CAUTION: Failure to obey a safety
warning may result in property
damage or personal injury to
yourself or to others. Always follow
the safety precautions to reduce the
risk of fire, electric shock, and
personal injury.
NOTE: Advises you of information or
instructions vital to the operation or
maintenance of the equipment.
3
SAFETY WARNINGS
WARNING: TO AVOID SERIOUS
PERSONAL INJURY, carefully
read and understand this entire
Operator‘s Manual before using your
hedge trimmer. Pay close attention
to the Operating Instructions and
Safety Warnings.
FOR SAFE OPERATION:
•Know your hedge trimmer —read and follow
all instructions. Read operators manual
carefully. Learn its applications and
limitations, as well as the specific potential
hazards related to this tool.
•Dress properly. Do not wear loose
clothing or jewelry. They can be caught
in moving parts. Use of sturdy gloves, non-
skid footwear and safety goggles or safety
glasses with side shields are recommended.
•STAY ALERT —Watch what you are doing
and use common sense. Do not operate
hedge trimmer when fatigued.
IMPORTANT SAFETY INFORMATION
READ ALL INSTRUCTIONS BEFORE USING THIS PRODUCT

SAFETY WARNINGS
4
•USE HEDGE TRIMMER PROPERLY. USE
ONLY for trimming the type of shrub, growth,
etc., described in the operating instructions.
Do not abuse hedge trimmer.
•DO NOT overreach or stand on unstable
support. Keep good footing and balance at
all times. Do not use while standing on a
ladder.
•Avoid unintentional starting of hedge trimmer.
Before inserting battery into hedge trimmer,
be sure lock-off button is not pressed
forward. Do not carry hedge trimmer with
finger on trigger.
•Keep hair, loose clothing, fingers, and all
parts of body away from openings and
moving parts. Long hair must be pulled back
and secured off shoulders and neck. Do not
wear loose fitting clothes or articles such as
scarves, strings, chains, ties, etc.
•Maintain hedge trimmer with care. Keep
blades sharp at all times, and clean for best
and safest performance. Follow maintenance
instructions. Always use a clean cloth when
cleaning. Never use brake fluid, gasoline,
petroleum-based products, or any strong
solvents to clean your tool.
•When not in use, store hedge trimmer
indoors in a dry place —where it is not
accessible to children.
•For service or repair, return the hedge
trimmer to your authorized dealer. See that
only identical replacement parts are used.
The use of non-standard parts, or other
accessories or attachments not designed for
this hedge trimmer, could result in serious
injury to the user or damage the hedge
trimmer, and void your warranty.
•Keep work area clean. Cluttered areas and
benches invite accidents.
•Do not use without front handle in place.
Keep both hands on handles when tool is on.
•Wear hearing protection during extended
periods of operation.
•Never use in an explosive atmosphere.
Normal sparking of the motor could ignite
fumes.
•Battery tools do not have to be plugged into
an electrical outlet; therefore, they are always
in operating condition. Be aware of possible
hazards, such as sharp blades, even when
tool is not operating. Always remove the
battery before cleaning or adjusting the tool.
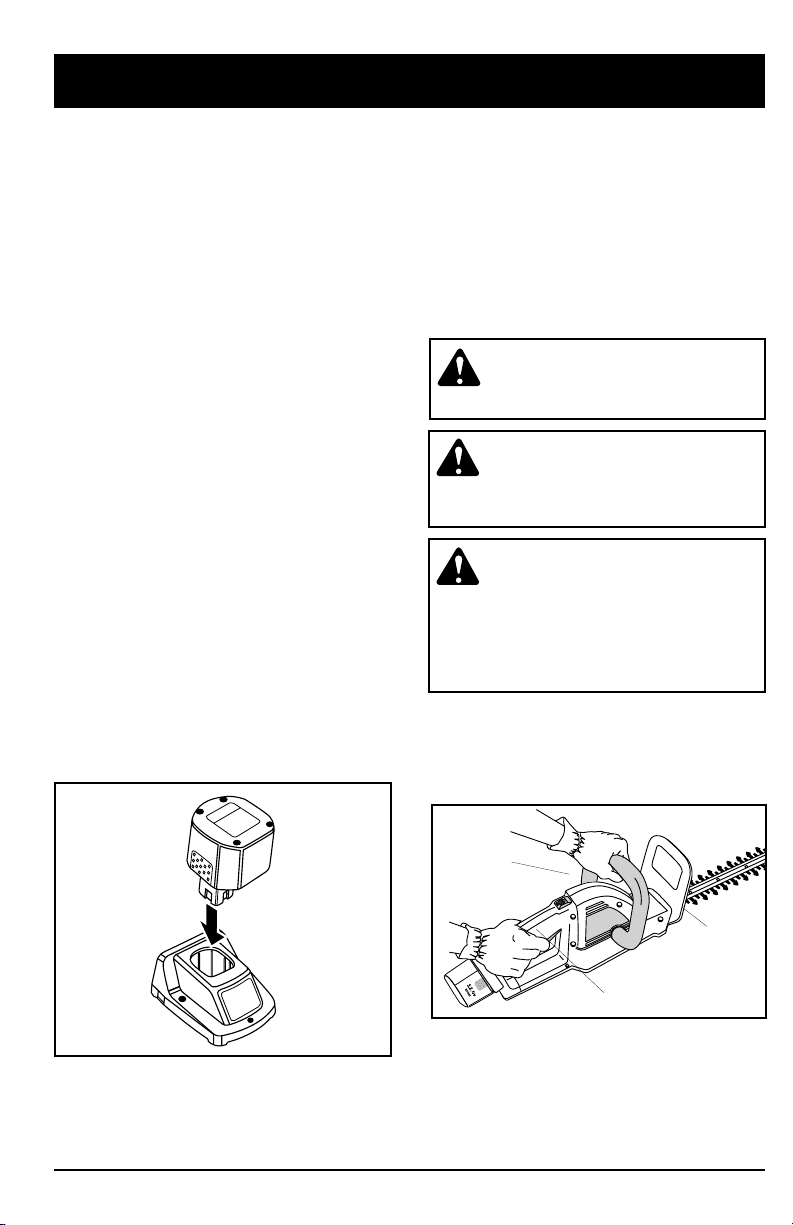
•USE ONLY THE CHARGING STAND
PROVIDED WITH YOUR HEDGE TRIMMER.
Do not substitute any other charging stand.
Use of another charging stand could
promote batteries to explode causing
possible serious injury.
•DO NOT PLACE HEDGE TRIMMER OR ITS
BATTERY NEAR FIRE OR HEAT. It might
explode.
•DO NOT CHARGE HEDGE TRIMMER IN A
DAMP OR WET LOCATION.
•Your hedge trimmer should be charged in a
location where the temperature is more than
50˚F (10˚C) but less than 100˚F (38˚C).
•DO NOT disassemble the battery. Battery
should be recycled, call 1-800-8 BATTERY
for recycling information.
•To avoid accidental starting, never carry your
hedge trimmer with your finger on the trigger.
•Before using charging stand, read all
instructions and cautionary markings in this
manual, on charging stand, and product
using charging stand.
•Do not expose 12V charger to rain or snow.
•DO NOT USE accessories or attachments
not sold or recommended by Ryobi to void
the risk of fire, electric shock or jury to
persons.
•To reduce risk of injury, charge only
nickel-cadmium type rechargeable batteries.
Other types of batteries may burst, causing
personal injury and damage.
•To reduce risk of damage to charger cord,
pull by the cord plug, rather than cord, when
disconnecting 12V charger.
•Make sure charger cord is located so that it
will not be stepped on, tripped over, or
otherwise subjected to damage or stress.
•DO NOT OPERATE 12V CHARGER WITH A
DAMAGED CORD OR PLUG. If damaged,
have replaced immediately by an authorized
service dealer.
•Do not operate 12V charger if it has received
a sharp blow, been dropped, or otherwise
damaged in any way; take it to an authorized
service dealer.
•Do not disassemble 12V charger; take it to
an authorized service dealer when service or
repair is required. Incorrect assembly may
result in a risk of electric shock or fire.

5
SAFETY WARNINGS
SAFETY AND INTERNATIONAL SYMBOLS
This operators manual describes safety and international symbols and pictographs that may appear
on this product. Read the operators manual for complete safety, assembly, operating and
maintenance and repair information.
• READ OPERATORS MANUAL
Failure to follow operating instructions and safety precautions
in operators manual can result in serious injury. Read
operators manual before starting or operating this unit.
SYMBOL MEANING
•SAFETY ALERT SYMBOL
Indicates danger, warning, or caution. May be used in
conjunction with other symbols or pictographs.
•WEAR EYE AND HEARING PROTECTION
WARNING: Thrown objects and loud noise can cause severe
eye injury and hearing loss. Wear eye and ear protection when
operating this unit.
•KEEP HANDS AWAY FROM BLADES
MOVING BLADES CAN CAUSE SEVERE INJURY. Do not put
hands on blades when starting the engine or while operating
hedge trimmer.
•FOR SERVICE INFORMATION, CALL:
USA: 1-800-345-8746
CANADA: 1-800-265-6778
•To reduce risk of electric shock, unplug the
12V charger from outlet before attempting
any maintenance or cleaning.
•Do not use 12V charger outdoors.
•Disconnect 12V charger from power supply
when not in use.
•SAVE THESE INSTRUCTIONS. Refer to them
frequently and use them to instruct other
users. If you loan someone this tool, also
loan them these instructions.

OPERATING INSTRUCTIONS
6
KNOW YOUR HEDGE TRIMMER
READ THIS OPERATOR’S MANUAL AND HEED THE SAFETY WARNINGS BEFORE STARTING
YOUR HEDGE TRIMMER. Compare the illustrations with your hedge trimmer to familiarize yourself
with the location of various controls and adjustments. Save this manual for future reference.
See Figure 1.
Fig. 2
Fig. 1
Blade
Guard
Lock-off
Button
Blade Cover
Trigger
Front
Handle
Wall
Spacers
Rear
Handle
Charging Stand Battery
12V
Charger
Screws
Wall
Anchors
1. TRIGGER —use for starting and stopping
the hedge trimmer.
2. HANDLES —Both front (wrap-around)
and rear handles are used to hold the hedge
trimmer during operation.
3. LOCK-OFF BUTTON —resets each time
the trigger is released.
4. GUARD —protects operator from thrown
debris and moving blade. It must be securely
attached at all times when operating hedge
trimmer.
5. BLADE —use to cut hedges.
6. BATTERY —use to power hedge trimmer.
7. BLADE COVER —protects operator from
blade when hedge trimmer is not in use.
8. CHARGING STAND —holds battery.
9. 12V CHARGER —plugs into wall outlet and
charging stand. Charges battery.
BATTERY AND CHARGING STAND
Your hedge trimmers requires a Ryobi #181918
battery, charging stand #181919, and 12V
charger #181925. The charging instructions
in this manual refer only to these parts.
HANGING HEDGE TRIMMER
For storage convenience, your hedge trimmer
can be hung on the wall by the top hole in the
blade. Make sure to use a screw or hook that
can support the weight of the hedge trimmer
when hanging. See Figure 2.

CHARGING STAND MOUNTING
See Figure 3.
When mounting the charging stand into a
plaster board wall, drill two 7/32 in. (5.56 mm)
diameter holes, 1-7/16 in. (36.5 mm) apart
horizontally. Tap wall anchors into hole with
hammer until flush with wall. Insert screws into
the wall spacers. Make sure the wider end of the
wall spacer contacts the head of the screw.
Screw into anchors (Fig 4).
When mounting the charging stand onto a wood
surface, place two marks, 1-7/16 in. (36.5 mm)
apart horizontally, install screws and wall
spacers provided. Make sure the wider end of
the wall spacer contacts the head of the screw.
Position the charging stands slots over the wall
spacers, and slide into place.
WARNING: ALWAYS assure the
trigger is OFF and the lock-off
button is properly disengaged before
installing the battery in your hedge
trimmer. Failure to heed this warning
can result in serious personal injury.
TO CHARGE BATTERY
See Figures 5 and 6.
The battery for this hedge trimmer has been
shipped in a low charge condition to prevent
possible problems. Therefore you should charge
the battery for at least 8 hours before using.
NOTE: Batteries will not reach full charge the
first time they are charged. Allow
several cycles (trimming followed by
recharging) for batteries to be fully
charged.
WARNING: To reduce the risk of
injury, charge only nickel-cadmium
rechargeable batteries. Other types
of batteries may burst causing
personal injury or damage.
OPERATING INSTRUCTIONS
7
Red Indicator
Light
Barrel
Connector
Charger Input
Fig. 4
Fig. 5
Fig. 3
Slots
Charger Input
Screws
Wall Anchors
Wall SpacersWall Spacers
12 Volt
Charger
Wall SpacersWall Spacers

8. The hedge trimmer should not be stored at
temperatures above 100ºF (37ºC) because
high temperatures will shorten the life of the
battery.
NOTE: The battery will become slightly warm
to the touch while charging. This is
normal and does not indicate a
problem.
9. After charging, disconnect the 12V charger
from the wall outlet and remove the battery
from the charging stand.
WARNING: NEVER use guard as a
handle. Never grasp the unit by the
guard. Failure to heed this warning
can result in serious personal injury.
WARNING: STAY ALERT and watch
what you are doing. Do not operate
hedge trimmer when fatigued.
Failure to heed this warning can
result in serious personal injury.
WARNING: NEVER operate the
hedge trimmer with broken or
missing parts. ALWAYS assure the
guard and front (wrap-around)
handle are secure and in good
condition. Failure to heed this
warning can result in serious
personal injury.
TO PREPARE FOR OPERATION
For ease of operation, your hedge trimmer
has a front and rear handle. See Figure 7.
OPERATING INSTRUCTIONS
8
Fig. 7
Front
Handle
Guard
Rear Handle
1. Charge battery only with the 12V charger
provided.
2. Plug 12V charger into the wall outlet and its
barrel connector into the charging stand
(Fig. 6). Make sure the wall outlet is normal
house voltage, 120 volts, 60 Hz, AC only.
3. Insert battery into the charging stand (Fig. 6).
NOTE: The shape of the battery matches the
shape of the charging stand socket.
4. Press down on battery to be sure contacts
on the battery engage properly with charging
stand contacts (fig. 6).
NOTE: DO NOT place charging stand in an
area of extreme heat or cold. It will
work best at normal room
temperature.
5. When the red light is on, the battery is being
charged.
If the light fails to turn on, check the
following:
a) Barrel connector has been properly installed
into the charging stand.
b) 12V charger has been plugged into the wall
outlet.
c) Battery is firmly seated in the charging stand.
6. Charge the unit for a minimum of 8 hours
before the first use.
7. The battery should be charged for a
minimum of 8 hours between each use. The
hedge trimmers operating time and the life of
the battery will be shortened if this
procedure is not followed.
Fig. 6

WARNING: TO AVOID serious
personal injury, ALWAYS use both
the front (wrap-around) and rear
handles to hold the hedge trimmer
during operation.
WARNING: ALWAYS assure the
switch is OFF and the lock-off
button is properly disengaged before
installing the battery in your hedge
trimmer. Failure to heed this warning
can result in serious personal injury.
TO INSTALL BATTERY
Your hedge trimmer is equipped with a battery,
which powers the unit.
1. Place battery in your hedge trimmer. Align
raised rib inside hedge trimmer with groove
on battery. See Figure 8.
2. Make sure the latches on each side of your
battery snap in place and battery is secured
in hedge trimmer before beginning operation.
TO REMOVE BATTERY
1. Locate latches on end of battery and
depress to release battery from your hedge
trimmer.
2. Remove battery from your hedge trimmer.
See Figure 9.
CAUTION: When placing battery in
your hedge trimmer, be sure raised
rib inside the hedge trimmer aligns
with groove on battery and snaps in
place properly. Improper assembly
of battery can cause damage to
internal components.
LOCK-OFF BUTTON
Your hedge trimmer is equipped with a lock-off
button, which reduces the possibility of
accidental starting. See Figure 10.
TO START HEDGE TRIMMER
To turn your hedge trimmer on, (Fig. 11),
remove blade cover and proceed as follows:
1. Slide the lock-off button forward (1).
2. Depress and hold trigger (2).
OPERATING INSTRUCTIONS
9
Fig. 8
Fig. 9
Fig. 10
Fig. 11
Lock-off
Button
Trigger
Battery
Hedge Trimmer
1
2
Latch
3. Release the lock-off button.
NOTE: The lock-off button is located on top
of the rear handle. The lock resets
each time the trigger is released.
4. To stop hedge trimmer, release the
trigger (2).
Fig. 8

WARNING: If any parts are missing
or damaged, do not operate your
hedge trimmer until they have been
replaced. Failure to do so could
result in possible serious personal
injury.
OPERATING INSTRUCTIONS
10
WARNING: Keep hands and fingers
away from moving parts. Any part of
body coming in contact with moving
parts could result in serious injury.
DANGER: If blade jams on any
electrical cord or line, DO NOT
TOUCH THE BLADE! IT CAN
BECOME ELECTRICALLY LIVE AND
VERY DANGEROUS. Release the
unit in the safest manner possible.
Disconnect the damaged electrical
cord or line from the power source.
If possible, do so safely. If in doubt,
call an electrician or the electrical
contractor for assistance. Failure to
heed this Danger will result in
serious personal injury and possibly
death.
TO TRIM A HEDGE
See Figures 12 and 13.
1. Use hedge trimmer properly. Before starting
hedge trimmer, hold the handles with both
hands and face the cutting blade away
from you.
Fig. 13
Fig. 12
WARNING: To prevent possible
serious injury from accidental
starting, remove battery from your
hedge trimmer and carry by the front
handle when not in use.
WARNING: GUARD AGAINST
ELECTRIC SHOCK HAZARD. Do
not use hedge trimmer in rain, in wet
locations, or on wet hedges or
shrubbery. Wear non-skid footwear.
2. If desired, you can use a string to help cut
your hedge level. Decide how high you want
the hedge. Then, stretch a piece of string
along the hedge at this height. Trim the
hedge just above this guide line of string.
See Figure 12. Trim the side of a hedge so
that it will be slightly narrower at the top as
shown in Figure 13. More of the hedge will
be exposed when shaped this way, and it
will be more uniform.
3. Wear gloves when trimming thorny or prickly
growth. When trimming new growth, use a
wide sweeping action, so that the stems are
fed directly into the cutting blade. Older
growth will have thicker stems and will be
trimmed easiest by using a sawing
movement.
Do not try to cut stems that are larger than
3/8 inch thick, or those obviously too large to
feed into the cutting blade. Use a non-powered
hand saw or pruning saw to trim large stems.

WARNING: When servicing, use
only identical Ryobi replacement
parts. Use of any other parts may
create a hazard or cause product
damage. Only the parts shown on
parts list, page 13, are intended to
be repaired or replaced by the
customer.
TO REMOVE BLADE
WARNING:Blades are sharp. When
handling blade assembly, do not place
your hand or fingers between blades
or in any position where they could
get pinched or cut. NEVER touch
blades or service unit with battery
installed.
MAINTENANCE AND REPAIR INSTRUCTIONS
11
TO LUBRICATE BLADE
Remove Battery From Hedge Trimmer.
1. For easier operation and longer blade life,
lubricate the hedge trimmer blade before and
after each use. Before lubricating, remove
the battery and lay hedge trimmer on a flat
surface. Apply light weight machine oil along
the edge of the top blade as shown in
Figure 14.
2. Occasionally, you should oil your hedge
trimmer during use. Before oiling, stop hedge
trimmer, remove battery, then oil. You then
can resume trimming. Do not oil while hedge
trimmer is running.
Fig. 14
Remove battery from hedge trimmer.
1. Place hedge trimmer upside down on a
workbench and remove four (4) bottom plate
screws. The bottom plate will lift towards the
blade. (Fig. 15).
4. Remove the four (4) blade screws (Fig. 17).
2. Remove bottom plate.
3. Align the cams as shown in Fig. 16. (The
yokes can’t be lifted unless it clears the lip of
the cams.)
Fig. 15
Bottom Plate
Fig. 16
Yoke
Unaligned
Cams
Aligned
Cams
Fig. 17

To preserve natural resources,
please recycle or dispose of
properly. THIS PRODUCT
CONTAINS NICKEL-CADMIUM
BATTERY AND MUST BE
DISPOSED OF PROPERLY. Local,
state, or federal laws may prohibit
disposal of nickel-cadmium
batteries in ordinary trash. Consult
your local waste authority for
information regarding available
recycling and/or disposal options,
or call 1-800-8 BATTERY.
MAINTENANCE AND REPAIR INSTRUCTIONS
12
Fig. 17
WARNING: Make sure bottom plate
is replaced before inserting the
battery, and starting the hedge
trimmer. Failure to do so will expose
internal parts, which could cause an
accident or electrical shock,
resulting in serious injury.
NOTE: If binding occurs after replacing the
blade assembly, repeat the steps
under To Remove Blade and To
Install Blade.
TO RECYCLE BATTERY
WARNING: Upon removal, cover the
battery’s terminals with heavy duty
adhesive tape. Do not attempt to
destroy or disassemble battery or
remove any of its components.
Nickel-cadmium batteries must be
recycled or disposed of properly.
Also, never touch both terminals
with metal objects and/or body parts
as short circuit may result. Keep
away from children. Failure to
comply with these warnings could
result in fire and/or serious injury.
450ANGLE
Ni Cd
Yoke
HEDGE TRIMMER LUBRICATION
All of the bearings in this tool are lubricated
with a sufficient amount of high-grade lubricant
for the life of the unit under normal operating
procedures. Therefore, no further lubrication
is required.
TO INSTALL BLADE
1. Align the cams (Fig. 15, Pg.11).
2. Place new blade on housing and align yokes
to drop into place. Rotate the blade so that it
drops past the lower cam (Fig. 17).
3. Install the four (4) blade screws and tighten
securely (Fig. 16, Pg.11).
4. Install the bottom plate (Fig.14, Pg.11) using
the 4 bottom plate screws. Tighten securely.
NOTE: When properly aligned, the blade
assembly fits in recessed slot in motor
housing.
CAUTION: Do not at any time let
brake fluids, gasoline, petroleum-
based products, penetrating oils,
etc., come in contact with plastic
parts. They contain chemicals that
can damage, weaken, or destroy
plastic.
CLEANING THE UNIT
1. Turn the shears off, and remove the battery.
2. Use a small brush or the air discharge of
a vacuum cleaner brush to keep the air
vents free of obstructions.
3. Do not use any strong detergents on the
plastic housing or plastic components.
Those parts can be damaged by certain
household cleaners that contain aromatic
oils such as pine and lemon, and may also
cause a shock hazard. Wipe off any
moisture with a soft cloth.
5. Each blade has an oval yoke attached to its
end. Slide the blades into position so the
yokes align. Remove the blade from the
housing (Fig. 17).

Item Part No. Description
1 181918 BATTERY
2 181919 CHARGING STAND
3 181920 REPLACEMENT BLADE
4 181921 FRONT (WRAP-AROUND) HANDLE
5 181662 FRONT HANDLE SCREW
6 181922 BLADE COVER
7 181923 GUARD
8 181665 GUARD SCREW
9 181924 BOTTOM PLATE
10 181667 BOTTOM PLATE SCREW
11 181925 12V CHARGER (Model No. 4400101)
12 181667 BLADE SCREW
13
Operating SPM . . . . . . . . . . . . . .1,000 +
Ignition Switch . . . . . . . . . . . . . .Lock-Off
Battery . . . . . . . . . . . . . . . . . . . .12 V DC
12V Charger . . . . . . . . . . . . . . . .8 Hours, 120VAC
Blade . . . . . . . . . . . . . . . . . . . . .18 Inches
REPLACEMENT PARTS
SPECIFICATIONS
1
12
9
8
6
2
5
3
4
10
11
7

RYOBI OUTDOOR PRODUCTS warrants each new
RYOBI Product for two (2) years according to the
following terms.
This warranty extends to the original retail purchaser only
and commences on the date of original retail purchase.
Any part of the RYOBI Product manufactured or supplied
by RYOBI and found in the reasonable judgement of
RYOBI to be defective in material or workmanship will
be repaired or replaced by an authorized RYOBI service
dealer without charge for parts and labor.
The RYOBI Product including any defective part must
be returned to an authorized service dealer within the
warranty period. The expense of delivering the RYOBI
Product to the dealer for warranty work and the expense
of returning it back to the owner after repair or
replacement will be paid for by the owner. RYOBI’s
responsibility in respect to claims is limited to making the
required repairs or replacements and no claim of breach
of warranty shall be cause for cancellation or rescission
of the contract of sale of any RYOBI Product. Proof of
purchase will be required by the dealer to substantiate
any warranty claim. All warranty work must be
performed by an authorized RYOBI service dealer.
This warranty is limited to ninety (90) days from the date
of original retail purchase for any RYOBI Product that is
used for rental or commercial purposes, or any other
income-producing purpose.
This warranty does not cover any RYOBI Product that
has been subject to misuse, neglect, negligence, or
accident, or that has been operated in any way contrary
to the operating instructions as specified in the RYOBI
operators Manual. This warranty does not apply to
any damage to the RYOBI Product that is the result of
improper maintenance or to any RYOBI Product that has
been altered or modified so as to adversely affect the
products operation, performance or durability or that has
been altered or modified so as to change its intended
use. The warranty does not extend to repairs made
necessary by normal wear or by the use of parts or
accessories which are either incompatible with the
RYOBI Product or adversely affect its operation,
performance or durability.
RYOBI reserves the right to change or improve the
design of any RYOBI Product without assuming any
obligation to modify any product previously
manufactured.
ALL IMPLIED WARRANTIES ARE LIMITED IN
DURATION TO THE TWO (2) YEAR WARRANTY PERIOD
OR NINETY (90) DAYS FOR PRODUCTS USED FOR
ANY COMMERCIAL PURPOSE. ACCORDINGLY, ANY
SUCH IMPLIED WARRANTIES INCLUDING
MERCHANTABILITY, FITNESS FOR A PARTICULAR
PURPOSE, OR OTHERWISE, ARE DISCLAIMED IN
THEIR ENTIRETY AFTER THE EXPIRATION OF THE
APPROPRIATE TWO-YEAR OR NINETY DAY
WARRANTY PERIOD. RYOBI’S OBLIGATION
UNDER THIS WARRANTY, IS STRICTLY AND
EXCLUSIVELY LIMITED TO THE REPAIR OR
REPLACEMENT OF DEFECTIVE PARTS, AND ROP
DOES NOT ASSUME OR AUTHORIZE ANYONE TO
ASSUME FOR THEM ANY OTHER OBLIGATION.
SOME STATES DO NOT ALLOW LIMITATIONS ON
HOW LONG AN IMPLIED WARRANTY LASTS, SO
THE ABOVE LIMITATION MAY NOT APPLY TO YOU.
RYOBI ASSUMES NO RESPONSIBILITY FOR
INCIDENTAL, CONSEQUENTIAL OR OTHER
DAMAGES INCLUDING, BUT NOT LIMITED
TO EXPENSE OF RETURNING THE RYOBI
PRODUCT TO AN AUTHORIZED SERVICE DEALER
AND EXPENSE OF DELIVERING IT BACK TO THE
OWNER, MECHANIC’S TRAVEL TIME, TELEPHONE
OR TELEGRAM CHARGES, RENTAL OF A LIKE
PRODUCT DURING THE TIME WARRANTY
SERVICE IS BEING PERFORMED, TRAVEL, LOSS
OR DAMAGE TO PERSONAL PROPERTY, LOSS OF
REVENUE, LOSS OF
USE OF THE PRODUCT, LOSS OF TIME, OR
INCONVENIENCE. SOME STATES DO NOT ALLOW
THE EXCLUSION OR LIMITATION OF INCIDENTAL
OR CONSEQUENTIAL DAMAGES, SO THE ABOVE
LIMITATION OR EXCLUSION MAY NOT APPLY TO
YOU.
This warranty gives you specific legal rights, and you
may also have other rights which vary from state to
state.
This warranty applies to all RYOBI Products
manufactured by RYOBI and sold in the
United States and Canada.
To locate your nearest service dealer dial
1-800-345-8746 in the United States or
1-800-265-6778 in Canada.
RYOBI OUTDOOR PRODUCTS
550 N. 54th Street
Chandler, AZ 85226 U.S.A.
RYOBI CANADA INC.
275 Industrial Rd
Cambridge, Ontario NIR 6K2 CANADA
LIMITED TWO-YEAR WARRANTY
SAVE THESE INSTRUCTIONS FOR FUTURE REFERENCE.
FOR QUESTIONS CALL 1-800-345-8746 IN U.S.
OR 1-800-265-6778 IN CANADA
operators MANUAL PART NO. 181910 REV. B (51329)
PRINTED IN U.S.A. 5/98
Table of contents
Other Ryobi Trimmer manuals

Ryobi
Ryobi RBC1020 User manual

Ryobi
Ryobi RLT3626E User manual

Ryobi
Ryobi CS30, SS30, BC30 User manual

Ryobi
Ryobi EVT350RG Operation manual

Ryobi
Ryobi RBC30SES User manual

Ryobi
Ryobi EXPAND-IT RY15524 User manual

Ryobi
Ryobi RLT3725CH-A User manual

Ryobi
Ryobi RHT3625 User manual

Ryobi
Ryobi RHT3626DR User manual

Ryobi
Ryobi RLT1830H13 User manual

Ryobi
Ryobi RY28020 Quick setup guide

Ryobi
Ryobi R18HLTR38 User manual

Ryobi
Ryobi RHT25X55R User manual

Ryobi
Ryobi RLT254CDSO User manual

Ryobi
Ryobi RBC430SBSC User manual

Ryobi
Ryobi HT816r, HT818r, HT822r User manual

Ryobi
Ryobi 725rE User manual

Ryobi
Ryobi RLT254CDSO User manual

Ryobi
Ryobi P2210 User manual

Ryobi
Ryobi P20190 User manual