Safety Solutions HUTCHENS DEVICE User manual

Installation Manual
HUTCHENS DEVICE™
Hutchens Device V8 4/6/06
The products and parts shown herein are to be installed and used in accordance with these
instructions. Any deviation by the buyer, installer, or user from these instructions constitutes
willful negligence. Products and parts are not to be used if defective, damaged or worn.
Products and parts are not to be used after a severe use and, in any event, not after three (3)
years from the date of purchase.

2
As with any restraint system, replace after severe use, or after 3 years of use.
WARNING: THIS ARTICLE IS SOLD WITHOUT WARRANTY, EXPRESSED OR IMPLIED. NO WARRANTY OR REPRESENTATION IS MADE
AS TO THIS PRODUCTS ABILITY TO PROTECT THE USER FROM ANY INJURY OR DEATH. THE USER ASSUMES THAT RISK.
Hutchens Device™
1-800-731-4404
Single Hook
Attachment
Locate helmet hooks symmetrically on
both sides of the helmet. The helmet
hooks should be located per Figure 1 for
a standard helmet and Figure 2 for a
sidewinder style helmet.
The hooks need to be located directly
in back of the helmet chin strap rivet.
Measure straight back from the chin
strap rivet .5”-1.25”. This should place
the mounting screw in front of the hard
foam liner.
The helmet hook attachment kit comes
with 2 (3/8”) screws and 2 (1/2” ) 10-32
screws. Only TWO screws will be used.
The end of the screw should be flush
(+/- 1/16”) with the inside edge of the
Nut/Washer when tightened.
The Nut Washer has been designed to be
friendly to the inside of the helmet. Use
a medium strength thread locker on the
threads of the Nut Washer.
Tighten the helmet hook assembly until
snug against the inside of the helmet.
Over tightening is not necessary and
may damage the helmet shell.
2
1
This device not recomended for use with an open face helmet.
1B

As with any restraint system, replace after severe use, or after 3 years of use.
WARNING: THIS ARTICLE IS SOLD WITHOUT WARRANTY, EXPRESSED OR IMPLIED. NO WARRANTY OR REPRESENTATION IS MADE
AS TO THIS PRODUCTS ABILITY TO PROTECT THE USER FROM ANY INJURY OR DEATH. THE USER ASSUMES THAT RISK.
Hutchens Device™
1-800-731-4404
B
B
Quick
Release
Tethers
(Yellow)
Waist
Strap
Leg Strap
Helmet
Tethers
Optional Seat Belt Anchor
Standard Anchor
Seat Belt
Anchor
Helmet Tether Helmet Tether
A
A) Helmet Tethers
Lace the helmet tethers provided, to the upper D-rings on the top of the Vertical straps on the Hutchens Device™.
Per Diagram A.
B) Leg Straps
(Optional)
The leg straps are a very
important part of the Hutchens
Device™. The leg straps help
provide provide a consistent fit
of the device and can help avoid
serious injury. The leg straps
should be worn at all times.
The vertical straps are to be
laced through the loop in the
leg straps. The buckle should
be located to the inside and top
of the thigh. This will place the
loop in the leg strap on the inner
thigh. Feed the vertical straps
through the loops in the leg
straps. See diagram B.
The “NEW T-Bar” will fit on any Latch & Link system currently on the market.
It will spread out the vertical straps as they come through the groin area.
3

4
Hutchens Device™
1-800-731-4404
Fitting the Device to the Occupant:
1. Hold harness by the elastic shoulder straps. Insert right arm through shoulder
elastic and chest strap with helmet tethers and D-rings to the back of the
occupant. Insert left arm through opposite shoulder elastic. Lock chest strap
buckle and adjust to size.
2. Lock waist strap and adjust to size.
3. With the helmet tethers positioned on shoulders,
buckle the leg straps if used. Enter and sit
down into the driver’s seat. Keep the
anchor in front of you while sitting.
4. Adjust the seat belt anchor between
the legs by pulling webbing through
the webbing slide adjuster and
lower slot of the seat belt
anchor. Secure seat belt
anchor into vehicle’s
restraint system latch.
Seathing the Harness
“SEAT” the harness by pulling up
on the helmet tethers near the d-
rings on top of the back straps on
the harness. Pull up on the harness
with enough tension to slightly lift
the occupant. This procedure is done
to take out any slack in the lower
portion of the harness. Tension
from the harness should be felt all
the way from the seat belt anchor to
the top of the harness. If the harness
seems to spring back down the back of
the occupant when tension is released,
a second seating procedure should be tried.
If the problem persists, make sure nothing is
under the harness between the harness and the
occupant causing the spring back.
The harness should be “SEATED” every time the
harness is used.
NOTE
Trim all tethers to optimal length for your size. Excess tether
length can cause hang ups and obstruct the effectiveness of
your Hutchens Device™. Cut the excess after fitting and burn
the cut ends to prevent unraveling.”
Quick Release Tethers
(Yellow)
Seat Belt
Anchor
As with any restraint system, replace after severe use, or after 3 years of use.
WARNING: THIS ARTICLE IS SOLD WITHOUT WARRANTY, EXPRESSED OR IMPLIED. NO WARRANTY OR REPRESENTATION IS MADE
AS TO THIS PRODUCTS ABILITY TO PROTECT THE USER FROM ANY INJURY OR DEATH. THE USER ASSUMES THAT RISK.
Waist Strap

Adjustment of the helmet tethers is critical to the proper function
of the harness. The highest neck tension occurs very early in
an accident. Therefore: the initial tension on the harness is
directly related to the effectiveness of the system.
The harness should be adjusted to allow a MAXIMUM of 1/2”
FORWARD movement before tension is felt in the harness
system. This should allow approximately 20 degrees of side
to side movement. (extra mirrors, where allowed, are a good
idea to help eliminate blind spots.)
5
Hutchens Device™
1-800-731-4404
6
NOTE: The best placement for the release tethers is
taped or attached to the chin of the helmet.
5
As with any restraint system, replace after severe use, or after 3 years of use.
WARNING: THIS ARTICLE IS SOLD WITHOUT WARRANTY, EXPRESSED OR IMPLIED. NO WARRANTY OR REPRESENTATION IS MADE
AS TO THIS PRODUCTS ABILITY TO PROTECT THE USER FROM ANY INJURY OR DEATH. THE USER ASSUMES THAT RISK.
5. Pull the Quick Release bail to release. Attach the Quick
release hook to the helmet D-rings on the helmet.
The Quick releases should be routed into the D-ring
from the “outside of the D-ring” to the inside, with
the Quick Release tether pointed down on each side.
Position the Shoulder Harnesses to the OUTSIDE of
the vertical straps and the helmet tethers. The helmet
tethers need to be on the inside of the shoulder belt
harnesses to provide a straight load path and to insure
the harness does not get caught up in the shoulder belts
in case a quick egress is needed. See Diagram 5B.
5B
6. Adjustments of the Helmet Tethers

6
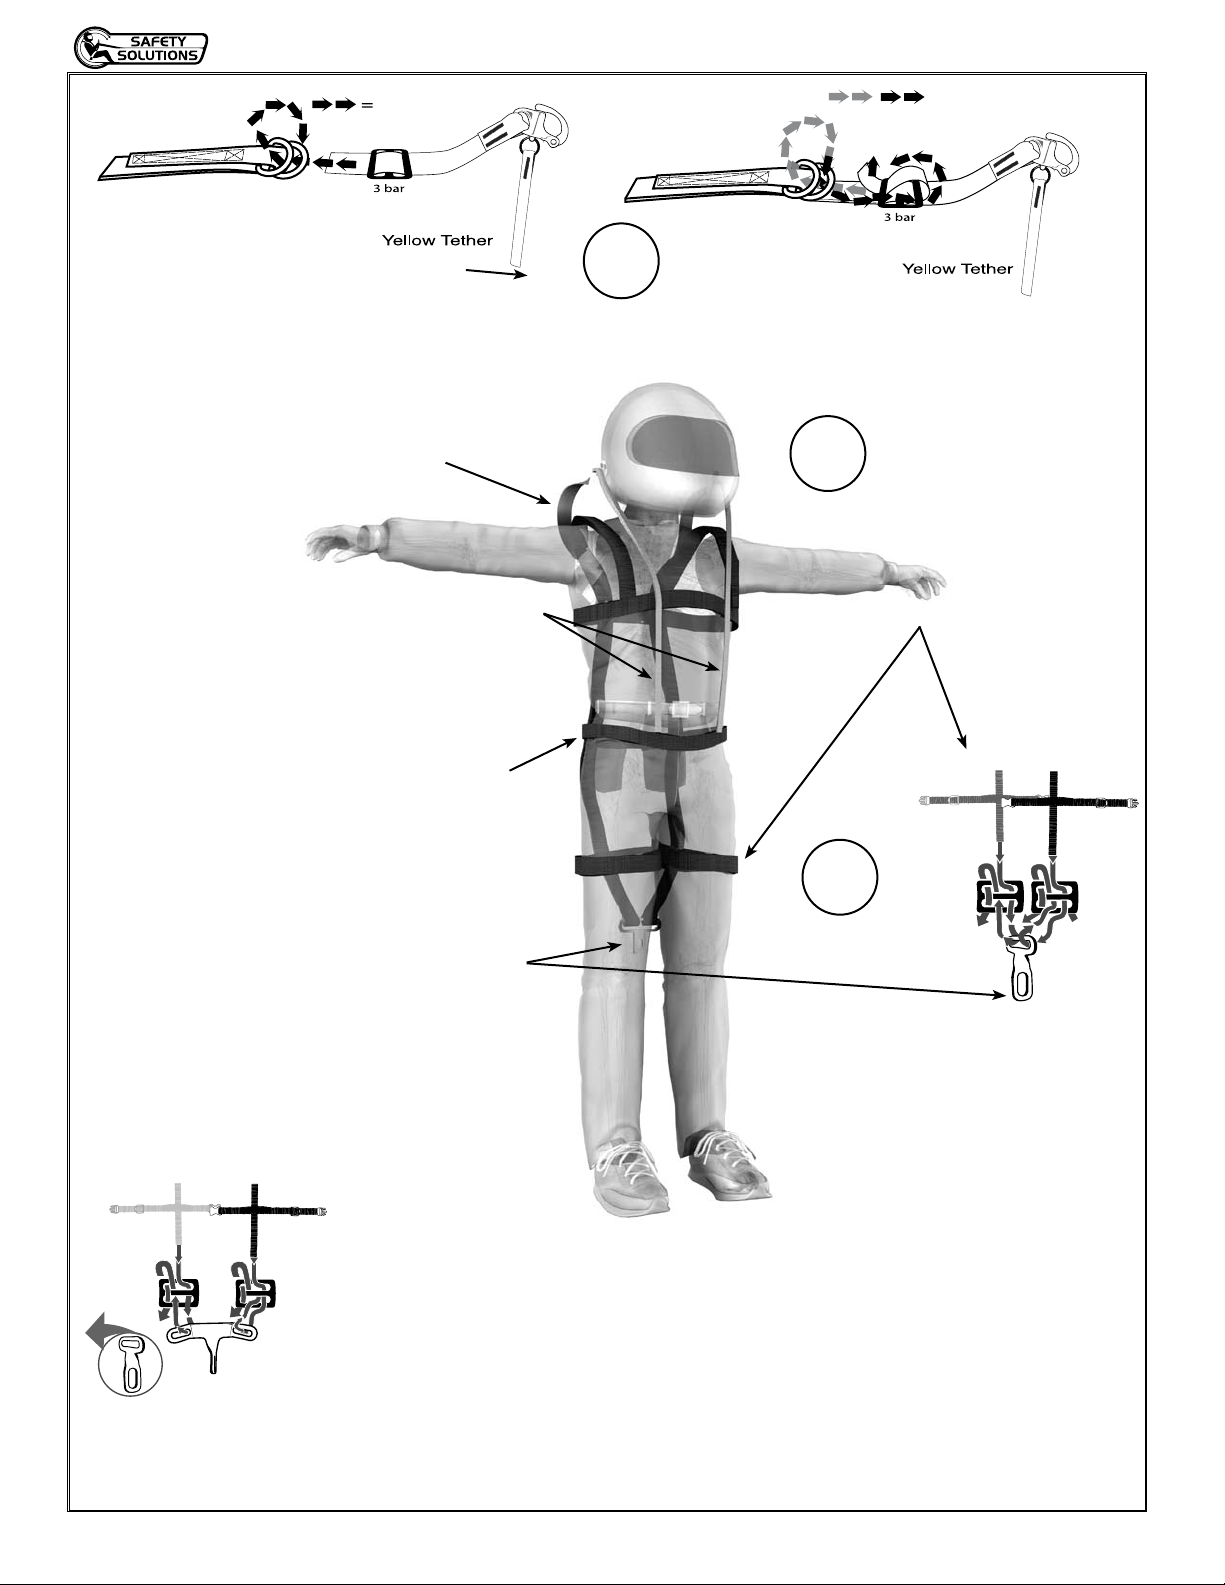
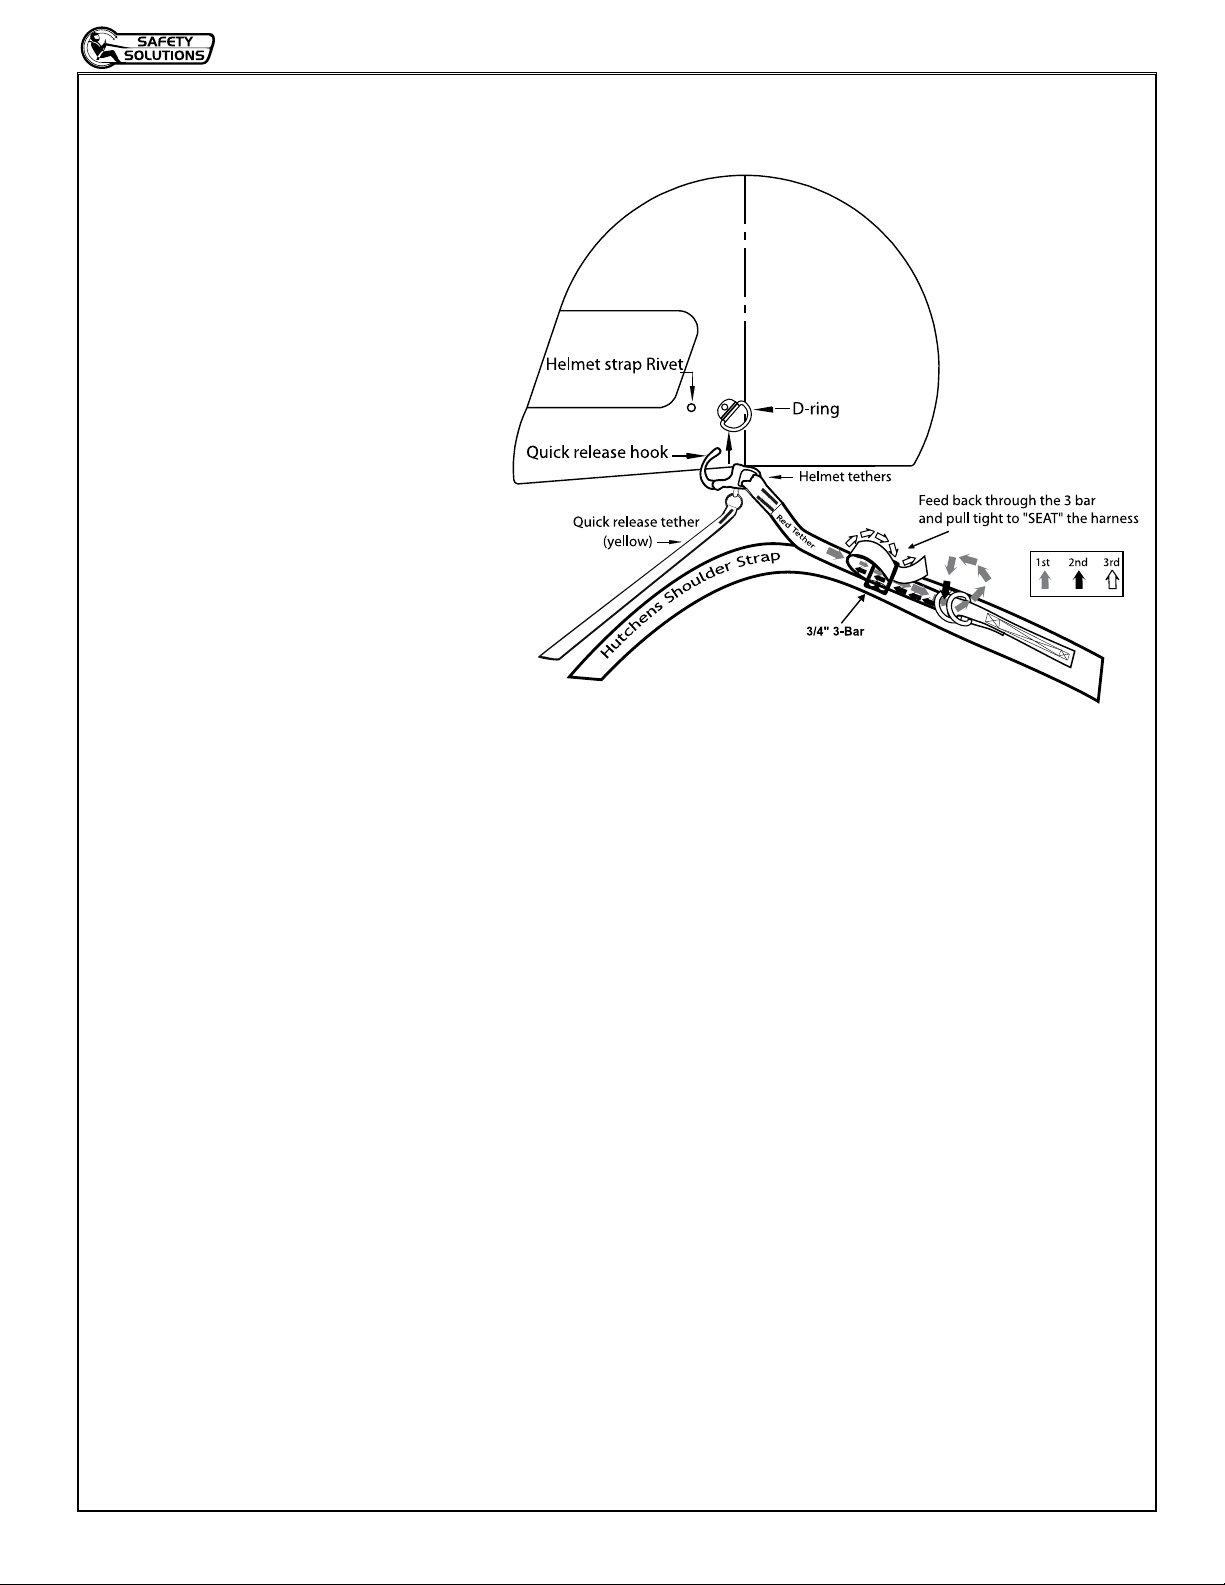
7. Each time the harness is worn, check to insure all
latches are secure. “SEAT” the harness, by pulling
up on the helmet tethers before attaching the
quick release to the helmet. This will take out
unwanted slack in the system.
Minor adjustments may be necessary to
properly tension the harness each time
the system is worn.
Some of the factors that can
influence the harness fit are:
1) Driving suit fit – a loose fitting
driving suit will allow the harness
to better fit the occupant. It will also
allow the fire suit to increase it’s effectiveness
in a fire by providing air gaps.
2) The seat and seat belt tension can also
change the routing distance and thus
require harness adjustment.
SAFETY SYSTEM
A Safety Solutions head and neck restraint, Huchens Device, is only one part of a good safety system for any
race car. It is very important to make sure all of your safety equipment is in top shape and interacts well with
the other components of your safety system.
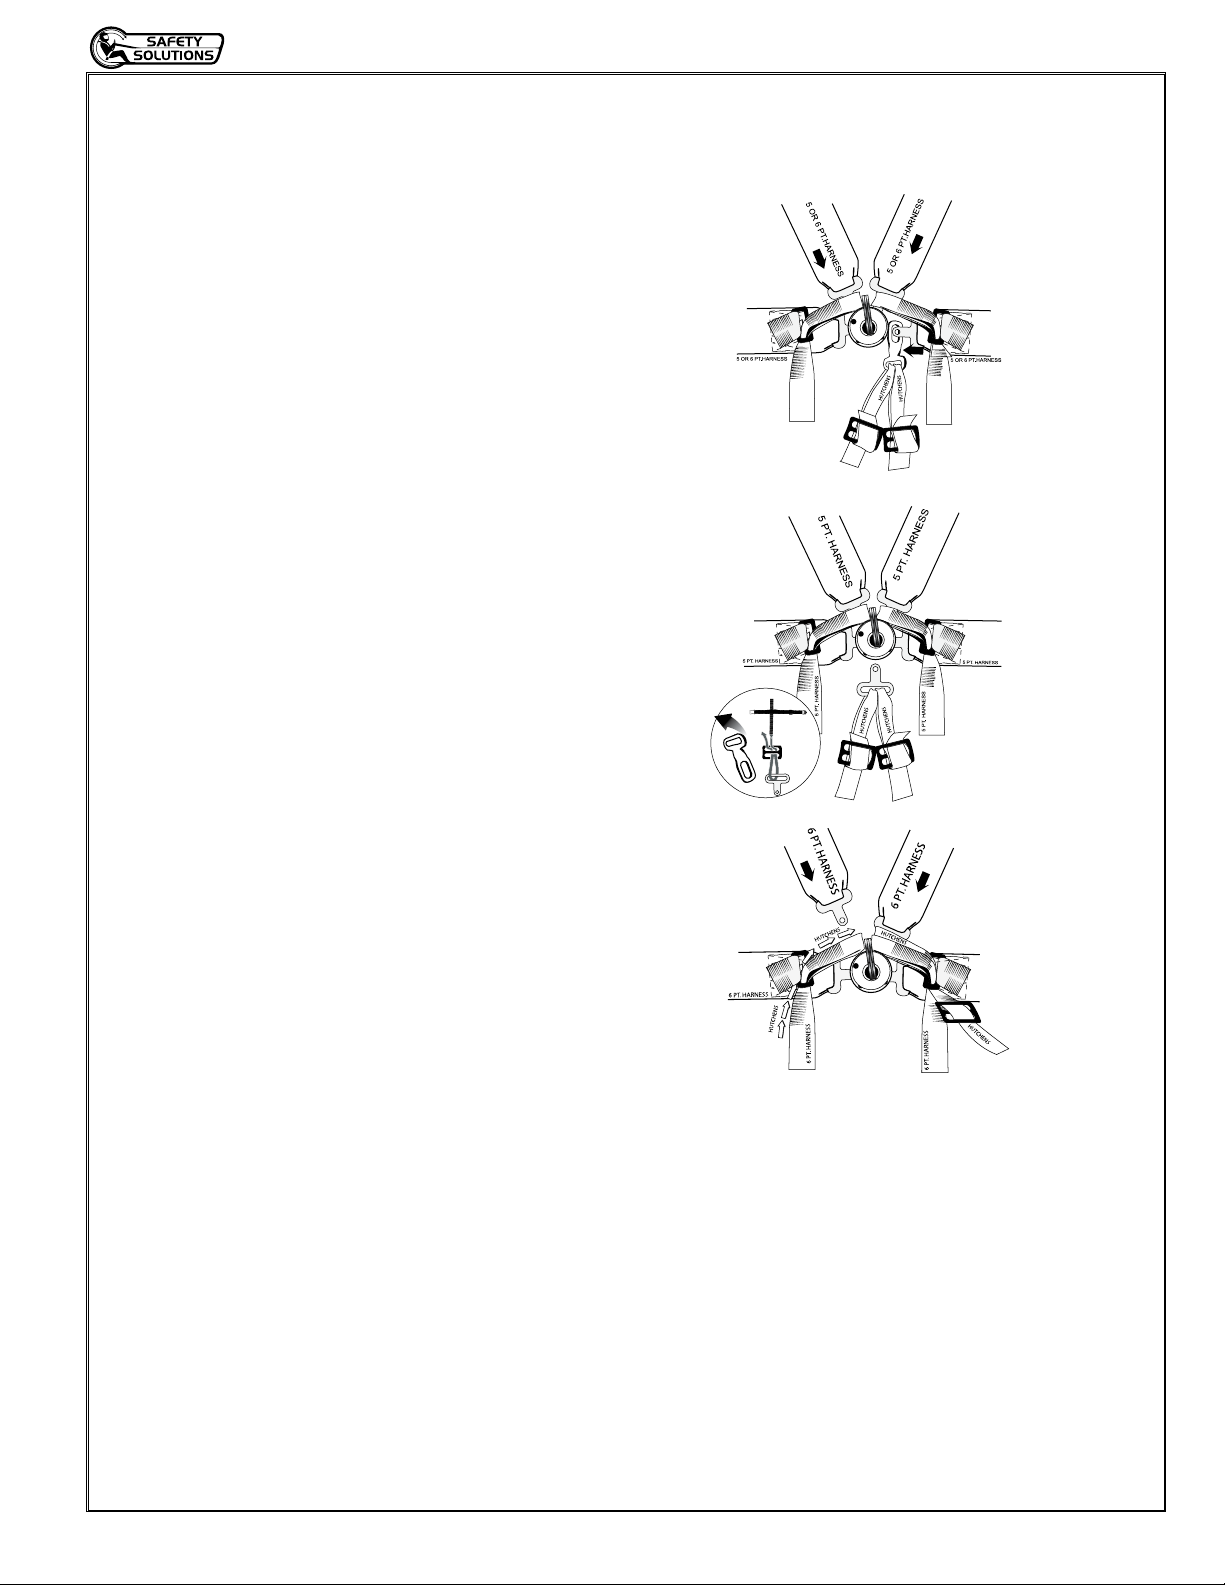
A Hutchens Device has been shown to be most effective in a system with properly mounted seat belts and a
6-point sub-belt system. The 6-point has been shown to better control the occupant’s pelvis earlier in the event.
By securing the pelvis earlier in the event, the upper torso and head loads will be reduced.
A rib support seat with shoulders and a quality head rest has also shown to be beneficial to the effectiveness of
the harness system. The seat should be securely mounted and have a ramp-up to the front of the seat to help
reduce the occupant motion in a frontal or angular frontal impact. The rib support seat will help slow down the
upper torso and cause the body to curl around it. This motion will increase tension on the vertical straps of the
harness.
A quality headrest and nets will help the occupant stay inside of the safety system and will help guide the head
during the event. Contact with the steering wheel in a stock car is very likely. For this reason, a wheel with thin
or relieved spokes and a column that can stroke can help control the head motion in an impact. This is the same
principal that is used in your passenger car.
Head and neck restraint devices are most effective in angular frontal and frontal crashes. They become less
effective in side and rear impacts. The occupant needs to rely on the other parts of the safety system in these
types of impacts. The seat and headrest is the main restraint in side and rearward impacts.
As with any restraint system, replace after severe use, or after 3 years of use.
WARNING: THIS ARTICLE IS SOLD WITHOUT WARRANTY, EXPRESSED OR IMPLIED. NO WARRANTY OR REPRESENTATION IS MADE
AS TO THIS PRODUCTS ABILITY TO PROTECT THE USER FROM ANY INJURY OR DEATH. THE USER ASSUMES THAT RISK.
Hutchens Device™
1-800-731-4404

7
Option 1:
Easiest - If using a 5-point or 6-point system with camlock.
Insert left lap belt tongue through the tongue on the Hutchens
Device™ then into buckle.
(This configuration has been tested with no issues.)
Option 2:
For use when not using a 6-point or the opening in the
bottom of the buckle.
Requires the use of a Camlock tongue that can be webbed
in place of the current tongue. The tongue is available from
Simpson ( upper torso Tongue for Camlock) or from BSR
Products. ( also known as a 6-point anchor. )
Option 3:
For use with the D-ring 6-point.
If the customer is using a Formula style belt with D-rings on
the lap belts. The harness can be modified by unlacing the
tongue on the harness and making a loop at each end of the
vertical straps. The loops then follow the 6-points through
the D-rings on the lap belts and up to the upper torso tongues
to lock into the belt system.
Attachment for a Camlock belt system
Option 1
Option 2
Option 3
As with any restraint system, replace after severe use, or after 3 years of use.
WARNING: THIS ARTICLE IS SOLD WITHOUT WARRANTY, EXPRESSED OR IMPLIED. NO WARRANTY OR REPRESENTATION IS MADE
AS TO THIS PRODUCTS ABILITY TO PROTECT THE USER FROM ANY INJURY OR DEATH. THE USER ASSUMES THAT RISK.
Hutchens Device™
1-800-731-4404

As with any restraint system, replace after severe use, or after 3 years of use.
WARNING: THIS ARTICLE IS SOLD WITHOUT WARRANTY, EXPRESSED OR IMPLIED. NO WARRANTY OR REPRESENTATION IS MADE
AS TO THIS PRODUCTS ABILITY TO PROTECT THE USER FROM ANY INJURY OR DEATH. THE USER ASSUMES THAT RISK.
1-800-731-4404
www.hutchensdevice.com
Table of contents