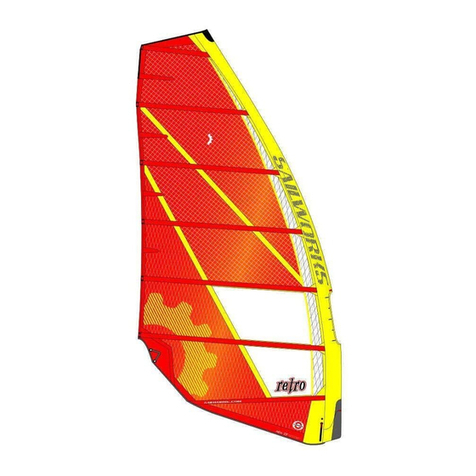
Sailworks NX Slalom Quick start guide

Sail
Maintenance
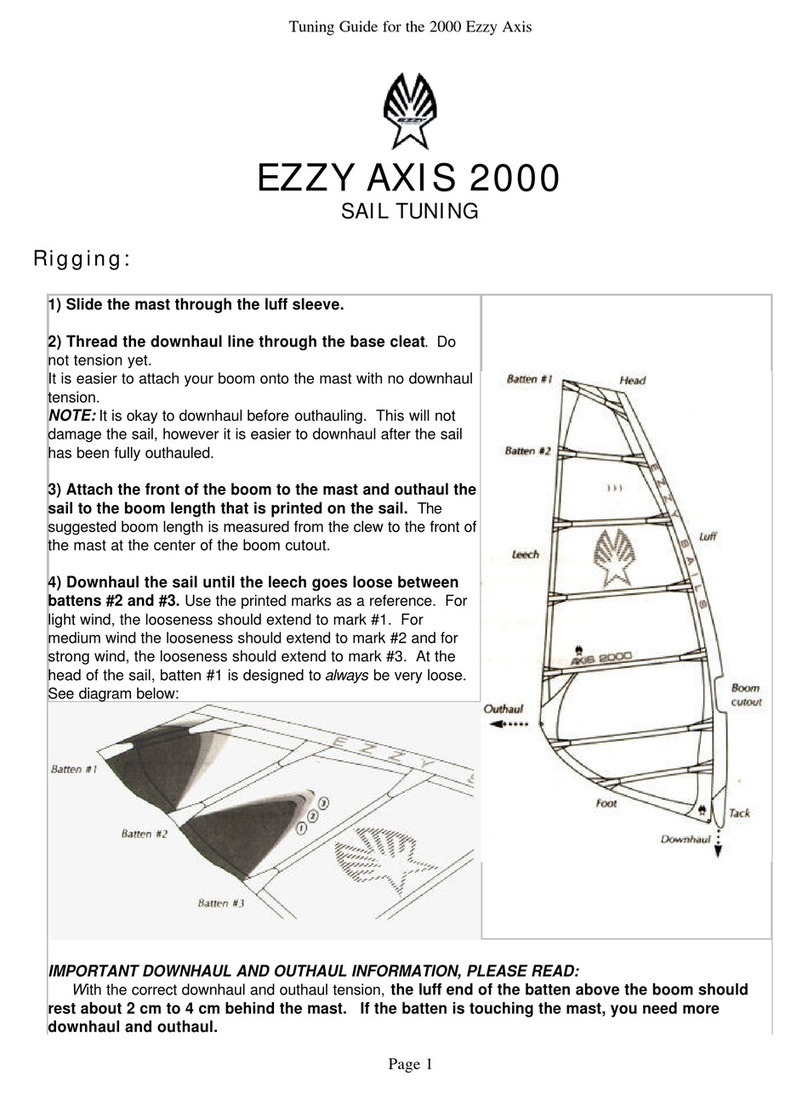
Extend the life of your new
NX sail by following these
simple tips:
• Let your sail dry before de-
rigging.
• Shake any sand or bea h
debris off the sail before
rolling it up at the bea h.
This will extend your sail’s
life onsiderably.
• Most s rat hes in the
monofilm are aused by
sand, grit or salt rystals
abrading the panels while
it is rolled up and
traveling in your ar. Rinse
the sail with fresh water
o asionally, in luding
inside the mast sleeve, to
avoid salt and sand
buildup.
• Avoid rigging on hard or
abrasive surfa es, as abrasion to fabri under high tension an be very damaging.
• If the sail is to be left rigged all-day or overnight, release the outhaul and downhaul
slightly to relax the rig tension.
• The sun’s ultra violet (UV) rays will degrade the monofilm over time. Store your rigged
sail out of dire t sunlight.
• To prevent reases in the monofilm, roll your sail on the paper tube it ame on, or roll it
tightly and store it where it won’t get flattened.
• Have tears promptly repaired by a qualified sail repairperson. Make temporary repairs to
the monofilm with Mylar pa king tape or a sti ker on both sides.
• Do not use solvents for leaning near seams, as this will dissolve the seam tape
adhesives. Use itrus based leaners or water and mild soap.
• When on the bea h, se ure your rigged sail from blowing away.
• Avoid getting sand or dirt inside the mast sleeve and batten po kets.
This redu es sail performan e by in reasing fri tion and wear on
the mast and battens.
• Ba k off the batten tension slightly if you are storing the sail for an
extended period between sailing seasons.
© Sailworks In . 2001 yDesign: Bridgeworks ®Photography: Darrell Wong • Bru e Peterson ÚPrinted in Canada
www.sailworks.com
5-LAYER SEAM
CONSTRUCTION
WIDE BOOM OPENING
WITH ANTI-CHAFE
PROTECTION
SCREW BATTEN
TENSIONERS ON
ALL BATTENS
ANTI-FLUTTER
LEECH BATTENS
TWO POSITION
STAINLESS STEEL
CLEW GROMMETS
STEPPED MONOFILM
CONSTRUCTION
CLOSED HEAD WITH
BATTEN LOCK TIP STABILIZER
RENFORCED
FOOT EDGE
NEOPRENE TACK
FLEX PAD
TACK STRAP
RIGGING HANDLE
WITH HEX KEY
RETAINER
TRIPLE PULLEY
POWER BLOCK
SPLIT MAST SLEEVE
FOR ALIGNED MATERIAL
LOADING
ZIPPER ACCESS
PORTS TO
VARIABLE TENSION
CAMBERS
THREE PIECE DOUBLE
STITCHED MAST SLEEVE
170 GRAM DACRON MAST SLEEVE
SIDES FOR LIGHTWEIGHT DURABILITY
FIVE 13 MM
TUBE BATTENS
CUSTOM TAPERED BATTENS
FOR OPTIMUM DRAFT
PLACEMENT & STABILITY
MAST TOP PATCH FROM ‘BALLISTIC’ NYLON
BATTEN END
ANTI-CHAFE
BUTTONS
Specifications
First Time Rigging
Assembly & Rigging
Tuning for Wind Range
Optimum Settings Chart
Troubleshooting
Sail Maintenance

The luff and boom lengths listed are intended as a guide to rig assembly and sail trim. Depending on the rig omponents you hoose,
these dimensions may not always orrespond exa tly to the settings that are best for you. We measure boom length from the front of
the mast at the middle of the boom opening, to the ba k orner of the sail between the two lew grommets. The maximum boom length
is a hieved at full outhaul tension with the boom positioned at the top of the boom opening. We measure luff length on a rigged sail
from the underside of the male head ap fitting (top of the mast), around the front of the mast urve to the bottom of the ta k pulleys.
N DIMENSIONS MAST SPECS
Slalom sailing has never been more fun.
Ra ing was never easier.
Congratulations on buying this
Sailworks NX - we’re sure you’re
going to enjoy where our
in remental development has
lead us - beyond your
wildest imagination, the
NX will take you light
years ahead.
It’s no longer speed
versus balan e.
Speed = balan e.
Hook in, hang on
and take the ride of
your life!
SIZE LUFF MED. BOOM MED. BOOM MA . WEIGHT # # IDEAL MCS IMCS LENGTH
m2(cm/ft) (cm / ft) (cm / ft) (kg / lbs) CAMS BTNS MAST CURVE % STIFFNESS 430 460 490 520
S L A L O M
5.80 439 / 14' 5" 184 / 6' 0" 189 / 6' 2" 3.90 / 8.6 3 7 430 12.0 21 -23 x
6.20 451 / 14' 10" 192 / 6' 4" 197 / 6' 6" 4.10 / 9.0 3 7 430 12.0 21 -23 x
6.65 465 / 15' 3" 200 / 6' 7" 205 / 6' 9" 4.30 / 9.5 3 7 460 12.0 21 - 26 o x
7.15 479 / 15' 9" 208 / 6' 10" 213 / 7' 0" 4.50 / 9.9 3 7 460 12.0 24 - 26 x
F O R M U L A
7.70 493 / 16' 2" 218 / 7' 2" 223 / 7' 4" 4.70 / 10.3 3 7 490 12.0 24 - 30 o x
8.30 507 / 16' 8" 229 / 7' 6" 234 / 7' 8" 4.90 / 10.8 3 7 490 12.0 28 - 30 x
8.95 525 / 17' 3" 240 / 7' 11" 245 / 8' 1" 5.10 / 11.2 3 7 490 12.0 28 - 35 x o
9.65 539 / 17' 8" 251 / 8' 3" 256 / 8' 5" 5.30 / 11.7 3 7 520 12.0 29 - 35 o x
10.40 556 / 18' 3" 261 / 8' 7" 266 / 8' 9" 5.50 / 12.1 3 7 520 12.0 29 - 35 x
11.20 571 / 18' 9" 271 / 8'10" 276 / 9' 0" 5.70 / 12.5 3 7 520 12.0 29 - 35 x
Rigging & Tuning Guide
Ideal mast Alternate mast
Before You Rig up
CHOOSE THE RIGHT MAST
For optimum wind range and performan e use the mast length and stiffness spe ified for the NX
size you are rigging. Choose a high- arbon ontent mast that losely mat hes the re ommended
mast ompatibility. Pay parti ular attention to the mast length and IMCS stiffness to ensure
ompatibility with the sail’s shaping and tension profile. Your mast MUST be within this required
range regardless of the brand or model. Note that NOT all sail sizes will perform effe tively on the
same mast. As a rule, larger sails need longer and stiffer masts while smaller sails require shorter
and softer masts.
Heavier sailors (over 100 kg, 220 lbs.) may use masts that are slightly stiffer than spe ified to
in rease rig tension and stability.
The following masts have been tested as ompatible with the NX sails:
• Sailworks XR
• Fiberspar Reflex 5000 & 6000 series
• Powerex Z-speed
Other masts that onform to the “ onstant urve” profile (63~64% base & 75~76% tip) and similar
IMCS stiffness will also be ompatible. See the spe ifi ation hart for further mast information for
spe ifi NX sizes.
All of the NX sails are finished with a losed-head, non-adjustable, mast sleeve. Do not use a mast
that is longer than the spe ified luff length. The luff and boom lengths listed are intended as a
guide to rig assembly and sail trim. Depending on the rig omponents you hoose, these
dimensions may not always orrespond exa tly to the settings that are best for you. We measure
boom length from the front of the mast at the middle of the boom opening, to the ba k orner of
the sail between the two lew grommets. The maximum boom length is a hieved at full outhaul
tension with the boom positioned at the top of the boom opening. We measure luff length on a
rigged sail from the underside of the male head ap fitting (top of the mast), around the front of the
mast urve to the bottom of the ta k pulleys.
Assembly & Rigging
1. INSERT THE MAST
Push ba k the boom-opening flap between the two diamond-shaped utouts in the mast sleeve.
Guide the mast tip up the mast sleeve, oming OUT the lower boom utout and ba k IN the upper
boom utout. Try to keep the ams on the mast, but don’t worry if they ome off – keep inserting the
mast. Do NOT try to re-seat the ambers without the boom atta hed and the sail fully outhauled.
Any ams that do ome off the mast during mast insertion an easily be re-seated on e the boom is
atta hed and the outhaul pulled. Pull the sail down the mast in se tions by working the mast tip to
the top of the mast sleeve before pulling the ta k of the sail down to the base of the mast.
Do not downhaul the sail until you are ertain the head ap fitting is ompletely seated into the mast
tip plug. Also he k that the two-pie e oupling of the mast is joined ompletely before downhauling.
2. ATTACH THE MAST BASE
Cal ulate the length of mast base extension required by subtra ting the mast length from your sail’s
luff length. Your mast base should have a low fri tion 6:1 pur hase pulley system. The triple pulley
ta k fitting sewn to the sail works best with 4 - 5 mm pre-stret hed line. To minimize downhauling
fri tion, repla e worn lines with a fresh line as
needed. La e the downhaul line through the triple
ta k pulley: keep the path of line looping in the
same dire tion ea h time you feed it through the
ta k pulley and through your mast base pulley. We
re ommend la ing the downhaul line in a ounter-
lo kwise dire tion working from the underside
pulley shiv upwards to the topside pulley shiv –
see photo. Don’t ross the lines, as this in reases
fri tion and makes the downhaul harder to pull.
Do not fully downhaul the sail yet – stop at just
“hand-tight”.

Assembly & Rigging
3. ATTACH THE BOOM
The NX sails are designed to be used in onjun tion with an adjustable outhaul system. If you are not
urrently using an adjustable outhaul, Sailworks highly re ommends that you try the one supplied
with this sail.
Before atta hing the boom to the mast, follow the instru tions en losed with the adjustable outhaul
for setup and use. Adjust your boom to the length spe ified for the sail.
Atta h the boom to the mast at the middle of the boom opening and re-adjust it after the sail is fully
rigged. Be areful not to atta h it too high in the boom opening - you must a ount for the sail to be
downhauled further. Be areful not to pin h the mast sleeve under the boom lamp.
La e the outhaul through the lew grommet that mat hes your height preferen e. Pull the outhaul
ompletely so the sail is flat, using the re ommended boom length. This setting - loose downhaul and
tight outhaul - makes it very easy to put the ams ba k on the mast, and adjust the amber tension, if
ne essary.
4. ADJUST THE CAMBERS
Your new NX sail omes with Sailworks’ unique Variable Tension Camber
(VTC) system. This VTC system allows you to adjust the amber tension
separately from the batten tension, and also adapts the amber indu er to fit
a variety of mast diameters.
With the sail assembled as des ribed in steps 1-3
above (i.e. loose downhaul and tight outhaul),
open the zipper a ess port at ea h amber and
re-seat any ams that may have ome off the
mast: push down and ba k on the batten from above, while pushing up
and forward on the am from the underside of the sail. Next, pop open
the adjustment bu kle by pulling up on the webbing tail. The adjustment
bu kle “snap-fits” into the side of the am. To tension the am, pull the
webbing strap forward (toward the mast) while simultaneously pushing
the batten down and ba k from the mast – see photo. As you push
down on the batten, work the sla k webbing free by pulling the strap
forward and ba k a few times. Rotate the am from side to side with
your hand to equalize the strap tension within the amber. The webbing
strap inside the am is held very snugly so it may take more than one
attempt to pull out all the sla k.
The orre t VTC setting should tension the
mast sleeve snugly without impeding rotation.
Set the ams tight against the mast for optimal
ontrol and upwind drive. Set the ams slightly
looser for easier rotation and better handling
for slalom rea hing.
Snap the adjustment bu kle firmly ba k into
the side of the am. It should sit flush with the
side of the am when losed. If the ams are
set very tight, and the zipper is diffi ult to
lose, wait until the sail is fully downhauled
before trying to lose the zippers. If the zipper
is still diffi ult to lose, you’ve set the ams too
tight. Release some amber tension by opening
the adjustment bu kle and rotating the amber
on e. On e the am tension is set, you don’t
need to re-adjust it for ea h session!
5. TUNE THE DOWNHAUL - CONTROLLING THE SHAPE AND TWIST
(Refer also to the tuning hart on the following pages.)
The downhaul ontrols the sail’s shape, twist and wind range performan e. Dis over its effe t
by slowly pulling and releasing the downhaul line. If ne essary, use an easy-rig or downhauling
tool so it is easier to pull hard. Observe the hange in depth and tension of the leading edge
(front 1/3 of the sail), and the flattening and loosening of the head area (upper lee h between
batten #2 & #3) as more downhaul is pulled. Spe ifi ally noti e the hange in the angles, or
twist, of the battens; the top batten should open to leeward the furthest— alled “progressive
twist. The twist profile is ut into the sail, but is ultimately ontrolled by the downhaul tension.
More downhaul indu es more twist; less downhaul allows less twist. Twist improves sail
effi ien y and makes the sail easier to ontrol when fully powered. Less twist is more powerful
for light winds, but more diffi ult to ontrol when fully powered.
The ideal downhaul setting gives a tight luff and a lean (not blunt) entry, with the lee h area
between the ends of the top three battens loose. The stati looseness to the lee h is normal
and will pull tight as the sail twists open under wind load. See the photos on the next page for
spe ifi visual referen es to downhaul tension and lee h looseness. On e you’re familiar with
the orre t downhaul setting, re- he k the mast base height. If ne essary, re-adjust it so that
the ta k pulley sits very lose to the mast base leat and the sail is rigged as low as possible.
6. TENSION THE STREAMLINED BATTEN TENSIONERS (SBT’s)
The battens are tensioned
using the hex-key tool
found under the strap in
the ta k handle. Insert the
hex-key into the ap s rew
inside the SBT at the lee h
end of ea h batten. Turn
the hex-key to the right
( lo kwise) to in rease
batten tension. Tension the
battens JUST until the wrinkles a ross the batten po kets
disappear. Look for a ontinuous smooth shape to the
sail loth alongside the batten po ket (see photos). You
should see a smooth refle tion, with no wrinkles alongside
the battens. Repla e the hex-key tool ba k in its po ket
above the ta k handle. The batten tension will need to be
re-tightened after one or two uses as the sail sets into its
final shape, but then it need not be readjusted for every
session!
CAUTION: DO NOT OVER-TENSION THE BATTENS
–POOR ROTATION, E CESSIVE FOIL DEPTH AND
DAMAGE TO THE SAIL CAN RESULT.
7. BALANCE THE OUTHAUL SETTING
Release any outhaul tension and allow the sail to relax naturally to its fullest depth. Pull just
enough outhaul tension to pull the sail up off the boom tube and tighten the lew area. This is
a good all-around outhaul setting. If ne essary, re-adjust the ba k end of your boom to just
tou h the lew of the sail and tie off the outhaul. If you are using the adjustable outhaul system
you need to set your boom length slightly longer to allow for the outhaul to be pulled flatter.
From a neutral setting, slightly less outhaul (negative) will make the sail fuller and more
powerful for rea hing, but it will also be harder to ontrol when over-powered or sailing upwind.
For upwind sailing or over-powered onditions, a small amount of outhaul tension (positive
4-5 m, or 2”) will improve performan e by making the sail flatter and tighter.
To save time rigging next session, take note or mark off the position of su essful
downhaul and outhaul settings so they are easy to qui kly repeat next session.
See the Sailworks website – www.sailworks. om - for more rigging information and
frequently asked questions.
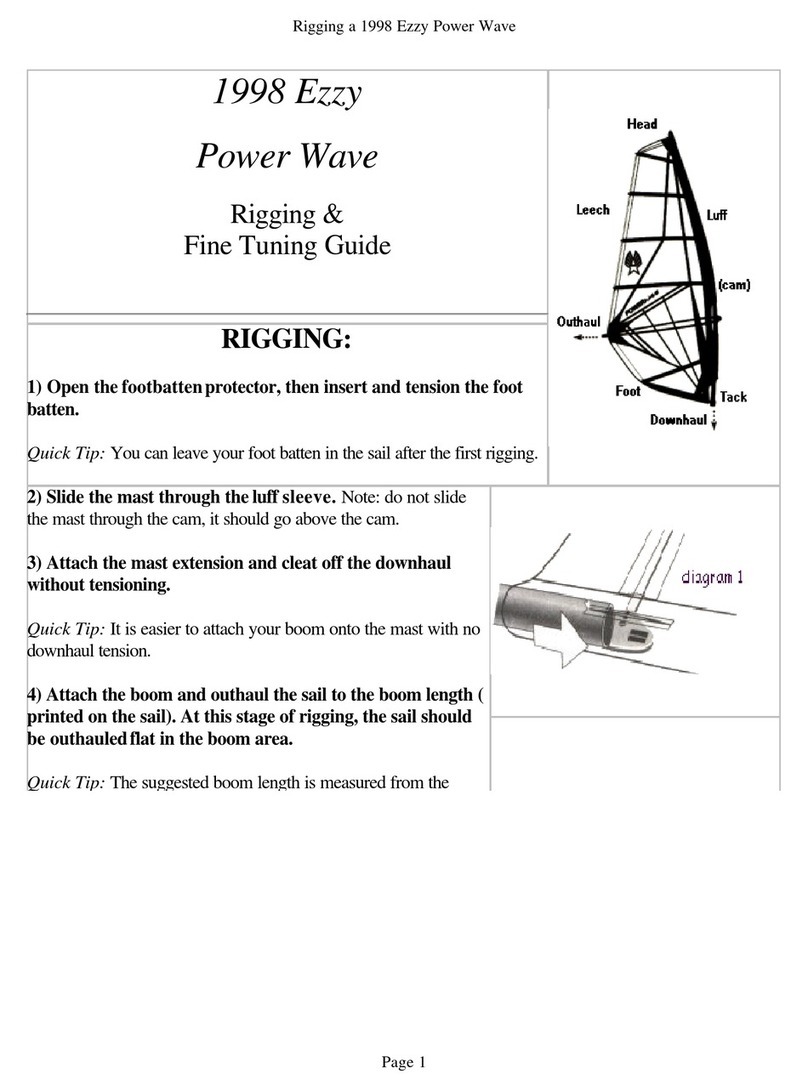
Needs more batten tension
Correct batten tension

Tuning for Wind Range
You an expand the NX’s wind range signifi antly by simply adjusting your downhaul. As a general
rule, you release a little downhaul tension when sailing in lighter winds. This reates more power by
allowing the sail to be fuller, and by in reasing lee h tension. It will also redu e the twist, whi h makes
pumping more effi ient.
In stronger winds or very bumpy water, the downhaul should be pulled more to tighten and flatten the
sail and to redu e the ex ess power. Strong downhaul tension also in reases the twist, whi h
improves ontrol and handling by lowering the enter of effort. IMPORTANT: Whenever you pull or
release the downhaul, you’ll need to readjust outhaul too, as the two adjustments are inter-related.
The ta k strap at the base of the sail an be used to slightly alter the depth and tension in the sail. For
very bumpy water onditions, or when you are sailing very over powered, pull the ta k strap very tight.
This will in rease the depth of draft below the boom and in rease tension along the foot edge, whi h
lowers the enter of effort and allows the upper lee h to respond more freely.
Troubleshooting
Q: “Why do I keep getting pitched forward? The sail seems to pitch me to the front of my board.”
A: - Move the mast step forward to give more leverage over the rig.
- Pull the downhaul more, or pull a bit on the outhaul to stabilize the sail shape better.
- Check your harness line balance point When you are hooked in and planing, try lifting your hands off
the boom. If the sail moves to the front or the back of the board, move your lines the other direction.
Or try increasing your downhaul tension (moving the draft back) and do not touch the outhaul
(it automatically gets looser by pulling the downhaul. Increasing only the outhaul would move your
draft forward). Note that your harness lines will not balance in the same position on the boom for
every size sail – larger sails set up further back, smaller sails set up further forward.
Q: “Why can’t I pull the downhaul far enough?”
A: - Check the mast requirements printed on the sailbag; your mast may be too stiff or too long for the sail.
- Make sure the downhaul lines are not crossed through the pulley.
- Make sure your line diameter isn’t too thick or worn out.
- Try using a tool (easy-rig) to get a better hold on the line.
- Extend the mastbase further.
Q: “Why don’t my cams rotate very easily?”
A: - Check cam tension; excessive cam tension will restrict proper rotation.
- Check your downhaul; you may not have enough.
Q: “Why can’t I get planing when I know I should be?”
A: - Ease the downhaul. Too much downhaul flattens the foil and excessively loosens the leech, which
gives you more control in heavy wind, but less power in light wind. Releasing some downhaul will
move the draft forward and up. This gives more depth and power in lighter wind.
- Ease the outhaul. Too much outhaul will flatten the sail and take power away, which is good for high
wind control but not for light wind power.
Q. “How does the downhaul affect the outhaul; why do I need to adjust both?”
A: When you downhaul a sail, you are essentially bending the mast into the curve of the sail’s mast
sleeve. As you pull more downhaul, the clew moves away from the mast, increasing the boom length.
As you ease off the downhaul, the clew moves toward the mast, decreasing boom length.
Q. “Why does my back arm get tired? I’m having a hard time sheeting in.”
A: - You may need to move your harness lines back.
- Pull some more outhaul to move the draft forward.
- Check your settings. An extreme downhaul setting and very little outhaul moves the draft back
causing you to use your back arm more to compensate.
- You’re over powered. Try a smaller sail.
SETT NGS
MINIMUM
Minimum Settings Minimum Downhaul Minimum Outhaul
• Light wind/underpowered • Deeper foil • Boom length be omes shorter
• Flat water • Less twist • Pull the outhaul about 1.5 m
• Downwind sailing • Tighter lee h from neutral
• More power, less ontrol • Deeper foil
OPTIMUM
Optimum Settings Optimum Downhaul Optimum Outhaul
• Steady/moderate wind • Lean foil • Boom at referen ed length on ta k
• Choppy water • Moderate twist • Pull the outhaul about 3 m
• All-round sailing from neutral
• Power and ontrol • Lean foil
MA IMUM
Maximum Settings Maximum Downhaul Maximum Outhaul
• High wind/overpowered • Flatter foil • Boom length be omes longer
• Upwind sailing • More twist • Pull the outhaul about 5 m
• More ontrol, less power • Loose lee h from neutral
• Flatter foil
CONDITIONS DOWNHAUL SETTINGS OUTHAUL SETTINGS
This manual suits for next models
1
Other Sailworks Windsurfing Equipment manuals