salling 89996481 User manual

89996481
RØREMASKINE / KITCHEN MACHINE
INSTRUCTION MANUAL

2
DK
INTRODUKTION
Mange tak fordi du har valgt et produkt fra Epiq. Dermed har du erhvervet et kvalitetspro-
dukt som opfylder alle gældende krav til præstation og sikkerhedsstandarder i EU. For at
sikre en korrekt behandling og en lang levetid anbefaler vi, at du overholder nedenstående
anvisninger.
Du bedes læse vejledningen og især sikkerheds anvisningerne omhyggeligt igennem,
inden du tager apparatet i brug. Opbevar denne betjeningsvejledning, og overlad altid kun
produktet til andre sammen med betjeningsvejledningen.
SIKKERHEDSFORANSTALTNINGER
GENERELT
• Forkert brug af produktet kan medføre personskade og beskadige apparatet.
• Anvend kun produktet til det, det er beregnet til. Producenten er ikke ansvarlig for
skader, der opstår som følge af forkert brug eller håndtering.
• Anbring altid produktet på et tørt, plant og stabilt underlag på god afstand af bordkant
eller lignende.
• Produktet er udelukkende beregnet til husholdningsbrug. Produktet må ikke anvendes
til erhvervsbrug.
• Produktet må kun sluttes til 220-240V,50/60Hz.
• Produktets motordel/elektronik, ledning og stikket må ikke nedsænkes i vand, og der
må ikke trænge vand i motordel / elektronik.
• Rør aldrig ved produktet, ledningen eller stikkontakten med våde eller fugtige hænder.
• Udsæt ikke produktet for direkte sollys, høje temperaturer, fugt, støv eller ætsende
stoffer.
• Forlad aldrig produktet, når det er tændt.
• Når produktet er i brug, bør det holdes under konstant opsyn. Børn bør altid holdes
under opsyn, når produktet anvendes, for at sikre at de ikke leger med produktet.
Produktet er ikke legetøj.
• Produktet kan indeholde skarpe dele og bør derfor opbevares utilgængeligt for børn.
• Brug kun tilbehør, der følger med produktet eller er anbefalet af producenten.
• Produktet må ikke bruges af personer med nedsat følsomhed, fysiske eller mentale
handicap, eller personer, som ikke er i stand til at betjene produktet, medmindre de
overvåges eller instrueres i brugen af en person, som er ansvarlig for deres sikkerhed.

3
LEDNING OG STIK
• Lad ikke ledningen hænge ud over bordkanten.
• Hold ledningen og produktet væk fra varmekilder, varme genstande og åben ild.
• Tag stikket ud af stikkontakten før rengøring, og hvis apparatet ikke er i brug. Undlad
at trække i ledningen, når du tager stikket ud af stikkontakten, men tag fat om selve
stikket.
• Sørg for, at ledningen er rullet helt ud.
• Kontrollér jævnligt, om ledningen eller stikket er beskadiget, og brug ikke produktet,
hvis dette er tilfældet, eller hvis det har været tabt på gulvet, tabt i vand eller er blevet
beskadiget på en anden måde.
• Hvis produktet, ledningen eller stikket er beskadiget, skal produktet efterses og om
nødvendigt repareres af en autoriseret reparatør. Forsøg aldrig at reparere produktet
selv. Kontakt købsstedet, hvis der er tale om en reparation, der falder ind under
reklamationsretten. Hvis der foretages uautoriserede indgreb i produktet, bortfalder
reklamationsretten.
REKLAMATIONSBESTEMMELSER
Reklamationsretten gælder ikke:
• Hvis ovennævnte ikke iagttages
• Hvis der har været foretaget uautoriserede indgreb i apparatet
• Hvis apparatet har været misligholdt, udsat for en voldsom behandling eller lidt anden
form for overlast
• Hvis fejl i apparatet er opstået på grund af fejl på ledningsnettet.
BORTSKAFFELSE AF PRODUKTET
Brugte produkter må ikke smides i husholdningsaffaldet. Iht. Lovforskrifterne skal det ud-
tjente produkt bortskaffes på ordentlig vis. Derved genanvendes de brugbare materialer, og
miljøet skånes. Nærmere informationer fås hos den ansvarlige kommunale myndighed eller
det lokale bortskaffelsesrma. Produktet er forsynet med følgende logo:

4
OVERSIGT OVER DELE
KONTROLPANEL
0 ----- Stop
Indstilling 1-6 ----- Driftshastighed
Indstilling 1 ----- Minimumshastighed – langsom
Indstilling 6 ----- Maksimumhastighed – hurtig
HASTIGHEDSINDSTILLINGER
Tilbehør Billede Hastigheds-
indstilling
Tid Kapacitet
Dejkrog 1, 2, 4 30 sekunder på
hastighed 1,
30 sekunder på
hastighed 2,
4 min. på ha-
stighed 4
700 g mel og
350 ml vand
(Temperatur
40+/-5° C.)
Kagespade 1-5 10 min.
1 Svingarm 2 Udløserknap
3 Hastighedsknap 4 Hoveddel
5 Fodplade 6 Drejeaksel
7 Låg 8 Skål
9 Piskeris 10 Dejkrog
11 Stænkskærm 12 Kagespade

5
Piskeris 6 10 min.
FØR APPARATET TAGES I BRUG FØRSTE GANG
• Tag apparatet og tilbehøret ud af kassen. Tag klistermærker, beskyttelsesfolie og pla-
stik af apparatet.
• Placer apparatet på en plan overade og sørg for, at der er 10 cm frirum rundt om
apparatet. Dette apparat må ikke installeres i et skab eller bruges udendørs.
• Før du bruger apparatet første gang, skal du tørre alle aftagelige dele af med en fugtig
klud. Brug aldrig slibende produkter.
• Sæt strømkablet i kontakten. (Bemærk: Sørg for, at den angivne spænding på appa-
ratet stemmer overens med den stedlige spænding, før apparatet tilsluttes. Spænding
220 V-240 V 50/60 Hz)
• Brug aldrig maskinen uafbrudt i mere end 10 min. Lad efterfølgende maskinen køle af i
ca. 40 min.
DRIFTSPOSITIONER
ADVARSEL!
Idriftsæt kun køkkenmaskinen, når tilbehør/redskab er monteret iht. til nedenstående tabel
og er i driftspositionen.
Punkt Position Tilbehør
1.
2. Monter dejkrog, kagespade, piskeris
efter behov.
De roterende redskaber kan medføre personskade!
Hold ngrene væk fra skålen, når apparatet er idriftsat.

6
Udskift ikke redskaber før apparatet er holdt helt op med at rotere og stikket er taget ud
af kontakten. Vent altid til de bevægelige dele er holdt helt op med at rotere, når apparatet
slukkes. Derefter skal apparatet tages ud af stikkontakten, før armen løftes af holderen,
eller når nogen af tilbehørets dele åbnes, tages af eller fjernes fra maskinen.
BRUG AF DEJKROG, KAGESPADE, PISKERIS
1. 1.Placer apparatet på en plan overade,
f.eks. et køkkenbord, og sørg for at det
står forsvarligt fast.
2. 1.Tryk på armens udløserknap (2), og løft
samtidig svingarmen (1) med hånden, så
den låser på plads med et klik. Svingar-
men svinger op.
3. 1.Sæt låget (7) på svingarmen, og drej det
en smule med uret, så det låser forsvarligt
på plads.
4. 1.Hæld madvarer i skålen (8).
2.Monter skålen i indhakket på motorhuset
(4).
3.Drej skålen en smule med uret, så den
låser på plads.

7
5. 1.Sæt stænkskærmen (11) på dejkrogen
(10) som vist på billedet. Drej og fastgør
krogen. Stænkskærmen kan forhindre, at
dejen drejer med op til toppen af krogen.
2.Monter det ønskede redskab (11 med 10
eller 12) på motorens drejeaksel (6) på
undersiden af svingarmen.
3.A. Dejkrogen (10) bruges til tung dej, hak-
ket kød eller anden tung æltning.
B. Kagespaden (12) bruges til at blande
lettere dejtyper.
C. Piskeriset (9) bruges til at piske øde,
æggehvider osv.
4.Drej redskabet, så pindene på akslen
passer med fordybningerne på redska-
bets øverste kant. Tryk redskabet op mod
svingarmen, og drej det samtidig mod
uret, indtil pindene og redskabet låser sik-
kert på plads. Redskabet må ikke sidde
løst og må ikke kunne trækkes ud.
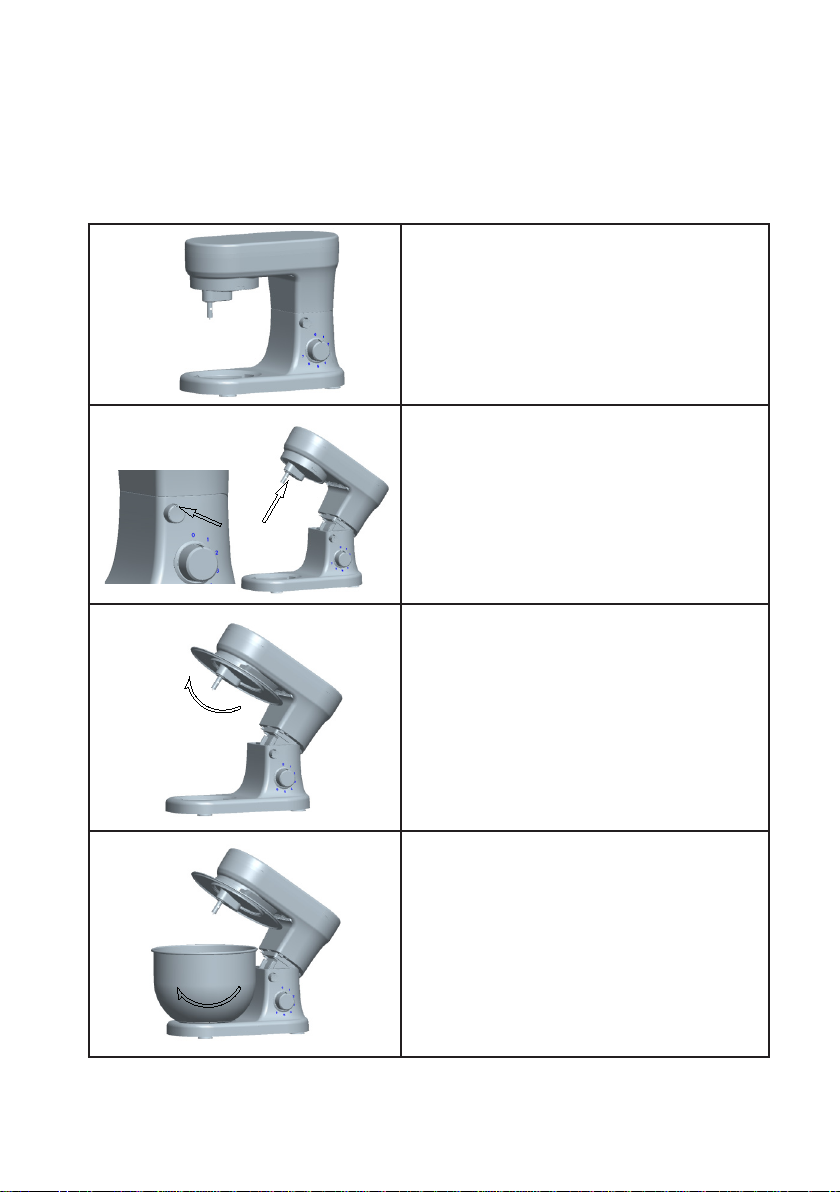
6. 1.Tryk på armens udløserknap, og sænk
samtidig svingarmen, så den låser på
plads med et klik. Låget skal sidde helt
fast på skålen, ellers er det monteret for-
kert. Apparatet er nu klar til brug.
2.Sæt el-ledningen i stikkontakten.
3.Vælg den rette hastighed (1-6). Hastighed
1 er langsom, og hastighed 6 er hurtig.
Anbefalede hastigheder, tid og kapacitet
er vist i tabellen ovenfor.
4.Hvis du har brug for at skrabe nede i skå-
len, skal du vente, indtil redskabet er helt
stoppet. Brug en spartel, aldrig ngrene.
7. 1.Sluk for apparatet ved at dreje hastig-
hedsknappen hen til 0, når du er færdig
med at blande. Sluk apparatet, og tag
stikket ud, før du udskifter redskaberne,
eller før du fjerner apparatets dele, eller
når apparatet ikke er i brug.
2.Tryk på armens udløserknap, og løft
samtidig svingarmen med hånden, så den
låser på plads med et klik. Svingarmen
svinger op.

8
8. 1.Tag redskabet af ved dreje det med uret.
2.Tag skålen af med de færdigblandede
fødevarer.
RENGØRING
Når apparatet skal rengøres, skal du være opmærksom på følgende:
• Træk stikket ud af stikkontakten, og lad apparatet køle af før rengøring.
• Motordelen må ikke nedsænkes i vand, og vand må ikke trænge ind i apparatet.
• Rengør motordelen ved at tørre den af med en fugtig klud. En lille smule rengørings-
middel kan benyttes, hvis apparatet er meget snavset.
• Brug ikke skuresvampe, ståluld eller stærke opløsningsmidler eller slibende rengø-
ringsmidler til at rengøre apparatet, da de kan beskadige apparatets udvendige over-
ader.
• Fjern apparatets dele, og rengør alle redskaberne særskilt.
• Sørg for ikke at berøre knive eller skarpe dele under brug og rengøring.
• VIGTIGT! Lad køkkenmaskinen tørre grundigt efter rengøring, før den bruges igen.
Brug ikke apparatet, hvis det er fugtigt.
• Efter rengøring og tørring skal tilbehøret anbringes i det beskyttende etui og stilles til
opbevaring.
• Opvask: Skål og piskeris tåler maskinopvask da det er rustfrit stål. Dejkrog og ka-
gespade bør vaskes op i hånden, da det kan blive misfarvet.
TEKNISKE DATA
Model: 89996481
220 V-240 V ~ 50-60 Hz
1200 W

9
UK
INTRODUCTION
Thank you for choosing a product from Epiq. You have acquired a quality product which
meets all applicable performance and safety standards in the EU. In order to ensure proper
treatment and a long product life, we recommend that you comply with the instructions
below.
Please read the manual and especially the safety instructions carefully before using the
device. Keep this manual and provide it for referral along with the product when others are
using it.
SAFETY PRECAUTIONS
GENERAL
• Improper use of the product can cause personal injury and damage.
• Only use the product for what it is intended. The manufacturer is not liable for dama-
ges arising from improper use or handling.
• Always place the product in a dry, at and stable surface well away from table edge or
similar.
• The product is intended for household use only. The product is not for professional
use.
• The product may only be connected to 220-240V,50/60Hz.
• The product engine/electronics, cord or plug cannot be submerged in water, and no
water may get in contact with the engine/electronics.
• Never touch the product, cord or plug with wet or damp hands.
• Do not expose the product to direct sunlight, high temperatures, humidity, dust or
corrosive substances.
• Never leave the product when it is turned on.
• When the product is in use, it should be kept under constant supervision. Children
should always be supervised when using the product to ensure that they do not play
with the product. The product is not a toy.
• The product may have sharp parts and must, therefore, be kept out of reach of chil-
dren.
• Only use the accessories that come with the product or that are recommended by the
manufacturer.
• The product must not be used by people with reduced sensitivity, physical or mental
disability, or people who are not able to operate the product unless they are supervi-
sed or instructed by a person responsible for their safety.

10
CORD AND PLUG
• Do not let the cord hang over the edge.
• Keep the cord and the product away from heat sources, hot objects and open
ames.
• Unplug the power cord before cleaning and if the appliance is not in use. Do not pull
the cord when removing the plug from the socket, rather grasp the plug itself.
• Make sure that the cord is fully extended.
• Check regularly that the cord and the plug are not damaged and do not use the
product if this is the case, or if it has been dropped on the oor, dropped in water or
damaged in another way.
• If the product or plug is damaged, the product must be inspected and, if necessary,
repaired by an authorised repairer. Never try to repair the product yourself. Please,
contact the store to see if there is a repair that falls under warranty. Tampering of the
product will void the warranty.
RULES OF COMPLAINTS
THE WARRANTY DOES NOT APPLY:
• If the above is not observed
• If there has been unauthorised intervention of the device
• If the appliance has been mishandled, subjected to rough treatment or some other
form of damage
• If faults have arisen because of faults in the distribution system
PRODUCT DISPOSAL
Used product should not be disposed as household waste. According to legislation,
the product should be disposed of properly so that the materials can be recycled in an
environmentally friendly manner. Further information is available from the responsible local
authority or local disposal company. The product is equipped with the following logo:

11
PARTS LIST
CONTROL PANEL
0 -----Stop
Setting1-6-----Operating speed
Setting1-----Minimum speed—slow
Setting6-----Maximum speed—fast
SPEED SETTINGS
Accessories Picture Speed
setting
Time Capacity
Dough
Hook
1, 2, 4 30 seconds at speed 1,
30 seconds at speed 2,
4min at speed 4
700 g our and
350ml water
(Temperature40+/-5°C.)
Cake Be-
ater
1-5 10 min.
Whisk 6 10 min.
1 Swivel arm 2 Release button
3 Speed control knob 4 Body
5 Foot pad 6 Spindle
7 Lid 8 Bowl
9 Whisk 10 Dough Hook
11 Splash guard 12 Cake Beater

12
BEFORE FIRST USE
• Take the appliance and accessories out the box. Remove the
stickers, protective foil or plastic from the device.
• Place the device on a at stable surface and ensure a minimum of 10cm. free space
around the device. This device is not suitable for installation in a cabinet or for outside
use.
• Before using your appliance for the rst time, wipe off all removable parts with a damp
cloth. Never use abrasive products.
• Put the power cable into the socket. (Note: Make sure the voltage which is indica-
ted on the device matches the local voltage before connecting the device. Voltage
220V-240V 50/60Hz)
• Never use the machine for longer than 10 minutes continuously, after this let the ma-
chine cool down for around 40 minutes.
OPERATING POSITIONS
WARNING!
Operate the Kitchen Machine only when the accessory/tool is attached according to this
table and is in the operating position.
Item Position Accessory
1.
2. Set up dough hook, cake beater, whisk,
according to your desire
Risk of injury from the rotating tools!
While the appliance is operating, keep ngers clear of the mixing bowl.
Do not change tools until the appliance is at a standstill and have been unplugged. Always
wait until the moving parts stop running after switching off, and then unplug the appliance
before lifting the arm of the stand, or opening, disassembling or removing the parts of any
of the accessories from the machine.

13
HOW TO USE DOUGH HOOK, CAKE BEATER, WHISK
1. 1.Place the appliance on a at surface, e.g.
a kitchen counter, and make sure it is
standing rmly.
2. 1.Press the arm release button (2) at the
same time lift the swivel arm (1) with hand
so that it locks into place with a click,The
swivel arm tilts up.
3. 1.Fit the lid (7) onto the swivel arm and turn
it slightly clockwise, so that it locks into
position securely.
4. 1.Place the food in the mixing bowl (8).
2.Fit the mixing bowl in the recess on the
motor house (4).
3.Turn the mixing bowl slightly clockwise,
so it locks into position.

14
5. 1.Put the splash guard (11) onto the Dough
Hook (10) as shown in the picture. Turn
and x the hook. The splash guard can
prevent the dough from climbing to the
top of the hook.
2.Fit the required accessory (11 with 10
or 12) onto the motor spindle (6) on the
underside of the swivel arm.
3.A. The dough hook (10) is used for heavy
dough, minced meat or other demanding
kneading jobs.
B.The cake beater (12) is used to mix
lighter types of dough.
C.The whisk (9) is used for whisking
cream, egg whites, etc.
4.Turn the accessory, so the pins on the
spindle are aligned with the depressions
on the accessory top edge. Press the
accessory against the swivel arm and turn
it anti-clockwise at the same time until the
pins engage and the accessory locks into
position securely. The accessory must not
be loose nor should you be able to pull it
free.
6. 1.Press the arm release button at the same
time lower the swivel arm so that it locks
into place with a click. The lid must t
tightly with the mixing bowl, otherwise it
is tted incorrectly. The appliance is now
ready for use.
2.Plug the power cord into main power
outlet.
3.Select the speed you want to use (1-6).
Speed 1 is the slowest and speed 6 is the
fastest speed.
Recommended speeds, time and capaci-
ty are shown in the table above.
4.If you need to scrape inside the mixing
bowl, wait until the accessory has stop-
ped completely. Use a spatuala, never
your ngers.

15
7. 1.Switch off the appliance by turning the
speed control knob to 0 when you have
nished mixing. Switch off the appliance
and unplug it before you change the ac-
cessories, or before you take the applian-
ce apart or when not in use.
2.Press the arm release button at the same
time lift the swivel arm with hand so that
it locks into place with a click. The swivel
arm tilts up.
8. 1.Detach the accessory by turning it
clockwise.
2.Remove mixing bowl with prepared food
anti-clockwise.
CLEANING
When cleaning the appliance, you should pay attention to the following points:
• Remove the plug from the mains socket, and allow the appliance to cool down before
cleaning it.
• Do not immerse the motor section of the appliance in water and make sure no water
enters the appliance.
• Clean the motor section by wiping it with a damp cloth. A little detergent can be added
if the appliance is heavily soiled.
• Do not use scouring pads, steel wool or any form of strong solvents or abrasive clea-
ning agents to clean the appliance, as they may damage the outside surfaces of the
appliance.
• Take the appliance apart and clean all of the accessories separately.
• Be careful not to touch the blades or sharp parts during use and cleaning.
• IMPORTANT! Allow the kitchen machine to dry properly after cleaning before using
again. Do not use the appliance if damp.
• After washing and drying, immediately place attachment into the protective sleeve for
storage.
• The bowl and whisk are diswasher safe as it is made of stainless steel. The Dough
hook and Cake beater should be handwashed as dishwasher might cause dicolour.
TEKNISKE DATA
Model: 89996481
220 V-240 V ~ 50-60 Hz
1200 W
Table of contents
Languages:
Other salling Kitchen Appliance manuals
Popular Kitchen Appliance manuals by other brands

Fisher & Paykel
Fisher & Paykel OR60 models Installation instructions and user guide

Nomiku
Nomiku sous vide Use & care manual

TECHWOOD
TECHWOOD TBAP-505 instruction manual

TEFAL
TEFAL COMFORT manual

Barton
Barton SEMI-AUTOMATIC 90801 Owner's manual and safety instructions

Philips
Philips HR2727/50 user manual