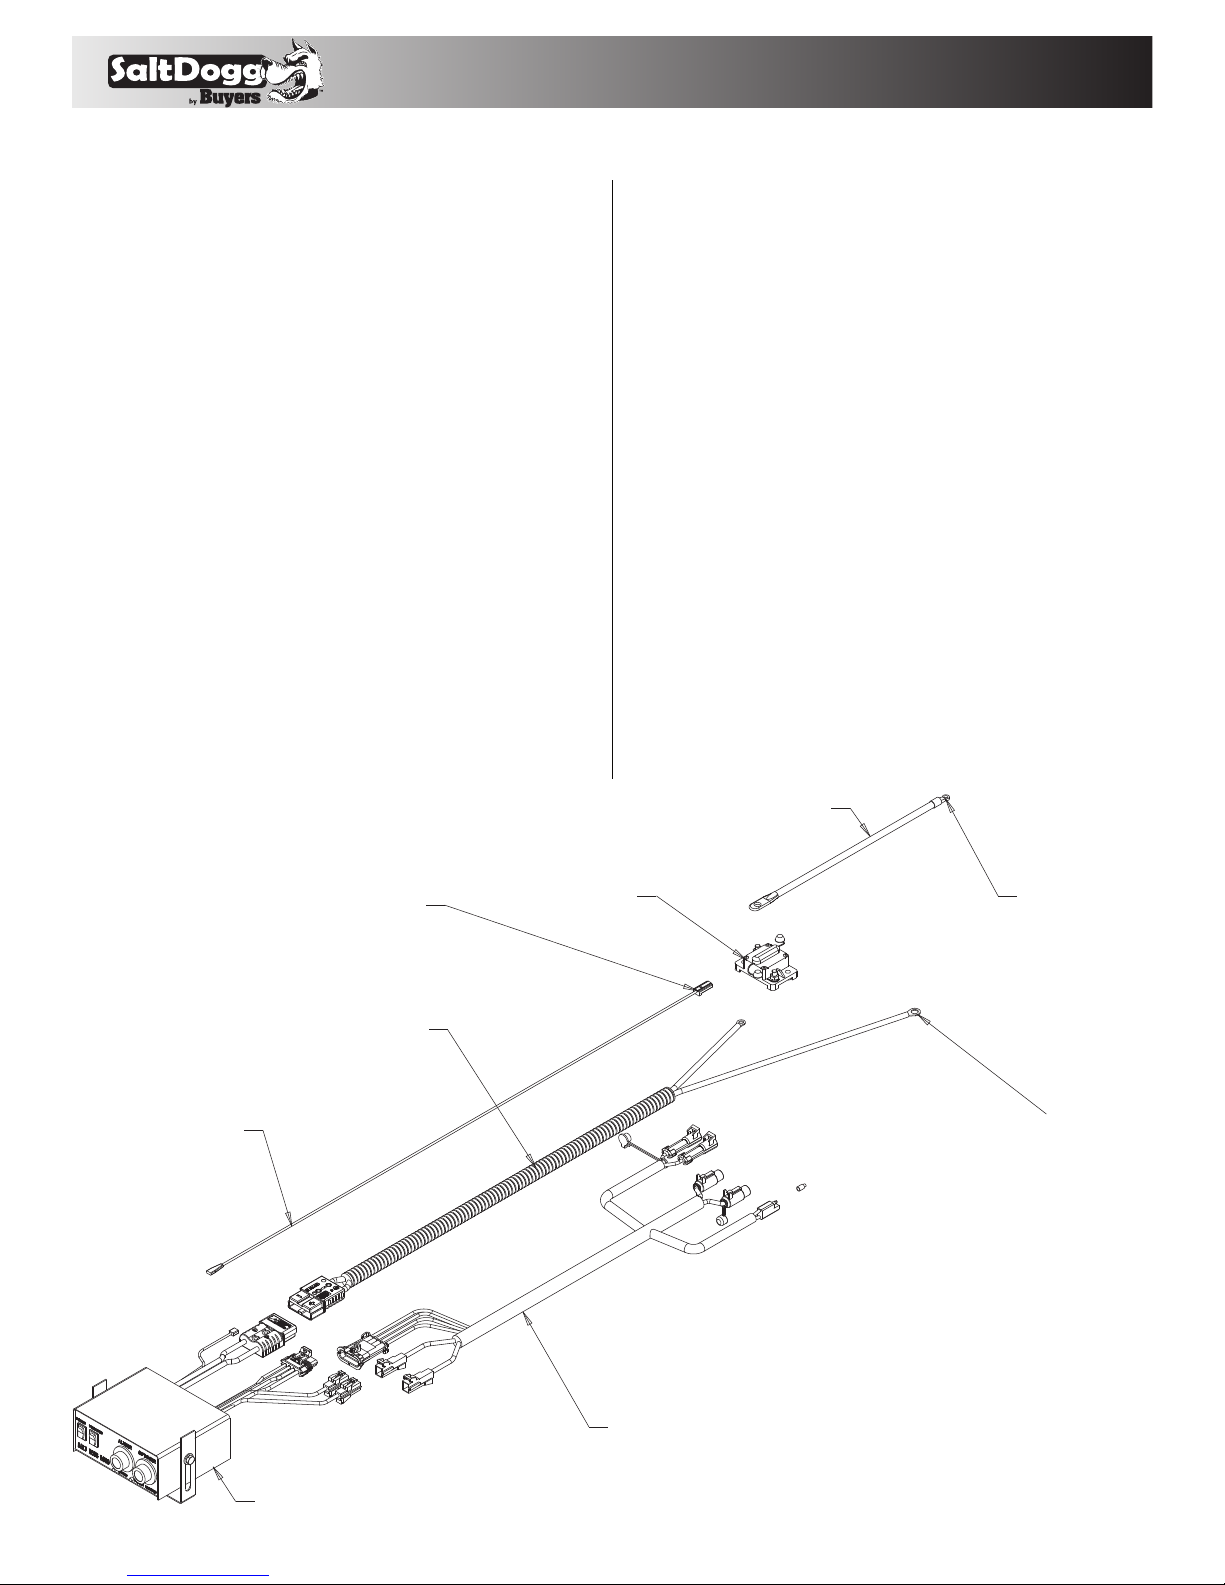
Salt Dogg SHPE4000CH User manual

1
Safety Precautions
1. Read this entire Owners Manual before operating this
spreader.
2. Read all safety decals on the spreader before operating.
3. Check to make sure all safety guards are securely mounted
into place before operating this spreader.
4. Verify that all personnel are clear of the spreader spray area
before starting or operating this spreader.
5. Do not over-load your vehicle beyond payload limits. If there
are any questions, contact the vehicle manufacturer.
6. Do not adjust, clean, lubricate or unclog material jambs
without first turning off the spreader.
7. Do not climb on or in the spreader during operation. Do not
ride on the spreader while the vehicle is in motion.
8. Make sure the spreader is securely fastened to the vehicle in
accordance with this manual.
9. Do not operate a spreader that is in need of maintenance or
repairs.
10. Batteries normally produce explosive gases which can
cause personal injury. Always disconnect the battery before
removing or replacing electrical components.
11. Do not leave unused material in hopper. Material can freeze
or solidify, causing spreader to not work properly, and/ or
damage the unit. Empty and clean after each use.
9049 Tyler Blvd. • Mentor, Ohio 44060
Phone (440) 974-8888 • Fax (440) 974-0165
Toll-Free Fax 800-841-8003 • saltdogg.com
Installation Instructions
SHPE4000CH SaltDogg® Electric
Drive Poly Hopper Spreader
4.0 cubic yards
—continued inside
Table of Contents
General Information ....................................................................1
Safety Precautions ......................................................................1
Installation Instructions ........................................................... 2-4
Spreader Operation ................................................................ 3-4
Spreader Maintenance ................................................................4
Repair Parts & Drawings ......................................................... 5-8
Warranty Information ..................................................................8
General Information
Overall Length: 123.3 inches
Overall Width: 77 inches
Overall Height: 47.3 inches
Empty Weight: 812 lbs
Capacity Struck: 4.0 cu. yd.
Vehicle Requirements
Trucks with GVWR 15,000 to 26,000 lbs.
150 AMP or higher alternator is recommended.
Average Material Weights
Materials to use Weight (pounds per cubic yard)
Fine Salt-Dry 2,250
Coarse Salt-Dry 1,431
Sand Coarse-Dry 2,565
Note: To calculate the total spreader weight (including ice
control material), add the empty spreader weight plus the ice
control material and spreader accessories.
WARNING
Improper installation and operation could cause
personal injury, and/or property damage. Observe
the following Safety Precautions before, during and
after operating this spreader. By following these
precautions and common sense, possible injury to
persons and potential damage to this machine may
be avoided.
CAUTION
Do not overload vehicle beyond the vehicle’s GVWR
or GAWR. Check vehicle’s load rating certification
sticker for maximum vehicle capacity.

2
INSTALLATION INSTRUCTIONS
1. MOUNTING THE SPREADER ONTO THE VEHICLE:
A. Remove the tailgate from the vehicle (if equipped) as well as
any other object which will interfere with the spreader.
B. Check truck’s bed for all kinds of sharp debris or foreign
objects. They can cut and seriously damage poly hopper.
C. Remove chute, hardware kit from inside spreader. If spreader
has been used make sure there is no material left in the hopper.
D. Prepare 4 boards as shown in Fig. 1. A board size is 2" x 4" x
60" long minimum. Boards can be as long as width of inside of
trucks body.
E. Next, set the spreader in the truck body. Use four bars on the
frame to lift the spreader (Fig. 1).
Fig. 1
F. Lower spreader onto 2" x 4" boards positioned in truck bed.
G. Center the spreader on the vehicle with the end of the
gear mount 14" to the rear of the nearest vertical obstruction
(bumper, trailer hitch, etc). Attach chute to spreader, check
for interference between the vehicle and the Spinner/Chute
Assembly.
H. Bolt the spreader to the vehicle frame through the lengths
of lumber using the holes located in each of the four (4) cross
members. Use 1/2" SAE Grade 5 hardware as required by
vehicle application.
I. In addition, secure spreader using four ratchet straps or chain
tie down kit (sold separately). Always tighten straps evenly!
• The spreader must be securely fastened to the frame of the
vehicle.
• Verify with the vehicle’s manufacturer that the factory installed
anchor points are designed for tie-down of such load.
• Periodically check that the spreader mounting hardware is
securely tightened, retighten if necessary.
2. CONTROL BOX AND VEHICLE WIRING HARNESS
INSTALLATION
Make sure you have connected the proper wire color.
THIS IS WIRE GROUND ELECTRICAL SYSTEM! NO
CONNECTIONS TO TRUCK’S FRAME OR BODY ALLOWED!
NOTE: Always disconnect battery before attempting to
install electrical components on your vehicle.
A. Mount the controller in a convenient location in the truck cab.
It is recommended not to mount the controller directly in front of
heat vents. Allow ample air space around controller.
B. Route both wire harnesses into truck cab through firewall
(it may be necessary to drill holes). Insulate hole to avoid water
leaks.
C. Insure no wires are nicked or damaged during installation.
D. Connect the 4-pin connector on the wire harness to the
control box 4-pin connector.
CAUTION
Never lift spreader with material in the hopper.
WARNING
Do not drill holes into fuel tanks, fuel lines, through
electrical wiring, etc that may be damaged by
drilling. To insure good performance of your
spreader, check the condition of truck’s electrical
system. Using digital voltmeter, check alternator and
battery voltage. With engine running and head lights
and heater fan ON good voltage reading should fall
between 13.0 and 15.3 volts. If voltage reading falls
out of this range, check and adjust your electric
system.
CAUTION
Do not mount controller in the way of air bag
deployment!
WARNING
Do not drill holes into fuel tanks, fuel lines, thru
electrical wiring, etc that may be damaged by drilling.
CAUTION
Inspect straps and hardware after each time spreader
is loaded. Tighten straps and hardware if necessary.
WARNING
Important! Do not use ratchet straps or tailgate latch
exclusively! Always fasten spreader to the vehicle!
LIFT SPREADERS
USING THESE HOLES

3
IMPORTANT! Make sure all wires securely attached to
vehicle or spreader. Use wire ties and/or wire clamps to
attach wires. All excess wires must be rolled into bungles
and attached to vehicle or spreader.
E. Connect the 2-pin connector on the power cable to the
control box mating connector.
F. Connect wire harness single connectors to control box
connectors.
G. Connect fuse connector to the fuse terminal or ignition
switch (5 AMP max).
H. Lay out a path for the power cable to the battery, use quick
ties to secure power cable.
DO NOT CONNECT TO BATTERY AT THIS TIME!
I. Lay out path for wire harness to the rear of the vehicle. It
is recommended to stay clear of the exhaust system. Excess
heat can damage the wire harnesses. Use quick ties to secure
harness to underbody.
J. Connect the wire harness to the motors and vibrator. Make
sure wire colors on wire harness match colors on the motor.
Thoroughly clean battery terminals. Make sure battery
terminals have no tarnish or corrosion.
DO NOT CONNECT WIRE HARNESS TO DAMAGED
OR CORRODED TERMINALS! IT MAY RESULT IN
OVERHEATING, LOST POWER AND POTENTIAL
CONTROLLER DAMAGE!
K. Install the circuit breaker within 12" from the battery. Connect
red wire from cable 3035935 and battery cable 3001379 to
circuit breaker according to the breaker markings. Connect
the power cable and battery cable directly to the battery.
Make sure connection to battery terminals is good and tight.
Loose connection to battery terminals will result in sparking,
overheating and possible battery damage!
In trucks with dual battery systems always connect power cable
to primary battery (larger capacity/ truck starting battery).
L. Insure all functions of the controller are working properly.
M. Observe chain moving in proper direction. If direction is
wrong reverse wires between Motor and Wire Harness.
N. Optional spot light (5 AMP max) can be installed on spreader.
Use utility light kit part number 3018009. Remove cap from
single white wire. Connect light to this wire and the trucks
frames known ground (negative).and trucks frame.
3. CONTROLLER OPERATION
A. SHPE4000CH is equipped with a dual independent speed
controller. To start spreader, press "POWER" switch. Switch will
be illuminated. Chain and spinner will start rotating full speed for
2-3 sec then will slow down to originally dialed speeds. Chain
and spinner can be adjusted independently.
3016934
3030628
0203700
3035935
CB150PB
3001379
BATTERY POSITIVE
BATTERY NEGATIVE
CONNECT TO FUSE
OR WIRE IN FUSE PANEL,
CONTROLLED BY
IGNITION SWITCH

4
A. Attach chute to hopper assembly by bolting chute to lower
tabs of motor mount. Then secure chute by engaging spring
latches in respective holes. Chute height can be adjusted by
attaching lower chute weldment to the upper one using upper or
lower set of holes.
B. The spread pattern and the amount of material dispensed is
dependent on the following factors:
1. Chain Gear Motor RPM
2. Baffle positions
3. Spinner Gear Motor RPM
4. SPINNER/CHUTE ASSEMBLY OPERATION
CAUTION
Always follow the following precautions so as not to
cause damage to the spreader.
4. Precautions
A. If the feed chain does not move because of dense material or
a material jam, remove all material from the hopper and free the
chain.
B. If the material in the hopper freezes, move the spreader into a
warm area to thaw.
C. To prevent the feed chain from freezing, do not store material
in the spreader.
D. The gearbox is designed to only accept torque from the
electrical motor. Therefore, DO NOT ATTEMPT TO FREE THE
FEED CHAIN BY USING A PIPE OR SIMILAR TOOL TO MOVE
OR DISLODGE THE CHAIN. If the feed chain is moved, the
gears within the gearbox will strip. This action will void all
warranties.
Spreader Maintenance
1. Use dielectric grease on all electrical connections before
an electrical connection is made or after a connector is
disconnected.
2. Grease the following:
• Idler shaft bearings (2)
• Flange bearings (2)
3. Check the Feed Chain tension periodically. To check the
tension, measure in 21"-25" from the rear edge of the gear box
mount. Push up on the chain with your hand. The conveyor
chain should lift up 2"-3" off the conveyor chain guide or cross
angles.
Feed
Chain
Rear of Sill
Extension
2" - 3"
21" - 25"
4. Empty the spreader of all ice control material when not in use
to prevent a frozen feed chain.
5. Wash out the spreader when it is not in use. At the end of
the season wash out the spreader to remove all ice control
materials. Thoroughly dry all metal surfaces. Paint and oil all
bare metal surfaces and chains to protect from rust. Properly
store the spreader for the next season.
End of Season Maintenance.
1. Wash spreader. Make sure no material or residue left in and
outside hopper.
2. Lubricate bearing using general automotive grease.
3. Inspect wire harness, connectors for broken insulation,
missing components. Replace if necessary.
4. Apply dielectric grease on all electrical connectors.
5. Store hopper indoors, in dry, cool place.
6. Inspect, clean and repaint frame.
7. Remove controller from truck. Store controller indoors, in dry,
cool place
8. Wash and lubricate chain.

5
ITEM
PART NO. QT Y. DESCRIPTION
13030392 1UPPER CHUTE WELDMENT
21410241 1WIPER BELT, HOPPER
3FWF025063007SS 3 WASHER, FLAT 1/4 SAE SS
4FCS025020075SS 3 SCREW, CAP 1/4-20 X 3/4 SST
5FNE025020031SS 3 NUT, NYLON INSERT 1/4-20 SST
69240131 1 DECAL #1, DANGER STAY CLEAR
73030420 1 CHUTE LOWER WELDMENT
83014960 4 BOLT, 3/8-16 X 1 CARRIAGE SHORT NECK SS'
9FNE038016044SS 4 NUT, NYLOCK 3/8-16 X 7/16 SST
10 3007824 1RETAINER GEARMOTOR, CHUTE
11 3030222 1 GEAR MOTOR .4 HP SPINNER
12 FWL031058008SS 3 WASHER, 5/16 LOCK SST
13 FCS031018063SS 3 SCREW, HHC 5/16-18 X 5/8 SST
14 3030182 1 HUB, SPINNER POLY
15 3030575 1 ENCLOSURE, GEAR MOTOR CHUTE
ITEM
PART NO. QT Y. DESCRIPTION
16 3030179 1 SPINNER 18" POLY CW
17 3030579 1BAFFLE, CHUTE
18 3025065 1BUSHING STRAIN RELIEF
19 3015873 4SCREW #12-14x.74 SS SELF DRIL HEX
WASHER HD
20 3007113 1 PIN, CLEVIS, 5/16 X 2-1/2, .141 HOLE ZN
21 3014994 1PIN,COTTER,1/8IN X 1IN SST
22 3030580 1 PIN, BAFFLE ATTACHMENT
23 3030581 1PIN, BAFFLE ADJUSTMENT
24 3001257 12 PIN, HAIR COTTER STAINLESS STL
25 FCS031018175SS 4 SCREW, HHC 5/16-18 X 1 3/4 SS
26 FWF031075006SS 12 WASHER, 5/16 SAE SST
27 FNE031018034SS 4 NUT, NYLOCK 5/16-18 SS
28 3031025 2 BAFFLE CHUTE ADJUST
29 3031051 4 PIN BAFFLE CHUTE
Chute Assembly
1
2
3
4
5 6
7
8
9
10
11
12
13
14
15
16
17
18
19
20 21
22
23
24
25
26 27
28
29

6
Hopper Assembly
1
2
3
4
5
6
7 8
9
10
11
12 13 14 15
16
17
18
19
20
21
22
23
24
25
26
27
28
29
30
31
32
33
34
35
36
37
38
39
40
41
424344
45
46
47
48
49
50
51
52
53
54
55
56

7
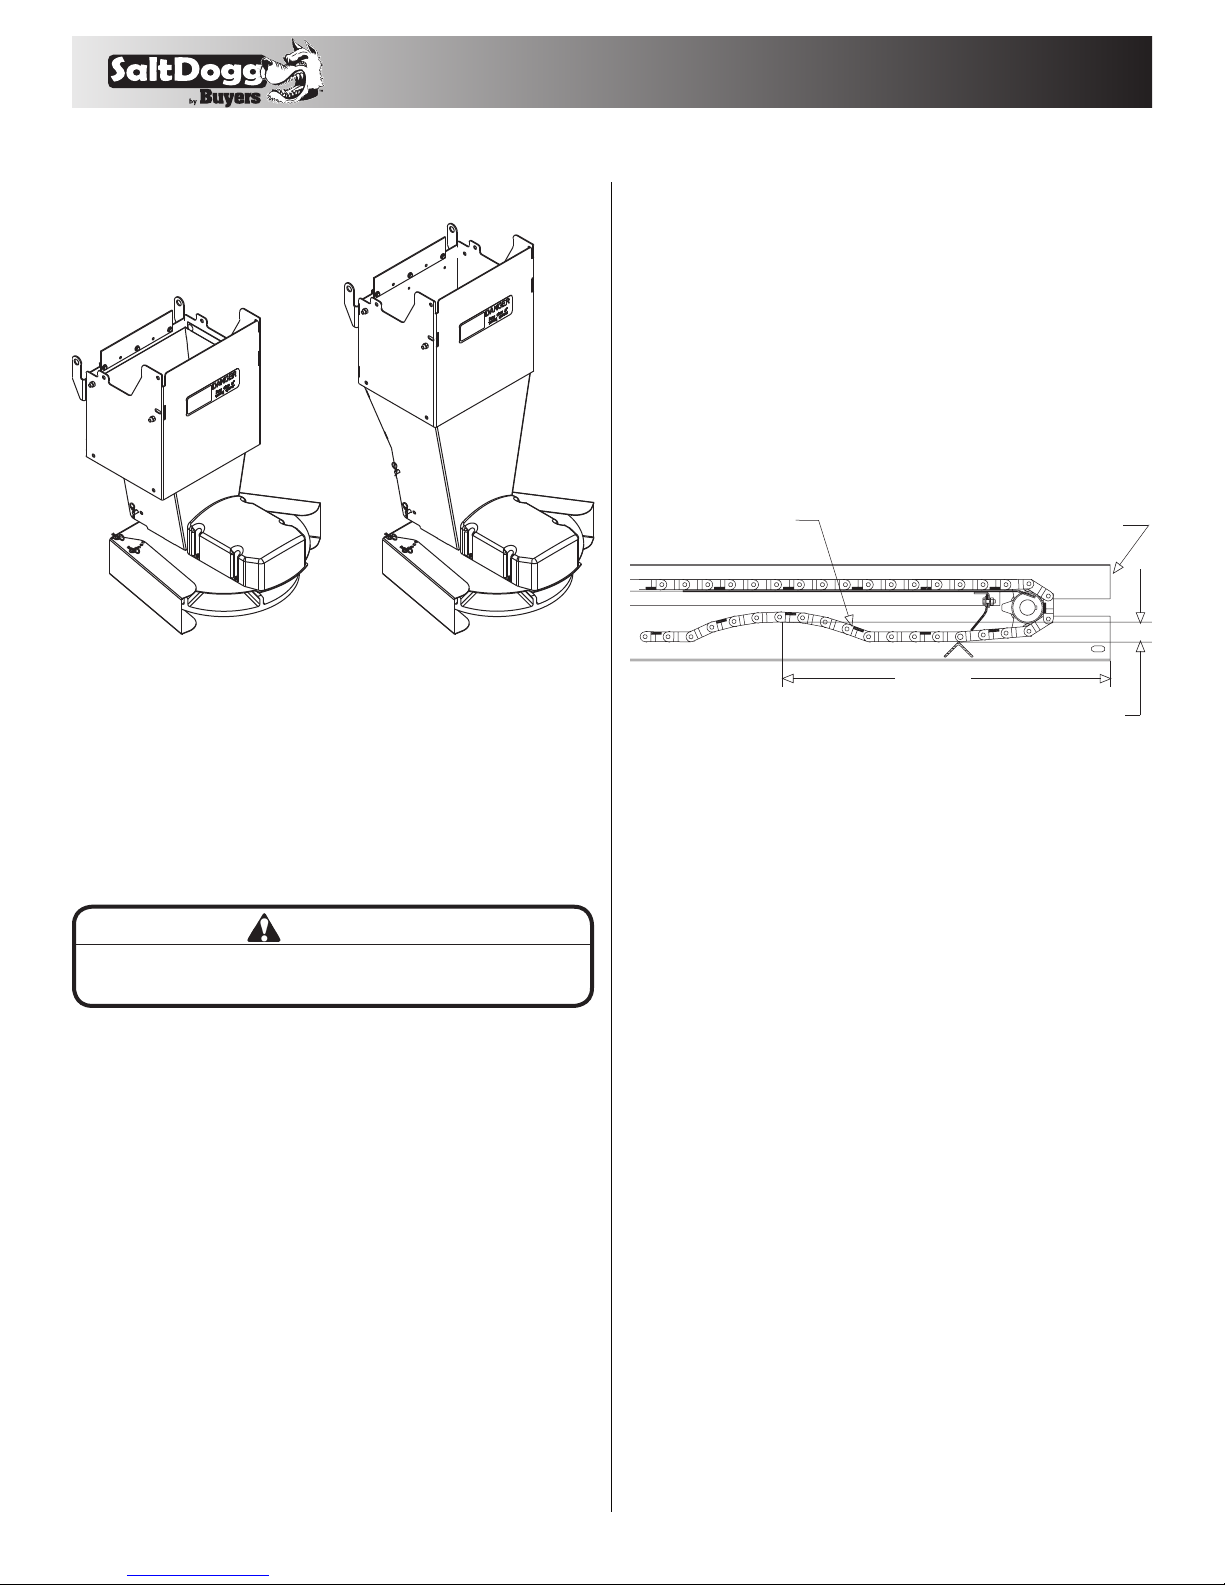
Hopper Assembly Bill of Materials
ITEM NO. PART NO. QTY. DESCRIPTION
13038843 1TROUGH WELDMENT SHPE4000CH
23001522 4 BOLT, CARRIAGE 1/2-13 X 1 SST
33001523 12 NUT, HX FLNG-1/2-13 SST
43025245 1MOTOR DECK, WELDMENT
53004278 8SCREW, BTN HD SOC CAP 1/2-13x
1 SST
63008872 2WIPER BELT, HOPPER
7FWF025063007SS 9 WASHER, FLAT 1/4 SAE SS
8FCS025020075SS 3 SCREW, CAP 1/4-20 X 3/4 SST
9FNE025020031SS 6 NUT, NYLON INSERT 1/4-20 SST
10 3008294 2BEARING, FLANGED
11 3006723 4 SCREW, HEX HD 1/2-13x1.5 GR5 SS
12 FNE050013053SS 4 NUT, NYLOCK 1/2-13 SS
13 3008316 1 SHAFT, SPROCKET DRIVE END
14 3008289 1 COUPLING, DRIVE SHAFT/ GEARBOX
15 1410803 2 PIN, CLEVIS, 3/8 X 2, 1038 ST, YZN
16 FPC013000100 2 COTTER PIN, 1/8 X 1, ZINC
17 KS402 3 KEY, 1/4 X 1/4 X 2
18 3008300 4SPROCKET, D667H CHAIN
19 3008290 2 BEARING, HEAVY DUTY TAKE-UP
20 3008317 1 SHAFT, IDLER SPROCKET
21 141050WSS 2 BOLT, WELDED TAKE UP, SCH IDLER
22 FNH063011054SS 2 NUT, HH 5/8-11 X 17/32 HIGH SST
23 3008860 1 CHAIN, 9FT. D667H CONVEYOR
24 3024575 1 GEAR MOTOR CONVEYOR 12 VDC
25 FCS038016100SS 4 SCREW, HHC 3/8-16 X 1 304 SST
26 3017121 2BRACKET, RECEPTACLE SZ8
DEUTSCH
27 FCS038016075SS 2 SCREW, HHC-3/8-16 X 3/4 SST
28 3039489 1COVER, CHAIN
29 3036883 1WELDMENT, MOTOR COVER
30 3015873 8SCREW #12-14x.74 SS SELF DRIL HEX
WASHER HD
31 3038847 1 HOPPER POLY 4 CU YA
ITEM NO. PART NO. QTY. DESCRIPTION
32 FCS025020100SS 3 SCREW, CAP HEX HD 1/4-20 X 1 SST
33 3007115 16 WASHER, FLAT 3/8 X 1.5 X.048 SST
34 FCS038016125SS 22 SCREW, HHC-3/8-16 X 1.25 SST
35 FNE038016044SS 26 NUT, NYLOCK 3/8-16 X 7/16 SST
36 1499035 2LABEL, WARNING 3
37 1499030 1 LABEL, CAUTION 1 (PAYLOAD)
38 3032591 1DECAL, DANGER, MOVING
CONVEYOR/ AUGER
39 3032593 1DECAL, DANGER, CONVEYOR
40 3032595 1DECAL, CAUTION, MOUNTING
41 3033172 1DECAL CONNECTION
42 3039490 2SCREEN SUPPORT, SHPE4000
43 3013279 1SCREEN SUPPORT, SHPE4000
44 FWF038100007SS 6 WASHER, FLAT 3/8 USS SST
45 3039492 1INVERTED VEE, WELDMENT
46 3012081 1 VIBRATOR 450 LBS, 12 VDC
47 3007066 4 SCREW, HHC-3/8-16 X 2 SST
48 3035346 1RIGHT ANGLE JUNCTION BLOCK
49 3035347 2GREASE FITTING 1/4TUBE 1/8 NPT
STRAIGHT
50 3036051 1 GREASE HOSE FRONT DR SIDE
51 3036052 1 GREASE HOSE FRONT PS SIDE
52 3035345 2GREASE FITTING 1/4TUBE 1/4-28
MALE 90 DEGREES
53 3035357 2SCREW SOCKET HD, RND 8-32X 1.50
SST
54 3035358 2 NUT, NYLOCK 8-32 SST, BLACK OXIDE
55 4375 3 CLAMP, HOSE .4375, 9/32 HOLE
56 3007522 3SCREW, SHEET MTL #12x1.0 HEX
WASHER HD SST

8
1
16
17
18
3 4 5
6
7
8
9
10
11
12
13
14
15
9049 Tyler Blvd. • Mentor, Ohio 44060
Phone (440) 974-8888 • Fax (440) 974-0165
Toll-Free Fax 800-841-8003 • saltdogg.com
3039499_A
SHPE4000CH Assembly
SALTDOGG®SPREADER WARRANTY
This warranty replaces all previous warranties and no employee of this company is authorized to extend additional warranties, or agreements, or implications not
explicitly covered herein. Buyers Products Company warrants all parts of the product to be free from defects in material and workmanship for a period of two (2)
years. Parts must be properly installed and used under normal conditions. Normal wear is excluded. Any part, which has been altered, including modifications,
misuse, accident, or lack of maintenance will not be considered under this warranty. The sole responsibility of Buyers Products Company under this warranty is
limited to repairing or replacing any part(s), which are returned, prepaid, 30 days after such defect is discovered, and returned part(s) are found to be defective
by Buyers Products Company. Authorization from Buyers Products Company must be obtained before returning any part. The following information must
accompany defective parts returned to Buyers Products Company: RMA #, spreader model, serial number, date installed, and distributor from whom purchased.
Buyers Products Company shall not be liable for damage arising out of failure of any unit to operate properly, or failure, or delay in work, or for any consequential
damages. No charges for transportation or labor performed on any part will be allowed under this warranty.
Bill of Materials
ITEM NO. PART NO. QTY. DESCRIPTION
13038842 1 HOPPER ASM 4.0 CU YD ELECTRIC MTR
23039515 1HARDWARE KIT SHPE4000CH
33016934 1 CONTROLLER SPEED 12 VDC, 60 AMP
43030628 1WIRE HARNESS MAIN
53035938 1 KIT POWER CABLE REPLACES 3016943
63012959 1TARP, SHPE4000
73013589 4 HOOK, TIE-DOWN SHPE4000
81496505 1 HOLD DOWN KIT, SPREADER (4 STRAPS)
99225 12 S-HOOK, 2.5" ZN, TARP STRAP
ITEM NO. PART NO. QTY. DESCRIPTION
10 TS31 6 STRAP, RUBBER TARP 31"
11 FCS038016100SS 2 SCREW, HHC 3/8-16 X 1 304 SST
12 FWF038100007SS 4 WASHER, FLAT 3/8 USS SST
13 FNE038016044SS 2 NUT, NYLOCK 3/8-16 X 7/16 SST
14 3030627 1 LANYARD PIN ASSEMBLY
15 0203700 1 WIRE ASSEMBLY, 36 LONG
16 3012458 2WIRE MESH, TOP SCREEN
17 66050 8 SNAPPER PIN, 1/4 X 2, YLW ZINC
18 3030391 1CHUTE ADJUSTABLE ELECTRO, SST
Table of contents
Other Salt Dogg Spreader manuals

Salt Dogg
Salt Dogg TGS06 User manual

Salt Dogg
Salt Dogg TGS03 User manual

Salt Dogg
Salt Dogg WB150BG User manual

Salt Dogg
Salt Dogg SHPE0750 Series User manual

Salt Dogg
Salt Dogg WB400 User manual

Salt Dogg
Salt Dogg SHPE0750 Series User manual

Salt Dogg
Salt Dogg WB400 User manual

Salt Dogg
Salt Dogg TGS01B User manual

Salt Dogg
Salt Dogg TGS03 User manual

Salt Dogg
Salt Dogg WB100B User manual
Popular Spreader manuals by other brands

Trynex International
Trynex International TurfEx TS45 owner's manual

IRIS Spreaders
IRIS Spreaders IJS-200 Operator's manual

Precision
Precision DS1000D Instructions-parts list

McGREGOR
McGREGOR WS-5008 Original instruction manual

KUHN
KUHN RAUCH AXIS QUANTRON-A manual

Craftsman
Craftsman 486.24595 owner's manual