Operation
User’s manual — 2900455/0 9
EN
3.3 Turning the machine on.
1) Close the door or dome and press the ON/OFF button.
⇒The orange LED in the START button lights up. The machine
f ills with water and heats it up.
⇒I
n the first 3 seconds, it is possible to access the initial set-
tings. The display shows:
> Central display: Model number. [Fig. 3/centre] [ ▶2.7.4 Model settings p. 7]
> Display, section [Fig. 3/b]: software version.
> If the icon appears, the
ENERGY SAVING
function is activated.
[▶2.7.2 Other settings p. 7]
> I
f the icon appears, the
THERMAL LOCK
function is activated.
[▶2.7.1 Initial Settings p. 6]
⇒When the working level is reached, the machine closes the
water inlet by means of a pressure switch or level probe fit-
ted in series with the inlet solenoid valve.
2) T
he machine heats up the rinsing boiler and the tank one after
the other.
⇒The machine is ready for use when the pre-set temperatures
are reached in the boiler (between 65 and 85 °C. depending
on the program) and in the tank (55 °C). The green arc lights
u
p with the icon on the display and a green LED on the
START button.
⭆T
he estimated time for this operation is approximately
30 minutes.
3.4 Main operation
3.4.1 Prewash
1) Remove any remaining dirt and rinse the items
before putting them in the dishwasher.
2) Place the items in the dishwasher basket.
3) When the basket is full, open the door or dome of
the machine and insert the basket centred on the support rails.
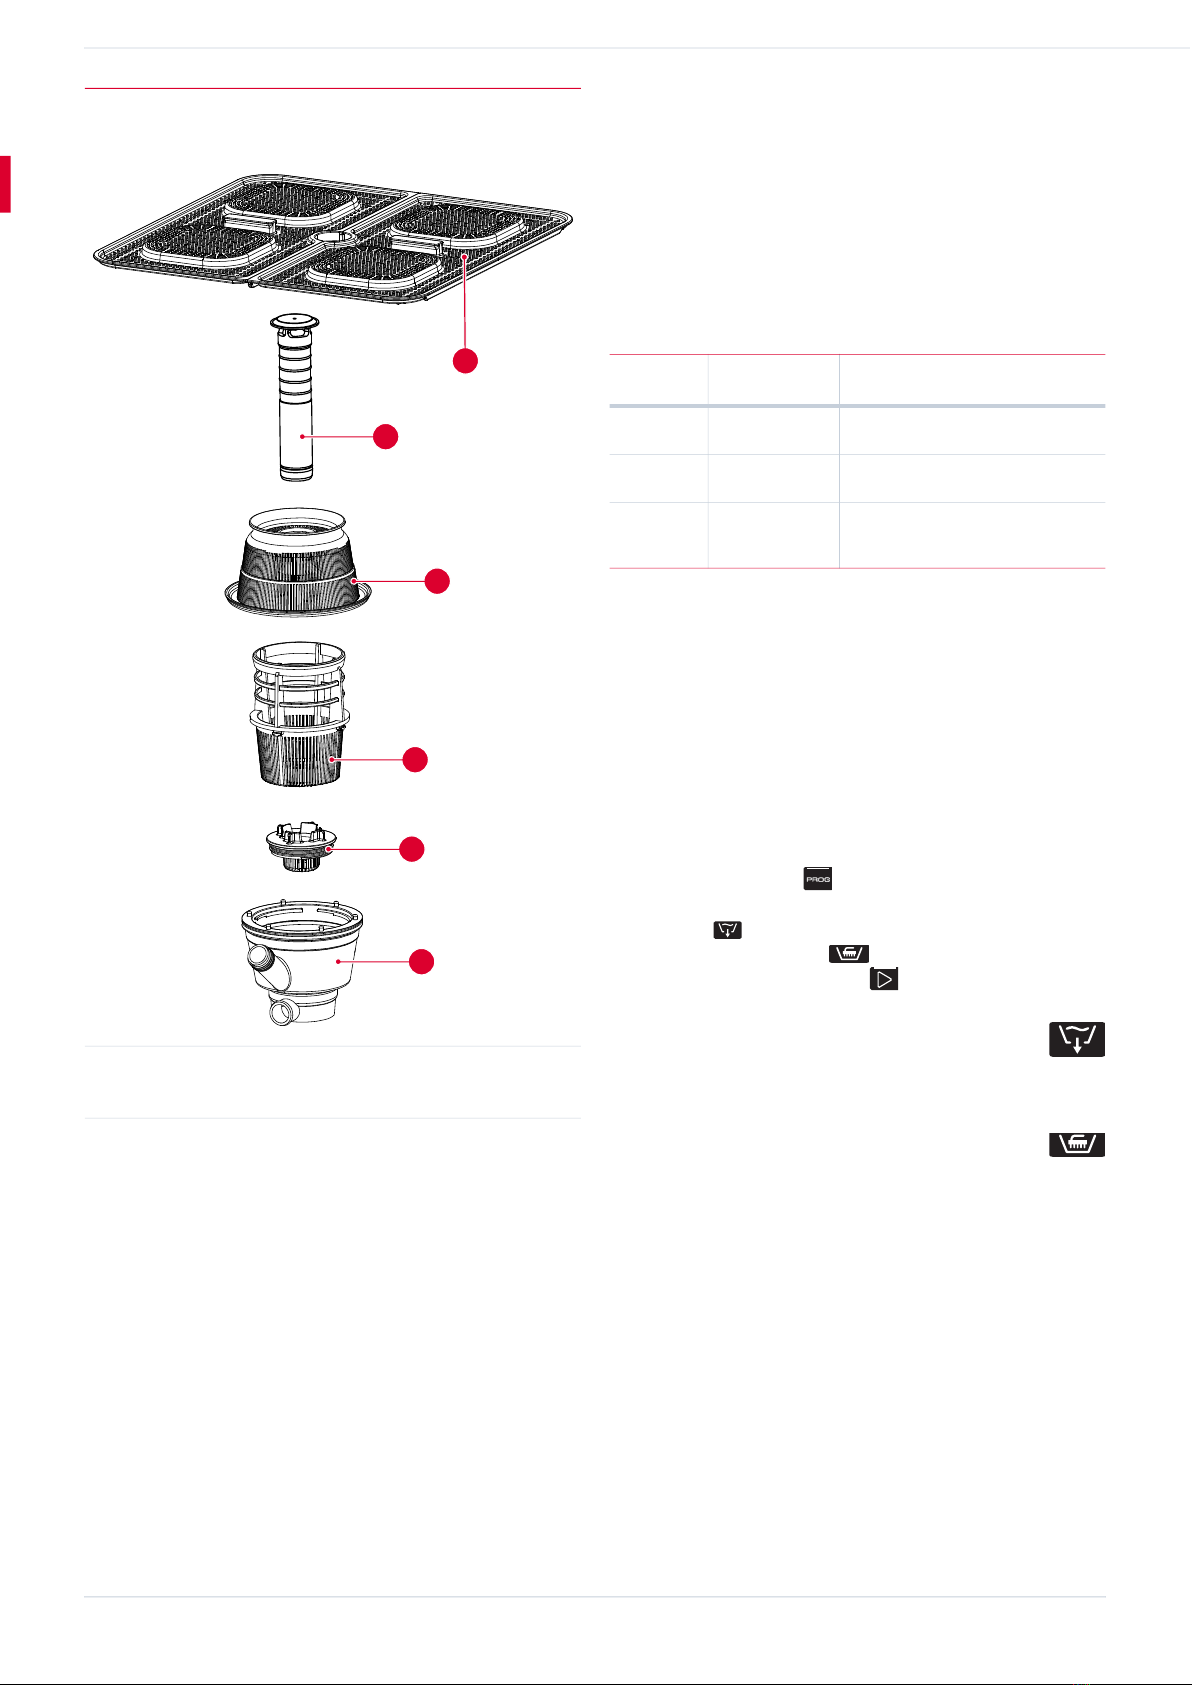
3.4.2 Program selection
1) To select the wash program that best suits the type of item you
want to wash, press the PROG button .
2) Select the type of wash cycle by successively pressing the
PROG button .
– While the led of the PROG button is on, the display shows the
time and tank and boiler temperatures corresponding to
the selected cycle.
– When the LED goes out, the display shows the actual temperatures.
3.4.3 Washing
1) Press the START button to start the wash cycle in the
machine.
– To move to the next phase of the wash cycle, press START suc-
cessively.
– If the
THERMAL LOCK
function is active, the machine does NOT
respond to buttons being pressed.
– I
f the door is opened, the machine pauses the cycle and the
icon comes on.
–[Models with drain pump] The icon flashes during the drain
phase prior to the rinse process.
2) During the washing phase, the icon and the temperature
of the wash tank are displayed.
3) During the rinsing phase, the icon and the boiler tempera-
ture are displayed.
4) When the wash cycle is finished, the machine
informs you with the following messages:
– 3 acoustic warnings ("beep")
– The blue progress crown is complete and flashing.
– The light of the START button flashes blue.
– The countdown shown on the screen has come to an end.
5) Open the door or dome and remove the basket from the dish-
washer.
6) If you want to wash more baskets, repeat the process from step
3.4.1-1).
⭆If the PROG or START button is not pressed within 2.5
hours, the machine switches off automatically.
Icon Description Icon Description
GLASSES Cycle DISHES Cycle
CUPS cycle CUTLERY cycle
JUGS cycle PANS cycle
DRAIN Cycle
Selectable with door/dome open.
SELF-CLEANING Cycle
Selectable with door/dome open.
[Models with descaler]
REGENERATION cycle
Selectable with door/dome open.
With a manual descaler, the tank has to be drained.
⚠Caution
Risk of irritation from splashes
If you open the door or dome in the middle of the cycle, the ma-
chine may spray soapy water at high temperature and, if it
comes into contact with the skin or mucous membranes, it may
cause irritation.
– Do not open the door or dome in the middle of the cycle.
⚠Caution
Risk of irritation from high temperature water vapour
After the end of the wash cycle, when you open the door or
dome of the dishwasher, a large amount of steam comes out at
high temperature and may irritate the skin or eyes. The items
may be at high temperature and cause minor skin irrita-
tion/burns.
– When opening the door or dome of the machine, avoid bringing
your face close to the machine.
– If steam gets on your face, wash your face with cool water.
– Wait a reasonable amount of time before removing items from
the dishwasher.