Samuel Heath V603-T Operational manual

Product Data Sheet
V603-T Trim To Suit V132-IS / V132-AIS
- Available Control Options -
V603-TM V603-TMB V603-TX V603-TXB V603-TL


Dimension Key
V603-TM / V603-TMB

Dimension Key
V603-TM / V603-TMB

Dimension Key
V603-TL

1
2
3
4
5
6
11
12
13
14
7
8
9
10
15
16
17
18
Spares Information
Item Part No. Description
-
-
-
-
-
-
-
-
VS56045
-
-
-
-
-
-
VS56047
VS56065
-
Cheese Head Screw
Washer
Cheese Head Screw
Washer
Volume Spindle
Diverter Body
Thermo Collar
Diverter Valve Locking Nut
Diverter Cartridge
Threaded Shank
Shower Plate
Thermo Body
Volume Body
Thermo Spindle
Thermo Locking Nut
CD Valve (Clockwise Closing)
Thermostatic Cartridge
Threaded Shank
1
2
3
4
5
6
7
8
9
10
11
12
13
14
15
16
17
18

Installation
1. Install the nished surface, ensuring the nished surface is in accordance with
the minimum and maximum installation depths shown on the drawings in the front of
this booklet.

Set Up
2. Ensure that the black line on the temperature spline (B) is in line with the step on
the cartridge.
3. Push temperature ring (A) onto temperature cartridge (B).
4. Attach spindle assembly (C) onto the temperature cartridge (B) ensuring that the
step on the temperature ring (A) lines up with the gap on the spindle assembly (C).
5. Secure the spindle in place by accessing the concealed screw in the spindle
assembly (C) using Allen key (D).
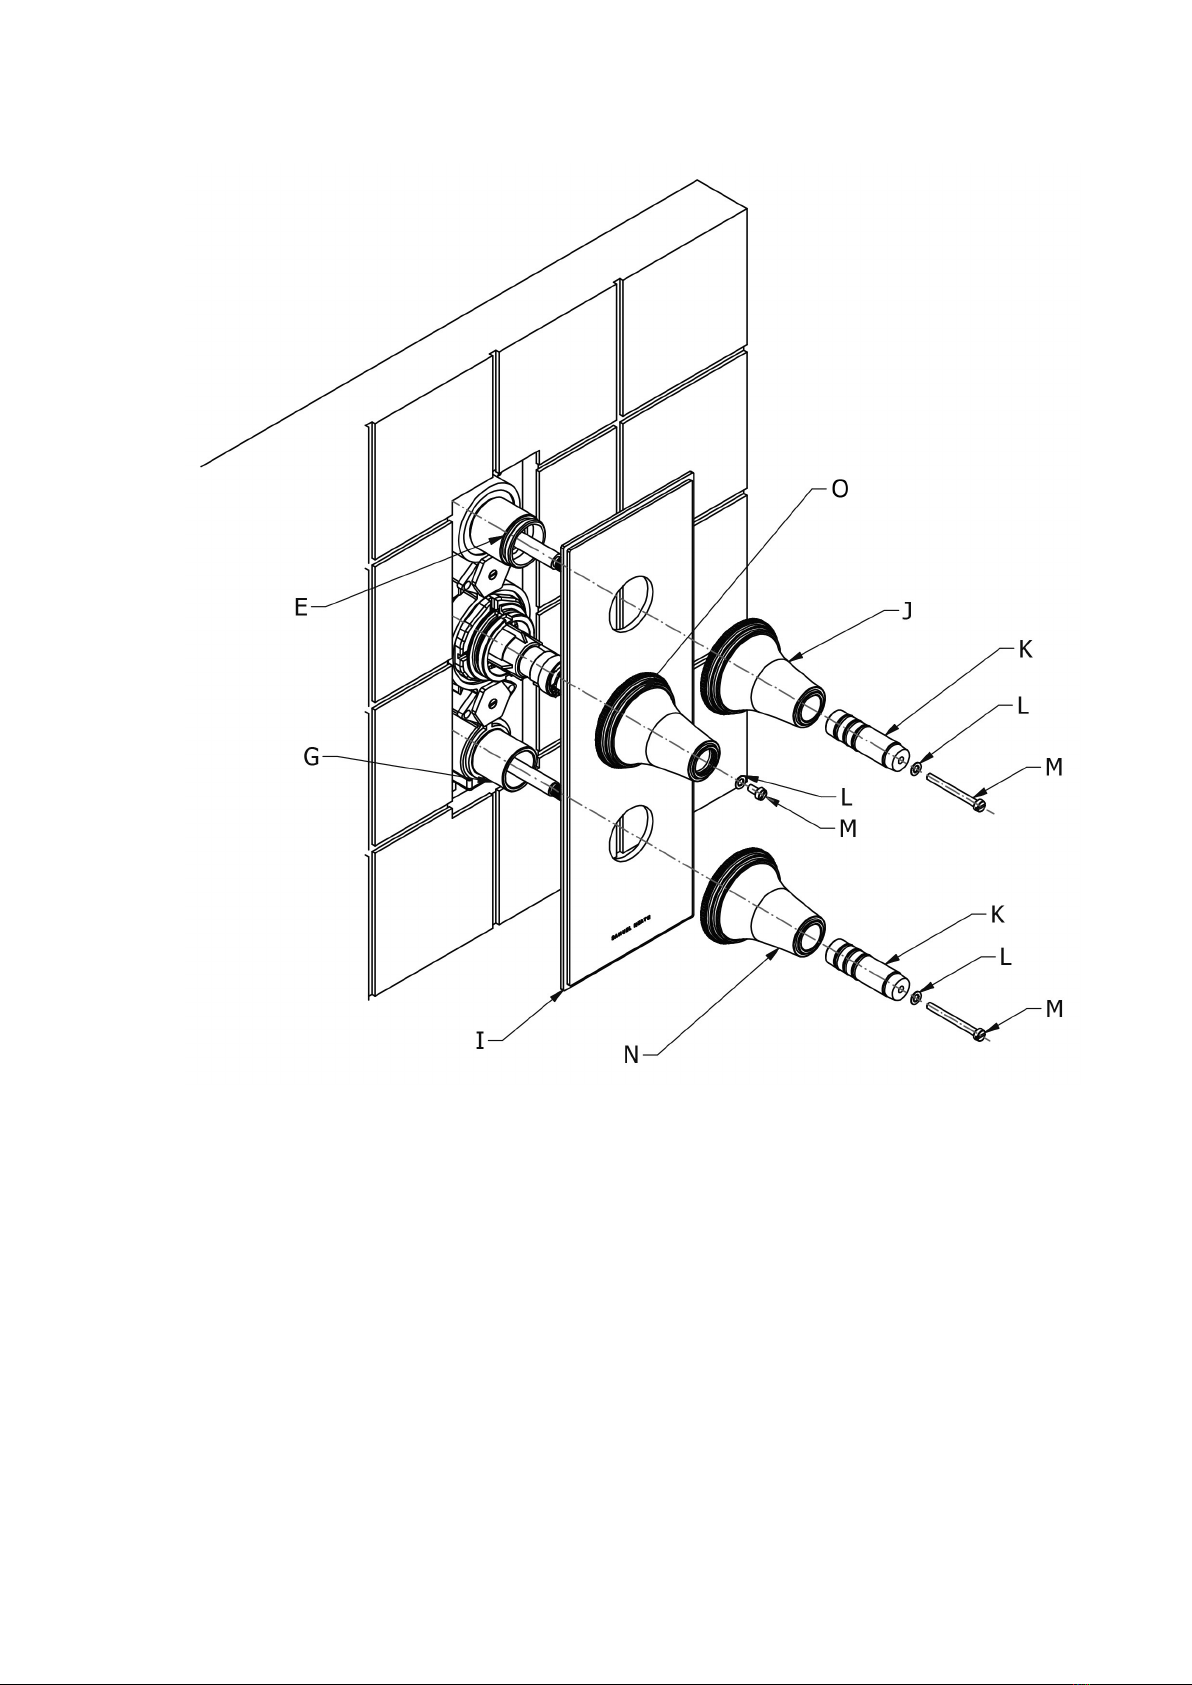
6. Screw volume collar (E) onto the diverter valve (F) and threaded collar (G) onto
the volume cartridge (H).

7. Apply a bead of silicon sealant to the wall where the trim plate assembly (I) will
sit.
8. Push trim plate assembly (I) onto the installed shower.
9. Clamp the trim plate assembly in place by screwing the diverter body (J) onto
threaded shank (E) and the volume body (N) onto the threaded shank (G).
10. Assemble spindles (K), washers (L) and screws (M).
Set Up

Temperature Override Mechanism
• This product has a pre-set maximum temperature of 41°C - 43°C (106°F - 109°F)
• An additional temperature increase is available by pressing in the sprung loaded
cross top as shown at the maximum setting.
• The unit automatically clicks back into pre-override when rotated back towards
cold.
• For further temperature increases, please see “Adjusting The Temperature”

Adjusting The Temperature
1. Remove thermo body (O).
2. Remove spindle assembly (C) by accessing the concealed screw using Allen key
(D).
Note: To remove the spindle assembly (C), the gap in the spindle assembly (C)
must be in line with the step on the temperature collar (A).
3. Rotate the spindle anti-clockwise to make the water hotter, and clockwise for
colder.
4. Reassemble the spindle assembly (C).

Control Assembly Instructions
1. Remove screw (A) and washer (B) from spindle
2. Position cross top (C) to tap body and assemble anti-rotational washer (B)
followed by screw (A).
Note: It is imperative that the anti-rotational washer is installed
3. Levers are also available (Assembly method is identical). Position lever at the
preferred angle.
4. Using a at edge screwdriver (E), tighten the screw (A) down against the
anti-rotational washer (B) to its fullest extent.
5. Insert the indice (D) to complete assembly.

1. Place adapter (A) onto the side
valve spindle.
2. Align the adapter (A) using
assembly guide screw (B) to mimic the
desired position of the Luxe Lever.
3. Carefully remove screw (B) and
secure adapter using screw (C) and
washer (D).
4. Attach Luxe Lever (E) to adapter (A)
using screw (G) and washer (F).
5. Conceal screw using indice (H).
Luxe Lever Assembly Instructions


8-40413-T
Head Oce and Customer Service
Leopold Street
Birmingham
England
B12 0UJ
T: +44 (0)121 766 4200
F: +44 (0)121 772 3334
www.samuel-heath.co.uk
US Customer Service
Federal I.D. No. 58-1504682
www.samuel-heath.com
IMPORTANT NOTES
1. Installation should be carried out by a competent engineer, in accordance with water regulations.
2. Before installation, ensure supply pipes are ushed clean. Debris or loose particles will aect the eciency of the ceramic disc
cartridge.
3. For mixer taps, it is recommended that hot & cold pressures are equally balanced.
4. To help maintain the high quality nish, please clean with a soft damp cloth. Do not use abrasive polish or cleaners. Stains may
be removed using undiluted washing up liquid.
5. Ceramic cartridges in hard water areas. To prolong the lifespan and reduce servicing periods of your Samuel Heath tap we
recommend that a suitable water softener be tted. Consult your installer/designer for details.
6. Please note that as with all tap and shower ware it will be necessary from time to time for the products to be serviced, this should
be carried out by a qualied Plumbing Engineer.
NOTES IMPORTANTES
1. L’installation doit être faite par un ingénieur qualié, selon les réglements du Service Eau.
2. Avant l’installation, il faut s’assurer que les tuyaux d’approvisionnement sont complètement purgés. Les déchets ottants auront
un eet détrimentaire sur l’ecacité de la cartouche céramique.
3. Il est recommandé que les pressions de l’eau chaude et eau froide des mitigeurs et mélangeurs soient maintenues à un niveau
égal.
4. Pour conserver la nition de haute qualité, nettoyer avec un chion doux et humide. N’employer jamais de la cire et des produits
abrasifs. Les tâches peuvent être enlevées à l’aide de liquide vaisselle pur.
5. Cartouches en céramique dans les régions à eau calcaire. Pour prolonger la durée et réduire l’entretien de votre robinetterie
Samuel Heath, nous recommandons d’utiliser un adoucisseur d’eau convenable. Veuillez consulter votre installateur/fournisseur
pour plus de renseignements.
6. Veuillez noter qu’un entretien sera nécessaire de temps en temps et doit être eectué par un installateur qualié.
WICHTIGE HINWEISE
1. Installation sollte durch einen kompetenten Fachmann und nach den üblichen Vorschriften ausgeführt werden.
2. Vor Installation Wasserleitung gründlich durchspülen. Verschmutzung wird die Funktion der Kartusche erheblich einschränken.
3. Für Mischbatterien ist es wichtig, daß Wasser mit gleichem Druck eingefuhrt wird.
4. Um den optimalen Zustand dieses Produktes zu erhalten, wischen Sie es bitte nur mit einem feuchten, weichen Lappen ab. Auf
keinen Fall Scheuermittel verwenden. Flecken lassen sich mit unverdünntem Geschirrspülmittel entfernen.
5. Keramikkartuschen in Hartwasserbereichen. Um die Lebensdauer zu verlängern und Wartungszeiten zu reduzieren empehlt
Samuel Heath den Einsatz eines geeigneten Wasserenthärters. Fragen Sie Ihren Installateur/Designer um Rat.
6. Bitte merken Sie, dass alle Armaturen ab und zu eine Wartung brauchen. Diese soll durch einen kompetenten Installateur
ausgeführt werden.
ATENCION
1. La instalación se debe realizar por un fontanero.
2. Antes de la instalación, deben pulgar las tuberias dejándo correr el agua por las tuberias para que arrastren los residuos de
montaje/obra, con el motivo de que no afecte la ecacia del cartucho de ceramica.
3. Para grupo baño/ducha se recomienda que las presiones del agua caliente y frio sean equilibradas.
4. Para ayudar a mantener el acabado de este producto, limpiar con un paño húmedo suave. No se debe emplear productos
abrasivos de baño. Las manchas se pueden quitar empleándo liquido lava-vajillas puro.
5. Cartuchos cerámicos en áreas de aguas duras . Para prolongar su vida útil y reducir los periodos de reparación de su grifo
Samuel Heath recomendamos la instalación de un descalcicador de agua. Consulte a su instalador para más detalles.
6. Igual que con todo tipo de griferia y duchas, de vez en cuando será necesario llevar a cabo una revisión al producto; esto
deberia ser realizado por un fontanero calicado.
ATTENZIONE
1. L’impianto deve essere montato da personale tecnico in conformità alle vigenti leggi.
2. Prima dell’installazione assicurarsi che le tubature dell’ aqua siano pulite. Detriti o residui di lavorazione compromettono
l’ecenza del cartuccio.
3. Per i gruppi, si raccomanda che le pressioni acqua calda e acqua fredda siano ugualmente bilanciate.
4. Per mantenere la nizione di ottima qualità, pulire con un panno soce e inumidito.
Non usare creme lucidanti e materiali abrasivi. Le macchie potranno essere tolte usando del detersivo per piatti puro.
5. Come con tutti i tipi di rubinetti e docce, di volta in volta è necessario eettuare una revisione al prodotto; questo dovrebbe
essere fatto da un idraulico qualicato.
Issue: B
This manual suits for next models
5
Table of contents
Other Samuel Heath Bathroom Fixture manuals
Popular Bathroom Fixture manuals by other brands

Franke
Franke EXOS676X Installation and operating instructions

Drive
Drive Bathtub safety rail instructions

Thermasol
Thermasol SEAT-S-GR manual

PHARO
PHARO Lift 2 26870 Series installation instructions

Roltechnik
Roltechnik INTEGRO installation instructions

Axor
Axor Starck 10929007 Instructions for use/assembly instructions