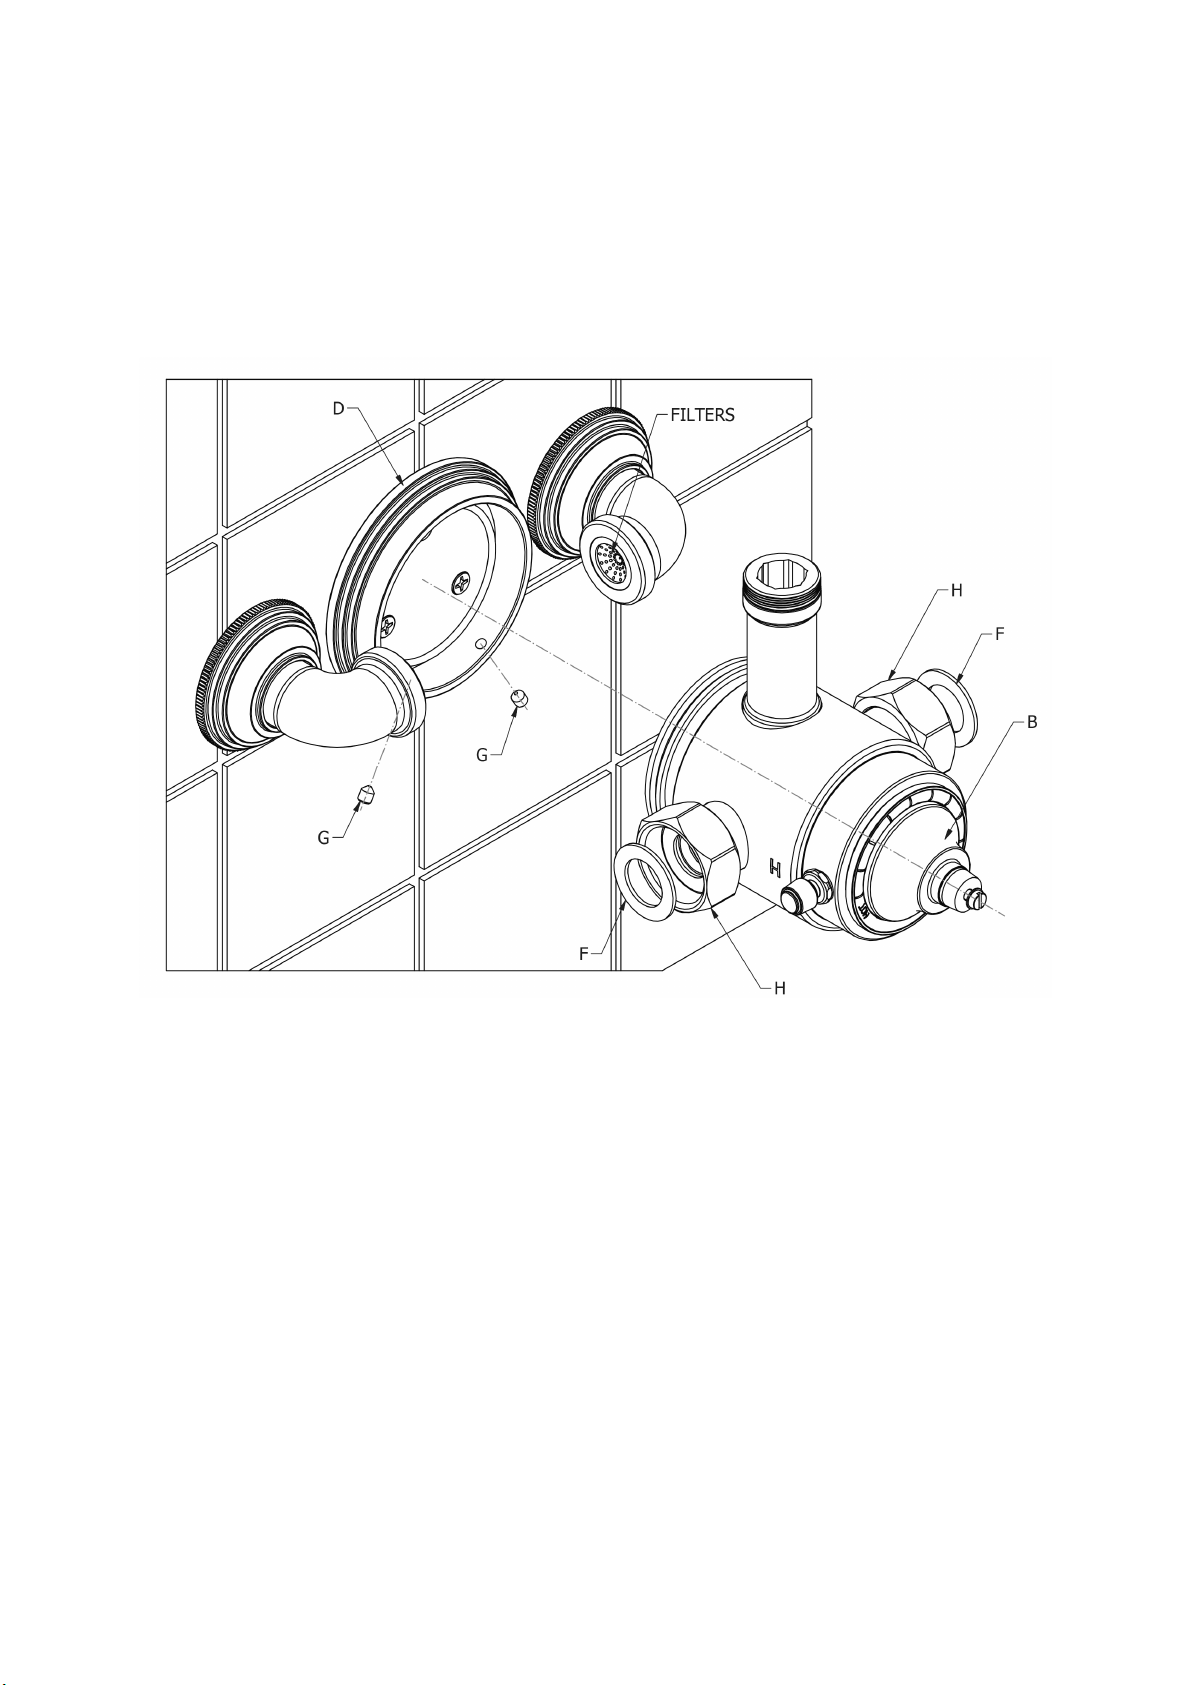
Samuel Heath V640 Operational manual

Product Data Sheet
V640 Exposed ½” Thermostatic Shower Valve
- Available Handle Options -
V640MB
V640X V640D
V640M
V640XB


Dimension Key
V640

Flow Rates
The ow rate data provided in this document is indicative of each product and is given in an open
outlet condition. Installation design, external connections and ttings not supplied may aect the
data provided.

Spares Information
1
2
3
5
4
6
7
8
9
10
11
12
13
14
15
Item Part No. Description
-
-
-
-
-
-
-
-
-
-
VS56064
-
-
-
-
Escutcheon
Wall Plug
Cross Head Screws
Oset Connector
Elbow Escutcheon
Elbow
Filter
Circlip
Check Valve
Rubber Washer
Thermo Cartridge
Valve Cap
Valve Stem
Washer
Securing Screw
1
2
3
4
5
6
7
8
9
10
11
12
13
14
15

Installation
1. Apply a suitable sealant tape to the threads of the oset connectors (A) and
proceed to assemble the oset connectors (A) into ush female ttings (not
supplied)
A
A

Set Up
2. Adjust the position of the oset connectors (A) as required to allow tting of
thermostatic valve (B) and elbows (C) - See dimension (X)
3. Screw the elbows (C) onto the oset connectors (A)
4. Set the valve body escutcheon (D) into the required position, ensuring it is in line
with the elbows (C), then mark & drill screw holes
5. Insert wall plugs to drilled holes and x the valve body escutcheon (D) into
position using screws (E) provided.
6. It is essential that the valve body is used to ensure correct positioning, taking
care not to damage its surface nish in the process.

Set Up
7. Push the thermostatic valve (B) between the elbows (C) and into the valve body
escutcheon (D), ensuring the rubber washers (F) are captivated.
8. Secure thermostatic valve (B) to escutcheon (D) with two grub screws (G) in the
escutcheon using Allen key provided.
9. Using a suitable spanner tighten the captive nuts (H), use a cloth to protect the
surface nish of the captive nuts (H).

Control Assembly Instructions
1. Remove screw (A) and washer (B) from spindle
2. Position cross top (C) to tap body and assemble anti-rotational washer (B)
followed by screw (A).
Note: It is imperative that the anti-rotational washer is installed
3. Levers are also available (Assembly method is identical). Position lever at the
preferred angle.
4. Using a at edge screwdriver (E), tighten the screw (A) down against the
anti-rotational washer (B) to its fullest extent.
5. Insert the indice (D) to complete assembly.

1. Place adapter (A) onto the side
valve spindle.
2. Align the adapter (A) using
assembly guide screw (B) to mimic the
desired position of the Luxe Lever.
3. Carefully remove screw (B) and
secure adapter using screw (C) and
washer (D).
4. Attach Luxe Lever (E) to adapter (A)
using screw (G) and washer (F).
5. Conceal screw using indice (H).
Luxe Lever Assembly Instructions


Head Oce and Customer Service
Leopold Street
Birmingham
England
B12 0UJ
T: +44 (0)121 766 4200
F: +44 (0)121 772 3334
www.samuel-heath.co.uk
US Customer Service
Federal I.D. No. 58-1504682
www.samuel-heath.com
IMPORTANT NOTES
1. Installation should be carried out by a competent engineer, in accordance with water regulations.
2. Before installation, ensure supply pipes are ushed clean. Debris or loose particles will aect the eciency of the ceramic disc
cartridge.
3. For mixer taps, it is recommended that hot & cold pressures are equally balanced.
4. To help maintain the high quality nish, please clean with a soft damp cloth. Do not use abrasive polish or cleaners. Stains may
be removed using undiluted washing up liquid.
5. Ceramic cartridges in hard water areas. To prolong the lifespan and reduce servicing periods of your Samuel Heath tap we
recommend that a suitable water softener be tted. Consult your installer/designer for details.
6. Please note that as with all tap and shower ware it will be necessary from time to time for the products to be serviced, this should
be carried out by a qualied Plumbing Engineer.
NOTES IMPORTANTES
1. L’installation doit être faite par un ingénieur qualié, selon les réglements du Service Eau.
2. Avant l’installation, il faut s’assurer que les tuyaux d’approvisionnement sont complètement purgés. Les déchets ottants auront
un eet détrimentaire sur l’ecacité de la cartouche céramique.
3. Il est recommandé que les pressions de l’eau chaude et eau froide des mitigeurs et mélangeurs soient maintenues à un niveau
égal.
4. Pour conserver la nition de haute qualité, nettoyer avec un chion doux et humide. N’employer jamais de la cire et des produits
abrasifs. Les tâches peuvent être enlevées à l’aide de liquide vaisselle pur.
5. Cartouches en céramique dans les régions à eau calcaire. Pour prolonger la durée et réduire l’entretien de votre robinetterie
Samuel Heath, nous recommandons d’utiliser un adoucisseur d’eau convenable. Veuillez consulter votre installateur/fournisseur
pour plus de renseignements.
6. Veuillez noter qu’un entretien sera nécessaire de temps en temps et doit être eectué par un installateur qualié.
WICHTIGE HINWEISE
1. Installation sollte durch einen kompetenten Fachmann und nach den üblichen Vorschriften ausgeführt werden.
2. Vor Installation Wasserleitung gründlich durchspülen. Verschmutzung wird die Funktion der Kartusche erheblich einschränken.
3. Für Mischbatterien ist es wichtig, daß Wasser mit gleichem Druck eingefuhrt wird.
4. Um den optimalen Zustand dieses Produktes zu erhalten, wischen Sie es bitte nur mit einem feuchten, weichen Lappen ab. Auf
keinen Fall Scheuermittel verwenden. Flecken lassen sich mit unverdünntem Geschirrspülmittel entfernen.
5. Keramikkartuschen in Hartwasserbereichen. Um die Lebensdauer zu verlängern und Wartungszeiten zu reduzieren empehlt
Samuel Heath den Einsatz eines geeigneten Wasserenthärters. Fragen Sie Ihren Installateur/Designer um Rat.
6. Bitte merken Sie, dass alle Armaturen ab und zu eine Wartung brauchen. Diese soll durch einen kompetenten Installateur
ausgeführt werden.
ATENCION
1. La instalación se debe realizar por un fontanero.
2. Antes de la instalación, deben pulgar las tuberias dejándo correr el agua por las tuberias para que arrastren los residuos de
montaje/obra, con el motivo de que no afecte la ecacia del cartucho de ceramica.
3. Para grupo baño/ducha se recomienda que las presiones del agua caliente y frio sean equilibradas.
4. Para ayudar a mantener el acabado de este producto, limpiar con un paño húmedo suave. No se debe emplear productos
abrasivos de baño. Las manchas se pueden quitar empleándo liquido lava-vajillas puro.
5. Cartuchos cerámicos en áreas de aguas duras . Para prolongar su vida útil y reducir los periodos de reparación de su grifo
Samuel Heath recomendamos la instalación de un descalcicador de agua. Consulte a su instalador para más detalles.
6. Igual que con todo tipo de griferia y duchas, de vez en cuando será necesario llevar a cabo una revisión al producto; esto
deberia ser realizado por un fontanero calicado.
ATTENZIONE
1. L’impianto deve essere montato da personale tecnico in conformità alle vigenti leggi.
2. Prima dell’installazione assicurarsi che le tubature dell’ aqua siano pulite. Detriti o residui di lavorazione compromettono
l’ecenza del cartuccio.
3. Per i gruppi, si raccomanda che le pressioni acqua calda e acqua fredda siano ugualmente bilanciate.
4. Per mantenere la nizione di ottima qualità, pulire con un panno soce e inumidito.
Non usare creme lucidanti e materiali abrasivi. Le macchie potranno essere tolte usando del detersivo per piatti puro.
5. Come con tutti i tipi di rubinetti e docce, di volta in volta è necessario eettuare una revisione al prodotto; questo dovrebbe
essere fatto da un idraulico qualicato.
8-40297
Issue: C
This manual suits for next models
5
Table of contents
Other Samuel Heath Bathroom Fixture manuals