Sanbot MAX User manual

Sanbot Max Product Instruction for Standard Version
Introduction
Thanks for purchasing our company product!
Please carefully read this Instruction before using the Sanbot Max Standard version robot
(hereinafter referred to as Sanbot Max Std), so you can operate this robot very easily as soon as
possible.
Please keep this instruction properly after reading it.
Robot is a self-operating equipment, and improper operation will lead to accidents or
injuries.
Please refer to this instruction and other related guidelines to make sure safety installation
and usage.
Sanbot Max Std application scenario and main function
Sanbot Max Std integrates the function of consultation, guidance, propaganda,
entertainment. It provides music and dance, gesture propaganda, guidance, track inspection, visitor
reception, chat consultation for enterpriser, mall, hotel, bank, hospital, government affair hall and
other place. With powerful function, Sanbot Max Std can satisfy repeated job post demand in
service links of all kinds of enterprises and partial replace correspond post staff to save the cost of
staff and management and increase service efficiency, therefore reaching continuous profit.
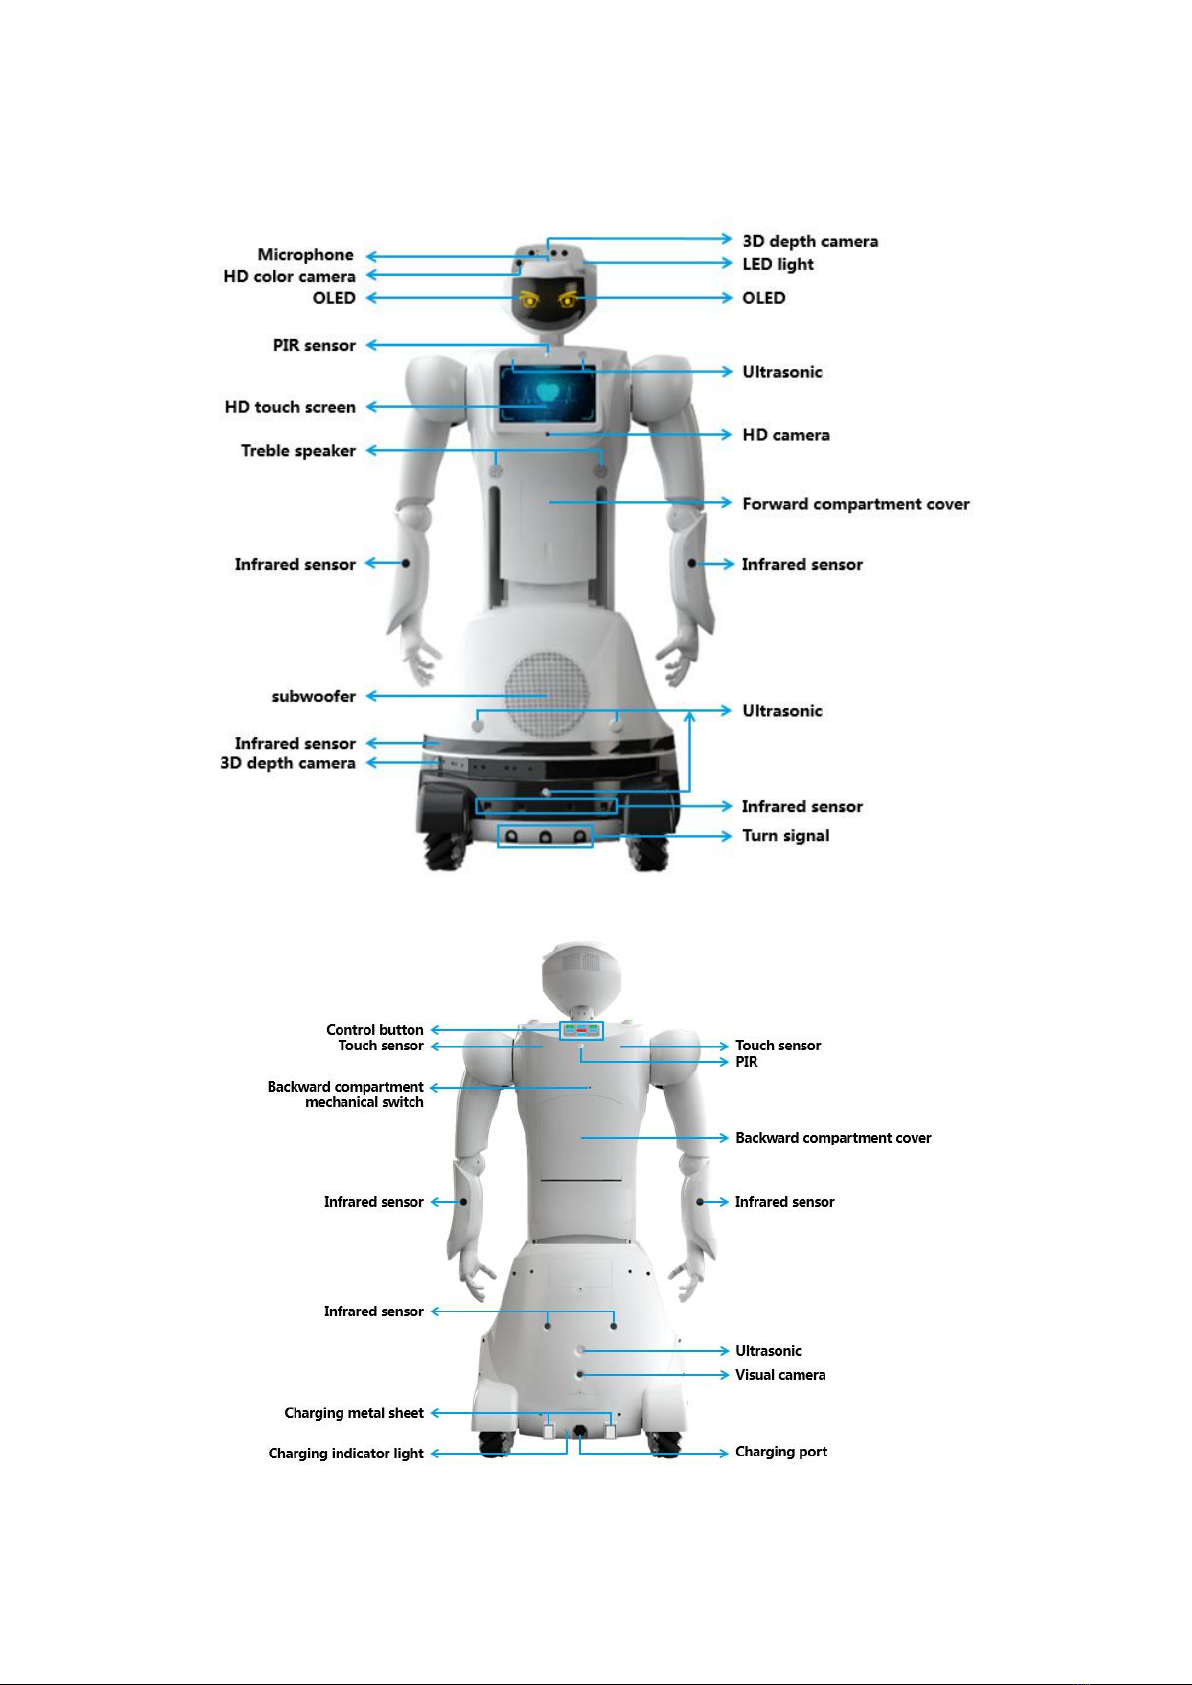
1. There are 10 degrees of freedom on Sanbot Max Std’s two arms and 10 degrees of freedom
on Sanbot Max Std’s two palms. With the rotation of 2 degrees of freedom on the head, it can
realize the display of diversified gesture and actions, like greeter and dance.
2. Sanbot Max Std has a comprehensive robot vision, equipped with HD color camera, HD
camera, visual camera, for security protection, video call, visual positioning and visual
recognition etc., function.
3. Sanbot Max Std has 11 touch sensors, 2 OLED eye displays, 4 atmosphere lamps, and all of
them can be triggered or flexible switch based on different scenario.
4. Sanbot Max Std adopts voice interaction solution with 6 microphones pickup, which can
make voice localization, echo cancellation beam orientation, high frequency gain,

reverberation cancellation.
5. Sanbot Max Std can support 3D SLAM map building, trajectory planning, navigation.
Combining 3D vision, Sanbot Max Std can realize the function of indoor space map building
and positioning.
6. Combining 3D laser vision, infrared and ultrasonic to fuse obstacle avoidance mode, Sanbot
Max Std can realize the function of emergency braking in case of unexpected situation and
moving on bypass obstacle.
7. Sanbot Max Std chassis adopts structural design of four-wheel outer hub motor plus
Mecanum wheel, so it can realize the rotation of 360 degrees, speed of movement up to 5m/s.
8. Sanbot Max Std with plenty of interfaces, such as USB, HDMI, RJ45, Audio IN, which can
access to many kinds of external devices.
9. Sanbot Max Std has precise auto-charging strategy and charging safety strategy.
10. Sanbot Max Std with open system, can satisfy custom development or self-development of
diversified industry customer.

Learn about Sanbot Max Std
Front
Rear

Lateral
Top
Bottom

Front of charging pile
Back of charging pile
Inner of charging pile

Unpacking Instruction
Tools needed:Cutting knife, small hammer, cloth gloves;
Unpacking environment: As the size of container is too large, if you wanna keep the carton well,
please make sure that the unpacking environment height is more than 3.5 meters.
Unpacking procedure: (Picture just for your information, please prevail in kind)
1. Please remove the outer packing case from bottom to top, and remove the plastic tape covered
on the poly foam.
2. Please remove the two pieces of foam from the front and back of the Sanbot Max Std, and
remove the plastic film covered on the Sanbot Max Std.

3. Unscrew the butterfly nuts (4 in total) on the left and right sides of wooden pallet, then force
out screws (4 in total) with hammer or by hand.
4. Take out of the two fixed wood blocks which are fixed by butterfly nuts and screw, and place
them on the side of pallet behind Sanbot Max Std to make a slope (Please notice the position
of hole)
5. Two staffs stand in front of and behind of the Sanbot Max Std and hold on the torso of Sanbot
Max Std to slowly push the Sanbot Max Std down the pallet along slope.

Basic operation
1. Transport Sanbot Max Std
At least 3 staffs are required to transport Sanbot Max Std at the same time, and the liftable part
is the handle of chassis (the specific position please referred to “know about Sanbot Max
Std”--Bottom) and force is forbidden in other parts.
2. Turn on Sanbot Max Std
Before turning on Sanbot Max Std, please make sure that:
Sanbot Max Std is on a flat level ground;
There are no any other obstacles within 90 centimeters of Sanbot Max Std;
Press the power switch at bottom of robot to turn on the power supply (The specific position
please referred to “Know about Sanbot Max Std”--bottom).
The first time turning on robot, please follow the instruction on the screen panel to finish start
wizard.
3. Charging method
Method①: Auto-charging
Please connect the power adapter of charging pile to power socket and make sure that Sanbot
Max Std’s auto-charging function is enable. During the use of robot, when the power is lower
than the set value, Sanbot Max Std will automatically remind the need for charging. User also
can turn on charging mode by voice command or system control.
Method②:Manual charging
Please connect the power adapter of charging pile to power socket and move the robot to
make the charging metal sheet on the back of robot contact metal charging sheet of charging pile.
It’s ok when you see the indicator flash on the charging pile or the charging status shows on the
robot screen.
Method③: Charging by power adapter
Please remove the back cover screw of charging pile with screwdriver (the specific position
please referred to “know about Sanbot Max Std”- back of charging pile) and open back cover to
remove the screw of power adapter (the specific position please refer to “know about your Sanbot
Max Std” – inner of charging pile), then loosen the screw nut of the power adapter charging port.

After taking out the power adapter, one end of the power adapter connects to charging port on the
back of robot, and the other end of power adapter connects to power socket. It’s ok when you see
the indicator flash on the charging pile or the charging status shows on the robot screen.
4. Control Sanbot Max Std
There are one red button and one green button respectively on left shoulder and right shoulder
of Sanbot Max Std.
Red button is stop/pause button, and green button is working/recover button. Turn on or Turn
off this function is selectable.
There are a set of buttons under the back and neck of Sanbot Max Std.
Up, down, left, right button can manually control robot to move forward, backward, left and
right.
Press down reset button can let robot reset.
Press down stop button can stop robot’s commands and actions.
Press down option button and then press left or right button can control robot left and right
lateral movement.
Press down option button and then press up or down button can control the back and front tilt
of the robot’s waist.
Please do not exert force on arms, fingers, head when push robot move manually.
5. Open and recover mode of forward/backward compartment and bracket
Forward compartment of Sanbot Max Std adopts press type spring switch. There is a press type
spring switch at the upper and lower ends of the forward compartment respectively. Press the
medium position of the upper end and the lower end of forward compartment down
respectively, then you can open the forward compartment. After aligning compartment, press it
again to close the compartment.
Backward compartment of Sanbot Max Std can be opened by software control or inserting a
hexagonal wrench into mechanical switch hole. Aligning the backward compartment to hatch,
press the medium position of the upper end of backward compartment down to close backward
compartment.

Specifications & parameters
Item
Parameters
Size
1370mm(H) x 763mm(W)x 615mm(D)
Weight
About 90kg
Battery
Lithium capacity: 1.0KWh; Voltage: 36V;
Working hours: normally about 10 hours
Sensors
Head
Mic x7、HD camera x1, 3D camera x1, Visual camera x1, Touch sensor x1
Torso
Gyroscope x1, PIR x2, Ultrasonic x2, Touch sensor x2, HD camera x1
Armx2
Infrared distance sensor x3(single arm), Touch sensor x4(single arm)
Chassis
Infrared distance sensor x18, Mecanum wheel x4, Gyroscope x1,
Visual camera x1, 3D camera x4, Ultrasonic x6
Active parts
Head
DOF x2
Horizontal 180 degree, Vertical 45 degree
Arm
DOF x5(each side)
Palm
DOF x5(each side)
Chassis
DOF x4
Arbitrary angle
Port
Backward
compartment
Type-A USB x2
Micro USB x1
Dial switch x2
Forward
compartment
HDMI port x1
Type-A USB x1
RJ45 Ethernet port x1
Audio in port x1
I²C interface x1
Charge
Back Chassis Charging interface x1
Video
4K pixels HD camera
720P HD color camera
Display
10.1 inch 1080P
OS
Android/LINUX/ROS/RTOS
Voice
Voice control, 360 degree voice localization, tweeter x4, subwoofer x1
Wireless
network
Wi-Fi: IEEE 802.11 a\b\g\n(2.4GHz\5GHz); Bluetooth 4.0; 4G(selectable)
Atmosphere
lamp
Ear x2, arm x2
Cornering
lamp
Chassis x3(straight, left, right)
Moving
speed
0~5m/s
Grade
4.5cm
Charging
type
Auto-charging, manual charging, wired charging

Specifications of Charging pile
Item
Parameters
Size
307mm(H) x 340.6mm(W)x 164.5mm(D)
Weight
4.8kg (including power adapter)
Input
AC 100-240V 50\60Hz
Output
DC 42Vmax\8Amax
Indicator
1 breath display
Working
temperature
0℃~+35℃
Working
humidity
10%~90%
Effective
distance of
auto-charging
infrared
0~2m, 140 degree signal cover
Installation
mode
Ground or wall-mounted indoor
Safety guide
In order to provide a better service for you, please follow the safety guide below (not
including all possible situation). This guide is to keep the robot from unexpected damage such as
collision, falling and function abnormality. Also, please operate with standard to make sure
personal safety.
The placement where to place and operate Sanbot Max Std
Place Sanbot Max Std on the flat horizontal ground.
Generally, please make sure that there is no obstacle around the Sanbot Max Std to avoid the
robot damaging during operation.
Do not place the Sanbot Max Std on the thick carpet.
Please make sure that there is no ladder or slope around the Sanbot Max Std.
Please make sure that Sanbot Max Std would not collide with any surrounding cables or rope
to prevent them from tripping or causing personal and property damage.
Please make sure that Sanbot Max Std is not directly exposed to sunlight.
Sanbot Max Std is designed for indoor use, please do not use it outdoors.
Please make sure that Sanbot Max Std is far away from radiator or heat source.

Notices for robot use
1. It is forbidden for unauthorized non-professionals to use the robot.
2. If minors are allowed to use this robot, please be sure to teach them all kinds of precautions
and power safety.
3. At any time, it is strictly forbidden to touch the joints such as head, neck, shoulder, elbow and
waist of the robot so as to avoid pinch injury.
4. It is forbidden to use external force to control the abnormal movement of the head of the robot,
such as twisting the head repeatedly or turning it forcefully when the head has been turned to a
limited position.
5. It is forbidden to use external force to control the abnormal movement of the arm of the robot,
such as twisting the arm repeatedly or turning it forcefully when the arm has been turned to a
limited position.
6. During the operation of the robot, it is forbidden to use external force to prevent or accelerate
the movement of head, arm and chassis so as to avoid structural damage.
7. Robot tend to lose their balance and fall when it moves forward or turns around along the
edges of lower steps.
8. Robot should place on a safe, flat horizontal ground. It is forbidden to use the robot at slope,
ladder, step, and high platform with small area.
9. If you need to push the robot move forward, please make sure the ground is flat and horizontal.
10.If the robot has been fallen down by accident, please make sure the power switch has been
turned off before lifting it up.
11. When using this robot, please make sure that the robot is far away from valuables so as to
avoid bruising or breaking valuables.
12.It is forbidden to dismantle robot, revise or try to fix any part of the robot.
13.It is forbidden to use external force to the robot. Do not lean on the robot.
14.Do not let the robot work or placed in the environment of over-heating, undercooling,
over-humidity or a lot of dust.
15.Please keep the camera and sensor free of dust or debris, otherwise, the robot may not work
properly.
16.Do not shake this robot. It may fall and injure the user.

17.Do not get close to the wheel of the robot, as it may overwhelm the user’s toes and cause injury
to people.
18.Do not let conductive objects touch the robot, otherwise, they may cause fire, malfunction due
to short circuit.
19.It is forbidden to treat robot by violence such as throwing, kicking, beating, otherwise, it may
lead to mechanical damage, abnormal function and performance degradation.
20.It is prohibited to insert any external objects into the outer shell of the robot (including
speakers).
21.Do not cover the head and torso of the robot, wear hats, wigs, glasses, accessories, etc..
Otherwise, it may prevent the normal operation of the sensor and increase the operating
temperature and lead to unexpected failure.
22.It is forbidden to immerse the liquid into the robot or put the robot in the liquid environment
for cleaning. If necessary, use a rag to dip in a small amount of mild liquid for cleaning and use
corrosive lotion is forbidden.
23.Please use robot legally and prohibit their use for illegal purposes.
※If the robot does not work properly, especially unusual sounds, smells or smoke found from the
robot, please turn off the power immediately and contact technical support or after-sales
service department.
Notice for charging pile use
1. This charging pile is designed for Sanbot Max Std and it is forbidden to use for other products.
2. This charging pile is designed for indoor use, please do not use outdoors.
3. Charging pile must be far away from radiator, fire, heat source and avoid direct sunlight or
exposure.
4. Please do not let charging pile work in the environment of over-heating, undercooling,
over-humidity, and a lot of dust.
5. Please using configured charging pile when charging. It is forbidden to use other type power
adapter to charge and be sure of electricity safety.
6. Please make sure that the available power supply voltage of the charging pile is adequate
before charging. Do not use the power supply other than those specified.
7. Charging pile and power adapter are not waterproof, please keep dry at any time.

8. Please place the charging metal sheet of the charging pile outward and back to flat wall. Power
adapter wire is arranged along the wall and make sure that there are no obstacles, thin wires
and strings around the charging pile.
9. When the charging pile is connected to the power supply, it is strictly forbidden for human or
conductive objects to contact the charging metal sheet.
10.Please protect the charging pile from dirt or other foreign bodies. If there is dust on the power
plug, please disconnect the power supply and clean the power plug with soft dry cloth.
11. If smokes, sparks, noise or abnormal conditions are found, please immediately unplug the
power plug from the wall socket and contact technical support or after-sales service
department.
Other manuals for MAX
1
Table of contents