Sangean WFT-2D User manual

GB
Version 1
WFT-2D

1
“Made for iPod” and “Made for iPhone” mean that an electronic accessory has been designed to connect specically to iPod or iPhone respectively,
and has been certified by the developer to meet Apple performance standards. Apple is not responsible for the operation of this device or its
compliance with safety and regulatory standards. Please note that the use of this accessory with iPod or iPhone may affect wireless performance.

GB
2
Contents
Introduction ...................................................................3-10
Before you can use this product ........................................3
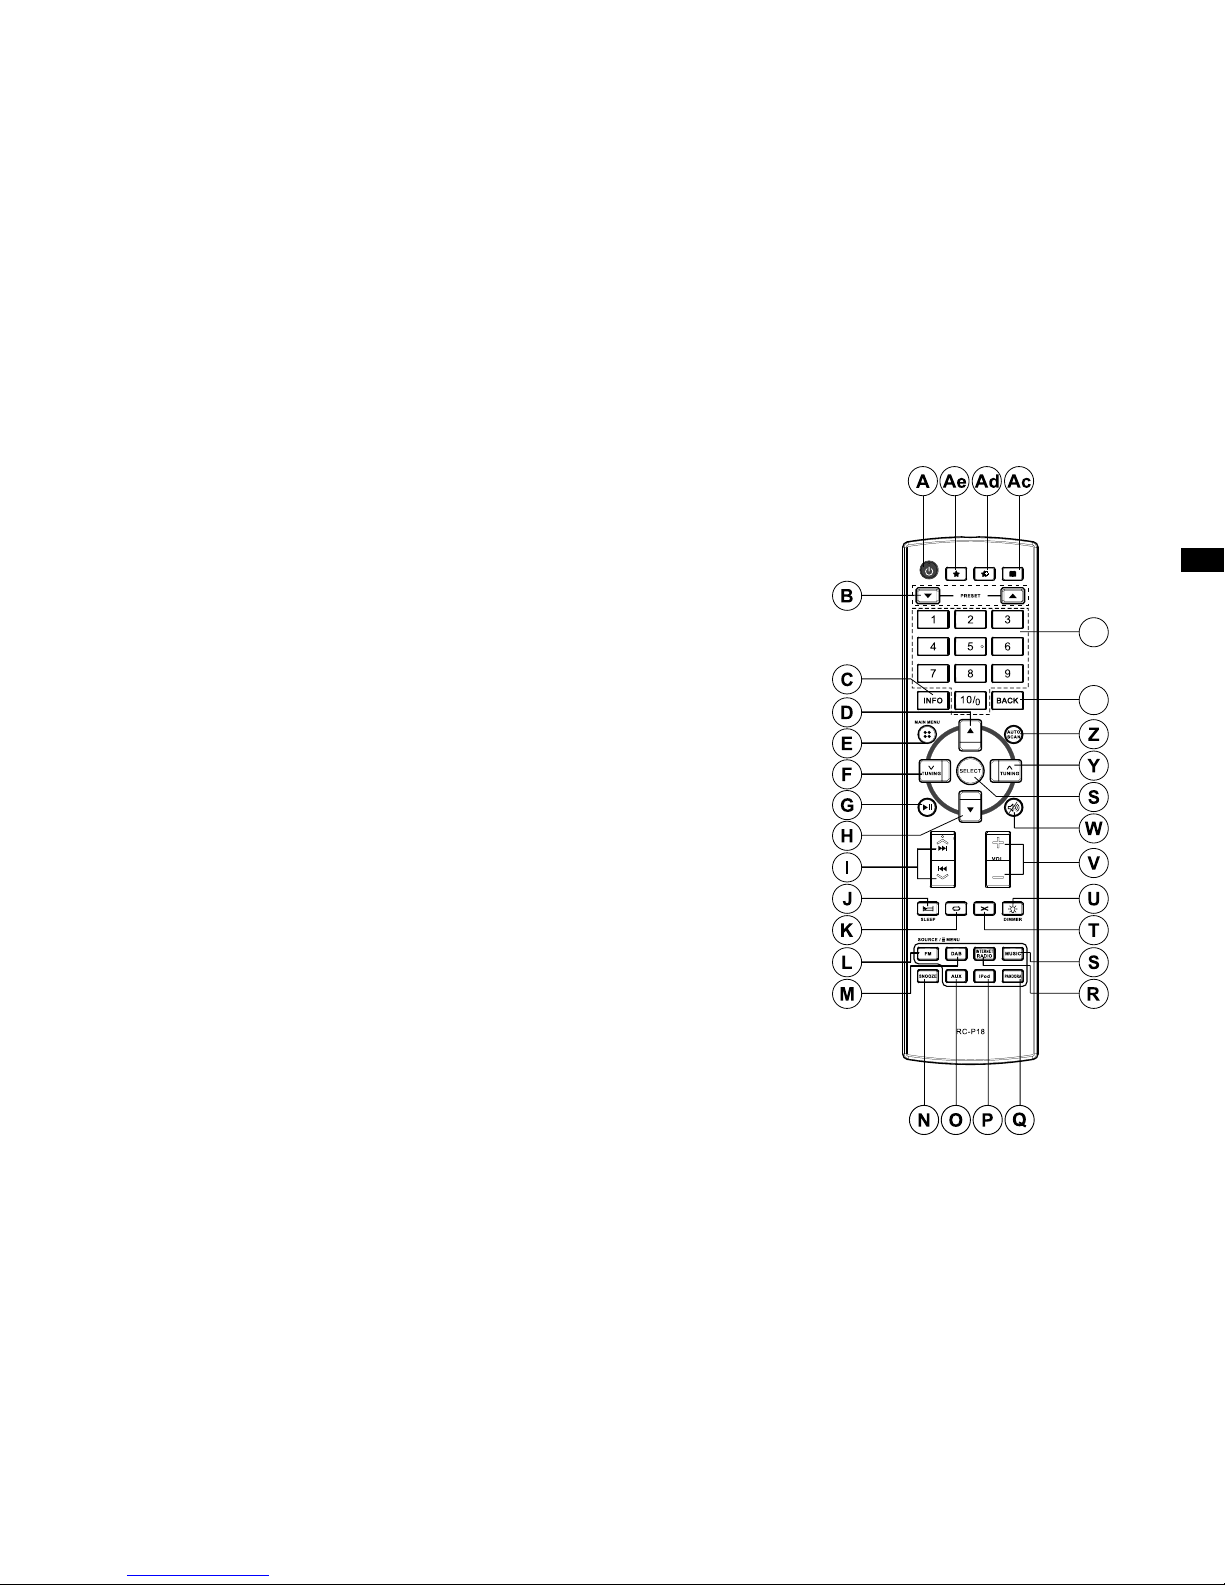
Controls and connections ..............................................4-5
Remote control battery operation ...................................6-7
Navigation controls .......................................................8-10
Network conguration ................................................11-19
Connecting your radio to your computer network ......11-16
Manual network conguration ....................................17-19
Internet Radio mode ...................................................20-30
Internet Radio - the basics ..........................................20-22
Selecting a radio station by location and genre .........23-24
Searching for a radio station by name ............................24
Selecting a new or popular station ..................................25
Selecting a podcast / BBC Listen Again ..........................26
Customising your radio ..............................................27-28
Favorite stations ..............................................................29
Selecting your added stations .........................................30
Music Player mode ......................................................31-44
Use with Windows, Apple Mac, Linux, USB memory ......32
Accessing your les via UPnP ...................................33-34
Locating and playing media les using UPnP .................35
Media selection ...............................................................36
Controlling playback ...................................................37-38
Display mode ..................................................................39
Using USB memory devices ...........................................40
Playing les from USB memory devices .........................41
Playlists ......................................................................42-44
DAB mode ....................................................................45-51
Selecting a DAB radio station .........................................47
Display mode ..................................................................48
Finding new DAB radio stations ......................................48
Manual Tuning .................................................................49
My favorites / Edit favorite stations .................................50
Prune invalid stations ......................................................51
FM mode ......................................................................52-55
Auto Scaning / Manual tuning ..........................................53
My favorites / Edit favorite stations .................................54
Stereo / Mono switching ..................................................55
Clock and Alarms ........................................................56-63
Automatically updating the clock .....................................56
Setting the clock format ...................................................57
Manually setting the clock ..........................................57-58
Setting the alarm clock .....................................................59
Disabling alarms ..............................................................60
Snooze timer ...................................................................61
Sleep timer ......................................................................62
Idle time out .....................................................................63
Display and Audio .......................................................64-79
Equaliser ....................................................................64-65
Brightness control .......................................................66-67
Headphone socket ...........................................................68
Optical and coaxial SPDIF output socket…................…..69
Line out socket ................................................................69
Factory reset ...................................................................70
Software update ..............................................................71
Network proles ..............................................................72
Software version display .................................................73
Audio FAQ .......................................................................73
Accessing audio les via UPnP server (Windows Vista and
XP) .............................................................................74-75
Audio codecs ...................................................................76
Demonstration mode .......................................................77
Cautions ..........................................................................78
Specications ..................................................................79

3
Before you can use this product Introduction
Before you can use your radio, you must have the following:
● A broadband Internet connection (not required for DAB, FM or Music
Player functions).
● A wireless access point (WiFi) or a wired Ethernet connection connected
to your broadband Internet Service Provider, preferably via a router.
In many cases the broadband modem, router and wireless access
point will be a single combined unit supplied by your Internet Service
Provider or bought from a computer store.
● If your wireless network is congured to use Wired Equivalent Privacy
(WEP) or WiFi Protected Access (WPA/WPA2) data encryption then
you either need to know the WEP, WPA or WPA2 key used for encryption
so you can get the radio to communicate with the network, or your
router needs to offer WiFi Protected Setup (WPS).
If connecting using WiFi, the radio will typically work within a 10-20 meter
radius from your wireless access point. The actual range achieved will
depend upon the building type, other nearby wireless networks, and
possible interference sources. DAB and FM radio functions can operate
wherever the radio is able to receive a suitable broadcast signal.
IMPORTANT:
Before you continue, make sure that your wireless access point or router
is powered up and working with your broadband Internet service (use your
computer to verify this). To get this part of the system working you must
read the instructions supplied with the wireless access point or router.

GB
4
Controls and connections
(Front view)
1. Headphone socket
2. USB socket
3. LCD display
4. Light sensor
5. Remote control sensor
6. VFD display
7. Standby button

5
Controls and connections
(Rear View)
8. Wi-Fi antenna
9. Telescopic antenna
10. Ethernet socket (RJ-45)
11. Optical SPDIF output
12. Coaxial SPDIF output
13. Line-out socket
14. Mains input socket

GB
6
Controls and connections-cont.
Remote control handset
Aa
Ab
Note:
Almost all functions that are available from the touch panel screen may also be performed using
the remote control. However, please note that there are two items cannot be accessed by using
remote control, which are Setting and Alarm.
On/ Standby button
Back button
Key pad buttons 1-10/0
Directory button
Add favorite button
Recall favorite station button
Recall preset station button
INFO button
Up button
Menu button
Tuning down button
Play/ Pause
Down button
Prev/ Next button (Fast-forward/ Rewind button)
Sleep button
Repeat button
FM button
DAB button
Snooze button
Aux in button (no function available)
iPod button (no function available)
Pandora button (no function available)
Internet radio button
Music button
Shufe button
Dimmer button
Volume Up/ Down button
Mute button
Select button
Tuning Up button
Auto scan button
A.
Aa.
Ab.
Ac.
Ad.
Ae.
B.
C.
D.
E.
F.
G.
H.
I.
J.
K.
L.
M.
N.
O.
P.
Q.
R.
S.
T.
U.
V.
W.
X.
Y.
Z.

7
Using the touch screen
The WFT-2D internet radio has a high resolution color display with touch sensitive controls. When
using the internet radio, the display shows only the controls that are needed at each stage of its
operation. To operate the controls simply touch the button area with the tip of a nger for about
half a second until the command has been accepted.
You may find that at first, the internet radio does not always detect that you have touched a
button. If so, try touching with a little more pressure, or for slightly longer. You will soon nd the
optimum touch needed to control your internet radio.
VFD display
On the right hand side of the touch screen is a VFD panel which displays some of key message
corresponding to the touch panel.
The panel may be cleaned using a dry cloth. Do not use abrasives, cleaning uids or solvents.

GB
8
Navigation controls on the touch screen
This section describes the basic means of controlling your WFT-2D internet radio. Instructions for
each operating mode are given in the later sections of this book.
1. Pressing the On/Standby control brings your radio out of Standby mode. Pressing the On/Standby
control while the radio is in use will cause it to return to the Standby mode with the clock display.
2. Touching the Mode buttons on the Home menu screen gives you access to each of the operating
modes: DAB radio, FM radio, Internet radio, iPod, My Music, Auxiliary Input, Alarms and Settings.
3. Touch the Menu bar on screen to access a high level menu for the current operating mode.
Touching the bar a second time will normally cause the radio to revert to the previous display
or menu.
4. Touch the Home button to return to the main home menu.
5. Many operations require the user to make a selection from the menu. This is done by touching
the relevant item on the touch screen. If there are more than four items in a menu, then you
will need to touch the Up or Down arrows so that the additional items become visible. The sliding
scroll bar on the right will give an indication showing the current portion of the menu that is displayed.
Pressing the area between the arrow and the bar will cause the menu to scroll further if there
are many items. If there are many items in a menu, then the radio allows the menu to 'wrap
around' in either direction. This can make it easier to reach items at the end of a long menu,
such as a list of countries or Internet radio stations.
6. If an error is made when navigating the menus, it is generally possible to go back to a higher
level menu by pressing the Back button on the screen.
Internet Radio
My Favourites
Local United King
BBC
Stations
15:05 26 Jun 2010
Internet Radio
My Music

9
7. Touch the Close button to exit the current mode. The display will return to the home menu
screen.
8. Touch the Volume button and then use the + or - buttons on the screen or use the Rotary Volume
control until your required volume level is reached.
9. Your internet radio has a Play mode idle screen which displays the time and date with information
relevant to the operating mode but without the control buttons being visible. The time delay
before the idle screen is shown can be adjusted between 1 and 10 minutes see the section of
‘Idle time out’.
When the idle screen is shown touch the screen to reactivate the main play-mode screen.
10. Your radio has slideshow feature adding visual content from digital radio broadcasters. This
feature allows you to view photos of presenters and artists, including album covers and
concert information, as well as obtain general information, such as weather, travel,
promotional updates and advertising information.
X
19:50
Thursday 21 Jul
I
My Music
info@joelosteen.com (joel Ostee
joel Osteen Audio Podcast)
The Right People

GB
10
Text entry screens
To enter text when in a text entry screen use the procedure below to navigate and select required
text.
Setup Wizard
To enter the text touch the required character on the display to cause the character to be
entered.
To enter UPPERCASE characters touch the arrow on the left hand side of the screen until the
arrow appears yellow.
The next character will be entered as uppercase.
To enter lowercase characters touch the arrow on the left hand side of the screen until the
arrow appears white. The next character will be entered as lowercase.
Touch the number/text button on the left hand side of the screen to toggle between numbers
and text.
If you make a mistake and wish to erase a character touch the left arrow (backspace key).
When the complete text has been entered touch the tick or Magnifying glass icon. The
icon shown will vary according to the text being entered.
To enter a space use the space bar on the keypad.
You can also use the remote control to highlight and enter text. Use the Left, Right and Up,
Down buttons to highlight text and use the Select button to enter text. You can carry out all the
above functions using the remote control.
Network key:
I
Q E R T Y U I O P
A S D F G H J K L
Z X C B N M
Setup Wizard
123
W
.
Q
123 - JONES
Search string:
I
Q E R T Y U I O P
A S D F G H J K L
Z X C B N M
Settings
123
W
.V
ROCK 100
A
123
abc

11
Conguration
Connecting your internet radio to your computer network
1. Place your internet radio on a at surface.
2. If you wish to use a wired network connection, plug the Ethernet cable into the RJ-45 socket
(marked LAN) at the back of the radio.
3. Plug the mains lead into the mains socket located at the back of your radio ensuring that the
plug is pushed fully into the socket.
4. Plug the other end of the mains lead into a wall socket and switch on the wall socket.
IMPORTANT:
The mains plug is used as the means of connecting the radio to the mains supply. The mains
socket used for the radio must remain accessible during normal use. In order to disconnect the
radio from the mains, the mains plug should be removed from the mains socket outlet completely.
5. When you apply power, the display on the radio will light up and say: 'WELCOME TO DIGITAL
RADIO'. The rst time that you use your radio (or after a Factory Reset) the display will show
'Start setup wizard now' . Touch Yes on the screen to start the setup wizard. You will then need
to select the desired language (go to step 7).
6. You are recommended to run the setup wizard, but if you wish not to, touch No on the display.
The screen will ask if you wish to run the setup wizard again at the next start up. The radio will
then enter standby mode with the clock not set.
7. For the language option, select English. You will then have a choice to set the clock to use the
12 or 24 hour format. Touch the desired hour format.
8. A menu allowing you to specify the synchronisation source for the clock will appear on the display.
The default of Internet will be the best option for most users.
Setup Wizard
Start setup wizard now?
Yes No
00:00
00:00
Time format
24h
12h
Setup Wizard
00:00
Select Time Sync Source
None
Internet
DAB
FM
Setup Wizard

GB
12
Connecting to your computer network-cont.
Touch the Internet option for the clock synchronization. The clock can also be updated from
DAB or the FM radio, from the Network, or not automatically updated. If you choose any option,
other than internet go to step 11. Otherwise you will rst need to select the correct time zone and
daylight savings setting, see steps 9 and 10. If you choose None you will need to set the clock
manually, see section ‘Manually setting the clock.’
9. Select the time zone which is applicable to your location.
10. You will then need to set the daylight Savings option according to your location (Daylight
Savings is also known as Summer / Winter time or BST/ GMT adjustment).
11. The display will then show a list of WiFi region options for the network set up. Touch the
required region. Do this even if planning to use the wired Ethernet connection. Your radio will
then scan for available WiFi networks.
12. The radio will enter the Network Settings Wizard and will display ‘Scanning….’ After a short
while the display will show a list of the available WiFi networks. If you are intending to use the
WiFi connection, go to step 13. To use the Ethernet connection to your router (with automatic
conguration), scroll through and touch the <Wired Network> menu item. The radio will attempt
to connect.
00:00
Select Time Zone
UTC +00:00: Dublin
,
London
UTC +00:30:
UTC +01:00: Madrld, Amsterdam
Setup Wizard
00:00
Use Daylight Savings
No
Yes
Setup Wizard
00:00
Select WLAN Region
Most of Europe
France
Japan
<Rescan>
Setup Wizard
00:00
Network Wizard
Smith
Jones
<WPS>
<Rescan>
Setup Wizard

13
Connecting to your computer network-cont.
If your network allows automatic conguration (which is normal) the radio will acquire a network
address. The screen should say ‘Connecting,’ and then ‘Setup Wizard completed.’ Touch OK to
exit the setup wizard, the radio will enter Standby mode. You can then skip to step 20 .
There are two indicator lights incorporated into the RJ-45 connector. If you have problems with
your wired connection, they may help you to identify the possible cause of the problem.
Yellow ON= Link established ; OFF =no connection
Yellow Flashing= Data transfer
Green ON= 100 Mbits/ sec link; OFF= 10 Mbits/ sec link
If your network does not support automatic conguration or if you wish to set it up manually then
you should select Manual Settings instead of selecting Wired in the Network Wizard, then see
the section of ‘Manual network conguration.’
13. If you plan to use a WiFi connection, you will rst need to identify your network in the list of
network names presented by the Network Wizard. If no networks are found then you may have
to get your wireless router working (please see the instructions supplied with it) or you may be
too far from the router. When the radio nds your wireless network, it displays the Network
Name (SSID) for the wireless access point on the screen. This is a name that is allocated to
the access point in your router by the person who set up the network-for example’ Jones
family’ or ‘Paul’s network.’ If the router supports WiFi Protected Setup, then ‘[WPS]’ will be
shown in front of the SSID. It is possible, and in some locations highly likely, that your radio
will nd more than one wireless network, in which case you should choose which one you need
to connect to.
14. Scroll through the list to see the SSID for each wireless network that has been found. If your
network is shown proceed to step 16 on the next page. If it is not shown then proceed to step 15.
If you make a mistake at any point, use the Back button to go back to the previous screen.
Setup Wizard
Setup wizard completed.
OK
15:09 23 Jun 2010
00:00
Network Wizard
<WPS>
<Rescan>
<Wired Network>
Manual settings
Setup Wizard
00:00
Network Wizard
Smith
Jones
<WPS>
<Rescan>
Setup Wizard

GB
14
Connecting to your computer network- cont.
15. If your network is not found, it may be because the router is congured not to broadcast the
SSID. You should then scroll through the menu and select Manual settings option in order to
enter the network details manually. This is described in ‘Manual Network Conguration’. If your
network name is being broadcast, and it was not found, then try re-scanning (press the Back
button), and if necessary try moving your radio to a location to a location closer to your access
point/ router.
16. When the SSID for the wireless network you wish to connect to appears on the screen, touch
to select. If WiFi Protected Setup (WPS) was indicated, you will see an additional menu at this
point, otherwise proceed to step 17. Choose one of the WPS menu options as required for your
router (WPS may be via push button, or using an identication number). 'Push Button' - the
display prompts you to press the WPS button on your router or access point and touch OK on
screen. The two devices should then connect with the encryption key sent automatically to
the radio.
'PIN' - the display shows an identication number which you must enter into your router using
a web browser (refer to your router's user documentation). Then touch OK on screen on the
radio. The two devices should then connect with the encryption key sent automatically to the
radio.
'Skip WPS' - if you wish to enter the encryption key yourself. If you chose Push Button or PIN
the screen will then show 'Connecting...' and then 'Setup wizard completed'. Touch OK to exit
the setup wizard and then go to paragraph 20 on the next page.
17. If your network is congured without an encryption key, the screen should say 'Connecting...',
and then 'Setup wizard completed'. Touch OK to exit the setup wizard and enter Standby mode.
If this is the case then you have successfully connected your radio to your network, so please
go to paragraph 20 on the next page.
18. If the screen displays 'Network Key:', it is because the network is using one of the encryption
systems: Wired Equivalent Privacy (WEP) or WiFi Protected Access (WPA). You will need to
enter the correct WEP or WPA key into the radio to allow it to communicate with your wireless
network. If you do not have the WEP or WPA key, then you should obtain it from the person
who set up your network. Some wireless routers may come with an encryption key already set
up by the supplier, in which case you should refer to the documentation provided with it. WPA
is used here to also include WPA2.
00:00
Network Wizard
Paul’s network <WPS>
<Rescan>
<Wired Network>
Manual settings
Setup Wizard
Network key:
I
Q E R T Y U I O P
A S D F G H J K L
Z X C B N M
Setup Wizard
123
W
.
V
123 - JONES

15
Connecting to your computer network- cont.
WEP keys are 10 or 26 characters long (using 0 - 9, and A - F). Press the '123' button, then press
again when it shows 'hex'. This provides a simplified keyboard layout for the WEP key entry.
Some wireless routers can also use pass-phrases for WEP but these are not supported.
WPA keys are usually set up using a pass-phrase of between 8 and 63 characters. Your radio
accepts pass-phrases for WPA keys.
19. To enter the WEP or WPA key, characters see page 11. Enter characters as needed until the
complete key has been entered. Remember, WEP keys only use the numbers 0-9 and letters
A-F. WPA keys are sensitive to upper and lower case characters. You must enter the key exactly
or the radio will not connect to the network. After the nal character of the WEP or WPA key
has been entered touch the tick symbol. The screen will show 'Connecting...' and then 'Setup
wizard completed'. Touch OK to exit the setup wizard. The radio should now be able to connect
to the network.
20. Once you have connected your radio to the network (and therefore also to the Internet) it will
go into Standby mode. It should then display the time as obtained from the Internet. If the time
display is not correct for any reason, it can easily be adjusted manually later, see the section
for ‘manually setting the clock.’
If you have followed the steps on the preceding sections successfully, your radio will have
connected to your router, and then made a connection to the Internet and set its clock. If this
is the case, then you can try listening to radio stations via the Internet as described in the
section of ‘Internet Radio’ onwards.
Network key:
I
Q E R T Y U I O P
A S D F G H J K L
Z X C B N M
123
W
.Q
123 - JONES
Setup Wizard
Setup Wizard
Setup wizard completed.
OK
15:09 23 Jun 2010
15:10
Monday 8 Aug

GB
16
Changing the network connection
In the sections above, you choose how your radio would be connected to your network, either
using a WiFi connection or using a wired Ethernet cable. From time to time, you may nd that you
need to connect to different computer networks. The Internet setup menu allows you to change
your radios network settings, scan for an alternative wireless network, or to manually congure
the network parameters.
The steps outlined below describe how you can do this - see also the section 'Network proles'
on. If you have no need to do this, however, please skip to the section of ‘Internet Radio’.
Conguring the radio to use an alternative WiFi connection
1. From the 'Settings'> 'Network settings' menu touch Network wizard. This will present you with
details of any WiFi networks that are found. Scroll down the list and touch the desired network
name. The radio will then use its WiFi system to communicate with the network. Depending on
the settings for the new network you may need to enter an encryption key. By default the radio
will then acquire an IP address and other network settings from your router using DHCP.
Conguring the radio to use the wired Ethernet connection
2. Connect your radio to your router using an Ethernet cable plugged into the RJ-45 socket (marked
LAN) at the back of the unit. From the 'Settings'>'Network settings' menu touch Network wizard.
This will present you with details of any WiFi networks that are found. Scroll down the list and
touch the <Wired Network> option. The radio will then use its Ethernet connection to communicate
with the network. By default the unit will then acquire an IP address and other network settings
from your router using DHCP.
Network settings
Network wizard
WPS Push button set
Network profiles
Manual settings
15:05 26 Jun 2010
Settings
Network Wizard
Paul’s network <WPS>
<Rescan>
<Wired Network>
Manual settings
15:05 26 Jun 2010
Settings
Network Wizard
Smith
Jones
<WPS>
<Rescan>
15:05 26 Jun 2010
Settings

17
Manual network conguration
If you do not wish to use DHCP for automatic conguration, or if your network is congured with
a hidden SSID, then you will need to enter some network settings manually. (Note - a hidden
SSID may prevent casual observers from detecting your network, but it is not recommended as a
means of network security.)
1. From the radios 'Settings'>'Network settings' menu, touch Manual settings. You must then choose
whether to connect using 'Wired' or 'Wireless' connections. If you choose 'Wireless' there are as
many as eleven settings screens, shown by the '1 of 11' progress marker at the top of the display.
If you choose 'Wired' there are seven screens and the progress marker will reect this, although
the steps to set up the network parameters are basically the same.
2. The next menu asks whether you wish to use DHCP to congure your network parameters (IP
address, subnet mask, gateway address, etc.). Unless you are familiar with networking and
related terminology, we recommend that you allow the use of DHCP. Choose DHCP Yes unless
you need to specify the network details manually.
If you have chosen 'Wired' and then DHCP Yes, your radio should now establish a connection
to the router using the Ethernet cable. Please skip to step 11 on page 20.
If you chose 'Wireless' and DHCP Yes, please skip to step 6 in order to set up the wireless
connection details. If you chose DHCP No for either connection method, the next step is to set
up the IP address.
3. The manually specied IP address should be chosen to be compatible with the settings in your
router and must be a unique address on your network. If you are using DHCP for some devices
and static (manually congured) IP addresses for others, the IP address used should fall outside
the range that the router may allocate using DHCP. Typically, the rst three groups of digits will
be the same for all devices on your network (Text entry is described on page 11). The display
may show an address of 0.0.0.0. To delete a character touch backspace. To clear, touch and
hold the backspace. Use digits and fullstop to enter the IP address, e.g. 192.168.1.25. Touch
the tick symbol to conrm. When the IP address has been entered, the subnet mask should be
entered. The subnet mask denes which parts of the IP address are common across your network.
For most small networks the subnet mask will be 255.255.255.0 and this is entered in the same way.
4. The Gateway address is normally the IP address of the router through which the radio connects
to the internet and is entered in the same way as the previous address.
Network Wizard
Paul’s network <WPS>
<Rescan>
<Wired Network>
Manual settings
15:05 26 Jun 2010
Settings
192.168.1.25
1 3 4 5 6 7 8 9 0
! @ # $ % & ( )
*
_ +
-
=: ; 、
.
Settings
123
2
IP address: [3/11]
I
Manual settings [1/11]
Add Wireless Network
Add Wired Network
15:05 26 Jun 2010
Settings

GB
18
Manual network conguration - cont.
5. In most installations the DNS settings (DNS = Domain Name System) will be set to the same IP
address as your router (192.168.1.1 in the example shown). In this case the secondary DNS
may be left at zero.
Text entry is described in previous section ‘Text entry screens’. Touch the tick symbol to conrm.
If you previously specied 'Wired' and then 'DHCP No', your radio should now connect to the
router using the Ethernet cable (in which case skip to step 11).
6. If you specied 'Wireless', the next step is to set up the WiFi connection, starting with the name
of the wireless network (SSID) followed by the encryption options and password.
To enter the SSID see text entry on page 11. Do this as needed until the complete network name
has been entered. The SSID setting is sensitive to upper and lower case characters and symbols.
You must enter it exactly as set up in your router.
7. Having entered the SSID, you must enter details of the encryption system used on your wireless
network. This should be the same as specied in your router settings. If your network does not
use encryption, then select the 'Open' option. Your radio should then connect to the network, so
skip to step 11. If your network uses WEP (Wired Equivalent Privacy) select 'Pre-Shared' option
then go to step 8. The remaining options are for WPA or WPA2 (WiFi Protected Access) - see
step 9.
8. If you chose 'Pre-Shared' in step 7, you should then choose the WEP option. The key should be
entered using only the numbers 0-9 and the letters A-F. The key will be 10 characters long for
64-bit encryption and 26 characters long for 128-bit encryption. Spaces or special symbols are
not permitted in WEP keys. Use the '123' then 'hex' buttons to access a keyboard for WEP key
entry. Once the key is entered the radio should connect to your network. Please skip to step 11.
192.168.1.1
1 3 4 5 6 7 8 9 0
! @ # $ % & ( )
*
_ +
-
=: ; 、
.
Settings
123
2
DNS IP address: [6/11]
I
Authentication type [9/11]
Open
Preshared
WPA
WPA2
15:05 26 Jun 2010
Settings
SSID: [8/11]
I
Q E R T Y U I O P
A S D F G H J K L
Z X C B N M
123
W
.
Q
My Network
Setup Wizard

19
Manual network conguration - cont.
9. WPA and WPA2 are similar, although WPA2 offers a higher level of security. Whichever you
selected in step 7, you then have to specify the variant used. They are TKIP (Temporal Key
Integrity Protocol) and AES (Advanced Encryption Standard). As previously, the setting should
match that used by your router. Some routers allow both to be specied, and the router will use
whichever variant is supported by the connected device. AES is regarded as the more secure
option if it is available.
10. The radio will then require you to enter the encryption key. This must be a string of between 8
and 63 characters and must be identical to the key which has been entered into your router.
Note - the encryption key is sensitive to the use of upper and lower case letters and symbols.
Take care to enter the key exactly, or the radio will not be able to connect to your router.
Once the key is entered the radio should connect to the network.
11. While the radio is trying to connect to the network, it will display 'Processing...' when checking
the encryption key (if using the WiFi connection) and then 'Connecting...'. If the connection is
made successfully, the radio will return to the Network settings menu. If the unit cannot connect,
then it will display a 'Failed to connect' message and will return to the SSID entry screen (step 6).
Once connected, the network settings are stored in the radio. The settings are retained when
the radio is disconnected from the mains. You may now use the Back and Mode buttons to
access the functions of your radio.
Encryption type [10/11]
TKIP
AES
15:05 26 Jun 2010
Settings
Network key: [11/11]
I
Q E R T Y U I O P
A S D F G H J K L
Z X C B N M
Settings
123
W
.
Q
My network key
Table of contents
Other Sangean Radio manuals

Sangean
Sangean ATS-909 User manual

Sangean
Sangean FatBox FB-100 User manual

Sangean
Sangean CL-100 - REV 1 User manual

Sangean
Sangean DT-210 User manual

Sangean
Sangean WR-11 User manual

Sangean
Sangean H201 User manual

Sangean
Sangean WFR-28BT User manual

Sangean
Sangean DPR-35 User manual

Sangean
Sangean ProTravel PT-50 User manual

Sangean
Sangean WFR-1 - DATASHEET 3 User manual

Sangean
Sangean SR-25 User manual

Sangean
Sangean DDR-53BT User manual

Sangean
Sangean SR-3 User manual

Sangean
Sangean ATS-404 User manual

Sangean
Sangean WFR-28BT User manual

Sangean
Sangean DT-180 User guide

Sangean
Sangean ATS-909X 2 User manual

Sangean
Sangean DPR-77 User manual

Sangean
Sangean PR-D3 User manual

Sangean
Sangean PR-D12BT User manual