Santec ECL-200 User manual

-~
ARTISAN
®
~I
TECHNOLOGY
GROUP
Your definitive source
for
quality
pre-owned
equipment.
Artisan Technology
Group
Full-service,
independent
repair
center
with
experienced
engineers
and
technicians
on staff.
We
buy
your
excess,
underutilized,
and
idle
equipment
along
with
credit
for
buybacks
and
trade-ins
.
Custom
engineering
so
your
equipment
works
exactly as
you
specify.
•
Critical
and
expedited
services
•
Leasing
/
Rentals/
Demos
• In
stock/
Ready-to-ship
•
!TAR-certified
secure
asset
solutions
Expert
team
ITrust
guarantee
I
100%
satisfaction
All
tr
ademarks,
br
a
nd
names, a
nd
br
a
nd
s a
pp
earing here
in
are
th
e property of
th
e
ir
r
es
pecti
ve
ow
ner
s.
Find the Santec MLS-8000 at our website: Click HERE
ECL-200
Quick
Start
Guide
Warning!
This device contains a semiconductor laser and is intended
for operation by persons familiar with this type
of
equipment. The beam is not visible to the naked eye, but
if it comes into contact with your eyes it may cause
permanent damage to your eyesight. Under no circumstances
look directly into the optical output connector on the
instrument
santec's
ECL-200
is a multi-channel tunable light source. It provides a wide
tuning range, with high output power and long term wavelength and power
stability. Its operation is relatively simple, but to ensure optimum
performance some care is requiredduringset-up. This document provides
a summary of the setting procedure.
Switching
ON
Check
the
voltage setting on the rear panel of the instrument
and adjust if necessary. In Europe
this is
usually
230V.
Plug in the main power lead.
Check
that
each
ECL-ZOO
unit
is
firmly
installed
in
the
MLS-8000
rack.
Insert the key into the key-lock on
the
MLS-8000
rack and turn
Artisan Technology Group - Quality Instrumentation ... Guaranteed | (888) 88-SOURCE | www.artisantg.com
the unit on. The
LED
indicatorson each ECL-200unit should light
momentarily.
Let the unit warm up. The unit can usually be used after
10-15
minutes, but it is usually best to allow
30
minutes, especially
if the unit has just come off a cold delivery truck!
Switching
OFF
Before turning the power OFF on the MLS-2000/8000 it is
important to ensure that the LD on each ECL-200module is turned
off. The LED indicator above each LD button should NOT be lit.
The LD button turns the current
to
the laser diode on and off
.
The LED will light up when the current is on.
It
can take several
seconds after pressing the LD button before the current drops
to zero and the LED goes out.
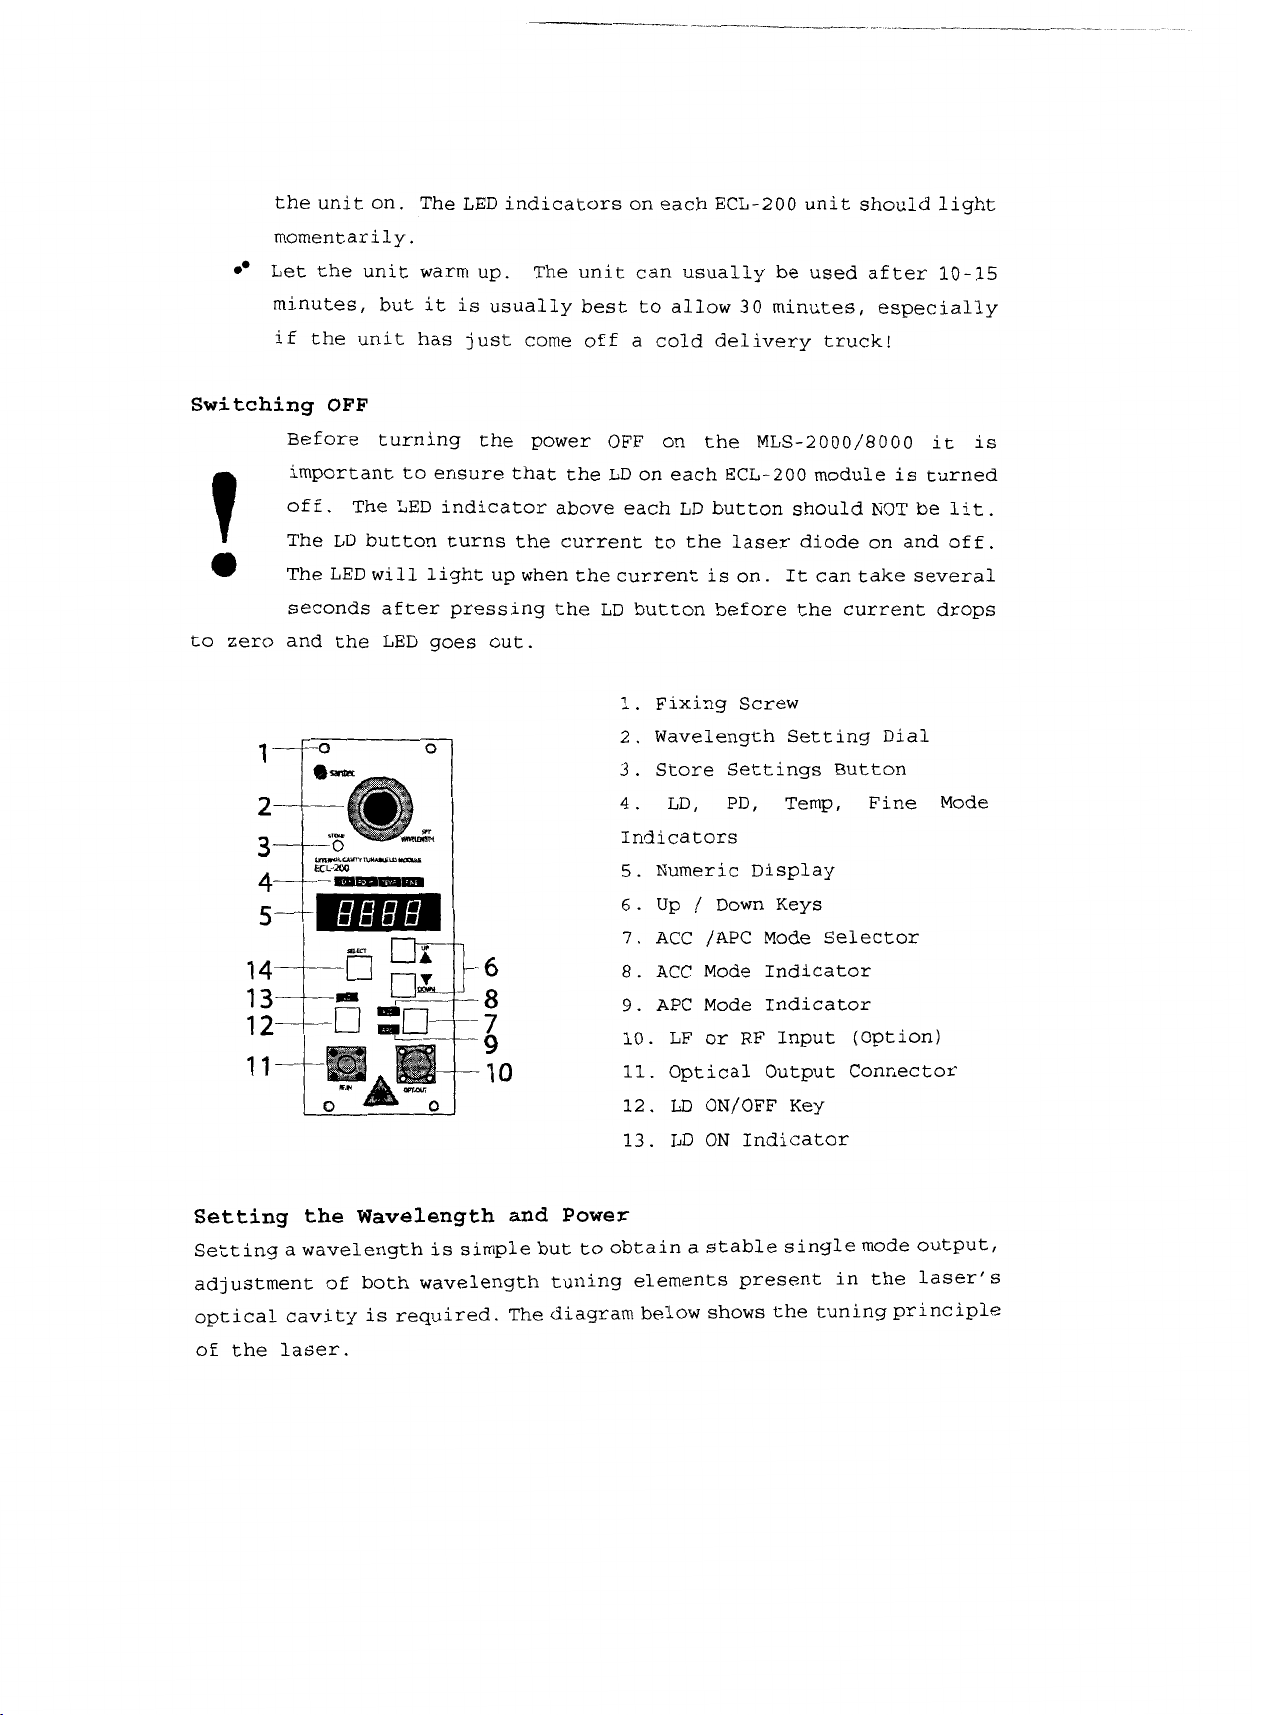
1.
Fixing Screw
1
2.
Wavelength Setting Dial
3. Store Settings Button
2
4.
LD, PD, Temp, Fine Mode
3
Indicators
4
5.
Numeric Display
5
6.
Up
/
Down Keys
7.
ACC /APC Mode Selector
14
6
8. ACC Mode Indicator
13
8
9.
APC Mode Indicator
12
7
9
10. LF or RF Input (Option)
11
10
11.
Optical Output Connector
12.
LD
ON/OFF Key
13. LD ON Indicator
Setting
the
Wavelength
and
Power
Settingawavelengthis simplebuttoobtaina stable singlemodeoutput,
adjustment of both wavelength tuning elements present in the laser's
optical cavity is required.
Thediagrambelowshowsthetuningprinciple
of the laser.
Artisan Technology Group - Quality Instrumentation ... Guaranteed | (888) 88-SOURCE | www.artisantg.com
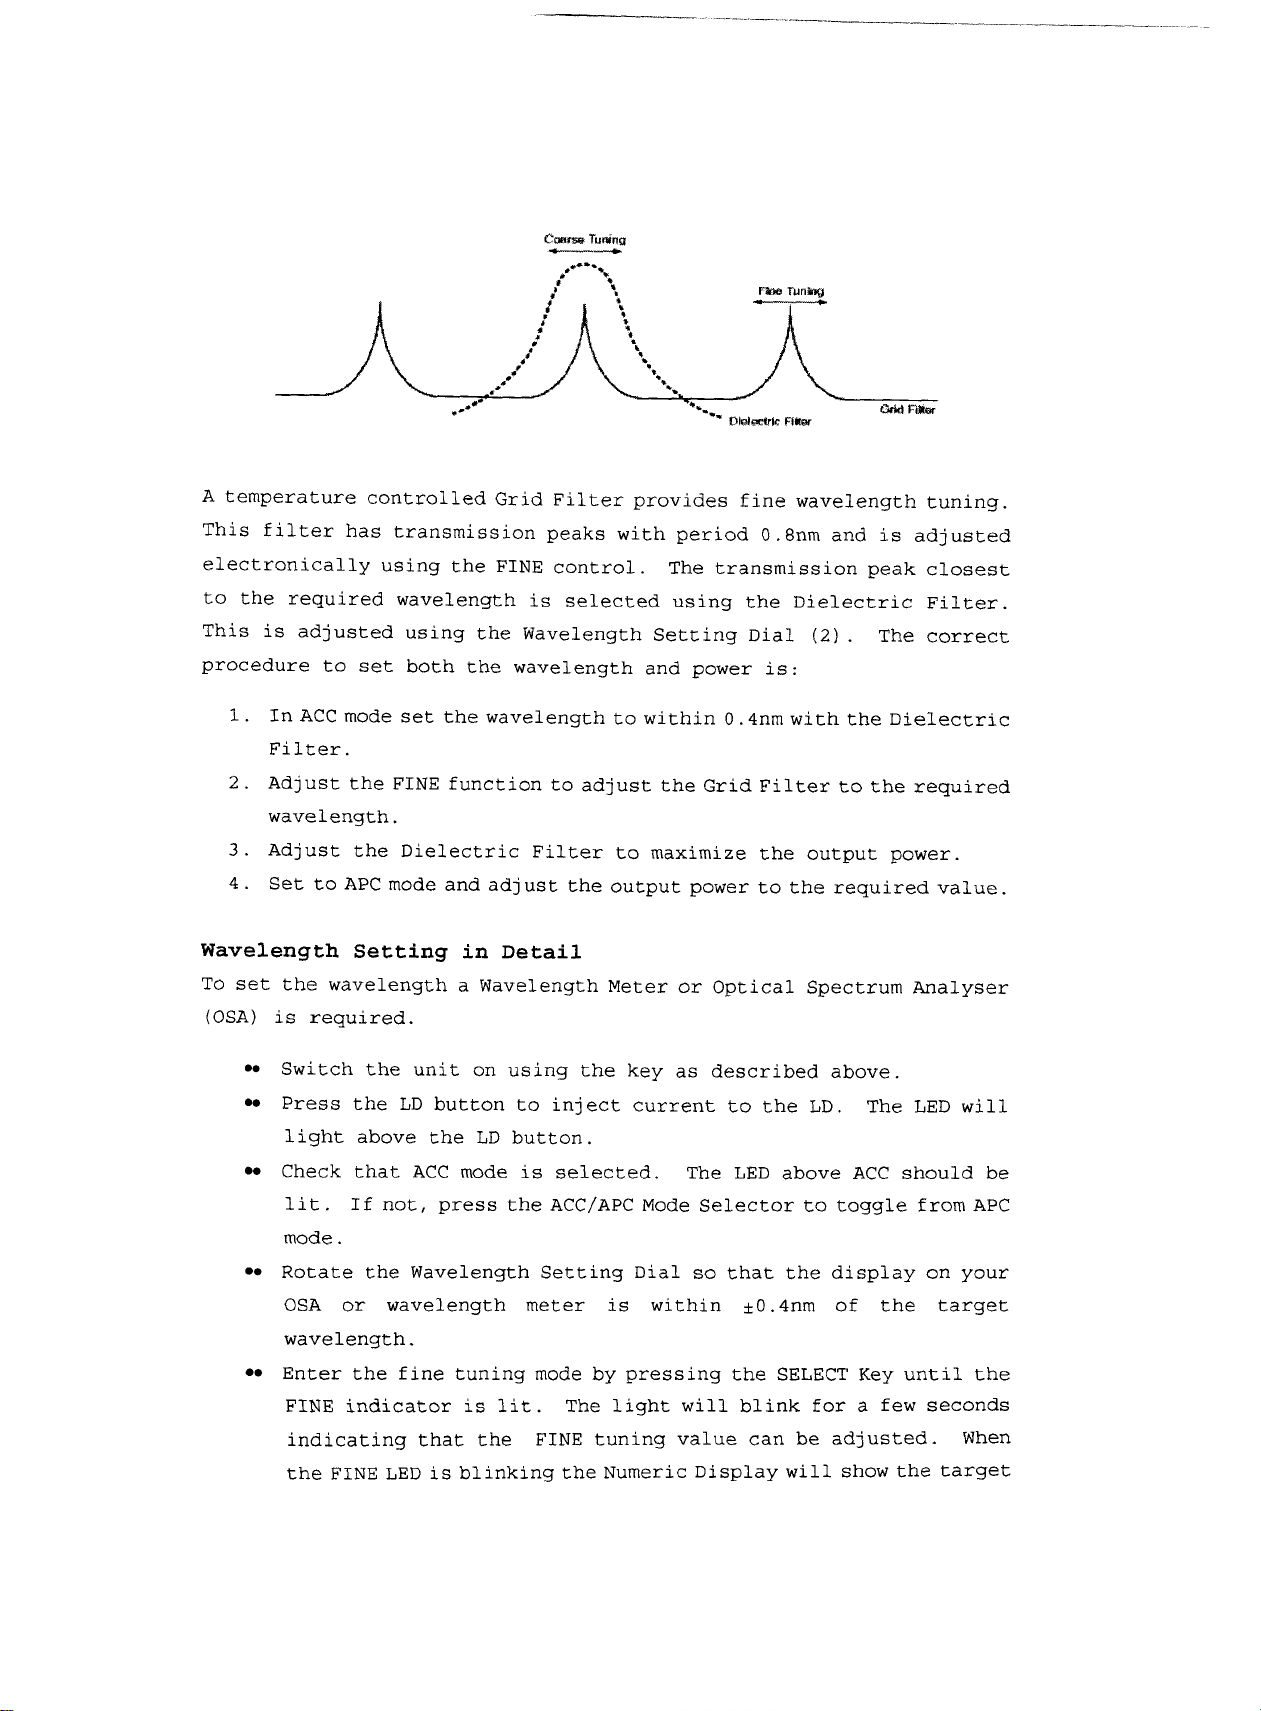
A
temperature controlled Grid Filter provides fine wavelength tuning.
This filter has transmission peaks with period 0.8nm and is adjusted
electronically using the FINE control. The transmission peak closest
to the required wavelength is selected using the Dielectric Filter.
This is adjusted using the Wavelength Setting Dial
(2).
The correct
procedure to set both the wavelength and power is:
1.
InACC mode set the wavelength to within 0.4nm with the Dielectric
Filter.
2.
Adjust the FINE function to adjust the Grid Filter to the required
wavelength.
3.
Adjust the Dielectric Filter to maximize the output power.
4. Set to APC mode and adjust the output power to the required value.
Wavelength Setting in Detail
To set the wavelength a Wavelength Meter or Optical Spectrum Analyser
(OSA)
is required.
Switch the unit on using the key as described above.
Press the
LD
button to inject current to the
LD.
The LED will
light above the LD button.
Check that ACC mode is selected. The LED above ACC should be
lit. If not, press the ACC/APC Mode Selector to toggle from APC
mode.
Rotate the Wavelength Setting Dial so that the display on your
OSA or wavelength meter is within k0.4nm of the target
wavelength.
Enter the fine tuning mode by pressing the SELECT Key until the
FINE indicator is lit. The light will blink for a few seconds
indicating that the FINE tuning value can be adjusted. when
the
FINE
LEDis blinkingthe Numeric Displaywill show the target
Artisan Technology Group - Quality Instrumentation ... Guaranteed | (888) 88-SOURCE | www.artisantg.com
value for FINE tuning. After a few seconds, the LED will
stop
blinking. The Numeric Display will then show the actual value
for the FINE tuning and it will no longer be possible to adjust
the setting. To re-enable setting (and start the
LED
blinking)
press the SELECT Key once. When the LED is blinking use the
UP
and DOWN Keys to adjust the FINE tuning value. Be aware that
FINE tuning adjusts the temperature of the Grid Filter and it
takes a few moments (10 to 20 seconds) to stabilize after each
adjustment. You will soon become accustomed to this.
Press the SELECT Key until the PD.lm indicator is lit. Very
carefully adjust the Wavelength setting Dial by a small amount
to maximize the value shown on the Numeric Display. This
procedure centres the Dielectric Filter on the Grid Filter peak.
When the two filters are aligned maximum output power is
observed.
Setting the Output Power in Detail
With the wavelength set, you may now set the power to a fixed output
power if desired. The Automatic Power Control (APC) mode will ensure
this power is constantly maintained.
Select the APC mode by pressing the ACC/APC Mode Selector. The
APC indicator should light.
Select the PD.lm mode by pressing the SELECT Keys until the
PD.
lm
indicator is lit. Monitor the output power on a power meter and
press the
UP
/
DOWN Keys to set the output power.
Coherence Control
The ECL-200 has a linewidth of typically 15OkHz. In many applications
the narrow linewidth is an advantage, but in some applications such as
sensors,where there are reflections in the fibre connected tothe laser,
a broader linewidth is advantageous. The ECL-200 has a coherence
control function which adjusts the linewidth of the laser.
Coherence Control function is activated (and deactivated) by
pressing and holding the SELECT Key for
3
seconds.
A
beep will
be heard and when the function toggles. The LD
ON/OFF Indicator
LED will blink when the Coherence Control function
is
active.
For further information, refer to Section
9
of the operation
Manual.
Artisan Technology Group - Quality Instrumentation ... Guaranteed | (888) 88-SOURCE | www.artisantg.com

Oh
No
...
It's
Not
Stable!
Now,
is
the unit stable? Does
it
have a single mode oscillation?
On rare occasions
it
will
not be possible to achieve single mode
operation on the first attempt. On an
OSA
multiple peaks
will
be seen; with a wavelengthmeter a stablewavelength readingwill
not be achieved. The most likely cause
is
that the Dielectric
Filter has not been adjusted correctly. However, if the
procedure above has been followed and single mode operation has
not been achieved,
it
is
necessary to adjust the
LD
temperature
by a small amount. Usually, a 0.5OC adjustment
will
solve the
problem. Toadjust the LDtemperature, PresstheSELECTKeyuntil
the
TEMP
light
is
blinking. Use the
UP
or
DOWN
Keys as necessary
toadjust the displayed value by 0.5. The initial readout should
be 25.0 (25.0°C). Allow 10-15 minutes for the
LD
temperature
to stabilize and then repeat the wavelength and power setting
procedure.
Remember, with Santec's ECL-200 every wavelength (to within
0.012nm) can be set, anda stablemode hop freeoutputobtained.
Saving
the
Settings
The settings on each ECL-200 module can be stored sothat theunit always
starts at exactly the same wavelength and power, with the coherence
control and
ACC/APC
settings preset. To save the settings:
Press
the
STORE
button with a pen. The unit
will
beep when
pressed.
Artisan Technology Group - Quality Instrumentation ... Guaranteed | (888) 88-SOURCE | www.artisantg.com

Artisan
Technology
Group
is
an independent supplier
of
quality pre-owned equipment
Gold-standard
solutions
Extend the life
of
your
critical industrial,
commercial, and military systems
with
our
superior service and support.
We
buy
equipment
Planning to
upgrade
your current
equipment? Have surplus equipment taking
up shelf space? We'll give it a
new
home.
Learn
more!
Visit us at artisantg.com for more info
on price quotes, drivers, technical
specifications, manuals, and documentation.
Artisan Scientific
Corporation
dba
Artisan
Technology
Group
is
not
an affiliate,
representative,
or
authorized
distributor
for
any
manufacturer
listed herein.
We're here to make your life easier.
How
can
we
help you today?
(217)
352-9330
Isales@artisantg.com Iartisantg.com
Other manuals for ECL-200
1
Table of contents
Other Santec Control Unit manuals


Popular Control Unit manuals by other brands

Festo
Festo Compact Performance CP-FB6-E Brief description

Elo TouchSystems
Elo TouchSystems DMS-SA19P-EXTME Quick installation guide

JS Automation
JS Automation MPC3034A user manual

JAUDT
JAUDT SW GII 6406 Series Translation of the original operating instructions

Spektrum
Spektrum Air Module System manual

BOC Edwards
BOC Edwards Q Series instruction manual

KHADAS
KHADAS BT Magic quick start

Etherma
Etherma eNEXHO-IL Assembly and operating instructions

PMFoundations
PMFoundations Attenuverter Assembly guide

GEA
GEA VARIVENT Operating instruction

Walther Systemtechnik
Walther Systemtechnik VMS-05 Assembly instructions

Altronix
Altronix LINQ8PD Installation and programming manual


