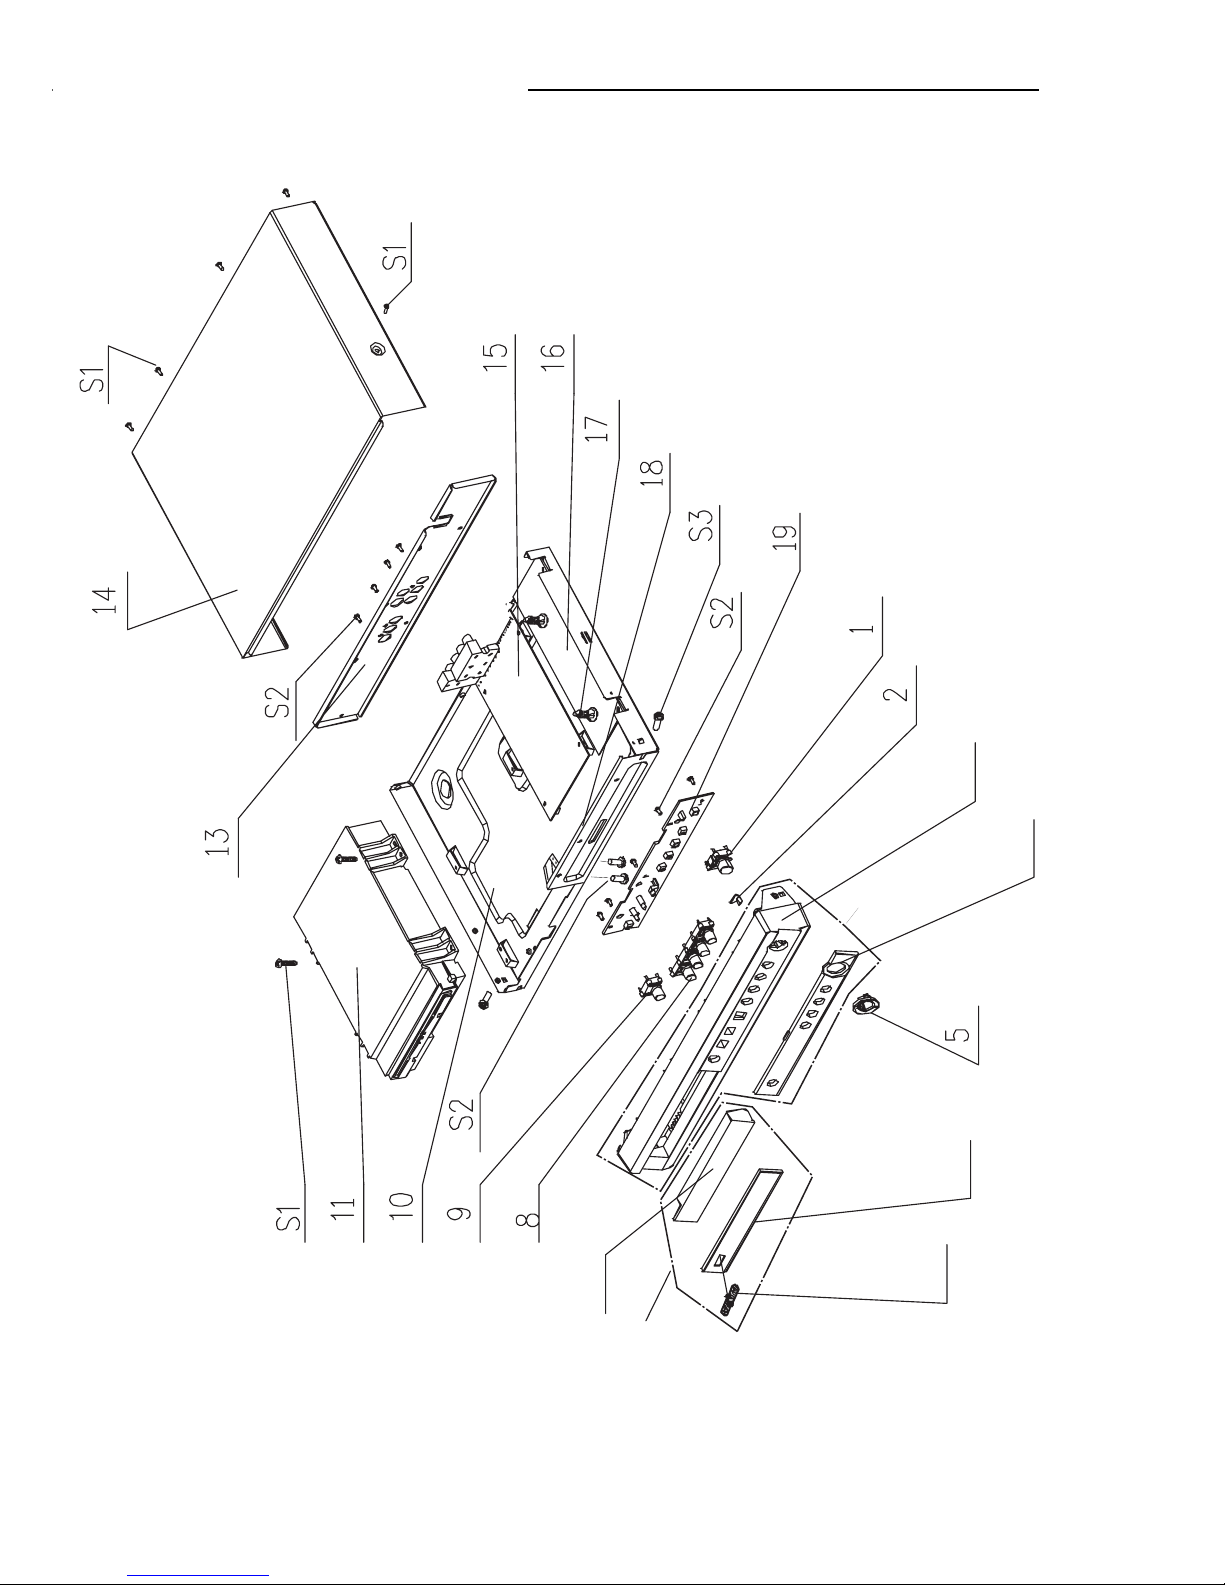
Sanyo DVD-SL40 User manual

FILE NO.
Service Manual
CONTENTS
DVD Video Player DVD-SL40 (XE)
PRODUCT CODE No.
137 123 05
REFERENCE No. SM5810569
DVD Mechanism Replacement ............................................. 1
Laser beam safety precaution ............................................... 1
Mechanism replacement ....................................................... 2
How to load software for main p.w.board .............................. 3
Sevice mode ......................................................................... 4
Exploded View (Cabinet & Chassis) ..................................... 5
Parts List ............................................................................... 6
Exploded View (DVD Mechan ism) ....................................... 8
Parts List ............................................................................... 8
IC Block Diagram & Description ............................................ 10
Block Diagram ...................................................................... 14
wiring Connection ................................................................. 15
Schematic Diagram ............................................................... 16
Wiring Diagram .................................................................... 28
REMOTE CONTROLLER RB-SL40
/ON
NEXTPREV
SEARCH MODE
SLOW
PAUSE/ STEP
PLAY
REV FWD
PROGRAM
123
456
789
0
+10
OPEN/CLOSE
ENT
SETUPMENU
AUDIO
RETURN
ZOOM ANGLE
SUBTITLE
RANDOM
ON SCREEN
REPEAT
A-B REPEAT
TOP MENU
(Caution)
There are two kinds of this model.
Type A : The DVD mechanism of part code "645 066 3802" is used for this type.
The 10th figure of a serial number is nothing or "A".
Type B : The DVD mechanism of part code "645 068 7495" is used for this type.
The 10th figure of a serial number is "B" or "C".
The differences between Type A and Type B are a DVD driver and a main p.w.board.

- 1 -
LASER BEAM SAFETY PRECAUTION
1. Cautionary instructions in handling the assy
(Safety instructions)
Optical pickup
The laser beam used in the pickup is classified as "class 2".
Exposing your eyes or skin to the beam is harmful. Take care
not to do so.
(Caution against static electricity and leakage voltage)
Ground securely the work tables, tools, fixtures, soldering irons
(including those made of ceramic) and measuring instruments
used in the production lines and inspection departments that
handle loaders. The workers shall also be grounded.
(Cautionary instructions in handling)
Do not touch the object lens when handling a loader, or the lens
will be stained, resulting in inadequate playability.
There is no power supply protection circuit provided for this
product or adjustment/inspection device. Short-circuiting may lead
to fire or damage.
Take care so as to protect from exposure to water, the entry of
metallic pieces or dew condensation.
In particular, a strong magnet adjacent to the pickup will not only
get inoperative but can damage the pickup if a small metallic
piece, such as a screw or swarm, enters.
The loader edge can cause injury if inadvertently handled.
Do not touch a rotating disk, or injury may result.
This product is a precision device. Handle carefully.
A shock or dropping will cause misalignment or destruction. If it
should occur, refer to clause 2.
This product is so designed as to endure an initial shock
equivalent to a drop from a height of approx. 90 cm under the
packed condition.
After the initial shock, the resistivity will still remain at a level of
50 to 60 G, but the mechanical robustness will weaken.
Do not place in a dusty location.
The entry and deposition of dirt into or on the pickup lens or
moving section will cause malfunction or degradation.
(Connectors)
Do not connect or disconnect while power is on.
Connecting or disconnecting signal wires or the main power cord
when the power is on may destruct the unit or fixture.
When connecting, push all the way in securely.
An insufficient insertion may cause a bad contact, leading to an
erroneous operation.
DVD MECHANISM REPLACEMENT
Do not connect or disconnect roughly by an excessively strong
force, or a broken wire or bad contact may result.
Semiconductors are connected. Do not touch connector terminals
directly.
If the worker is grounded, there is nothing to worry about static
electricity, but the rust on the connector terminal surface caused
by the touch may result in bad contact.
(Caution)
Before disconnecting FFC
cable, make it "SHORT" as
shown left.
After connecting FFC
cable,make it "OPEN" as
shownleft.
(Power source)
The power source need be good in quality (free from
instantaneous interruptions or noises).
A low quality power source may well cause malfunction.
(Storage)
Do not place or store in a dusty place or a place where dew
condensation is possible.
The entry and deposition of dirt or dust into or on the pickup lens
or moving section will cause malfunction or degradation.
Also, dew condensation causes rust; the rust penetrate into the
precision part of a pickup, causing malfunction, or degrading the
optical quality of the internal lens and reflector, which also leads
to malfunction.
(OPEN)(SHORT)
•Pick-up that emits a laser beam is used in this CD player section.
CAUTION :
USE OF CONTROLS OR ADJUSTMENTS
OR PERFORMANCE OF PROCEDURES
OTHER THAN THOSE SPECIFIED HEREIN
MAY RESULT IN HAZARDOUS RADIATION
EXPOSURE
LASER OUTPUT.......... 0.6 mW Max. (CW)
WAVELENGTH ............. 790 nm
(OPEN)(SHORT)
(Type A)
(Type B)
CLASS 1 LASER PRODUCT
LUOKAN 1 LASERLAITE
KLASS 1 LASERAPPARAT
CLASS 1 LASER PRODUCT
LUOKAN 1 LASERLAITE
KLASS 1 LASERAPPARAT
CAUTION – INVISIBLE LASER RADIATION WHEN OPEN AND
INTERLOCKS DEFEATED. AVOID EXPOSURE TO BEAM.
ADVARSEL – USYNLIG LASER STRÅLING VED ÅBNING, NÅR
SIKKERHEDSAFBRYDERE ER UDE AF FUNKTION, UNDGÅ UDS ÆTTELSE
FOR STRÅLING.
VARNING – OSYNLIG LASER STRÅLNING NÄR DENNA DEL ÄR ÖPPNAD
OCH SPÄRR ÄR URKOPPLAD. STRÅLEN ÄR FARLIG.
VORSICHT – UNSICHTBARE LASERSTRAHLUNG TRITT AUS, WENN
DECKEL GEÖFFNET UND WENN SICHERHEITSVERRIEGELUNG
ÜBERBRÜCKT IST. NICHT, DEM STRAHL AUSSETZEN.
VARO – AVATTAESSA JA SUOJALUKITUS OHITETTAESSA OLET ALTTIINA
NÄKYMÄTTÖMÄLLE LASERSÄTEILYLLE. ÄLÄ KATSO SÄTEESEEN.

- 2 -
1
2
MECHANISM REPLACEMENT
2. How to remove the tray.
3. How to insert the tray.
1
1
2
1
2
1
1
1
2
Escutcheon
1. How to Remove DVD Mechanism
First, it is necessary to remove Escutcheon.
Move both the right and left 1 tray pins to the ends.
Remove the 2 tray.
Rotate the 1 gear.
Move forward the 2 tray.
Move the 1 slide to the left end.
Insert the 2 tray.
How to remove Escutcheon.
An eject button is pushed and a tray is taken out.
Please remove Escutcheon, as shown in the left figure 2 .
When an eject button 1 does not function. Above figure
Please insert a cylindrical thing with a diameter of 3mm or less
in the hole 3 in the side of a DVD mechanism.
A tray is pushed out.
3
Side of DVD mechanism
Front Rear
Cylindrical thing
21
3
(Type A)
(Type B)
Move the left 2 pins and the screw of 1 is remove.
Remove the 3 tray.

- 3 -
G-SANKOL
G-SANKOL
5. Base mechanism mounting parts.
4. Tray parts.
MECHANISM REPLACEMENT
: Clean the groove by alcohol well.
A
A
A
G-SANKOL
G-SANKOL
HOW TO LOAD SOFTWARE FOR MAIN P.W.BOARD
1. Power on, then open tray.
2. It take on CD-ROM (Part code is "0PRADC7123--A") for UPDATE software to the tray, and tray close.
3. It is displayed on a TV screen as "FLASH".
4. It is displayed on a TV screen as "dvdsl40.San" or "dvdsl40t.San"
5. It is displayed on a TV screen as "reading".
6. A TV screen becomes dark.
4. The display of a TV screen repeats "ERASE" and "WRITE"
5. It is displayed on a TV screen as "DONE" and Power off.
(Type A)
(Type B)

- 4 -
SERVICE MODE
B. How to enter Service Mode.
You can enter Service Mode in any one of the following ways
A. Market / Region SETUP
In the initial condition for this model, Market and Region
information are undefined.
In the following cases, be sure to set up Market/Region.
1. When updating the system using CD-R
(Part code :0PRADC7123--A ).
2. When replacing a DVD main p.w.board.
2. Setting Market code
2-1. While a highlighted indicator is displayed on the figure
A of the Market denotation , push or button on
the remote controller.
The indicator reset to "WM".
Market code of this model is "XE".
2-2. Specify the code of the model in accordance with the
Market/Region setup above.
2-3. Once the desired code is display , push pbutton to
move the highlighted indicator to the Region input
area.
MARKET
REGION 1
Exit
MARKET
REGION 1
Exit
WM
MARKET
REGION 1
Exit
WM
MARKET WM
REGION 1
Exit
MARKET WM
REGION 1
Exit
Figure A
Figure B
Figure C
1 <-> 2 <-> 3 <-> 4 <-> 5 <-> 6
4. Saving settings
4.1 Make sure that the Market and Region settings are
properly set.
(If any of the settings are incorrect, you can make a
change by moving the indicator using obutton, and
following procedures 2 and 3 above. )
4.2 After ensuring that the settings are all correct, push
ENT button while the indicator is on Exit area. The
settings are now saved.
5. Power OFF.
(Reference figure)
(Reference figure)
(Reference figure)
1. Displaying Internal Setup screen
1-1. Dislay on "No Disc" by Function button.
1-2. Press the remote key and step by step enter 7-2-2-4-
stop button , then speedy press NEXT button,
appear about the figure A picture on TV screen.
3. Setting REGION code
3.1 While a highlighted indicator is displayed on about the
figure B of the Region denotation, push ENT, and
each button on the remote controller. With each push
the indicator will advance as shown below.
3
The sample of a display of a region
code.
3.2 Set up the region coder currently displayed on the
set.
3.3 Once the desired number is displayed, push pbutton
to move the highlighted indicator to Exit area.
Other manuals for DVD-SL40
2
Table of contents
Other Sanyo DVD Player manuals

Sanyo
Sanyo DWM-400 User manual

Sanyo
Sanyo DVD-DX405 User manual

Sanyo
Sanyo FWDP105F B User guide

Sanyo
Sanyo DVD-DX405 User manual

Sanyo
Sanyo Dwm450 - Progressive Scan Dvd Player User manual

Sanyo
Sanyo DVD-SL40 User manual

Sanyo
Sanyo DVD-SL33 User manual

Sanyo
Sanyo DVD-SL20V User manual

Sanyo
Sanyo DVD-9000 Operating manual

Sanyo
Sanyo DVD-DX501 User manual

Sanyo
Sanyo DVD-SL25 User manual

Sanyo
Sanyo dvw6100 User manual

Sanyo
Sanyo HV-DX4EV User manual

Sanyo
Sanyo DVD-DX500 User manual

Sanyo
Sanyo DWM-370 User manual

Sanyo
Sanyo DWM-390 User manual

Sanyo
Sanyo HV-DX350A User manual

Sanyo
Sanyo DVD-9201 User manual

Sanyo
Sanyo DVD-SL22 User manual

Sanyo
Sanyo DVD-DX500 User manual