manuals.online logo
Brands
  1. Home
  2. •
  3. Brands
  4. •
  5. SATO KEIRYOKI
  6. •
  7. Measuring Instrument
  8. •
  9. SATO KEIRYOKI PC-7700 II User manual

SATO KEIRYOKI PC-7700 II User manual

Instruction Manual
Digital Thermohygrometer Model PC-7700Ⅱ
1. Introduction
Thank you for purchasing the digital thermohygrometer model PC-7700Ⅱ.
- This product is designed to measure temperature and humidity of atmosphere. Do
not use it for other purposes.
- Read this manual carefully before use and keep the manual in a safe place for future
reference.
2. Names of Sections
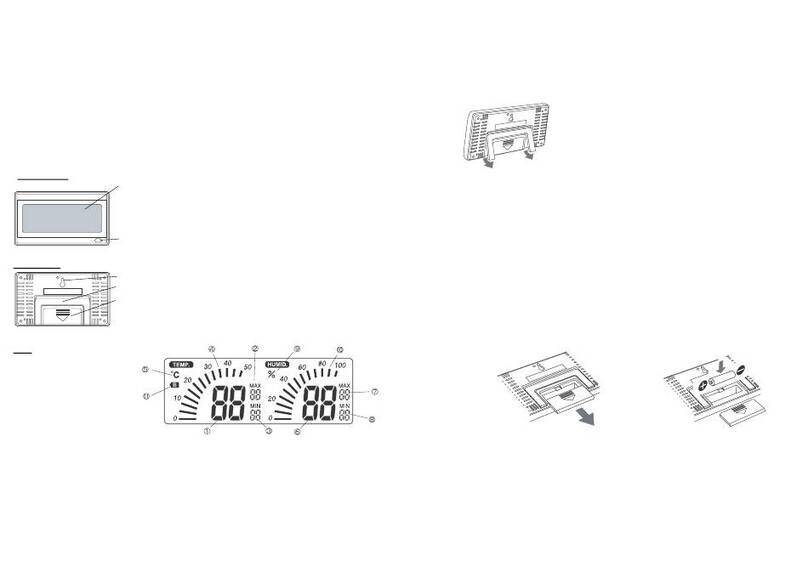
Front view
Rear view Wall-mounting hole: For mounting the unit on a wall
Desk stand: Use this to place the unit on a desk/table top.
Battery compartment/lid: Use one AAA battery
LCD
① Current temperature
② Maximum temperature
③ Minimum temperature
④ Temperature indication bars
⑤ Temperature unit (°C)
⑥ Currenthumidity
⑦ Maximum humidity
⑧ Minimum humidity
⑨ Unit of humidity (%): The relative humidity is displayed.
⑩ Humidity indication bars
⑪ Low battery indicator: Lights up when the battery is low.
LCD display: Displays current, maximum (highest) and
minimum (lowest) temperature and current, maximum (highest)
and minimum (lowest) relative humidity. The current
temperature and humidity are also displayed as indication bars.
Reset button: Clears the memory of maximum and minimum
temperature, maximum and minimum humidity.

3. Using PC-7700Ⅱ
The PC-7700Ⅱdisplays current temperature and humidity values in numeric as well as the
bar indicators. It also displays maximum temperature and humidity and minimum
temperature and humidity values last recorded since a battery replacement or pressing the
reset key. The unit can be placed on a desk or mounted on a wall.
 Desktop Use Pull out the stand attached to the back of the unit for
desktop use. Find a stable place free of direct sunlight and
air conditionings to install.
Caution!
Temperature and humidity values vary depending on the
location of the instrument in a room. Temperature is often
higher farther away from the floor and lower closer to the
floor. Install the unit in a place that suits your needs.
 Wall-mounting Use
. When mounting on a wall, use the wall-mounting hole to secure it to the wall with a screw.
. A screw is not included in the package. You need to purchase a screw of the size described
above from a home center or a hardware store.
. Select a place without the risk of falling and make sure that the screw is firmly secured and
the installation is properly done. Check the installation by slightly moving the unit from
side-to-side and up-and-down.
4. How to Install a Battery
Remove the battery compartment lid and place one AAA battery inside with correct polarities
as illustrated inside of the battery compartment
(1) Remove the battery compartment lid. (2) Place a battery.
On the LCD, temperature (current, maximum and minimum) and humidity (current,
maximum and minimum) values will be displayed. In addition, the current temperature and
humidity values are displayed as the bar indicators.
 Use one AAA/R03 manganese or AAA/LR03 alkaline battery.
 Replace the battery when the low battery indicator appears on the LCD. When the battery
power becomes low, the display dims, measurement errors occur and the clock displays a
wrong time.
Note: Immediately replace the battery when the Low Battery indicator appears.
The battery on the unit lasts about one year at 20°C with 50% relative humidity.
5. Cautions in Use
 The instrument is delicately made. Be careful not to drop it or give a shock to it.
 The instrument is not waterproof. Avoid a direct contact with water.
 Do not use the instrument at a place exposed to direct sunlight or near a heater. Doing so
may cause deformation of the casing and/or malfunction of the instrument.
 Do not clean the instrument with alcohol, thinner or any other organic detergents etc. Use
a cloth moistened with neutral detergent water.
 Do not install the instrument near a TV, a cell phone or a microwave oven. Doing so may
cause the readings of temperature and humidity unstable due to electromagnetic
interference. Avoid exposing the instrument to strong electromagnetic fields.
 If the instrument is not used for a long period of time, remove the battery to avoid any
leakage of the battery fluid which could damage the instrument.
 Never alter or disassemble the instrument to avoid malfunctions. Especially never put the
instrument in a fire
6. Warnings
 Batteries pose a danger of suffocation or poisoning if swallowed. Keep batteries out of
reach of children.
 When batteries are not in use, insulate the terminals with tape to prevent contact with
other metal objects or batteries. Otherwise, a short circuit may occur and cause a fire or an
explosion.
 For environmental conservation, dispose the used batteries in compliance with local rules
and regulations.
 If the LCD panel broke, be sure not to touch the liquid inside. Doing so may cause skin
irritations. If swallowed, gargle with water and seek a medical attention immediately. If the
liquid comes in contacts with eyes or skin, wash them off with clean water for at least 15
minutes and seek a medical attention.
7. Specifications
Name No. 1069-00 Digital Thermohygrometer
Model PC-7700Ⅱ
Measuring Range Temperature : -10 to 50˚C
R. Humidity : 20 to 95% rh
Bar Indicator Range Temperature : 0 to 50˚C
R. Humidity : 0 to 100% rh
Accuracy Temperature : ±1˚C at 10 to 40˚C
±2˚C other than above
R. Humidity : ±5%rh: at 40 to 70% at 15 to 35˚C
±7%rh: at other than above
Resolution Temperature : 1˚C
R. Humidity : 1% rh
Operating Condition -10C to 50˚C, less than 95% rh (no condensing)
Storage Condition -10C to 50˚C, less than 95% rh (no condensing)
Sampling Time about every 10 sec.
Sensors Temperature : Thermistor
R. Humidity : Electrical resistance change humidity sensor
Power Requirement 1.5VCD (“AAA” size manganese battery 1)
Battery Life About one year (at 20˚C, 50%rh state)
Dimensions (W) 150 (H) 85 (D) 17 mm
Weight approx. 135 g (including battery)
Standard Accessory “AAA” size manganese battery 1
3-4, Kanda-kajicho, Chiyoda-ku, Tokyo 101-0045 JAPAN
TEL:+81(0)3-3254-8117 :(0)3-3254-8123
URL: http://www.sksato.co.jp/english/

Other SATO KEIRYOKI Measuring Instrument manuals

SATO KEIRYOKI S270WP Series User manual

SATO KEIRYOKI

SATO KEIRYOKI S270WP Series User manual

SATO KEIRYOKI WVAT6D0-3-10 User manual

SATO KEIRYOKI

SATO KEIRYOKI WVAT6D0-3-10 User manual

SATO KEIRYOKI SK-93F-II User manual

SATO KEIRYOKI

SATO KEIRYOKI SK-93F-II User manual

SATO KEIRYOKI SK-660PH Series User manual
SATO KEIRYOKI

SATO KEIRYOKI SK-660PH Series User manual

SATO KEIRYOKI 7542-00 User manual

SATO KEIRYOKI

SATO KEIRYOKI 7542-00 User manual

SATO KEIRYOKI 7610-20 User manual

SATO KEIRYOKI

SATO KEIRYOKI 7610-20 User manual

SATO KEIRYOKI SK-181GT User manual

SATO KEIRYOKI

SATO KEIRYOKI SK-181GT User manual

SATO KEIRYOKI Sophia User manual

SATO KEIRYOKI

SATO KEIRYOKI Sophia User manual

SATO KEIRYOKI PC-9225 User manual

SATO KEIRYOKI

SATO KEIRYOKI PC-9225 User manual

SATO KEIRYOKI SK-610PH-II User manual

SATO KEIRYOKI

SATO KEIRYOKI SK-610PH-II User manual

SATO KEIRYOKI 7720-00 User manual

SATO KEIRYOKI

SATO KEIRYOKI 7720-00 User manual

SATO KEIRYOKI PC-5110 User manual

SATO KEIRYOKI

SATO KEIRYOKI PC-5110 User manual

SATO KEIRYOKI SWPII-07 User manual

SATO KEIRYOKI

SATO KEIRYOKI SWPII-07 User manual
SATO KEIRYOKI 1518-00 User manual

SATO KEIRYOKI

SATO KEIRYOKI 1518-00 User manual

SATO KEIRYOKI PALMA 2 User manual

SATO KEIRYOKI

SATO KEIRYOKI PALMA 2 User manual

SATO KEIRYOKI SK-5RAD-SP User manual

SATO KEIRYOKI

SATO KEIRYOKI SK-5RAD-SP User manual

SATO KEIRYOKI PC-5000TRH II User manual

SATO KEIRYOKI

SATO KEIRYOKI PC-5000TRH II User manual

SATO KEIRYOKI SK-650PH User manual

SATO KEIRYOKI

SATO KEIRYOKI SK-650PH User manual

SATO KEIRYOKI 7820-00 User manual

SATO KEIRYOKI

SATO KEIRYOKI 7820-00 User manual

SATO KEIRYOKI SK-RHG User manual

SATO KEIRYOKI

SATO KEIRYOKI SK-RHG User manual
SATO KEIRYOKI PC-7700II User manual

SATO KEIRYOKI

SATO KEIRYOKI PC-7700II User manual

SATO KEIRYOKI SK-M460-TRH User manual

SATO KEIRYOKI

SATO KEIRYOKI SK-M460-TRH User manual

SATO KEIRYOKI 1722-00 User manual

SATO KEIRYOKI

SATO KEIRYOKI 1722-00 User manual
SATO KEIRYOKI 640S-1 User manual

SATO KEIRYOKI

SATO KEIRYOKI 640S-1 User manual

Popular Measuring Instrument manuals by other brands

LaserLiner VideoScope manual

LaserLiner

LaserLiner VideoScope manual

Rohde & Schwarz RT-ZP05S user manual

Rohde & Schwarz

Rohde & Schwarz RT-ZP05S user manual

MGL Avionics Ultra Horizon XL owner's manual

MGL Avionics

MGL Avionics Ultra Horizon XL owner's manual

Wohler SM 500 operating manual

Wohler

Wohler SM 500 operating manual

IME Nemo 96HD manual

IME

IME Nemo 96HD manual

VEE GEE 43045 Operation manual

VEE GEE

VEE GEE 43045 Operation manual

Endress+Hauser Turbimax CUS52D operating instructions

Endress+Hauser

Endress+Hauser Turbimax CUS52D operating instructions

Hanna Instruments HI 9126 instruction manual

Hanna Instruments

Hanna Instruments HI 9126 instruction manual

Eastron DCM230 user manual

Eastron

Eastron DCM230 user manual

Fluke 360 Calibration information

Fluke

Fluke 360 Calibration information

Boshi Electronic Instrument GY-4 user manual

Boshi Electronic Instrument

Boshi Electronic Instrument GY-4 user manual

Artistic License Dali-Scope user guide

Artistic License

Artistic License Dali-Scope user guide

KEHUA TECH MR33 Series user manual

KEHUA TECH

KEHUA TECH MR33 Series user manual

EMH XC-RACK Instructions for use

EMH

EMH XC-RACK Instructions for use

Omega HHLM112SD user guide

Omega

Omega HHLM112SD user guide

Iveda IvedaAI user guide

Iveda

Iveda IvedaAI user guide

Rigel Uni-Therm quick start guide

Rigel

Rigel Uni-Therm quick start guide

LDS Dactron PHOTON+ System guide

LDS

LDS Dactron PHOTON+ System guide

manuals.online logo
manuals.online logoBrands
  • About & Mission
  • Contact us
  • Privacy Policy
  • Terms and Conditions

Copyright 2025 Manuals.Online. All Rights Reserved.