Saunum Luxury User manual

Saunum Luxury
heater with a sauna room indoor climate device
INSTRUCTION FOR USE AND INSTALLATION

2 3
THE BEST SAUNA
EXPERIENCE TO HAVE!
I
am very glad that you have invested in the Saunum
device, and I believe that our innovative technology
will offer you a wonderful and extraordinary sauna
experience.
I have a degree in thermal engineering and come from the
Southern Estonia, where my love for saunas began.The special
feature of local historic smoke saunas is the lower tempera-
ture and higher humidity level than, for example, a classic
Finnish sauna. In ordinary saunas, the stone volume of the
sauna heater is generally small. Such an arrangement can
cause a sudden, burning hot steam and an extremely uneven
temperature, where your head and shoulder level is really hot,
but your feet are left cold. Such an experience can be quite
unpleasant and may cause headaches and lead to body stress.
However, in ancient smoke saunas and Native American sau-
nas, the stones were rst heated during the day. Then the heat
stored in the stones was used to cleanse the body and create a
truly enjoyable sauna experience.
Inspired by the experience of a smoke sauna, I wanted to
create an innovative solution that combines the best features
of an authentic sauna with modern technology; enabling a
pleasantly mild and relaxing sauna experience without pain-
fully scorching steam. For that, however, I had to solve the
problem of how to achieve an even temperature, at both the
head and foot levels. My development work was supported
by research done alongside Tallinn University of Technology,
in which we analysed the thermal stratication and air move-
ment in the sauna room. Saunum was born in cooperation
between scientic thinking and technological innovation.
Saunum’s unique patented mixing system of air layers cap-
tures the hot steam that rises under the ceiling of the sauna
room, mixes it with the cooler air from the surface of the oor,
and directs the milder steam back evenly. This makes for an
enjoyable, unaggressive heat. You can sit in the sauna for a
longer time, and enjoy a sweat and a deep cleanse without
feeling tired. The stone volume of our heaters is signicantly
larger than other sauna heaters, which is the reason for the
especially pleasant indoor climate with long and soft steam.
A moist steamy sauna, a therapeutic salt sauna, or a healthy
aroma sauna – all of these functions are available on Saunum’s
devices to create a truly relaxing sauna experience. When us-
ing Himalayan salt balls in our device, salt ions that are ben-
ecial to skin and respiratory tract evaporate and the steam
circulates these into the air. Adding a sauna aroma system that
blends steam and healthy aroma oil creates an even more en-
joyable sauna environment.
Saunum’s sauna devices are suitable for both adults and
children.
Have a pleasant sauna!
Andrus Vare
The creator of Saunum

5
Saunum Saunas OÜ
congratulates you
on choosing a heater with
an innovative sauna room
indoor climate device!
CONTENTS
Safety information ___________________________________
INSTRUCTIONS FOR USE
Heating the sauna room ______________________________
Using the sauna climate device _________________________
Adjusting the temperature _____________________________
Regulation of the sauna climate _________________________
Use of Himalayan salt balls ____________________________
Throwing water on the heater ____________________________
Loading the stones ___________________________________
Warnings _________________________________________
Solving problems ____________________________________
Maintenance _______________________________________
Sauna room _________________________________________
Sauna room ventilation _______________________________
Power of the heater __________________________________
INSTALLING
Safety distances _____________________________________
Before the installation _________________________________
Dimensions _______________________________________
Product completeness _________________________________
Installation instructions _______________________________
Electrical connections ________________________________
Power output congurations ____________________________
Insulation resistance _________________________________
Failiure of a heating element ___________________________
Warranty _________________________________________
Installation Report ____________________________________
6
8
8
9
9
10
11
11
12
13
15
16
16
17
18
19
20
21
22
26
29
29
37
39
41
CONTENTS

6 7
SAFETY INFORMATION
SAFETY INFORMATION
SAFETY
INFORMATION
These instructions for installation and use
are intended for the sauna owner or main-
tenance provider, as well as the electrician
responsible for installing the heater with
a sauna room indoor climate device. After
installing the heater with an indoor climate
device, the instructions must be handed
over to the owner or maintenance provider.
Before using the Saunum Luxury heater
with an indoor climate device (hereinafter
‘sauna climate device’), read the installation
and safety instructions. The sauna climate
device is intended for heating the sauna
room at 60–100 °C and for regulating the
sauna room climate during steaming.
NB! The climate control unit and the
heater of the sauna must not be ope-
rated in temperatures exceeding 100 °C!
NB! Do not use the sauna climate device
for any other purposes!
NB! To connect the sauna climate device
to the power network, a control device for
the control of electric heaters is required.
The control device must correspond to the
power of the heater used according to Ta-
ble1.
The control device must have the ability to
control the fan of the sauna climate device,
and the function of simultaneously switch-
ing o the heater and the fan of the sauna
climate device is recommended.
To ensure the longevity of the device,
make sure that the temperature of the
sauna room at the height of the lower
part of the device does not exceed 80 °C.
Table 1
Conguration
13.2 kW
16.6 kW
19.8 kW
Power requirement
3 x 230 V 20 A
Power cable Main Braker to
Control device
Device
Saunum Luxury 5 x 4 mm SIHF
Power cable
Control device to Heater
Two cables, 5 x 4 mm SIHF
14–18 m3
18–22 m3
22–28 m3
Cubic size of the
sauna room m
The minimum height
of the ceiling
215 cm
215 cm
215 cm
If it is exceeded, the thermal protection will
be applied and the fan will stop; the fan
will start running again if the temperature
drops below the fuse limit of application.
The manufacturer is not responsible for any
malfunction caused by an overrun of the
authorized operating temperature.
5 x 4 mm
Saunum Luxury
Saunum Luxury
3 x 230 V 25 A
3 x 230 V 30 A
5 x 6 mm
5 x 6 mm

8 9
INSTRUCTIONS FOR USE
HEATING
THE SAUNA ROOM
Before using the sauna climate device for
the rst time, make sure that:
• the electrical connections meet the
requirements;
• the supply voltage corresponds to
the nominal ratings allowed for the
sauna climate device;
• the protective earth (PE) is in work-
ing order;
• the attachments of the sauna cli-
mate device housing are in order;
• the sauna climate device is properly
attached to the wall;
• the over-current fuses are in working
order;
• the fan rotor rotates smoothly;
• there are no tools or materials left
after mounting the device in the
housing.
When switching the sauna climate device
on, check:
• the direction of the air ow – the air
intake from the upper and the out-
put from the lower opening;
• that there is no vibration or excessive
noise when the fan is running.
When the sauna climate device is switched
on for the rst time, the heaters and the
stones will emit an odour. The sauna room
must be properly ventilated to remove the
odour.
If the power of the heater is suitable for
the sauna room, it takes 45 to 90 minutes
to reach the desired temperature in a pro-
perly insulated sauna room. The stones are
usually heated to the steam temperature
at the same time as the sauna room. Only
switch the device fan on just before enter-
ing the sauna room – this will help to pre-
vent the sauna bench from overheating
and an excessive energy consumption.
Saunum’s recommended temperature
for sauna experience is 65 ° to 80 °C.
USING THE SAUNA
CLIMATE DEVICE
NB! Before switching the sauna climate de-
vice on, always make sure that nothing is
above or near it.
The operating time of the sauna climate
device model Saunum Luxury Experience
may be adjusted by a separate control de-
vice.
• The sauna climate device must not
be used if the components of its
housing have been removed and/
or the wiring diagram has been
changed.
• Children should not be allowed to
access or play with the sauna climate
device.
• When switching the sauna climate
device on and o, refer to the in-
structions for the use of the control
device you are using.
NB! After using the sauna, make sure that
all parts of the sauna climate device are
switched o (the heating and the fan have
stopped).
ADJUSTING
THE TEMPERATURE
NB! It is recommended to keep the air cir-
culation fan of the sauna climate device
switched o during the heating up of the
sauna room! In this case, the sauna room
heats up faster and the sauna bench does
not get too hot during the heating. To nd
the right setting, start testing at the lowest
temperature and lowest airow rate.
REGULATION OF THE
SAUNA CLIMATE
The amount of air circulation generated by
the device is regulated by the same control
unit that is used for heating control.
The airow speed increases by adjusting
it on the control unit you may choose be-
tween three dierent speeds..
INSTRUCTIONS FOR USE

10 11
INSTRUCTIONS FOR USE
USE OF HIMALAYAN
SALT BALLS
The sauna climate device comes with Hima-
layan salt balls. The use of salt balls in the
device is optional and does not aect the
main function of the device.
To use the salt balls, they must be installed
in the sockets behind the air outlet grille
and the fan. Make sure that the salt balls
are installed correctly and do not impede
the fan rotation. To install or remove the
salt balls, remove the bottom side rib from
either side of the heater and place the salt
balls in their sockets.
burnt on the heated rocks, but instead are
dispersed in the room by means of Saunum
fan spreading the fragrance evenly in the
sauna.
Follow the instructions on the package.
NB! Do not pour water into the ventilation
openings of the sauna climate device!!
LOADING
THE STONES
Stacking stones has a great eect on the
operation of the heater.
Important to know:
• The diameter of the stones must be
5–10 cm & 10–15 cm.
• Only stones sold for saunas are in-
tended for use in the heaters.
• Do not use light, porous ceramic
“stones”, or soft tiles in the heater.
They do not store enough heat when
heated and can result in damage to
the heating elements.
• Wash any dust o the stones before
placing them in the heater.
NB! When using Saunum Luxury, we recom-
mend using high-quality crushed sauna
stones.
We recommend using a long spoon to ma-
neuver the salt balls through the bottom
grille and then gently drop the salt balls in
the sockets. After installing or removing
the salt balls, reposition the bottom side
ribs. The sauna climate device may only be
used with the side ribs in place!
A detachable gutter which captures the dis-
solved particles of the salt balls is located
underneath the salt ball sockets. When re-
placing old salt balls, it is recommended to
slide it out of it’s socket and give it a good
wash.
THROWING WATER
ON THE HEATER
The air in the sauna becomes dry as it heats
up.Therefore, it is necessary to create steam
to achieve a suitable level of humidity. The
eects of heat and steam on people are dif-
ferent. When testing the dierent settings
of the sauna climate device, you will nd
the most suitable combination of tempera-
ture and humidity. The eects of heat and
steam on people are dierent. When test-
ing the dierent settings of the SAUNUM
climate device, you will nd the most suit-
able combination of temperature and hu-
midity.
The volume of the sauna ladle should
not exceed 0.2 litres. When throwing
water, the amount of water should not
exceed 0.2 litres, because by pouring
too much water on the stones at once,
some of it may be sprayed outwards in
splashes of boiling water.
Make sure that people are at a safe distance
from the heater when creating steam! Hot
steam and water splashes cause skin burns.
The water to be thrown onto the heater
must meet the requirements for clean do-
mestic water. Only fragrances specially de-
signed for a sauna may be used in the wa-
ter. Saunum recommends Saunum sauna
oil kit, which composes of a small bowl with
oil that is placed in the same socket as the
salt balls. This way the fragrances are not
Do not use/start the device if the salt balls
get into the fan housing!
NB! The use of third-party salt balls is not
covered by the device warranty.

12 13
When loading the stones, note:
• Use dierent size of stones to tightly
pack the stones on the outer layer of
the heater. Heating elements should
not be openly visible.
NB! Direct radiating heat from the ele-
ments may be cause a re hazard.
• Stones between the elements should
be placed loosely, that achieves bet-
ter airow and cooling of the heating
elements.
• Do not pour sauna rocks into the
heater, place them by hand.
• Do not force the stones between the
heating elements.
• Do not overll the heater, there
shouldn't be a pile on top of the
stone basket.
• Do not place objects in the vicinity of
the stone area or the fan of the sau-
na climate device that may change
the amount or direction of the air
owing through the sauna climate
device.
WARNINGS
• Staying in the sauna room for a long
time raises your body temperature,
which may be dangerous to your
health! Do not touch the hot heater
– the stones and the outside of the
heater may burn you!
• Do not allow children, disabled or
sick people into the sauna room
without supervision!
• Consult a doctor about medical con-
traindications to steam!
• Consult a doctor about medical con-
traindications to salt treatment!
• Make sure you are not allergic to salt
treatment. Saunum is not responsi-
ble for the side eects of salt treat-
ment!
• Consult a pediatrician or family doc-
tor about the presence of children in
the sauna room!
• Be careful when moving in the sauna
and sauna room, as the bench and
the oor may be slippery!
• Do not go to the sauna under the
inuence of alcohol, drugs, or nar-
cotics!
• Do not sleep in the hot sauna room!
• Sea air and humid climates may
cause an oxide layer (rust) on the
metal surfaces of the heater!
WARNINGS
SOLVING PROBLEMS
• Make sure you have proper ventila-
tion in the sauna room. Saunum is
not responsible for possible salt cor-
rosion of equipment and machinery.
If necessary, consult a specialist!
• Do not hang towels and clothes to
dry in the sauna room – this may
cause a re hazard!
• Excessive moisture may damage the
electrical equipment!
• There must be no obstructions closer
than 50 cm in front of the fan open-
ing!
• Sauna users must not keep their
feet or other body parts closer than
50cm in front of the fan!
• Do not cover. Sauna heater must not
be covered with anything.
Please note. The electric heater requires
a control unit and stones.
NB! Do not leave the fan of the sauna cli-
mate device running when you are not in
the sauna room – this will cause an exces-
sive energy consumption, and the sauna
bench will become too hot!
SOLVING PROBLEMS
NB! Contact a qualied service specialist
to perform maintenance. In the case of
any disturbances in the operation of the
sauna climate device, the use of the de-
vice must be stopped immediately, and
the device must be inspected by a per-
son authorised by Saunum.
THE SAUNA CLIMATE DEVICE DOES NOT
HEAT OR BLOW AIR.
• Make sure that the heater fuses are
in working order.
• Make sure the connection cable is
connected.
• Make sure that the sauna climate
device is switched on.
• Increase the maximum tempera-
ture in the sauna room.
THE SAUNA ROOM HEATS UP SLOWLY.
THE WATER THROWN ON THE STONES
COOLS THEM DOWN QUICKLY.
• Make sure that the air circulation
fan of the sauna climate device is
switched o during the heating up.
• Make sure that the fuses of the sau-
na climate device are in working
order.
• Make sure that all heating elements
are hot (smouldering) when the
sauna climate device is operating.

14 15
• Increase the selected temperature
on the control device.
• Make sure that the power of the
heater is sucient.
• Check the stones. Stones that are
placed too tightly, falling down/
sinking closer over time, or the
wrong type of stone may inter-
fere with the air ow through the
heater and therefore reduce the
heating speed.
• Make sure that the ventilation of
the sauna room is correct.
THE SAUNA ROOM HEATS UP QUICKLY,
BUT THE TEMPERATURE OF THE STONES
IS INSUFFICIENT. THE WATER THROWN
ON THE STONES FLOWS DOWN.
• Make sure that the power of
the heater is not too high. If the
power of the heater is suitable
for the sauna room, it takes 45 to
90 minutes to reach the desired
temperature in a properly insulat-
ed sauna room.
• Make sure that the ventilation of
the sauna room is correct.
• Reduce the speed of the sauna
climate device fan.
THE WALL COVERING OR OTHER
MATERIAL NEAR THE HEATER BECOMES
DIRTY QUICKLY.
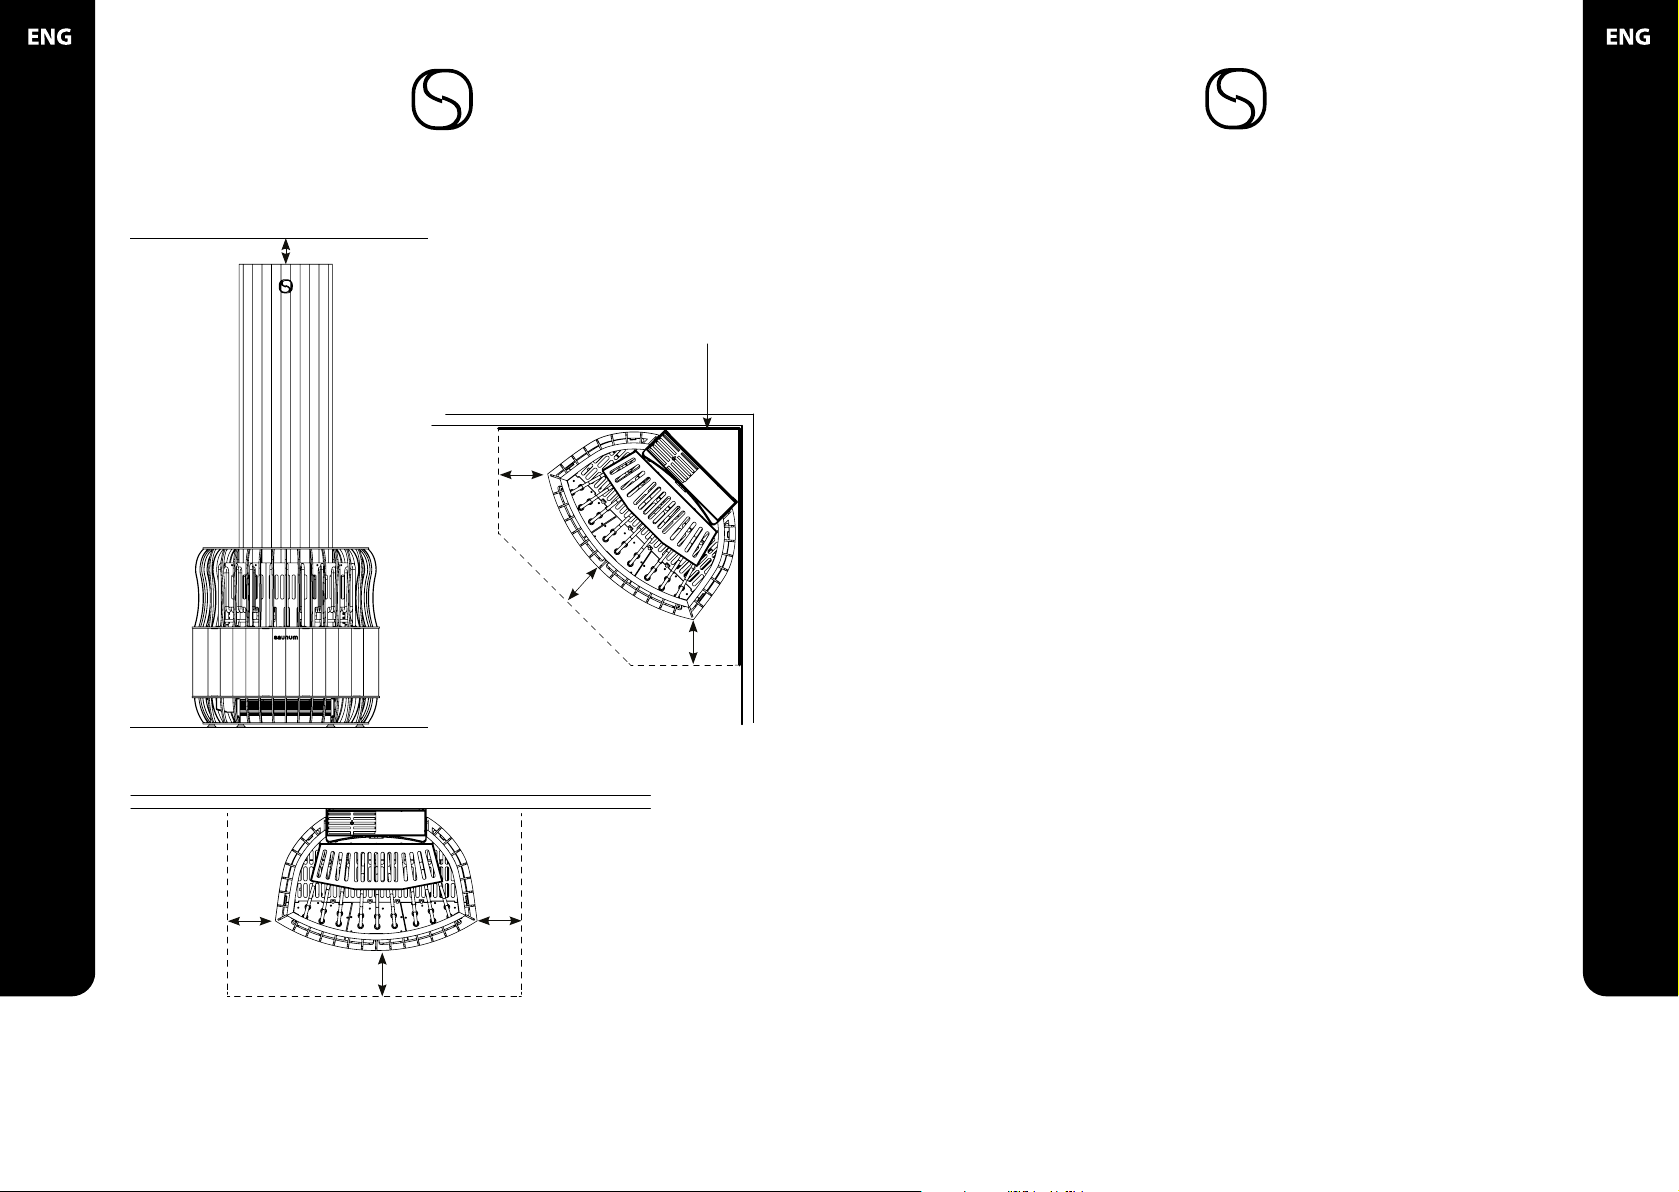
• Observe the safety distance
requirements.
• Check the stones. Stones that are
placed too tightly, stones falling
down/sinking closer over time, or
the wrong type of stone may inter-
fere with the air ow through the
heater and cause the surrounding
materials to overheat.
• Make sure that no heating ele-
ments are visible between the
stones. If the heating elements
are visible, lift the cooled stones
so that the heating elements are
completely covered.
NB! Too sparsely placed stones allow the
heating elements to overheat and worsen
the indoor climate of the sauna room. It
may cause a re hazard!
THE WOODEN SURFACES OF THE SAUNA
ROOM BECOME DIRTY OVER TIME.
This process may be accelerated by:
• sunlight;
• heat from the heater;
• wall protectors (protection equip-
ment has poor heat resistance);
• ne particles from the stones.
THE HEATER SMELLS.
• See section HEATING THE SAUNA
ROOM page 8.
• A hot heater may amplify odours
mixed with air, but this, however,
is not caused by the sauna nor the
heater. Causes include paint, glue,
oil, spices, etc.
SOLVING PROBLEMS
MAINTENANCE
MAINTENANCE
Due to large temperature uctuations,
stones tend to break down. Stones must
be restacked at least once a year and even
more frequently when using the sauna
often. When restacking the stones, remove
stone fragments from the bottom of the
heater and replace the broken stones with
new ones. By monitoring this, the heating
capacity of the heater remains optimal and
the risk of overheating of the heating ele-
ments is avoided.
If you use Himalayan salt balls with the
sauna climate device, it is recommended
to inspect the salt balls once a year and, if
necessary, replace worn and broken balls
with new ones. Make sure that there are no
foreign objects in the fan air vents of the
sauna climate device.
CAUTION! Before maintaining and clean-
ing the sauna climate device, the device
power supply must be disconnected from
the mains, and the moving parts of the unit
must completely stop.
Before servicing and cleaning the sauna
climate device, make sure that:
• the sauna climate device is discon-
nected from the mains by discon-
necting the main switch of the con-
troller unit;
• the device fan has stopped com-
pletely;
THE SAUNA CLIMATE DEVICE IS MAKING
NOISE.
• There is always a certain noise
when the fan is running. If it is not
uniform and/or accompanied by a
metallic sound, the fan is likely to
need maintenance or repair. Check
that there are no foreign objects in
the fan air vents.
• Try switching the fan to a lower
speed.
• Loud sounds are likely to be caused
by stones cracking due to heat.
• Thermal expansion of the heater
parts may cause noise when the
heater warms up.

16 17
• the prescribed occupational safety
and personal protective equipment
is used when performing the work;
• the connection cables are undam-
aged. In the event of damage to the
connection cables, have the cables
replaced by a qualied electrician
in accordance with the applicable
standards and requirements before
continuing maintenance and clean-
ing work.
The device housing can be cleaned with
a cloth dampened with water. Do not use
pressure washers, running water, chemical
cleaners, or solvents to clean the housing!
Use a 10% citric acid solution to remove
scale and rinse with water.
SAUNA ROOM
A prerequisite for the installation of the
sauna climate device is a properly prepared
sauna room. The thermal insulation of walls
and ceilings must be appropriate, other-
wise it will take too much time and energy
to heat the room. The power supply cables
for the heater and the fan must be indicat-
ed on the electrical connection board in ac-
cordance with Table 1 (see pages 6–7).
SAUNA ROOM
VENTILATION
Saunum climate device does not replace
proper ventilation and fresh air in the room
is still needed. The air in the sauna room
should be exchanged 3–6 times an hour.
When using mechanical air extraction,
place the air supply above the sauna climate
device. When using natural air
extraction,
place the air supply under or next to the
sauna climate device. The air supply pipe
must have a diameter of 80 to 100 mm.
Install the air outlet near the oor, as far as
possible from the sauna climate device. The
diameter of the air extraction pipe must be
twice the diameter of the air supply pipe.
If the air outlet is in the washroom, there
must be a gap of at least 100 mm under the
sauna room door.
Exhaust ventilation in the sauna room is
mandatory.
The venting hole for drying (optional)
must be installed in the ceiling near the
wall opposite to the sauna climate device
(closed during heating and sauna). The
sauna can also be dried by leaving the
door open after using the sauna. The sau-
na ventilation system should preferably
prevent the sauna exhaust air from enter-
ing other rooms, especially when using the
sauna climate device with salt balls.
POWER OF THE HEATER
If there is sucient insulation behind the
wall and ceiling covering, the power of the
heater is determined by the volume of the
sauna room. Non-insulated walls (brick,
glass block, glass, concrete, etc.) need a
more powerful heater. Add 1.2 m³ to the
volume of the sauna room for each square
metre of uninsulated wall.
For example, a 10 m³ sauna room with
a glass door corresponds to the capacity
requirement of a 12 m³ sauna room. If the
sauna room has log walls, multiply the
volume by 1.5. The optimal sauna room
sizes for the sauna climate device Saunum
Luxury are given in Table 1 (see pages 6–7).
The height of the sauna room is usually 215
to 230 cm.
NSTRUCTION FOR USE
NSTRUCTION FOR USE

18 19
SAFETY DISTANCES
100–150 mm
min 250 mm
min 250 mmmin 250 mm
min 250 mm
min 250 mm
min 250 mm
Non-combustible material
BEFORE THE
INSTALLATION
The installation of the sauna climate device
must be performed by a qualied electri-
cian. The connection of the device must be
performed in a stable location with a cable
that meets the temperature conditions.
Protective earthing (PE) must be connected
to the connection terminal of the device,
with the cross-sectional area of the cable
being at least 4 mm. The device must be
powered from the control device’s supply
circuit, which is protected by over-current
fuses. The required over-current fuses sizes
and the connection cables dimensions are
given in Table 1 (see pages 6–7).
Before starting the installation work,
read the installation instructions and
observe the following:
• The power and type of the heater are
suitable for the given sauna room.
The recommended sauna room
volume is given inTable 1 (see pages
6–7).
• The supply voltage is suitable for the
sauna climate device.
• At the installation site of the sauna
climate device, the minimum safety
distances given in Table 1 (see pag-
es 6–7), measured from the heater
housing, are guaranteed.
• The dimensions of the device are are
shown on page 20.
• It must also be ensured that the
upper edge of the fan outlet of the
sauna climate device is lower than
the lower edge of the bench.
• There must be no obstructions
in front of the air outlet from the
device, the exhaust air ow must be
able to ow freely across the sauna
room.
• The device works most eciently
when there is a gap between the
ue top and the ceiling (see gure
2) and the exhaust air is blown under
the bench.
• Safety distances must be complied
with unconditionally, as failure to do
so may result in a re hazard.
NSTRUCTION FOR USE

20 21
DIMENSIONS
423 mm
2050–2350 mm 813 mm
844 mm
2050–2350 mm
599 mm
844 mm
599 mm
PRODUCT COMPLETENESS
A- Flue
B- Stone basket
C- Front panel covering the electronics
D- Salt ball tray
A
B
C
D
E
F
H
G
E- Bottom grille
F- Side panels
G- Heating element tunnel
H- Flue bottom mount

22 23
INSTALLATION INSTRUCTIONS
INSTALLATION
1. There are six positions (50 mm step)
to install the ue. The top of the ue
must be 100 to 150 mm from the ceiling.
In order to determine correct position,
measure the height of the ceiling and
use follow the drawing to determine the
correct position. For example, the top of
the ue is 2050 mm from ground in the
lowest position, therefore suitable for
ceiling height 2150 to 2200mm.
2250 mm
2150 mm
2050 mm
100–150 mm
2. Slide the ue on to the ue mount.
3. Fix the ue to previously determined po-
sition using two bolts and the slots in the
bottom mount.
4. Remove the side panels from the heater
main frame by pulling them towards you-
self.
5. Fix the ue assembly to the main frame
using 4 bolts included in the set.
4 x
INSTALLATION INSTRUCTIONS

24 25
INSTALLATION INSTRUCTIONS
6. Re-position the side panels. 7. Install the salt balls (see USE OF HIMA-
LAYAN SALT BALLS).
8. Install the heating element tunnel by
positioning it in the stone basket partially
covering the heating elements. When posi-
tioning, notice that there is a slot in the tun-
nel for each heating element and use the
top view for reference.
9. Stack the rocks, see LOADING THE
STONES for guidelines.

26 27
ELECTRICAL
CONNECTIONS
Connect the sauna climate device to the
control device. Power of the heater is con-
gurable on site according to the sauna
The electrical connection of the device
must be performed by a qualied per-
son in accordance with the applicable
standards and requirements.
Before doing any electrical connections
make sure that the device is disconnec-
ted from the mains!
ELECTRICAL CONNECTIONS
Now bring the power cable to the connec-
tors. First, insert the cables through the
cable glands which are located in the rear
bottom part of the heater (see illustrations
below).
To access the electrical connections you
need to rst remove the front panel by pull-
ing it toward yourself.
Then remove the panel that covers the elec-
trical connections. It is xed to the heater
with two bolts. Undo the bolts, pull the
panel slightly towards yourself and slide it
out. See the illustrations for more info.
Then pull the cables through the diagonal
chute.
Once the cables are pulled through the
chute, you can connect them to the con-
nectors according to the schematics on
pages 30–36.
ELECTRICAL CONNECTIONS

28 29
NB! Due to the potential danger of ther-
mal embrittlement, it is forbidden to use
a PVC-insulated cable as the connection
cable for the sauna climate device.
• The internal connections of the device
are made by means of push in or screw
terminals according to to electrical
schematic (see pages 30–36) and Ta-
ble1 (see pages 6–7) in this manual.
• Protective earthing (PE) must be con-
nected to the connection terminal of
the device.
• The heater must be powered from
the 400 VAC 3N 50/60 Hz supply cir-
cuit through a control device.
• The power cable must enter the
housing of the sauna climate device
so that the water does not ow along
the cable into the electrical connec-
tion box of the housing of the sauna
climate device. The outer insulation
of the cable can only be peeled o
from the part that is in the device
housing.
• If the connecting and installation
cables are located higher than
1000mm from the oor of the sau-
na room or inside the walls of the
sauna room, they must be able to
withstand a temperature at least 170
°C (e.g., SSJ). Electrical equipment
installed in the steam room below
1000 mm must withstand a tem-
perature of at least 90 °C.
ELECTRICAL CONNECTIONS
• The recommended cross-section of
the connection cable grooves is giv-
en in Table 1 (see pages 6–7).
NB! The sauna climate device may only
be connected by a professional electri-
cian in accordance with the applicable
regulations!
POWER OUTPUT
CONFIGURATIONS
The heater can be congured in three dis-
tinct ways, enabling output power options
of 13.2 kW, 16.6 kW or 19.8 kW. The con-
gurations can be changed by means of
changing jumper pin positions (provided in
Luxury kit) and power cables.
• 13.2 kW heater is supplied with a
single 5 x 4 mmpower cable and
requires that two additional jumper
pins are connected to the connector.
• 6.6 kW heater is supplied with two
5 x 4mmpower cables. The jumper
pins come precongured from the
factory to deliver an output power
of 16.6 kW.
• 19.8 kW heater is supplied with a two
5 x 4 mm power cables and requires
that two additional jumper pins are
connected to the connector.
By default the heater jumper pins are con-
gured to 16.6 kW.
INSULATION
RESISTANCE
During the nal inspection of the electri-
cal installation, a leakage may be detected
when measuring the insulation resistance
of the sauna climate device, and which has
occurred due to the insulation material of
the heating elements absorbing moisture
from the air (storage, transport). After a few
uses of the sauna climate device, this mois-
ture will disappear.
NB! Do not connect the control device to
the mains via a residual-current device!
ELECTRICAL CONNECTIONS

30 31
ELECTRICAL CONNECTIONS
R3
R6
R8
R2
R4
R7
L2 L1
L3
R9
R1
R5
Group 1: 6 x 2200 W Group 2: Dissabled
13.2kW
5 x 4 mm SiHF
* For the 12 kW conguration
Group 2 (elements 1, 5 and 9) is
dissabled.
It is possible to use them to subti-
tutes when Group 1 element has
failed.
Detailed instructions can be found
in the maintanence part of the
manual.
13.2 kW
R2 R3
R1
R4 R5 R6 R7 R8 R9
GROUP 1
R2 R3 R4 R6 R7 R8
GROUP 2
R1 R5 R9
R1 R5 R9 R3 R2 R4 R6 R8 R7
1 2 3 4 5 6 7 8 9 10 11 12 13
NL1L2
L3
NL3 L2 L1
GROUP 2 GROUP 1

32 33
ELECTRICAL CONNECTIONS
R2 R4
R7
R3
R8R6
L2 L1
L3
R9
R1
R5
L2 L1
L3
Group 1: 6 x 1660 W Group 2: 3 x 2200 W
16.6 kW
2 x 5 x 4 mm SiHF
16.6 kW
R2 R3
R1
R4 R5 R6 R7 R8 R9
GROUP 1
R2 R3 R4 R6 R7 R8
GROUP 2
R1 R5 R9
In 16.6 kW conguration Group 1
uses a delta conguration. Each line
of the triangle has 2 elements in se-
ries. No jumper on terminals 1–3.
Group 2 is connected in a star con-
guration. 2 slot jumpers have to be
installed on terminals 4–5 and 6–7.
1 2 3 4 5 6 7 8 9 10 11 12 13
NL1L2
L3
R1 R5 R9 R3 R2 R4 R6 R8 R7
NL3 L2 L1
GROUP 2 GROUP 1

34 35
ELECTRICAL CONNECTIONS
Group 1: 6 x 2200 W Group 2: 3 x 2200 W
19.8 kW
2 x 5 x 4 mm SiHF
19.8 kW
R3
R6
R8
R2
R4
R7
L2 L1
L3
R9
R1
R5
L2 L1
L3
R2 R3
R1
R4 R5 R6 R7 R8 R9
GROUP 1
R2 R3 R4 R6 R7 R8
GROUP 2
R1 R5 R9
In 19.8 kW conguration both
Groups use a star connection.
All 4 of the included jumpers must
be installed according to the draw-
ing: 3 slot on terminals 1–3, 2 slot
connecting terminals 3 and 6, 2 slot
on 4–5 and 6–7.
1 2 3 4 5 6 7 8 9 10 11 12 13
R1 R5 R9 R3 R2 R4 R6 R8 R7
NL3 L2 L1
NL1
L2
L3
GROUP 2 GROUP 1

36 37
N
N
U
V
W
L1
MAX 100W
L2
L3
5V
D+
In7
D-
GND
GND
GND
FUSE
T3.15A
TC
TS
20A
250V AC
20A
250V AC
20A
250V AC
23A
250V AC
23A
250V AC
23A
250V AC
1 2 3 4 5 6 7 8
0-10Gnd GndGnd Gnd3V3 3V35VD+D-In1 In2 In3In4 In5 Gnd In6In7 GndGndIn8 In9
TS TC
NNNSL SCLS FS 5FS4 FS 3FS2 FS 1
S
134
25
67 8910
INSTALLATION INSTRUCTIONS
FAILIURE OF
A HEATING ELEMENT
The heater is designed with longevity in
mind. But even then at some point in the
heaters life especially in professional use
the heating elements can fail. The health of
the heating elements should be routinely
checked.
It is possible to check for broken elements
by:
• Checking if any of the brakers have
tripped
• DO all of the elements turn red(only
6 in case of 13.2 kw model)
• Visual check when replacing the
stones.
ELECTRICAL CONNECTIONS
1. Main switch
2. RCCB
3. Safety relay
4. Switching relay
5. Group 1 L1
MAIN PANEL
380 VAC 3N
TEMPERATURE
SENSOR
SiHF 3 x 0,25 mm
2m included
with Leil cont-
roller, may be
extended with
KLMA 4 x 0,8
outside of the
sauna room. > 2 x 0,25 mm
DOOR SENSOR
KLMA 4 x 0,8
CONTROL PANEL
1/2 x SiHF 5 x 4 mm
(according to heater power)
SAUNUM
LUXURY
HEATER
SiHF 5 x 0,75 mm
FAN
MOTOR
230 V
60 W
6. Group 1 L2
7. Group 1 L3
8. Group 2 L1
9. Group 2 L2
10. Group 2 L3
In case of a heating element failure, it is
possible to recongure the heater and still
use it by disabling some of the heating
elements. Underpowered heater is not a
suitable solution for long term but these
solutions enable the use of sauna while
waiting for replacement parts or planning
for the repair.
13.2 kW version:
It is possible to rewire the heater to use one of
the elements from Group 2 as replacement.
To do that:
Pick most suitable replacement element.
Ideally next to the failed element, elements
that can be used are 1, 5 and 9. Replace the
line wire of the failed element with the new
chosen one. Heater will now work with full
MAINTANANCE LOG
Date Action Taken/Comments Work performed by
dd:mm:yyyy Failure of R7, R7 substituted with R5
dd:mm:yyyy Replacement of R7, R5 wires returned to correct position
Example

38 39
INSTALLATION INSTRUCTIONS
WARRANTY
With the Saunum device warranty, Saunum
guarantees that the product will be free
from defects in the materials and the
assembly for a specied period after the
date of purchase. If, during the warranty
period, the device is found to be defective
due to the use of substandard materials
or the quality of the assembly, Saunum’s
recommended repair partners will repair or
replace the device or its defective part with-
out charge for labour and parts under the
conditions set out below. Saunum reserves
the right to decide whether to replace the
defective product component or to replace
the device with a new one. The replaced
defective product components remain the
property of Saunum.
Warranty conditions:
1. The warranty is only valid if a com-
pleted installation report is submit-
ted with the claim.
2. The device has been connected to
the power network by a qualied
electrician in accordance with the
regulations in force.
3. The warranty period of the sauna
climate device when used in a pri-
vate sauna is two (2) years.
4. The warranty period of the sauna
climate device when used in a pub-
lic sauna is one (1) year.
Not covered by the warranty:
1. Routine maintenance and cleaning
of the device and replacement of
the components due to normal
wear and tear.
2. Adaptation or modication of the
device for any purpose other than
that indicated in the instructions for
use.
3. Risks arising from transport.
4. Damage resulting from the misuse
of the device.
5. Damage resulting from the impro-
per installation of the device;
6. Repairs to the device not carried out
by Saunum’s recommended repair
partner (maintenance partner).
7. Accidents, lightning, water, re, im-
proper ventilation, or any other fac-
tor beyond the control of Saunum.
8. Breakages caused by the use of
stones and salt balls not recom-
mended by Saunum.
9. The heating elements and the salt
balls.
WARRANTY
Replacing the heating elements
Steps for replacing the heating elements.
Tools needed:
• Screwdriver PH2
• 24 mm deep socket wrench
• 8 mm wrench (preferably deep socket)
1. Disconnect from power.
2. Remove the stones.
3. Remove front panel.
4. Remove cover from the failed element
section and electrical compartment.
5. Check if the heater has been temporarily
been rewired (R1-R9 on wires correspond to
markings on the terminals).
6. Replace the heating element (it should
always come with a new gasket).
7. Reposition all components in reverse
order.
8. Turn on the heater for 3–5 seconds and
check if all the elements are heating up.
9. Restack the stones.
power and replacing the element is not
needed.
16.6 kw version:
Element failure in Group 1
Switch the failed element with a one from
Group 2 and leave the according braker
(now in group 2) on the control panel o.
The heater will be underpowered to 14.4 kW.
Element failure in Group 2
Turn o the according braker on the control
panel.
19.8 kW version:
Element failure in Group 1
Turn o the according braker on the control
panel. The heater will be underpowered to
15.4 kW.
Element failure in Group 2
Turn o the according braker on the control
panel. The heater will be underpowered to
17.6 kW.
Disconnected element wires must be insu-
lated, xed with a cable tie and marked as
"BROKEN" inside the electrical compart-
ment.
The wiring must be returned to its original
state when an element gets replaced. Both
actions must be recorded in the mainte-
nance log (see page 37) in this manual!
Table of contents
Other Saunum Heater manuals