manuals.online logo
Brands
  1. Home
  2. •
  3. Brands
  4. •
  5. Saxby Lighting
  6. •
  7. Light Fixture
  8. •
  9. Saxby Lighting Cody track 79219 Manual

Saxby Lighting Cody track 79219 Manual

Cody track
79219, 79303
Instruction leaflet
WWW.saxbylighting.com Saxby lighting. BH23 3PE
Iss .1 9/11/2018
Care and Safety
•We recommend cleaning with a soft dry cloth. Do not use solvents or abrasive cleaners as these could damage the finish.
•Always disconnect the product from mains at least 10 minutes allowing to cool down before any maintenance or adjustment.
•Slide the tab down, and rotate the product 90 degrees to engage the connections in the track.
•Locate the product in the track with the connections in the slot.
•Allow the tab to slide back up and ensure that it is located correctly in the track slot.
•Replace fuse or circuit breaker and switch on. Your light is now ready for use.
Fitting Units
•Undo the screw and remove the cover from the live end. Push out the desired cable access point.
•Indentify the correct cable from the supply and pull through.
•Refit the cover onto the live end taking care not to trap the cable.
•Connect the supply wires to the terminal block, opposite the corresponding wires from the fitting.
The central connector can also be wired in this way.
Connection
Wiring
N
L
N
L
Supply
Check that ......
You have correctly identified the wires.
The connections are tight.
No loose strands have been left out of the connection block.
•The track accessories are provided with earth connection points on both sides.
•When offering the accessory to the track, verify which tab needs to be
removed. (See left hand diagram).
•To remove the tab, grasp firmly with a pair of pliers and lever back.
The tab should snap cleanly off. (See right hand diagram).
•Locate the accessory in the track and push home.
End view of track
Earth
Conductor
Remove One
or Other Tab
Marked in Grey
Remaining Earth tab needs
to be inserted into Earth
conductor to ensure Earth
continuity.
Thank you for purchasing this light fitting. Please read the instructions carefully before use to ensure safe and satisfactory
operation of this product. Please retain these instructions for future reference.
Warining
Please read these instructions carefully before commencing
any work.
If replacing an existing fitting, make a careful note of the
connections.
If replacing an existing fitting, make a careful note
of the connections.
This light fitting should be connected to a fused circuit.
The light source of this luminaire is not replaceable;
when the light source reaches its end of life the
whole luminaire shall be replaced.
This track is suitable for dimming. Fittings with low
Only to be installed outside arms reach.
voltage lamps are not suitable for dimming.
Care must be taken to only use the same type of
fitting that is able to be dimmed, and that the dimmer
wattage must not be exceeded.
This unit must be fitted by a competent and qualified
electrician.
Check the pack and make sure you have all of the parts
listed.
To prevent electrocution switch off at mains supply before
installing or maintaining this fitting.
Ensure other persons cannot restore the electrical supply
without your knowledge.
Install in accordance with IEE Wiring regulations and
current Building Regulations.
Technical data
Supply
Bulb Type:
Voltage: 240 V~, 50 Hz
Max. 38W LED COB 4000K
Conformity with all relevant EC Directive requirements.
Waste electrical products should not be disposed of with household waste.
Please recycle where facilities exist.Check with your Local Authority or
local store for recycling advice.
Minimum distance from lighted objects (0.5 metres)
0,5
Class I product, must be connected to earth.
Track accessory
IP20
108.0mm
35.0mm
35.5mm
79.5mm
294.0mm
35.0mm
35.0mm
108.0mm
108.0mm
35.0mm
16.5mm
183.0mm
183.0mm
35.0mm
35.0mm
108.0mm
183.0mm
40.0mm40.0mm
43.0mm
Products
79219/79303
Layout
This track system can be extended to a variety of different configurations using accessories such as left bends, right bends,
T jucntions, X junctions and flexible joints.
TJunction
X Junction
Dead End
Bend
Installation
• Plan the track layout and and decide accessories needed before fixing anything to the ceiling.
• The maximum power per run of track is 1kW (1000W).
•Mark the first hole position and fit the screw in position as shown.
•Feed the screw through the keyhole slot, and slide into position. Mark the position of the second hole.
•Locate the track and fit the second screw into position.
•If fitting accessories, remove the end cap, and push them firmly home. Fit extra lengths of track as required.
• Ensure the ceiling is capable of holding the weight of the track and products. Take care to avoid damaging any
concealed wiring and pipes. The correct fixings should be used for brick, cavity walls or plasterboard.
35.0mm
182.0mm
1000.0mm
2000.0mm
3000.0mm
35.0mm
150mm175mm
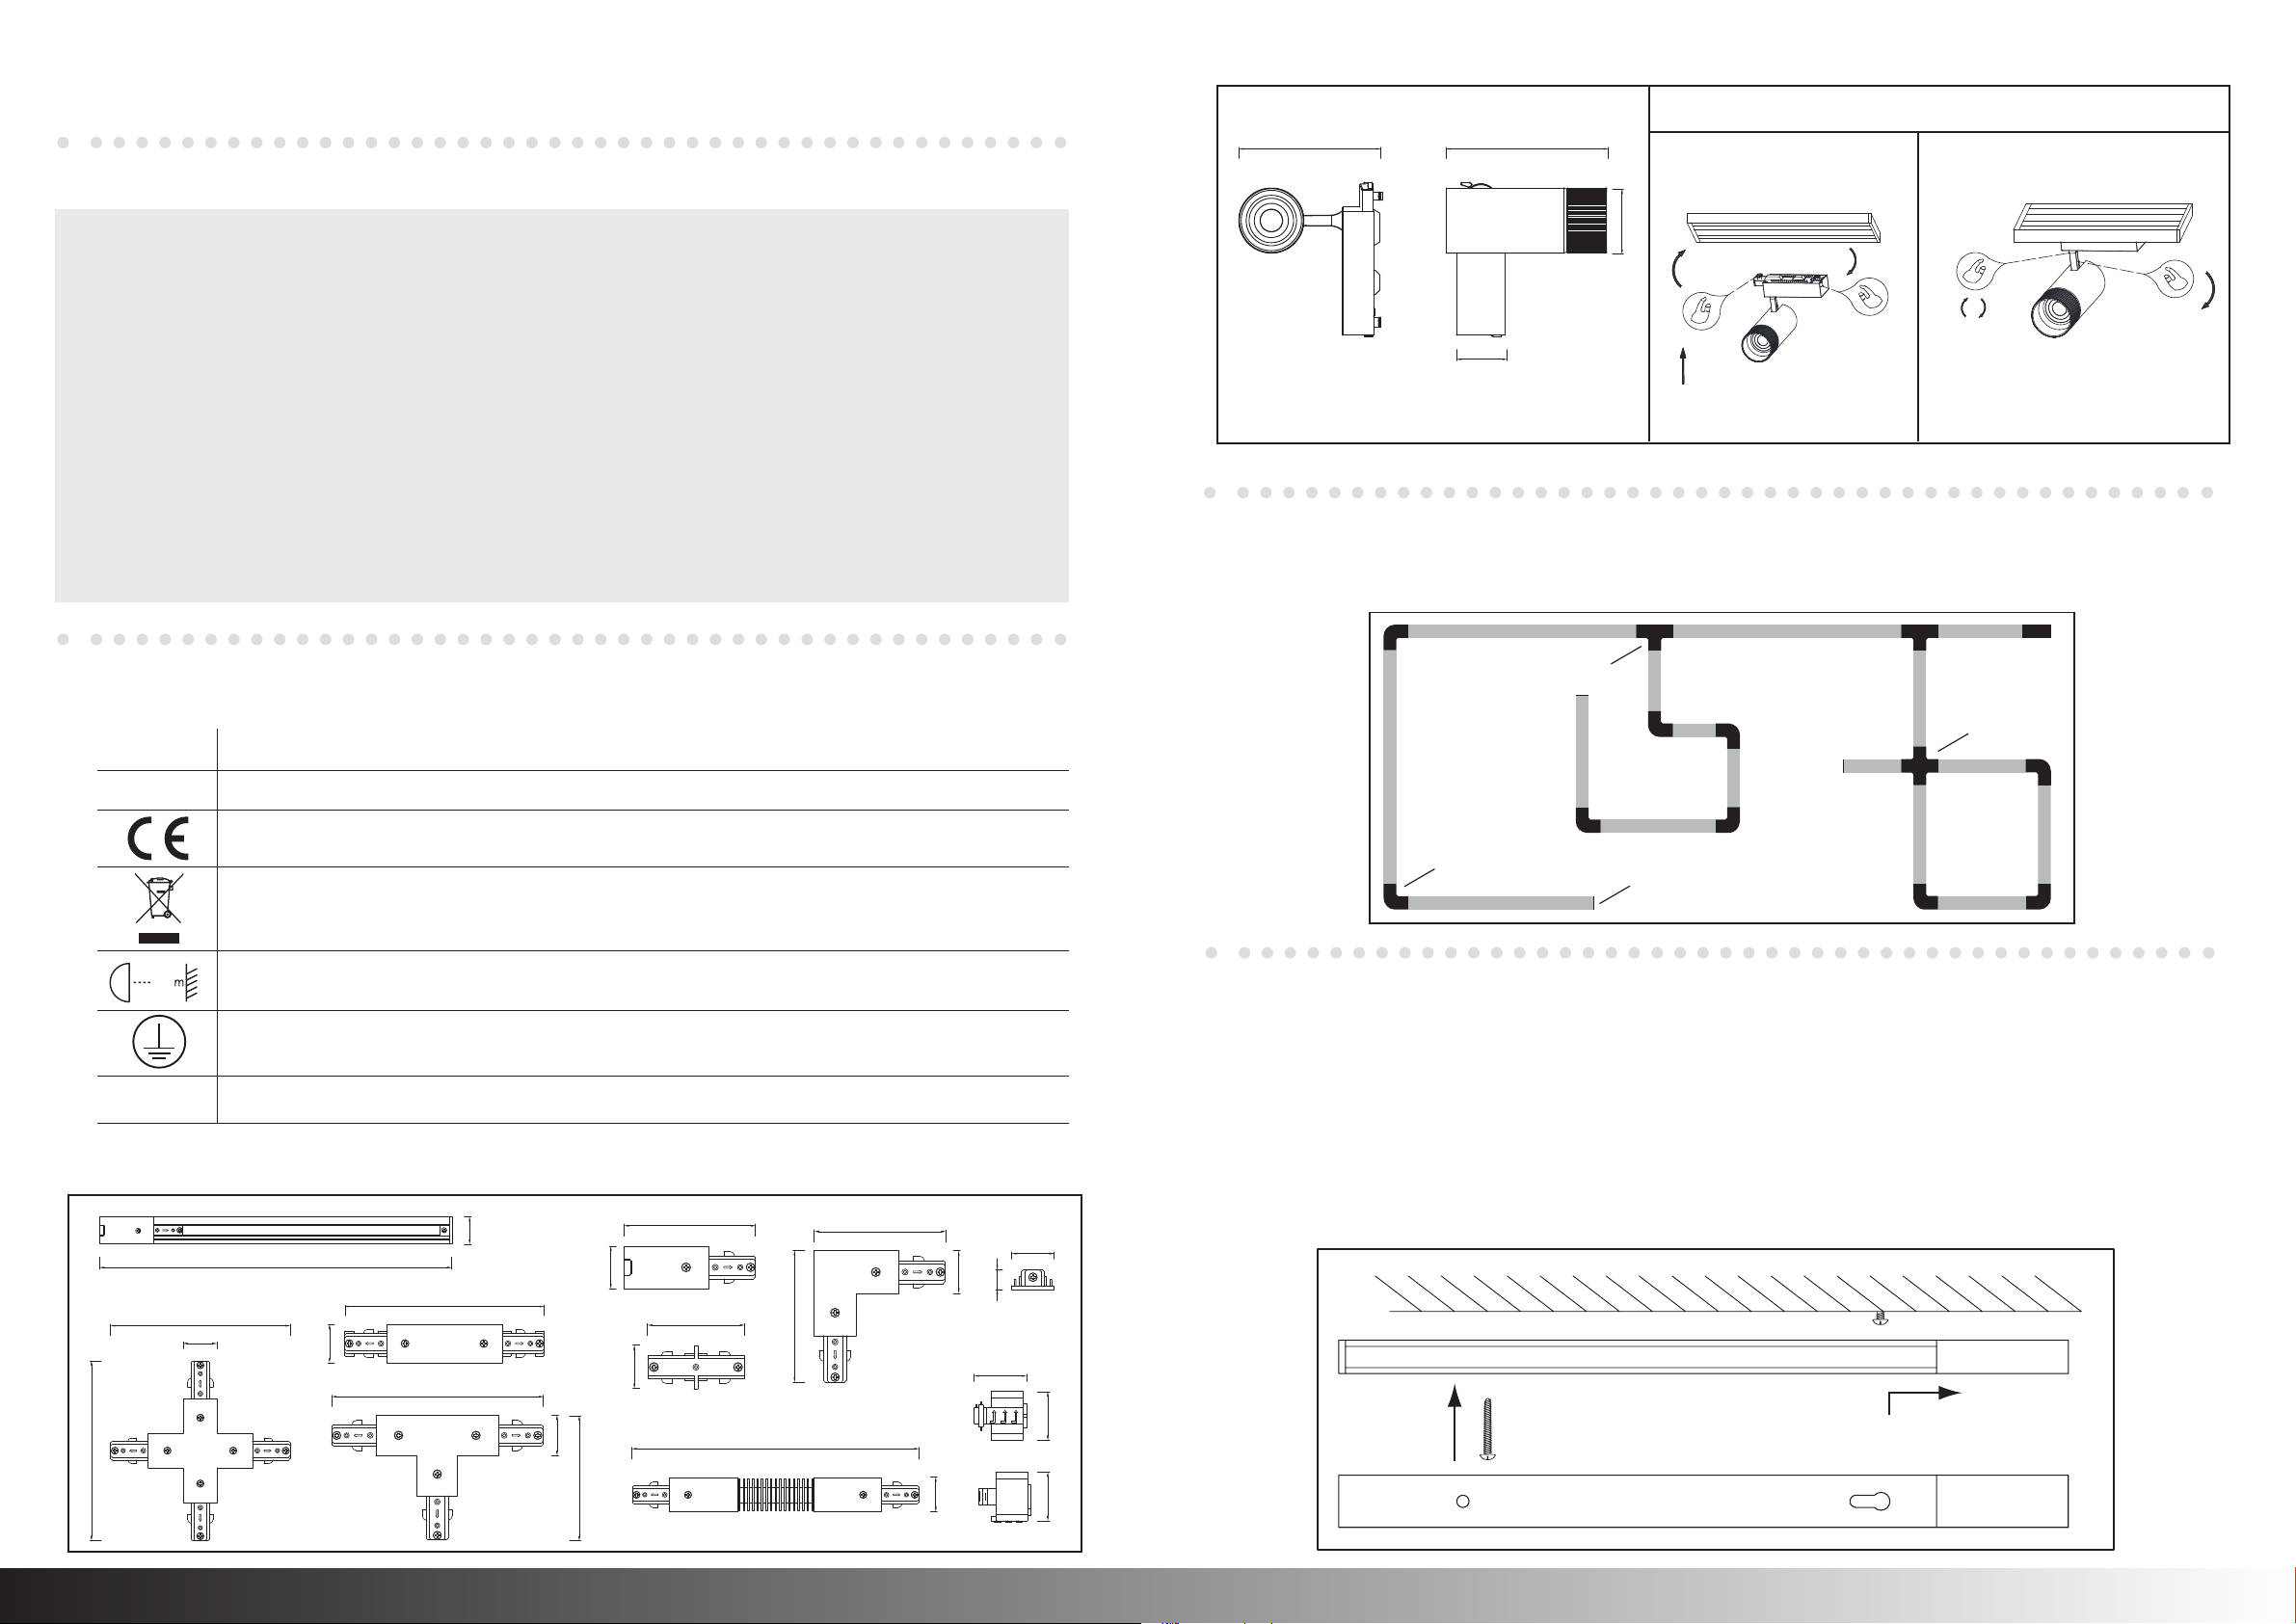
Install the product on the track:
1 2
90mm
80mm
0-350°
0-90°

This manual suits for next models

1

Other Saxby Lighting Light Fixture manuals

Saxby Lighting 1818S Manual

Saxby Lighting

Saxby Lighting 1818S Manual

Saxby Lighting Atlantis 14018 User manual

Saxby Lighting

Saxby Lighting Atlantis 14018 User manual

Saxby Lighting Sirio 75505 Manual

Saxby Lighting

Saxby Lighting Sirio 75505 Manual

Saxby Lighting Recon User manual

Saxby Lighting

Saxby Lighting Recon User manual

Saxby Lighting Luxway User manual

Saxby Lighting

Saxby Lighting Luxway User manual

Saxby Lighting Aqualine 52309 Manual

Saxby Lighting

Saxby Lighting Aqualine 52309 Manual

Saxby Lighting Eyot Wall EL-YG-5006 Manual

Saxby Lighting

Saxby Lighting Eyot Wall EL-YG-5006 Manual

Saxby Lighting Linear Pro 72364 Manual

Saxby Lighting

Saxby Lighting Linear Pro 72364 Manual

Saxby Lighting SightEco 72640 Manual

Saxby Lighting

Saxby Lighting SightEco 72640 Manual

Saxby Lighting Seran 55689 Manual

Saxby Lighting

Saxby Lighting Seran 55689 Manual

Popular Light Fixture manuals by other brands

Online LED Store PIM-00000186-V001 quick start guide

Online LED Store

Online LED Store PIM-00000186-V001 quick start guide

Cooper Lighting Quiet Ceiling Series QCT-1975BK Specification sheet

Cooper Lighting

Cooper Lighting Quiet Ceiling Series QCT-1975BK Specification sheet

Philips XP Series specification

Philips

Philips XP Series specification

Flash F7100299 user manual

Flash

Flash F7100299 user manual

ADJ Inno Spot Elite User instructions

ADJ

ADJ Inno Spot Elite User instructions

CREE LIGHTING CPY Series Disassembly instructions

CREE LIGHTING

CREE LIGHTING CPY Series Disassembly instructions

Hama Xavax 00111973 operating instructions

Hama

Hama Xavax 00111973 operating instructions

Philips iColor Cove QLX Powercore installation instructions

Philips

Philips iColor Cove QLX Powercore installation instructions

Lightolier CA3FMR SERIES Installation

Lightolier

Lightolier CA3FMR SERIES Installation

Lightolier Lytecaster 1128 specification

Lightolier

Lightolier Lytecaster 1128 specification

Ibiza DERBY-MULTI manual

Ibiza

Ibiza DERBY-MULTI manual

Algam Lighting MB80 manual

Algam Lighting

Algam Lighting MB80 manual

Philips Lytecaster 478X specification

Philips

Philips Lytecaster 478X specification

Cyclops Lighting LEDE 320S manual

Cyclops Lighting

Cyclops Lighting LEDE 320S manual

American DJ Arcbeam 150 instructions

American DJ

American DJ Arcbeam 150 instructions

Qtx Dazzler user manual

Qtx

Qtx Dazzler user manual

QVC H203869 instructions

QVC

QVC H203869 instructions

Blizzard Lighting ToughPar manual

Blizzard Lighting

Blizzard Lighting ToughPar manual

manuals.online logo
manuals.online logoBrands
  • About & Mission
  • Contact us
  • Privacy Policy
  • Terms and Conditions

Copyright 2025 Manuals.Online. All Rights Reserved.