manuals.online logo
Brands
  1. Home
  2. •
  3. Brands
  4. •
  5. Scarabeo
  6. •
  7. Toilet
  8. •
  9. Scarabeo 8311 User manual

Scarabeo 8311 User manual

ART. 8311 + 8312
VASO MONOBLOCCO CON CASSETTA E SISTEMA DI SCARICO GEBERIT DUE FLUSSI
MONOBLOC WC BOWL WITH CISTERN AND GEBERIT DUAL-FLUSH FLUSHING SYSTEM
CUVETTE MONOBLOC AVEC RÉSERVOIR ET MÉCANISME DE CHASSE
D’EAU GEBERIT À DOUBLE VIDAGE
MONOBLOCK-WC-BECKEN MIT SPÜLKASTEN UND ABFLUSSSYSTEM GEBERIT
MIT 2-MENGEN-SPÜLUNG
TAZA MONO BLOQUE CON CISTERNA Y SISTEMA DE DESCARGA GEBERIT
PARA DOS VOLÚMENES
Curva tecnica per WC, da utilizzare per
scarico a pavimento (INCLUSA)
WC spigot bend, to be used for floor
drainage system (INCLUDED)
Pipe coudée pour WC, à utiliser pour
évacuation au sol (COMPRISE)
WC-Anschlussbogen, für Bodenabflüsse
zu verwenden (ENTHALTEN)
Codo técnica para WC, para utilizar para
desagüe al suelo (INCLUIDA)
SEZIONE A-A
Ø55
Ø80
Ø100
175
560
265 340
420
210
290
90
175
420
360
Ø36
150
440
185
1-3
VASO A TERRA CON SCARICO A PAVIMENTO | FLOR TRAP WC
WC AVEC EVACUATION AU SOL | WC MIT BODENABLAUF
INODORO CON DESCARGA A SUELO
“A” =
“B” = VASO A TERRA CON SCARICO A PAVIMENTO | FLOR TRAP WC
WC AVEC EVACUATION AU SOL | WC MIT BODENABLAUF
INODORO CON DESCARGA A SUELO
290
175
210
Predisporre gli scarichi e le connessioni secondo le quote riportate sulle schede tecniche.
Configure drainage and bracket fixtures according to the measurements indicated in the technical diagrams.
Prévoir les évacuations ainsi que les connexions selon les cotes indiquées dans les fiches techniques.
Die Abflüsse und die Bolzen für die Haltebügel an die im Datenblatt angegebenen Abmessungen anpassen.
Disponer los desagües y las conexiones según las cotas indicadas en las fichas técnicas.
“A”
“B”
2-3
WL
CL
1
Per semplificare l’istallazione, si consiglia di fissare il flessibile al galleggiante prima di bloccare la cassetta
al sanitario e successivamente avvitare il flessibile sull’attacco a parete.
To simplify installation, it is advisable to connect the flexible to the floating before securing the cistern to
the wc, then screw the flexible to the wall connection.
Afin de simplifier l’installation, connecter le flexible au flotteur avant de fixe le réservoir à la cuvette. Ensuite,
visser le flexible à la connexion murale.
Zur vereinfachung die installation, es wird empfohlen die flexible auf der schwimmer zu festsetzen bevor der
kassette auf der wc blockieren und dann die flexible auf dem angriff auf wand zu schrauben.
Para simplificar la instalación se ajonseca de fijar el flexible a el flotador antes de bloquear la cisterna a el
sanitario y sucesivamente atornillar el flexible sobre el ataque a pared.
2
Installare la cassetta su sanitario con kit di fissaggio in dotazione. Frapporre tra il sanitario e la cassetta
l’apposita guarnizione prima di fissarla.
Install the cistern onto the wc by means of the fitted fixing kit. Insert the provided washer between the wc
and the cistern before securing it.
Installer le réservoir sur la cuvette par moyen du kit de fixation fourni avec. Insérer le joint entre la cuvette
et le réservoir avant de le fixer.
Die kassette auf der wc mit der befestigungsbausatz installieren. Zwischen der wc und der kassette die
spezielle dichtung starren bevor starren es.
Instalar la cisterna sobre el sanitario utilizando el kit de fijacion en dotación. Interponer entre el sanitario y
la cisterna la especifica guarnición antes de fijarla.
3-3
4
Applicare un leggero strato di silicone nel perimetro del sanitario che è a contatto con la cassetta di cera-
mica e il pavimento. Raccomandiamo di utilizzare un silicone universale anti muffa. Rimuovere gli eccessi
di silicone aiutandosi con carta assorbente.
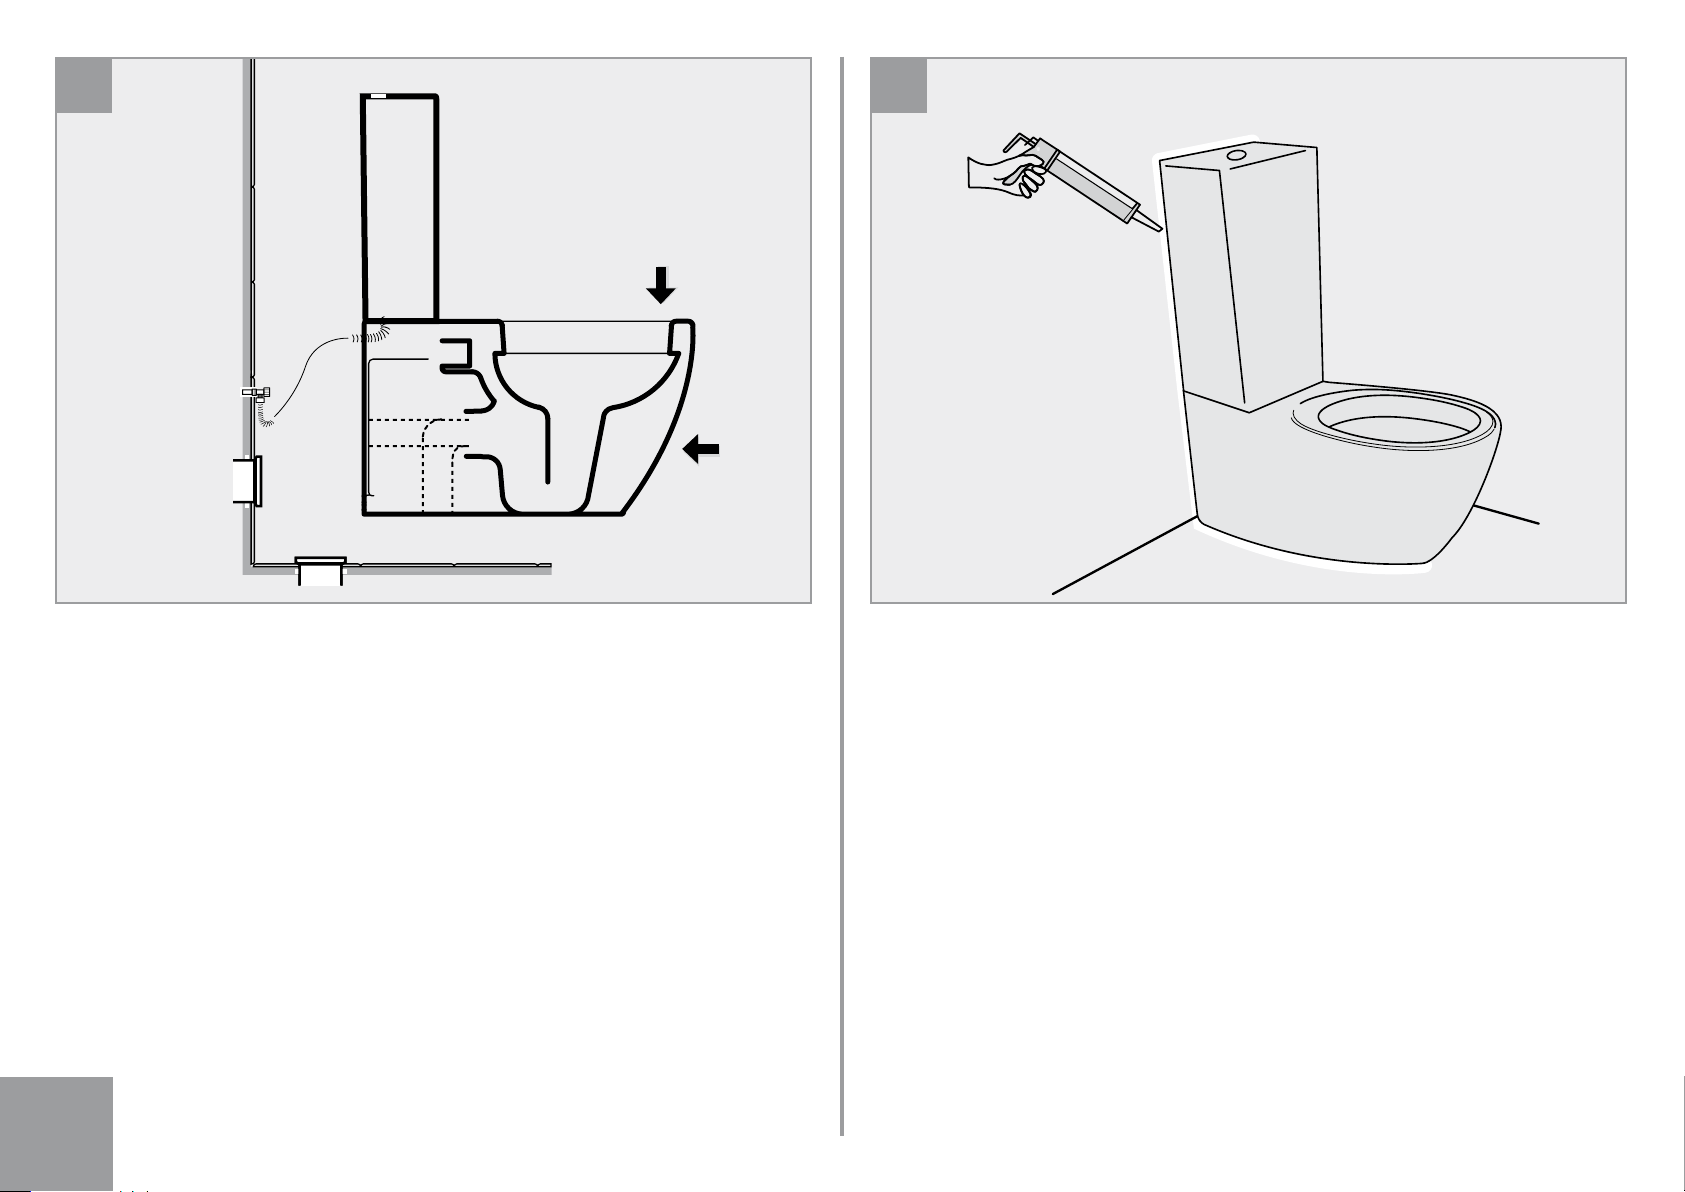
Apply a thin layer of silicon sealant around the perimeter of the toilet bowl where it touches the ceramic
cistern cover and the floor. The use of a universal anti-mould silicon sealant is recommended. Remove any
excess silicon with absorbent paper.
Appliquer une légère couche de silicone sur le pourtour du sanitaire qui touche au réservoir de chasse d’eau
en céramique et au sol. Nous recommandons l’utilisation d’un silicone universel anti-moisissure. Enlever
l’excès de silicone en se servant de papier essuie-tout.
Rundum einen dünnen Silikonstreifen auftragen, wo das WC den Keramik-Spülkasten und den Boden
berührt. Wir empfehlen, ein universelles Anti-Schimmel-Silikon zu verwenden. Überschüssiges Silikon mit
saugfähigem Papier entfernen.
Aplicar una fina capa de silicona en el perímetro del sanitario que está en contacto con el depósito de
cerámica y el suelo. Recomendamos utilizar una silicona universal antimoho. Quitar el excedente de silicona
usando papel absorbente.
3
Posizionare il pezzo allineando lo scarico con il foro a muro o a pavimento a seconda della predisposi-
zione. Contemporaneamente, inserire entrambe le connessioni, della cisterna e dello scarico del sanitario.
ATTENZIONE: per agevolare l’innesto dei raccordi dell’entrata e uscita acqua si consiglia di lubrificare
entrambe le parti.
Place the wc aligning the drainage with the wall or floor hole, according to the predisposition carried out. At
the same time, insert both cistern and wc drainage connections. PLEASE NOTE: To make the water inlet/
drainage connections easier, lubricate both parts.
Placer le monobloc en alignant l’évacuation horizontale ou verticale, en fonction de la prédisposition. Insérer
les tuyaux du réservoir et de l’évacuation aux connexions en même temps. ATTENTION : pour simplifier
l’emboitement des raccords d’arrivée et de sortie de l’eau, il est conseillé de lubrifier les deux pièces.
Platzieren der wc angelehnen der abflusse mit der loch auf wand oder auf boden abhanging von der erstel-
lung. Gleichzeitig, die verbindungen von der kassette und von den wc abfluss einfugen. ACHTUNG: Um das
Einschieben der Wasser- Zu- und Ableitungen zu vereinfachen, empfiehlt es sich, beide Teile einzufetten.
Posicionar el wc alineado el desague con el agujero a muro o a suelo a segunda de la predisposición. Al
mismo tiempo insertar ambas las conexiones de la cisterna y de el desagues del sanitario. ATENCIÓN:
Para facilitar el encastre de los acoples de entrada y salida del agua se aconseja lubricar ambas partes.

This manual suits for next models

1

Other Scarabeo Toilet manuals

Scarabeo Moai 8604 User manual

Scarabeo

Scarabeo Moai 8604 User manual

Scarabeo Moon 5522 User manual

Scarabeo

Scarabeo Moon 5522 User manual

Scarabeo Moai 8606 User manual

Scarabeo

Scarabeo Moai 8606 User manual

Scarabeo PLANET 8105/A/P User manual

Scarabeo

Scarabeo PLANET 8105/A/P User manual

Scarabeo Wish 2013 User manual

Scarabeo

Scarabeo Wish 2013 User manual

Scarabeo Next 8311 User manual

Scarabeo

Scarabeo Next 8311 User manual

Popular Toilet manuals by other brands

Etac Hi-Loo 8030 1065 Assembly instruction

Etac

Etac Hi-Loo 8030 1065 Assembly instruction

Helvex WC ULTRA 2P installation guide

Helvex

Helvex WC ULTRA 2P installation guide

Signature Hardware GRAYVIK 946603 quick start guide

Signature Hardware

Signature Hardware GRAYVIK 946603 quick start guide

Jungborn DONELLA Assembly instructions

Jungborn

Jungborn DONELLA Assembly instructions

DURAVIT Starck 1 Mounting instructions

DURAVIT

DURAVIT Starck 1 Mounting instructions

Villeroy & Boch 9M02 quick start guide

Villeroy & Boch

Villeroy & Boch 9M02 quick start guide

Thetford Porta Potti Excellence user manual

Thetford

Thetford Porta Potti Excellence user manual

TRONE Aquatina II A2ETBCERN-12.WH instruction manual

TRONE

TRONE Aquatina II A2ETBCERN-12.WH instruction manual

Raritan Crown Head Installation, operation and maintenance instructions

Raritan

Raritan Crown Head Installation, operation and maintenance instructions

Kohler K-3423 installation instructions

Kohler

Kohler K-3423 installation instructions

Villeroy & Boch 98M9U101 installation manual

Villeroy & Boch

Villeroy & Boch 98M9U101 installation manual

Dudley ELECTROFLO installation guide

Dudley

Dudley ELECTROFLO installation guide

Axent ONE C user manual

Axent

Axent ONE C user manual

Drive DeVilbiss Healthcare 12027RA instruction manual

Drive DeVilbiss Healthcare

Drive DeVilbiss Healthcare 12027RA instruction manual

Cinderella CLASSIC product manual

Cinderella

Cinderella CLASSIC product manual

Excellent DAKOTA CENL.4020.593.D1.WH Installation instruction

Excellent

Excellent DAKOTA CENL.4020.593.D1.WH Installation instruction

American Standard CRISTALLO CLJ461402 installation instructions

American Standard

American Standard CRISTALLO CLJ461402 installation instructions

Lotus ATS-800 user manual

Lotus

Lotus ATS-800 user manual

manuals.online logo
manuals.online logoBrands
  • About & Mission
  • Contact us
  • Privacy Policy
  • Terms and Conditions

Copyright 2025 Manuals.Online. All Rights Reserved.