ScentAir ScentDirect SDD4004 User manual

ScentDirect™ SDD4004
SCENT DELIVERY SYSTEM
Installation and Operation Instructions

2
31600001-MANUAL-SDD4004-REV.A
TABLE OF CONTENTS
Required Tools ............................................................................................................. 2
About..........................................................................................................................2
System Overview..........................................................................................................3
System Specifics ...........................................................................................................3
Installation...................................................................................................................4
Determine Mounting Locations..................................................................................4
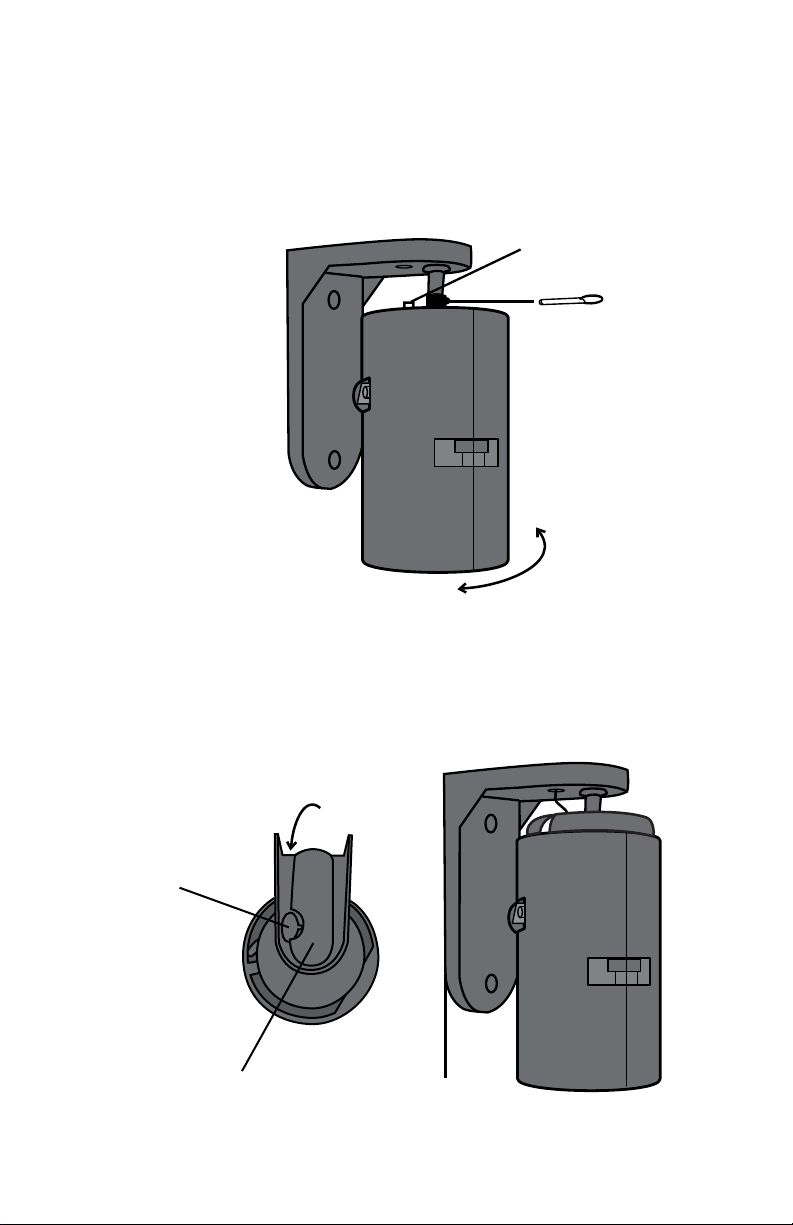
Wall Mount Installation.............................................................................................4
Universal Track Mount Installation.............................................................................6
Cartridge Installation................................................................................................ 7
Cartridge Replacement.............................................................................................7
System Control Unit .....................................................................................................8
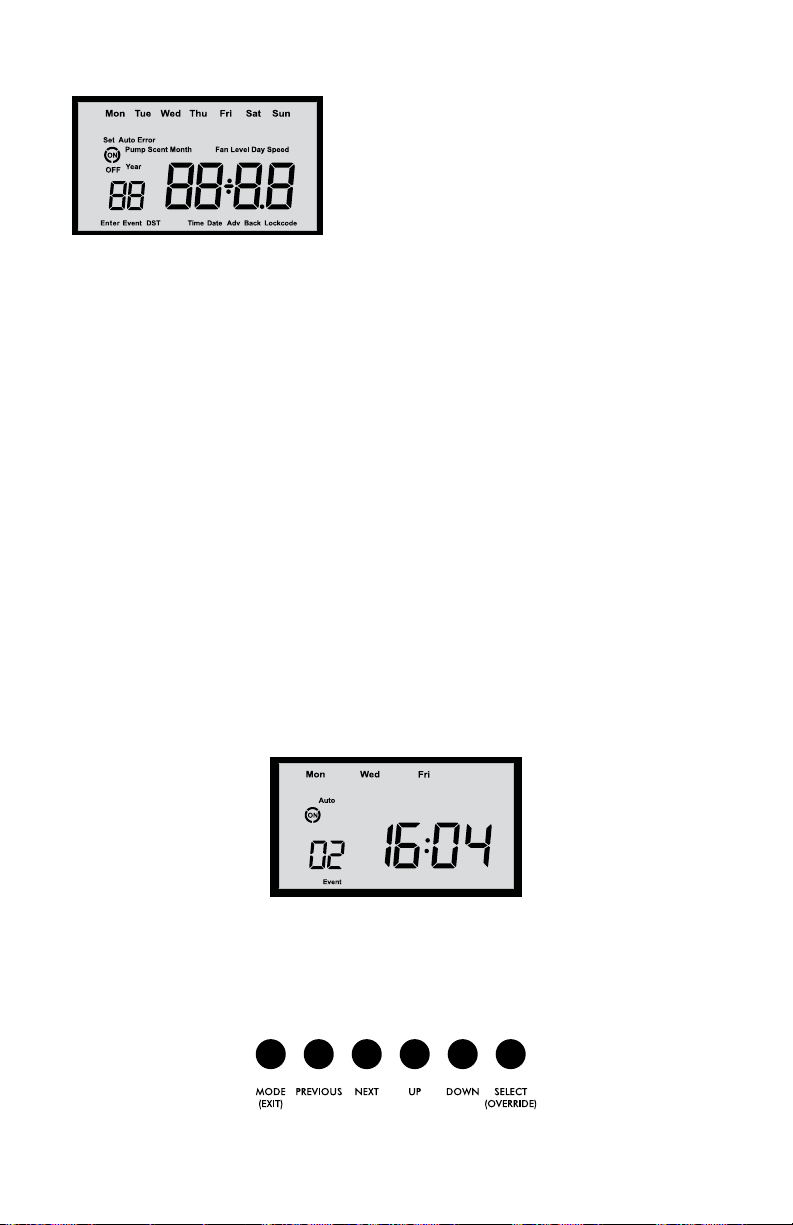
LCD Display ............................................................................................................8
Button Functions.......................................................................................................8
System Set-Up..............................................................................................................9
Set the Time & Date .................................................................................................9
Set Daylight Savings Time.........................................................................................10
Programmed Events .....................................................................................................10
Scent Intensity Screen ...............................................................................................12
Review & Edit a Set Event ..........................................................................................13
Delete a Previously Set Event.....................................................................................13
Event Rules ..............................................................................................................14
Set Pump Speed.......................................................................................................14
Set Fan Speed..........................................................................................................14
Lockcodes ...................................................................................................................15
Entering Lockcodes...................................................................................................15
System Override ..........................................................................................................16
Manual Mode..............................................................................................................16
Display Revision...........................................................................................................16
Display Run Time .........................................................................................................16
SD Card Programming.................................................................................................17
Saving System Data Onto an SD Card ...................................................................... 17
Restoring Data From an SD Card..............................................................................17
System Programming Tree ............................................................................................18
Troubleshooting ...........................................................................................................19
REQUIRED TOOLS
• Pencil
• Tape Measure
• Phillips Head Screw Driver with a 6” shank
• Small Level
• Drill
• 1/4” Drill Bit
• 5/16” Nut Driver
ABOUT
The ScentDirect™ scent diffusion system is designed to deliver a dry vapor fragrance
directly into the air in any enclosed space. The system uses air at low pressures to atomize
liquid fragrance into a dry vapor. The atomization occurs inside the system and the scent is
delivered from the system with a fan. The ScentDirect™ has variable settings to cover a wide
range of applications.

3
31600001-MANUAL-SDD4004-REV.A
SYSTEM OVERVIEW
1. ScentDirect System
2. Fragrance Cartridge
3. Universal Power & Plug Kit
4. Dust Shield
5. Wall Mount
6. 3x #8 Plastic Drywall Anchor
7. 3x Masonry Screw
8. 3x Wood / Machine Screw
9. Mounting Pin
10. 2x Plastic Screw Cover
1 2
3 4 5
6 7 8 9 10
SYSTEM SPECIFICS
1. 180° Adjustable Rotation with Lock
2. Security Loop
3. SD Card Slot
4. Wire Wrap
5. LCD Screen
6. Fan
7. Collector Locking Levers
8. Air Output Fitting
9. Cartridge Guide Plate
10. Door Latch
1 2 3 4
5
6
7 8
9 10

4
31600001-MANUAL-SDD4004-REV.A
Wall Mount Installation
1. Install the wall mount bracket. FIG. A
• Ensure that the mount is level with the arm of the wall mount located at the top of
the bracket and mark the two hole locations with a pencil.
• Use your screwdriver to drive the provided white plastic anchors into the wall.
• Place the wall mount bracket over the flush anchor screws.
• Use your screwdriver to drive the provided screws and plactic screw covers to
secure the bracket to the wall. Fold over the plastic screw cover.
FIG. A
INSTALLATION
Determine Proper Mounting Location
Always review the air flow characteristics of the property before starting an installation. First
identify the location to be scented and then locate the supply air vents near the area to be
scented. The ScentDirect™ should be located between these two locations to ensure airflow
will carry the fragrance to the desired location.
The ScentDirect™ should NOT be located near:
•Exhaust Vent •Open Doors •Open windows •HVAC Return Grill
The system should be mounted so that the output crosses the path of airflow if possible.
The ScentDirect™ system comes standard with a wall mount bracket and hardware. An
additional track mounting kit is also available. It is also possible to secure a safety line to
the system based on your local requirements. Mount the ScentDirect™ out of the reach of
children. A good rule of thumb is to mount it above “nose-level” or higher and allow local
air currents to distribute the fragrance evenly throughout a room; typically 7’ to 12’ (2.1m -
3.6m) from the floor. The system must also be upright and level to function correctly.

5
31600001-MANUAL-SDD4004-REV.A
2. Hang the ScentDirect™ FIG. B
• Align the bracket mounting pin into the adjustable connection on top of the
ScentDirect™. Insert the mouning pin once the holes are aligned. 1
• Adjust the angle of the system so the fragrance output is in the direction of the
area to be fragranced. 2
• Once the desired angle is achieved, tighten the thumb screw on the top of the
ScentDirect™ to hold it in position. 3
3. Power the ScentDirect™ FIG. C
• Plug the power cord into both the wall outlet and ScentDirect™.
• Extra power cord can be routed around the wire wraps or tucked into the recess in
the back of the system out of sight.
• Install the dust cover with the power cord routed out of the slot provided.
• Neatly enclose the excess wire on the wall with the provided wire cover.
1
2
3
FIG. B
FIG. C
Wrap the excess wire around the raised area
on the top of the wall mount bracket.
Pass-through for
power adaptor cord.
TOP VIEW

6
31600001-MANUAL-SDD4004-REV.A
Universal Track Mount Installation
1. Install the universal track mount bracket. FIG. D
• Place the adapter around the track mount and tighten the thumb screws until the
clamp is tight on the track. 1
2. Hang the ScentDirect™
• Align the bracket mounting pin into the adjustable connection on top of the
ScentDirect™. Insert the mouning pin once the holes are aligned. 2
• Adjust the angle of the system so the fragrance output is in the direction of the
area to be fragranced. 3
• Once the desired angle is achieved, tighten the thumb screw on the top of the
ScentDirect™ to hold it in position. 4
FIG. F
FIG. E
3. Power the ScentDirect™ FIG. E
• Install the appropriate convenience power adapter.
• Plug the power cord into both the adapter and ScentDirect™.
• Extra power cord can be routed around the wire wraps or tucked into the recess in
the back of the system out of sight.
• Install the dust cover with the power cord routed out of the slot provided.
1
2
3
4
TOP VIEW
Wrap the excess wire around the 3 raised
areas on the top of the ScentDirect™.

7
31600001-MANUAL-SDD4004-REV.A
Cartridge Installation
1. Locate the scent cartridge that was shipped with the system and remove the cartridge
from the shipping container and inner bag.
NOTE: Remove the shipping caps by unscrewing the caps from BOTH the white air inlet
nozzle and black air outlet nozzle of the scent cartridge.
2. Open the front door of the system by lifting the door latch. Ensure that the latch stays
on the unit. If the latch separates, it is easy to put back in place.
3. Pull the cartridge assembly removal levers outward to allow the cartridge to be inserted
and slide the new scent cartridge assembly into the system using the guide rails. FIG. F
NOTE: The white air inlet nozzle on the cartridge should align with the air fitting in the
back of the system.
Cartridge Replacement
1. Open the front door of the system by lifting the door latch. Ensure that the latch stays
on the unit. If the latch separates, it is easy to put back in place.
2. Pull the cartridge assembly removal levers outward to unlock the old cartridge.
3. Slide the old cartridge out of the alignment rails until completely removed from the
ScentDirect unit.
NOTE: At this time, clean the system by using a damp cloth or compressed air to remove
dust from the fan and residue on the casing.
4. Locate the replacement scent cartridge that was shipped to the store and remove the
cartridge from the shipping container and inner bag.
NOTE: Remove the shipping caps by unscrewing the caps from BOTH the white air inlet
nozzle and black air outlet nozzle of the scent cartridge.
5. Slide the new scent cartridge assembly into the system using the guide rails. The white
air inlet nozzle on the cartridge should align with the air fitting in the back of the
system.
6. Close the levers to lock the cartridge in place. Do not force the levers. If they do not
easily close, ensure the white air inlet nozzle is correctly aligned.
7. Close the doorand slide latch down to lock the case.
FIG. F
4. Close the levers to lock the cartridge in place. Do not force the levers. If they do not
easily close, ensure the white air inlet nozzle is correctly aligned.
5. Close the door and slide latch down to lock the case.

8
31600001-MANUAL-SDD4004-REV.A
SYSTEM CONTROL UNIT
LCD Display
Pressing any button will turn the backlight on and
activate the screen. The backlight must be on in order
to perform any of the operations described in this
manual. If left alone for two minutes, the backlight
will turn off and the machine will return to the main
screen. Once the system is turned on the first screen
that will show is the main screen displaying the current
time and day of the week. Below explains the display options in detail.
• Set - Will appear with other functions when editing the settings. When Set is shown,
the current displayed setting will be editable. Below are the settings that can be adjusted
when Set is displayed:
• Set Event ON Time / Set Event OFF Time / Set Event Scent Time Level
• Set Pump Speed
• Set Fan Speed
• Set Time / Set Date Month Day Year
• Set DST Date Month Day Adv / Set DST Date Month Day Back
• Set Lockcode
• Auto - Indicates that the machine is currently setup to run at specified days and times.
Automatic operation can be temporarily overridden as described in section “System
Override”.
• Error - Displayed when there is a conflict in event settings. The system will not function
when Error is displayed.
• Event - Displayed when running off a program along with the current number above
• ON - Displayed along with the specific Event number at the left of the display. A circle
will appear when the machine is actively emitting fragrance. The fan will continue to
run at all times ON is displayed even while fragrance is not being emitted.
• OFF - Indicates that the machine has been manually switched OFF until the start of the
next event or manual control change.
• Lockcode - Displayed when the controls have been protected with a password to
prevent tampering. The lockcode behavior is described in the “Lockcodes” section.
Button Functions
The ScentDirect has six (6) buttons that control the programming of the system. All button
presses are made as “clicks”. Holding down keys is never required.
GLOSSY
CLEAR
WINDOW
LEFT: The time
is shown and
the system is
automatically
running on Event
2, set for Monday,
Wednesday and
Friday.
GLOSSY
CLEAR
WINDOW

9
31600001-MANUAL-SDD4004-REV.A
SYSTEM SET-UP
Set the Time & Date
Use the Time menu to change the time of day as well as the Date. The system uses 24-hour
clock notation for all time displays, never AM/PM.
• Press any button to activate the screen if the backlight is off.
• Press MODE two times from the main screen to navigate to the Set Time screen, the
words “Set” and “Time” will be shown on the screen.
• Press SELECT to edit the Time. The first selected digit will begin to blink.
• Press PREVIOUS / NEXT to navigate to each of the four digits then use UP / DOWN to
change to the desired time.
• Continuing to press NEXT / PREVIOUS will change the time screen to the Date screen,
“Set” and “Date” will be displayed. Use UP / DOWN to change to the desired Year,
Day and Month.
• Press MODE at any point to discard the current changes without saving.
• Press SELECT to confirm and save the changes.
GLOSSY
CLEAR
WINDOW
GLOSSY
CLEAR
WINDOW
MODE (EXIT) - Moves through the six (6) setup screens. Each setup screen will have the word
”SET” illuminated in addition to other key words that help identify which screen you are in.
This button is also used to exit a setting without saving changes. Below are the program
options selected with each press of the MODE (EXIT) button:
1. SET EVENT - Use this menu to schedule programmed events to operate the system
during specific hours. You can program up to 14 events, Events can be added, deleted,
reviewed, and changed from this menu using the other buttons. See “Programmed
Events” for further detail of this function.
2. SET TIME - Use this menu to change the time of day on the 24-hour clock and to
change the current month, day and year. The system uses 24-hour clock notation for all
time displays, never AM/PM.
3. SET PUMP - Use this menu to adjust the pump speed between three (3) settings. This
controlls the amount of frangrance being atomized; one (1) is Low, two (2) is Medium
and three (3) is High. The pump speed will be the same for all programmed events.
4. SET FAN - Use this menu to adjust the fan speed between ten (10) settings. Higher
levels will push fragrance a little further from the machine with higher sound levels. The
fan speed will be the same for all programmed events.
5. SET DST - Use this menu to determine if the system is in Daylight Savings Time mode.
You can control when the system will automatically more forward or back an hour.
6. SET LOCKCODE - Use this menu to select a four digit lockcode that will prevent
changes from being made to the settings by unauthorized users.
PREVIOUS / NEXT - Used to navigate through the setup screens and options.
UP / DOWN - Used to change settings in specific setup screens and options.
SELECT (OVERRIDE): Push to make changes at any of the setup screens, use this button
to enter the edit mode for specific features. Pressing this button will also save the current
settings. Each time you save a change, the screen backlight will flash to confirm the setting
was saved.
ABOVE: Setting the time to 2:32pm ABOVE: Setting the date to June 21st, 2013

10
31600001-MANUAL-SDD4004-REV.A
Set Daylight Savings Time
• Press any button to activate the screen if the backlight is off.
• Press MENU four (4) times from the main screen, the words “Set” and “DST” will be
displayed along with the current DST setting; either “OFF” if the feature is turned off
or “ON” and the date at which the clock will be advanced an hour. Press PREVIOUS /
NEXT to review the date for the clock to be set back.
• If you are in a location with no Daylight Savings Time, press SELECT and choose “OFF”
with UP / DOWN. Press SELECT to confirm and save the changes.
• If you are in a location that uses Daylight Savings Time, press SELECT and choose
“ON” with UP / DOWN. Press SELECT to advance.
• The words “Date” and “Adv” will be displayed, use PREVIOUS / NEXT and UP /
DOWN to set the day and month when the system should advance the clock. Press
SELECT after the correct date is shown on the screen to save the setting and advance.
• The words “Date” and “Back” will be displayed, press UP / DOWN to set the day and
month when the system should adjust the time back an hour.
• Press MODE at any point to discard the current changes without saving.
• Press SELECT to confirm and save the changes.
GLOSSY
CLEAR
WINDOW
GLOSSY
CLEAR
WINDOW
PROGRAMMED EVENTS
Use the Event menu to schedule programmed events to operate the system during specific
hours. You may program up to 14 events each of which can be set to occur on multiple days
of the week. Events can be added, deleted, reviewed, and changed from this menu.
• Press any button to activate the screen if the backlight is off.
• Press MODE once from the main screen to navigate to the Set Event screen, the words
“Set” and “Event” will be shown on the screen. The selected event number will always
be shown in this mode. Upon entering Set Event, the event number will be showing an
‘empty’ event with dashes displayed for the time.
• Press SELECT to begin editing Event 1. The days of the week will begin to blink.
• Press UP / DOWN to change to the desired day(s) for the event to take place.
Continuing to press UP / DOWN will show various combinations of days, there are 17
options, including 7 for the individual days (Press UP first) and 10 other combinations
(Press DOWN first). The default with all days flashing would create an event that is
active every day of the week.
ABOVE: Setting March 10th as the day the
internal clock will advance an hour.
ABOVE: Setting November 7th as the day the
internal clock will move back an hour.
M
T
W
Th
F
S
Su

11
31600001-MANUAL-SDD4004-REV.A
• Press NEXT to navigate to each of the four digits of the On Time, the words “Set” and
“On” will be shown on the screen. Press UP / DOWN to set the desired On Time. This
will be when the system will start to produce fragrance for this event.
• Press NEXT to navigate to each of the four digits of the Off Time, the words “Set” and
“Off” will be shown on the screen. Press UP / DOWN to set the desired Off time. This
is the time that the system will end operation for this event.
NOTE: If the Off Time is earlier than the On Time the machine will understand that the
event will run past midnight and turn off the next day.
• Press NEXT to navigate to the Scent Intensity screen for Event 1. Press PREVIOUS
/ NEXT to go back and forth between any of the settings for the current event. More
information on Scent Intensity can be found on the next page.
GLOSSY
CLEAR
WINDOW
GLOSSY
CLEAR
WINDOW
GLOSSY
CLEAR
WINDOW
GLOSSY
CLEAR
WINDOW
ABOVE: Event 1 is empty with no settings. Press
SELECT to edit.
ABOVE: Setting the Event ON Time to 8:00am
from Tuesday through Friday.
ABOVE: Setting the Event 1 OFF Time to
7:00pm.
ABOVE: Setting Event 1 Scent Time to four (4)
minutes and 50% levels
• Press SELECT to accept all current event settings and return to the Main screen. The
display screen backlight will blink to indicate the event was saved OR display “Error” if
there was a problem with the event times.
• Press MODE at any point before pressing SELECT to discard the current changes and
return to the review of existing events.
NOTE: If error was displayed the system will remain in edit mode so the current event
can be corrected without losing any of the information already entered.
NOTE: After saving an event the system will automatically display the next empty event
number, so multiple new events can be added one after another with minimum effort.

12
31600001-MANUAL-SDD4004-REV.A
Scent Intensity Screen
The ScentDirect™ regulates the output of fragrance by cycling on and off. These adjustments
are easily changeable to help obtain the right level of fragrance in your space. Below are
in-depth descriptions of scent output options available for adjustment.
• SCENT TIME - This defines the interval period in minutes for each cycle from when
the system turns on through the rest period to the next turn on. This can be adjusted in
incriments of one (1) minute up to ten (10) minutes. As the Scent Time increases, the
amount of fragrance in the air will have time to change by a greater amount as the
machine cycles on and off.
• LONG Scent Time: Setting longer times can help ensure that the fragrance
is noticed in an environment where customers might stay for longer periods by
counteracting the natural tendency to become used to a scent over time.
• SHORT Scent Time: Setting shorter scent times is best used to keep the level of
fragrance consistent in a space where the customers will be crossing in and out of
the space frequently, such as a hall or entrance way.
GLOSSY
CLEAR
WINDOW
• SCENT LEVEL - This adjusts the fragrance intensity by increasing or decreasing the
average level of fragrance from 5% to 95%. The higher the number the more intense
the fragrance will be. The total amount of fragrance delivered over an entire event
will be the same if the level is the same, regardless of the scent time setting. Keep in
mind that the scent levels may need to be adjusted after a time to achieve the desired
effect. The ScentDirect™ will allow you to adjust the scent levels without having to re-
enter any of the time information.
GLOSSY
CLEAR
WINDOW

13
31600001-MANUAL-SDD4004-REV.A
Review & Edit a Set Event
• Press any button to activate the screen if the backlight is off.
• Press MODE once from the main screen, the words “Set” and “Event” will be shown
on the screen.
• Press UP / DOWN to cycle though the stored Event numbers. The On Time will be
displayed for each of them in turn.
• Press PREVIOUS / NEXT to switch between the On Time, Off Time, Scent Time and
Scent Level information for each Event. While reviewing the Event information the
days of the week will be displayed for both On Time and Off Time, making events
that run past midnight easier to keep straight.
NOTE: The event numbers may have changed since they were originally entered, as the
list is automatically sorted when events are added and erased so that the highest event
number is always empty.
• Press SELECT to edit the currently selected event. This will cause one of the fields to
blink and allow you to make any changes desired. Use PREVIOUS / NEXT to switch
between all of the data fields.
• Press MODE at any point to discard the current changes without saving.
• Press SELECT to confirm and save the changes.
Delete a Set Event
• Press any button to activate the screen if the backlight is off.
• Press MODE once from the main screen, the words “Set” and “Event” will be shown
on the screen. The selected Event number will be shown in this mode.
• Press UP / DOWN to cycle though the stored Event numbers.
• Press SELECT to edit the event to be deleted.
• Set the On Time and Off Time to be the same. Pressing SELECT at this point will
delete this event.
NOTE: Press UP & DOWN at the same time to simultaneously set the On Time and Off
Time to 00:00, providing an easy shortcut to delete events rapidly.
• Press MODE at any point before pressing SELECT to discard the current changes and
return to the review of existing events.
GLOSSY
CLEAR
WINDOW
GLOSSY
CLEAR
WINDOW
GLOSSY
CLEAR
WINDOW

14
31600001-MANUAL-SDD4004-REV.A
Event Rules
The ScentDirect™ allows combinations of events with different scent intensity, scent time and
scent level. An event can occur inside another event, for instance, you could establish a low
scent level for the entire workday MON - FRI from 08:00-17:30 hours as Event 1, then add
Event 2 with a high scent level during your busiest hours on MON from 14:00-16:30 hours.
It is NOT possible to save an event that overlaps an existing event or has the same start or
stop times. If you have an event that runs every day from 21:00 to 05:00 the next morning,
you cannot add an event that runs from 04:00 to 15:00, because it overlaps and would
not clearly define the scent levels for the overlap. The display screen backlight will display
“Error” if there was a problem with the event times. If error was displayed the system
will remain in edit mode so the current event can be corrected without losing any of the
information already entered.
Set the Pump Speed
This menu allows the Pump Speed to be adjusted between three (3) settings. This controlls
the amount of frangrance being atomized; one (1) is Low, two (2) is Medium and three (3) is
High. The Pump Speed will be the same for all fragrance events.
• Press any button to activate the screen if the backlight is off.
• Press MENU three (3) times from the main screen, the words “Set”, “Pump” and
“Speed” will be displayed along with the current pump speed value. Press SELECT to
edit the setting. This will cause the Pump Speed field to blink. Press UP / DOWN to
adjust the amount from 1, 2 or 3.Low pump speeds are generally preferred.
• Press SELECT to confirm and save the changes or press MENU to discard any changes.
GLOSSY
CLEAR
WINDOW
Set the Fan Speed
This menu allows you to adjust the Fan Speed based on your application and will be used
for all fragrance events. The values are from 1-10 with higher levels pushing fragrance a
little further from the machine with higher sound levels. It is best if natural airflow in the
room distributes scent. The machine fan to drive it completely by itself across a large space.
• Press any button to activate the screen if the backlight is off.
• Press MENU four (4) times from the main screen, the words “Set”, “Fan” and “Speed”
will be displayed along with the current fan speed value. Press SELECT to edit the
setting. This will cause the Fan Speed field to blink. Press UP / DOWN to adjust the
amount from 1 to 10.
• Press SELECT to confirm and save the changes or press MENU to discard any changes.
LEFT: Error
displayed when
trying to save
Event 3. Adjust the
ON / OFF times
and try to save
again.
ABOVE: Setting the Pump Speed to 2 (Medium) ABOVE: Setting the Fan Speed to 3 (Low)

15
31600001-MANUAL-SDD4004-REV.A
LOCKCODES
In this menu you can select a four digit lockcode that will prevent changes from being made
to the settings by unauthorized users.
• Press any button to activate the screen if the backlight is off. Press MODE six (6) times
from the main screen, the words “Set” and “Lockcode” will be displayed along with the
current Lockcode setting; either “OFF” if the feature is turned off or “ON” and the
current Lockcode being used.
• Press SELECT to edit the lockcode screen and press UP to change the setting to “on”
• Press SELECT to advance to the next screen, use PREVIOUS / NEXT to choose between
the blinking digits to be edited, use UP / DOWN to choose the desired digit of 0-9
• Press SELECT to save the lockcode to the system.
NOTE: Once a lockcode is set to “ON” the machine will be automatically locked two (2)
minutes after any authorized operation. When lockcode is displayed at the main screen
pressing any key will bring up the enter lockcode screen described below. If you forget
your lockcode please contact ScentAir. We recommend turning the lockcode feature off
when it is not needed in case the code if forgotten.
Entering a Lockcode
• Press any button to activate the screen if the backlight is off.
• The words “Enter” and “Lockcode” will be displayed along with 4 zeros with the first
one blinking.
• Press PREVIOUS / NEXT, and UP / DOWN to enter the correct 4 digit code.
• Press SELECT to enter the digits selected.
NOTE: If the code is invalid “Error” will be displayed and you can try again to enter
a valid code. If the code is correct the display will return to the main display, and all
buttons and settings will be accessible temporarily.
CLEAR
WINDOW
CLEAR
WINDOW
LEFT: Setting
the Lockcode to
“1001”

16
31600001-MANUAL-SDD4004-REV.A
SYSTEM OVERRIDE
Pressing SELECT while the system is operating during a programmed event will temporarily
stop the system, displaying Auto, OFF and the current Day of the Week and Time. Pressing
SELECT when the system is not running will turn it ON using the last setting. Automatic
operation will resume at the start of the next event.
You may also check the current Scent Levels or temporarily change the Scent Time and
Scent Level during a running programmed event. Press PREVIOUS / NEXT or UP / DOWN
to view or edit the current scent settings displayed with the Scent Time blinking. Press
SELECT to save any changes or MODE to exit without saving.
While the machine is in auto mode the changes will only work for the duration of the current
event. Permanent changes to events must be made from the Set Event menu as described
above under “Reviewing, Editing and Deleting a Previously Set Event”.
MANUAL MODE
If no events are running (“Auto” not displayed) you may press the SELECT button to activate
the system and start atomizing fragrance in always on mode. The screen will show the word
“ON” but not “Auto”. This special run state will be active, even if power is disconnected
from the machine, until events are added or the machine is switched off by pressing the
SELECT button again from the main display.
Pressing SELECT while the system is operating during a programmed event will stop the
system, displaying Auto, OFF and the current Day of the Week and Time. Pressing SELECT
when the system is not running will turn it ON using the last setting. Automatic operation will
resume at the start of the next event.
DISPLAY REVISION
This menu allows you to determine the program revision number.
• Press any button to activate the screen if the backlight is off.
• Press MENU four (4) times from the main screen, the words “Set”, “Fan” and “Speed”
will be displayed along with the current fan speed value.
• Press PREVIOUS & NEXT at the same time to view the revision number.
DISPLAY RUN TIME
This menu allows you to determine the total time the system has been running.
• Press any button to activate the screen if the backlight is off.
• Press MENU three (3) times from the main screen, the words “Set”, “Pump” and
“Speed” will be displayed along with the current fan speed value.
• Press PREVIOUS & NEXT at the same time to view the total run time.

17
31600001-MANUAL-SDD4004-REV.A
SD CARD PROGRAMMING
The SDD4004 allows the use of a detachable industry standard SD flash memory card (1GB
or smaller, card must be SD, HDSD card are not accepted) to store five (5) sets of setup
information and rapidly copy it into additional SDD4004 units. Therefore entering identical
fragrance events, DST dates and the like need only be done on one machine if you have
multiple machines to set up. All Events (up to 14), DST settings, Pump and Fan speeds,
and the 4 digit Lockcode (if set) will be stored and restored from the flash card. The clock
time can not be adjusted by the use of the memory card.
The SD card to be used does need to be initialized for use with the SDD4004, this
initialization can be done on any computer with the ability to write and format flash cards
using software supplied by ScentAir. The initialization need be done only once for a given
card as the 5 data positions on the card can be reused over and over again.
Saving System Setup Data onto an SD Card
After setting up all the settings on a SDD4004 to your requirements, check that the display is
on the Main screen
• Insert the initialized SD card. It will press in fully flush with the faceplate and then lock in
position with a few millimeters exposed when properly inserted. The display will change
to show the letters ‘Cd’ (for card) and a number ‘01’ initially, which is the memory date
position to be used.
• Use UP / DOWN to change the slot number.
• PREVIOUS and NEXT must be pressed together to start the save process. Do not remove
the card while the display is blinking.
NOTE: A dark icon will appear at the bottom left of the display to indicate that the
process was successful. If the display blinks for a very long period of time or ‘error’ is
displayed, there is probably a problem with the initialization of that card. The card must
then be removed. Upon removal the machine will return to normal operation, starting
from the set lockcode menu.
Restoring Data from an SD Card
Please insert the SD card with previously saved data in at least one of the 5 data position.
The display will change to the ‘Cd’ display. Use the UP and DOWN keys to change the slot
number to the one containing the desired program. Then press SELECT to restore the data
from the card to the ScentDirect™. The display will blink while the card is accessed, and
a block icon on the lower right will appear when the process is finished. Please note that
restoring a data position from the card will overwrite all existing setup data on the machine.
Removing the card as described above will exit the SD card screen. Please note that if a
lockcode was programmed onto that memory data position you will now see that code at the
set lockcode menu and have the opportunity to disable lockcode mode before the controls
are locked out.
GLOSSY
CLEAR
WINDOW
GLOSSY
CLEAR
WINDOW
ABOVE: Display after saving the current system
data to location “01” of the SD card

18
31600001-MANUAL-SDD4004-REV.A
SYSTEM PROGRAMMING GUIDE
PROGRAMMED
EVENTS
TIME
OF
DAY
REVIEW PROGRAMMED
EVENTS (1-14)
CREATE
NEW
EVENT
EDIT SELECTED
EVENT
SCENT
CYCLE TIME
SCENT
% LEVEL
MAIN
SCREEN
ADJUST CURRENT EVENT
SCENT OPTIONS
24 HOUR CLOCK
MONTH, DAY & YEAR
PUMP
SPEED
ADJUST (1-3)
DST
ON / OFF
DATE FORWARD
DATE BACKWARD
LOCKCODE
EDIT LOCKCODE ON / OFF ADVANCE
SELECT LOCKCODE
DIGIT
DAY OF WEEK
(1-17)
EVENT
ON TIME
EVENT
OFF TIME
SAVE ANY
CHANGES
EXIT WITHOUT
SAVING
FAN
SPEED
ADJUST (1-10)
MODE PREVIOUS NEXT UP DOWN SELECT
MODE
SELECT
UP / DOWN
SELECT
UP / DOWN
UP / DOWN UP / DOWN
UP / DOWN UP / DOWN
PREVIOUS NEXT
UP / DOWN
UP / DOWN
MODE
MODE
MODE
UP / DOWN
UP / DOWN
MODE
PREVIOUS NEXT
UP / DOWN
MODE
SELECT UP / DOWN SELECT
PREVIOUS NEXT
UP / DOWN
UP / DOWN
PREVIOUS NEXT
SAVE
SELECT
UP / DOWN
MT WT hF SS u
SELECT
TOGGLE
CURRENT MODE
ON / OFF

19
31600001-MANUAL-SDD4004-REV.A
PROBLEM SOLUTION
System display will not turn on
(Wall Mounted)
• Make sure system is plugged in
• Ensure cord is properly plugged into top of
system
• Check for power to outlet, if it has power try
another power supply
• When machine is plugged in, push over-ride
button once to check backlight
• If backlight turns on and there is no information
on the LCD display, the LCD is malfunctioning
System display will not turn on
(Track Mounted)
• Check to ensure power for track light is on
• Check to ensure power is properly plugged into
track mount cord and the ScentDirect™ system
• When machine is plugged in, push over-ride
button once to check backlight
• If backlight turns on and there is no information
on the LCD display, the LCD is malfunctioning
Cannot smell scent • Check bottle fill level
• Remove cartridge and check that there is air
coming out of the metal cartridge connection
when pump is running
• Call technical services
Fan doesn’t run • Call or email ScentAir Technical Service
Replacement Item Numbers • Filter - #30400029
• Levers - #30800004
• Power Supply White - #31000095
• Power Supply Black - # 31000096
• Side Lock White - #30800016
• Side Lock Black - #30800034
• Color Kit White - #SDA4004WCK
• Color Kit Black - #SDA4004BCK
• PCBA - #30600002
Maitenance Schedule • Fan Cleaning - 6 months
• Filter Replace - 6 months
• Cartridge Replace - Between 1 - 3 months
TROUBLESHOOTING

For further assistance please contact Technical Services at:
US & CANADA: 1.704.504.2320
EMEA: +33 (0) 5 62 57 63 20
APAC: +852 356 378 42
techservices@scentair.com
Other manuals for ScentDirect SDD4004
2
Table of contents
Other ScentAir Dispenser manuals
Popular Dispenser manuals by other brands

Cornelius
Cornelius 318569000 installation instructions

Bobrick
Bobrick B-822 Series Instruction for installation and maintenance

WaterLogic
WaterLogic PUREZZA CLASSE manual

Bennett
Bennett 3000 Series installation manual

Stern Engineering
Stern Engineering TRENDY FOAM Installation and maintenance guide

lancer
lancer Delta-600 R-290 Operation manual