ScentAir ScentWave User manual

ScentWave™
User’s Manual
Patent Number 7651077
TABLE OF CONTENTS
Quick Setup.................................................................................................................2
Proper Placement.........................................................................................................3
Getting Started ............................................................................................................4
Control Panel...............................................................................................................5
Scent Level ..................................................................................................................6
Fan Speed ...................................................................................................................6
Run Mode....................................................................................................................7
Scent Events.................................................................................................................8
Time & Date ................................................................................................................10
Lockcode.....................................................................................................................11
Plate-less Arm Mounting (SWD1005) ............................................................................12
Plate-less Wall Mounting (SWD1005) ............................................................................13
Wall Mounting Arm (SWD1004)....................................................................................14
Wall Mounting Plate (SWD1004)...................................................................................15
Plate-less Wall Mounting Template (SWD1005)..............................................................16

2
IMPORTANT SAFETY INSTRUCTIONS
WARNING - When using electric products, basic precautions should always be followed, including the following:
a) Read all the instructions before using the product.
b) To reduce the risk of injury, close supervision is necessary when product is used near children.
c) Do not put fingers or hands into the product.
1
QUICK SETUP
The ScentWave settings can be adjusted in many
different ways. It can run up to six (6) separate events
and will use the selected Scent Level and Fan Speed
to deliver fragrance at different intensities to the
space.
1. CHOOSE THE SCENT LEVEL:
Scent Level controls the scent intensity of the cartridge
with fan intervals. The Scent Level is independent of
a Scent Event, meaning the currently selected Scent
Level will be used for any active Scent Event.
There are seven (7) levels. Set the system to one (1)
for low fragrance intensity. Set the system to seven (7)
for high fragrance intensity.
Turn to Page 6 for more information on setting the
Scent Level.
2. ADJUST THE FAN SPEED:
Fan Speed controls the coverage area of the
fragrance based on the speed of the cartridge
fan. One system can effectively cover spaces up to
2000sqft (186m2).
Start with the knob at the “12:00” position and adjust
after an hour. Turn clockwise for faster speeds. Turn
counterclockwise for slower speeds.
Turn to Page 6 for more information on changing
the Fan Speed.
3. SET UP AN EVENT:
Scent Events are used to schedule the system to run
at certain times and on specific days of the week. The
system can save up to 6 events.
During a Scent Event, the system will use an On Time
and Off Time to run on scheduled Day Combinations.
Turn to Page 8 for more information on setting up a
Scent Event.
2
3
EVENT
SETTINGS

3
PROPER PLACEMENT
Placement of the ScentWave system within a space
is key to creating an effective scented environment.
Before installing the ScentWave, take into account
the following placement suggestions when finding
the best location for the system within your space.
SUGGESTED POSITIONING:
3Where guests first enter the space
3Near an area of high traffic volume
3Crossing the path of airflow from a duct
3In a discrete location
3Close to the ground when possible
3Within 10’ (3m) of a power outlet
AVOID POSITIONING:
2Adjacent to exhaust vents
2Near doors opening to the outside
2In an open window
2Near an HVAC return grill
2At face height when sitting/standing
2Within reach of unattended children
Entrance
Hallway
Lobby
Desk
Back Entrance
I am most effective when
positioned and aimed so that
my scent output crosses the
path of airflow.

4
GETTING STARTED
ScentWave Cartridges are designed to last for three
hundred 300 hours; when running ten (10) hours a
day at Scent Level four (4). It is ideal to replace the
ScentWave Cartridge when a new one is received.
To help maintain the life and performance of the
ScentWave, when changing the cartridge, remove
any dust that has accumulated on the system.
The ScentWave will not function without a power
source and a connected ScentWave Cartridge.
CARTRIDGE INSTALLATION: (Fig.1)
1. Plug the ScentWave Cartridge cord into the
connection on the inside bottom front of the
ScentWave.
2. Insert the ScentWave Cartridge by lining up
the tabs on the cartridge and system and
push in completely.
3. Lock the ScentWave Cartridge by turning
clockwise.
4. Connect the provided power supply to the
ScentWave and plug into the nearest outlet.
1
2
3
4
My power cord is essential
to making sure I function
correctly.
Check that the cartridge
power cord is undamaged
and completely plugged into
the ScentWave system for
proper use.
Fig.1: ScentWave Cartridge changes are simple and easy to perform. To ensure fragrance quality, change the old cartridge when
a new one is received.

5
CONTROL PANEL
DISPLAY SCREEN
When the system is running the
word ON will be displayed; a
circle will appear around ON
while the fan is operating.
The Scent Level will be displayed
as the default screen.
BUTTON FUNCTIONS
The ScentWave functions and
settings are controlled by the six (6)
buttons under the display screen.
Some buttons may have alternate
functions when held down.
Specific button details are found
within this owners manual.
POWER
The ScentWave can be switched
off by pressing and holding
the CHECK button for four (4)
seconds.
Pressing any button will wake up
the ScentWave and will resume the
normal programmed operation.

6
SCENT LEVEL
The ScentWave uses the Scent Level to control the
amount of fragrance that is emitted into the space.
The Scent Level cycles a fan within the cartridge on
and off for specific intervals.
Adjust the Scent Level to increase or decrease
the amount of fragrance within the space. This is
the best option for controlling the intensity of the
fragrance within the space.
There are seven Scent Levels of fragrance intensity;
one (1) is minimum and seven (7) is maximum.
The default setting is four (4). The displayed Scent
Level will be used for all scheduled Scent Events.
Fragrance intensity changes with adjustment of the
scent level.
The ScentWave will always display the current Scent
Level on the display screen. When the fan is running,
the word ON will be surrounded by a circle. (Fig.2)
ADJUSTING THE SCENT LEVEL:
• Press -or +to adjust the Scent Level. (Fig.3)
SCENT
EVENT
PAUSE
RUN
EVENT OVERRIDE
EVENT
SETTINGS
NEXT
DIGIT
RUN
MODE
Fig.2: Scent Level main display.
4
5
6
7
3
2
1
MIN MAX
FAN SPEED
The ScentWave uses Fan Speed to control the
coverage of the system. The Fan Speed is controlled
with the knob at the lower right of the ScentWave.
Adjust the Fan Speed to increase or decrease the
fragrance coverage of the ScentWave system. Set
the fan speed by turning the knob clockwise or
counterclockwise. (Fig.4)
ADJUSTING THE FAN SPEED:
• Turning the knob counterclockwise will cause
the fan to run slower and will fragrance the
area closest to the ScentWave. The further
you turn it counterclockwise, the quieter the
system will become.
• Turning the knob clockwise will cause the
fan to run faster and will fragrance an area
further from the ScentWave. The further
clockwise, the louder the system will become.
500 sq.ft. 2000
50%
25%
5%
100%
75%
MAX MIN
Fig.3: There are seven (7) Scent Levels to choose from.
Fig.4: Adjusting the fan speed changes the overall scent
coverage area.

7
RUN MODE
The ScentWave has alternate run modes to
temporarily change the way the system will perform
without editing the details of a Scent Event.
Under normal operation a bar is shown under
SCENT EVENT. There are two (2) EVENT OVERRIDE
modes called PAUSE and RUN.
You can change the current run mode by pressing
CLOCK and CHECK at the same time. A black bar
will appear on the display screen under the currently
selected mode.
SCENT EVENT:
This indicates that the ScentWave is currently set-up
to function under a preset event schedule. This is
the default screen when running a scheduled Scent
Event. (Fig.5)
EVENT OVERRIDE:
The ScentWave preset events can be temporarily
overridden without editing the events by changing
the current run mode.
• PAUSE: During an active event, PAUSE
mode will cause the system to stop running
for the remainder of the current Scent
Event. Activating the PAUSE mode before a
scheduled event will cause the system to skip
the next event. (Fig.6)
• RUN: When the ScentWave is not running an
event, selecting RUN will cause the system to
activate immediately at the currently selected
Scent Level. The system will run until the Off
Time of the next Scent Event. If the system is
running an event, RUN mode will force the
event to continue beyond its scheduled Off
Time. (Fig.7)
SCENT
EVENT
PAUSE
RUN
EVENT OVERRIDE
EVENT
SETTINGS
NEXT
DIGIT
RUN
MODE
SCENT
EVENT
PAUSE
RUN
EVENT OVERRIDE
EVENT
SETTINGS
NEXT
DIGIT
RUN
MODE
Fig.5: Default Screen showing the Scent Level
Fig.6: PAUSE mode activated as an EVENT OVERRIDE.
Fig.7: RUN mode activated as an EVENT OVERRIDE.
SCENT
EVENT
PAUSE
RUN
EVENT OVERRIDE
EVENT
SETTINGS
NEXT
DIGIT
RUN
MODE

8
SCENT EVENTS
The ScentWave uses a Scent Event to schedule the
system to run at certain times and on specific days
of the week. During a Scent Event, the system will
use an On Time and Off Time on scheduled days
of the week. The current Scent Level determines the
fragrance intensity.
The ScentWave default settings are currently saved
as Event 1 and can be edited. A total of six (6) Scent
Events can be programmed.
EDITING AN EVENT:
1. Press EVENT SETTINGS to edit the first event;
beginning with the hour slot. (Fig.8)
• Press -or +to adjust the hour that the
system will use for On Time.
2. Press NEXT DIGIT once to move to the
minutes for the On Time.
• Press -or +to adjust the minutes in
increments of five (5).
3. Press NEXT DIGIT again to move to the days
of the week. (Fig.9)
• Press -or + to choose between 17
different Day Combinations.
4. Press NEXT DIGIT again to move to the
hours for the Off Time.
• Press -or +to adjust the hour. (Fig.10)
5. Press NEXT DIGIT to move to the minutes for
the Off Time.
• Press -or +to adjust the minutes in
increments of five (5).
6. Press the CHECK button at any time to save
your changes. The display will blink and
then change to show the Scent Level on the
default screen.
SCENT
EVENT
PAUSE
RUN
EVENT OVERRIDE
EVENT
SETTINGS
NEXT
DIGIT
RUN
MODE
Fig.8: The On Time hour slot will be flashing. Set and
Event 1 will also be displayed.
Fig.10: The Off Time hour slot will be flashing. Set and
Event 1 will also be displayed.
SCENT
EVENT
PAUSE
RUN
EVENT OVERRIDE
EVENT
SETTINGS
NEXT
DIGIT
RUN
MODE
Fig.9: The Days Of The Week will be flashing. Set, Event
1 and the On Time will also be displayed.
SCENT
EVENT
PAUSE
RUN
EVENT OVERRIDE
EVENT
SETTINGS
NEXT
DIGIT
RUN
MODE
NOTE: Items flashing on the display are notified by the blue starburst in this manual.

9
CREATING A NEW EVENT:
1. Press EVENT SETTINGS until you reach an
empty event. (Fig.11)
• Press -or +to begin creating a new
event by changing the On Time hours.
2. Follow steps 2 - 5 (page 8) for “EDITING AN
EVENT” to continue creating a new event.
• The Off Time will flash empty hours
until -or +is pressed.
• Create up to six (6) Scent Events.
REVIEWING & DELETING EVENTS:
1. Press EVENT SETTINGS until arriving at the
event number to delete.
• Pressing the EVENT SETTINGS button
will change the display to the On Time
and Off Time of programmed events.
2. Press and hold the CLOCK button for three
(3) seconds to delete the selected event.
(Fig.12)
• Event 1 cannot be deleted.
3. Press EVENT SETTINGS to review or create
other scheduled events or press CHECK to
save and go back to the home screen.
SCENT
EVENT
PAUSE
RUN
EVENT OVERRIDE
EVENT
SETTINGS
NEXT
DIGIT
RUN
MODE
Fig.11: ON and empty hour slots will be flashing along
with the current event number.
SCENT
EVENT
PAUSE
RUN
EVENT OVERRIDE
EVENT
SETTINGS
NEXT
DIGIT
RUN
MODE
Fig.12: When deleting an event, if any higher numbered
events exist, it will move down to occupy the currently
shown event number.
17 DAY COMBINATIONS TO
CHOOSE FROM FOR SCENT EVENTS
Tue Wed Thu Fri Sat Sun
Mon Wed Thu Fri Sat Sun
Mon Tue Thu Fri Sat Sun
Mon Tue Wed Fri Sat Sun
Mon Tue Wed Thu Sat Sun
Mon Tue Wed Thu Fri Sun
Mon Tue Wed Thu Fri Sat
Mon Tue Wed Thu Fri
Sat Sun
Mon Tue Wed Thu Fri Sat Sun
3
4
5
6
7
8
9
1
2
10
11
Sun
12
Sat
Fri
13
Thu
14
Wed
15
Tue
16
Mon
17

10
TIME & DATE
View the current time and date by pressing the
CLOCK button. Press CLOCK from the home screen
to view the time. Press CLOCK a second time to view
the date.
EDITING THE TIME & DATE:
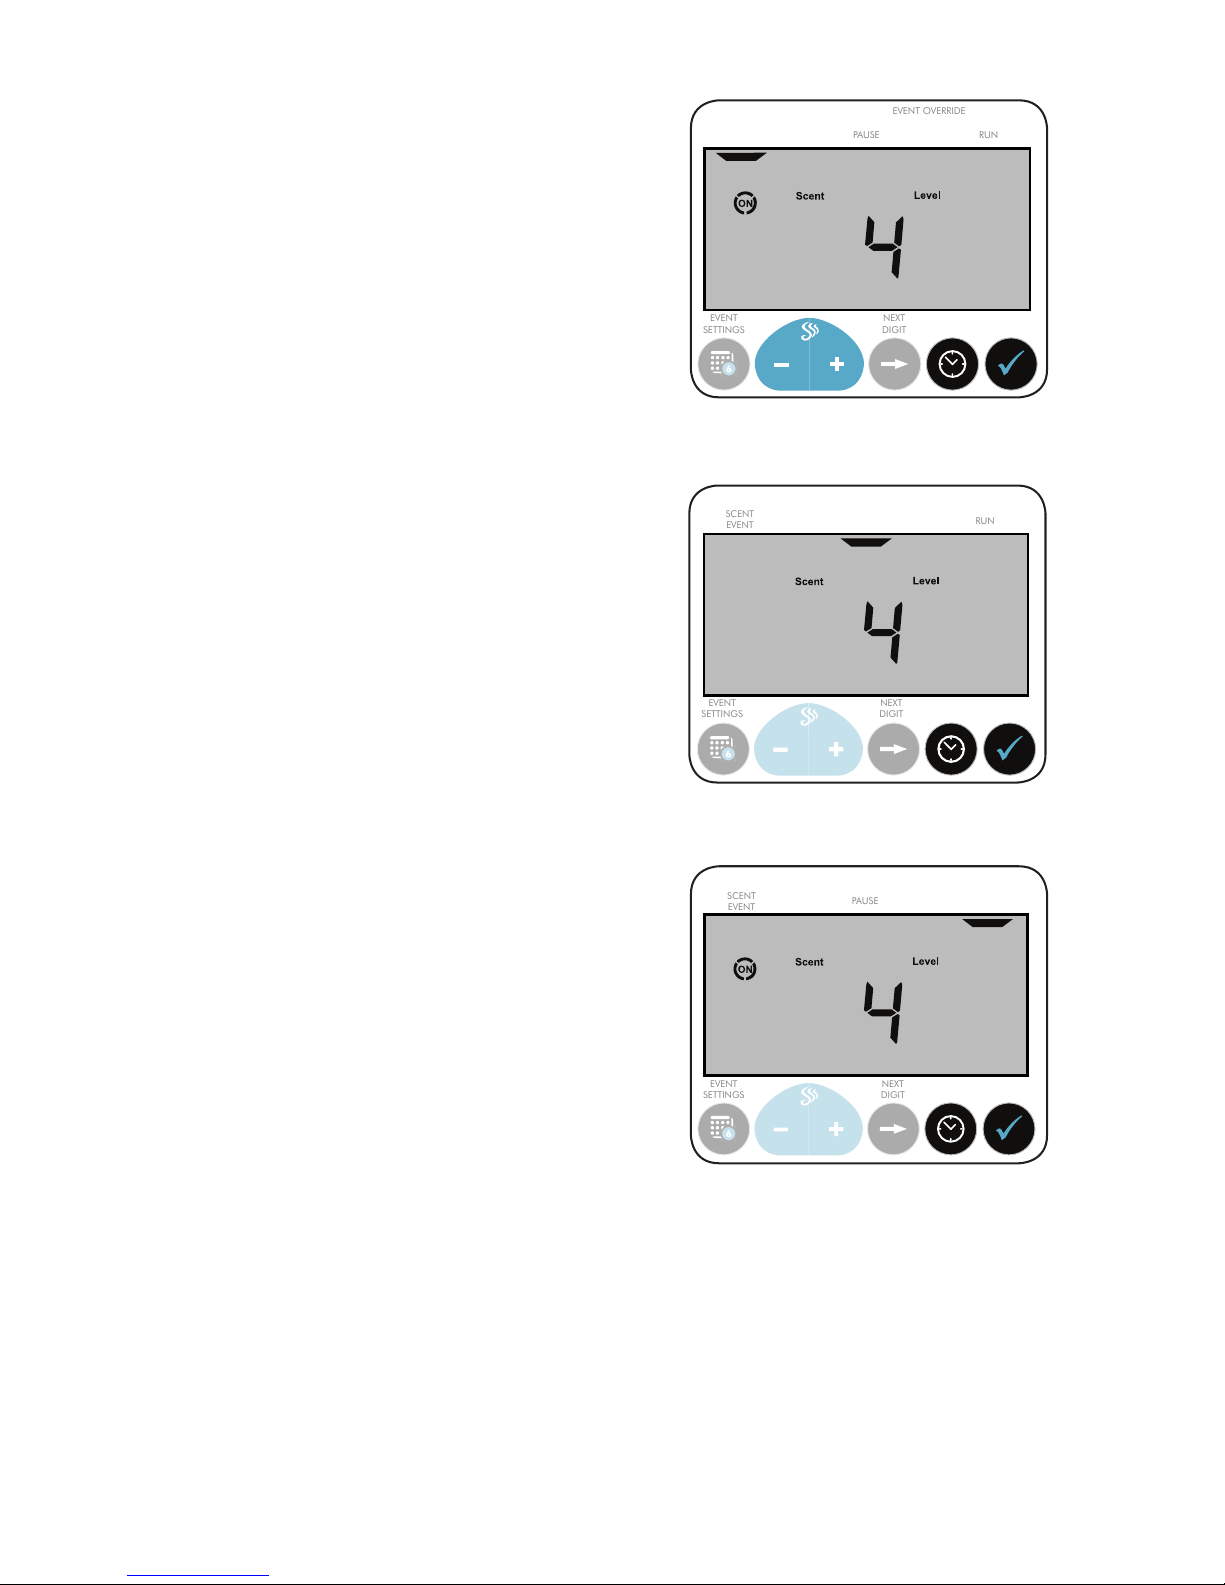
1. Press and hold the CLOCK button for two
(2) seconds. The hour digit slot will flash.
(Fig.13)
• Use -or +to adjust the hour.
• Press NEXT DIGIT to move to the
minute slot. Use -or +to change the
minutes.
2. Press the CLOCK button again to move to
edit the date. The first digit of the year slot
will flash. (Fig.14)
• Press -, +and NEXT DIGIT to change
the selected fields as they are selected.
3. Press CHECK to save and return to the home
screen.
DAYLIGHT SAVINGS TIME (DST):
1. Press and hold the CLOCK button from the
home screen until the time is displayed with
the first digit flashing.
2. Press the CLOCK button one (1) time to
display the date. The first digit of the year
slot will flash.
3. Press the CLOCK button one (1) more time.
DST will flash. (Fig.15)
• When DST is on, the Month, Day and
Date Adv is displayed. This is the day of
the year that the machine will advance
the clock forward one hour.
• Press NEXT DIGIT to change the display
to show Date Back and the date when
the clock will change back.
A. If DST is on, press and hold the -button for
three (3) seconds to turn off DST.
• The date on the screen will disappear
and OFF will be displayed.
B. If DST is off, press and hold the +button for
three (3) seconds to turn on DST.
• The date on the screen will appear and
ON will be displayed.
SCENT
EVENT
PAUSE
RUN
EVENT OVERRIDE
EVENT
SETTINGS
NEXT
DIGIT
RUN
MODE
SCENT
EVENT
PAUSE
RUN
EVENT OVERRIDE
EVENT
SETTINGS
NEXT
DIGIT
RUN
MODE
Fig.13: This is the screen shown for editing the time.
Fig.14: This is the screen shown for editing the date.
SCENT
EVENT
PAUSE
RUN
EVENT OVERRIDE
EVENT
SETTINGS
NEXT
DIGIT
RUN
MODE
Fig.15: This is the screen for DST. You cannot adjust the
dates the system will use for DST.

11
LOCKCODE
The ScentWave controls can be locked to prevent
unintended changes. When active, the display will
show Lockcode and the buttons and knob will not
perform their ordinary functions. Turning the knob
or pressing a button will display ‘CodE’ confirming
that the machine has been locked.
Both locking and unlocking the machine require the
user to enter the lockcode “4321”.
ACTIVATING THE LOCKCODE:
1. Press and hold the NEXT DIGIT button from
the home screen for three (3) seconds.
(Fig.16)
• Press -or +to adjust the digit value.
• Press NEXT DIGIT to move to the next
open slot.
• Repeat step for all open digits.
2. Press CHECK to confirm and lock.
DEACTIVATING THE LOCKCODE:
1. Press the NEXT DIGIT button. The words
Enter and Lockcode will appear on the
screen.
2. Press -, +to adjust the digit. Use the NEXT
DIGIT button to move to the next number
slot. Adjust the values to the universal unlock
code 4321. (Fig.17)
3. Press CHECK to confirm and unlock.
SCENT
EVENT
PAUSE
RUN
EVENT OVERRIDE
EVENT
SETTINGS
NEXT
DIGIT
RUN
MODE
SCENT
EVENT
PAUSE
RUN
EVENT OVERRIDE
EVENT
SETTINGS
NEXT
DIGIT
RUN
MODE
Fig.16: The words Set and Lockcode will appear on the
screen.
Fig.17: Enter the digits 4321 to unlock the ScentWave.

12
IDENTIFY YOUR DEVICE
NOTE: Ensure the ScentWave intended
to be mounted has the hole pattern on
the bottom of the system.
PLATE-LESS ARM MOUNTING
The ScentWave 1005 is equipped to allow mounting
to a wall surface using the optional arm mounting
kit and hardware.
ARM MOUNTING THE SCENTWAVE:
1. Remove the mounting ring from the base by
loosening the retainer ring on the universal
mount arm.
2. Hold the base in the desired location and
mark three (3) screw holes with pencil.
• For drywall, drill a 1/4” (7.5mm) pilot
hole and use a screwdriver to drive the
provided white plastic anchors into the
wall. (Fig.18)
• Use the screwdriver to drive the screws
into the holes, holding the base in
place.
3. Attach the Mounting Arm to the ScentWave.
• Attach the ScentWave to the pivot end
of the wall mounting arm through the
center hole using the provided screw.
Tighten using a screwdriver to secure
the screw in place. (Fig.19)
4. Attach the assembly to the wall.
• Attach the wall mounting arm to the
base using the retainer ring on the
arm and tighten at the desired angle.
(Fig.20)
• Adjust the pivot end as necessary for a
correct angle and secure fit.
Pivot
Adjustment
Fig.18: You can mount the retainer ring in any direction,
there is no up or down.
Fig.19: Do not over tighten the screw so as to prevent
stripping of the pilot hole.
Fig.20: You can change the direction of the ScentWave
with the pivot adjustment screw.

13
PLATE-LESS WALL MOUNTING
The ScentWave 1005 is equipped to allow mounting
to a flat surface using the supplied hardware.
MOUNTING THE SCENTWAVE:
1. Using the template on the back of this
manual (page 16), mark the location on the
wall where the ScentWave will be mounted.
• Choose either the small or large
openings to use for mounting.
• For drywall, drill a 1/4” (7.5mm) pilot
hole and use a screwdriver to drive the
provided white plastic anchors into the
wall. (Fig.21)
• Drive the screws into the anchors
leaving 5/16” (7.9mm) between the
top of the screw and the wall.
2. Attach the ScentWave to the wall:
• Line up the slots on the ScentWave
system with the screws in the wall and
slide into place. (Fig.22)
• Remove the ScentWave and adjust the
wall screws as necessary for a tight fit.
5/16” (7.9mm)
Fig.21: This example is using the large openings on the
bottom of the ScentWave for mounting to a wall.
Fig.22: Adjust the mounting screws as needed to ensure
the ScentWave is securely in place.
NOTE: Ensure the ScentWave intended
to be mounted has the hole pattern on
the bottom of the system.
IDENTIFY YOUR DEVICE

14
WALL ARM MOUNTING
The ScentWave 1004 is equipped to allow mounting
to a wall surface using the mounting plate and
optional arm mounting kit and hardware.
ARM MOUNTING THE SCENTWAVE:
1. Remove the mounting ring from the base by
loosening the retainer ring on the universal
mount arm.
2. Hold the base in the desired location and
mark three (3) screw holes with pencil.
• For drywall, drill a 1/4” (7.5mm) pilot
hole and use a screwdriver to drive the
provided white plastic anchors into the
wall. (Fig.23)
• Drive the screws into the holes, holding
the base in place.
3. Attach the Mounting Arm to the ScentWave.
• Attach the mounting plate to the pivot
end of the wall mounting bracket
through the center hole using the
provided lock nut and screw. Tighten
using a screwdriver to secure the nut in
place. (Fig.24)
• Attach the mounting plate assembly to
the bottom of the ScentWave using the
provided plate screws and pilot holes.
4. Attach the assembly to the wall. (Fig.25)
• Attach the wall mounting arm to the
base using the retainer ring on the arm
and tighten at the desired angle. Adjust
the pivot end as necessary for a correct
angle and secure fit.
Pivot
Adjustment
Fig.23: You can mount the retainer ring in any direction,
there is no up or down.
Fig.24: You must attach the arm to the mounting plate
BEFORE attaching the mounting plate to the ScentWave.
Fig.25: You can change the direction of the ScentWave
with the pivot adjustment screw.
NOTE: Ensure the ScentWave intended
to be mounted has four small holes
near the rubber feet for attaching
the mounting plate.
B
B
A
IDENTIFY YOUR DEVICE

15
WALL MOUNTING PLATE
The ScentWave 1004 is equipped to allow mounting
to a flat surface using the mounting plate and
supplied hardware.
MOUNTING THE SCENTWAVE:
1. Ensure that the wall mounting plate is level
and mark two (2) hole locations with a
pencil.
• Choose either the small or large
openings to use for mounting.
• For drywall, drill a 1/4” (7.5mm) pilot
hole and use a screwdriver to drive the
provided white plastic anchors into the
wall. (Fig.26)
• Drive the screws into the anchors
leaving 1/4” (7.5mm) between the top
of the screw and the wall.
2. Attach the mounting plate to the ScentWave.
• Attach the mounting plate to the bottom
of the ScentWave using the provided
plate screws, pilot holes, slotted or hex
driver. (Fig.27)
3. Attach the ScentWave to the wall.
• Line up the slots on the ScentWave
system with the screws in the wall and
slide into place. (Fig.28)
• Remove the ScentWave and adjust the
wall screws as necessary for a tight fit.
1/4” (7.5mm)
Fig.26: This example is using the large openings on the
bottom of the ScentWave for mounting to a wall.
Fig.28: Adjust the mounting screws as needed to ensure
the ScentWave is securely in place.
NOTE: Ensure the ScentWave intended
to be mounted has four small holes
near the rubber feet for attaching
the mounting plate.
Fig.27: Attach the mounting plate to the ScentWave.
IDENTIFY YOUR DEVICE

PRD-100 71001001-Rev.B
For further assistance please contact ScentAir:
US & Canada: +1 704 504 2320
UK: +44 1628 601 650
France: +33 5 62 57 63 20
Hong Kong: +852 3563 5566
www.scentair.com/scentwave
X X
X
X
Small Opening
Small Opening
Large Opening Large Opening
3.13” (79.5mm)
2.30”
(58.4mm)
Fig.29: Wall Mounting template to be used for the ScentWave 1005 system.
Table of contents
Other ScentAir Dispenser manuals
Popular Dispenser manuals by other brands

Prince Castle
Prince Castle McDONALD'S 398-B quick start guide

rosseto
rosseto EZ-PRO 1B Assembly instructions

MAIER-PAPIER
MAIER-PAPIER NEUTRALLE MICROBURST 3000 manual

Franke
Franke RODX600E Installation and operating instructions

DPR
DPR DN01 user manual

DEMA
DEMA 692T FOAM STATION I Installation instruction