Schacht WOLF FL3051 User manual

WOLF STROLLER
Assembly InstructIons
Find out more at schachtspindle.com
Schacht Spindle Company 6101 Ben Place Boulder, CO 80301
p. 303.442.3212 f. 303.447.9273
© 2018 Schacht Spindle Company, Inc. 11.18
open—ready to weave
folded—ready to travel
FL3051
for InstAllAtIon on Wolf PuP, Wolf PuP lt,
bAby Wolf, And mIghty Wolf looms
WIthout heIght extender
Wolf Pup 8.10 looms require the Wolf Pup 8.10 Stroller (FL3052); all Wolf looms
with height extenders require the Wolf Height Extender Stroller (FL3053). If you
received this booklet with FL3052 or FL3053, please visit our website for the
correct booklet.

– 2 – – 3 –
PARTS LIST
4 – caster blocks with casters
2 – stroller bars
4 – 1/4-20 x 3" Phillips truss head
machine screws
2 – 1/4-20 x 4" Phillips truss head
machine screws
4 – 1/4-20 x 2-1/4" carriage bolts
2 – 1/4-20 x 1-1/2" hex bolts
2 – 1/4-20 x 1-3/4" hex bolts
1 – 1/4-20 x 2" Phillips truss head
machine screw
8 – 1/4" USS washers
1 -- 3/4" x 1/2" plastic spacer
8 – 1/4-20 lock nuts
2 – 1/4-20 wing nuts
TOOLS
#2 Phillips screwdriver
slotted (at) screwdriver
rubber mallet or hammer
7/16" or adjustable wrench
piece of scrap wood
drill and 1/4" bit (optional)
clamp (optional)
a couple of books
NOTES
1. Please read all instructions prior to beginning installation. This instruction booklet
contains two dierent sets of instructions—be sure that you are following the correct
instruction set for your loom before beginning any installation.
2. Not all of the included parts are needed to attach the stroller to every loom; there
may be parts left over when you have nished.
3. Wolf loom legs are called out by where they cross each other. The legs that touch
the ground at the front of the loom are called “inside” legs because they are covered
by the “outside” legs when they cross at the loom center.
4. You may need to drill holes in the loom legs. FOR BABY WOLF looms with serial
numbers lower than 4-1608, 4-4-1609, and 8-546, see page 8. For Wolf Pup or Wolf
Pup LT looms shipped prior to December 2016, see page 6.
lock nut
wing nut
at washer
USING THE STROLLER
1. For traveling: Fold the loom, making
sure that the treadles come to rest above
the rear leg brace. Tighten the fold knobs
and secure the slide lock bars (on bigger
looms only) to keep the loom closed.
The loom now sits on its stroller wheels
(Figure 1). Remove the wing nuts on the
bolts in the front caster blocks. Place the
slots in the stroller bars over these bolts,
replace the wing nuts, and tighten.
2. For weaving: Remove the wing nuts
from the front caster blocks and detach
the stroller bars. Replace the wing nuts
and tighten. Loosen the fold knobs
one-quarter turn, unfold the loom, and
secure slide lock bars on bigger looms.
Loosening the fold knobs all the
way or removing them can cause
the loom to collapse, which could
result in injury.
FIGURE 1: USING THE STROLLER
stroller bar
wing nut
carriage bolt
Phillips truss head
machine screw
hex head bolt

– 2 – – 3 –
InstAllAtIon on bAby Wolf & mIghty Wolf looms
1. Install the Wolf Stroller on a hard
surface. Open the loom to weaving
position (see front cover illustration).
2. Set the treadle support on a block
of wood or a few books to elevate the
loom front about two inches. Remove the
machine screws and barrel nuts that hold
the treadle support to the inside legs at
hole [A] (Figure 2). Save the barrel nuts
for the next step.
3. Set a caster block on the outer side of
an inside leg, with the caster wheel toward
the front and the oor (Figure 3). Line
up hole [D] at the bottom of the block to
hole [A] in the leg. Insert a 1/4-20 x 3"
Phillips truss head machine screw though
the caster block and the leg. Thread the
machine screw into a barrel nut in the
treadle support and tighten, using a slotted
screwdriver to hold the barrel nut in
position. Repeat with a second caster block
and the other inside leg.
4. Set the rear leg brace on a block of
wood or a few books to elevate the loom
back about two inches. Remove the
machine screws and barrel nuts holding
the rear leg brace to the outside legs at
hole [B] (Figure 2).
5. Set a caster block on the outer side
of an outside leg, with the caster wheel
toward the back and the oor (Figure 4).
Line up hole [E] at the center of the caster
block to hole [B] in the outside leg. Insert
FIGURE 2: WOLF LEGS
treadle
support
rear leg
brace
barrel nut
(save)
CC
A
B
right inside leg right outside leg
barrel nut
(save)
FIGURE 4: CASTER BLOCK AND OUTSIDE LEG
E
outside leg
1/4-20 x 3"
Phillips truss head
machine screw
D
1/4-20 x 3" Phillips truss
head machine screw
FIGURE 3: CASTER BLOCK AND INSIDE LEG
inside leg

– 4 – – 5 –
a 1/4-20 x 3" Phillips truss head machine
screw through the caster block and the leg.
Thread the machine screw into the barrel
nut in the rear leg brace and tighten, using
a slotted screwdriver to hold the barrel nut
in position. Repeat with the last caster block
and the other outside leg.
6. Attach the tops of the caster blocks:
From the inner side of a leg, insert a 1/4-20
x 2-1/4" carriage bolt through hole [C],
then through the top hole [F]) in the caster
block (Figure 5). Cover the bolt with a
piece of scrap wood, then tap the bolt into
position with a rubber mallet or hammer.
Place a 1/4" washer and a 1/4-20 lock nut
on the carriage bolt and tighten the lock
nut enough to draw the head of the carriage
bolt into the wood of the leg. Repeat this
step for the other three caster blocks. Note:
For the inside right leg, depress the brake
release pedal or undo the brake cord from
the pedal, to allow easier access to hole [C].
If you detached the brake cord from the
pedal, reattach it.
7. Attach the hex bolt to hold the front
of the stroller bar: From the inside of the
loom, insert a 1/4-20 x 1-3/4" hex bolt
through hole [G] in the front caster block.
Secure with a 1/4" washer and a 1/4-20
lock nut. Place a 1/4-20 wing nut on the bolt
(Figure 6). Repeat for the other front caster
block.
8. Attach the stroller bar to the rear caster
block: From the inside of the loom, insert a
1/4-20 x 1-1/2" hex bolt through hole [H]
in the rear caster block (Figure 7). Place a
washer on the hex bolt and then place the
round hole at the
end of the stroller
bar over the bolt so that the
jog in the bar points inward. Secure with
a 1/4-20 lock nut, using a 7/16" wrench to
attach the lock nut. Tighten the lock nut
securely enough to hold the bar in place,
but loosely enough for it to pivot. Repeat for
the other rear caster block. •
FIGURE 7: SUPPORT BAR AND REAR CASTER BLOCK
1/4-20 x 1-1/2" hex bolt
stroller bar
1/4-20 lock nut
1/4" washer
H
FIGURE 5: CASTER BLOCK TOP
1/4-20 x 2-1/4"
carriage bolt
1/4-20 lock nut
1/4" washer
F
C
FIGURE 6: STROLLER BAR AND FRONT CASTER
BLOCK
1/4-20 x 1-3/4"
hex bolt
1/4-20 lock nut
1/4-20 wing nut
1/4"
washer
G

– 4 – – 5 –
InstAllAtIon on Wolf PuP & Wolf PuP lt looms
1. Install the Wolf Stroller on a hard
surface. Open the loom to weaving
position (see front cover illustration).
2. Set the treadle support on a block
of wood or a few books to elevate the
loom front about two inches. Remove the
machine screws and barrel nuts that hold
the treadle support to the inside legs at
hole [A] (Figure 8).
3. Set a caster block on the outer side of
an inside leg, with the caster wheel toward
the front and the oor (Figure 9). Line
up hole [D] at the bottom of the block to
hole [A] in the leg. Insert a 1/4-20 x 3"
Phillips truss head machine screw though
the caster block and the leg. Thread the
machine screw into the barrel nut in the
treadle support and tighten, using a slotted
screwdriver to hold the barrel nut in
position. Repeat with a second caster block
and the other inside leg.
4. Set the rear leg brace on a block of
wood or a few books to elevate the loom
back about two inches. Remove the
machine screws and barrel nuts holding
the rear leg brace to the outside legs at
hole [B] (Figure 8).
5. Set a caster block on the outer side
of an outside leg, with the caster wheel
toward the back and the oor (Figure
10). Line up hole [E] at the bottom of the
NOTE: If you installed the wheels that came with your loom, we recommend
that you take them o before installing the Wolf Stroller.
FIGURE 9: CASTER BLOCK AND INSIDE LEG
D
1/4-20 x 3" Phillips truss
head machine screw
inside leg
FIGURE 10: CASTER BLOCK AND OUTSIDE LEG
E
outside leg
1/4-20 x 4"
Phillips truss head
machine screw
FIGURE 8: WOLF LEGS
treadle
support
rear leg
brace
barrel nut
(save)
CC
A
B
right inside leg right outside leg
barrel nut
(save)

– 6 – – 7 –
caster block to hole [B] in the outside leg.
Insert a 1/4-20 x 4" Phillips truss head
machine screw through the caster block
and the leg. Thread the machine screw
into the barrel nut in the rear leg brace
and tighten, using a slotted screwdriver to
hold the barrel nut in position. If you do
not need to drill holes in the outside legs
(Steps 6–8), tighten this screw rmly into
the barrel nut. Otherwise, tighten the bolt
so that the caster block rotates but is not
loose.
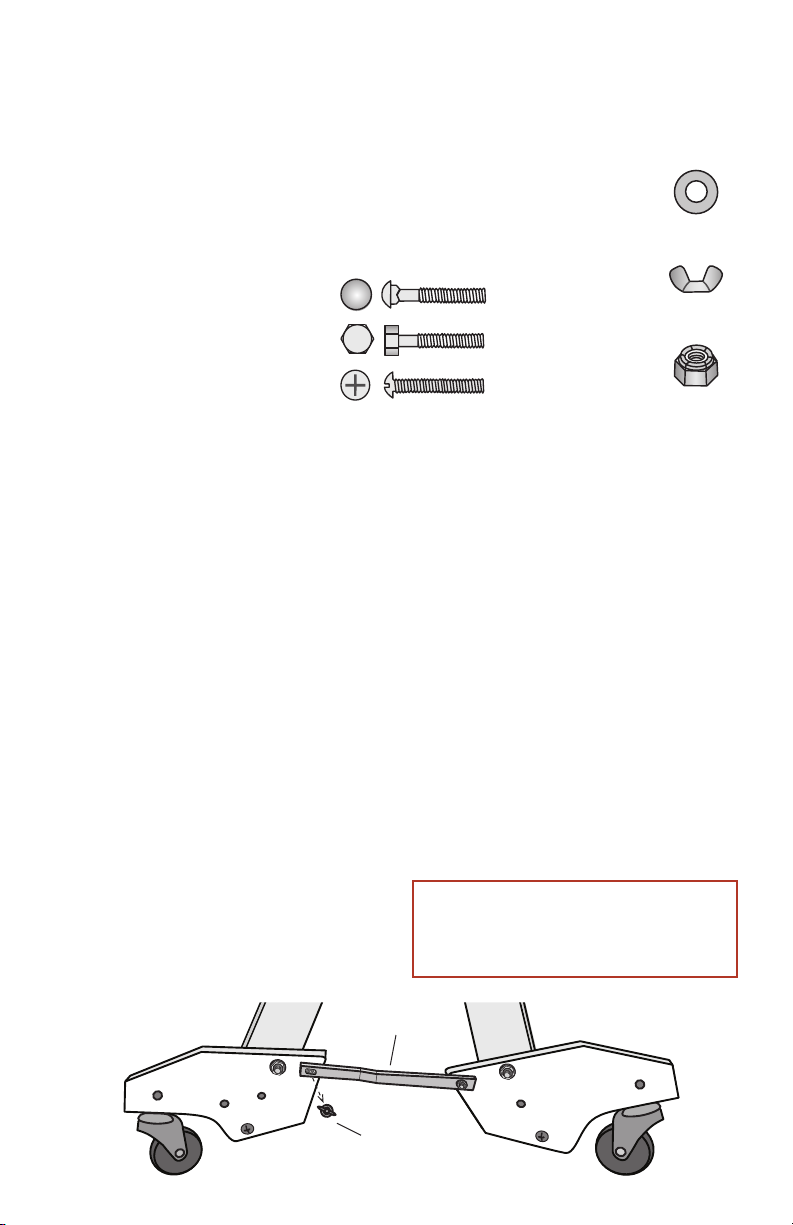
FIGURE 12: CASTER BLOCK TOP
1/4-20 x 2-1/4" carriage bolt
1/4-20 lock nut
1/4" washer
F
C
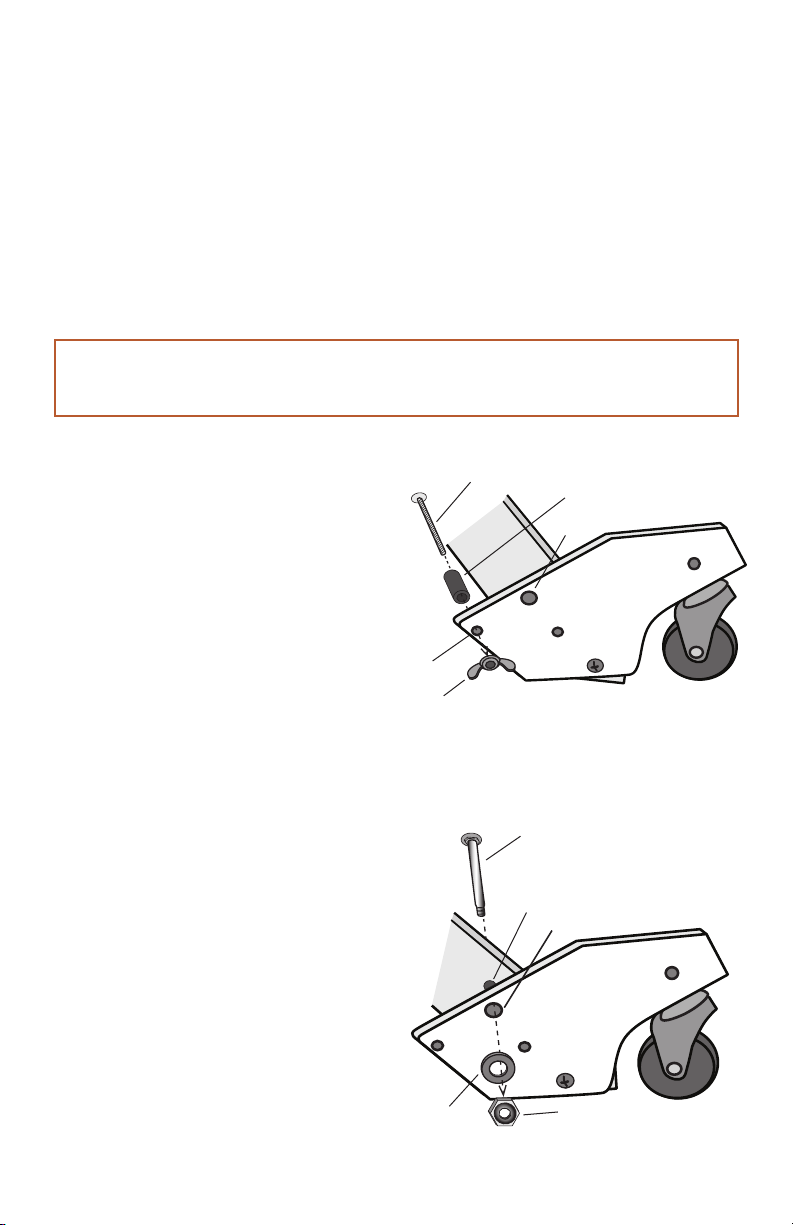
FIGURE 11: DRILL GUIDE
F
H
black plastic spacer
1/4-20 x 2" Phillips truss
head machine screw
1/4-20 wing nut
NOTE: Follow steps 6–8 only if you are adding strollers to a Wolf Pup or
Wolf Pup LT shipped prior to December 2016. If you are working on a
loom shipped after that date, skip to step 9.
6. Set up the rear caster block as a
drilling jig: Insert the the 1/4-20 x 2"
Phillips truss head machine screw into
the black plastic spacer. Slide the screw
through hole [H] from the inside of the
loom, and tighten a 1/4" wing nut down on
the exposed bolt (Figure 11).
7. Rotate the caster block until the black
plastic spacer comes to rest as a stop
against the loom leg. Set a piece of scrap
wood against the inside of the outside leg
to prevent blowing out the wood when
you drill; clamp the caster block and scrap
wood into this position.
8. Using the top hole [F] in the caster
block as a drill guide, drill a hole with a
1/4" bit through the outside leg. Remove
the plastic spacer, machine screw, and
wing nut from hole [H]. Repeat steps 5–8
on the other outside leg.
9. Attach the tops of the four caster
blocks to the loom legs: From the inner
side of a leg, insert a 1/4-20 x 2-1/4"
carriage bolt through hole [C], then
through the top hole [F]) in the caster
block (Figure 12). Cover the bolt with a
piece of scrap wood, then tap the bolt into
position with a rubber mallet or hammer.
Place a 1/4" washer and a 1/4-20 lock
nut on the carriage bolt and tighten the

– 6 – – 7 –
lock nut enough to draw the head of the
carriage bolt into the wood of the leg.
Repeat this step for the other three caster
blocks. Note: For the inside right leg,
depress the brake release pedal or undo
the brake cord from the pedal, to allow
easier access to hole [C]. If you detached
the brake cord from the pedal, reattach it.
10. Attach the hex bolt to hold the front
of the stroller bar. From the inside of the
loom, insert a 1/4-20 x 1-3/4" hex bolt
through hole [G] in the front caster block.
Secure the hex bolt with a 1/4" washer
and a 1/4-20 lock nut. Place a 1/4-20 wing
nut on the bolt (Figure 13). Repeat for the
other front caster block.
11. Attach the stroller bar to the rear
caster block. From the inside of the loom,
insert a 1/4-20 x 1-1/2" hex bolt through
hole [H] in the rear caster block (Figure
14). Place a washer on the hex bolt and
then place the round hole at the end of the
stroller bar over the bolt so that the jog
in the bar points inward. Secure with a
1/4-20 lock nut, using a 7/16" wrench to
attach the lock nut. Tighten the lock nut
securely enough to hold the stroller bar
in place, but loosely enough for it to pivot.
Repeat for the other rear caster block. •
FIGURE 14: STROLLER BAR AND REAR CASTER BLOCKS
1/4-20 x 1-1/2" hex bolt
stroller
support bar
1/4-20 lock nut
1/4" washer
H
FIGURE 13: STROLLER BAR AND FRONT CASTER
BLOCK
1/4-20 x 1-3/4"
hex bolt
1/4-20 lock nut
1/4-20 wing nut
1/4"
washer
G

– 8 – – PB –
DRILLING GUIDE TEMPLATE
For Baby Wolf looms with serial numbers
lower than 4-1608, 4-4-1609, and 8-546,
you will need to drill holes in the inside
and outside legs using this template.
Photocopy this page so that you can use a
fresh template for each leg.
Use a 1/4" drill bit. Clamp a piece of scrap
wood underneath the leg to prevent blow-
ing out the wood when you drill.
Table of contents
Other Schacht Other manuals
Popular Other manuals by other brands

Motorvac
Motorvac 500-1125B user manual

ReelCraft
ReelCraft 5000 Series operating instructions

Marcato
Marcato Regina Instructions for use and maintenance

HIOS
HIOS BLOP-OST2 instruction manual

Sunex Tools
Sunex Tools 66037 owner's manual

STEIN
STEIN EMBRACE FRAMELESS HINGED DOOR - TILE installation instructions