Schwinn S5477D User manual

This manual contains important safety, performance and maintenance
information. Read the manual before taking your rst ride on your
new bicycle, and keep the manual handy for future reference.
To register your bike visit
www.schwinnbikes.com/registerbike
Owner’s Manual
Cruiser Bicycle


Contents
1 Safety ............................................4
Safety Signal Words ...............................4
User Responsibility................................4
Bicycle Setup ....................................5
Personal Safety...................................8
Riding Safety....................................11
Before You Ride Safety Checklist ...................13
2 Parts Idencaon . . . . . . . . . . . . . . . . . . . . . . . . . . . . . . . . 14
3 Assembly . . . . . . . . . . . . . . . . . . . . . . . . . . . . . . . . . . . . . . . . 16
Tools Required . . . . . . . . . . . . . . . . . . . . . . . . . . . . . . . . . . 16
GengStarted..................................17
AachtheHandlebar.............................18
AachtheBrakeCables . . . . . . . . . . . . . . . . . . . . . . . . . . 19
AachtheFrontFenderandFrontWheel ...........20
AachtheSeat..................................25
AachthePedals ................................27
AachtheBasket................................28
AachtheBell . . . . . . . . . . . . . . . . . . . . . . . . . . . . . . . . . . 29
4 Adjustments......................................30
Tools Required . . . . . . . . . . . . . . . . . . . . . . . . . . . . . . . . . . 30
AdjusngtheBrakes . . . . . . . . . . . . . . . . . . . . . . . . . . . . . 31
AdjusngtheRearDerailleur . . . . . . . . . . . . . . . . . . . . . . 38
AdjusngtheSeatHeight . . . . . . . . . . . . . . . . . . . . . . . . . 39
AdjusngtheHandlebar . . . . . . . . . . . . . . . . . . . . . . . . . . 41
AdjusngtheHeadset ............................42
AdjusttheBoomBracket . . . . . . . . . . . . . . . . . . . . . . . . 44
5 Use..............................................45
BrakeOperaon.................................45
GearOperaon..................................47
Security ........................................49
6 Maintenance . . . . . . . . . . . . . . . . . . . . . . . . . . . . . . . . . . . . . 50
Basic Maintenance ...............................50
LubricaonSchedule .............................51
Parts Maintenance . . . . . . . . . . . . . . . . . . . . . . . . . . . . . . 52
HubBearings....................................55
InangtheTireTube . . . . . . . . . . . . . . . . . . . . . . . . . . . . 55
RepairingaFlatTire ..............................56
TroubleshoongGuide ...........................57
7 Warranty.........................................60
Purchase Record.................................61

2
Congratulaons
onyournewbicycle!Properassemblyandoperaonofyour
bicycleisimportantforyoursafetyandenjoyment.Our
customerservicedepartmentisdedicatedtoyoursasfacon
withPacicCycleanditsproducts.Ifyouhavequesonsorneed
adviceregardingassembly,parts,performance,orreturns,
pleasecontacttheexpertsatPacicCycle.Enjoy the ride!
Toll free: 1-800-626-2811.
Customer Service hours:Monday-Friday8AM-5PMCentral
StandardTime(CST)
Youmayalsoreachusat:
Web:www.pacic-cycle.com
Email:customerservice@pacic-cycle.com
Mail: P. O. Box 344
4730 E. Radio Tower Lane
Olney,IL62450
Do not return this item to the store. Please call Pacic Cycle
customer service if you need assistance. You will need your
modelnumberanddatecodelocatedontheservicesckernear
theboombracketarea.SeeSecon 7: Purchase Record for the
locaonofthemodelnumberonyourbicycle.
About This Manual
Itisimportantforyoutounderstandyournewbicycle.
Byreadingthismanualbeforeyougooutonyourrstride,you’ll
knowhowtogetbeerperformance,comfort,andenjoyment
fromyournewbicycle.Itisalsoimportantthatyourrstrideon
yournewbicycleistakeninacontrolledenvironment,awayfrom
cars,obstaclesandothercyclists.
Thismanualcontainsimportantinformaonregardingsafety,
assembly,use,andmaintenanceofthebicyclebutisnot
intendedtobeacompleteorcomprehensivemanualcoveringall
aspectsconcerningbicycleownership.Werecommend
consulngabicyclespecialistifyouhaveanydoubtsorconcerns
regardingyourexperienceorabilitytoproperlyassembleand
maintainthebicycle.
A Special Note For Parents and Guardians
Itisatragicfactthatmostbicycleaccidentsinvolvechildren.
Asaparentorguardian,youbeartheresponsibilityforthe
acviesandsafetyofyourminorchild.Amongthese
responsibiliesaretomakesurethatthebicyclewhichyour
childisridingisproperlyedtothechild;thatitisingood
repairandsafeoperangcondion;thatyouandyourchild
havelearned,understandandobeynotonlytheapplicablelocal
motorvehicle,bicycle,andtraclaws,butalsothecommon
senserulesofsafeandresponsiblebicycling.Asaparent,you
shouldreadthismanualbeforelengyourchildridethe
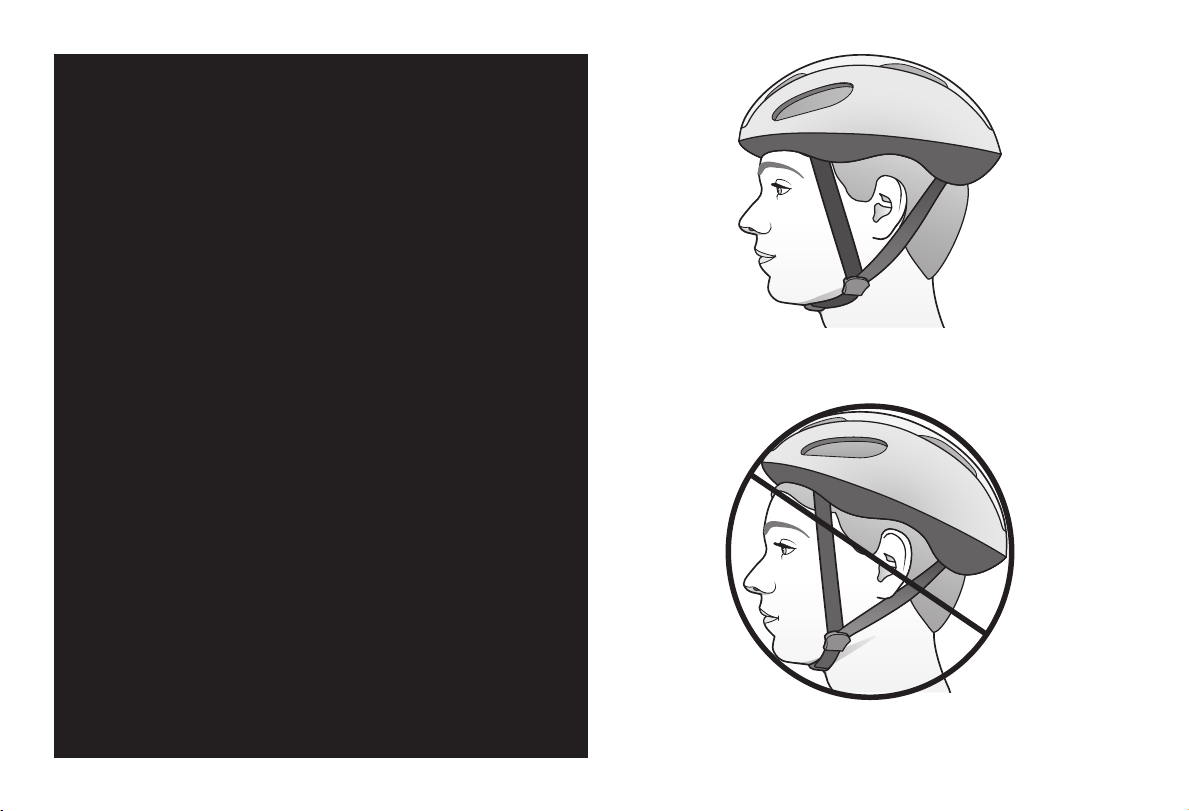
bicycle.Pleasemakesurethatyourchildalwayswearsan
approvedbicyclehelmetwhenriding.

3
CorrectFing
Makesureyourhelmetcoversyourforehead
IncorrectFing
Foreheadisexposedandvulnerabletoseriousinjury
• ALWAYS WEAR A PROPERLY FITTED
HELMET WHEN RIDING YOUR BICYCLE
• DO NOT RIDE AT NIGHT
• AVOID RIDING IN WET CONDITIONS
Helmets
Save
Lives!

4
1 Safety
WARNING!
CAUTION!
SAFETY SIGNAL WORDS
The following safety signal words indicate a safety message.
The symbol alerts you to potenal hazards. Failure to follow the
warning may result in damage to property, injury, or death.
This manual contains many Warnings and Cauons concerning
the consequences of failure to follow safety warnings. Because
any fall can result in serious injury or even death, we do not
repeat the warning of possible injury or death whenever the risk
of falling is menoned.
Indicates a hazard or unsafe pracce that will result in severe
injury or death. Failure to read, understand and follow the safety
informaon in this manual may result in serious injury or death.
Indicates a hazard or unsafe pracce that could result in
minor injury.
Indicates a hazard unrelated to personal injury, such as
property damage.
❶Safety
NOTICE
USER RESPONSIBILITY
All persons assembling, using, and maintaining the bicycle must
read and understand the safety warnings and operang
instrucons in this manual before using the bicycle.
It is the responsibility of the user, or in the case of a child rider,
an adult, to ensure the bicycle is properly maintained and in
proper operang condion. Doing so will reduce the risk of
injury. Always conduct regular maintenance and inspecon of
your bicycle. Complete the Safety Checklist at the end of this
secon before each use.
A responsible adult must always supervise the use of the bicycle
by a child. You must ensure:
WARNING!
• The child is wearing the proper protecve are and approved
bicycle helmet.
• The child is seated securely and the bicycle is properly ed
to the child.
• The child understands applicable laws and common sense
rules of safe responsible bicycling.
Do not install any kind of power plant or internal combuson
engine to a bicycle. Adapng a bicycle in this manner poses an
extreme safety risk to rider and could result in loss of control
or death.

Safety 1
5
Figure 1.1
BICYCLE SETUP
Correct Bicycle Size
Riding a bicycle that is not correctly sized to the rider may
result in the rider’s feet not being able to touch the ground and
balance the bicycle, properly reach the handlebar for steering
or braking, and loss of control when pedaling.
Use the wheel size in the following table as a guide to match
the rider and bicycle. For example, bicycles with a wheel size of
12 inches t a rider that is 28 to 38 inches tall. Note: Some
bicycles such as folding bicycles may have smaller wheels but
sll t adults.
If the bicycle has a top tube on the frame, check that there is
one to three inches of clearance between the rider and the top
tube. Figure 1.1
Inability to safely reach the handlebars and dismount the
bicycle may result in loss of control of the bicycle. If the
bicycle has a top tube on the frame, ensure there is one to
three inches of clearance between the rider and the top tube.
Improper setup or maintenance of the bicycle may result in
an unexpected movement, loss of control, and serious injury
or death.
WARNING! Wheel Size Riders Approximate Height
12 inch 28 - 38 inches tall
16 inch 38 - 48 inches tall
18 inch 42 - 52 inches tall
20 inch 48 - 60 inches tall
24 inch 56 - 66 inches tall
26 inch, 27.5 inch,
29 inch, 700c 64 - 74 inches tall
Top tube
1 to 3 inch
clearance

6
1 Safety
Figure 1.2
Improperly adjusted seat height could aect the rider’s ability
to reach the handlebar and pedals resulng in unexpected
movement, loss of control, and serious injury or death. Follow
these guidelines when adjusng the seat height. Always
ensure the seat post minimum inseron marks are below the
seat clamp and cannot be seen. Ensure the seat clamp is
locked and the seat cannot move.
WARNING!
Seat Height and Handlebar Reach
❶Your legs should be almost completely straight when the
pedal is in the down most posion, just a slight bend in
the knee. Figure 1.2
Note: The rider’s feet may not touch the ground easily. If
this is the case the rider can simply move forward o the
seat to mount and dismount the bicycle or the seat can be
adjusted lower if the rider is uncomfortable with the height,
but note that riding is more dicult with the seat too low,
as the legs are in an unnatural posion.
Do not raise the seat so much the knees lock straight when
pedaling or you have to move forward o the seat to pedal.
This is unsafe and the bicycle cannot be controlled in this
condion.
❷You should be able to safely reach the handlebar with
your arms bent slightly (approximately 10 degrees) at
the elbow.
Adjust the
seat height
2
1

Safety 1
7
Figure 1.3
Wheels
❶ Some bicycles will come equipped with quick-release levers
for the front wheel. The wheels must be securely locked.
Ensure the wheel quick-release lever is rmly locked in
place. Figure 1.3
Seat Post
❷ Ensure the seat post’s minimum inseron marks are not
visible above the quick-release seat clamp and the clamp is
locked in place.
Note: See Secon 4: Adjusng the Seat Height if
adjustments are needed.
Improper setup or maintenance of the quick-release levers
may result in an unexpected movement, loss of control, and
serious injury or death. Before riding always check that the
quick-release lever is rmly locked in place and the seat does
not move.
Quick-release Levers
WARNING!
1
Quick-release
seat clamp
Quick-release
wheel
2
Minimum inseron
marks are located
on the seat post
Seat post
Seat tube

8
1 Safety
Riding a bicycle without protecve gear, clothing, or a helmet
may result in serious injury or death. Always wear protecve
gear, clothing, and helmet when riding the bicycle. Ensure
protecve gear does not interfere with steering, braking, and
pedaling.
WARNING!
ProtecveGearandClothing
Always wear: Figure 1.4
• Colors that are easily seen and, if possible, reecve clothing.
• Clothing appropriate for the weather condions.
• Use of protecve gear such as pads for the knees and elbows
is highly recommended for children.
• A properly ed, ASTM or SNELL approved, bicycle helmet
shall be worn at all mes by riders of the bicycle. For
informaon regarding how to properly t a helmet visit:
hp://www.nhtsa.gov/people/injury/pedbimot/bike/
easystepsweb
Do not wear:
• Loose clothing parts, strings, or jewelry that may become
entangled with moving parts on the bicycle or interfere with
handling of the bicycle.
PERSONAL SAFETY
• Pants with loose pant legs. If necessary, always tuck pant legs
into a sock or use a leg band to avoid the clothing becoming
caught in the drive chain.
• Shoes with uned shoe laces.
Figure 1.4
Properly ed helmet
Elbow pads
Knee pads
Leg band Shoes fastened
or ed
Easily seen or
reecve clothing

Safety 1
9
Figure 1.6
Figure 1.5
Helmet Use
Important! Many states have passed helmet laws regarding
children. Make sure you know your state’s helmet laws. It is your
job to enforce these rules with your children. Even if your state
does not have a children’s helmet law, it is recommended that
everyone wear a helmet when cycling. When riding with a child
carrier seat or trailer, children must wear a helmet.
It is strongly advised that a properly ng, ASTM or SNELL
approved, bicycle safety helmet be worn at all mes when riding
your bicycle. In addion, if you are carrying a passenger in a
child safety seat, they must also be wearing a helmet.
The correct helmet should: Figure 1.5
• Be comfortable
• Have good venlaon
• Fit correctly
• Cover forehead
Incorrecthelmetposion:Figure1.6
• Helmet does not cover the forehead

10
1 Safety
Figure 1.7
Important! Federal regulaons require every bicycle over 16
inches to be equipped with front, rear, wheel, and pedal
reectors. Many states require specic safety devices. It is your
responsibility to familiarize yourself with the laws of the state
where you ride and to comply with all applicable laws, including
properly equipping yourself and your bike as the law requires.
Bicycles under 16 inches are considered “sidewalk bicycles” and
may not be ed with reectors. These bicycles should not be
ridden on streets, at night or unsupervised by an adult.
Check and conrm the front and rear reectors are in the
correct posion: Figure 1.7
• FrontReector: Should aim forward (when viewed from
above) and be mounted so it is within 5 degrees of vercal.
• RearReector: Should aim straight back (when viewed from
above) and be mounted so it is within 5 degrees of vercal.
Reectors
Missing, damaged, or dirty reectors will aect the ability of
others to see and recognize you as a moving bicyclist increasing
the risk of being hit, serious injury or death. Always check the
reectors are in place and make sure they are clean, straight,
unbroken and securely mounted before riding the bicycle.
WARNING!
Rear (red)
plus or minus
5 degrees of
vercal
Front wheel
(white)
Rear wheel
(white)
Pedal (orange)
Front (white)

Safety 1
11
General Safety
• Familiarize yourself with all the bicycle’s features before
riding. Pracce gear shis, braking, and the use of toe clips
and straps, if installed.
• Always ride defensively in a predictable, straight line. Never
ride against trac.
• Expect the unexpected (e.g., opening car doors or cars
backing out of concealed driveways).
• Take extra care at intersecons and when preparing to pass
other vehicles.
• Maintain a comfortable stopping distance from all other
riders, vehicles and objects. Safe braking distances and forces
are subject to the prevailing weather condions. Do not lock
up the brakes. When braking, always apply the rear brake
rst, then the front. The front brake is more powerful and if it
is not correctly applied, you may lose control and fall.
• Always use the correct hand signals to indicate turning
or stopping.
• Obey the trac laws (e.g., stopping at a red light or stop sign,
giving way to pedestrians).
• Wear proper riding are, reecve if possible, and avoid
open toe shoes.
• Do not use items that may restrict your hearing and vision.
• Do not carry packages or passengers that will interfere with
your visibility or control of the bicycle.
RoadCondions
• Be aware of road condions. Concentrate on the path ahead.
Avoid pot holes, gravel, wet road markings, oil, curbs, speed
bumps, drain grates and other obstacles.
• Cross train tracks at a 90 degree angle or walk your
bicycle across.
Wet Weather
• When riding in wet weather always wear reecve clothing
and use safety lights to enhance visibility.
• Exercise extreme cauon when riding in wet condions.
• Ride at a slower speed. Turn corners gradually and avoid
sudden braking.
• Brake earlier, it will take a longer distance to stop.
• Pot holes and slippery surfaces such as line markings and train
tracks all become more hazardous when wet.
WARNING!
RIDING SAFETY
Riding the bicycle in unsafe condions (i.e. at night), in an unsafe
manner, or disregarding trac laws may result in an unexpected
movement, loss of control, and serious injury or death.

12
1 Safety
Night Riding
• Important! Riding a bicycle at night is not recommended.
Check your local laws regarding night riding.
• Ensure bicycle is equipped with a full set of correctly
posioned and clean reectors.
• Use a white light on the front and a red light on the rear.
Use lights with ashing capability for enhanced visibility.
• If using baery powered lights, make sure baeries are
well charged.
• Wear reecve and light colored clothing. Wear reecve
clothing and use safety lights for increased visibility.
• Ride at night only if necessary. Slow down and use familiar
roads with street lighng.
Hill Technique
• Gear down before a climb and connue gearing down as
required to maintain pedaling speed.
• If you reach the lowest gear and are struggling, stand up on
your pedals. You will then obtain more power from each
pedal revoluon.
• On the descent, use the high gears to avoid rapid pedaling.
• Do not exceed a comfortable speed; maintain control and
take addional care.
• Braking will require addional distance. Iniate braking slowly
and earlier than usual.
Cornering Technique
• Brake slightly before cornering and prepare to lean your body
into the corner.
• Maintain the inside pedal at the 12 o’clock posion and
slightly point the inside knee in the direcon you are turning.
• Keep the other leg straight, do not pedal through fast or ght
corners.
• Decrease your riding speed, avoid sudden braking and
sharp turns.
Safe Riding Rules for Children
• Many states require that children wear a helmet while cycling.
Always wear a properly ed helmet.
• Do not play in driveways or the road.
• Do not ride on busy streets.
• Do not ride at night.
• Obey all the trac laws, especially stop signs and red lights.
• Be aware of other road vehicles behind and nearby.
• Before entering a street: Stop, look le, right, and le again
for trac. If there’s no trac, proceed into the roadway.
• If riding downhill, be extra careful. Slow down using the
brakes and maintain control of the steering.
• Never take your hands o the handlebars, or your feet o the
pedals when riding downhill.

Safety 1
13
BEFORE YOU RIDE SAFETY CHECKLIST
Before every ride, it is important to carry out the following
safety checks. Do not ride a bicycle that is not in proper
workingcondion!
Accessories
□The reectors are properly placed and not obscured. Note:
Bicycles 16” and under may not be equipped with reectors
since small children should not ride at night.
□ All other ngs on the bike are properly and securely
fastened, and funconing.
□ The rider is wearing a properly ed helmet (protecve gear
if necessary) and that clothing and loose items are properly
constrained.
Bearings
□All bearings are lubricated, run freely and display no excess
movement, grinding or raling.
Brakes
□ The front and rear brakes work properly.
□ The brake shoe pads are not overly worn and are correctly
posioned in relaon to the rims.
□The brake control cables are lubricated, correctly adjusted
and display no obvious wear.
□ The brake control levers are lubricated and ghtly secured
to the handlebar.
Chains
□The chain is oiled, clean and run smoothly.
Cranks and Pedals
□ The pedals are securely ghtened to the crank arms.
□The crank arms are secured to the axle and are not bent.
Frame and Fork
□The frame and fork are not bent or broken.
□ The quick-release clamps are locked in place.
Steering
□The handlebar and post are correctly adjusted and
ghtened, and allow proper steering.
□ The handlebars are set correctly in relaon to the forks and
the direcon of travel.
□ The handlebar binder bolt is ghtened.
Wheels and Tires
□ The rims do not have dirt or grease on them.
□ The wheels are properly aached to the bicycle and axle.
□ The res are properly inated within the recommended
pressures displayed on the res sidewall.
□ The res have the proper amount of tread, no bulges or
excessive wear.

14
Part name Torque
(in. lb)
16 Rim -
17 Valve stem -
18 Spoke -
19 Wheel axle nut (front) 180-240
19A Wheel quick-release (opon) -
19B Wheel axle nut (rear) 240-300
20 Fork dropout -
21 Pedal 300-360
22 Crank arm 300
23 Chain guard -
24 Boom bracket lockring 300
25 Chain -
26 Chainwheel -
27 Freewheel -
28 Rear derailleur -
29 Back rack -
30 Linear brake assembly -
30A Brake cable pinch bolt 50-70
Part name Torque
(in. lb)
1Handlebar grip -
2Rear brake lever 55 -70
3Brake cable -
4 Shier cable -
5Handlebar -
6Front brake lever -
7Stem binder bolt 100-120
8Handlebar binder bolt(s) 145-200
9Stem -
10 Headset 175-260
11 Caliper brake aaching nut 70-85
12 Caliper brake assembly 50-70
12A Brake cable pinch bolt 50-70
12B Brake pads -
12C Brake pads hardware 50-60
13 Front Fender -
14 Fork -
15 Tire -
Part name Torque
(in. lb)
30B Brake pad -
30C Brake pad hardware 50-60
30D Brake spring -
30E Brake pivot bolt 17-20
31 Seat post clamp 60-80
31A Seat quick-release (opon) ?
32 Seat post -
33 Seat post aaching hardware 130-170
34 Saddle (seat) -
❷Parts Idencaon
Cruiser Bicycle
Get to know the parts of your bicycle. This will help with assembly, maintenance, and troubleshoong. Color, style and parts may vary.

Parts Idencaon 2
15
1
4
3
12
10
14
20
19
34
21
27
22
23
17
25
30B
31
6
16
18
7
32
12A
30C
29 12C
11
19B
26
30A
30D
30E
28
12B
2
8
13
15
33
30
24
31A
19A
5
9

3 Assembly
16
Figure 3.1
WARNING!
• Improperassemblyofthisproductmayresultinserious
injuryordeath.Alwaysfollowtheinstruconsinthis
manualandcheckcricalcomponents(e.g.wheels,seat,
pedals,brakes,derailleurs,res)beforeeachuse.
• Werecommendthatyouconsultabicyclespecialistifyou
havedoubtsorconcernsastoyourexperienceorabilityto
properlyassemble,repair,ormaintainyourbicycle.Ifyour
bicyclewasobtainedassembled,werecommendthatyou
readtheseinstruconsandperformchecksspeciedin
thismanualbeforeriding.
Ifyouneedreplacementpartsorhavequesonspertainingto
theassemblyofyourbicycle,calltheservicelinedirectat:
1-800-626-2811. Monday-Friday8:00amto5:00pmCentral
StandardTime(CST).
TOOLS REQUIRED
• Phillipsheadscrewdriver
• 4mm,5mm,6mmand8mmAllenwrench
• Adjustablewrenchora9mm,10mm,14mmand15mm
openandboxendwrenches
• Apairofplierswithcablecungability
Your new bicyclewasassembledandtunedinthefactoryand
thenparallydisassembledforshipping.Youmayhave
purchasedthebicyclealreadyfullyassembledandreadytoride
orintheshippingcartonintheparallydisassembledform.
Thefollowinginstruconswillenableyoutoprepareyour
bicycleforyearsofenjoyablecycling.
Formoredetailsoninspecon,lubricaon,maintenanceand
adjustmentofanyareapleaserefertotherelevantseconsin
thismanual.Ifyouhavequesonsaboutyourabilityto
properlyassemblethisunit,pleaseconsultaqualiedspecialist
beforeriding.
❸Assembly
WARNING!

Assembly 3
17
17
Figure 3.2
GETTING STARTED
❶ Openthecartonfromthetopandremovethebicycle.
Figure 3.2
❷ Removethestrapsandprotecvepackagingfromthe
bicycle.Important!Donotdiscardpackingmaterialsunl
assemblyiscompletetoensurethatnorequiredpartsare
accidentallydiscarded.
❸ Inspectthebicycleandallaccessoriesandpartsforpossible
shortages.Itisrecommendedthatthethreadsandallmoving
partsinthepartspackagebelubricatedpriortoinstallaon.
Note:Werecommendusingalithiumbasedgreaseonthe
partsbeforeassembly.
Not all bicycles will come equipped with accessories such as
baskets and bells.
Pedals
Handlebar
assembly
Frame
FrontwheelFront
fender
Bell
Basket
Seat
Seatpost

3 Assembly
18
Figure 3.3
ATTACH THE HANDLEBAR
❶Turnthefrontforktofaceforward.Figure 3.3
Posionthehandlebarassemblyoverthesteerertube.Look
atallthecablestobesuretheyruninasmootharcfrom
theshierorbrakelevertothefrontbrakeorcablestopon
theframe.Important!Iftheyaretwistedorkinked,the
shiingandbrakingwillnotwork.
❷ Insertthestempostintothesteerertubeandadjustthe
handlebarunltheriderfeelstheyhavecontrolofthe
bicycleandarecomfortable.SeeSecon 1, Fig. 1.2: Seat
Height and Handlebar Reachforguidelines.
Important!Besuretheminimum inseron marksdonotgo
abovethetopoftheheadsetandarenotvisible.
WARNING!
• Improperaachmentofthehandlebarmayresultin
damagetothestempost,steerertubeandresultinlossof
control,seriousinjuryordeath.Ensuretheminimum
inseron marksonthestempostarenotvisibleabovethe
topoftheheadset.
• Failuretoproperlyghtenhandlebarcomponentsmay
resultinlossofcontrol,seriousinjuryordeath.Always
checkthehandlebarcannotmoveandissecuredtothe
framebeforeridingthebicycle.
❸ Usinga6mmAllenwrenchghtenthestembinderboltat
thetopofthestempost.Checkthehandlebarbinderbolt(s)
tobesuretheyareproperlyghtenedandthehandlebaris
clampedinplace. Note:SeeSecon 4: Adjusng the
Handlebar ifadjustmentsareneeded.
Frontfork
facingforward
Handlebarbinderbolt(s)
Headset
Stempost
Steerer
tube
Stembinder
bolt
1
2
3
Minimum
inseron
marks
Table of contents
Languages:
Other Schwinn Bicycle manuals

Schwinn
Schwinn Paramount User manual

Schwinn
Schwinn Hybrid User manual

Schwinn
Schwinn HYBRID BICYCLE User manual

Schwinn
Schwinn Roadster User manual

Schwinn
Schwinn S6767 User manual

Schwinn
Schwinn Classic Cruiser Installation and operating instructions

Schwinn
Schwinn Roadster User manual

Schwinn
Schwinn S-14 Cruiser User manual

Schwinn
Schwinn 26" Adult Tricycle User manual

Schwinn
Schwinn FASTBACK TRAILER User manual