Scotty Depthpower 30" User guide

• Installation • Maintenance •
• Use and Safety •
CAUTION! Read through this entire booklet before operating your Scotty Downrigger.
Improper use may damage your downrigger and void the warranty. You may also expose
yourself to unnecessary danger and physical injury.
The Way To Fish™
DEPTHPOWER
ELECTRIC DOWNRIGGER

2
Electric Downrigger Manual
Thank you for choosing a Scotty Downrigger. In 1973 Scotty produced its
rst downrigger. Our goal was to manufacture a superior downrigger, built to
withstand the demanding marine environment, and we now produce many
manual and electric models. This instruction book will give you basic
instruction on mounting and using your downrigger. Please read carefully.
It will improve your results and also give you important tips on downrigger
safety and care. Good Fishing!
Features
Speed & Efciency
The Scotty Depthpower Downrigger’s drive mechanism incorporates a
positive drive gear belt to turn the downrigger spool. This highly efcient
belt system is used by many auto makers for valve timing, and the benet
to the sherman is that power is transferred from the motor at a greater
efciency than worm gear drives used in most electric downriggers. The
result is a faster retrieval speed with less electric power used. The Scotty
Depthpower Downrigger will retrieve at speeds two to three times faster
than most electrics.
Clutch Brake
The Scotty clutch brake allows descent of the downrigger weight at any
speed you choose. Most of the time you will want a slow, even
descent speed to avoid tangles. However, in instances where you
want a lure deep very quickly, the Scotty will respond, giving you
complete control. In addition, the brake is factory set to allow the line to
pay out if you hang up on the bottom. If you do happen to hang up on the
bottom, the clutch brake may allow you time to turn the boat around
and lift free the weight. It is advisable to always carry a good set of wire
cutters in case the downrigger weight cannot be set free.
Auto-Stop
Auto-Stop control permits hands free line retrieval and automatically
stops at any pre-set point.

3
Fishing with Downriggers
Downrigger shing is a whole new style of trolling. It may take a little while
to get used to it, but after you begin to catch sh with it, you’ll never go back
to using heavy tackle. Unlike conventional trolling, the rst evidence of a
strike may show with just a wiggle of your rod tip or your downrigger pulley.
When a sh strikes, your rod tip goes up, the line will momentarily go slack
and you now have your sh on the line with no weight at all! Quite often, the
sh will rush to the surface (with no weight to hold him down) and put up a
spectacular ght right on top.
After a strike, note the reading on the depth counter so you can get your
line back to the exact same depth after you land the sh. Many suspended
sh travel in schools. By returning to the exact same location you will have
an excellent chance of hooking up again.
If the sh is large we suggest you retrieve the downrigger before you land
the sh. This eliminates the possibility of the sh tangling in the downrigger
line or the weight hitting the bottom if you drift into shallow water while
playing the sh. To avoid tangles you should wind up all downriggers on the
boat before you stop to drift. If shing alone, you should get your sh under
control and then retrieve the downrigger.
4
Downrigger Safety
The Scotty Depthpower 30” and 60” electric downriggers are designed
for use on wide beam boats of 16 ft. in length and up. Installation on
smaller boats is not recommended. All sports have some physical hazards
connected with them and shing with downriggers calls for some common
sense and precaution.
There are natural physical forces
associated with long arm downriggers.
The load or strain at the mounting point of
a downrigger is proportional to the length
of the arm. In the event of a bottom hang
up with a 30” - 60” arm and high breaking
strength trolling wire, the arm leverage can
exert a tremendous force on the gunnel of
your boat. It is obvious that this force could
overcome a weak-mounting point on the
boat. In the case of a small boat, it could
cause the boat to submerge or overturn
if the wire is caught on the bottom in a
strong tide or in a heavy wind.
Care must always be exercised to avoid
tangling your downrigger wire in your boat
prop. The best way to avoid this risk is to
mount the downrigger near the stern of
the boat so that the wire never gets under
the boat in a turn. Sharp turns should be
avoided.
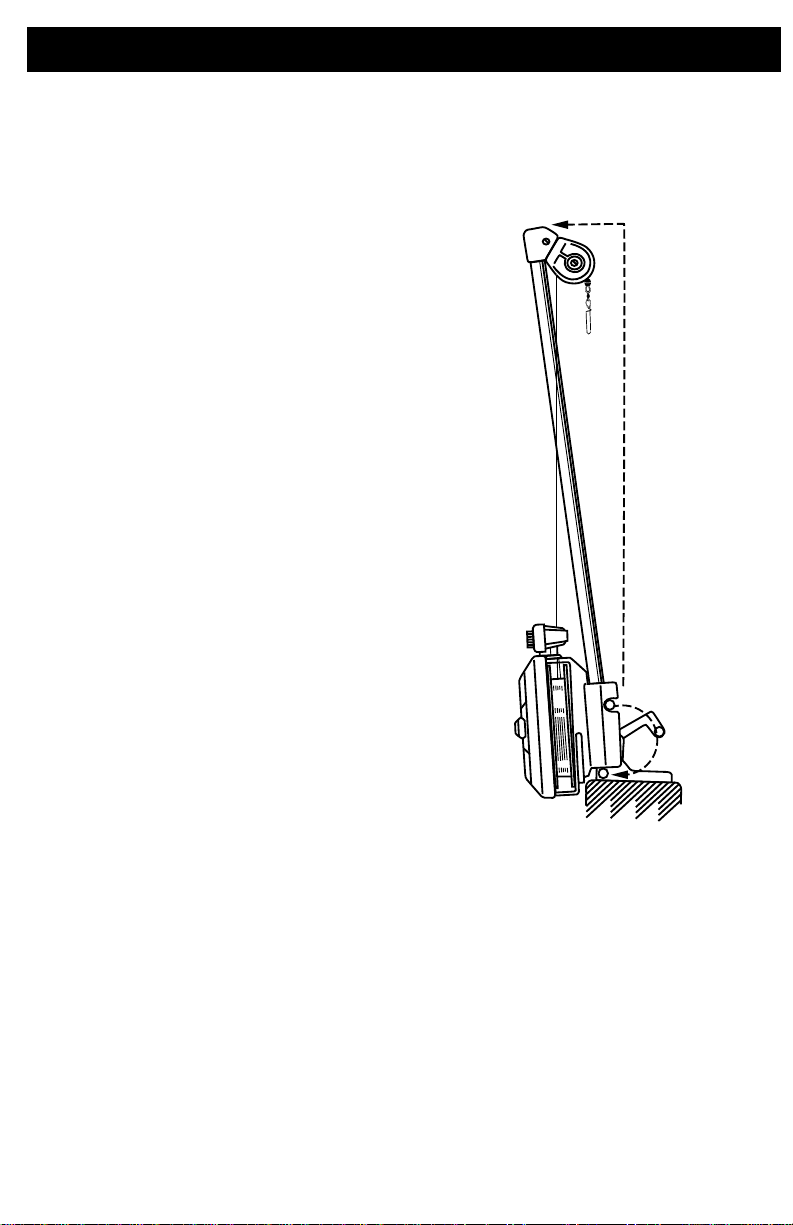
When the downrigger is tilted up, the
boom must be tilted back past vertical,
and the red lock lever tucked fully under
the downrigger base.
Keep your ngers away from the
underside of the downrigger base and
always remove the weight when the
downrigger is tilted up or unattended.
Make sure the area where you are
mounting your downrigger is strong and reinforced. If it is weak, reinforce it
with a backing plate of wood or metal.
Always try to bring the weights, releases, and tackle inboard to you. When
retrieving or hooking up, do not lean out, as a sudden roll or a slippery deck
could send you overboard.
Don’t attempt to retrieve a weighted or snagged downrigger cable by hand.
Wave or boat motion could cause serious injury.
VERTICAL
Red lock lever must
be tucked under
base to lock
the downrigger upright.

5
What happens when you hit bottom?
When your weight touches bottom while trolling, you will see the downrigger
boom bounce. You should immediately bring your weight up to a safer
depth.
WARNING! Be very cautious when shing in strong tidal current or on windy
days. If the weight or wire snags on the bottom, the force of the tide or wind
on the boat can put a terric strain on the downrigger.
KEEP a pair of wire cutters handy in case you have to cut the wire in
an emergency! Because of the built in tilt-up feature, the downrigger
boom may y up quickly when the wire breaks or is cut, so be sure to
stand clear, not leaning over the boom.
We recommend you always have a large scale chart of your shing area
and know your position at all times when deep trolling. With a relatively
smooth bottom, if your weight hangs up on a small ledge it can often be
released by turning around and pulling from the opposite direction. The wire
line can be paid out if necessary while you turn the boat to the direction of
the hang-up. After a hang-up, the wire should be examined for any broken
strands. If strands are broken, it should be cut and rejoined as a temporary
measure and replaced as soon as possible.

6
Wiring Instructions and Installation
WARNING:
Batteries contain a large amount of potential electrical energy.
Extreme care must be used when working with batteries. An improper
connection to a battery can release enough energy to cause severe
injury or re.
PLEASE READ THROUGH ALL INSTRUCTIONS PRIOR TO
INSTALLATION.
Required for Installation and NOT included with this kit:
30 amp fuse with fuse holder•
Overcurrent Protection
The wiring between the battery and the receptacle must have proper
overcurrent protection in the form of an inline 30-amp fuse. Position the
overcurrent protection within 7” of the battery.
Wire Gauge
Use good quality marine grade tinned electrical wire to bring power to your
downrigger. To determine the correct gauge of wire, measure the “wire run
length” which is the distance from the positive (+) power source connection,
to your downrigger and back to the negative (-) power source connection.
For wire run lengths up to 25 feet use minimum 12 Ga. wire, for runs of 25
– 40 feet use 10 Ga. wire. Wire smaller than the recommended gauge will
not carry sufcient power to operate your downrigger at its rated speed and
power, it will run noticeably slower.
The downrigger should always be unplugged when not in use.
1 1/8"
Receptacle template
7
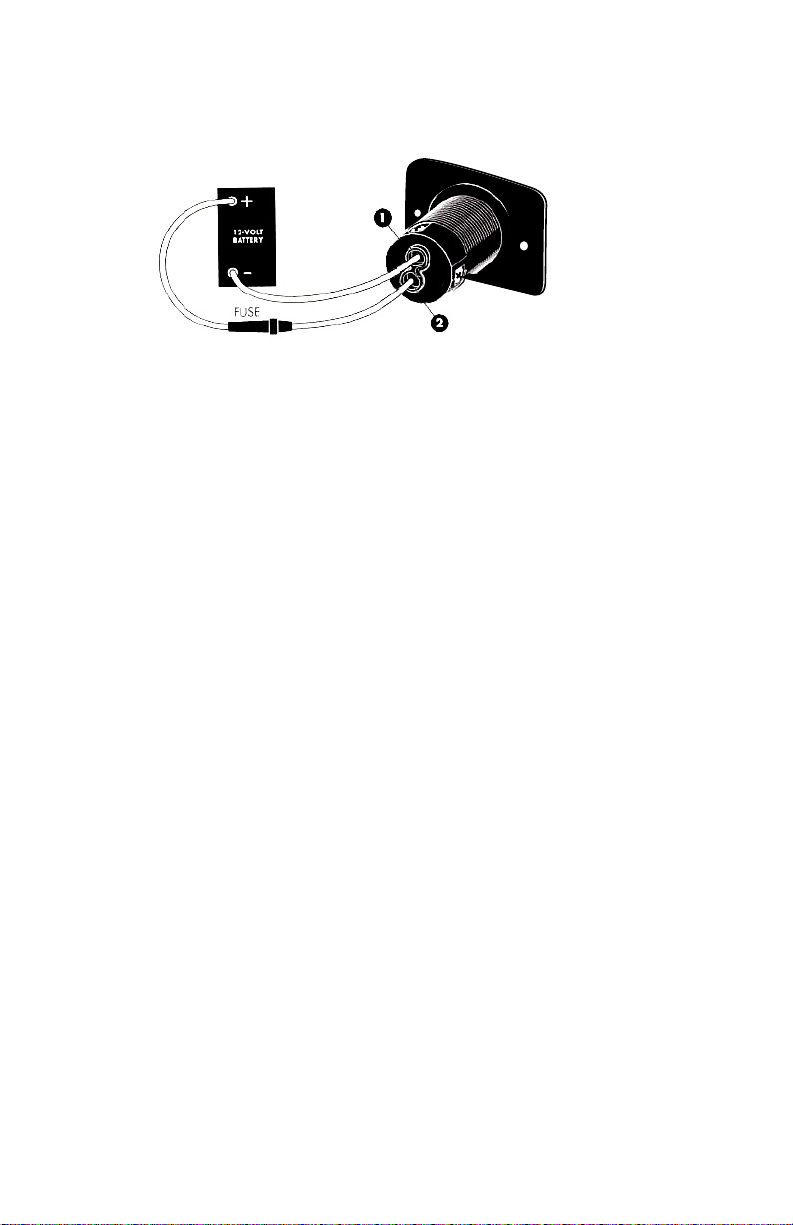
Receptacle Installation & Wiring
Itisimportantthatthe receptacleiswiredtomatchhowtheplugiswired.The
terminals marked “1” and “2” on the receptacle mate with the corresponding
terminals marked “1” and “2” on the plug.
Mounting the receptacle requires a 1 1/8” hole to be drilled. Select1. a location where the boats structure will not be weakened. Also,
mount on a vertical surface to lessen the amount of water that can
enter the receptacle.
Using the template on page 6, mark and drill the required holes.2. Slide the rubber receptacle boot onto the wire. Strip the wire3. insulation back ½” to expose clean bare wire. Do NOT solder the
ends of the wires.
Feed the wire from the back, through the 1 1/8” hole. Insert the4. negative (-) wire into terminal “1” and the fused positive (+) wire
into terminal “2” and tighten both terminal screws. Make certain
there is no wire insulation inside the terminals, and there are no
stray wire strands outside the terminals. Do not overtighten!
Mount the receptacle. Ensure the drain hole is facing down.5. Push the rubber receptacle boot onto the receptacle from the6. backside.
Circuit Breaker
Your Scotty electric downrigger is equipped with an automatic circuit
breaker to protect the motor from overload. If you hang up on the bottom or
on a heavy mass of weeds and then push the power up button, the circuit
breaker will probably trip. Wait 5 to 10 seconds for it to automatically reset
and you will have power again. However, do not repeatedly attempt to lift
a load too heavy for the downrigger motor. If possible the downrigger line
must rst be freed from the obstruction.
Note: It is also possible to trip the circuit breaker by raising a weight
over 20 lb. from extreme depth. The circuit breaker is designed to trip
at 15 amps. If this happens allow the circuit breaker to cool several
seconds before resuming lifting.
12 Volt Battery
In-Line 30 amp Fuse

8
Mounting Instructions
AllScottyelectricdownriggersmount ontheScottyNo.1023tiltupmounting
bracket supplied with the downrigger. This bracket can be bolted directly
to your gunnel or on top of an alternative mount (for additional mounting
options see page 15). The downrigger can be mounted on the side of the
boat, the stern or off the corner. Downriggers work best if they are mounted
near the stern of the boat. They will work in any location but the risk of
tangling wire line in your prop while turning the boat is minimized the further
back the downrigger is mounted.
You will be handling heavy weights and setting lines and releases, ensure
your mounting location is convenient and safe for these operations. Do
not mount it where you have to reach or lean a long way to make the
connections.
The mounting bracket must be mounted on a at surface and the rear
of the bracket must be with in 1/4” of the edge of the gunnel so that the
downrigger brake handle has clearance for tilting (see diagram). Because
of the heavy stresses placed on the boat gunnel by the leverage of the long
downrigger arm, we recommend that a wood or metal backing plate always
be installed on the underside of the mounting surface. This spreads the
load and reduces damage to the boat in the event of a bottom hang up.
You should also consider rod holder mounting locations when deciding
where to mount your downrigger. Scotty Depthpower Downriggers come
with two types of rod holders, boom mounted and dual platform style. You
may choose to use the supplied rod holder as is, or mount additional rod
holders on your boat. Rod holders work equally well when mounted either
fore or aft of the downrigger.
NOTE: If your boat's
gunnel configuration
does not allow this
standard mounting,
see the optional
mounts on page 13.
1/4" Maximum
to inside edge
Note: If your boat’s
gunnel conguration
does not allow this
standard mounting,
see optional mounts
on page 15.
9
Rigging Your Fishing lines
Once mounted, push the downrigger brake handle forward to1. ensure it is in the locked position. Attach your weight to the
downrigger snap hook. Use enough weight to ensure
the downrigger cable does not drag back at more than
a 30 degree angle when travelling at trolling speeds.
7 to 12 lb. is adequate for most shing conditions.
NOTE:Always keep tension on downrigger wire. Downrigger wire
could kink or spill off spool edges if it becomes slack.
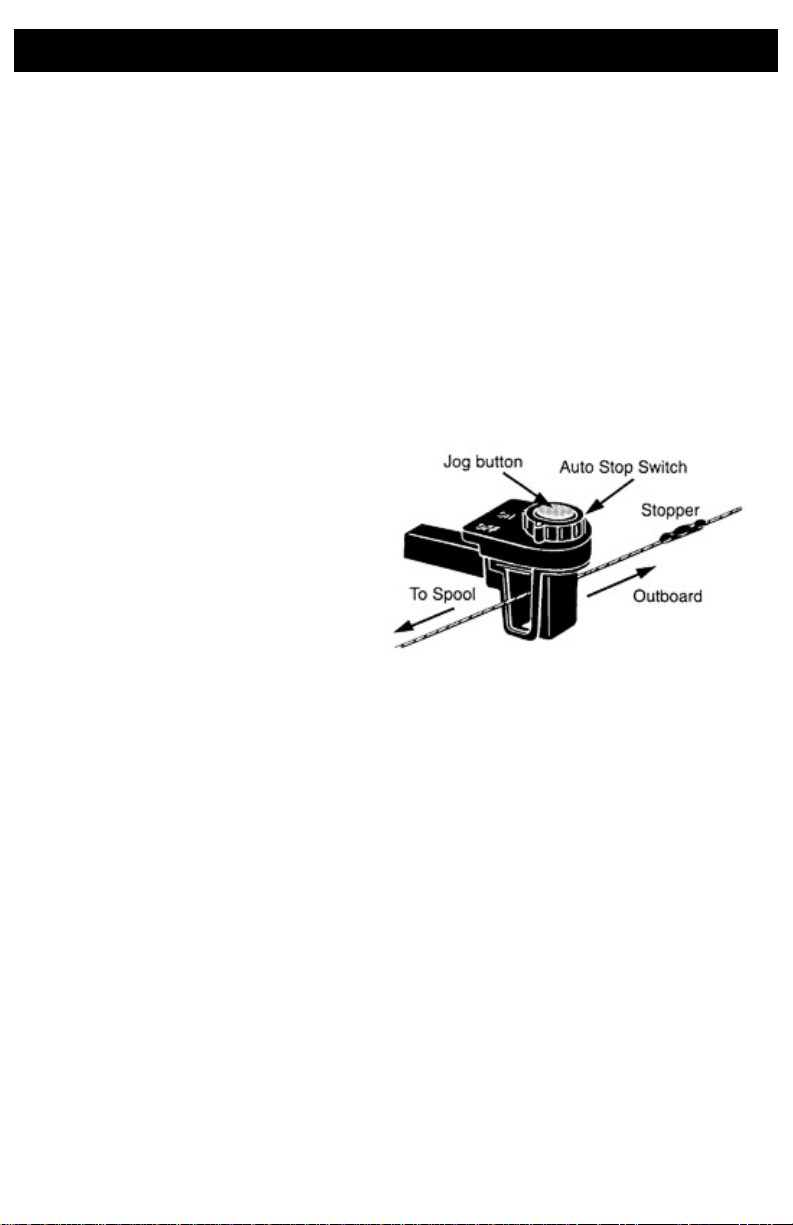
The AUTO STOP shuts off the downrigger when a stopper bead2. passes through it and triggers the shut off switch (a stopper bead
has already been installed on the downrigger cable). You can
place other stopper beads at any point on your cable.
Your release clip should always be located at least ve feet lower3. than a stopper bead.
Have the AUTO STOP switch in the “OFF” position, pointing in4. line with the boom.
Connect the power source.5.
Lower the weight down6. approximately ten feet.
Turn the AUTO STOP7. switch to “ON” and your
downrigger will stop as
soon as your stopper bead
enters the gate passage.
Push the jog button to8. bring the weight or release clip up to the pulley.

10
Clip the snap of the Power Grip release to the downrigger weight.9. Attach your shing line to the Power Grip release by squeezing
the jaws apart and placing your shing line between the pads. You
can adjust the release tension by placing the shing line further
into the jaws. To further increase the release tension you can
move the tension adjuster slider to the out position.
With your shing rod in a rod holder, set the tension on your reel10.so that the line will pay out, but with enough drag tension so that it
doesn’t free wheel. It is important to have your shing line tight to
the downrigger line because you may lose the sh if it has slack
line after releasing off the downrigger.
The downrigger weight is lowered by moving the brake handle in a11. clockwise direction. You can go as fast or as slow as you wish, but if
you are using a asher or dodger it is best to descend at a slow,
even rate to eliminate fouling the asher or dodger with the
downrigger cable.
After each use, it is advisable to rinse off your downrigger with fresh
water to avoid salt build-up. The unit is made of non-corrosive materials,
but a build up of salt and seaweed could affect performance.

11
Downriggers Do’s and Don’ts
DO Attachyourrodandreellinetoyourdownriggerwhileyourboatisin
forward motion, this will avoid tangles.
DO Read the depth counter when you catch your sh, then go back to the
same depth.
DO Replace cable regularly to avoid lost gear.
DO Rinse off your downrigger with fresh water after each use, if used
in saltwater.
DO Clean power plugs regularly
DON’T Use heavier weight than shing conditions require. Heavy weights
reduce performance and efciency, and shorten wire life.
DON’T Let the downrigger wire go slack. Kinks may form or the wire
could spill off spool edges.
DON’T Let your shing reel spin free while you lower your downrigger.
Set a light drag.
DON’T Use nylon or other monolament line on your downrigger. Nylon
will stretch in use and shrink back on the spool with enough force
to damage it. Use of Nylon line will void the downrigger warranty.
Use of Scotty brand braided line will not void your warranty
DON’T Spray downrigger or wire with spray lubricants, oils etc., as these
will damage the plastic.
DON’T Attempttoretrieveaweightorsnaggeddownriggercablebyhand.
Wave or boat motion could cause serious injury.
12
Emergency Crank Handle
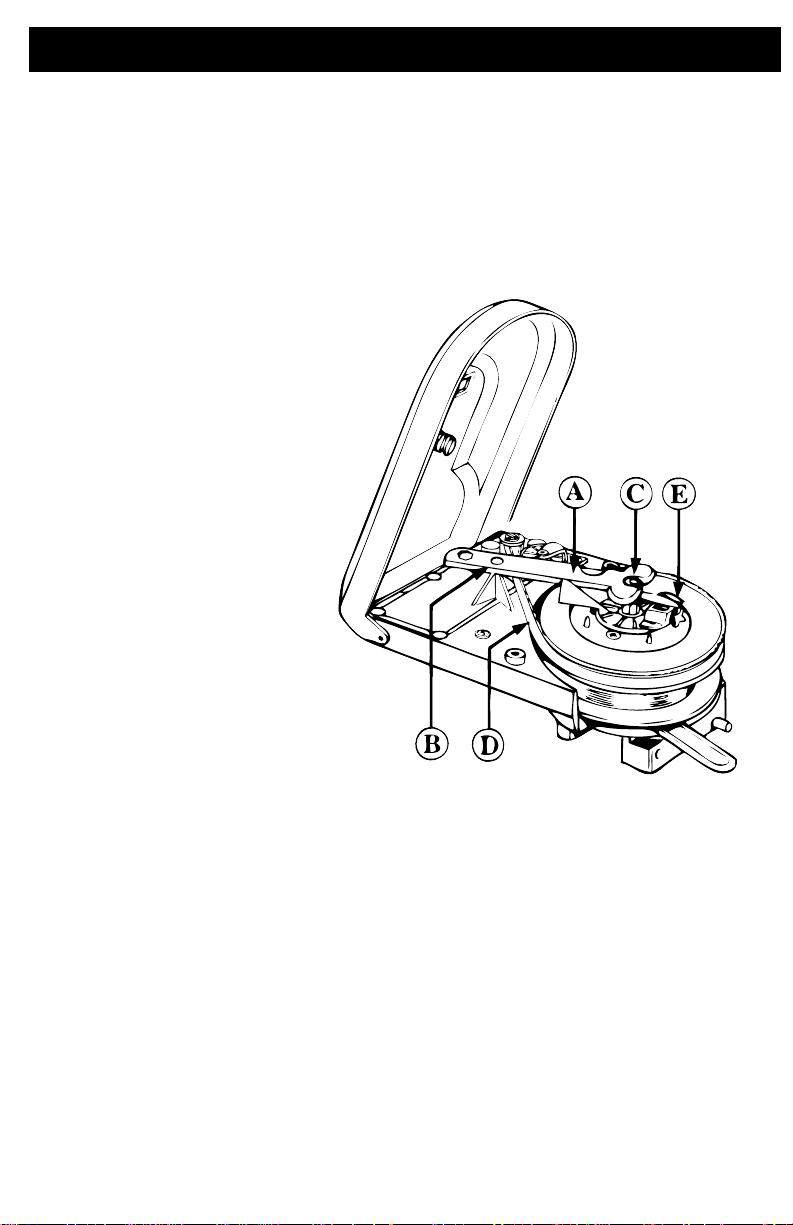
Before shing with your Scotty Depthpower for the rst time, you should
familiarize yourself with the use of the Emergency Crank Handle A. This
device is intended for use when a power loss has occurred and the weight
must be retrieved.
DISCONNECT POWER TO THE DOWNRIGGER.1. Move the latch on the2. top of the downrigger
lid to the ‘unlocked’
position and tilt the lid
open.
Remove the lid by3. pulling sideways on
one of the mounting
tabs.
Lift the Emergency4. Crank Handle Aoff the
locating pin Band pull
it off the nut C.
Lift the Drive Belt 5. D
off the spool gear E
and put it in a secure
place.
Slide the non-forked6. end of the Emergency
Crank Handle into
the slot on the top of
the spool gear Eat
a 45° angle. You will
now be able to crank
up the wire line using
the Emergency Crank
Handle.
As the weight is being retrieved, the counter pressure plate7. assembly will spin with the spool. Therefore, rotate the counter
pressure plate so that the star wheel on the counter does not
interfere with the pins on the spool gear. Adjust the counter
reading by spinning the counter star wheel by hand.
The parts that have been removed should be installed in the8. reverse order they were taken off. Rotate the counter pressure
plate assembly so that the arm that supports the Emergency
Crank Handle is aligned between the shaft, locating the counter
under the cover window. Lift the Emergency Crank Handle over
the locating pin Bengaging its hole onto the pin.
TheEmergency Crank Handle9. Amustalways be securely in place
when the downrigger is in use under power, as it ensures correct
alignment of the drive unit. Make sure the lid is down and locked
before connecting the power.

13
Care And Maintenance
Your Scotty Electric Downrigger is constructed of corrosion resistant
materials. The following regular maintenance checks should be
performed:
Rinse with fresh water after every use.1. Routinely check the stainless steel fastenings with a screwdriver2. to see that they are snug and secure.
Checktheelectricalplugconnectorsforcorrosionandcleanoffany3. corrosion found. Failure to clean corrosion may cause electrical
arcing and shorting which may be a potential re hazard.
Do not use any lubricants. Lubricants will attack the plastic4. components.
Do not expose the downrigger to ultraviolet light for extended5. periods of time.
A fabric cover (Scotty product No. 3015) is available to protect your
downrigger from ultraviolet damage.
BRAKE ADJUSTMENT
It may be necessary to adjust the brake tension if either the weight does not
descend freely or cannot be held when the brake is in the on position.
DISCONNECT POWER TO THE DOWNRIGGER.1. Remove any weight from the line.2. Unlatch and carefully remove the lid. Remove the Emergency3. Crank Handle, as instructed in step 4 on page 12.
Move the brake handle to the “off’ position so that the spool can4. move freely. Using a 9/16 inch wrench or the molded hex in the
emergency crank handle, either tighten or loosen the nylock nut
as required to obtain the correct brake setting. NOTE: With the
brake off, a 7lb. weight should descend freely, but with the brake
on, it should hold 15 to 20 lbs. With a weight on, the brake should
engage automatically when the handle is released.
Re-assemble the Emergency Crank Handle and install the lid as5. instructed in steps 7 and 8, on page 12.

14
Care And Maintenance
WIRE MAINTENANCE
We have found many things can affect the life of the wire. Included in
these are such things as; an unobserved kink, electrolysis caused by stray
electrical currents emanating from the boat, certain types of jelly sh and/
or minute sea creatures which may have a corroding effect when left on the
wire. Frequent inspection and wiping or washing wire with fresh water may
help to prolong the wire’s life span.
HOW TO REPLACE WIRE
DISCONNECT POWER TO THE DOWNRIGGER.1. Mount the downrigger someplace secure (its regular boat mount2. is good) and pull off the old wire. When you come to the end of the
wire, cut the loop off the downrigger spool.
Take the free end of the wire from the supply spool and thread3. it through the pulley, fairlead and the autostop. Thread the wire
through the holes from the inside of the spool.
Tie an overhand knot in the wire, pulling it snug against the spool.4. Tie a second overhand knot giving you a “square knot” and pull it
snug. Secure the loose end with tape to keep it from fouling the
remainder of the wire line.
Wind the wire onto the spool using the Emergency Crank Handle.5. For directions on the use of the Emergency Crank Handle see
page 12. Keep tension on the supply spool to wind the new wire
on as tight as possible. Be sure to let wire unroll from the supply
spool, rather than spill off the side. Avoid twisting or kinking the
wire, or winding it onto the spool too loosely. (This operation is
best carried out with two people.)
Attach a new Scotty bumper and snap hook.6.
Windingmorethan300’of150Ib.testwireontothespoolwillaffectaccuracy
of the depth counter. Use of larger diameter wire will also affect the counter
accuracy and may not be compatible with Scotty stopper beads.
Scotty utilizes the highest quality wire available. As there are many
causes of wire breakage, wire is not subject to any warranty, expressed
or implied.

This manual suits for next models
1
Table of contents
Other Scotty Fishing Equipment manuals


Popular Fishing Equipment manuals by other brands


MIVARDI
MIVARDI M‑CHPREL user guide

Smith-Root
Smith-Root VVP-15B user manual

Clam
Clam Jason Mitchell 200XT PRO THERMAL manual

Avet Reels
Avet Reels Two Speed Assembly SX 6 - 4 parts list

Fisherman's Habit
Fisherman's Habit 98882 Setup and operation instructions

Browning Fishing
Browning Fishing 9912004 quick start guide