SDI radii xpert User manual

1
OUR
VISION.
YOUR
SMILE. www.sdi.com.au
INSTRUCTIONS FOR USE
PLEASE READ THESE INSTRUCTIONS BEFORE OPERATING THIS UNIT
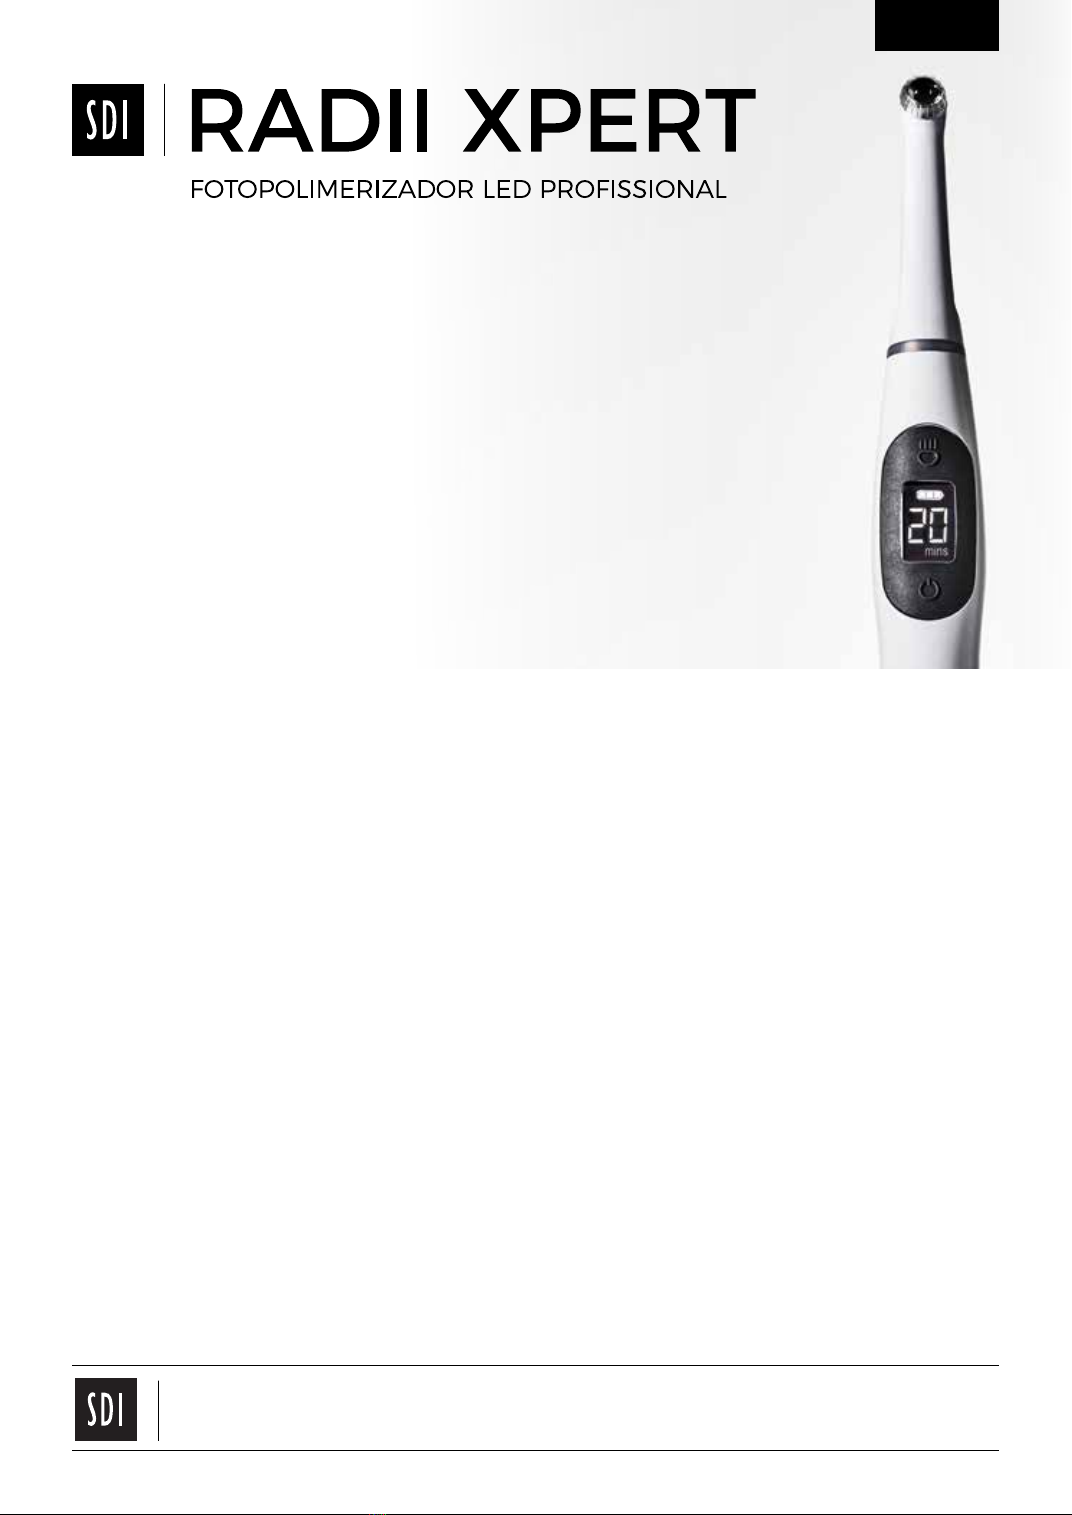
PRODUCT DESCRIPTION
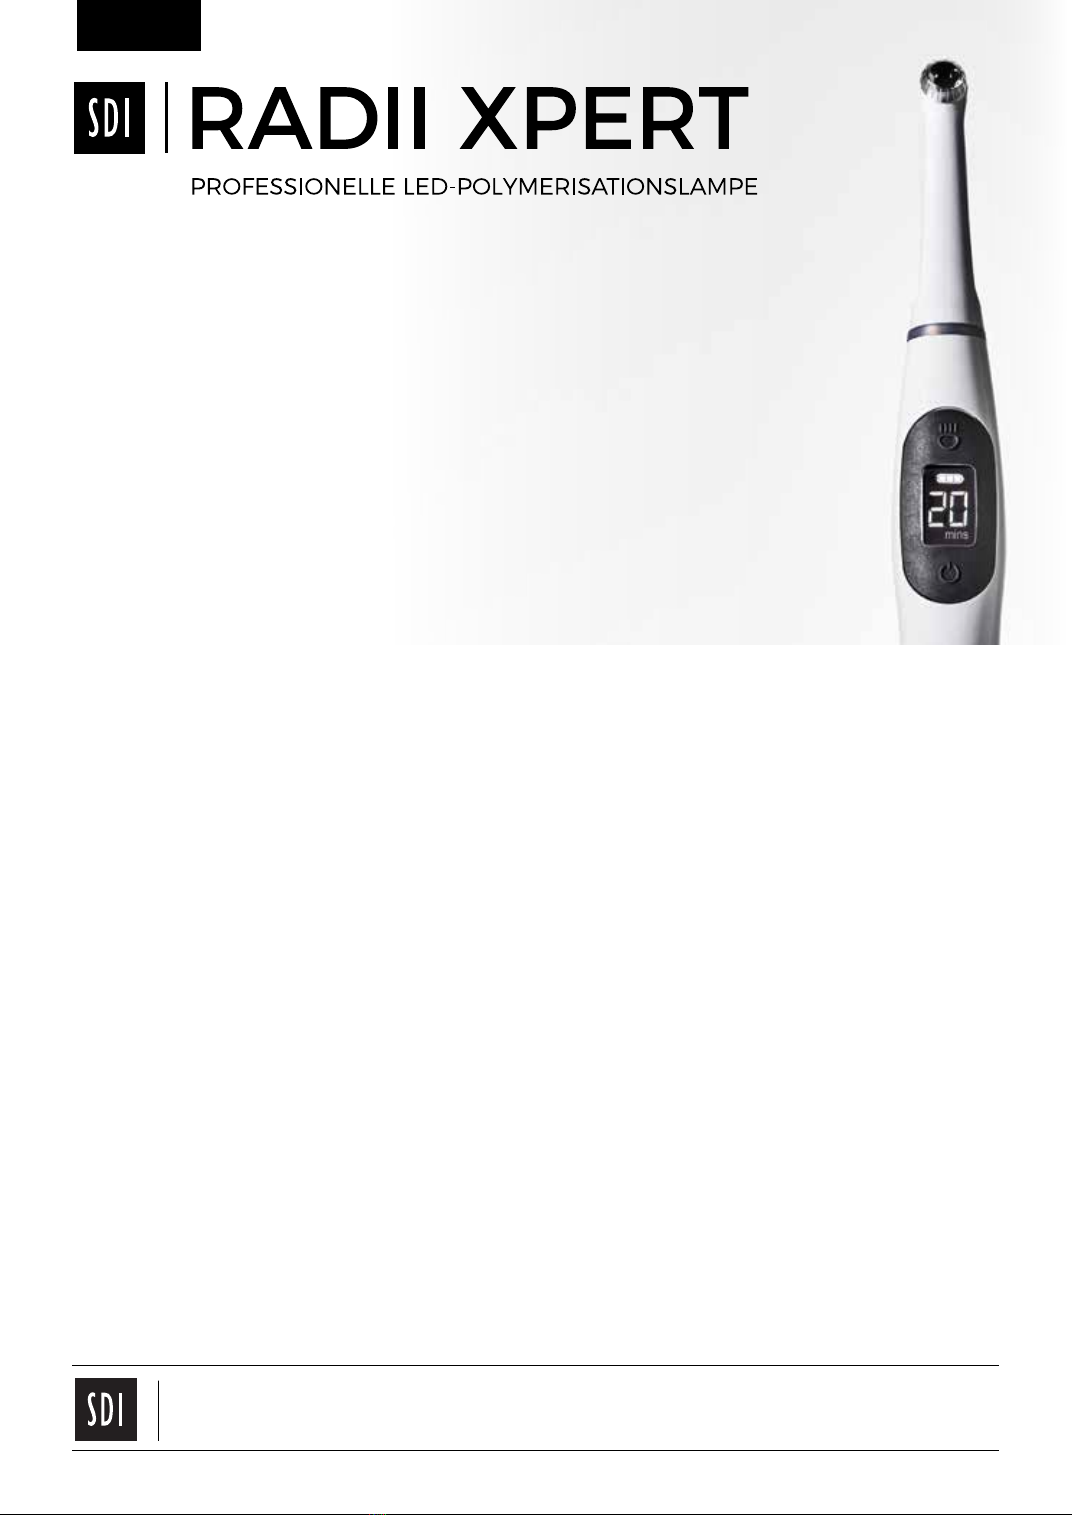
Thank you for purchasing the Radii Xpert LED curing light. The Radii Xpert is a high performance light source
for the intraoral polymerization of light-cured materials with photoinitiator(s) in the wavelength range of
440 nm - 480 nm (standard curing tip). It has been designed to consistently produce optimum polymerization
for all light-cured materials in order to produce high-quality restorations.
Target assist technology, a special low power light, has been incorporated into the Radii Xpert to assist users
to accurately position the curing tip before polymerization begins.
The Radii Xpert is a high quality medical device which has been designed in accordance to the latest science
and technology for curing lights. Each unit comes with an international power supply and is suitable for power
outlets from 100 - 240 Volts.
SMARTER DESIGN.
OPTIMAL CURE EVERY TIME.
ENGLISH

2
SAFETY, WARNINGS & CAUTIONS
Use of the Radii Xpert is restricted to qualified medical professionals in accordance with the safety instructions below:
1. Do not open or alter the Radii Xpert in anyway. Only dealers authorised by SDI Ltd may open the housing and repair
the device.
2. Do not introduce any objects into the unit with the exception of replacement parts handled in accordance with this manual.
3. Only charge the Radii Xpert handpiece in the Radii Xpert charger.
4. Connect the power plug into a suitable grounded and approved outlet.
5. Always unplug the power to the charger during cleaning of the unit.
6. Do not use damaged power cord.
7. Should you have any reason to suspect the safety of the Radii Xpert to be compromised, the unit must be taken out of operation
and appropriately labelled to prevent third parties from inadvertently using a potential defective unit.
1. The Radii Xpert emits a high intensity light and must only be used as indicated in this manual.
2. Do not look directly into the light source.
3. Operator, assistants and patient must always wear appropriate blue light blocking eye protection or use a blue light blocking
light shield.
4. Restrict exposure to the oral cavity in which clinical treatment is intended.
5. Avoid direct contact of curing tip with soft tissues and mucosa.
1. Radii Xpert can only be operated with the supplied LED tip and is not compatible with previous Radii model
of LED attachments.
2. Condensation resulting from unit being transferred from a cold to a warm environment may be a potential risk.
The unit should only be turned on after it is completely equilibrated to ambient temperature.
3. Use only genuine SDI Ltd parts when replacing defective components as directed in this manual.
4. Do not operate the unit in the proximity of flammable mixtures.
5. Keep solvents, flammable liquids and sources of intense heat away from the unit as they may damage the
plastic housing.
6. Do not allow cleaning agents to enter the Radii Xpert as this may short circuit the unit.
7. Do not use the Radii Xpert in patients or by users:
a. with heart pacemaker implants who have been advised to be cautious with regard to their exposure to small electrical
devices.
b. with a history of photo biological reactions (including individuals with urticaria solaris or erythropoietic protoporphyria) or
who are currently on photo-sensitising medication (including 8-methoxypsoralen or dimethylchlorotetracycline).
c. who have history of retinal disease.
d. who have had surgery for eye cataracts.
Seek advice from their prescribing medical practitioner prior to operating the Radii Xpert on these patients.
8. Prior to each use of the Radii Xpert, ensure that the emitted intensity is sufficient to safely guarantee polymerization.
9. The Radii Xpert was developed and tested in accordance to relevant EMC regulations and standards to conform with legal
requirements. Due to variables that may exist within the work environment, such as power supply, wiring and the ambient
conditions that can affect the EMC properties of the Radii Xpert, EMC disruption may occur. If this happens, move the unit to a
different location.
10. SDI Ltd accepts no liability for any damage resulting from the use of the Radii Xpert for any other purpose than the polymerization
of light-cured dental materials.
SHOCK HAZARD
HIGH INTENSITY
LIGHT
CAUTION
TRANSPORT AND STORAGE CONDITIONS
Ambient
temperature:
85%
max
10%
+40°
+104° F
C
32°F
0° C1060 hPa
500 hPa
0.5 atm
1.0 atm
Relative
humidity:
Atmospheric
pressure:
ENGLISH
3
CAUTION
Do not autoclave the
LED light attachment or
any part of the Radii Xpert.
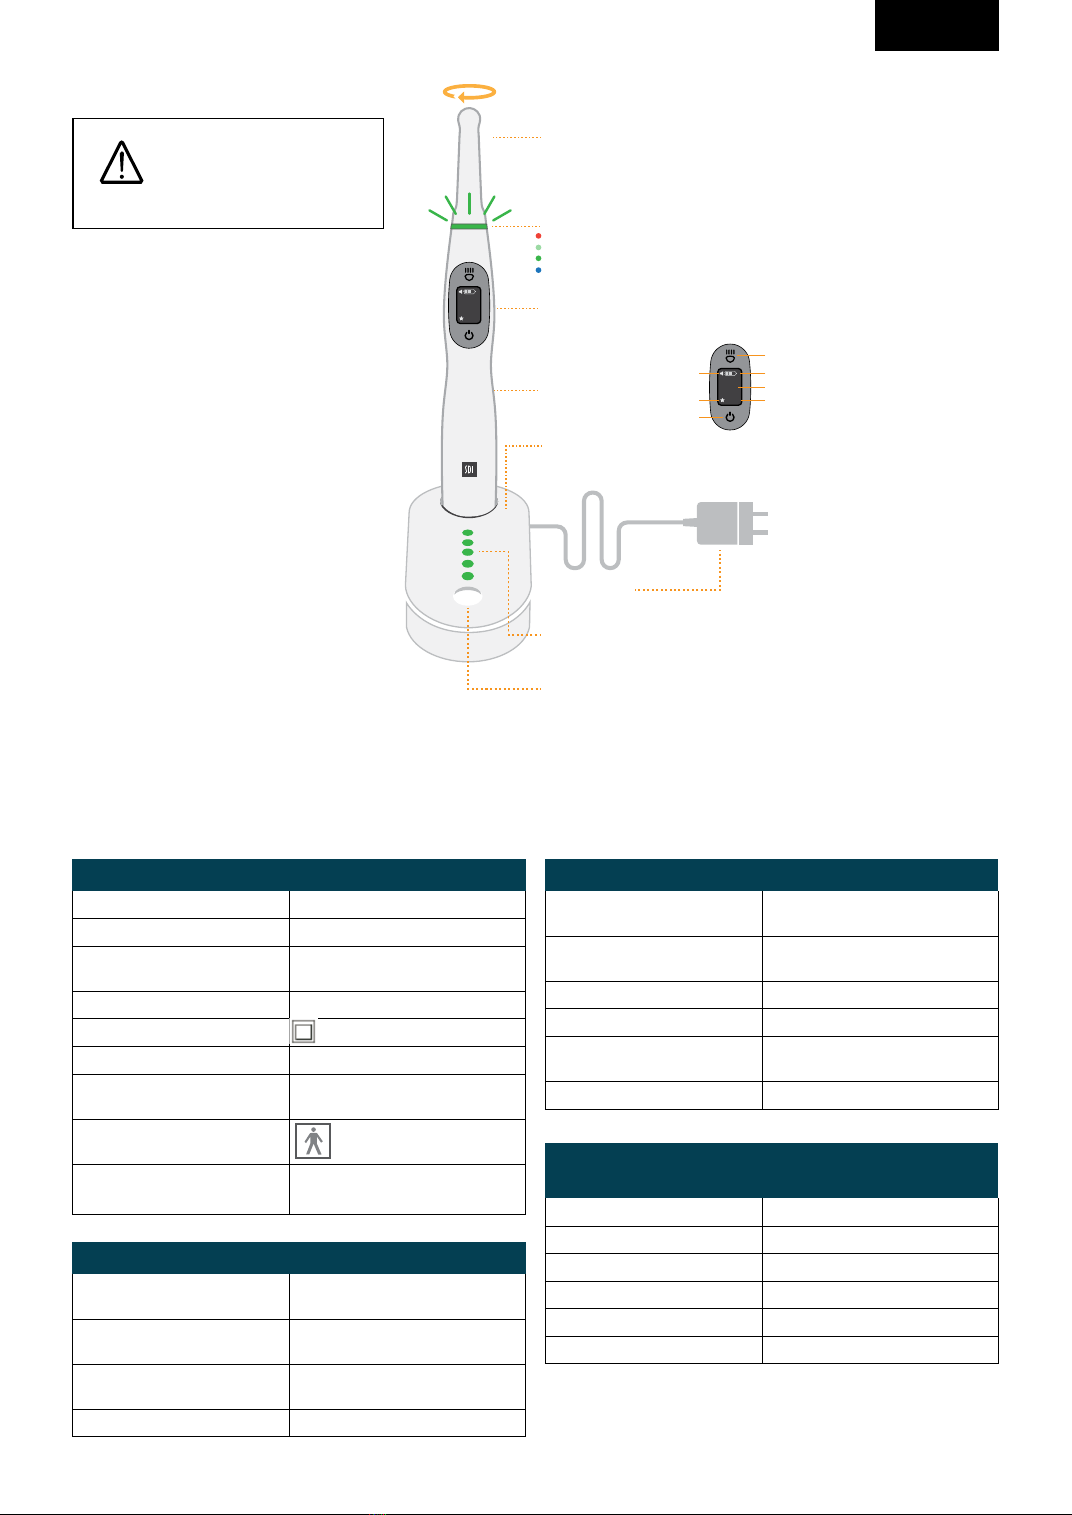
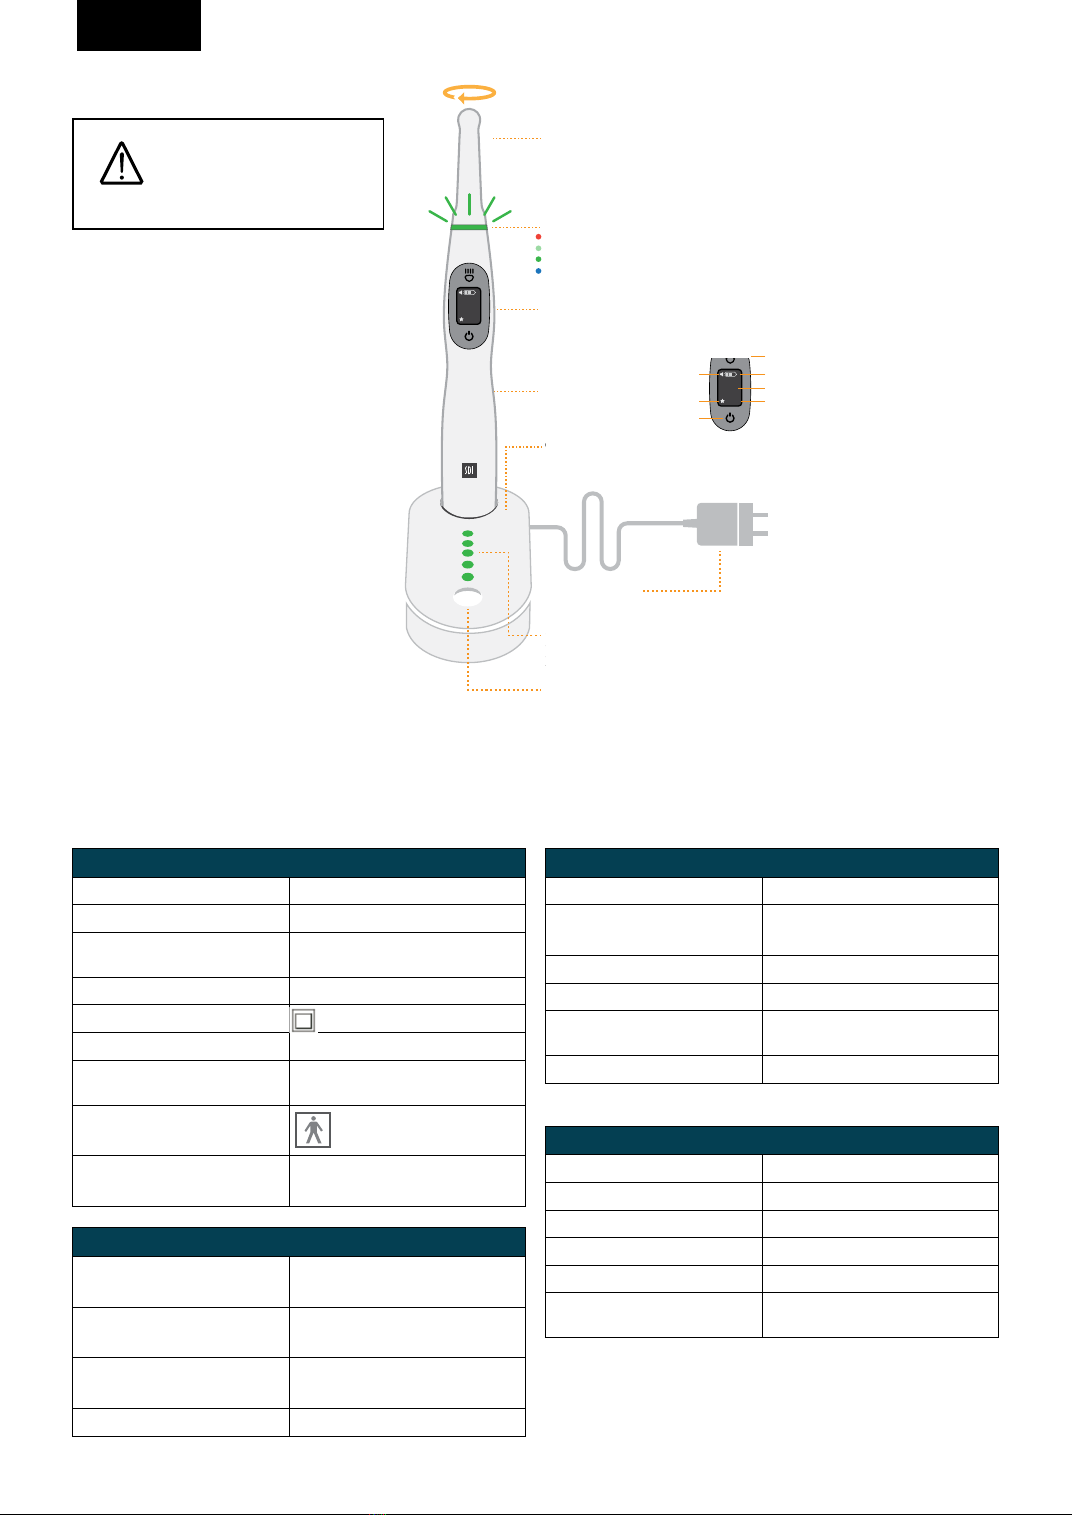
PRODUCT OVERVIEW
AC power pack
with international
plug adaptor heads
Intensity indicator
light check with
blue LED’s status indicator
Charging
charging (low battery) - solid red
charging - pulsing green
fully charged - solid green
Charging dock
User interface
- control buttons
- function display
- adjustable timer with countdown
power on
favourites mode timer units
- s = seconds
- mins =minutes
activate curing
sound icon
countdown timer
battery status
Handpiece
Rotatable
LED attachment
Status indicator
charging (low battery) - solid red
charging - pulsing green
fully charged - solid green
curing in progress - solid blue
radii
xpert
20
s
20
s
CHARGING DOCK
Operating voltage 100 – 240 V – 50 / 60 Hz
Power input 12 V DC
Dimensions Length: 142 mm, Width: 70 mm,
Height: 70 mm
Weight 155 g
Classification Class II - double insulated
Safety IEC 60601-1
EMC
(Electro-Magnetic Compliance) IEC 60601-1-2
Protection from
electrical shock Type BF
Protection from ingress
of liquids Handpiece: IPX4
Charging dock: IPX3
INDICATIONS FOR USE
1. Standard curing attachment:
• To polymerize all light-cured products in the wavelength range of 440 nm - 480 nm (standard curing tip)
TECHNICAL DATA
HANDPIECE
Wavelength emission range Standard curing attachment:
440 nm - 480 nm
Wavelength peak Standard curing attachment:
460 nm
Dimensions Length: 255 mm
Diameter: 30 mm
Weight 185 g
CHARGER AND HANDPIECE
Time to charge low battery For everyday case approx
3 hours
Time to charge flat battery Allow 5 - 6 hours.
(Best left on overnight)
Operating temperature 10°C - 40°C (50°F - 104°F)
Relative humidity 10 % - 85 %
Atmospheric pressure 0.5 atm - 1.0 atm
(500 hPa to 1060 hPa)
Total height with handpiece 290 mm
POWER PLUG WITH INTERNATIONAL AC
ADAPTERS
Input voltage 100 – 264 V – 50 / 60 Hz
Output voltage 12 V DC
Output current 1.0 A
Dimension 38 mm H x 45 mm W x 70 mm L
Weight 104 g / 3.66 ounces
Rating Medical grade (UL, CE, RoHS, WEEE)
ENGLISH
4
CHARGING DOCK (FIGURE 1)
1. Slide the correct AC adapter head into the power plug and plug into power supply. Tilt it slightly and apply slight pressure until you hear it snap
into place.
2. Plug the other end of the AC power plug into the back of the charging dock.
3. Place charging dock on a suitable flat table top and turn the power ON.
4. The LED lights on the charging dock will flash once from all red to all green to all blue. This indicates the unit is ready to use.
HANDPIECE (FIGURE 2)
1. Remove the Radii Xpert handpiece from its packaging and place into the charging dock.
2. Allow the Radii Xpert to fully charge until status ring and all five lights on the charging base illuminate solid green.
Note:
1. During charging the status ring and lights on the charging base illuminate pulsing green.
2. The Radii Xpert contains a lithium ion rechargeable battery that does not have any memory and can be recharged at any time.
OPERATING
1. Remove the Radii Xpert handpiece from the charging dock and place a hygienic barrier sleeve.
Note: Ensure the Radii Xpert barrier sleeve fits flush over the lens without wrinkling/folds. Seam of the sleeve should be positioned down
the sides of the attachment and handpiece. (Figure 3)
2. Rotate the curing tip to desired position.
3. Press (top button) and hold. A very low intensity light will illuminate to assist you to position the curing tip in the oral cavity. When the tip is in
the correct position, release your finger tip and curing will commence. Status ring illuminates solid blue with the standard curing tip attached. The
LCD displays 20, counting down to 0.
4. One long beep will sound when curing finishes and the status ring goes OFF.
5. Press to start another 20 second cure.
6. To change pre-set curing time (temporary setting). Press and hold for 1-2 seconds. Numbers on LCD start flashing.
7. Press to scroll up through the options from last setting used. Press once to select. Numbers on LCD stop flashing.
8. Discard barrier sleeve after each patient.
9. Clean and sanitise the handpiece. See MAINTENANCE AND CLEAN section in this manual.
Note:
1. Single patient use hygienic Radii Xpert barrier sleeve (100 pieces is included in each kit) is strongly recommended to prevent cross contamination
and protect the lens cap from dental material adhering to its surface and body. These sleeves have been especially designed to produce optimal
emission.
2. Light output may be significantly reduced if the wrong barrier sleeve is used or not correctly placed.
CURING TIME
1. Follow the recommended curing times published by the manufacturer of your restorative materials.
2. The indicated curing times usually assume the light tip is held at the correct position over the material being polymerized.
QUICK START-UP
ALL FIGURES CAN BE FOUND ON PAGE 11
Check the content of the box for completeness and any possible transportation damage. If parts are damaged or missing, contact your local SDI
representative immediately.
FACTORY SETTINGS
The factory setting of the Radii Xpert’s standard curing attachment is 20 seconds per exposure cycle.
QUICK LIGHT INTENSITY STATUS CHECK USING THE BUILT-IN INTENSITY INDICATOR (FIGURE 4)
1. Gently place the LED attachment tip on the test area of the
charging dock. Ensure the tip is level and central within the
test area. If not centered, it may give you lower readings.
2. Activate the light.
All 5 blue LEDs 100%
4 blue LEDs 90%
3 blue LEDs 80%
2 blue LEDs 70%
1 blue LED 60%
ENGLISH
5
SLEEP MODE
The Radii Xpert will go into a sleep mode (LCD turns OFF) when it is:
1. Sitting on the charging dock or
2. Not in use for more than 3 minutes
The unit will automatically wake up when removed from the charging dock. Press to start curing.
If the unit turns OFF / goes into sleep mode outside the charging dock, press once to wake unit up. Press to start curing.
OPERATION
1. HANDPIECE
LED ATTACHMENT PROGRAM
Standard curing
attachment
(440 nm - 480 nm)
• Default curing time: 20 seconds
• LCD counting down
20, 19, 18….3,2,1
• User option curing time:
2, 10, 20 seconds
Note: Observe Instructions for Use of
the material applied when selecting
curing time.
STATUS - WHILE CHARGING STATUS RING INDICATOR
Charging (low battery) Solid red
Charging in progress Pulsing green
Charge completed Solid green
STATUS - WHILE CHARGING CHARGING DOCK INDICATOR
Charging (low battery) Solid red
Charging in progress Pulsing green
Charge completed Solid green
2. CHARGING DOCK LIGHTS DISPLAY (WHILE HANDPIECE IS CHARGING)
STATUS - WHILE OPERATION STATUS RING INDICATOR
Positioning light (target assist) Solid yellow
Curing in progress Solid blue
LED attachment too warm
(allow to cool) 1 red flash, then shuts off
Charge level low Solid blue for 1 second and
2 short beeps
HOW TO CHANGE THE LED (FIGURE 5)
To change the LED attachment, carefully pull off the LED attachment from the handpiece and click in a new LED attachment.
HOW TO CHANGE THE LENS CAP (FIGURE 6)
1. Turn the lens cap anti-clockwise to remove.
2. Replace with a new lens cap by screwing it on clockwise.
HOW TO SET FAVOURITE CURING TIME (FIGURE 7)
1. Press and hold for 1-2 seconds. Numbers on LCD start flashing.
2. Press to scroll up through the options from last setting used.
3. Press and hold for 1-2 seconds to save. Numbers on LCD stop flashing. Status ring illuminates solid green for 2 seconds with one short beep,
to confirm selection is saved.
4. A star appears on the bottom left of the LCD screen. Unit is ready to use.
HOW TO ADJUST THE AUDIO VOLUME (FIGURE 8)
1. Press to turn the unit on.
2. Remove the LED attachment from the Radii Xpert handpiece.
3. Press and hold for 1-2 seconds to activate change mode.
4. Speaker symbol lights up.
5. Bar graph displays volume settings
6. Press to scroll through options. Buzzer will sound to demonstrate the volume level (mute, low, medium, high).
7. Press and hold for 1-2 seconds to save. Status ring illuminates solid green for 2 seconds with one short beep, to confirm
selection is saved.
8. A star appears on the bottom left of the LCD screen. Re-insert the LED attachment. Unit is ready to use.
ENGLISH

6
HOW TO CHANGE THE BATTERY
1. Hold the handpiece in the palm of your left hand.
2. Use your right hand to turn the bottom of the handpiece approximately 10 degrees anti-clockwise (twist then pull, Figure 9).
3. Carefully remove the battery from the handpiece.
4. Insert a new battery and lock in position twisting it 10 degrees clockwise (push then twist, Figure 10).
5. Turn ON the Radii Xpert handpiece and place it into the charging dock until status ring shows solid green.
Note: The LED attachment does not have to be attached to the handpiece to charge the battery.
6. Dispose of used battery in accordance to local regulations. Do not dispose with unsorted household waste.
Battery Life Expectancy: Battery life is dependent on the amount of use and LED efficiency. To extend the life of your Radii Xpert battery, keep it on
the charging dock at the end of each day if possible. In doing so SDI Ltd would expect consumers to experience a minimum of 300 total discharges.
PROBLEM POSSIBLE CAUSE SOLUTION
Handpiece status ring flashes red. Handpiece over heated. Allow handpiece to cool down before reuse.
Handpiece status ring shows solid red. Battery low. Handpiece can still be used for curing. Return to
charging dock as soon as possible.
Handpiece status ring flashes blue once and
goes OFF. Battery empty. Return to charging dock for charging.
No light appears on the charging dock when
handpiece is docked. No power. 1. Check all connections are clean and properly
connected.
2. Ensure power outlet is switched ON.
3. If the above does not work, move the whole unit
to a different powerpoint.
4. Call your local SDI Ltd representative for repair.
Unit works fine yesterday but will not turn on
this morning. Moisture from condensation. 1. Check for sign of moisture inside the barrier
sleeve.
2. Remove barrier sleeve and allow unit to dry for
a few hours.
No audio beep heard when connecting with
the handpiece. Battery empty. Return to charging dock for charging.
The light intensity is too low. 1. Dirty or scratched lens cap.
2. Barrier sleeve.
Check and clean lens cap. Replace if required.
Ensure barrier sleeve fits tightly over the emission
tip.
The LCD on the handpiece flashes. Unit is in the setting mode. Press once to come out of the setting mode.
Battery shows corrosion or emits a scorched
odour. Do not use unit. Call your local SDI representative.
The dental material does not
cure completely. Wrong attachment? Ensure the correct LED attachment is used. Check
material specifications for curing requirement from
the manufacturer.
I want to delete my favourite setting and go
back to the factory setting. Place the handpiece on the charging dock, wait for
status ring to show charging status
Press (top & bottom button)
simultaneously for 1–2 seconds, then status ring
illuminates solid yellow, keep holding until you hear
one long beep which confirms Unit has returned to
factory setting.
The handpiece has been on the charger
overnight. Status ring still showing red and
handpiece felt very hot.
Charging problem. Battery maybe at the end
of its useful life. Replace battery.
The light emission does not start when the
button is pressed.
Battery is flat. Return to charging dock for charging.
The LED attachment does not fit
the handpiece. Wrong Radii LED attachment. LED attachments from previous model of
Radii is not compatible with the Radii Xpert.
TROUBLE SHOOTING
ENGLISH
7
Do not autoclave the LED light attachment
or any part of the Radii Xpert.
Liquids must not enter any part of the handpiece
or charger.
Do not spray liquids directly onto, or apply copious
amounts of liquids to the Radii Xpert. Instead,
spray solutions on a cloth to wipe.
HANDPIECE
1. After each use, remove and dispose of barrier sleeve.
2. Wipe the Radii Xpert handpiece with a disinfectant wipe
(benzalkonium base) or soft cloth moistened with isopropyl
alcohol/ethyl alcohol based cleaners.
3. Do not wipe electrical contacts at the base of the handpiece.
Use a dry cloth to clean if required.
4. Allow handpiece to air dry before placing a new barrier sleeve.
Note: If using anti-bacterial wipes, ensure they are not soaked in excess liquid.
Liquid residue must not enter any part of the handpiece or charger.
CHARGING DOCK
1. Disconnect power from charging dock.
2. Wipe surface with a disinfectant wipe (benzalkonium base) or soft cloth moistened with isopropyl alcohol/ethyl alcohol based cleaners.
3. Use an air gun to blow off any debris collected inside the handpiece holder and carefully wipe clean without wetting the electrical contacts.
MAINTENANCE AND CLEANING
STORAGE DURING EXTENDED PERIODS OF NON-USE
If the Radii Xpert is not to be used for an extended period of time, ie during holiday periods, fully charge the handpiece or keep it on the charging dock
with the power ON.
The Radii Xpert has a built in safety feature to prevent the battery from discharging totally.
DISPOSAL INSTRUCTION
Do not dispose unserviceable battery and curing lights as unsorted municipal waste. Hazardous substances are present in electronic
equipment and present potential risks to human health and the environment if disposed of in municipal landfills which are not designed
to prevent migration of substances into the soil and groundwater.
Please dispose of in accordance to your specific country regulations.
CAUTION
CLEANING AGENT APPROVED FOR USE CLEANING AGENT NOT APPROVED FOR USE
70% Isopropanol alcohol Oxidising agents such as hydrogen peroxide
Neutral-enzymic cleaner High alkaline detergents
Ethyl alcohol based Hand soaps and dish soaps
Antiseptic benzalkonium chloride wipes Abrasive cleaners
Chlorhexidine gluconate Acetone based cleaners
Glutaldehyde Bleach based cleaners
Any cleaners with phosphoric acid
Ammonia or iodine complex solution
WARRANTY
SDI Ltd provides a three (3) year warranty against defects in materials or workmanship from the date of purchase to the original purchaser of this
product with the exception of the battery which has a two (2) year warranty. User is responsible for determining the suitability of the product for user’s
application. If this unit is defective within the warranty period, SDI Ltd or your local approved service centre will repair the unit at no cost. This warranty
is only valid providing an inspection indicates that any such defect developed during normal and proper use subject to the conditions below.
SDI Ltd shall under no circumstances be liable for incidental or consequential damages. The warranty does not apply to any damage or defect caused
by the user’s failure to follow the instructions for use or the other user error in operating or maintaining the unit. Although SDI Ltd offers services to
repair the Radii Xpert after the expiration of the warranty, SDI Ltd only guarantees the availability of such services and replacement parts for two (2)
years after the model has been discontinued.
Only the above warranty shall be applicable, all other warranties, expressed or implied are hereby excluded.
CLAIM
In case of a claim under warranty, the complete unit (handpiece, charging dock, AC power plug and LED attachment) is returned, carriage paid to the
dealer or directly to SDI Ltd together with a copy of the purchase document together with a clear description of the defect. Ensure you have your Radii
Xpert’s serial number ready when communicating with the Customer Service team.
REGISTERING YOUR RADII XPERT WARRANTY
TO SPEED UP YOUR WARRANTY CLAIM, IT IS ADVISABLE TO REGISTER YOUR RADII XPERT WITH SDI LTD AS SOON AS POSSIBLE USING THE
FOLLOWING TWO OPTIONS:
1. Fill out the warranty card included in kit and return with a copy of your receipt to:
SDI Ltd PO Box 314 Bayswater, VIC 3153 AUSTRALIA
2. Alternatively goto http://www.sdi.com.au/warranty to register your warranty.
ENGLISH
8
OUR
VISION.
YOUR
SMILE. www.sdi.com.au
GEBRAUCHSANWEISUNG
BITTE DIESE GEBRAUCHSANWEISUNG VOR INBETRIEBNAHME DES GERÄTS LESEN
PRODUKTBESCHREIBUNG
Vielen Dank für den Kauf der Radii Xpert LED-Polymerisationslampe. Radii Xpert ist eine leistungsstarke
Lichtquelle zur intraoralen Polymerisation lichthärtender Materialien mit Photoinitiator(en) im
Wellenlängenbereich 440 nm - 480 nm (Standard-Lichtaufsatz). Sie sorgt verlässlich für eine optimale
Polymerisation aller lichthärtenden Materialien, und damit für hochwertige Restaurationen.
Radii Xpert verfügt über die Target-Assist-Technologie, ein spezielles Licht mit niedriger Intensität, zur
exakten Positionierung des Lichtaufsatzes vor Beginn der Polymerisation.
Radii Xpert ist ein hochwertiges Medizinprodukt auf dem neuesten Stand von Wissenschaft und Technik
im Bereich Polymerisationslampen.
Jede Lampe ist mit einem internationalen Netzteil erhältlich und für Steckdosen mit 100 - 240 Volt
geeignet.
INTELLIGENTERES DESIGN.
JEDERZEIT OPTIMALE LICHTHÄRTUNG.
DEUTSCH

9
SICHERHEIT, WARNHINWEISE & VORSICHTSMASSNAHMEN
Radii Xpert darf nur von qualifiziertem medizinischem Fachpersonal gemäß den folgenden Sicherheitshinweisen benutzt werden:
1. Radii Xpert keinesfalls öffnen oder modifizieren. Nur von SDI Ltd autorisierte Händler dürfen das Gehäuse öffnen und das Gerät
reparieren.
2. Keine Objekte in das Gerät einsetzen, mit Ausnahme von gemäß dieser Gebrauchsanweisung verwendeten Ersatzteilen.
3. Das Radii Xpert Handstück nur in der Radii Xpert Ladestation aufladen.
4. Den Netzstecker nur an eine geeignete, geerdete und zugelassene Steckdose anschließen.
5. Die Ladestation vor der Reinigung stets von der Stromzufuhr trennen.
6. Kein schadhaftes Stromkabel benutzen.
7. Bei begründetem Verdacht auf Sicherheitsmängel Radii Xpert unbedingt außer Betrieb nehmen und entsprechend
kennzeichnen, damit nicht versehentlich Dritte eine eventuell defekte Lampe verwenden.
1. Radii Xpert gibt ein Licht mit hoher Leistung ab und darf nur gemäß dieser Gebrauchsanweisung verwendet werden.
2. Nicht direkt in die Lichtquelle blicken.
3. Behandler, Assistenz und Patient müssen stets einen geeigneten Augenschutz oder Lichtschutzschild mit Blaulichtfilter tragen
bzw. verwenden.
4. Die Belichtung auf den Behandlungsbereich, d.h. die Mundhöhle, begrenzen.
5. Direkten Kontakt des Lichtaufsatzes mit Weichgeweben und Schleimhaut vermeiden.
1. Radii Xpert kann nur mit dem zugehörigen LED-Aufsatz verwendet werden; mit LED-Aufsätzen früherer Radii-Modelle
ist sie nicht kompatibel.
2. Kondensation nach Transport der Lampe von einer kalten in eine warme Umgebung stellt ein potentielles Risiko dar.
Die Lampe sollte erst eingeschaltet werden, wenn sie vollständig die Umgebungstemperatur angenommen hat.
3. Zum Ersatz fehlerhafter Teile gemäß der Gebrauchsanweisung nur Originalteile von SDI Ltd verwenden.
4. Das Gerät nicht in der Nähe leicht entzündlicher Substanzen betreiben.
5. Lösungsmittel, leicht entzündliche Flüssigkeiten und starke Wärmequellen vom Gerät fernhalten, da sie das Kunststoffgehäuse
schädigen können.
6. Darauf achten, dass kein Reinigungsmittel ins Innere der Radii Xpert gelangt, da dies zu einem Kurzschluss führen kann.
7. Radii Xpert darf nicht benutzt werden bei Patienten oder von Behandlern mit:
a. implantiertem Herzschrittmacher, die vor Risiken durch Einflüsse elektrischer Kleingeräte gewarnt wurden.
b. vorangegangenen photobiologischen Reaktionen (u.a. solarer Urtikaria und erythropoetischer Protoporphyrie) oder
momentaner Einnahme photosensibilisie-render Medikamente (u.a. 8-Methoxypsoralen und Dimethylchlortetracyclin).
c. vorangegangener Netzhauterkrankung.
d. vorangegangener Operation am grauen Star.
Vor der Anwendung der Radii Xpert bei diesen Patienten den Rat des verordnenden Arztes einholen.
8. Vor jedem Gebrauch der Radii Xpert prüfen, ob die abgegebene Leistung für eine sichere Polymerisation ausreicht.
9. Radii Xpert wurde nach geltendem Recht entsprechend den maßgeblichen EMV-Vorschriften und - Normen entwickelt und
getestet. Gewisse Variablen im Arbeitsumfeld, z.B. Stromversorgung, Verkabelung und Umgebungsbedingungen, können die
EMV-Eigenschaften der Radii Xpert beeinflussen und so die EMV stören. In einem solchen Fall das Gerät an einem anderen Ort
aufstellen.
10. SDI Ltd übernimmt keine Haftung für eventuelle Schäden bei Gebrauch der Radii Xpert für andere Zwecke als die
Polymerisation lichthärtender Dentalmaterialien.
GEFAHR VON
ELEKTRISCHEM
SCHLAG
HOHE
LICHTLEISTUNG
VORSICHT
TRANSPORT- UND LAGERBEDINGUNGEN
Umgebungstemperatur Relative
Luftfeuchtigkeit
Luftdruck
DEUTSCH
10
VORSICHT
Weder den LED-Lichtaufsatz
noch andere Teile der
Radii Xpert autoklavieren.
PRODUKTÜBERSICHT
AC power pack
with international
plug adaptor heads
Intensity indicator
light check with
blue LED’s status indicator
Charging
charging (low battery) - solid red
charging - pulsing green
fully charged - solid green
Charging dock
User interface
- control buttons
- function display
- adjustable timer with countdown
power on
favourites mode timer units
- s = seconds
- mins =minutes
activate curing
sound icon
countdown timer
battery status
Handpiece
Rotatable
LED attachment
Status indicator
charging (low battery) - solid red
charging - pulsing green
fully charged - solid green
curing in progress - solid blue
radii
xpert
20
s
20
s
NETZTEIL
MIT INTERNATIONALEN
NETZADAPTERN
LADESTATION
Betriebsspannung 100 – 240 V – 50 / 60 Hz
Stromeingang 12 V DC
Maße Länge: 142 mm, Breite: 70 mm,
Höhe: 70 mm
Gewicht 155 g
Klassifizierung
Schutzklasse II – doppelt isoliert
Sicherheit IEC 60601-1
EMV (Elektromagnetische
Verträglichkeit) IEC 60601-1-2
Schutz gegen elektrischen Schlag Typ BF
Schutz gegen das Eindringen
von Flüssigkeiten Handstück: IPX4
Ladestation: IPX3
INDIKATIONEN
1. Standard-Lichtaufsatz:
• Zur Polymerisation aller lichthärtenden Produkte im Wellenlängenbereich 440 nm - 480 nm (Standard-Lichtaufsatz)
HANDSTÜCK
Wellenlängenbereich des Lichts Standard-Lichtaufsatz:
440 nm - 480 nm
Wellenlängenmaximum Standard-Lichtaufsatz:
460 nm
Maße Länge: 255 mm
Durchmesser: 30 mm
Gewicht 185 g
LADESTATION UND HANDSTÜCK
Ladedauer bei schwachem Akku Für alltägliche Fälle ca. 3 Stunden
Ladedauer bei leerem Akku Etwa 5 - 6 Stunden
(am besten über Nacht aufladen)
Betriebstemperatur 10°C - 40°C (50°F - 104°F)
Relative Luftfeuchtigkeit 10 % - 85 %
Luftdruck 0.5 atm - 1.0 atm
(500 hPa to 1060 hPa)
Gesamthöhe mit Handstück 290 mm
NETZTEIL MIT INTERNATIONALEN ADAP-TERN
Eingangsspannung 100 – 264 V – 50 / 60 Hz
Ausgangsspannung 12 V DC
Ausgangsstrom 1.0 A
Maße 38 mm H x 45 mm W x 70 mm L
Gewicht 104 g
Einstufung Medizinische Einstufung (UL, CE,
RoHS, WEEE)
DREHBARER LED-AUFSATZ
STATUSANZEIGE
AUFLADEN (AKKU SCHWACH) – DAUERHAFT ROT
AUFLADEN – BLINKT GRÜN
VOLL AUFGELADEN – DAUERHAFT GRÜN
POLYMERISATION IM GANG – DAUERHAFT BLAU
BEDIENOBERFLÄCHE
- BEDIENTASTEN
- FUNKTIONSANZEIGE
- EINSTELLBARER TIMER MIT COUNTDOWN
AUFLADEN
AUFLADEN (AKKU SCHWACH) – DAUERHAFT ROT
AUFLADEN – BLINKT GRÜN
VOLL AUFGELADEN – DAUERHAFT GRÜN
LEISTUNGSANZEIGE
LICHTPRÜFUNG MIT BLAUER LED-STATUSANZEIGE
HANDSTÜCK
LADESTATION
TON-SYMBOL
POLYMERISATION AKTIVIEREN
LADEZUSTAND
COUNTDOWN-TIMER
TIMER-EINHEITEN
- S = SEKUNDEN
- MINS = MINUTEN
FAVORITEN-MODUS
EIN/AUS
TECHNISCHE DATEN
DEUTSCH
11
SCHNELLSTART:
ALLE ANGABEN SIEHE SEITE 58
Den Packungsinhalt auf Vollständigkeit und eventuelle Transportschäden kontrollieren. Bei schadhaften oder fehlenden Teilen sofort die lokale
SDI-Vertretung kontaktieren.
WERKSEINSTELLUNGEN
Die Werkseinstellung für den Standard-Lichtaufsatz der Radii Xpert beträgt 20 Sekunden pro Polymerisationszyklus.
LADESTATION (ABBILDUNG 1)
1. Den korrekten Adapter auf das Netzteil stecken und dieses an das Stromnetz anschließen. Leicht kippen und sanft drücken, bis es hörbar
einrastet.
2. Das andere Ende des Netzteils hinten an der Ladestation anschließen.
3. Die Ladestation auf eine geeignete ebene Fläche stellen und einschalten.
4. Die LED-Lämpchen an der Ladestation blinken einmal von ganz rot über ganz grün bis ganz blau. Dies zeigt, dass das Gerät betriebsbereit ist.
HANDSTÜCK (ABBILDUNG 2)
1. Das Radii Xpert Handstück aus der Packung nehmen und in die Ladestation stellen.
2. Radii Xpert voll aufladen, bis der Statusring und alle fünf Lämpchen an der Ladestation dauerhaft grün leuchten.
Hinweis:
1. Während des Aufladens blinken der Statusring und die Lämpchen an der Ladestation grün.
2. Radii Xpert hat einen Lithium-Ionen-Akku, der keinen Memory-Effekt zeigt und jederzeit wieder aufgeladen werden kann.
BETRIEB
1. Das Radii Xpert Handstück aus der Ladestation nehmen und mit einer hygienischen Schutzhülle versehen.
Hinweis: Darauf achten, dass die Radii Xpert Schutzhülle eben und faltenfrei auf der Linse liegt. Die Naht der Hülle sollte sich seitlich an
Lichtaufsatz und Hand-stück befinden (Abbildung 3).
2. Den Lichtaufsatz in die gewünschte Position drehen.
3. (obere Taste) gedrückt halten. Es leuchtet ein sehr schwaches Licht auf, das die Positionierung des Lichtaufsatzes in der Mundhöhle
erleichtert. Wenn der Aufsatz richtig positioniert ist, die Taste loslassen, und die Härtung beginnt. Der Statusring leuchtet bei befestigtem
Standardaufsatz dauerhaft blau. Das Display zeigt 20 und zählt bis 0 herunter.
4. Am Ende der Lichthärtung ist ein langer Signalton zu hören, und der Statusring schaltet sich aus.
5. drücken, um einen neuen 20-Sekunden-Zyklus zu starten.
6. Zur Änderung der voreingestellten Polymerisationszeit (temporäre Einstellung) (untere Taste) 1-2 Sekunden gedrückt halten. Die Zahlen am
Display blinken nun.
7. drücken, um von der zuletzt verwendeten Einstellung durch die Optionen nach oben zu scrollen. Zur Auswahl einmal drücken.
Die Zahlen am Display blinken nicht mehr.
8. Die Schutzhülle nach jedem Patienten entsorgen.
9. Das Handstück reinigen und desinfizieren. Siehe Abschnitt WARTUNG UND REINIGUNG in der Gebrauchsanweisung.
Hinweis:
1. Es sollten unbedingt die hygienischen Radii Xpert Einmal-Schutzhüllen (100 Stück in jeder Packung) angebracht werden, um
Kreuzkontaminationen zu vermeiden und die Linsenkappe vor Materialanhaftungen zu schützen. Die Hüllen wurden speziell für eine optimale
Lichtdurchlässigkeit konzipiert.
2. Die Lichtleistung kann stark nachlassen, wenn die falsche Schutzhülle verwendet oder unkorrekt angebracht wird.
POLYMERISATIONSZEIT
1. Die vom Hersteller des verwendeten Restaurationsmaterials angegebene Polymerisationszeit beachten.
2. Die angegebene Polymerisationszeit setzt in der Regel eine korrekte Positionierung des Lichtaufsatzes über dem zu härtenden
Material voraus.
SCHNELLTEST DER LICHTLEISTUNG MIT DER INTEGRIERTEN LEISTUNGSANZEIGE (ABBILDUNG 4)
1. Die Spitze des LED-Aufsatzes sanft auf die Prüffläche an
der Ladestation legen. Die Spitze muss eben und mittig
auf der Fläche liegen. Liegt sie nicht mittig, so können die
Messwerte niedriger sein.
2. Die Lampe einschalten.
Alle 5 blauen LEDs 100%
4 blaue LEDs 90%
3 blaue LEDs 80%
2 blaue LEDs 70%
1 blaue LED 60%
DEUTSCH

12
LED-AUFSATZ WECHSELN (ABBILDUNG 5)
Zum Wechseln des LED-Aufsatzes diesen vorsichtig vom Handstück abziehen und einen neuen LED-Aufsatz einrasten lassen.
LINSENKAPPE WECHSELN (ABBILDUNG 6)
1. Die Linsenkappe gegen den Uhrzeigersinn abschrauben.
2. Eine neue Linsenkappe im Uhrzeigersinn anschrauben.
BEVORZUGTE POLYMERISATIONSZEIT EINSTELLEN (ABBILDUNG 7)
1. 1-2 Sekunden gedrückt halten. Die Zahlen am Display blinken nun.
2. drücken, um von der zuletzt verwendeten Einstellung durch die Optionen nach oben zu scrollen.
3. Zum Speichern der Auswahl 1-2 Sekunden gedrückt halten. Die Zahlen am Display blinken nicht mehr.
Der Statusring leuchtet 2 Sekunden dauerhaft grün, und ein kurzer Signalton ist zu hören; dies bestätigt die Speicherung.
4. Ein Stern erscheint unten links auf dem Display. Das Gerät ist betriebsbereit.
LAUTSTÄRKE EINSTELLEN (ABBILDUNG 8)
1. Zum Einschalten drücken.
2. LED-Aufsatz vom Radii Xpert Handstück abnehmen.
3. Zum Aktivieren des Änderungsmodus 1-2 Sekunden gedrückt halten.
4. Lautsprechersymbol leuchtet.
5. Balkenanzeige gibt Lautstärken an
6. drücken, um durch die Optionen zu scrollen. Signaltöne demonstrieren die Lautstärke (stumm, niedrig, mittel, hoch).
7. Zum Speichern 1-2 Sekunden gedrückt halten. Der Statusring leuchtet 2 Sekunden dauerhaft grün, und ein kurzer Signalton ist zu hören; dies
bestätigt die Speicherung der Auswahl.
8. Ein Stern erscheint unten links auf dem Display. Den LED-Aufsatz wieder befestigen. Das Gerät ist betriebsbereit.
Der Ton bleibt auf der gewählten Einstellung, bis das Gerät auf die Werkseinstellung zurückkehrt. Zurück zur Werkseinstellung, Handstück in die
Ladestation stellen. (obere & untere Taste) 1-2 Sekunden gleichzeitig drücken, dann leuchtet der Statusring 4 Sekunden dauerhaft gelb,
und die Werkseinstellung wird wiederhergestellt.
SCHLAFMODUS
Radii Xpert geht in den Schlafmodus (Display schaltet sich aus), wenn sie:
1. In der Ladestation steht oder
2. Länger als 3 Minuten nicht benutzt wird
Das Gerät erwacht automatisch, wenn es aus der Ladestation genommen wird. Zum Start der Lichthärtung drücken.
Wenn das Gerät außerhalb der Ladestation in den Schlafmodus geht (sich ausschaltet), zum Wecken einmal drücken. Zum Start der Lichthärtung
drücken.
BETRIEB
LED-AUFSATZ PROGRAMM
Standard-Lichtaufsatz
(440 nm - 480 nm)
• Voreingestellte Polymerisationszeit:
20 Sekunden
• Countdown auf Display
• Benutzereinstellbare Polymerisa-
tionszeiten: 2, 10, 20 Sekunden
Hinweis: Beachten Sie die empfohlenen
Polymerisationszeiten des jeweiligen
Herstellers des angewandten Materials.
STATUS – BEIM AUFLADEN STATUSRING-ANZEIGE
Aufladen (Akku schwach) Dauerhaft rot
Aufladen im Gang Blinkt grün
Aufladen abgeschlossen Dauerhaft grün
STATUS – BEIM AUFLADEN ANZEIGE AN LADESTATION
Aufladen (Akku schwach) Dauerhaft rot
Aufladen im Gang Blinkt grün
Aufladen abgeschlossen Dauerhaft grün
2. LÄMPCHEN AN LADESTATION LEUCHTEN
(BEIM AUFLADEN DES HANDSTÜCKS)
STATUS – IN BETRIEB STATUSRING-ANZEIGE
Positionierungslicht
(Target Assist) Dauerhaft gelb
Polymerisation im Gang Dauerhaft blau
LED-Aufsatz zu warm
(abkühlen lassen) 1 rotes Blinken, dann
Abschaltung
Ladezustand niedrig 1 Sekunde dauerhaft blau und
2 kurze Signaltöne
1. HANDSTÜCK
DEUTSCH
13
AKKU WECHSELN
1. Das Handstück in der linken Handfläche halten.
2. Mit der rechten Hand den Boden des Handstücks um ca. 10 Grad gegen den Uhrzeigersinn drehen
(erst drehen, dann ziehen, Abbildung 9).
3. Vorsichtig den Akku aus dem Handstück nehmen.
4. Einen neuen Akku einsetzen und durch Drehung um 10 Grad im Uhrzeigersinn einrasten lassen (erst einschieben, dann drehen, Abbildung 10).
5. Das Radii Xpert Handstück einschalten und in die Ladestation stellen, bis der Statusring dauerhaft grün wird.
Hinweis: Der LED-Aufsatz muss beim Aufladen des Akkus nicht am Handstück befestigt sein.
6. Den alten Akku gemäß den geltenden Vorschriften entsorgen. Nicht im unsortierten Hausmüll entsorgen.
Lebensdauer der Batterie: Die Lebensdauer der Batterie hängt von der Nutzungsdauer und der LED-Effizienz ab. Um die Lebensdauer Ihres Radii
Xpert-Akkus zu verlängern, legen Sie ihn nach Möglichkeit am Ende eines jeden Tages in die Ladestation. Somit erhalten Sie mindestens 300
Gesamtentladungen.
FEHLERBEHEBUNG
PROBLEM MÖGLICHE URSACHE LÖSUNG
Statusring am Handstück blinkt rot. Handstück überhitzt. Handstück vor weiterer Verwendung
abkühlen lassen.
Statusring am Handstück leuchtet
dauerhaft rot. Akku schwach. Handstück ist noch zur Lichthärtung verwendbar.
Sobald möglich, in die Ladestation stellen.
Statusring am Handstück blinkt einmal blau
und schaltet sich ab. Akku leer. Zum Aufladen in die Ladestation stellen.
An der Ladestation leuchtet kein Licht, wenn
das Handstück eingestellt wird. Kein Strom. 1. Prüfen, ob alle Anschlüsse sauber und alle Teile
korrekt angeschlossen sind.
2. Prüfen, ob die Steckdose eingeschaltet ist.
3. Falls beides nicht hilft, das Gerät an eine andere
Steckdose anschließen.
4. Zur Reparatur an die lokale Vertretung von SDI
Ltd wenden.
Das Gerät funktionierte gestern
einwandfrei und geht heute Morgen
nicht an.
Feuchtigkeit durch Kondensation. 1. Schutzhülle auf Anzeichen von Feuchtigkeit im
Inneren prüfen.
2. Schutzhülle abnehmen und Lampe einige
Stunden trocknen lassen.
Bei der Verbindung mit dem Handstück ist
kein Signalton zu hören. Akku leer. Zum Aufladen in die Ladestation stellen.
Die Lichtleistung ist zu niedrig. 1. Linsenkappe schmutzig oder verkratzt.
2. Schutzhülle.
Linsenkappe prüfen und reinigen. Eventuell
ersetzen. Die Schutzhülle muss eng an der
Linsenkappe anliegen.
Das Display am Handstück blinkt. Gerät im Einstellungsmodus. einmal drücken, um den Einstellungsmodus zu
beenden.
Der Akku zeigt Anzeichen von Korrosion oder
riecht verschmort. Gerät nicht verwenden. Die lokale Vertretung von SDI Ltd kontaktieren.
Das Dentalmaterial härtet nicht
vollständig aus. Falscher Aufsatz? Prüfen, ob der richtige LED-Aufsatz verwendet wird.
Herstellerangaben zur korrekten Lichthärtung des
Materials beachten.
Ich möchte meine bevorzugte Einstellung
löschen und zur Werkseinstellung
zurückkehren.
Legen Sie das Handstück auf die Ladestation und
warten Sie, bis der Statusring den Ladestatus
anzeigt.
Drücken Sie die obere und untere Taste
gleichzeitig 1-2 Sekunden. Der Statusring leuchtet
dann durchgehend gelb. Halten Sie diesen solange
gedrückt bis Sie einen langen Piepton hören, der
bestätigt, dass das Gerät auf die Werkseinstellung
zurückgesetzt wurde.
Das Handstück war über Nacht in der
Ladestation. Der Statusring leuchtet immer
noch rot, und das Handstück ist sehr heiß.
Problem beim Aufladen. Akku eventuell am
Ende seiner Lebensdauer. Akku wechseln.
Die Lichtemission beginnt nicht, wenn man
die Taste drückt.
Akku leer. Zum Aufladen in die Ladestation stellen.
Der LED-Aufsatz passt nicht zum
Hand-stück. Falscher Radii LED-Aufsatz. LED-Aufsätze früherer Radii-Modelle sind
mit der Radii Xpert nicht kompatibel.
DEUTSCH

14
HANDSTÜCK
1. Nach jedem Gebrauch die Schutzhülle abnehmen und entsorgen.
2. Das Radii Xpert Handstück mit einem Desinfektionstuch
(auf Benzalkoniumbasis) oder einem mit Reinigungsmitteln auf
Isopropanol-/Ethanolbasis befeuchteten weichen Tuch abwischen.
3. Die elektrischen Kontakte an der Handstückbasis nicht feucht abwischen.
Nötigenfalls mit trockenem Tuch reinigen.
4. Das Handstück vor Anlegen einer neuen Schutzhülle an der Luft trocknen lassen.
Hinweis: Bei der Verwendung von antibakteriellen Wischtüchern ist darauf zu achten, dass keine Flüssigleit in das
Handstück oder die Ladestation eindringt.
LADESTATION
1. Ladestation von der Stromzufuhr trennen.
2. Oberfläche mit einem Desinfektionstuch (auf Benzalkoniumbasis) oder einem mit Reinigungsmitteln auf Isopro-panol-/Ethanolbasis befeuchteten
weichen Tuch abwischen.
3. Handstückhalter mit Druckluft von abgelagertem Schmutz reinigen und sanft abwischen, ohne die elektrischen Kontakte zu befeuchten.
LAGERUNG BEI LÄNGEREM NICHTGEBRAUCH
Wenn Radii Xpert längere Zeit nicht verwendet werden soll, z.B. in Betriebsferien, das Handstück voll aufladen oder bei eingeschalteter
Stromversorgung in der Ladestation stehen lassen.
Radii Xpert besitzt eine integrierte Sicherheitsfunktion, die eine vollständige Entladung des Akkus verhindert.
HINWEISE ZUR ENTSORGUNG
Unbrauchbare Akkus und Polymerisationslampen nicht als unsortierte kommunale Abfälle entsorgen. Elektronische Geräte enthalten
Gefahrstoffe und stellen daher ein potentielles Gesundheits - und Umweltrisiko dar, wenn sie in kommunalen Deponien entsorgt werden,
aus denen die Stoffe in Boden und Grundwasser gelangen können.
Bitte gemäß den in Ihrem Land geltenden Vorschriften entsorgen.
GARANTIE
SDI Ltd gewährt dem Erstkäufer dieses Produkts für drei (3) Jahre ab dem Kaufdatum eine Garantie auf Material - und Verarbeitungsfehler, mit
Ausnahme des Akkus, für den zwei (2) Jahre Garantie gelten. Es obliegt dem Anwender, das Produkt auf seine Eignung für den vorgesehenen Zweck
zu prüfen. Falls an dem Produkt innerhalb der Garantiefrist Fehler auftreten, wird es von SDI Ltd oder dem lokalen zugelassenen Servicezentrum
kostenlos repariert. Diese Garantie gilt nur, wenn eine Kontrolle ergibt, dass der Fehler bei normaler und sachgemäßer Anwendung aufgetreten ist, und
unterliegt den folgenden Bedingungen.
SDI Ltd haftet unter keinen Umständen für Neben - oder Folgeschäden. Die Garantie gilt nicht für Schäden oder Fehler, die aus einer Nichtbeachtung
der Gebrauchsanweisung oder sonstigen fehlerhaften Verwendung oder Wartung des Geräts durch den Anwender entstehen. SDI Ltd bietet zwar auch
nach Ablauf der Garantie Reparaturdienste für die Radii Xpert, garantiert aber die Verfügbarkeit dieser Dienste und der Ersatzteile nur für zwei (2) Jahre
nach Auslistung des Modells.
Es gilt nur die obengenannte Garantie; alle sonstigen ausdrücklichen oder stillschweigenden Garantien werden hiermit ausgeschlossen.
ANSPRÜCHE
Zur Geltendmachung von Garantieansprüchen das gesamte Gerät (Handstück, Ladestation, Netzteil und LED-Aufsatz) frachtfrei an den Händler oder
direkt an SDI Ltd zurücksenden, zusammen mit einer Kopie des Kaufbelegs und einer eindeutigen Beschreibung des Fehlers.
Bei der Kommunikation mit dem Kundendienst die Seriennummer der Radii Xpert bereithalten.
REGISTRIERUNG DER GARANTIE FÜR RADII XPERT
Zur schnellen Geltendmachung von Garantieansprüchen ist es ratsam, die Radii Xpert baldmöglichst auf eine der folgen-den Arten bei SDI Ltd zu
registrieren:
1. Die in der Packung enthaltene Garantiekarte ausfüllen und mit einer Kopie des Kaufbelegs zurücksenden an:
SDI Ltd PO Box 314 Bayswater, VIC 3153 AUSTRALIEN
2. Alternativ die Garantie unter www.sdi.com.au/warranty registrieren.
WARTUNG UND REINIGUNG
VORSICHT
Weder den LED-Lichtaufsatz noch andere Teile der
Radii Xpert autoklavieren. Flüssigkeiten dürfen in
keinen Teil des Handstücks oder der Ladestation
eindringen.
Radii Xpert nicht direkt mit Flüssigkeiten
besprühen oder mit größeren
Flüssig-keitsmengen behandeln. Lösungen
auf ein Tuch sprühen und damit abwischen.
ZULÄSSIGE REINIGUNGSMITTEL NICHT ZULÄSSIGE REINIGUNGSMITTEL
70% Isopropanol Alcohol Oxidationsmittel wie Wasserstoffperoxid
Neutralenzymatische Reiniger Stark alkalische Tenside
Ethanolbasierte Mittel Handseifen und Spülmittel
Antiseptische Benzalkoniumchlorid-Tücher Abrasive Reiniger
Chlorhexidingluconat Acetonbasierte Reiniger
Glutaraldehyd Bleichmittelbasierte Reiniger
Reiniger mit Phosphorsäure
Ammoniak- oder Iod-Komplex-Lösungen
DEUTSCH
15
OUR
VISION.
YOUR
SMILE. www.sdi.com.au
INSTRUÇÕES DE USO
POR FAVOR LEIA ESTAS INSTRUÇÕES ANTES DE OPERAR O INSTRUMENTO
DESCRIÇÃO DO PRODUTO
Obrigado por comprar o fotopolimerizador LED Radii Xpert. O Radii Xpert é uma fonte de luz de alto desempenho
para a polimerização intra-oral de materiais polimerizados por luz com foto-iniciadores na faixa de comprimento
de onda de 440 nm - 480 nm (com a ponta de fotoativação padrão). Ele foi projetado para produzir uma
polimerização ideal e consistente para todos os materiais curados a luz, a fim de produzir restaurações de alta
qualidade.
Na tecnologia “target assist”, uma luz especial de baixa potência, foi incorporada no Radii Xpert para ajudar os
usuários a posicionar com precisão a ponta de fotoativação antes que a polimerização comece.
O Radii Xpert é um dispositivo odontológico de alta qualidade que foi projetado de acordo com a mais recente
ciência e tecnologia para luzes de polimerização. Cada unidade vem com uma fonte de corrente universal que
pode ser usada em tomadas de 110 a 240 volts.
DESENHO INTELIGENTE.
FOTOATIVAÇÃO OTIMIZADA
A CADA UTILIZAÇÃO.
PORTUGUÊS

16
SEGURANÇA, ADVERTÊNCIAS E CUIDADOS
O uso do Radii Xpert é restrito a dentistas profissionais qualificados de acordo com as instruções de segurança abaixo:
1. Nunca abra ou altere o Radii Xpert de forma alguma. Apenas revendedores autorizados pela SDI Ltda podem abrir o invólucro e
efetuar reparos no instrumento.
2. Não introduza quaisquer objetos na unidade à exceção de peças de reposição manuseadas de acordo com este manuual.
3. Só carregue o fotopolimerizador Radii Xpert no carregador original que vem com o aparelho.
4. Ligue a fonte numa tomada adequada, aterrada e aprovada.
5. Sempre desconecte a alimentação do carregador ao limpar o instrumento.
6. Não use um cabo elétrico danificado.
7. Se você tiver algum motivo para suspeitar que a segurança do Radii Xpert esteja comprometida, a unidade deve
ser retirada da operação e rotulada adequadamente para impedir que terceiros usem sem querer uma unidade potencialmente
defeituosa.
1. O Radii Xpert emite uma luz de alta intensidade e só deve ser usado conforme indicado neste manual.
2. Não olhe diretamente para a fonte de luz.
3. O operador, os assistentes e o paciente devem sempre usar proteção apropriada para olhos de bloqueio de luz azul.
4. Restringir a exposição à luz à cavidade oral a que o tratamento clínico se destina.
5. Evite contato direto da ponta de polimerização com tecidos moles e mucosa.
1. O Radii Xpert só pode ser operado com a ponta LED fornecida e não é compatível com os acessórios de LED do modelo Radii
anterior.
2. A condensação resultante da transferência da unidade de um ambiente frio para um ambiente quente pode ser um risco
potencial. O instrumento só deve ser ligado depois de estar completamente equilibrado à temperatura ambiente.
3. Use somente peças SDI Ltda genuínas ao substituir componentes defeituosos conforme indicado neste manual.
4. Não utilize a unidade na proximidade de misturas inflamáveis.
5. Mantenha solventes, líquidos inflamáveis e fontes de calor intenso longe da unidade, pois podem danificar o invólucro de
plástico.
6. Não deixe que produtos de limpeza penetrem no Radii Xpert pois isso pode causar um curto-circuito.
7. Não use o Radii Xpert em pacientes ou por operadores que:
a. Tenham implantes de marca-passo cardíaco que foram aconselhados a terem cuidado em relação à sua exposição a
pequenos dispositivos elétricos.
b. Com uma história de reações foto-biológicas (incluindo indivíduos com urticária solaris ou protoporfiria eritropoiética) ou
que estão atualmente em medicação fotossensibilizante (incluindo 8-metoxipsoraleno ou
clorotetraciclina de dimetilo).
c. Que tenham histórico de doença na retina.
d. Que tiveram cirurgia para catarata.
Converse com o médico desses pacientes antes de utilizar o Radii Xpert neles.
8. Antes de cada uso do Radii Xpert, assegure-se de que a intensidade emitida seja suficiente para garantir a polimerização com
segurança.
9. O Radii Xpert foi desenvolvido e testado de acordo com os regulamentos e padrões de EMC (compatibilidade eletromagnética)
relevantes de acordo com os requisitos legais. Devido a variáveis que podem existir dentro do ambiente de trabalho, tais
como fonte de energia, fiação e condições ambientais que podem afetar as propriedades EMC do Radii Xpert, pode ocorrer a
interrupção da EMC. Se isso acontecer, mova a unidade para um local diferente.
10. A SDI Ltda não se responsabiliza por qualquer dano resultante do uso do Radii Xpert para qualquer outro propósito que não seja
a polimerização de materiais dentários polimerizados por luz.
PERIGO DE
CHOQUE
ELÉTRICO
LUZ DE ALTA
INTENSIDADE
CUIDADO
TRANSPORTE E CONDIÇÕES DE ARMAZENAMENTO
Temperatura
ambiente
Umidade
relativa
Pressão
atmosférica
PORTUGUÊS

17
CUIDADO
Não use autoclave com
acessório de luz de LED
ou em qualquer outro
componente do Radii Xpert.
VISÃO GERAL DO INSTRUMENTO
AC power pack
with international
plug adaptor heads
Intensity indicator
light check with
blue LED’s status indicator
Charging
charging (low battery) - solid red
charging - pulsing green
fully charged - solid green
Charging dock
User interface
- control buttons
- function display
- adjustable timer with countdown
power on
favourites mode timer units
- s = seconds
- mins =minutes
activate curing
sound icon
countdown timer
battery status
Handpiece
Rotatable
LED attachment
Status indicator
charging (low battery) - solid red
charging - pulsing green
fully charged - solid green
curing in progress - solid blue
radii
xpert
20
s
20
s
BASE PARA CARGA
Voltagem de operação 100 – 240 V – 50 / 60 Hz
Entrada de corrente 12 V DC
Dimensões comprimento: 142 mm,
largura: 70 mm, altura: 70 mm
Peso 155 g
Classificação Classe II - isolamento duplo
Segurança IEC 60601-1
EMC
(Conformidade Eletro Magnética)
IEC 60601-1-2
Proteção contra choque elétrico Tipo BF
Proteção contra entrada de
líquidos Caneta: IPX4
Base para carga: IPX3
FOTOPOLIMERIZADOR
faixa de comprimento de onda
emitida Acessório padrão de polime-
rização: 440 nm - 480 nm
Pico de comprimento de onda Acessório padrão de polime-
rização: 460 nm
Dimensões Comprimento: 255 mm
Diâmetro: 30 mm
Peso 185 g
INSTRUÇÕES DE USO
1. Acessório padrão de polimerização:
• Para polimerizar todos os produtos de fotoativação por luz na faixa de comprimento de onda de 440 nm - 480 nm
(ponta de fotoativação padrão)
CARREGADOR E CANETA
Tempo para carregar a bateria Para uso normal diário
aproximadamente 3 horas
Tempo para carregar a bateria
totalmente descarregada Deixe 5 - 6 horas
(ideal deixar carreando a noite
toda)
Temperatura de operação 10°C - 40°C (50°F - 104°F)
Umidade relativa 10 % - 85 %
Pressão atmosférica 0.5 atm - 1.0 atm
(500 hPa to 1060 hPa)
Altura total com o
fotopolimerizador 290 mm
FONTE DE CORRENTE COM ADAPTADORES UNIVERSAIS PARA
TOMADA DE CORRENTE ALTERNADA
Voltagem de entrada 100 – 264 V – 50 / 60 Hz
Voltagem de saída 12 V DC
Corrente de saída 1.0 A
Dimensões 38 mm H x 45 mm W x 70 mm L
Peso 104 g
Classificação Grau Médico (UL, CE, RoHS, WEEE)
DADOS TÉCNICOS
ACESSÓRIO LED
ROTATIVO
INDICADOR DE STATUS
carregando (bateria fraca) - vermelho aceso
carregando - verde piscando
totalmente carregada - verde aceso
polimerização em progresso - azul aceso
INTERFACE DO USUÁRIO
- botões de controle
- exibição de função
- temporizador ajustável com
contagem regressiva
FONTE PARA LIGAR EM
CORRENTE ALTERNADA
com adaptadores
universais para tomada
CARREGANDO
carregando (bateria fraca) - vermelho aceso
carregando - verde piscando
totalmente carregada - verde aceso
INDICADOR DE INTENSIDADE
verificação da luz com
indicador de estado do LED azul
CANETA
BASE PARA
CARGA
ícone de som
ativar a polimerização
estado da bateria
temporizador com contagem regressiva
unidades de tempo
- s = segundos
- min =minutos
modos favoritos
ligado
PORTUGUÊS
18
INICIO RÁPIDO
TODAS AS FIGURAS PODEM SER ENCONTRADAS NA PÁGINA 58
Verifique o conteúdo da caixa para conferir qualquer possível dano de transporte. Se houver peças danificadas ou faltando, entre em contato com o
representante local da SDI Ltda imediatamente.
CONFIGURAÇÕES DE FÁBRICA
A configuração de fábrica do acessório de fotoativação padrão do Radii Xpert é de 20 segundos por ciclo de exposição.
BASE DE CARGA (FIGURA 1)
1. Conecte o adaptador adequado de corrente alternada no plugue e encaixe na tomada. Incline a peça levemente e pressione levemente até ouvi-la
clicar ao se ajustar no lugar.
2. Conecte outra face do plugue de corrente alternada na parte posterior da base de carga.
3. Coloque a base de carga numa superfície plana adequada e ligue pressionando ON.
4. As luzes LED na base de carga piscarão todas de uma só vez, alternando de vermelho para verde e de verde para azul.
CANETA (FIGURA 2)
1. Remova o fotopolimerizador Radii Xpert da sua embalagem e coloque na base de carga.
2. Deixe o Radii Xpert carregar totalmente até que o anel sinalizador e todas as cinco luzes na base de carga fiquem acesas em verde.
Nota:
1. Durante a carga, o anel sinalizador e as luzes da base de carga ficam piscando verde.
2. O Radii Xpert contém uma bateria recarregável de íon de lítio sem efeito memória e pode ser recarregada a qualquer momento.
OPERAÇÃO
1. Remova o fotopolimerizador Radii Xpert da base de carga e introduza uma capa protetora higiênica.
Nota: Assegure-se que a capa protetora se ajuste perfeitamente sobre a lente sem rugas ou dobras. A costura da capa deve ser
posicionada ao longo dos lados da fixação e do fotopolimerizador. (Figura 3)
2. Gire a ponta de fotoativação para a posição desejada.
3. Pressione (o botão superior) e mantenha pressionado. Uma luz de intensidade muito baixa se acenderá para ajudá-lo a posicionar a ponta de
fotoativação na cavidade oral. Quando a ponta estiver na posição correta, solte a ponta do dedo e a fotoativação começará. O anel de estado fica
aceso azul com a ponta de fotoativação padrão engatada. O LCD mostra 20, e vai contando até 0.
4. Vai se ouvir um bip longo quando a fotoativação termina e o anel de estado vai para OFF.
5. Pressione para começar outro ciclo de fotoativação de 20 segundos.
6. Para mudar o tempo de fotoativação pré-definido (regulagem temporária) Pressione (botão inferior) e mantenha pressionado de um
1 a 2 segundos. Os números no LCD começam a piscar.
7. Pressione para rolagem ascendente das opções a partir da ultima definição usada. Pressione uma vez para selecionar. Os números no
LCD param de piscar.
8. Descarte a capa higiênica após cada paciente.
9. Limpe e desinfete o fotopolimerizador. Veja a seção MANUTENÇÃO E LIMPEZA neste manual.
Nota:
1. É altamente recomendável usar uma capa higiênica Radii Xpert para cada paciente. A barreira sleeve (acompanha 100 peças em cada kit) para
evitar a contaminação cruzada e proteger a tampa da lente da adesão de material dentário em sua superfície e corpo. Essas capas foram
desenvolvidas especialmente para produzir a emissão ideal.
2. A emissão de luz poderá ser seriamente reduzida se for usada uma capa protetora errada ou não posicionada corretamente.
TEMPO DE FOTOATIVAÇÃO
1. Siga os tempos de fotoativação recomendados pelo fabricante de seus materiais restauradores.
2. Os tempos de fotoativação indicados geralmente assumem que a ponta da luz é mantida na posição correta
sobre o material que está sendo polimerizado.
VERIFICAÇÃO RÁPIDA DO ESTADO DE INTENSIDADE DE LUZ UTILIZANDO O INDICADOR DE INTENSIDADE
INCORPORADO (FIGURA 4)
1. Coloque cuidadosamente a ponta do acessório LED na
área de teste da base de carga. Confirme que a ponta
está nivelada e no centro da área de teste. Se não estiver
centrada, poderá dar leituras mais baixas.
2. Ative a luz.
Todos os 5 LEDs azuis 100%
4 LEDs azuis 90%
3 LEDs azuis 80%
2 LEDs azuis 70%
1 LEDs azul 60%
PORTUGUÊS

19
MODO DE ESPERA
O Radii Xpert entra em modo de espera (LCD desliga) quando ele estiver:
1. Na base de carga ou;
2. Não estiver sendo usado por mais de 3 minutos.
O instrumento vai se ativar automaticamente quando retirado da base de carga. Pressione para começar a fotoativação.
Se o instrumento desliga - OFF / entra em estado de espera fora da base de carga, pressione o botão uma vez para reativá-lo. Pressione para
começar a fotoativação.
OPERAÇÃO
ACESSORIO LED PROGRAMA
Acessório padrão de
fotoativação • Tempo de fotoativação default:
20 segundos
• LCD em contagem regressiva
• Opção de tempo de fotoativação do
usuário: 2, 10, ou 20 segundos
Nota: Observe as Instruções de Uso do
material aplicado ao selecionar tempo
de fotoativaçãoe.
ESTADO - DURANTE A CARGA ANEL SINALIZADOR DE
ESTADO
Carregando (bateria fraca) Aceso vermelho
Carregando Verde piscando
Carga completa Aceso verde
ESTADO - DURANTE A CARGA INDICADOR DA BASE DE
CARGA
Carregando (bateria fraca) Aceso vermelho
Carregando Verde piscando
Carga completa Aceso verde
2. LUZES DA BASE DE CARGA
(ENQUANTO O FOTOPOLIMERIZADOR ESTÁ CARREGANDO)
ESTADO - DURANTE A
OPERAÇÃO ANEL SINALIZADOR DE
ESTADO
Luz de posicionamento
(target assist) Aceso amarelo
Fotoativação em progresso Aceso azul
Acessório LED demasiado
aquecido (deixe resfriar) Pisca vermelho uma vez e
depois apaga
Nível de carga baixo Aceso azul por 1 segundo e
2 bips curtos
COMO MUDAR O LED (FIGURA 5)
Para mudar o acessório do LED, retire cuidadosamente o LED do fotopolimerizador e introduza um novo LED - Você ouvirá um clique.
COMO MUDAR A TAMPA DA LENTE (FIGURA 6)
1. Remova a tampa girando-a no sentido anti-horário.
2. Substitua com uma tampa nova, girando-a no sentido horário.
COMO AJUSTAR SEU TEMPO DE CURA FAVORITO (FIGURA 7)
1. Pressione e mantenha pressionado por 1 a 2 segundos. Os números no LCD começam a piscar.
2. Pressione para rolagem ascendente das opções a partir da ultima definição usada.
3. Pressione e mantenha pressionado por 1 a 2 segundos para salvar. Os números no LCD param de piscar. O anel de estado fica aceso verde
por 2 segundos com um bip curto, para confirmar que essa seleção foi salva.
4. Aparece uma estrela no canto inferior esquerdo da tela de LCD. O aparelho está pronto para uso.
COMO AJUSTAR O VOLUME DO AUDIO (FIGURA 8)
1. Pressione para ligar o aparelho.
2. Remova o LED do fotopolimerizador Radii Xpert.
3. Pressione e mantenha pressionado por 1 a 2 segundos para ativar o modo de modificação.
4. O ícone do alto-falante acende.
5. Um gráfico de barra exibe as regulagens de volume
6. Pressione para rolar pelas opções. Um bip vai soar para demonstrar o nível de volume (mudo, baixo, médio, alto).
7. Pressione e mantenha pressionado por 1 a 2 segundos para salvar. O anel de estado fica ligado verde por 2 segundos com um bip curto, para
confirmar que essa seleção foi salva.
8. Aparece uma estrela no canto inferior esquerdo da tela de LCD. Recoloque o LED.O aparelho está pronto para uso.
O áudio permanecerá na configuração selecionada até que a unidade volte à configuração de fábrica. Para voltar à configuração de fábrica,
coloque o fotopolimerizador na base de carga. Pressione (os botões de cima e de baixo) simultaneamente por 1 a 2 segundos; em
seguida o anel de estado fica aceso amarelo por 4 segundos e volta à regulagem de fábrica.
1. FOTOPOLIMERIZADOR
PORTUGUÊS

20
COMO MUDAR A BATERIA
1. Segure o fotopolimerizador na palma de sua mão esquerda.
2. Use a mão direita para girar a base do fotopolimerizador cerca de 10 graus no sentido anti-horário (gire e puxe, Figura 9).
3. Remova cuidadosamente a bateria do fotopolimerizador.
4. Coloque uma bateria nova e a trave em sua posição girando 10 graus no sentido horário (empurre e gire, Figura 10).
5. Ligue o fotopolimerizador Radii Xpert e acoplado na base de carga até que o anel sinalizador fique aceso verde.
Nota: O LED não precisa estar no fotopolimerizador para carregar a bateria.
6. Descarte a bateria usada de acordo com os regulamentos locais. Não a descarte no lixo comum.
Expectativa de duração da bateria: A duração da bateria depende da quantidade e o tempo de utilização do Led. Para prolongar a vida útil da
sua bateria Radii Xpert, mantenha-a na estação da base carregadora durante o horário do expediente, se possível. Ao fazê-lo, a SDI Ltda esperaria
que os consumidores experimentassem um mínimo de 300 descargas totais.
RESOLUÇÃO DE PROBLEMAS
PROBLEMA CAUSA POSSÍVEL SOLUÇÃO
O anel de estado do fotopolimerizador pisca
vermelho. Fotopolimerizador sobreaquecido. Deixe o fotopolimerizador resfriar antes de usá-lo
de novo.
O anel de estado do fotopolimerizador fica
aceso vermelho. Bateria fraca. O fotopolimerizador ainda pode ser usado para
fotoativação. Coloque de volta na base de carga
assim que possível.
O anel de estado do fotopolimerizador pisca
azul uma vez e desliga. Bateria a zero. Coloque de volta na base para carregar.
Não acende nenhuma luz na base de carga
quando o fotopolimerizador é colocado nela. Não há corrente elétrica. 1. Verifique se todos os contatos estão limpos e
corretamente conectados.
2. Assegure-se que a fonte esteja ligada.
3. Se tudo o que foi dito acima não funcionar
mude todo o aparelho para outra tomada.
4. Envie seu equipamento para assistência técnica
SDI Ltda.
O aparelho funcionou perfeitamente ontem,
mas hoje não quis ligar. Umidade de condensação. 1. Verifique se há sinais de umidade dentro da
capa higiênica.
2. Remova a capa higiênica e deixe a unidade
secar por algumas horas.
Não se ouve o bip quando liga o
fotopolimerizador. Bateria a zero. Coloque de volta na base para carregar.
A intensidade da luz está muito fraca. 1. Tampa da lente suja ou arranhada.
2. Capa higiênica.
Verifique e limpe a tampa da lente. Substitua se
necessário. Assegure-se que a capa higiênica se
ajusta firmemente na ponta de emissão de luz.
O LCD no fotopolimerizador está piscando. O aparelho está em modo de trabalho. Pressione uma vez para sair do modo de
regulagem.
A bateria mostra corrosão ou solta um odor
acre. Não use o aparelho. Envie seu equipamento para assistência técnica
SDI Ltda.
O material dental não fotopolimeriza
completamente. Acessório errado? Assegure-se que esteja usando o LED correto.
Verifique as especificações do material quanto às
características de fotoativação do fabricante.
Quero apagar minha regulagem favorita e
voltar à regulagem de fábrica. Coloque a peça de mão na base carregadora e
aguarde o anel de status mostrar o status de
carregamento.
Pressione (botão superior e inferior)
simultaneamente por 1-2 segundos; o anel de
status acenderá em amarelo sólido; mantenha
pressionado até ouvir um sinal sonoro longo,
que confirma que a unidade retornou com as
configurações de fábrica.
O fotopolimerizador ficou no carregador
a noite toda. O anel de estado ainda está
vermelho e o fotopolimerizador está muito
quente.
Problemas na carga. A bateria pode estar no
fim de sua vida útil. Envie seu equipamento para assistência técnica SDI
para uma avaliação.
A emissão de luz não começa quando
pressiono o botão .
A bateria está a zero. Coloque de volta na base para carregar.
O Acessório LED não se encaixa no
fotopolimerizador. Acessório LED Radii errado. Acessórios LED do modelo anterior de Radii não são
compatíveis com Radii Xpert.
PORTUGUÊS
Other manuals for radii xpert
1
This manual suits for next models
1
Table of contents
Languages:
Other SDI Dental Equipment manuals


Popular Dental Equipment manuals by other brands


B.A. International
B.A. International OPTIMA BA520FM Operation manual

Bien Air
Bien Air iOptima installation instructions

Ivoclar Vivadent
Ivoclar Vivadent Programat CS operating instructions

Planmeca
Planmeca Creo C5 user manual

Ultima
Ultima 250 Series owner's manual

KaVo
KaVo SMARTair operating instructions


