Seac KS01 User manual

• Istruzioni
• Instructions
• Instructions
• Instrucciones
• Anweisugen
SIDEMOUNT
11661-SEAC-MANUALE JACKET sidemount-totale.indb 1 15/06/2015 09.24.07

Italiano 3
English 13
Français 23
Español 33
Deutsch 43
11661-SEAC-MANUALE JACKET sidemount-totale.indb 2 15/06/2015 09.24.07

3
Italiano
MANUALE D’ISTRUZIONI JACKET-SIDEMOUNT
Congratulazioni per aver scelto la qualità e l’afdabilità di un prodotto SEAC. L’attrezzatura
da lei acquistata è stata realizzata con materiali selezionati e collaudati. Lo sviluppo e la
continua ricerca ci permettono di essere in continua evoluzione.
Processi innovativi di produzione, continui teste prove reali di funzionalità sviluppati nei
nostri centri di ricerca garantiscono l’afdabilità che contraddistingue tutti i prodotti SEAC.
AVVERTENZE GENERALI
ATTENZIONE
Leggere attentamente il manuale di istruzioni prima dell’uso e conservarlo.
ATTENZIONE
Prima di utilizzare il Jacket-Sidemount o qualsiasi altro prodotto per l'immersione
subacquea è necessario seguire un corso tenuto da istruttori qualificati e
conseguire il relativo brevetto. L'utilizzo di attrezzature subacquee da parte di
persone non in possesso del brevetto è pericoloso e può essere causa di gravi
incidenti anche mortali per il subacqueo ed i suoi accopagnatori.
• Durante l’assemblaggio e la messa a punto del Sidemount, sono stati attuati tutti gli
accorgimenti possibili per fornire un prodotto altamente affidabile nel tempo.
• Tali accorgimenti possono essere resi inefficienti qualora l’utente non utilizzi il Jacket-
Sidemount in maniera corretta e non provveda ad una adeguata manutenzione.
• La SEAC declina ogni responsabilità per qualsiasi problema derivante dalla mancata
osservanza delle raccomandazioni riportate nel presente manuale.
RIFERIMENTI ALLA EN 1809- SCOPO -DEFINIZIONE – LIMITAZIONI
• SCOPO: lo Standard EN 1809 permette di verificare i requisiti minimi di sicurezza e le
prestazioni dei JACKET-SIDEMOUNT di tipo gonfiabile.
• JACKET - definizione (EN 1809): dispositivo in grado di permettere al subacqueo un
controllo del proprio assetto durante l’immersione.
• LIMITAZIONI: Non è scopo dello Standard EN 1809 stabilire requisiti per dispositivi
di galleggiamento o giubbetti di salvataggio. Il JACKET-SIDEMOUNT non è inteso per
garantire in superficie una posizione a testa alta in caso di incoscienza o incapacità del
subacqueo.
Al ne di garantire la massima attenzione alla sicurezza sul Jacket è cucita una etichetta
riportante il seguente testo:
Questo Jacket-Sidemount non è un giubbotto di salvataggio e non garantisce il
sostentamento in supercie con il viso fuori dall’acqua.
Prima di utilizzare questo Jacket è necessario seguire un corso tenuto da istruttori
qualicati e conseguire il relativo brevetto per immersioni con Sidemount. L’uso
dell’attrezzatura subacquea da parte di persone non brevettate è pericoloso e può essere
causa di gravi incidenti anche mortali per il subacqueo ed i suoi accompagnatori.
Questo equilibratore può essere montato su monobombola no a 15 litri (diam. mm 220).
Leggete attentamente il Manuale di Istruzioni allegato. Prima di ogni uso controllate la
funzionalità del Jacket-Sidemount. Controllate accuratamente che non ci siano perdite di
aria e il assicurarsi del corretto funzionamento di tutti i componenti, collegate la frusta
LP del Jacket-Sidemount ad un’uscita di bassa pressione del primo stadio dell’erogatore
quando questo non è collegato alla bombola. Un’eventuale immissione di alta pressione
nella frusta può essere causa di rotture e gravi incidenti.
Dopo ciascuna immersione, comprese quelle in piscina, il Jacket-Sidemount deve essere
risciacquato esternamente ed internamente in acqua dolce. Riponetelo parzialmente
gono in un locale fresco ed aerato. La mancanza di manutenzione può causare danni al
Jacket-Sidemount o comprometterne il buon funzionamento. Nella parte retro dell’etichetta
è possibile visualizzare le varie spinte di galleggiamento riportate in Chilogrammi e in
Newton.
11661-SEAC-MANUALE JACKET sidemount-totale.indb 3 15/06/2015 09.24.07

4
Italiano
ATTENZIONE
Le istruzioni del presente manuale dovranno essere integrate con quelle
relative alle altre apparecchiature componenti il vostro SCUBA (gruppo bombola
assemblato). Prima di utilizzare il vostro gruppo bombola assemblato leggete
attentamente tutte le istruzioni per l’uso riportate nei relativi manuali.
CARATTERISTICHE TECNICHE
• CONNESSIONE AL PRIMO STADIO
Collegate la frusta del Jacket-Sidemount ad una uscita di bassa pressione del primo
stadio dell’erogatore.
ATTENZIONE
Prestate molta attenzione a collegare la frusta ad una uscita di bassa pressione. Il
collegamento all’ alta pressione può provocare gravi incidenti alle persone e danni
all’attrezzatura.
• GRUPPO DI COMANDO
Il gruppo di comando Seac è stato progettato e realizzato per garantirvi una rapida
e precisa regolazione dell’assetto in acqua. La sua forma ergonomica è garazia di
manegevolezza e praticità.
I suoi due pulsanti, di carico e scarico, di diversa forma e posizione, permettono di
individuare quello al momento necessario senza alcuna possibilità d’errore, anche senza la
necessità di posare lo sguardo sul comando.
Collegate l’attacco rapido della frusta al gruppo di comando (Fig. 2).
Eseguite questa operazione prima di mettere il primo stadio in pressione, l’inserimento
dell’attacco rapido sarà così più agevole.
• OPERAZIONE DI GONFIAGGIO
Per gonfiare il vostro Jacket-Sidemount è sufficiente premere il pulsante C (Fig. 1).
Rilasciando il pulsante di carico, immediatamente deve cessare l’alimentazione d’aria.
Se ciò non avvenisse, non utilizzare il jacket ma rivolgersi ad una officina autorizzata
Seac.
• OPERAZIONE DI SGONFIAGGIO
È possibile scaricare l’aria tramite il gruppo di comando premendo il pulsante E (Fig.1)
• OPERAZIONE DI GONFIAGGIO A BOCCA
È possibile gonfiare a bocca il vostro Jacket-Sidemount tramite il boccaglio C (Fig.1) del
gruppo di comando, applicando la seguente procedura:
1) Appoggiate la bocca al boccaglio.
2) Premete il pulsante di scarico e contemporaneamente sofate.
3) Rilasciate il pulsante di scarico.
4) Ripetete no al gonaggio desiderato.
A: CORRUGATO
B: INNESTO RAPIDO
C: PULSANTE DI
CARICO
D: BOCCAGLIO
E: PULSANTE DI
SCARICO
FIG. 1 FIG. 2 FIG. 3
11661-SEAC-MANUALE JACKET sidemount-totale.indb 4 15/06/2015 09.24.08

5
Italiano
ATTENZIONE
Il vostro Jacket-Sidemount non va utilizzato come fonte di aria respirabile.
Non respirate aria attraverso il boccaglio del gruppo comando.
VALVOLA DI SOVRAPRESSIONE/SCARICO RAPIDO
Il Vostro Jacket-Sidemount è dotato di valvole di sovrapressione di scarico (Fig. 4).
La valvola scarica automaticamente l’aria del Jacket-Sidemount quando la pressione
interna supera quella esterna di un valore prestabilito.
Lo scopo di questa valvola è di prevenire un’accidentale sovrapressione del Jacket-
Sidemount, che può dare origine ad un danneggiamento del prodotto.
Questa valvola funziona pure come scarico rapido, tirando il pomolo collegato alla sagola.
La normativa EN 1809:2014 prevede che la valvola di sovrapressione sia posizionata nella
parte superiore dell'involucro gonabile, alcuni modelli, sono predisposti per poter essere
congurati in questo modo, e con la possibilità di spostare la valvola di sovrapressione e/o
il gruppo comando nella posizione superiore del Jacket-Sidemount.
FIG. 4
ATTENZIONE
Nel caso di fuoriuscita di microbolle non significa che il Jacket-Sidemount
stia perdendo pressione, ma potrebbe trattarsi di aria intrappolata tra le
intercapedini dei tessuti.
TASCHE TRIM POCKETS
I Jacket-Sidemount SEAC sono provvisti di tasche supplementari, alloggiate sotto il coprischienale,
di grande capienza e appositamente progettate per contenere zavorra integrata.
ATTENZIONE
Leggete attentamente le istruzioni qui di seguito riportate in quanto sono
determinanti per la vostra sicurezza e la lunga durata della vostra attrezzatura.
ISTRUZIONI PER L’USO
La funzione del Jacket-Sidemount è di rendere più confortevole l’immersione permettendo
al subacqueo di mantenere un assetto neutro.
Prima di usare il Vostro Jacket-Sidemount in mare, sarebbe opportuno utilizzarlo in
piscina, attrezzandovi come per un’immersione in acque libere.
Come prima operazione regolate il nastro ventrale e i nastri degli spallacci secondo la vostra
corporatura. Una corretta regolazione vi permetterà massimo comfort e stabilità.
• MODALITÀ DI CONTROLLO PRIMA DELL’IMMERSIONE
1) Controllate che tutti i raccordi e le valvole siano ben ssati con le ghiere di
ssaggio ben serrate.
2) Assicuratevi del buon ssaggio dei nastri con le bombole.
3) Gonate completamente il Jacket-Sidemount ed aspettate circa 15 minuti. Se
il Jacket-Sidemount si presenta sgono non usatelo e rivolgetevi ad un’ Ofcina
Autorizzata SEAC.
4) Vericate più volte tutte le funzioni di gonaggio e sgonaggio del gruppo di
comando. Controllate attentamente il buon funzionamento del sistema di gonaggio
a bocca tramite il boccaglio.
5) Vericate attentamente il corretto funzionamento della valvola di sovrappressione/
scarico rapido.
6) Non lasciate il Jacket-Sidemount al sole e non appoggiatelo su superci pungenti o
ruvide che potrebbero danneggiarlo.
11661-SEAC-MANUALE JACKET sidemount-totale.indb 5 15/06/2015 09.24.08

6
Italiano
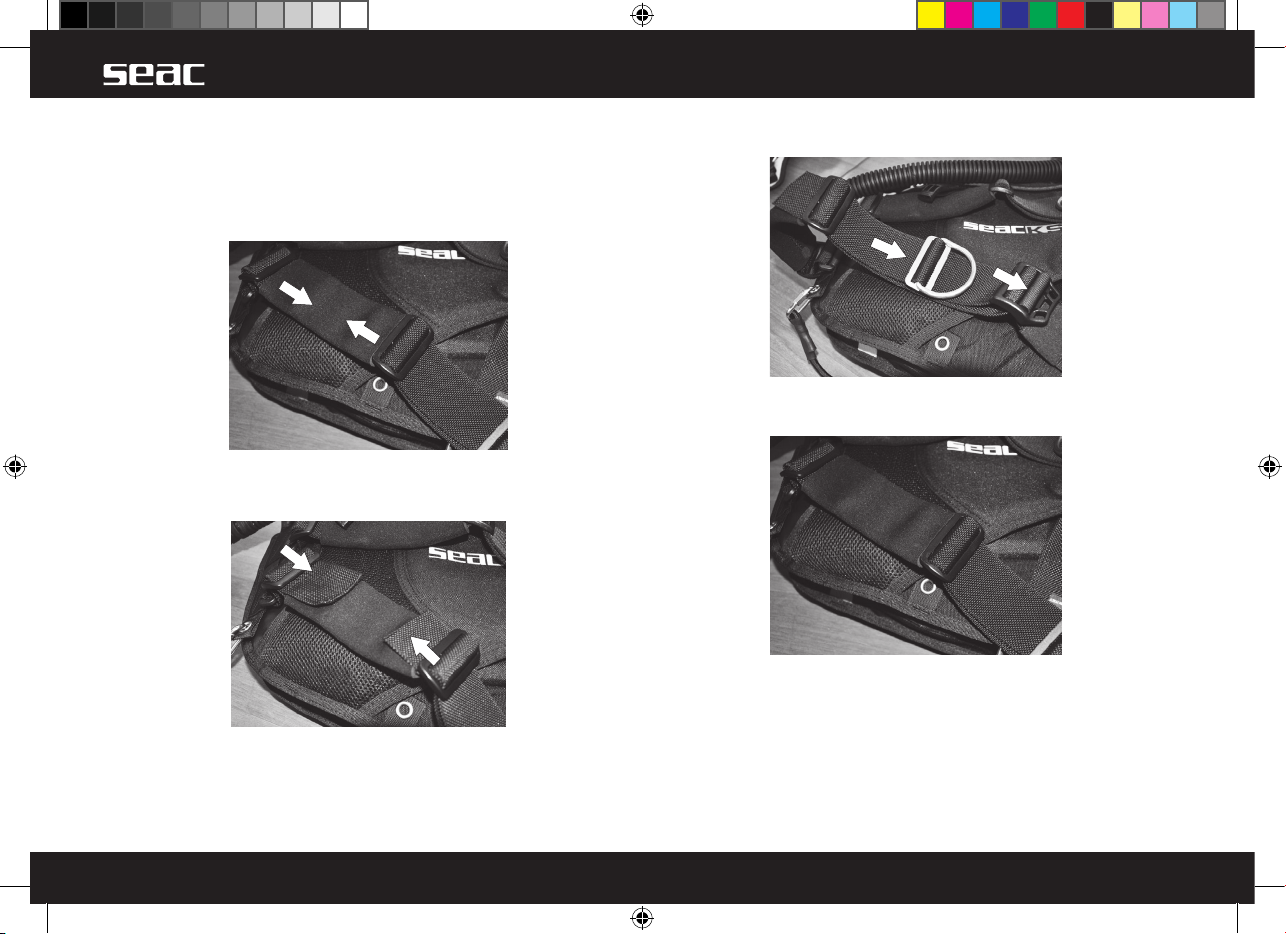
• REGOLAZIONE SPALLACCI A NASTRO
Gli spallacci del jacket sono progettati per poter essere regolati in due posizioni
diverse: regolazione alta, zona schienale (A) e regolazione diretta, zona spallaccio (B).
• SEQUENZA REGOLAZIONE
Fig.1: Spostare i due lembi del manicotto in neoprene (Fig.1) e fare uscire i terminali del
nastro di regolazione (Fig. 2)
A
B
FIG. 1
Fig.2: Regolare il nastro nella lunghezza desiderata facendolo scorrere lungo i due
triglidi di plastica (C e D)
C
D
FIG. 2
Fig.3: Regolare il D-Ring (E) nella posizione desiderata e regolare il nastro attraverso il
triglide di plastica (F).
E
F
FIG. 3
Fig.4: Riposizionare il manicotto di neoprene come in origine.
FIG. 4
11661-SEAC-MANUALE JACKET sidemount-totale.indb 6 15/06/2015 09.24.08

7
Italiano
• VESTIZIONE
- Indossare gli spallacci; si consiglia di inserire per primo il braccio sinistro, facendo
attenzione a non interferire col gruppo corrugato e la frusta.
- Chiudere saldamente la fibbia in acciaio del nastro ventrale.
- Regolare il nastro degli spallacci.
- Agganciare le fibbie sternali, se in dotazione.
- Regolare la fibbia del sottocavallo.
• SEQUENZA CHIUSURA FIBBIA BOMBOLA
Fig.1: Seguendo le frecce, inserire l’estremità della cinghia dal lato interno verso
l’esterno della fibbia (tra la staffa cucita e la parte mobile) e fatela passare nella
feritoia 1.
1
FIG. 1
Fig.2: Fare passare l’estremità della cinghia nel passante 2. Esercitare una forte
trazione della cinghia nella direzione indicata in modo da fare aderire strettamente la
cinghia sulla bombola.
2
FIG. 2
Fig.3: Mantenere in tensione la cinghia e fare passare la sua estremità nella feritoia 3.
Tirare con decisione e fare ribaltare la fibbia.
3
FIG. 3
Fig.4: La fibbia si chiuderà con uno scatto secco bloccando lo schienalino alla bombola.
Fissare la cinghia in eccesso negli appositi tessuti a velcro.
FIG. 4
11661-SEAC-MANUALE JACKET sidemount-totale.indb 7 15/06/2015 09.24.08

8
Italiano
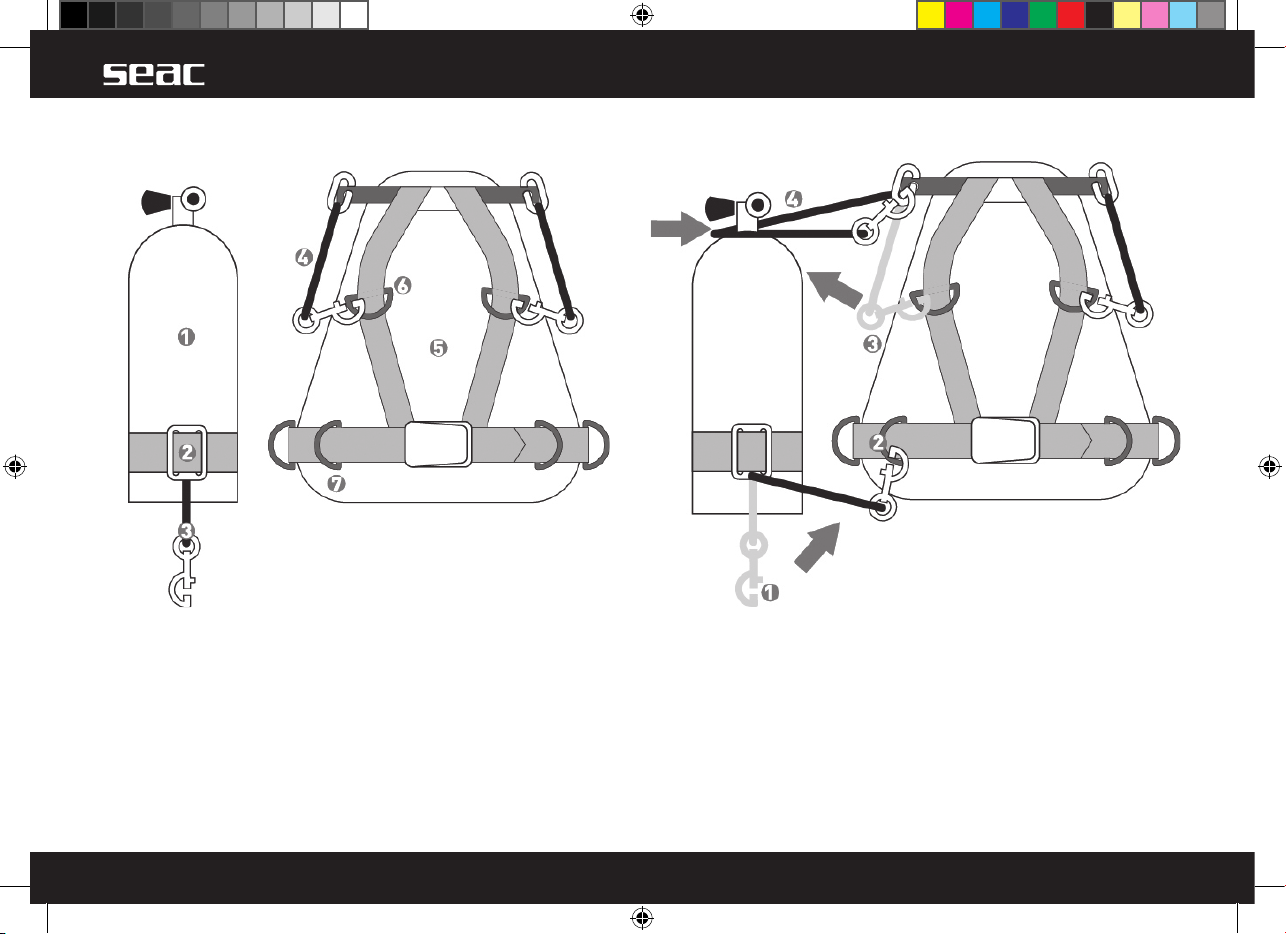
• ASSEMBLAGGIO BOMBOLE:
Per un corretto assemblaggio delle bombole al Jacket-Sidemount, seguire lo schema sotto
rappresentato nella seguenti gure:
1) Bombola
2) Nastro bombola
3) Moschettone in metallo con elastico e triglide (optional)
4) Elastico con moschettoni in metallo
5) Jacket Sidemount
6) Anello in Acciaio sso
7) Anello in Acciaio regolabile
• ASSEMBLAGGIO DELLE BOMBOLE AL SIDEMOUNT:
1) Fissare e posizionare il nastro sulla bombola
2) Agganciare il moschettone in metallo 1 all'anello regolabile 2 posto sul nastro ventrale
3) Sganciare il moschettone 3, fare passare l'elastico intorno al collo della bombola e sotto
la rubinetteria, agganciare il moschettone all'anello posto sull'estremità dell'elstico.
4) Ripetere la stessa sequenza per la seconda bombola
11661-SEAC-MANUALE JACKET sidemount-totale.indb 8 15/06/2015 09.24.09

9
Italiano
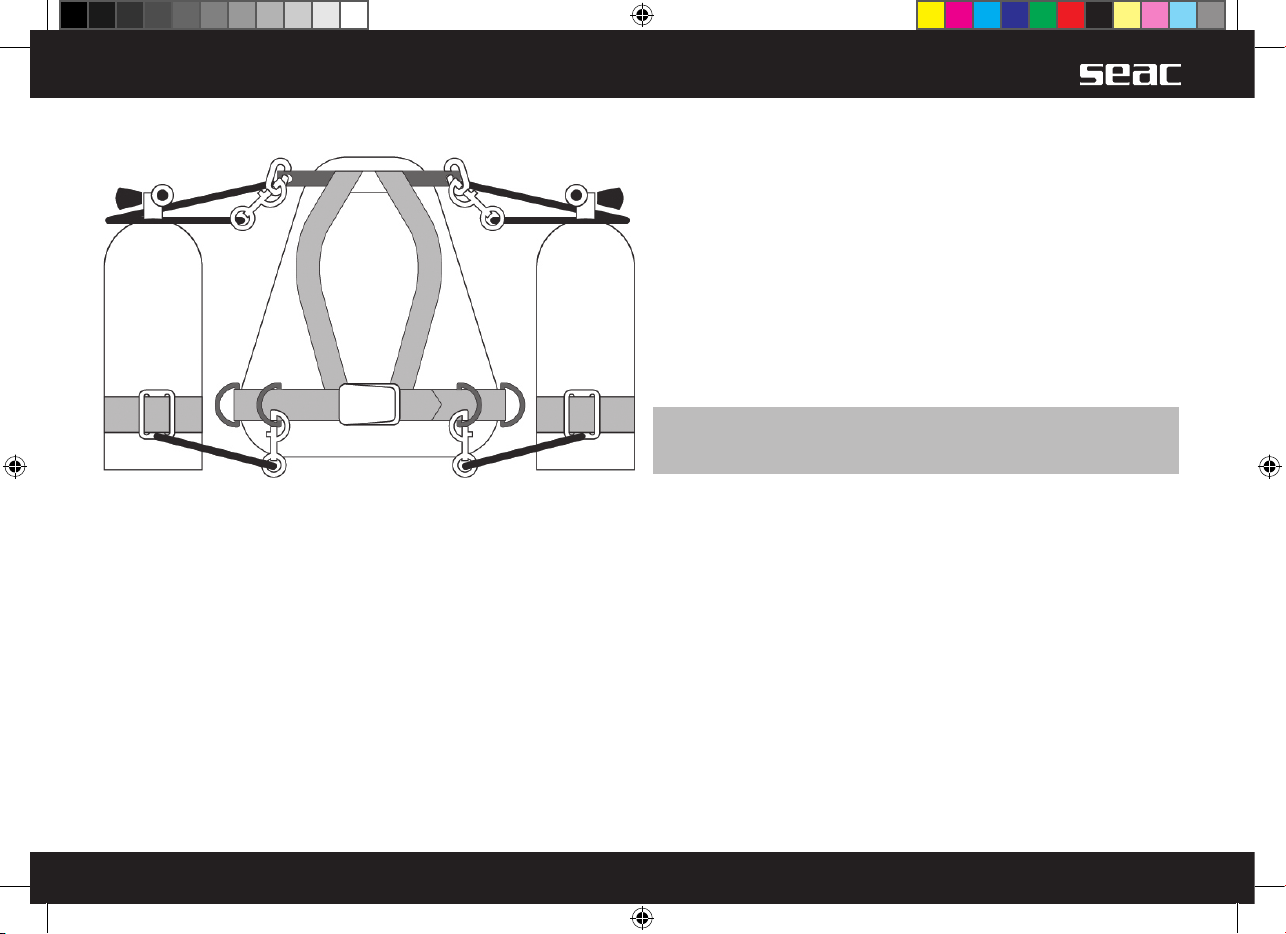
• CONFIGURAZIONE ASSEMBLAGGIO DELLE BOMBOLE AL SIDEMOUNT:
MODALITÀ DI CONTROLLO PRIMA DELL’IMMERSIONE
- Controllate che tutti i raccordi e le valvole siano ben fissati con le ghiere di fissaggio
ben serrate.
- Assicuratevi del buon fissaggio tra bombola e schienalino
- Gonfiate completamente il Jacket-Sidemount ed aspettate circa 15 minuti. Se il Jacket
si presenta sgonfio non usatelo e rivolgetevi ad un’Officina Autorizzata SEAC.
- Provate più volte tutte le funzioni di gonfiaggio e sgonfiaggio del gruppo di comando.
Controllate attentamente il buon funzionamento del sistema di gonfiaggio a bocca
tramite il boccaglio.
- Verificate attentamente il buon funzionamento della valvola di sovrappressione/scarico
rapido.
- Non ponete il Jacket-Sidemount al sole e non appoggiatelo su superfici pungenti o
ruvide che potrebbero danneggiarlo.
VESTIZIONE
- Indossare gli spallacci; si consiglia di inserire per primo il braccio sinistro, facendo
attenzione a non interferire col gruppo corrugato e la frusta.
- Regolare i nastri ventrali e chiudendo saldamente la fibbia di metallo.
- Regolare gli spallacci scorrevoli tirando contemporaneamente le estremità dei nastri.
- Agganciare le fibbie sternali, se in dotazione.
- Regolare la fibbia del sottocavallo facendola passare attraverso il nastro ventrale.
ATTENZIONE
Il Vostro Jacket-Sidemount non è un giubbetto di salvataggio e non è progettato
per mantenervi in superficie a testa in alto in caso di svenimento.
FUNZIONAMENTO
• IN SUPERFICIE
Per aumentare il sostentamento in supercie, Vi suggeriamo di gonare il Jacket-Sidemount
agendo sul pulsante di carico del gruppo comando per aumentare la vostra spinta positiva.
• IN IMMERSIONE
Impugnate il gruppo comando e premete sul pulsante di scarico, con questa operazione
azionerete la valvola di scarico graduale agevolando la fuoriuscita dell’aria.
In alternativa potete usare la valvola di scarico rapido tirando il gruppo di comando verso
il basso, l’aria fuoriuscirà rapidamente dalla valvola.Una volta iniziata la discesa, la velocità
tenderà ad aumentare, essa verrà compensata con rapidi colpetti sul pulsante di carico.
• ASSETTO NEUTRO
Una volta raggiunta la profondità desiderata, insufando e/o scaricando la giusta quantità
d’aria nel Jacket-Sidemount, vi permetterà di otterrete un comodo assetto neutro.
• RISALITA
Durante la fase di risalita, l’aria contenuta nel Jacket-Sidemount si espande provocando
un aumento della spinta positiva e di conseguenza un aumento della velocità, potete
controllare il vostro assetto esercitando una leggera pressione sul pulsante di scarico. In
caso di necessità, l’utilizzo del gruppo comando, servirà a contenere e limitare la velocità
di risalita.
MODALITÀ DI CONTROLLO PRIMA DELL’IMMERSIONE
ATTENZIONE
Durante la fase di risalita è strettamente necessario regolare l’equilibrio
idrostatico per evitare una velocità troppo rapida. Consultate il Vostro
Istruttore o il manuale di immersione per ulteriori informazioni in merito ad una
sicura velocità di risalita. Seguite sempre e comunque le norme richieste dal
vostro computer subacqueo o dalla vostra tabella di decompressione durante
ogni fase dell’immersione.
11661-SEAC-MANUALE JACKET sidemount-totale.indb 9 15/06/2015 09.24.09
10
Italiano
ATTENZIONE
Vi raccomandiamo di utilizzare il Jacket-Sidemount solo come compensatore del
vostro assetto. Utilizzare il Jacket-Sidemount per sollevare dal fondo oggetti
pesanti può essere estremamente pericoloso causando risalite incontrollate e
conseguenti gravi incidenti per il subacqueo ed i suoi accompagnatori.
MANUTENZIONE
Per mantenere il vostro Jacket-Sidemount in perfetta efficienza sono necessarie le seguenti
indicazioni:
• Dopo ogni immersione sia in mare che in piscina, sciacquate sempre con acqua dolce
l’interno e l’esterno del Jacket e assicurarsi di fare fuoriuscire ogni residuo di acqua
tramite le valvole di sovrapressione.
• Non riporre mai il Jacket-Sidemount con altro equipaggiamento e oggetti appuntiti che
possa lacerare l’involucro gonfiabile.
• Evitare di riporre il Jacket-Sidemount umido o piegato, ma farlo perfettamente
asciugare, lavando accuratamente l’interno, scaricate l’acqua e quando è
perfettamente asciutto riporlo in un luogo fresco ed areato.
• Alla fine di ogni immersione inserite sempre il tappo di protezione dell’attacco rapido
dopo aver scollegato la manichetta.
• Evitare l’esposizione prolungata del Jacket-Sidemount alla luce del sole.
• Sciacquate accuratamente con acqua dolce tutti i dispositivi di carico e scarico.
Per pulire l’interno seguite i seguenti consigli:
- Svitare la valvola di sovrapressione e introdurre acqua dolce (circa 1/4 del volume del
Jacket).
- Riassemblare la valvola di sovrapressione.
- Gonfiate il Jacket-Sidemount, capovolgendo e scuotendo lo stesso da parte a parte per
fare circolare l’acqua.
- Capovolgete il sacco e con il corrugato rivolto verso il basso, premendo il pulsante di
scarico, fare uscire attraverso il boccaglio tutta l’acqua precedentemente inserita.
ATTENZIONE
Per la pulizia del Jacket-Sidemount non utilizzate nessun tipo di solventi o
prodotti detergenti.
UTILIZZO DEI JACKET-SIDEMOUNT CON MISCELE D'ARIA ARRICCHITA
ATTENZIONE
Questo prodotto è stato progettato e realizzato per uso con aria atmosferica
compressa oppure miscele Nitrox fino ad una percentuale massima del 40% di
ossigeno contenuto.
L’uso di miscele con una percentuale di ossigeno superiore al 40% e/o composta
con altri gas (ad esempio con l'aggiunta di elio), puo' provocare danni o
deterioramento del jacket e pregiudicarne il corretto funzionamento.
ATTENZIONE
Non utilizzare nessun Jacket-Sidemount SEAC con miscele arricchite d'ossigeno
(Nitrox - Massimo contenuto d'ossigeno: 40%) senza prima aver ricevuto
adeguati insegnamenti in merito al loro utilizzo: Non osservare questa
avvertenza può essere causa di gravi incidenti.
ATTENZIONE
Non usare questo Jacket-Sidemount SEAC con altri gas o con aria arricchita
d'ossigeno. I Jacket SEAC sono progettati per essere utilizzati solo con aria
atmosferica compressa. Il mancato rispetto di questa avvertenza può causare
usura precoce dell'attrezzatura, difetti di funzionamento e possibili esplosioni,
che possono provocare danni anche molto gravi.
CERTIFICATO DI GARANZIA
SEACSUB S.p.A. garantisce il buon funzionamento del prodotto cui il presente documento è
allegato.
La garanzia ha durata di anni 2 (due) in relazione alle vigenti normative europee.
La garanzia ivi contenuta può essere esercitata esclusivamente alle condizioni ed entro i limiti
di seguito indicati:
1. La garanzia ha durata di anni 2 (due) a partire dal momento in cui il prodotto viene
acquistato presso un rivenditore autorizzato SEAC e non necessita di alcuna formalità di
preventiva o successiva convalida.
2. La garanzia è riconosciuta esclusivamente al primo acquirente del prodotto presso un
rivenditore autorizzato SEAC.
Essendo strettamente nominativa, non è cedibile a terzi se non previo espressa
autorizzazione da parte di SEAC.
3. La garanzia copre tutti e solo i difetti di funzionamento derivati da:
• Materiali ritenuti non idonei.
• Evidenti errori nella progettazione.
• Fabbricazione o assemblaggio del prodotto o parti di esso.
• Istruzioni e avvertenze d’uso errate o inadeguate.
4. La garanzia si estingue automaticamente, e con effetto immediato, a seguito di
intervenute riparazioni, modiche, trasformazioni, adattamenti o manomissioni in genere
effettuate sul prodotto nito o parti di esso non preventivamente autorizzate da SEAC e
comunque effettuate da personale non autorizzato.
11661-SEAC-MANUALE JACKET sidemount-totale.indb 10 15/06/2015 09.24.09
11
Italiano
5. La garanzia dà diritto all’intervento e alla riparazione gratuita nel più breve tempo
possibile, ovvero alla completa sostituzione gratuita del prodotto (a scelta insindacabile
di SEAC) o parti di esso dove venga riconosciuto da parte di SEAC difetti di funzionamento
tassativamente e precedentemente indicati al punto 3.
6. La garanzia può essere esercitata mediante inoltro, a SEAC, del prodotto ritenuto
difettoso.
Il tramite autorizzato alla presente operazione deve essere il rivenditore SEAC dove il
prodotto è stato acquistato.
Nel caso questo sia fattivamente impossibile, previa autorizzazione, può essere
autorizzato all’invio del prodotto difettoso un qualsiasi altro rivenditore SEAC. Condizione
necessaria per l’esercizio della garanzia è che il prodotto sia accompagnato da copia dello
scontrino scale o della fattura (o di altro documento equipollente di registrazione scale
da cui risultino il nominativo del rivenditore autorizzato SEAC presso cui il prodotto è stato
acquistato nonché la data d’acquisto del medesimo) comprovanti l’acquisto.
Nel caso in cui la SEAC riceva un prodotto che:
• Non sia accompagnato dal documento di registrazione fiscale aventi le caratteristiche
sopra citate.
• Versi in circostanze tali da determinare l’estinzione della garanzia secondo quanto
indicato nel punto 4.
• Presenti difetti derivanti da cause esterne ed ulteriori rispetto a quelle tassativamente
indicate al punto 3.
• Sia stato utilizzato impropriamente e/o per usi diversi da quello per il quale il prodotto
è stato progettato si asterrà dall’effettuare qualsiasi intervento sul prodotto, dandone
immediata comunicazione al mittente o al rivenditore autorizzato.
Qualora il mittente intenda comunque far eseguire l’intervento, trasmetterà a SEAC,
nei quindici giorni lavorativi successivi, una richiesta in tal senso nella quale dovrà
espressamente dichiarare di voler sostenere tutti i costi relativi all’intervento stesso
(mano d’opera, eventuali parti di ricambio, spese di spedizione).
In caso contrario la SEAC provvederà alla restituzione del prodotto con spese a cura del
destinatario.
SCHEDA TECNICA
MODELLO: KS01
TIPO: Sidemount
CERTIFICAZIONE: CE 0474 RINA - EN 1809
GRUPPO DI COMANDO: Inator a pistone con tasti in tecnopolimero.
TIPOLOGIA INVOLUCRO: Aircell Tridimensionale
MATERIALE INVOLUCRO: Cordura 500 Den PU
SALDATURA: Alta frequenza
SCHIENALE: No
SISTEMA DI BARDATURA: Imbragatura indipendente a nastro con
regolazione spallacci
VALVOLE DI SCARICO RAPIDO: 1 meccaniche di sovrapressione
TASCHE: No
SISTEMA ZAVORRA INTEGRATA: 2 tasche con chiusura a velcro (Max 2 Kg per
tasca.) + 1 Tasca con zip (Max 2 Kg)
D-RING 10 Anelli Acciaio Inox da 50 mm
TRIM WEIGHT: Optional
PESO (KG): Taglia Unica: 2,0 Kg
11661-SEAC-MANUALE JACKET sidemount-totale.indb 11 15/06/2015 09.24.09
12
Italiano
SCHEDA TECNICA
MODELLO: KS10
TIPO: Sidemount
CERTIFICAZIONE: CE 0474 RINA - EN 1809
GRUPPO DI COMANDO: Inator a pistone con tasti in tecnopolimero.
TIPOLOGIA INVOLUCRO: Aircell Tradizionale
MATERIALE INVOLUCRO: Poliuretano
SALDATURA: Alta frequenza
SCHIENALE: No
SISTEMA DI BARDATURA: Imbragatura indipendente a nastro con
regolazione spallacci
VALVOLE DI SCARICO RAPIDO: 1 meccaniche di sovrapressione
TASCHE: No
SISTEMA ZAVORRA INTEGRATA: 1 tasche con chiusura a velcro (Max 4 Kg) +
1 Tasca con zip (Max 2 Kg)
D-RING 7 Anelli Acciaio Inox da 50 mm +
2 maniglie in Acciaio Inox da 70 mm.
TRIM WEIGHT: Optional
PESO (KG): Taglia Unica: 2,3 Kg
SPINTA DI GALLEGGIAMENTO:
MODELLO: KS01 KS10
TAGLIA: TAGLIA UNICA (dalla XS alla XXL) TAGLIA UNICA (dalla XS alla XXL)
KG 12.2 11.0
NEWTON 120 108
LIBBRE 26.9 24.2
11661-SEAC-MANUALE JACKET sidemount-totale.indb 12 15/06/2015 09.24.09

13
English
SIDEMOUNT BC INSTRUCTIONS
Congratulations on having chosen the quality and reliability of a SEAC product. The
equipment you have purchased was made with selected and tested materials. Development
and constant research allow us to evolve continually.
Innovative production processes, constant controls and testing, as well as testing under
real conditions as conducted in our research centre, guarantee the reliability that all SEAC
products are known for.
GENERAL WARNINGS
WARNING
Carefully read the instruction manual before use and keep the manual for the life
of the product.
WARNING
Before using the Sidemount BC or any other product for underwater diving,
you should attend a course held by qualified instructors and obtain the relevant
diving certificate. Use of diving equipment by people without a diving certificate
is dangerous, and can cause serious, or even fatal, accidents for the diver and
his/her companions.
• During assembly and tuning of the BC, every step was taken to ensure high reliability of
the product over a period of time.
• However, these measures can be rendered ineffective if the product is not used
correctly and if adequate maintenance is not performed.
• SEAC denies all responsibility for any problem resulting from a failure to observe the
recommendations provided in this manual.
REFERENCES TO EN 1809 - OBJECT - DEFINITIONS - LIMITS
• OBJECT: The EN 1809 standard examines the minimum safety requirements and the
performance of inflatable SIDEMOUNT buoyancy compensator vests.
• BUOYANCY COMPENSATOR VEST - Definition (EN 1809): A device allowing the diver
to control his/her buoyancy during the dive.
• LIMITATIONS: The object of the EN 1809 Standard does not cover the requirements
for floating devices or safety jackets. A SIDEMOUNT buoyancy compensator vest is
not intended to guarantee, on the surface, a head-up position to an unconscious or a
temporarily disabled diver.
In order to ensure maximum attention to safety, a label is sewn onto the BC with the
following text:
This Sidemount BC vest is not a life vest, and does not guarantee that the diver will oat
on the surface with his or her face out of the water.
Before using this BC, divers must attend a course held by qualied instructors and obtain
the relevant diving certicate for dives with Sidemount. The use of diving equipment by
non-certied divers is dangerous and can lead to serious accidents, or even death, to the
diver and his/her dive buddies.
This BC can be mounted on a single tank set up to 15 liters (diam. 220 mm). Read the
attached Instruction Manual carefully. Check that the Sidemount BC operates correctly
before every use. Carefully check that there are no air leaks and make sure that all
components function correctly. Connect the LP hose on the Sidemount BC to a low
pressure port on the regulator rst stage while the regulator is not connected to the tank.
If high pressure is introduced into the hose, it can cause ruptures and serious accidents.
After each dive, including dives in a pool, the Sidemount BC must be rinsed inside and
out with fresh water. Store the BC partially inated in a cool, ventilated location. A lack
of maintenance can cause damage to the Sidemount BC and compromise its proper
operation. The back side of the label shows the various buoyancy lift levels in kilograms
and Newton.
11661-SEAC-MANUALE JACKET sidemount-totale.indb 13 15/06/2015 09.24.09

14
English
WARNING
The instructions in this handbook must be integrated with instructions for other
component parts of your SCUBA equipment (assembled tank unit). Before using
your assembled tank unit, carefully read all the instructions contained in the
corresponding handbook.
TECHNICAL CHARACTERISTICS
• CONNECTING TO THE FIRST STAGE
Connect the Sidemount BC hose to a low pressure port on the regulator first stage.
WARNING
Be very careful to connect to the hose to a low pressure port. Connecting to
high pressure can cause serious harm to people and can damage the equipment.
• INFLATOR UNIT
The Seac inflator unit was designed and manufactured to ensure quick and precise
regulation of buoyancy in the water. Its ergonomic shape ensures manageability and
practicality.
Its two buttons - inflation and deflation - are different shapes and in different positions,
making it easy to identify the correct button and leaving no room for error. It also
makes it unnecessary for the diver to look at the inflator unit.
Connect the quick coupler on the hose to the inflator unit (fig. 2).
Conduct this operation before you pressurize the first stage. This will make it easier to
insert the quick coupler.
• BC INFLATION
To inflate your BC, simply press the C button (fig. 1).
The flow of air should stop as soon as you release the inflation button. If this does not
happen, do not use the BC, and contact an authorized SEAC repair shop.
• BC DEFLATION
The air can be deflated using the inflator unit by pressing the E button (fig. 3).
• BC ORAL INFLATION
Your Sidemount BC can be inflated orally using the mouthpiece, C (fig. 1), on the
inflator unit as follows:
1) Put the mouthpiece in your mouth.
2) Press the deation button while blowing into the mouthpiece.
3) Release the deation button.
4) Repeat as necessary to reach the desired level of ination.
A: CORRUGATED
B: QUICK COUPLER
C: DEFLATION
BUTTON
D: MOUTHPIECE
E: DEFLATION BUTTON
FIG. 1 FIG. 2 FIG. 3
11661-SEAC-MANUALE JACKET sidemount-totale.indb 14 15/06/2015 09.24.09
15
English
WARNING
Your Sidemount BC should never be used as a source of breathable air.
Do not breath air through the inator unit mouthpiece.
OVER-EXPANSION RELIEF/QUICK AIR DUMP VALVE
Your Sidemount BC features an over-expansion relief valve (g. 4).
The valve automatically releases air from the Sidemount BC when the internal pressure
exceeds the external pressure by a preset amount.
This valve is provided in order to prevent accidental over-expansion in the Sidemount BC,
which can result in damage to the product.
This valve also operates as a quick air dump, by pulling the knob on the cord.
The EN 1809:2014 standard calls for the over-expansion relief valve to be placed on the
upper section of the inatable bag. Certain models are arranged so they can be congured
this way, with the option to move the over-expansion relief valve and/or the inator to the
upper position of the Jacket-Sidemount.
FIG. 4
WARNING
If micro-bubbles leak from the Sidemount BC, this does not indicate that it is
losing pressure; instead this could be air that was trapped in spaces between
the fabric fibers.
TRIM POCKETS
The SEAC Sidemount BCs offer additional high-capacity pockets located under the
backrest that have been specially designed to hold integrated weight.
WARNING
Carefully read the instructions provided below, because they are vital for your
safety and the lasting performance of your equipment.
INSTRUCTIONS FOR USE
The purpose of a Sidemount BC is to make diving more comfortable by allowing the diver
to maintain neutral buoyancy.
Before using your Sidemount BC in the ocean, you should test it in the pool, using the
equipment you would use for an open water dive.
First of all, adjust the cummerbund and shoulder straps to t your body shape. Correct
adjustment helps ensure optimal comfort and stability.
• PRE-DIVE INSPECTION
1) Check that all connectors and valves are rmly secured, with the locking rings fully
tightened.
2) Make sure that the straps fastening the tank are rmly fastened.
3) Fully inate the Sidemount BC and wait about 15 minutes. If the Sidemount BC
deates, do not use it, and contact an authorized SEAC repair shop.
4) Check all the ination and deation functions of the inator unit a few times.
Carefully check the correct operation of the oral ination system using the
mouthpiece.
5) Carefully check that the over-expansion/quick air dump valve is functioning
correctly.
6) Never leave the Sidemount BC in the sun, and do not lay it on sharp or rough
surfaces that could damage it.
11661-SEAC-MANUALE JACKET sidemount-totale.indb 15 15/06/2015 09.24.09
16
English
• ADJUSTING BELTED SHOULDER STRAPS
The shoulder straps on the BC have been designed to be adjustable to two different
positions: upper adjustment, backpack area (A), and direct adjustment, shoulder strap
area (B).
• ADJUSTMENT SEQUENCE
Fig. 1: Move aside the two edges of the neoprene hose (Fig. 1) and let out the ends of
the adjusting belt (Fig. 2).
A
B
FIG. 1
Fig. 2: Adjust the belt to the desired length by sliding it through the plastic triglide
buckle (C and D).
C
D
FIG. 2
Fig. 3: Adjust the D-Ring (E) to the desired position and adjust the belt through the
plastic triglide buckle.
E
F
FIG. 3
Fig. 4: Move the neoprene hose back to its original position.
FIG. 4
11661-SEAC-MANUALE JACKET sidemount-totale.indb 16 15/06/2015 09.24.10

17
English
• DONNING
- Put on the shoulder straps. We suggest that you put your left arm through first, being
careful not to become entangled in the corrugated hose and LP hose.
- Firmly close the steel buckle on the cummerbund strap.
- Adjust the shoulder straps.
- Fasten the chest straps, if provided.
- Adjust the crotch strap buckle.
• TANK BUCKLE CLOSURE SEQUENCE
Fig. 1: Following the arrows, insert the end of the strap from the inside of the buckle
outward (between the sewn bracket and the moving section) and pass it through slot 1.
1
FIG. 1
Fig. 2: Pass the end of the strap through loop 2. Pull firmly on the strap in the
direction shown so that it holds snug against the tank.
2
FIG. 2
Fig. 3: Keep the strap taut while threading the end through slot 3. Pull firmly and let
the buckle overturn.
3
FIG. 3
Fig. 4: The buckle will close with a sharp click, holding the backpack to the tank. Fasten
the excess strap to the special Velcro fabric.
FIG. 4
11661-SEAC-MANUALE JACKET sidemount-totale.indb 17 15/06/2015 09.24.10
18
English
• ASSEMBLING THE TANKS:
To assembly the Sidemount BC tanks correctly, follow the diagrams provided below.
1) Tank
2) Tank strap
3) Metal carabiner with elastic and triglide (optional)
4) Elastic with metal carabiners
5) Sidemount BC
6) Fixed steel ring
7) Adjustable steel ring
• ASSEMBLING THE TANKS TO THE SIDEMOUNT:
1) Position the strap on the tank and fasten.
2) Clip metal carabiner 1 to adjustable ring 2 located on the cummerbund strap.
3) Unhook carabiner 3. Thread the elastic around neck of the tank and under the valves.
Hook the carabiner to the ring on the end of the elastic.
4) Repeat the same steps for the second tank.
11661-SEAC-MANUALE JACKET sidemount-totale.indb 18 15/06/2015 09.24.10
19
English
• CONFIGURATION ASSEMBLING THE TANKS TO THE SIDEMOUNT: PRE-DIVE INSPECTION
- Check that all connectors and valves are firmly secured, with the locking rings fully
tightened.
- Make sure that the tank and backpack are properly connected.
- Fully inflate the Sidemount BC and wait about 15 minutes. If the BC deflates, do not
use it, and contact an authorized SEAC repair shop.
- Try all the inflation and deflation functions of the inflator unit a few times. Carefully
check the correct operation of the oral inflation system using the mouthpiece.
- Carefully check that the over-expansion/quick air dump valve is functioning correctly.
- Never leave the Sidemount BC in the sun, and do not lay it on sharp or rough surfaces
that could damage it.
DONNING
- Put on the shoulder straps. We suggest that you put your left arm through first, being
careful not to become entangled in the corrugated hose and LP hose.
- Adjust the chest straps and firmly close the metal buckle.
- Adjust the sliding shoulder straps by pulling both straps at the same.
- Fasten the chest straps, if provided.
- Adjust the crotch strap buckle, threading it through the cummerbund strap.
WARNING
Your Sidemount BC is not a safety jacket or personal floatation device and is
not designed to keep a diver on the surface in a head-up position should he/she
become unconscious.
OPERATION
• ON THE SURFACE
To increase support on the surface, we suggest you blow up the Sidemount BC with the
ination button to increase your positive lift.
• DURING DIVE
Grip the inator unit and press the deation button. With this operation you'll trigger the
gradual deation button allowing the air to discharge.
You can also use the quick dump valve by pulling the inator unit downward. The air will exit
the valve rapidly. Once you have started your descent your speed will begin to increase.
Compensate for this with quick presses on the inator button.
• NEUTRAL BUOYANCY
When you reach your desired depth, adding and/or releasing the right amount of air in the
Sidemount BC will allow you to achieve a comfortable neutral buoyancy.
• ASCENT
During your ascent, the air in your Sidemount BC will expand, causing an increase in
positive lift and a consequent increase in speed. You can control your buoyancy by pressing
lightly on the deation button. If necessary you can use the inator unit to limit and control
the speed of your ascent.
11661-SEAC-MANUALE JACKET sidemount-totale.indb 19 15/06/2015 09.24.10
20
English
PRE-DIVE INSPECTION
WARNING
During the ascent, it is crucial that the diver regulate hydrostatic balance to
avoid ascending too quickly. Consult your instructor or dive manual for further
information about a safe speed of ascent. Always abide by the standards dictated
by your dive computer or decompression tables during all stages of the dive.
WARNING
We recommend that you use the Sidemount BC only as a compensator for your
buoyancy. Using the Sidemount BC to lift heavy objects from the seabed can be
extremely dangerous and lead to uncontrolled ascents that can result in serious
accidents for the diver and his or her buddies.
MAINTENANCE
The following instructions are vital to keep your Sidemount BC operating perfectly:
• After every dive, both in the ocean or in the pool, always rinse the BC inside and out
with fresh water, and make sure you have cleared out any remaining water using the
over-expansion relief valve.
• Never store the Sidemount BC with other equipment or objects that are sharp and
could puncture the buoyancy bag.
• Do not store the Sidemount BC wet or folded; always allow it to dry fully. Carefully wash
the inside, drain out the water, and when the BC is completely dry store it in a cool,
ventilated place.
• At the end of each dive, always replace the protective cap on the quick coupling after
having disconnected the hose.
• Avoid leaving the Sidemount BC exposed to the sun for long periods.
• Carefully rinse all the inflation and deflation mechanisms with fresh water.
To clean the inside of the BC, proceed as follows:
- Unscrew the over-expansion relief valve and add fresh water (about 1/4 the volume of
the BC).
- Replace the over-expansion relief valve.
- Inflate the BC, turning it upside down and shaking side to side to circulate the water
around inside.
- Turn the bag so the corrugated hose points downward and press the inflation button.
This will empty all the water through the mouthpiece.
WARNING
In cleaning the Sidemount BC, do not use any type of solvents or cleaning products.
USE OF THE SIDEMOUNT BCs WITH OXYGEN-RICH MIXTURES
WARNING
This product was designed and created for use with compressed atmospheric
air or Nitrox blends up to a maximum percentage of 40% oxygen content.
The use of blends with an oxygen percentage greater than 40% and/or made
with other gases (such as added helium), can cause damage or deterioration in
the BC and compromise its proper operation.
WARNING
Do not use any SEAC Sidemount BC with oxygen rich mixtures (Nitrox -
Maximum oxygen content: 40%) without having first received adequate training
on their use: Failure to observe this warning may result in a serious accident.
WARNING
Do not use this SEAC Sidemount BC with other gases or with oxygen-rich
mixtures. SEAC BCs are designed only for use with compressed atmospheric air.
Failure to observe this warning may result in premature wear of the equipment,
defective operation, or risk of explosion, resulting in potentially serious damage.
CERTIFICATE OF GUARANTEE
SEACSUB S.p.A. guarantees the correct operation of this product as described in this
document.
The warranty has a duration of 2 (two) years in accordance with current European
regulations.
The warranty herein can be exercised according to the conditions and limits expressly
indicated below:
1. The warranty has a duration of 2 (two) years starting from the time the product is
purchased at a SEAC authorized dealer and requires no prior or subsequent formal validation.
2. The warranty is acknowledged only to the original buyer of the product at a SEAC
authorized dealer.
The warranty is strictly personal, and cannot be transferred to a third party without express
advance authorization from SEAC.
3. The warranty covers all, and only, malfunctions due to:
• Materials found to be unsuitable.
• Evident design errors.
• Fabrication or assembly of the product or its parts.
• Incorrect or inadequate instructions and recommendations for use.
4. The warranty terminates automatically, and with immediate effect, following any
repairs, modications, transformations, adjustments or tampering in general, carried out
on the nished product or parts of it, that were not authorized in advance by SEAC or were
carried out by non-authorized personnel.
11661-SEAC-MANUALE JACKET sidemount-totale.indb 20 15/06/2015 09.24.10
Table of contents
Languages:
Other Seac Diving Instrument manuals


Popular Diving Instrument manuals by other brands

Genesis
Genesis Centauri manual

Kirby Morgan
Kirby Morgan KMB-18 A/B Operation and maintenance manual

Kirby Morgan
Kirby Morgan 415-107 user guide

Ocean Technology Systems
Ocean Technology Systems EMDG-2SM installation instructions

Uwatec
Uwatec Aladin TEC 3H User manuals

Dräger
Dräger PSS BG 4 RP Instructions for use


