manuals.online logo
Brands
  1. Home
  2. •
  3. Brands
  4. •
  5. Sealey
  6. •
  7. Heater
  8. •
  9. Sealey Space Warmer LP13.V3 User manual

Sealey Space Warmer LP13.V3 User manual

Refer to
instructions
Hot surface
1.1. GENERAL SAFETY
 IMPORTANT: The LP13.V3 is a mobile, propane-fired, unvented, infrared space heater for commercial applications only. It is designed for use
with Propane cylinders of between 7kg to 15kg gas capacity. DO NOT use domestically.
WARNING!Use only in well ventilated spaces of more than 15m³to prevent an accumulation of dangerous combustion
gases.
DO NOT operate heater in basements or otherwise below ground level, in high rise flats, bathrooms or bedrooms.
DO NOT operate heater in leisure vehicles such as caravans and autocaravans.
WARNING! Heater will become very hot during use.
WARNING! Ensure Health & Safety, local authority, and general workshop practice regulations are adhered to when using this
equipment.
Familiarise yourself with the application and limitations of the heater, as well as the potential hazards.
WARNING!Disconnect the heater from the gas supply before performing any maintenance.
Maintain the heater in good condition (use an authorised service agent).
Replace or repair damaged parts. Use genuine parts only. Unauthorised parts may be dangerous and will invalidate the warranty.
WARNING! Keep all guards and holding screws in place, tight and in good working order. The guard on this appliance is to prevent risk
of fire or injury from burns and no part of it should be permanently removed. IT DOES NOT GIVE FULL PROTECTION FOR YOUNG
CHILDREN OR THE INFIRM. Check regularly for damaged parts. A guard or any other part that is damaged must be repaired or
replaced before the heater is next used. Avoid twisting the regulator's flexible tube. The tube should be inspected for damage regularly
and replaced if damage is found. Refer to the tube for its specification and length.
Keep gas hose away from heat, oil and sharp edges. Ensure that all connections are secure.
Keep the heater clean for best and safest performance.
Ensure the propane bottle is in a stable upright position before igniting the heater. DO NOT use with the bottle in any position other than
upright.
DO NOT use any fuel other than propane.
Ensure there are no flammable or combustible materials within 2 metres of the heater and that nothing, including walls, is less than
500mm from any surface of the heater.
DO NOT use the heater where there are flammable liquids, solids or gases such as paint solvents, etc.
WARNING! NOT to be used for the heating of habitable areas of domestic premises: for use in public buildings, refer to national
regulations.
WARNING! DO NOT use in basements or areas below ground level.
DO NOT move the heater when it is operating.
DO NOT use the heater for any purpose other than that for which it is designed.
DO NOT operate the heater if any parts are damaged or missing as this may cause failure and/or personal injury.
DO NOT adjust, or tamper with, the regulator.
DO NOT allow untrained persons to operate the heater.
DO NOT operate the heater when you are tired or under the influence of alcohol, drugs
or intoxicating medication.
When not in use disconnect from the gas supply and store in a safe, dry, childproof area.
In the event of a gas leak immediately close the bottle valve, extinguish any flame and
then place equipment in a well ventilated area, preferably outdoors, and away from any
heat sources (including strong sunlight). Rectify cause of leakage.
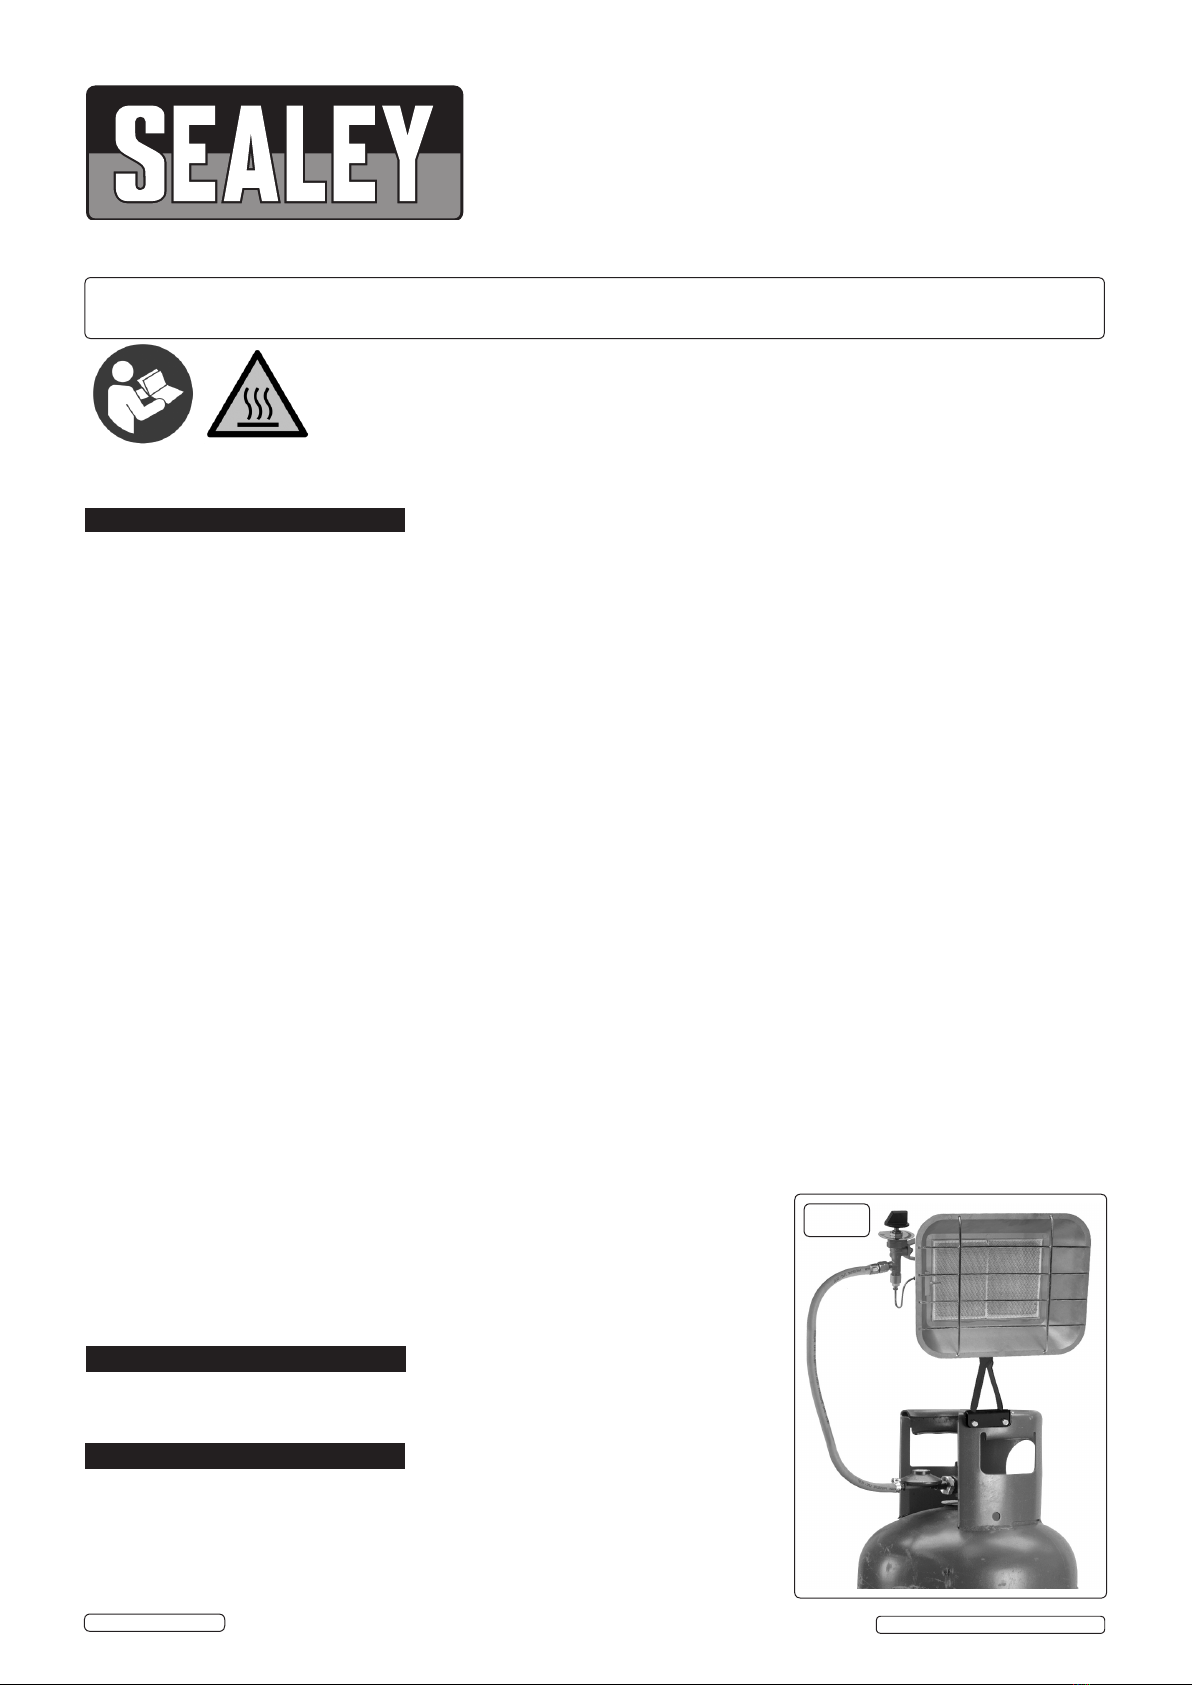
Ceramic plaque type heater. Mounts on the rim of a propane cylinder. Adjustable output from
10,250 to 15,354Btu/hr. Supplied with 700mm of hose and 37mbar fixed regulator. Fully CE
approved. Gas bottle not included.
fig.1
IMPORTANT: PLEASE READ THESE INSTRUCTIONS CAREFULLY. NOTE THE SAFE OPERATIONAL REQUIREMENTS, WARNINGS & CAUTIONS. USE THE PRODUCT
CORRECTLY AND WITH CARE FOR THE PURPOSE FOR WHICH IT IS INTENDED. FAILURE TO DO SO MAY CAUSE DAMAGE AND/OR PERSONAL INJURY AND WILL
INVALIDATE THE WARRANTY. KEEP THESE INSTRUCTIONS SAFE FOR FUTURE USE.
Thank you for purchasing a Sealey product. Manufactured to a high standard, this product will, if used according to these
instructions, and properly maintained, give you years of trouble free performance.
1. SAFETY
2. INTRODUCTION
3. SPECIFICATION
Model No. . . . . . . . . . . . . . . . . . . . . . .LP13.V3
Fuel. . . . . . . . . . . . . . . . . . . . . . . .Propane
Output. . . . . . . . . . . . . . . . . 10,250-15,354Btu/hr
Fuel Consumption. . . . . . . . . . . . . 0.220-0.330kg/hr
SPACE WARMER® PROPANE HEATER
10,250-15,354BTU/HR BOTTLE MOUNTED
MODEL NO: LP13.V3
Original Language Version
© Jack Sealey Limited LP13.V3 Issue:4 (H,F ERP) -25/06/18
This product is only suitable for well insulated areas or occasional use.
WARNING! Ensure that you read, understand and apply the safety instructions in Section 1.
6.1. Lighting heater (Refer to fig.3)
6.1.1. Open the gas bottle valve.
6.1.2. Push the heater control dial down and turn it fully clockwise to the on position and keep it held down.
6.1.3. After a few seconds bring a flame up to the bottom edge of the burner (fig.2).
6.1.4. After the gas ignites keep the dial held down for a further 20 seconds then turn the control dial anticlockwise to reduce the
heat output to the required level.
6.2. Turning off heater
6.2.1. Close the gas bottle valve.
6.3. Changing propane bottle
WARNING! Only change the bottle in a flame free atmosphere.
6.3.1. Ensure the bottle valve is closed and then unscrew the POL nut clockwise and remove the regulator.
6.3.2. Loosen and wind back the three screws in the clamp at the base of the heater support bracket and remove the heater from the gas
bottle.
6.3.3. Fit the heater to a new gas bottle as in 5.1.2. and 5.1.3. Check for gas leaks as in 5.1.5.
5.1. Assembly (See fig.2)
5.1.1. Fit the mounting bracket to the heater assembly using the wing nut, hinge screw and serated washer. The bracket should be
mounted on the right hand side of the mounting flange as the heater faces you. Ensure that the side of the clamping channel with
two bolts is facing forwards,
5.1.2. Fit the channel section of the support bracket over the shroud of the propane bottle and clamp it in place using the three screws.
Be sure to fit the channel with the two screws on the outside of the shroud and one, on the inside, as shown below.
5.1.3. Fit the regulator to the bottle by screwing the POL nut anticlockwise into the port of the gas bottle valve. Tighten nut with a spanner.
5.1.4. Attach one end of the gas hose to the barbed male connector on the regulator and hose clip . Attach the other end of the gas hose to the
barbed male connector of the heater valve inlet and hose clip. A small amount of washing up liquid would assist fitting the hose. Ensure
the hose is routed so that it does not touch any part of the heater, which will become hot during operation.
5.1.5. Open the bottle valve and, using soapy water, check all joints for leaks.
fig.2
4.1. Contents
4.1.1. Check content against the list below and, in the event of shortages or damage,
contact your supplier.
Contents:
 •Heatermountingbracket  
 •Wingnutwithhingeboltandserratedwasher
 •Heaterassembly   
 •Hoseandgasbottleregulator
4. CONTENTS
5. ASSEMBLY
6. OPERATION
Original Language Version
© Jack Sealey Limited LP13.V3 Issue:4 (H,F ERP) -25/06/18
7.1. Storage
7.1.1. Disconnect the cylinder and store it in a well ventilated area away from combustable material, preferably in an outhouse.
7.1.2. The heater should be covered in a dry, dust free cover and placed in its original packaging.
7.2. Cleaning
DO NOT clean the heater when it has just been turned off.
7.2.1. Use a soft, dry cloth.
DO NOT cleanwithaggressive,abrasiveorinammablesubstances,theycouldcauseareordamagethepaint.
7.3. Maintenance
7.3.1. Any repairs must be performed by specialised personnel and using original replacement parts.
7.3.2. To ensure proper operation of the burner, we recommend annual maintenance, performed at an authorised service centre.
DO NOT makeanymodicationstotheheater,itisdangerous!
NOTE: Spidersorsmallinsectscouldtakeupresidenceinsidetheburnerornozzlealteringtheowofgasandcombustion.Inspect 
them frequently.
fig.3
7. MAINTENANCE
FAULT POSSIBLE CAUSE REMEDY
Gas leak Regulator and hose connection.
Valve and hose connection.
Split or perished hose
POL nut connection
Brush a solution of washing up liquid and water
on to all connections and look for active
bubbles. Tighten clips or replace hose.
Check POL nut fitting is tight (ACW)
Inefficient combustion across the ceramic
plaque.
Missing piece of creamic fire clay.
Gas jet holes blocked.
Replace plaque or repair with a compatible
fire cement and leave to set for
approximately 48 hours.
Clear blockages
Burner flame extinguishes during operation. Low gas or empty bottle.
Thermal element not hot enough.
The wind has extinguished the flame.
Thermal element faulty.
Faulty manual valve.
Change the gas bottle.
Go through the start up procedure again.
Allow to cool before restarting. Move
appliance away from draughts.
Replace the thermocouple. Contact your
Sealey Dealer.
Replace the valve. Contact your Sealey
Dealer.
Heater will not light. Gas cylinder valve is closed
Volume control not opened fully when
atempting ignition.
Insects inside the burner
Turn on the gas cylinder control, check for
leaks.
Read instructions 6.1.2, 6.1.3 and 6.1.4 for
ignition process.
Clear blockages.
8. TROUBLESHOOTING
Sealey Group, Kempson Way, Suffolk Business Park, Bury St Edmunds, Suffolk. IP32 7AR
01284 757500 01284 703534 sales@sealey.co.uk www.sealey.co.uk
Note: It is our policy to continually improve products and as such we reserve the right to alter data, specifications and component parts without
prior notice.
Important: No Liability is accepted for incorrect use of this product.
Warranty: Guarantee is 12 months from purchase date, proof of which is required for any claim.
ENVIRONMENT PROTECTION
Recycle unwanted materials instead of disposing of them as waste. All tools, accessories and packaging should be sorted, taken to
a recycling centre and disposed of in a manner which is compatible with the environment. When the product becomes completely
unserviceable and requires disposal, drain any fluids (if applicable) into approved containers and dispose of the product and fluids
according to local regulations.
Original Language Version
© Jack Sealey Limited LP13.V3 Issue:4 (H,F ERP) -25/06/18

Other Sealey Heater manuals

Sealey IR37.V4 User manual

Sealey

Sealey IR37.V4 User manual

Sealey CH2013.V3 User manual

Sealey

Sealey CH2013.V3 User manual

Sealey LP451R User manual

Sealey

Sealey LP451R User manual

Sealey IR37.V2 User manual

Sealey

Sealey IR37.V2 User manual

Sealey LP35 User manual

Sealey

Sealey LP35 User manual

Sealey LP200.V4 User manual

Sealey

Sealey LP200.V4 User manual

Sealey EH3001 User manual

Sealey

Sealey EH3001 User manual

Sealey IRC153110V User manual

Sealey

Sealey IRC153110V User manual

Sealey CD2005.V3 User manual

Sealey

Sealey CD2005.V3 User manual

Sealey EH2001 User manual

Sealey

Sealey EH2001 User manual

Sealey AB3412 User manual

Sealey

Sealey AB3412 User manual

Sealey IR15110V User manual

Sealey

Sealey IR15110V User manual

Sealey IR18 User manual

Sealey

Sealey IR18 User manual

Sealey EH3000 User manual

Sealey

Sealey EH3000 User manual

Sealey RD1500.V6 User manual

Sealey

Sealey RD1500.V6 User manual

Sealey Space warmer  LP100.V4 User manual

Sealey

Sealey Space warmer LP100.V4 User manual

Sealey CH2800.V2 User manual

Sealey

Sealey CH2800.V2 User manual

Sealey RD1500.V6 User manual

Sealey

Sealey RD1500.V6 User manual

Sealey IRS153110V User manual

Sealey

Sealey IRS153110V User manual

Sealey RD1500.V2 User manual

Sealey

Sealey RD1500.V2 User manual

Sealey EH2000 User manual

Sealey

Sealey EH2000 User manual

Sealey IR33 User manual

Sealey

Sealey IR33 User manual

Sealey SPACE WARMER LP41 User manual

Sealey

Sealey SPACE WARMER LP41 User manual

Sealey LP1500.V2 User manual

Sealey

Sealey LP1500.V2 User manual

Popular Heater manuals by other brands

Beretta Tivano Series installation manual

Beretta

Beretta Tivano Series installation manual

Dimplex XT12 installation instructions

Dimplex

Dimplex XT12 installation instructions

THORMA SALZBURG F 9472 5 Installation and operation manual

THORMA

THORMA SALZBURG F 9472 5 Installation and operation manual

TPI Corporation FES-4548-3 installation instructions

TPI Corporation

TPI Corporation FES-4548-3 installation instructions

GSi PNEG-377 Service manual

GSi

GSi PNEG-377 Service manual

Adax VP9 Installation instruction

Adax

Adax VP9 Installation instruction

Westfalia Frost Guard 109314 instruction manual

Westfalia

Westfalia Frost Guard 109314 instruction manual

EUROM 340105 instruction manual

EUROM

EUROM 340105 instruction manual

G3 Ferrari TEPOR user manual

G3 Ferrari

G3 Ferrari TEPOR user manual

OYPLA Home 3940 user manual

OYPLA Home

OYPLA Home 3940 user manual

Heatstore DYNAMIC HSDR500T Installation and operating instructions for manual and remote control options

Heatstore

Heatstore DYNAMIC HSDR500T Installation and operating instructions for manual and remote control options

VIVAX home CH-2006FW user manual

VIVAX home

VIVAX home CH-2006FW user manual

Immergas JULIUS 11 ERP Instruction and recommendation booklet

Immergas

Immergas JULIUS 11 ERP Instruction and recommendation booklet

MPM MUG-04 user manual

MPM

MPM MUG-04 user manual

Bionaire BPH1009 instruction manual

Bionaire

Bionaire BPH1009 instruction manual

Bionaire BCH4267 Instruction leaflet

Bionaire

Bionaire BCH4267 Instruction leaflet

Matsui MTHE1800 instruction manual

Matsui

Matsui MTHE1800 instruction manual

DAY Useful Everyday 69651 instruction manual

DAY Useful Everyday

DAY Useful Everyday 69651 instruction manual

manuals.online logo
manuals.online logoBrands
  • About & Mission
  • Contact us
  • Privacy Policy
  • Terms and Conditions

Copyright 2025 Manuals.Online. All Rights Reserved.