manuals.online logo
Brands
  1. Home
  2. •
  3. Brands
  4. •
  5. Sealey
  6. •
  7. Vacuum Cleaner
  8. •
  9. Sealey CP20VAV User manual

Sealey CP20VAV User manual

20V 15L HANDHELD ASH VACUUM CLEANER
MODEL NO: CP20VAV
Thank you for purchasing a Sealey product. Manufactured to a high standard, this product will, if used according to these
instructions, and properly maintained, give you years of trouble free performance.
IMPORTANT: PLEASE READ THESE INSTRUCTIONS CAREFULLY. NOTE THE SAFE OPERATIONAL REQUIREMENTS, WARNINGS & CAUTIONS. USE
THE PRODUCT CORRECTLYAND WITH CARE FOR THE PURPOSE FOR WHICH IT IS INTENDED. FAILURE TO DO SO MAY CAUSE DAMAGE AND/OR
PERSONAL INJURYAND WILL INVALIDATE THE WARRANTY. KEEP THESE INSTRUCTIONS SAFE FOR FUTURE USE.
1. SAFETY
WARNING! This handheld ash vacuum cleaner is for the vacuuming of cold ashes from replaces, wood or coal stoves, BBQ’s and
grills.
NOTE: Cold ash is defined as ash that has sufficiently cooled down without any pockets of hot embers.
9 Rake through the ash with metal tools, to check for any hot embers prior to using the handheld ash vacuum cleaner.
8DO NOT use for vacuuming materials with a temperature above 40ºC.
▲DANGER! DO NOT vacuum hot or glowing ash, cigarette ends, inammable, explosive, corrosive or other dangerous substances.
8DO NOT use to vacuum soot.
8DO NOT use to vacuum the following health hazardous dusts:
Class L (soft woods and solid surface material).
Class M (hard woods, board materials, concrete and brick dust).
Class H (asbestos and mould).
8DO NOT operate the handheld ash vacuum cleaner without the lter in place. Using the ash vacuum cleaner without the lter may
result in motor failure and will invalidate the warranty.
8DO NOT allow children or untrained persons to operate the handheld ash vacuum cleaner.
8 This appliance can be used by children aged from 8 years and above and persons with reduced physical, sensory or mental
capabilities or lack of experience and knowledge if they have been given supervision or instruction concerning use of the appliance
in a safe way and understand the hazards involved.
8DO NOT Allow children to play with the appliance.
9 Cleaning and user maintenance shall not be made by children without supervision.
8DO NOT place the attachments close to your face.
8DO NOT point the hose end at other persons or animals.
8DO NOT leave the handheld ash vacuum cleaner running unattended. Remove the battery cartridge when not in use.
8DO NOT operate the handheld ash vacuum cleaner while under the inuence of drugs, alcohol or intoxicating medication.
8DO NOT use the handheld ash vacuum cleaner in the rain or in very damp conditions.
8DO NOT use the handheld ash vacuum cleaner for a task it is not designed to perform.
9 Remove the battery cartridge from the handheld ash vacuum cleaner before servicing, changing accessories, or performing any
maintenance.
9 Use only genuine parts and accessories. Unauthorised parts and accessories may be dangerous and will invalidate your warranty.
9 Maintain the handheld ash vacuum cleaner in good condition. Use an authorised agent for servicing.
9 Empty and clean the handheld ash vacuum cleaner after each use.
9 When not in use store the handheld ash vacuum cleaner in it’s original packaging in a clean, safe, childproof location.
WARNING! The warnings, cautions and instructions discussed in this instruction manual cannot cover all possible
conditions and situations that may occur. It must be understood that common sense and caution are factors which
cannot be built into this product, but must be applied by the operator.
2. INTRODUCTION
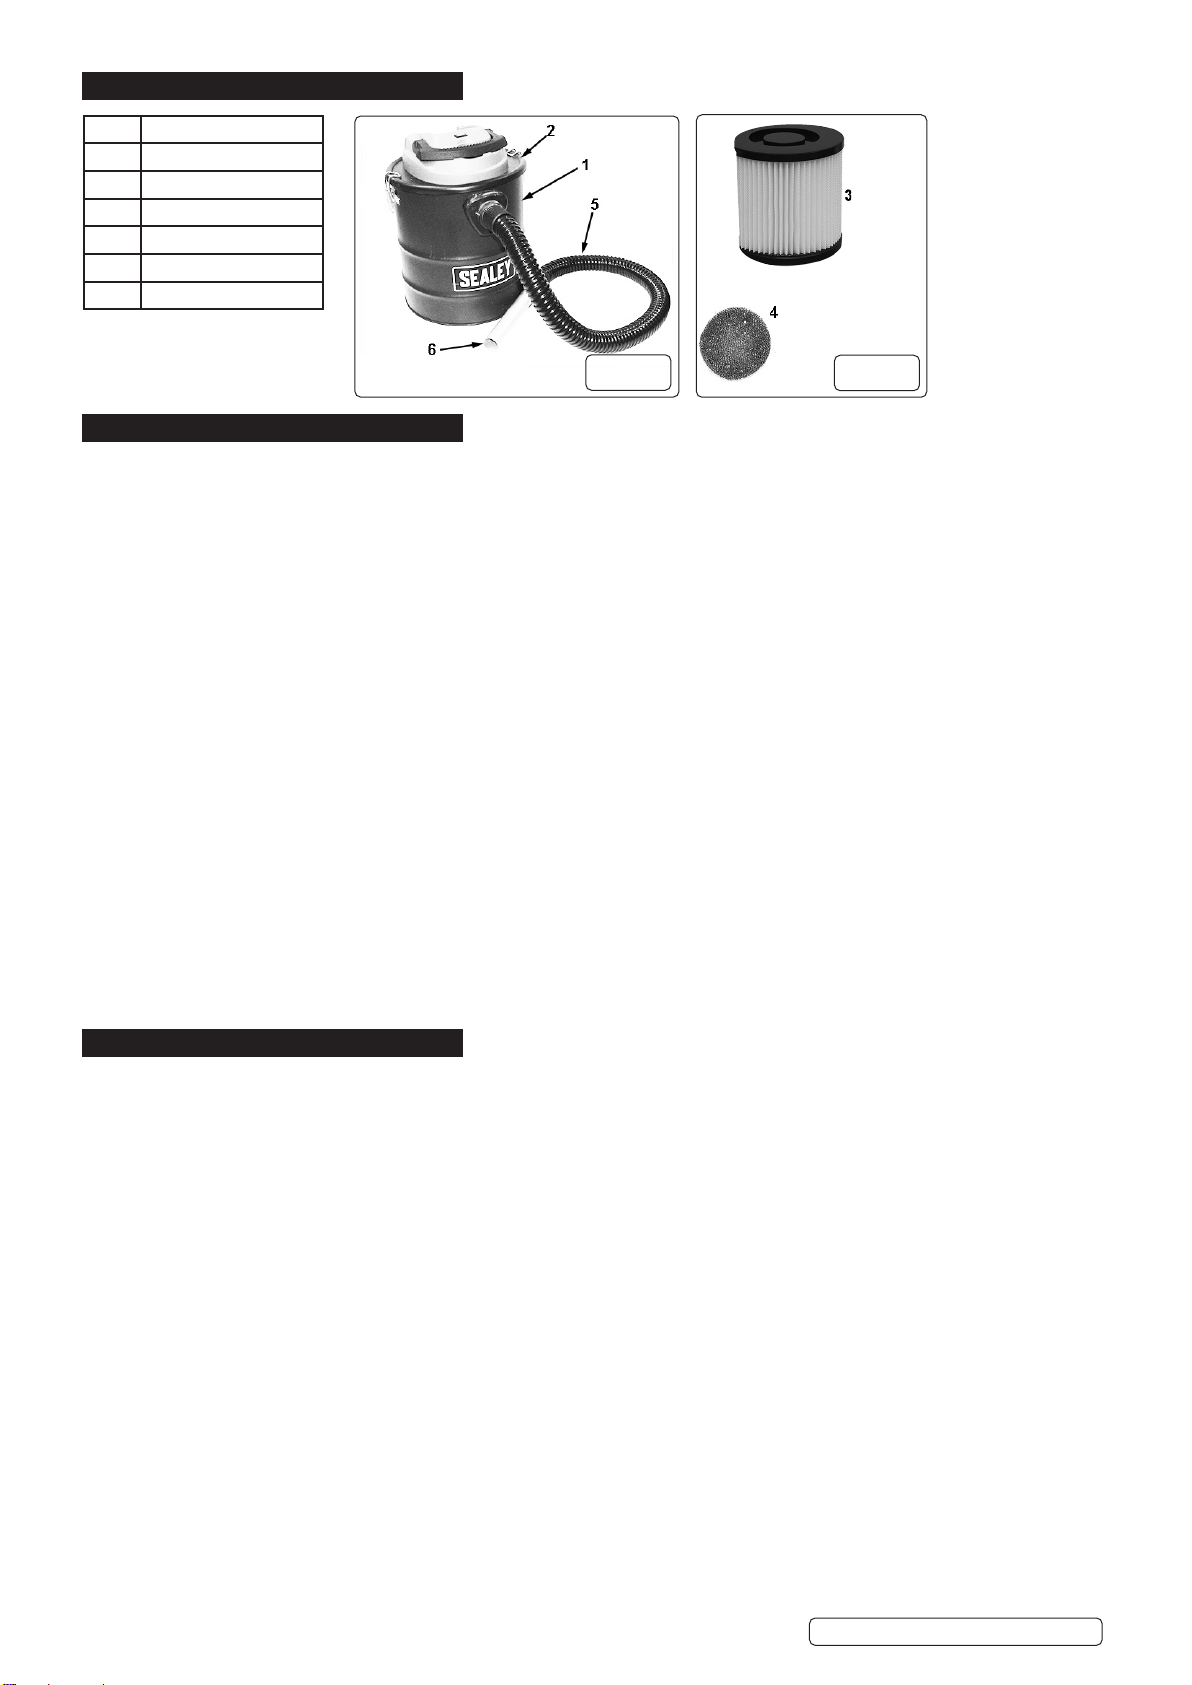
Extremely lightweight portable cordless ash vacuum. Ideal for the collection of ash or re debris from replaces, stoves, wood burners,
BBQs, grills and more. 150W motor provides great suction performance whilst also acting as a blower. With a 15L capacity, the lightweight
tank features quick release clips for ease of emptying. A 1m exible metal lined suction hose allows the suction of ash up to a temperature
of 40°C(100°F). Easily switch to blow function by using the outlet on the top of the vacuum. Includes a HEPA lter with inner metal mesh
preventing the leaking of ash and dust and round aluminium nozzle. Requires compatible 20V battery and mains charger, sold separately.
3. SPECIFICATION
Model No: ...............................................................CP20VAV
Airow: .......................................................................36m³/hr
Battery: ..................20V 2Ah - 6Ah Lithium-ion (not included)
Consumable Parts: .......................... CP20VBP2-2Ah Battery
......................P20VBP4-4Ah Battery,CP20VBP6-6Ah Battery
Drum Size: .......................................................................15L
Filter Type: ....................................................................HEPA
CP20VAV Issue 1 14/12/21
Original Language Version
© Jack Sealey Limited
Refer to
instructions Keep in dry area
protect from rain
Warning!
Maximum Vacuum Pressure: ...................................100mbar
Motor Power:.................................................................150W
Replacement Parts: CP20VMC-Mains Charger (not included)
Supply:.............................................................................20V
Vacuum Accessories Diameter: ...................................35mm
4. CONTENTS
5. ASSEMBLY
5.1. ATTACHING THE FOAM FILTER
5.1.1. Attach the foam lter to the underside of the motor housing, securing it onto the two retaining tabs (g 3).
5.2. REMOVING THE FOAM FILTER
5.2.1. With care ease the foam lter o󰀨 the retaining tabs.
5.3. ATTACHING THE HEPA FILTER
5.3.1. The HEPA lter is a push t. Fully push the lter onto the motor housing (g 4).
5.4. REMOVING THE HEPA FILTER
5.4.1. To remove the HEPA lter follow section 5.3 but in reverse.
5.5. ATTACHING THE COVER
5.5.1. Centrally place the cover with the attached lters onto the top of the tank (g 5).
5.5.2. Secure into place with the latch hooks (g 5).
5.6. REMOVING THE COVER
5.6.1. To remove the cover follow section 5.5 but in reverse.
5.7. ATTACHING THE HOSE
5.7.1. Align the tongues on the end of the hose with the grooves in the tank suction inlet and turn in the direction of the lock arrow
indicator (g 5).
5.8. REMOVING THE HOSE
5.8.1. To remove the hose follow section 5.7 but in reverse.
5.9. ATTACHING THE HOSE NOZZLE EXTENSION
5.9.1. Centrally insert one end of the metal hose nozzle extension into the remaining open end of the hose (g 1).
5.10. REMOVING THE HOSE NOZZLE EXTENSION
5.10.1. To remove the hose nozzle extension follow section 5.9 but in reverse.
5.11. INSTALLING THE BATTERY CARTRIDGE
5.11.1. Align the tongue on the battery cartridge with the groove in the battery housing on the cover and slide into place (g 5).
5.11.2. Insert all the way until the battery cartridge is locked into position with an audible click.
5.12. REMOVING THE BATTERY CARTRIDGE
5.12.1. Push the battery cartridge latch button, the slide and remove the battery.
6. OPERATION
NOTE: Ensure all Safety Instructions in Section 1 are read and fully understood and carried out before use and retain the
instructions and warnings for future reference.
6.1. POWER SWITCH
6.1.1. To turn the handheld ash vacuum cleaner on, press the I (ON) on the power switch (g 6).
6.1.2. To turn the handheld ash vacuum cleaner o󰀨, press the O (OFF) on the power switch (g 6).
6.2. EMPTING THE TANK
WARNING! Ensure that the power switch is in the OFF position and the battery cartridge is removed.
6.2.1. Release the latch clips (g 5) and remove the cover (g 5) and place in a secure location.
6.2.2. Empty the ash into a suitable container.
NOTE: Dispose of the ash properly according to local regulations.
6.3. BLOWER FUNCTION
6.3.1. Turn the power switch to the OFF position.
6.3.2. Remove the suction hose from the tank. See section 5.8.
6.3.3. Lift the carry handle into the raised position.
6.3.4. Align the tongues on the end of the suction hose with the grooves in the tank cover, situated on top of the cover, and turn clockwise
to lock the suction hose in place (g 6).
6.3.5. Turn the power switch to the ON position.
6.4. RETURN TO VACUUM FUNCTION
6.4.1. Turn the power switch to the OFF position.
6.4.2. Remove the suction hose, from the tank cover, by turning counter clockwise.
6.4.3. Reattach the suction hose to the tank (g 1). See section 5.7.
Original Language Version
© Jack Sealey Limited
ITEM DESCRIPTION
1 Tank
2Cover
3HEPA Filter
4 Foam filter
5Suction hose
6Hose nozzle extension
g.1 g.2
CP20VAV Issue 1 14/12/21
7. MAINTENANCE
WARNING! Prior to carrying out any maintenance or cleaning remove the battery cartridge. See section 5.12.
7.1. HEPA FILTER CLEANING
7.1.1. When there is a notable reduction of suction the HEPA lter will require cleaning.
7.1.2. Remove the cover from the tank. See section 5.6.
7.1.3. Remove the lter. See section 5.4.
7.1.4. For routine cleaning, remove any deposits using a soft bristle brush (not supplied) into a suitable container.
NOTE: Dispose of the waste properly according to local regulations.
WARNING! Avoid breathing in any airborne dust.
7.2. CLEANING
7.2.1. Clean with a damp cloth
8DO NOT use abrasive or solvent cleaners.
8. TROUBLESHOOTING
g.3
g.4
g.5
g.6
PROBLEM POSSIBLE CAUSE SOLUTION
Motor does not start No battery charge Recharge the battery cartridge. Replace the
battery if recharging is ineffective
Cleaner not switched on Switch on
Low suction power Blocked hose Remove the blockage
Dust filter clogged Remove and clean
Motor cover not fitted correctly Remove and reattach correctly
Original Language Version
© Jack Sealey Limited CP20VAV Issue 1 14/12/21
Sealey Group, Kempson Way, Suffolk Business Park, Bury St Edmunds, Suffolk. IP32 7AR
01284 757500 01284 703534 sales@sealey.co.uk www.sealey.co.uk
ENVIRONMENT PROTECTION
Recycle unwanted materials instead of disposing of them as waste. All tools, accessories and packaging should be sorted, taken to
a recycling centre and disposed of in a manner which is compatible with the environment. When the product becomes completely
unserviceable and requires disposal, drain any fluids (if applicable) into approved containers and dispose of the product and fluids
according to local regulations.
WEEE REGULATIONS
Dispose of this product at the end of its working life in compliance with the EU Directive on Waste Electrical and Electronic Equipment
(WEEE). When the product is no longer required, it must be disposed of in an environmentally protective way. Contact your local solid
waste authority for recycling information.
Note: It is our policy to continually improve products and as such we reserve the right to alter data, specifications and component parts without prior
notice.
Important: No Liability is accepted for incorrect use of this product.
Warranty: Guarantee is 12 months from purchase date, proof of which is required for any claim.
Original Language Version
© Jack Sealey Limited CP20VAV Issue 1 08/12/21

Other Sealey Vacuum Cleaner manuals

Sealey PC35230V User manual

Sealey

Sealey PC35230V User manual

Sealey PC80 User manual

Sealey

Sealey PC80 User manual

Sealey GV180WM User manual

Sealey

Sealey GV180WM User manual

Sealey PC200SDAUTO.V2 User manual

Sealey

Sealey PC200SDAUTO.V2 User manual

Sealey PC200A User manual

Sealey

Sealey PC200A User manual

Sealey Power Clean VMA92 User manual

Sealey

Sealey Power Clean VMA92 User manual

Sealey PC380M User manual

Sealey

Sealey PC380M User manual

Sealey SA316.V2 User manual

Sealey

Sealey SA316.V2 User manual

Sealey SA317.V2 User manual

Sealey

Sealey SA317.V2 User manual

Sealey SM48.V3 User manual

Sealey

Sealey SM48.V3 User manual

Sealey SM47.V3 User manual

Sealey

Sealey SM47.V3 User manual

Sealey PC102 User manual

Sealey

Sealey PC102 User manual

Sealey POWER PRODUCTS PC200.V2 User manual

Sealey

Sealey POWER PRODUCTS PC200.V2 User manual

Sealey PC310.V2 User manual

Sealey

Sealey PC310.V2 User manual

Sealey VMA913 User manual

Sealey

Sealey VMA913 User manual

Sealey SM48.V3 User manual

Sealey

Sealey SM48.V3 User manual

Sealey Quality MACHINERY SM48.V3 User manual

Sealey

Sealey Quality MACHINERY SM48.V3 User manual

Sealey PC20SD20V User manual

Sealey

Sealey PC20SD20V User manual

Sealey CP20VCV User manual

Sealey

Sealey CP20VCV User manual

Sealey PC150A User manual

Sealey

Sealey PC150A User manual

Sealey PC35110V User manual

Sealey

Sealey PC35110V User manual

Sealey PC200 User manual

Sealey

Sealey PC200 User manual

Sealey PC85 User manual

Sealey

Sealey PC85 User manual

Sealey Power Products PC80 User manual

Sealey

Sealey Power Products PC80 User manual

Popular Vacuum Cleaner manuals by other brands

Riccar Charisma owner's manual

Riccar

Riccar Charisma owner's manual

KENT KC-B502 instruction manual

KENT

KENT KC-B502 instruction manual

OSOTEK Horizon H200 manual

OSOTEK

OSOTEK Horizon H200 manual

Beko VRT 74225 VI user manual

Beko

Beko VRT 74225 VI user manual

Bissell Perfect sweep turbo 2880 SERIES quick start guide

Bissell

Bissell Perfect sweep turbo 2880 SERIES quick start guide

Shark Rocket Zero-M ZS352 owner's guide

Shark

Shark Rocket Zero-M ZS352 owner's guide

RIDGID R86090 Operator's manual

RIDGID

RIDGID R86090 Operator's manual

Truper ASP-04 manual

Truper

Truper ASP-04 manual

inventum ST306BZA instruction manual

inventum

inventum ST306BZA instruction manual

Levita VC0030 user manual

Levita

Levita VC0030 user manual

Gaggia Aspir Ecologic user guide

Gaggia

Gaggia Aspir Ecologic user guide

Vax VCW-04 instruction manual

Vax

Vax VCW-04 instruction manual

Bissell Symphony troubleshooting guide

Bissell

Bissell Symphony troubleshooting guide

iRobot Looj 330 owner's manual

iRobot

iRobot Looj 330 owner's manual

Arzum Turkey instruction manual

Arzum

Arzum Turkey instruction manual

U-Line Sanitaire H-2549 manual

U-Line

U-Line Sanitaire H-2549 manual

Philips Vision HR 8910 Service manual

Philips

Philips Vision HR 8910 Service manual

Honeywell HWM6530I user manual

Honeywell

Honeywell HWM6530I user manual

manuals.online logo
manuals.online logoBrands
  • About & Mission
  • Contact us
  • Privacy Policy
  • Terms and Conditions

Copyright 2025 Manuals.Online. All Rights Reserved.