Sealey PC200A User manual

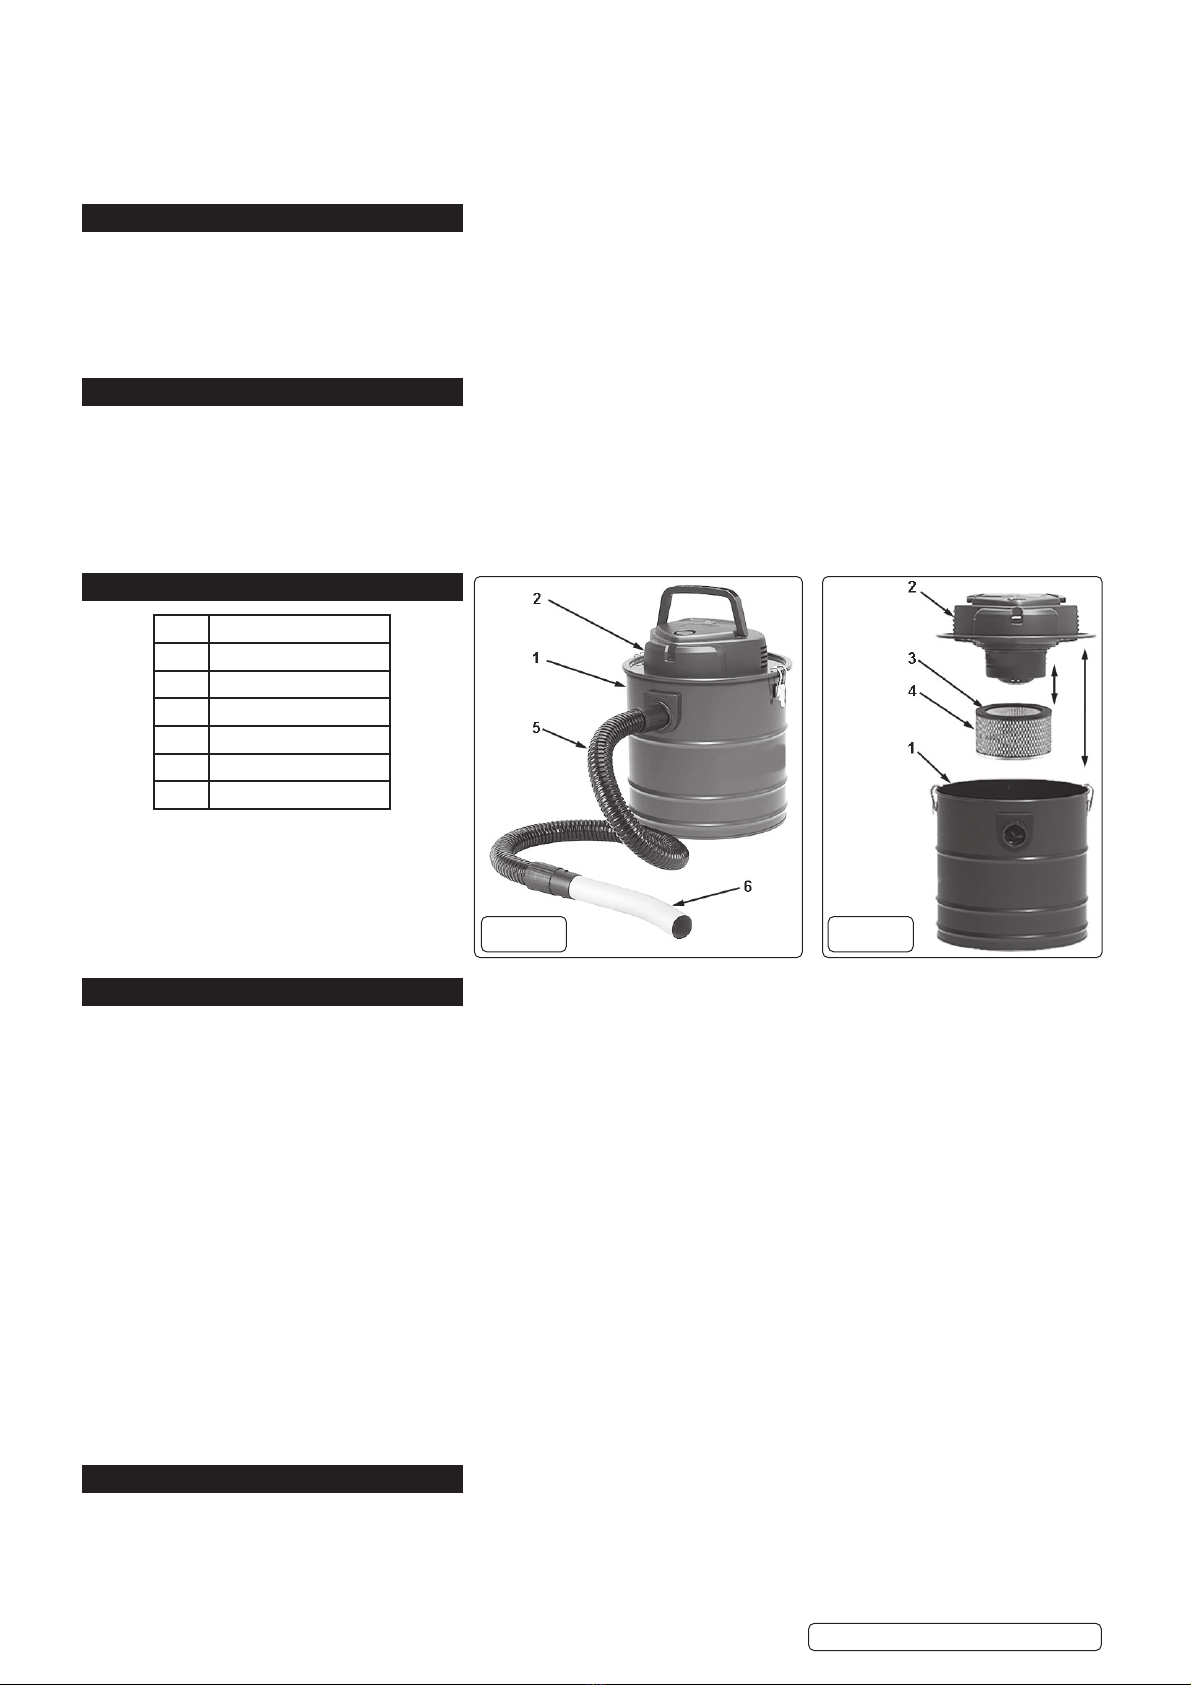
20L 3-IN-1 ASH VACUUM CLEANER
1200W/230V
MODEL NO: PC200A
Thank you for purchasing a Sealey product. Manufactured to a high standard, this product will, if used according to these
instructions, and properly maintained, give you years of trouble free performance.
I
MP
PO
R
RTA
TA
NT:
PLEA
S
E READ THE
S
E IN
S
TRU
C
TI
O
N
S
C
AREFULLY. N
O
TE THE
S
AFE
O
PERATI
O
NAL RE
Q
UIREMENT
S
, WARNIN
GS
&
C
AUTI
O
N
S
. U
S
E
TH
HE
P
PR
O
ODU
C
T
CO
RRE
C
TLY AND WITH
C
ARE F
O
R THE P
U
RP
OS
E F
O
R WHI
C
H IT I
S
INTENDED. FAIL
U
RE T
O
D
O
SO
MAY
C
A
US
E DAMA
G
E AND
/O
R
PE
ER
S
SON
N
AL IN
JU
RY AND WILL INVALIDATE THE WARRANTY. KEEP TH
ESE
IN
STR
UCT
ION
S S
AFE
FO
R F
U
T
U
RE
USE
.
1. SAFETY
1.1. ELECTRICAL SAFETY
WARNING! It is the user’s responsibility to check the following:
Check all electrical equipment and appliances to ensure that they are safe before using. Inspect power supply leads, plugs and
all electrical connections for wear and damage. Sealey recommend that an RCD (Residual Current Device) is used with
all electrical products. You may obtain an RCD by contacting your local Sealey Stockist.
If the product is used in the course of business duties, it must be maintained in a safe condition and routinely PAT (Portable
Appliance Test) tested.
Electrical safety information, it is important that the following information is read and understood.
1.1.1. Ensure that the insulation on all cables and on the appliance is safe before connecting it to the power supply.
1.1.2. Regularly inspect power supply cables and plugs for wear or damage and check all connections to ensure that they are secure.
1.1.3. Important: Ensure that the voltage rating on the appliance suits the power supply to be used and that the plug is fitted with the
correct fuse - see fuse rating in these instructions.
DO NOT pull or carry the appliance by the power cable.
DO NOT pull the plug from the socket by the cable. Remove the plug from the socket by maintaining a firm grip on the plug.
DO NOT use worn or damaged cables, plugs or connectors. Ensure that any faulty item is repaired or replaced immediately by a
qualified electrician.
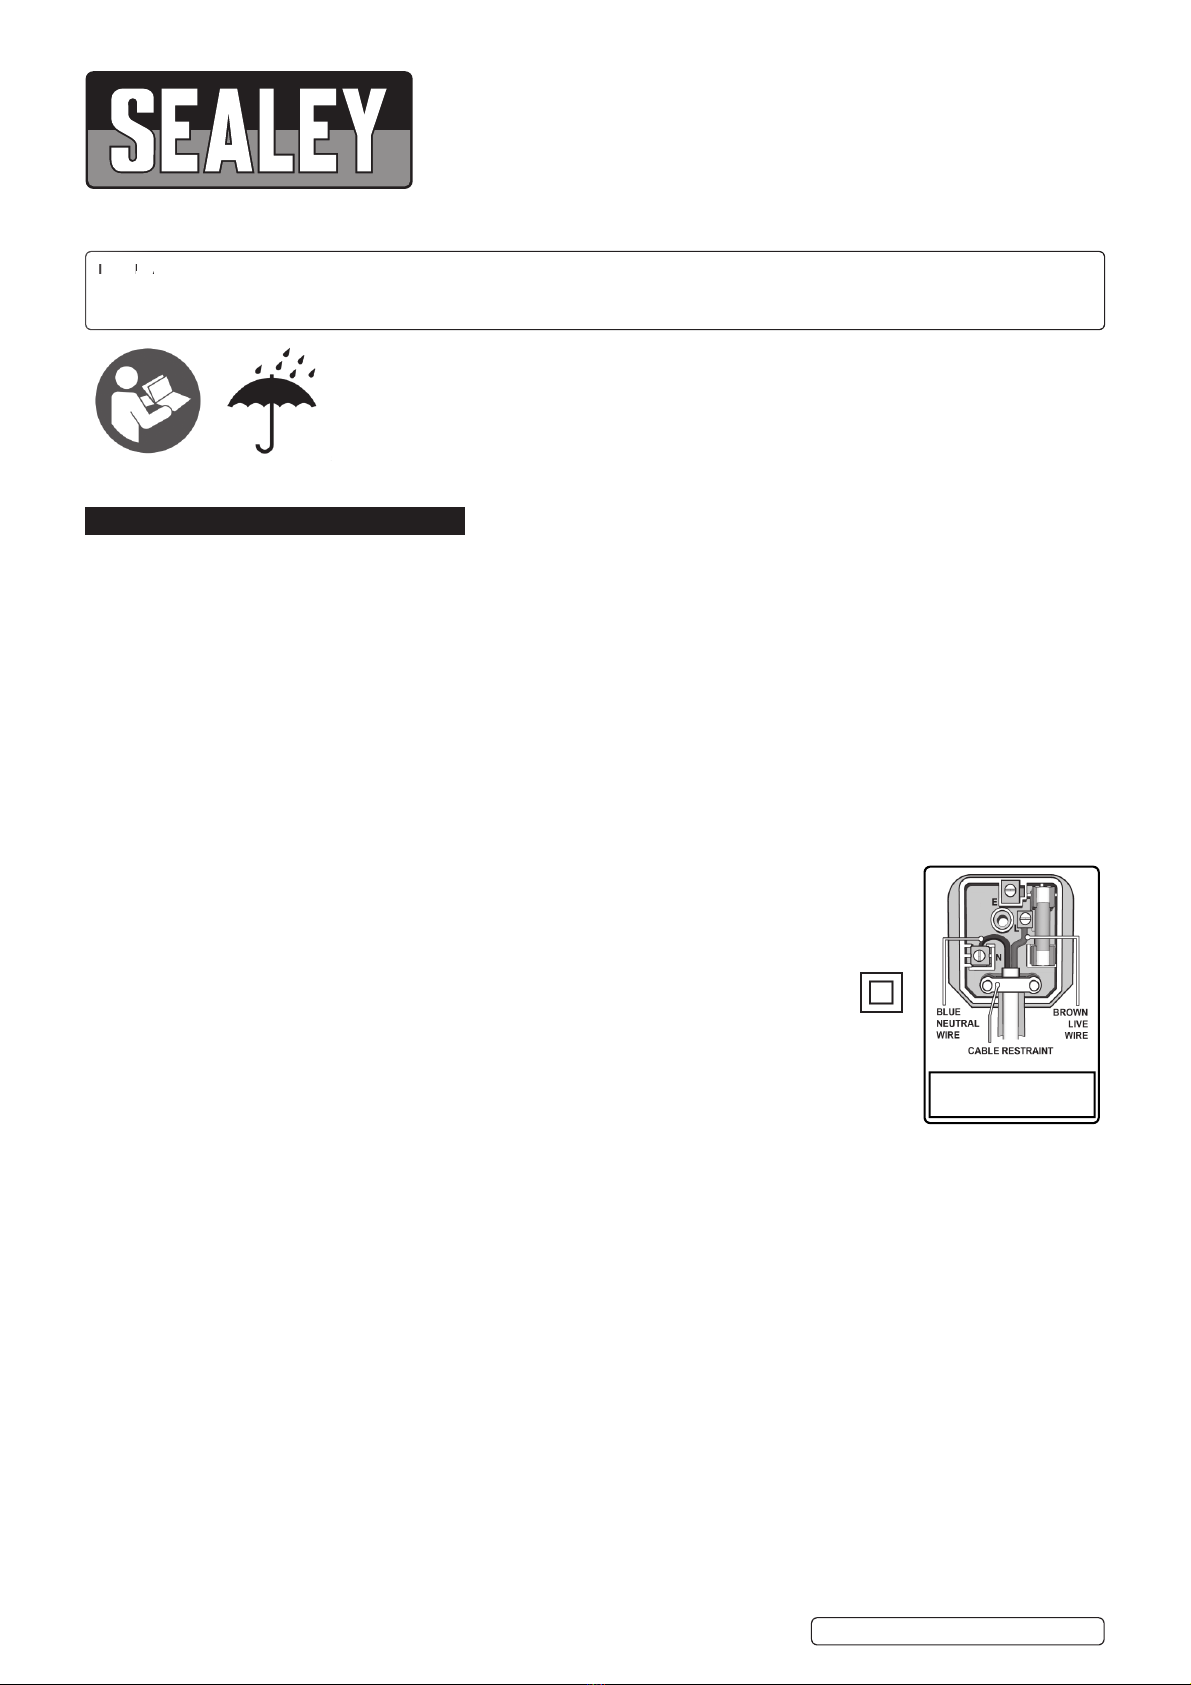
1.1.4. This product is fitted with a BS1363/A 13 Amp 3 pin plug.
If the cable or plug is damaged during use, switch the electricity supply and remove from use.
Replace a damaged plug with a BS1363/A 13 Amp 3 pin plug. If in doubt contact a qualified electrician.
Class II products are wired with live (brown) and neutral (blue) only, and are marked with the
Class II symbol;
A) Connect the BROWN live wire to the live terminal ‘L’.
B) Connect the BLUE neutral wire to the neutral terminal ‘N’.
C) After wiring, check that there are no bare wires and ensure that all wires have been correctly
connected.
Ensure that the cable outer sheath extends inside the cable restraint and that the restraint is tight.
DO NOT connect either wire to the earth terminal.
Sealey recommend that repairs are carried out by a qualified electrician.
1.2. GENERAL SAFETY
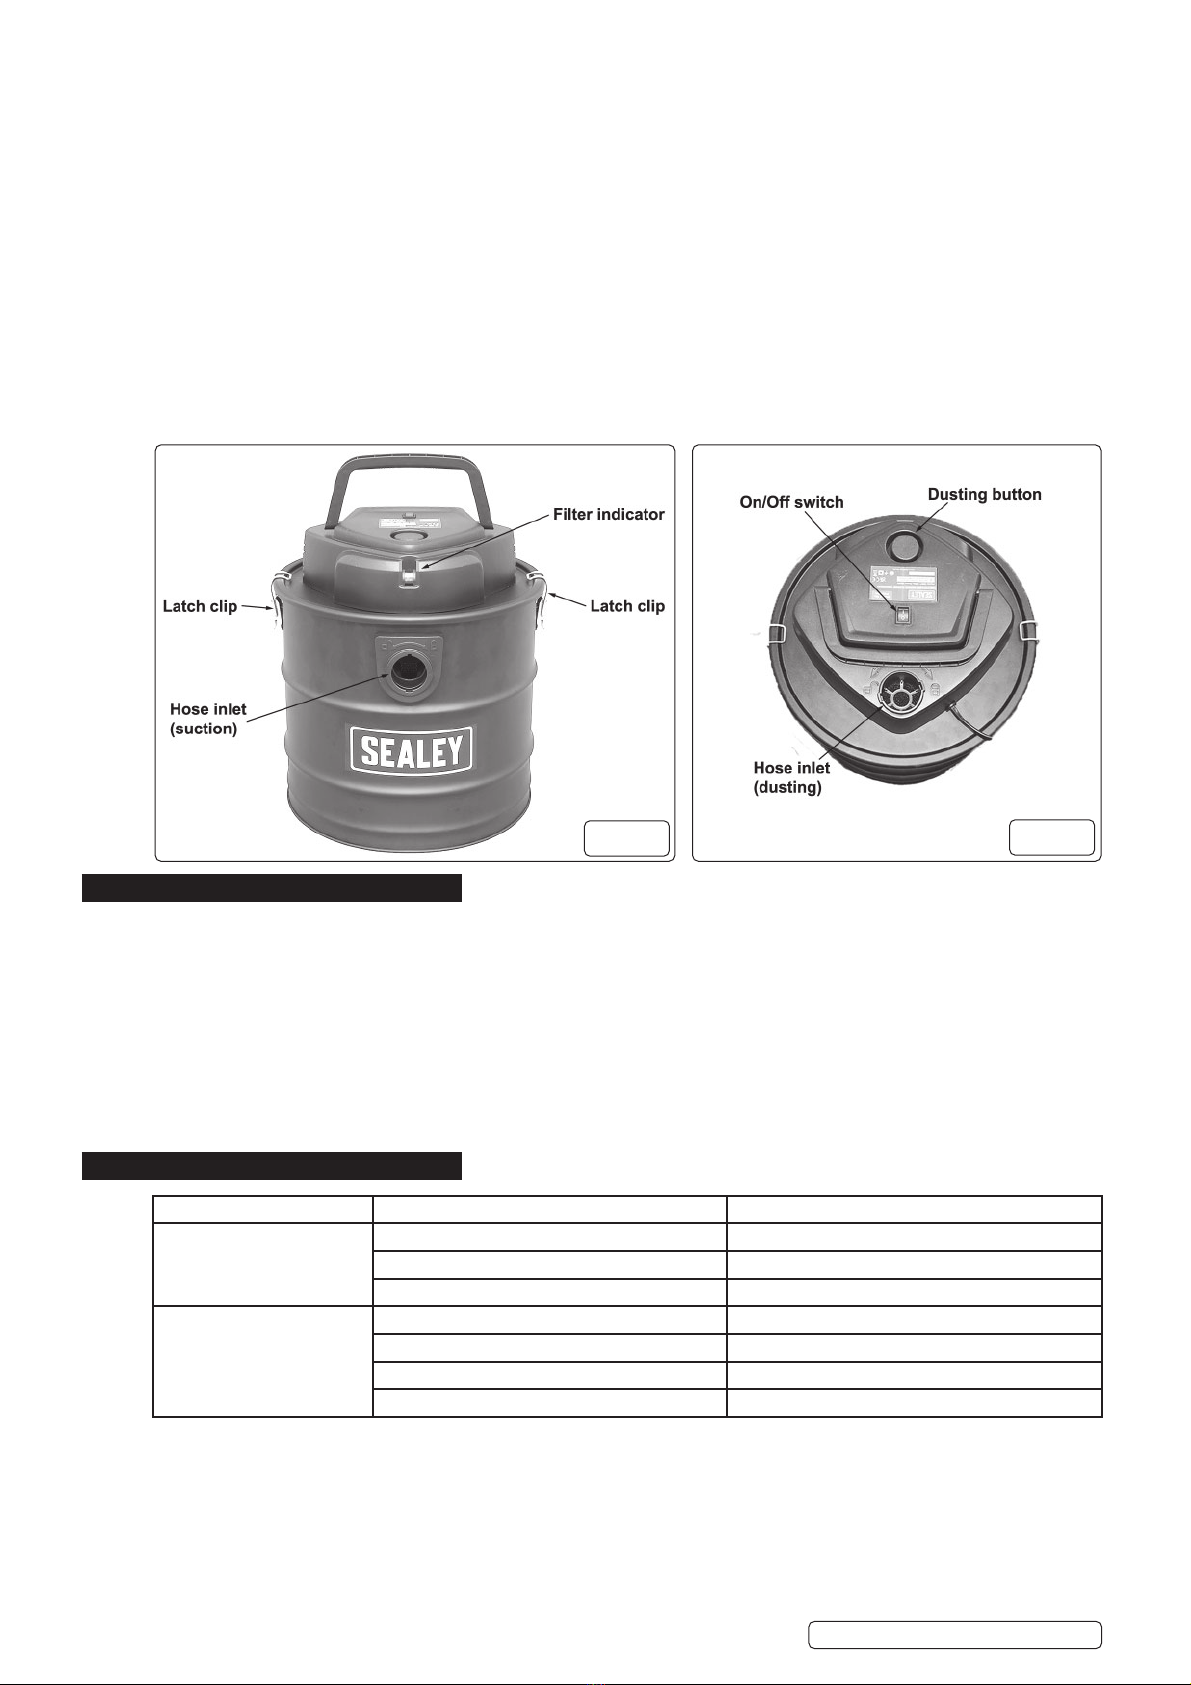
WARNING! This ash vacuum cleaner is for the vacuuming of cold ashes from fireplaces, wood or coal stoves, BBQ’s and grills.
NOTE: Cold ash is defined as ash that has sufficiently cooled down without any pockets of hot embers.
Rake through the ash with metal tools, to check for any hot embers prior to using the ash vacuum cleaner.
DO NOT use for vacuuming materials with a temperature above 40ºC.
▲DANGER! DO NOT vacuum hot or glowing ash, cigarette ends, inflammable, explosive, corrosive or other dangerous substances.
DO NOT use to vacuum soot.
DO NOT use to vacuum the following health hazardous dusts:
Class L (soft woods and solid surface material).
Class M (hard woods, board materials, concrete and brick dust).
Class H (asbestos and mould).
DO NOT operate the ash vacuum cleaner without the filter in place. Using the ash vacuum cleaner without the filter may result in
motor failure and will invalidate the warranty.
DO NOT allow children or untrained persons to operate the ash vacuum cleaner.
DO NOT place the attachments close to your face.
DO NOT point the hose end at other persons or animals.
DO NOT leave the ash vacuum cleaner running unattended. Turn the power supply OFF when not in use.
DO NOT operate the ash vacuum cleaner while under the influence of drugs, alcohol or intoxicating medication.
DO NOT use the ash vacuum cleaner in the rain or in very damp conditions.
DO NOT use the ash vacuum cleaner for a task it is not designed to perform.
Disconnect the ash vacuum cleaner from the power supply before servicing, changing accessories, or performing and
maintenance.
Use only genuine parts and accessories. Unauthorised parts and accessories may be dangerous and will invalidate your warranty.
Recommended fuse rating
13 Amp
PC200A Issue 1 23/11/21
Original Language Version
© Jack Sealey Limited
Refer to
instructions
Keep in dry area
protect from rain

Maintain the ash vacuum cleaner in good condition. Use authorised agent for servicing.
Empty and clean the ash vacuum cleaner after each use.
When not in use store the ash vacuum cleaner in it’s original packaging in a clean, safe, childproof location.
WARNING! The warnings, cautions and instructions discussed in this instruction manual cannot cover all possible
conditions and situations that may occur. It must be understood that common sense and caution are factors which
cannot be built into this product, but must be applied by the operator.
2. INTRODUCTION
Ideal for the collection of ash or fire debris from fireplaces, stoves, wood burners, BBQs, grills and more. A powerful 1200W motor provides
great suction performance whilst also acting as a blower. With a 20L capacity, the lightweight tank features quick release clips for ease
of emptying. A 1.2m flexible metal lined suction hose allows the suction of ash up to a temperature of 40°C(100°F). Easily switch to blow
function by using the outlet on the top of the vacuum. Features filter cleaning function by placing the end of the nozzle on the button at the
top of the unit. Includes a HEPA filter with metal cover preventing the leaking of ash and dust and round aluminium nozzle. Cable length
2.5m.
3. SPECIFICATION
Airflow: .......................................................................90m³/hr
Drum size:........................................................................ 20L
Filter type: ........................................................Cartridge filter
Maximum vacuum pressure: .................................... 160mbar
Motor power: ...............................................................1200W
Supply:...........................................................................230V
Vacuum accessories diameter: ................................. Ø34mm
4. CONTENTS
5. ASSEMBLY
5.1. ATTACHING THE FILTER
5.1.1. Place the outer mesh filter over the HEPA filter (fig 2).
5.1.2. Place the HEPA filter and outer mesh filter onto the motor cover and secure by turning the filter in the direction of the lock arrow
indicator (fig 2).
NOTE: There is a safety switch fitted on the motor cover which prevents the ash vacuum cleaner from operating with no filter.
5.2. REMOVING THE FILTER
5.2.1. To remove the filter follow section 5.1 but in reverse.
5.3. ATTACHING THE MOTOR COVER
5.3.1. Centrally place the motor cover with the attached filters onto the top of the tank (fig 2).
5.3.2. Secure into place with the latch hooks (fig 3).
5.4. REMOVING THE MOTOR COVER
5.4.1. To remove the motor cover follow section 5.3 but in reverse.
5.5. ATTACHING THE HOSE
5.5.1. Align the tongues on the end of the hose with the grooves in the tank suction inlet (fig 3) and turn in the direction of the lock arrow
indicator.
5.6. REMOVING THE HOSE
5.6.1. To remove the hose follow section 5.5 but in reverse.
5.7. ATTACHING THE HOSE NOZZLE EXTENSION
5.7.1. Centrally insert one end of the metal hose nozzle extension into the remaining open end of the hose (fig 1).
5.8. REMOVING THE HOSE NOZZLE EXTENSION
5.8.1. To remove the hose nozzle extension follow section 5.7 but in reverse.
6. OPERATION
NOTE: Ensure all Safety Instructions in Section 1 are read and understood and carried out before use and save the instructions and
warnings for future reference.
6.1. POWER SWITCH
WARNING! Ensure that the ash vacuum power switch is in the OFF position prior to connecting to the electrical mains.
6.1.1. Plug the ash vacuum cleaner into the electrical mains.
PC200A Issue 1 23/11/21
Original Language Version
© Jack Sealey Limited
ITEM DESCRIPTION
1 Tank
2 Motor cover
3 Hepa filter
4 Outer mesh filter
5 Suction hose
6 Hose nozzle extension
fig.1 fig.2

6.1.2. To turn the ash vacuum cleaner on, press the ൺ(ON) on the power switch (fig 4).
6.1.3. To turn the ash vacuum cleaner off, press the O(OFF) on the power switch (fig 4).
6.2. EMPTING THE TANK
WARNING! Ensure that the power switch is in the OFF position and the plug is removed from the electrical mains.
6.2.1. Release the latch clips (fig 3) and remove the motor plate and place in a secure location.
6.2.2. Empty the ash into a suitable container.
NOTE: Dispose of the ash properly according to local regulations.
6.3. DUSTING BUTTON
6.3.1. If the suction power drops this can be improved by pressing the dusting button (fig 4).
6.3.2. Turn the power switch to the OFF position.
6.3.3. Remove the metal nozzle extension from the hose.
6.3.4. Align the tongues on the end of the hose with the grooves in the tank dusting inlet (fig 4), on the top of the motor plate, and turn in
the direction of the lock arrow indicator.
6.3.5. Turn the power switch to the ON position and press the duster button (fig 4).
6.4. FILTER INDICATOR
6.4.1. The filter indicator is located on the motor plate (fig 3).
6.4.2. When the indicator shows red this indicates that the filter needs replacing or cleaning.
7. MAINTENANCE
WARNING! Prior to carrying out any maintenance or cleaning isolate the ash vacuum cleaner from the electrical power source.
7.1. HEPA FILTER CLEANING
7.1.1. When there is a notable reduction of suction the HEPA filter will require cleaning.
7.1.2. Remove the motor cover from the tank. See section 5.4.
7.1.3. Remove the filter. See section 5.2.
7.1.4. For routine cleaning, remove any deposits using a soft bristle brush (not supplied) into a suitable container.
NOTE: Dispose of the waste properly according to local regulations.
WARNING! Avoid breathing in any airborne dust.
7.2. CLEANING
7.2.1. Clean with a damp cloth
DO NOT use abrasive or solvent cleaners.
8. TROUBLESHOOTING
fig.3 fig.4
PROBLEM POSSIBLE CAUSE SOLUTION
Motor does not start Power cable not plugged in Plug power cable into power source
Cleaner not switched on Switch on
Start motor temperature protection Wait 30 minutes and switch on again
Low suction power Blocked hose Remove the blockage
Dust filter clogged Remove and clean or press the dusting button
Motor cover not fitted correctly Remove and reattach correctly
Filter indicator shows RED Clean or replace filter
PC200A Issue 1 23/11/21
Original Language Version
© Jack Sealey Limited

PC200A Issue 1 23/11/21
Original Language Version
© Jack Sealey Limited
Sealey Group, Kempson Way, Suffolk Business Park, Bury St Edmunds, Suffolk. IP32 7AR
01284 757500 01284 703534 sales@sealey.co.uk www.sealey.co.uk
ENVIRONMENT PROTECTION
Recycle unwanted materials instead of disposing of them as waste. All tools, accessories and packaging should be sorted, taken to
a recycling centre and disposed of in a manner which is compatible with the environment. When the product becomes completely
unserviceable and requires disposal, drain any fluids (if applicable) into approved containers and dispose of the product and fluids
according to local regulations.
WEEE REGULATIONS
Dispose of this product at the end of its working life in compliance with the EU Directive on Waste Electrical and Electronic Equipment
(WEEE). When the product is no longer required, it must be disposed of in an environmentally protective way. Contact your local solid
waste authority for recycling information.
Note: It is our policy to continually improve products and as such we reserve the right to alter data, specifications and component parts without prior
notice.
Important: No Liability is accepted for incorrect use of this product.
Warranty: Guarantee is 12 months from purchase date, proof of which is required for any claim.
Other Sealey Vacuum Cleaner manuals

Sealey
Sealey VALET MACHINE VMA915 User manual

Sealey
Sealey AUTO Valet VMA 913 User manual

Sealey
Sealey PC455 User manual

Sealey
Sealey DFS35M User manual

Sealey
Sealey PC150A User manual

Sealey
Sealey PC380M110V User manual

Sealey
Sealey VMA913 User manual

Sealey
Sealey PC200SDAUTO.V2 User manual

Sealey
Sealey PC300 User manual

Sealey
Sealey PC200.V3 User manual

Sealey
Sealey PC200SD110V.V2 User manual

Sealey
Sealey PC310.V2 User manual

Sealey
Sealey CPV144 User manual

Sealey
Sealey PC35110V User manual

Sealey
Sealey PC150A User manual

Sealey
Sealey PC200SDAUTO User manual

Sealey
Sealey CPV72 User manual

Sealey
Sealey PC20SD20V User manual

Sealey
Sealey SA317.V2 User manual

Sealey
Sealey pc310 User manual