manuals.online logo
Brands
  1. Home
  2. •
  3. Brands
  4. •
  5. Sealey
  6. •
  7. Vacuum Cleaner
  8. •
  9. Sealey CPV72 User manual

Sealey CPV72 User manual

INSTRUCTIONS FOR:
VACUUM CLEANER CORDLESS
WET & DRY RECHARGEABLE 7.2V
MODEL No: CPV72
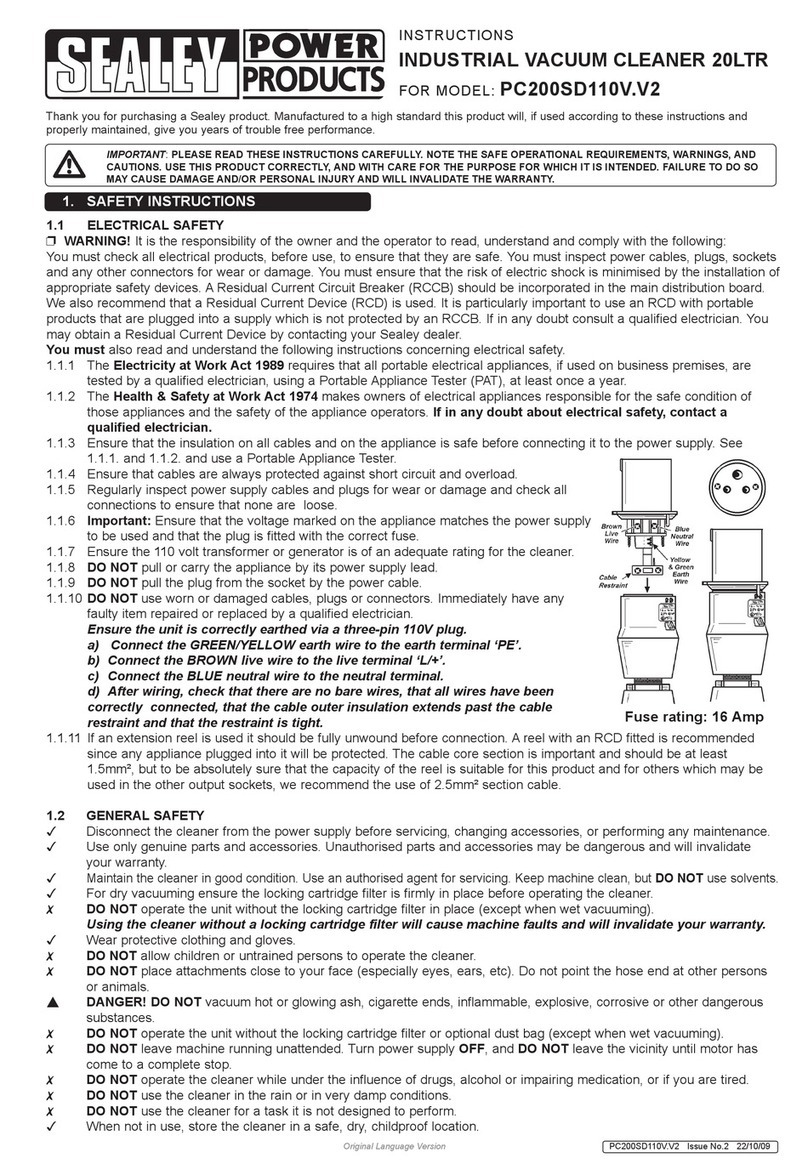
1. SAFETY INSTRUCTIONS
IMPORTANT: PLEASE READ THESE INSTRUCTIONS CAREFULLY. NOTE THE SAFE OPERATIONAL REQUIREMENTS,
WARNINGS AND CAUTIONS. USE THIS PRODUCT CORRECTLY AND WITH CARE FOR THE PURPOSE FOR WHICH IT IS
INTENDED. FAILURE TO DO SO MAY CAUSE DAMAGE AND/OR PERSONAL INJURY AND WILL INVALIDATE THE WARRANTY.
KEEP THESE INSTRUCTIONS FOR FUTURE USE.
Thank you for purchasing a Sealey product. Manufactured to a high standard this product will, if used according to these instructions and properly
maintained, give you years of trouble free performance.
1.1. GENERAL
 Keep the vacuum clean and in good condition.
Replace or repair damaged parts. Use recommended
parts only. Unauthorised parts may be dangerous and
will invalidate the warranty.
Keep children and non-essential persons away from the
work area.
 DO NOT leave the vacuum operating unattended.
 DO NOT use the vacuum for a task it is not designed for.
 DO NOT operate the vacuum when you are tired or
under the influence of alcohol, drugs or intoxicating
medication.
 DO NOT operate the vacuum if any parts are missing or
damaged, as this may cause failure and/or personal
injury.
Stay alert, watch what you are doing and use common
sense when operating vacuum.
 DO NOT allow persons unfamiliar with the vacuum or
these instructions to operate the vacuum.
 Recharge only with the charger supplied.
WARNING! Sparks inside motor can ignite flammable
vapours or dust. To avoid fire or explosion do not use
near flammable or combustible liquids or gases.
 DO NOT vacuum anything that is burning or smoking
such as cigarettes, matches or hot ashes.
DO NOT vacuum toxic materials to avoid health hazards
from vapours or dusts.
Keep the vacuum and all accessories where they will not
be subjected to heat or flame. To avoid injury, shock, or
fire, never use a damaged vacuum, cord or charger.
 Switch off immediately if foam or liquid exits the
vacuum.
 DO NOT put any object into openings.
DO NOT use with any opening blocked.
Keep free of dust, lint, hair, and anything that may
reduce air flow. Keep hair, loose clothing, fingers away
from openings and moving parts.
 DO NOT use for dry vacuuming without filter in place.
 DO NOTuse any charger other than the one with the vac.
 DO NOT handle plug or charging unit with wet hands.
Replace or repair damaged parts. Use recommended
parts only. Unauthorised parts may be dangerous and
will invalidate the warranty.
Original Language Version
1.2. ELECTRICAL SAFETY FOR USE OF TRANSFORMER.
USE ONLY THE SUPPLIED
TRANSFORMER PLUG FOR CONNECTING LAMP
TO THE POWER SUPPLY.
 WARNING! It is the user’s responsibility to read,
understand and comply with the following electrical
instructions:
You must ensure the risk of electric shock is minimised by
the installation of appropriate safety devices. An RCCB
(Residual Current Circuit Breaker) should be incorporated
in the main distribution board. We also recommend that
an RCD (Residual Current Device) is used with all
electrical products, particularly portable equipment which
is plugged into an electrical supply not protected by an
RCCB.
You must also read and understand the following
instructions concerning electrical safety.
1.2.1. The Electricity At Work Act 1989 requires all portable
electrical appliances, if used on business premises, to be
tested by a qualified electrician, using a Portable
Appliance Tester (PAT), at least once a year.
1.2.2. The Health & Safety at Work Act 1974 makes owners
of electrical appliances responsible for the safe condition
of the appliance and the safety of the appliance operator.
If in any doubt about electrical safety, contact a
qualified electrician.
1.2.3. You must ensure that you:
Inspect the transformer plug, cable and connector for wear
and damage to ensure items are safe before connecting
to the mains power supply. If worn or damaged DO NOT
use.
Important: Check that the voltage marked on the
transformer plug is the same as the power supply to be
used.
Uncoil the cable between transformer plug and vacuum.
 DO NOT pull the transformer plug from the mains socket
by the lead.
 DO NOT use any other type of transformer with this
product.
 DO NOT try to take the transformer plug apart.
 DO NOT use the transformer plug to power any other
electrical item.
 DO NOT get the transformer plug wet, or use in wet,
damp conditions (for indoor use only).
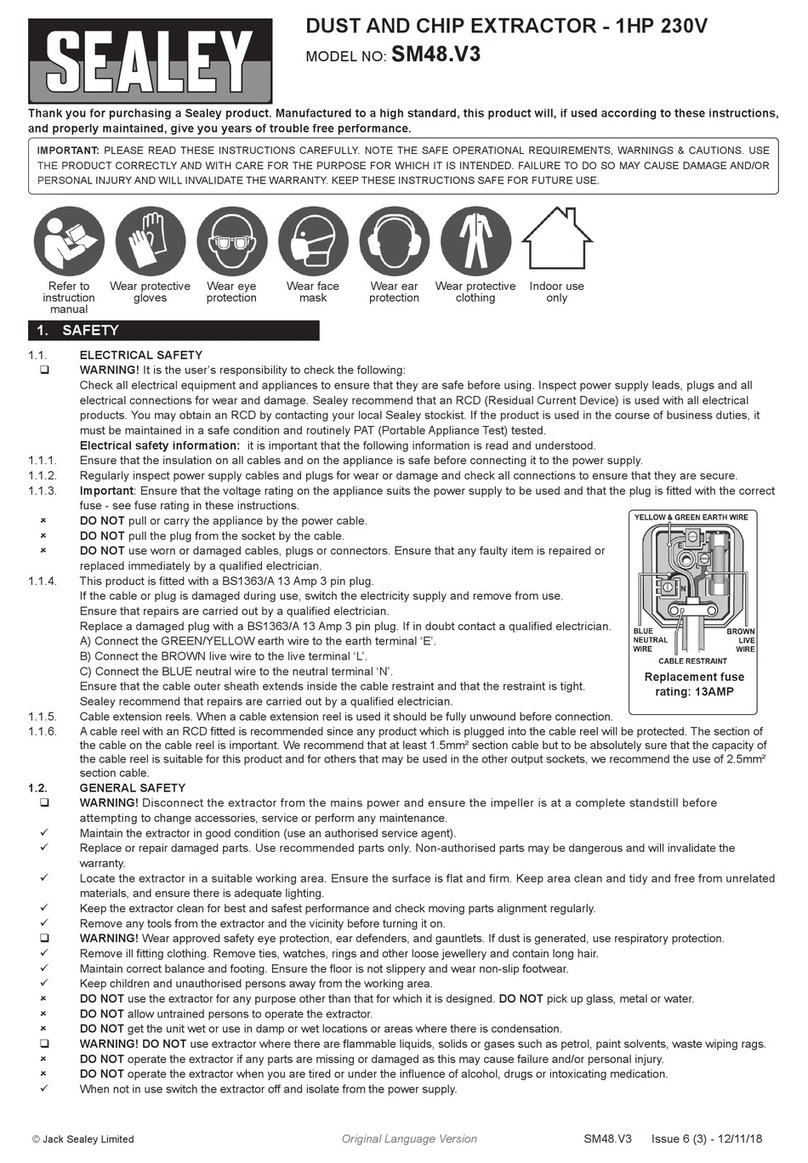
 WARNING!NEVER substitute a standard 13amp 3 pin
plug, or any other type of plug, for the transformer plug.
This transformer plug reduces and rectifies the mains
voltage (230 volts AC) to 7.2V.
WARNING! The warnings, cautions and instructions in
this manual cannot cover all possible conditions and
situations that may occur. It must be understood by the
operator that common sense and caution are factors
which cannot be built into this product, but must be
applied by the operator.
NOTE: This appliance is not intended for use by persons
(including children) with reduced physical, sensory or
mental capabilities or lack of experience and knowledge,
unless they have been given supervision or
instruction concerning the use of the appliance by a
person responsible for their safety. Children should be
supervised to ensure that they do not play with the
appliance.
CPV72 Issue: 1 - 09/12/13
©Jack Sealey Limited
2. SPECIFICATIONS
Ideal for quick clearing up of spillages. Convenient for use in
the home, workshop or car. Built in crevis tool for wet and dry
pick up. Includes detail brush, squeegee brush, storage bag
and reusable filter. Features removeable collection chamber
for easy disposal of waste.
Voltage:.............................. 7.2V
Charging Time: ................. 3-5hr
Weight: .............................0.8kg
3. CLEANING & MAINTENANCE
4. TROUBLESHOOTING
2.1. BEFORE FIRST USE
2.1.1. Unpack all parts and check for completeness if
anything is incomplete contact your dealer.
2.1.2. Charging the battery
DO NOT use the vacuum whilst it is being charged.
●charge the battery before first use.
●place the vacuum on a dry and even surface.
●make sure the vacuum is switched off (see fig.1).
●insert the plug of the adaptor into the charging
socket (fig.1) plug the adaptor into a suitable
charging socket and switch on, the red charge light
will come on.
●the battery is charged automatically, charging time is
3-5 hours.
● only charge the battery when it is almost flat. This
increases the durability of the battery.
● charge the battery at room temperature between 0°
and 37°C.
2.2. VACUUMING METHODS
2.2.1. DRY VACUUMING (See fig.2).
●without the foldable crevice tool for dry dirt.
●with the foldable crevice tool for cleaning crevices,
small corners and slots.
●with the foldable crevice tool and the detail brush for
cleaning upholstery and cushions.
2.2.2. WET VACUUMING (See fig.3).
●without the rubber squeegee for damp dirt.
●with the rubber squeegee for small amounts of liquid.
Note: The maximum amount of liquid is indicated by
MAX.
2.3. GENERAL OPERATION
 WARNING! never use the vacuum cleaner without the
air filter installed.
 WARNING! Clean or change the air filter regularly for
best performance. If after switching off, dust falls out of
the appliance, it indicates that the dust container is full
and needs to be emptied.
 WARNING! Make sure the charging adaptor is
disconnected from the charging socket.
 WARNING! Make sure the On/Off switch is set to the
Off position.
 WARNING! Never immerse the motor part of the
appliance into the water or any other liquid.
2.3.1.Switching On/Off (See fig.1).
●slide the On/Off switch to the on position.
●clean the dust, wet dirt etc. from the desired area
and switch to the Off positon.
●empty the vacuum when the dust container is full, or
if the MAX mark has been reached by liquid. (Refer
to Cleaning and Maintenance).
3.2. Emptying Dust Container (See g.4).
3.2.1. Press the dust container release button (see g.1) to
release the dust container. Then remove the air lter
and its holder from the dust container.
3.2.2. Hold the dust container over a bin and shake out
the dry dirt or pour out the water into a suitable
container.
3.3. Cleaning the Air Filter (See fig.4).
3.3.1. Remove the air filter from the dust container and clean
it using warm soapy water. Then rinse under running
water and let it dry.
3.3.2. Rinse out the dust container with water, dry all the parts
thoroughly, and reassemble.
3.4. Storage
Store in a dry place away from moisture, direct sunlight
and where it is inaccessible to children.
3.1. Cleaning
Clean the appliance after each use. Use a damp cloth
and a mild cleaning agent to clean the surfaces of the
vacuum cleaner. DO NOT use aggressive or abrasive
cleaning agents, petrol, solvents, chemically treated
cloths or other cleaning agents, they can damage the
casing.
Problem Possible Cause Solution
Vacuum does not Battery is empty. Charge battery.
work. Dust container is Empty dust
full. container.
Vacuum cleaner Power adaptor Connect adaptor to
is connected to is not connected a suitable power
the adaptor, but to the power supply. outlet.
the battery is not
charged. The On/Off switch Slide it to the Off
is set to the On position.
position.
The vacuum only The battery is not Charge the battery.
works for a short fully charged.
time.
The efciency The nozzle is Check the nozzle
decreases or blocked; or the opening; or clean/
the motor lter is blocked replace the lter.
vibrates. by ne dust.
Original Language Version CPV72 Issue: 1 - 09/12/13
©Jack Sealey Limited
g.1
g.2
g.3
Original Language Version CPV72 Issue: 1 - 09/12/13
g.4
©Jack Sealey Limited
CPV72 Issue: 1 - 09/12/13
NOTE: It is our policy to continually improve products and as such we reserve the right to alter data, specifications and component parts without prior notice.
IMPORTANT: No liability is accepted for incorrect use of this product.
WARRANTY: Guarantee is 12 months from purchase date, proof of which will be required for any claim.
INFORMATION: For a copy of our latest catalogue and promotions call us on 01284 757525 and leave your full name and address, including postcode.
01284 757500
01284 703534
sales@sealey.co.uk
Sole UK Distributor, Sealey Group,
Kempson Way, Suffolk Business Park,
Bury St. Edmunds, Suffolk,
IP32 7AR
www.sealey.co.uk
Web
email
Original Language Version
Battery Removal
To disconnect the battery pack remove the 7 screws holding the two halves of the casing together, split the two halves,cut the
wires to the batteries and dispose of batteries according to local authority guidelines.
Under the Waste Batteries and Accumulators Regulations 2009, Jack Sealey Ltd are required to inform potential purchasers of
products containing batteries (as defined within these regulations), that they are registered with Valpak’s registered
compliance scheme.
Jack Sealey Ltd’s Batteries Producer Registration Number (BPRN) is BPRN00705
Environmental Protection.
Recycle unwanted materials instead of disposing of them as waste.
All tools, accessories and packaging should be sorted, taken to a recycle
centre and disposed of in a manner which is compatible with the environment.
WEEE Regulations.
Dispose of this product at the end of its working life in compliance with the
EU Directive on Waste Electrical and Electronic Equipment. When the product
is no longer required, it must be disposed of in an environmentally protective
way. Contact your local solid waste authority for recycling information.
Parts support is available for this product. To obtain a parts listing and/or diagram,
please log on to www.sealey.co.uk, email sales@sealey.co.uk or telephone 01284 757500.
©Jack Sealey Limited

Other Sealey Vacuum Cleaner manuals

Sealey PC200SDAUTO User manual

Sealey

Sealey PC200SDAUTO User manual

Sealey AUTO Valet VMA 913 User manual

Sealey

Sealey AUTO Valet VMA 913 User manual

Sealey PC200SD110V.V2 User manual

Sealey

Sealey PC200SD110V.V2 User manual

Sealey PC150A User manual

Sealey

Sealey PC150A User manual

Sealey PC200.V3 User manual

Sealey

Sealey PC200.V3 User manual

Sealey PC477 User manual

Sealey

Sealey PC477 User manual

Sealey PC380M110V User manual

Sealey

Sealey PC380M110V User manual

Sealey Power Clean VMA92 User manual

Sealey

Sealey Power Clean VMA92 User manual

Sealey CPV144.V2 User manual

Sealey

Sealey CPV144.V2 User manual

Sealey VALET MACHINE VMA915 User manual

Sealey

Sealey VALET MACHINE VMA915 User manual

Sealey POWER PRODUCTS PC200.V2 User manual

Sealey

Sealey POWER PRODUCTS PC200.V2 User manual

Sealey SA317.V2 User manual

Sealey

Sealey SA317.V2 User manual

Sealey Quality MACHINERY SM48.V3 User manual

Sealey

Sealey Quality MACHINERY SM48.V3 User manual

Sealey PC200SDAUTO.V2 User manual

Sealey

Sealey PC200SDAUTO.V2 User manual

Sealey PC200A User manual

Sealey

Sealey PC200A User manual

Sealey VMA92.V2 User manual

Sealey

Sealey VMA92.V2 User manual

Sealey PC300 User manual

Sealey

Sealey PC300 User manual

Sealey PC20LN User manual

Sealey

Sealey PC20LN User manual

Sealey PC460 User manual

Sealey

Sealey PC460 User manual

Sealey pc310 User manual

Sealey

Sealey pc310 User manual

Sealey CPV100 User manual

Sealey

Sealey CPV100 User manual

Sealey PC20SD20V User manual

Sealey

Sealey PC20SD20V User manual

Sealey PC700 User manual

Sealey

Sealey PC700 User manual

Sealey DDE01 User manual

Sealey

Sealey DDE01 User manual

Popular Vacuum Cleaner manuals by other brands

Vivax VC-700R REO instruction manual

Vivax

Vivax VC-700R REO instruction manual

RIDGID V-1225 operating instructions

RIDGID

RIDGID V-1225 operating instructions

AEG Vampyr 6000 Repair notes

AEG

AEG Vampyr 6000 Repair notes

Gorenje VCEA21GPLRCY instruction manual

Gorenje

Gorenje VCEA21GPLRCY instruction manual

DS Produkte VC9388 manual

DS Produkte

DS Produkte VC9388 manual

Nilfisk-Advance SC100 Instructions for use

Nilfisk-Advance

Nilfisk-Advance SC100 Instructions for use

Vax C91-P2 SERIES instruction manual

Vax

Vax C91-P2 SERIES instruction manual

AEG PRO operating instructions

AEG

AEG PRO operating instructions

Kenmore BC3005 user manual

Kenmore

Kenmore BC3005 user manual

Eureka 420 Series owner's guide

Eureka

Eureka 420 Series owner's guide

Miele Vacuum cleaners operating instructions

Miele

Miele Vacuum cleaners operating instructions

Zelmer ZVC315HP user manual

Zelmer

Zelmer ZVC315HP user manual

Titan 1230 General assembly

Titan

Titan 1230 General assembly

Truvox ORBIS OBF431500 Original instructions

Truvox

Truvox ORBIS OBF431500 Original instructions

Philips FC8952 manual

Philips

Philips FC8952 manual

Morphy Richards Storm hard floor cylinder vacuum cleaner owner's manual

Morphy Richards

Morphy Richards Storm hard floor cylinder vacuum cleaner owner's manual

iTools ITASC18C instruction manual

iTools

iTools ITASC18C instruction manual

Tapo RV10 manual

Tapo

Tapo RV10 manual

manuals.online logo
manuals.online logoBrands
  • About & Mission
  • Contact us
  • Privacy Policy
  • Terms and Conditions

Copyright 2025 Manuals.Online. All Rights Reserved.