Sebo Automatic X5 User manual
Technische Daten
Gebläsemotor ............ 1100 Watt
max..... 1300 Watt
Unterdruck................... 225 mbar
(2300 mm WS)
Luftmenge.................... 50 dm 3/ s
Filtertüte...................... 5,3 dm3, 3-lagig
Arbeitsbreite................. 378 mm
Bürstenantrieb.............. Zahnriemen
Bürstendrehzahl.......... 2700 U/min
Bodenanpassung......... automatisch
sensorgesteuert
Anschlußleitung ........... 12,2 Meter
CAUTION - Safety advice
Do not vacuum hot material eg. ash.
Do not leave machine near heat source eg.
fires, ovens, radiators.
Do not remove any screws.
If the power cord is damaged it must be replaced
with a genuine SEBO part. For safety reasons this
must be done by a SEBO service representative or
an authorized Service technican.
Do not run over the cable.
Disconnect from mains before maintenance,
or changing brush, bag and filters.
Keep away from liquid or moisture.
Vacuum dry surfaces only.
Do not use with a damaged cable.
Fit only 10 amp fuse.
ACHTUNG - Hinweise zur Sicherheit
- elektrisches Gerät, vor Wasser, Hitzequellen und
Feuchtigkeit schützen
- gemäß der Anschlußwerte des Typenschildes,
anschließen und betreiben,
- Wenn die Netzanschlussleitung dieses Gerätes
beschädigt wird, muss sie durch den Hersteller
oder seinem Kundendienst oder von einer ähnlich
qualifizierten Person ersetzt werden, um
Gefährdungen zu vermeiden.
- Mit eingeschaltetem Gerät nicht über die
Anschlussleitung fahren.
- nur zur Reinigung trockener Flächen, nichts
Glühendes oder Heißes aufsaugen,
- Menschen oder Tiere nicht absaugen,
- Gerät mit Defekten nicht anschließen,
- wenn das Gerät selbst abschaltet, erst aus-
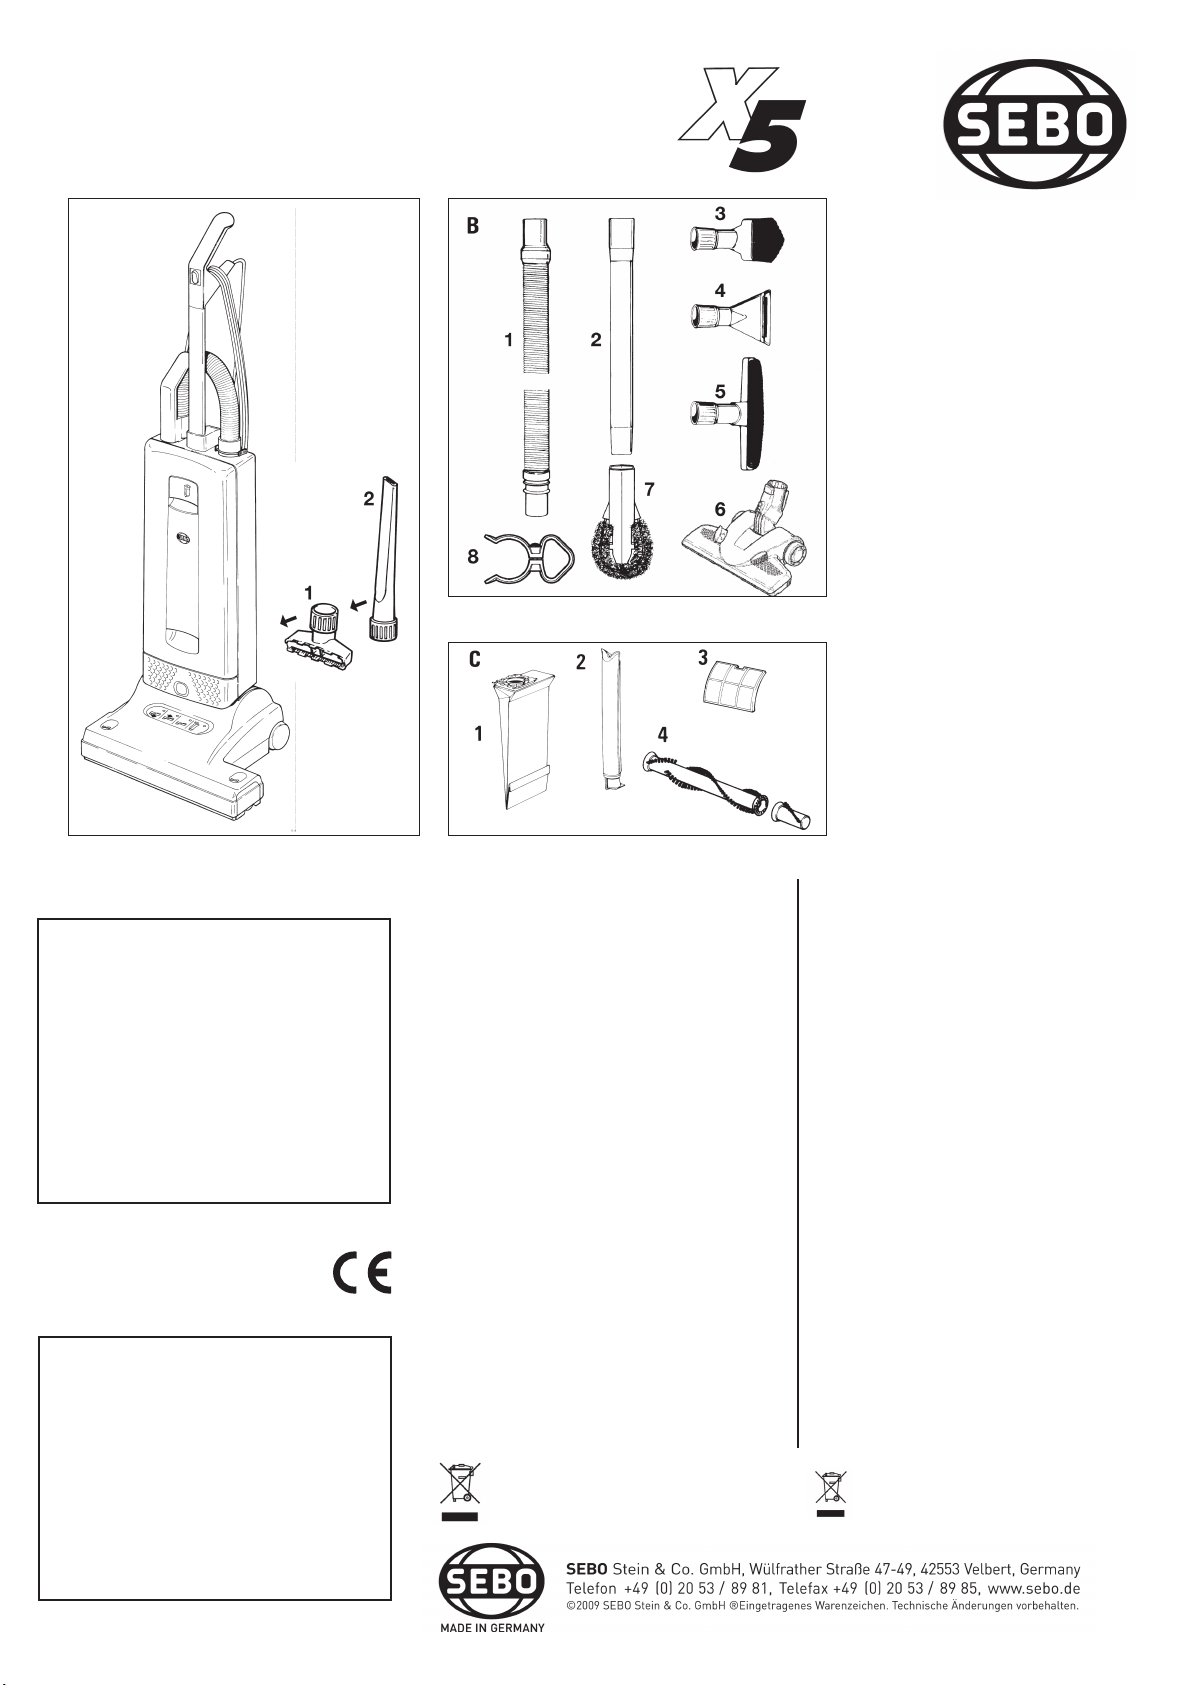
A Zubehör
11491 Polsterdüse
21092 Fugendüse
B Sonderzubehör
11495 ER Verlängerungsschlauch
21084 Verlängerungsrohr
31094 Staubpinsel
41090 Flachpolsterdüse
51325 Wand- und Polsterdüse
67290 DG SEBO Kombidüse
71496 Heizkörperpinsel
85460 Zubehörklammer
C Service-Teile
15093 ER Filtertüte
25036 ER Micro-Hygienefilter
35143 Abluftfilter
45290 ER Rundbürstenset
A Attachments
11491 Upholstery Nozzle
21092 Crevice Nozzle
B Optional Attachments
SEBO AUTOMATIC
A selection of attachments is available as a kit 11495 ER Extension Hose
21084 Straight Tube
31094 Dusting Brush
41090 Upholstery Nozzle, special
51325 Wall and Floor Brush
67290 DG Combination Nozzle
71496 Radiator Brush
85460 Attachment clip
C Service Parts
15093 ER Paper Bag
25036 ER Microfilter
35143 Exhaust Filter
45290 ER Brush Roller Set
A
Gewicht........................ 7,6 kg
Isolationsklasse............ II, doppelt isoliert
Arbeiten an der elektrischen Installation dürfen nur
von Sachkundigen ausgeführt werden.
Vacuum motor ............. 1100 Watt
max...... 1300 Watt
Air flow.......................... 50 l / s
Dust bag....................... 5,3 litres, 3-layer
Working width............... 378 mm
Brush drive................... tooth belt
Brush speed................. 2700 rpm
Floor adjustment......... automatically
sensor advised
Cable............................ 10 m
Weight.......................... 7,6 kg
Protection.................... double insulated
For service please contact your supplier or the
address below.
Technical Details
THIS APPLIANCE HAS A ROTATING BRUSH:
Do not run over mains cable.
Do not leave plugged in and unattended.
Do not tilt the brush head on to the floor when using
the hose. This can cause marking.
Some floor coverings may be damaged by
upright vacuums eg. wool loop carpets and cushi-
on vinyl. Check with flooring supplier
before use and treat with care.
Children and pets should be supervised to ensure
that they do not play with the appliance.
This appliance is not intended for use by persons
(including children) with reduced physical, sensory
or mental capabilities, or lack of experience and
knowledge, unless they have been given supervision
or instruction concerning use of the appliance by a
person responsible for their safety.
IT IS THE USERS RESPONSIBILITY TO
OPERATE THIS APPLIANCE IN ACCORDANCE
WITH THE OPERATING INSTRUCTIONS.
PLEASE READ AND RETURN GUARANTEE CARD.
schalten, dann Netzstecker ziehen und erst
dann die Ursache beseitigen,
- nach der Benutzung den Netzstecker ziehen,
- keine Schrauben lösen, Arbeiten im Geräte-
inneren nur durch Fachkräfte,
- Benutzung auf eigene Verantwortung, der
Hersteller kann für Schäden durch die Be-
nutzung nicht verantwortlich gemacht werden,
- gemäß der Gebrauchsanweisung benutzen
und deren spezielle Hinweise beachten.
- Kinder sollten beaufsichtigt werdenm um sicher
zu stellen, dass sie nicht mit dem Gerät spielen.
- Dieses Gerät ist nicht dafür bestimmt, durch
Personen (einschließlich Kinder) mit einge-
schränkten physischen, sensorischen oder
geistigen Fähigkeiten oder mangels Erfahrung
und/oder mangels Wissen benutzt zu werden. Es
sei denn, sie werden durch eine für Ihre Sicherheit
zuständige Person beaufsichtigt oder erhielten
von Ihr Anweisung, wie das Gerät zu benutzen ist.
Hinweis zur Entsorgung: (Gilt nur innerhalb der EU)
Sie können dieses Gerät kostenlos an jeder
öffentlichen Sammelstelle abgeben. Weitere
Informationen erhalten Sie durch ihre Kommune.
Elektroaltgeräte gehören nicht in den Restmüll.
Note on disposal:
For disposal of used appliances, please
follow the advice of your local authority.
06551 - 02.2010
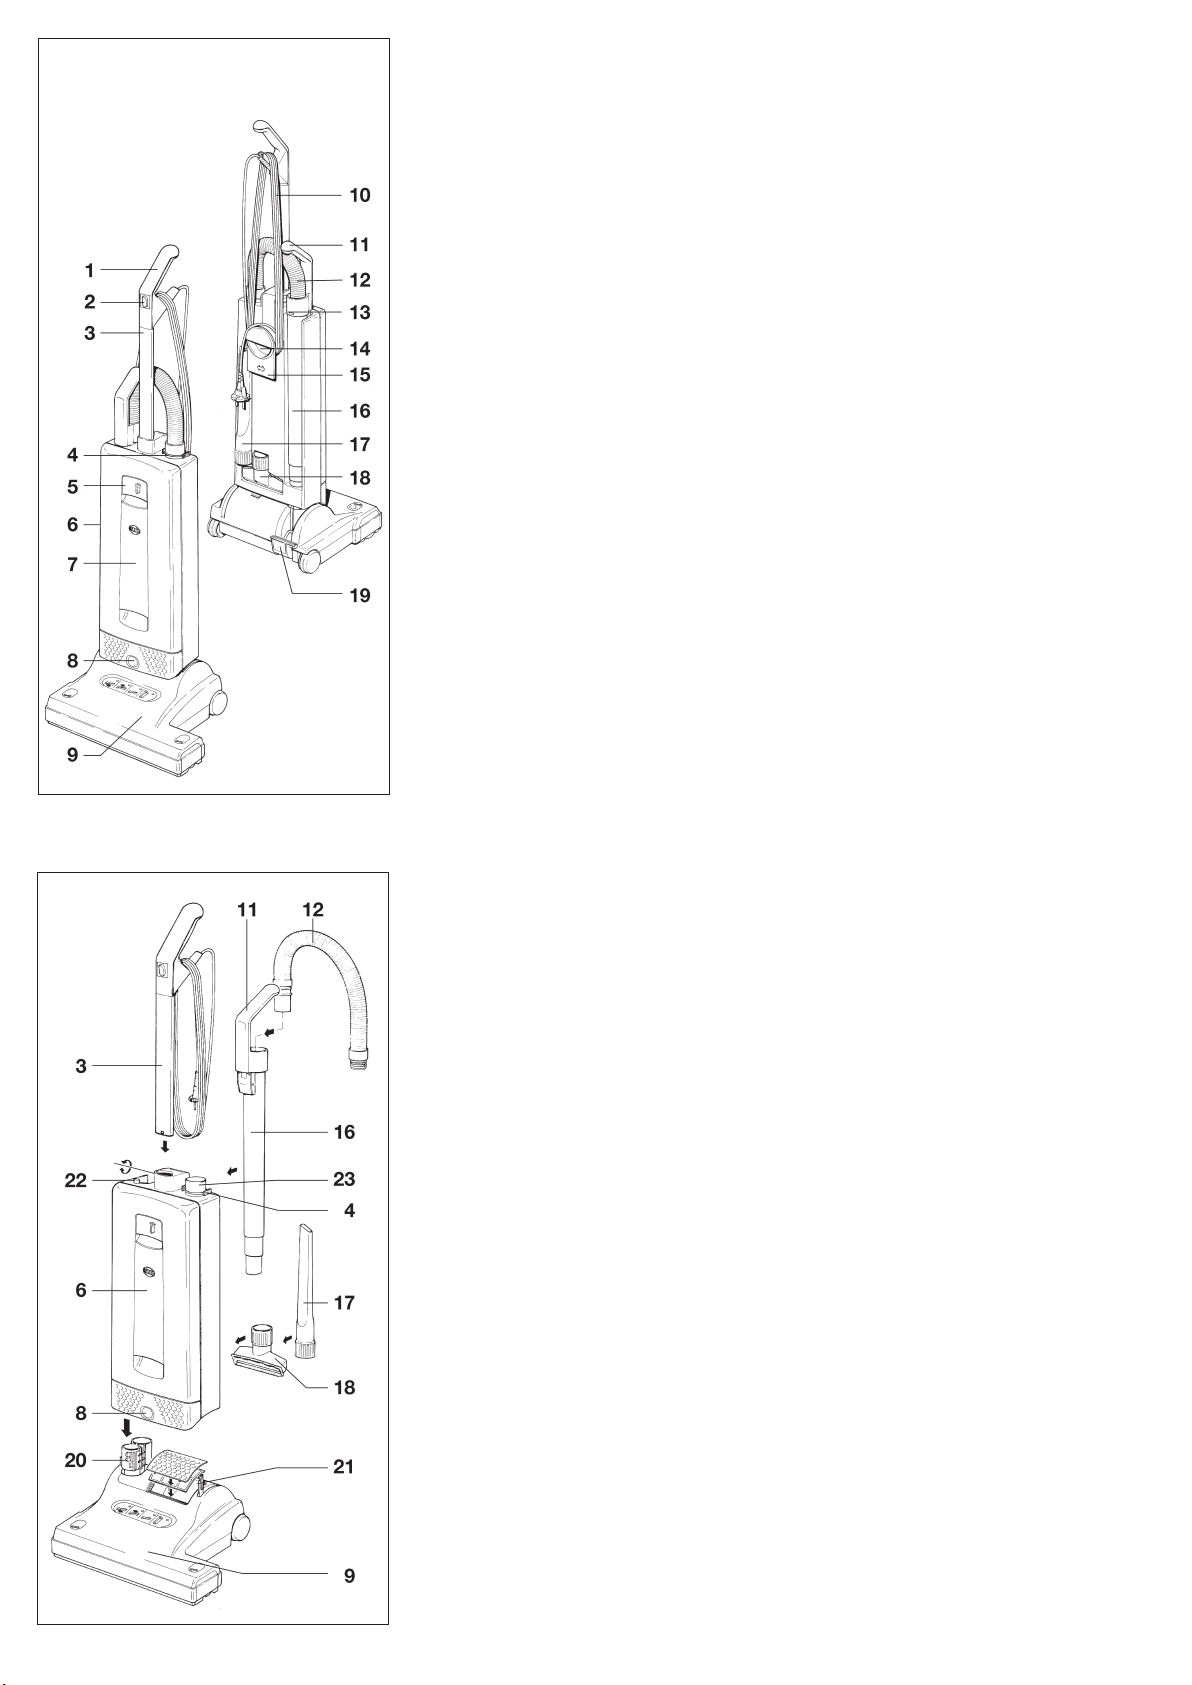
10 Cable
11 Attachment tube handle
12 Hose
13 Handle catch
14 Carrying handle
15 Cable hook
16 Attachment tube
17 Crevice nozzle
18 Upholstery nozzle
19 Foot pedal
10 Anschlußleitung
11 Handgriff des Teleskopschlauchs
12 Schlauch
13 Exzenterhebel
14 Griffmulde / Tragegriff
15 Leitungshaken
16 Saugrohr des Teleskopschlauchs
17 Fugendüse
18 Polsterdüse
19 Rastpedal
1 Handle grip
2 On / Off switch
3 Handle assembly
4 Retaining ring
5 Cover release flap
6 Dust bag housing
7 Front cover
8 Housing release button
9 Base with brush
1 Griff
2 Schalter
3 Stiel
4 Sicherungsring
5 Deckelschloß
6 Filtergehäuse
7 Deckel
8 Entriegelungstaste
9 Gerätefuß mit Bürste
SEBO AUTOMATIC X5
Please read this instruction manual. Do not
use the machine before reading the Cautions.
INSTRUCTION MANUAL
Your SEBO vacuum cleaner is designed to give
you excellent performance and long life.
Reading this manual will help you get the most
from its’ many features
Assembling the vacuum cleaner:
In the box you will find the machine in four
major parts. To assemble the machine, put the
swivel neck ( 20 ) and support lever ( 21 ) in the
upright position. Carefully place the dust bag
Bitte lesen Sie zuerst gründlich diese
Gebrauchsanweisung.
Die Sicherheitshinweise beachten.
Gebrauchsanweisung
Dieser SEBO automatic X Universalstaub-
sauger ist auf hohe Leistung, Benutzer-
freundlichkeit und Langlebigkeit ausgelegt.
Eine rotierende Bürste mit automatischer
Höheneinstellung im Gerätefuß (9) reinigt Ihre
Teppiche und andere Böden schonend und
gründlich. Der Teleskopschlauch stellt kom-
fortabel eine Reichweite beim Staubsaugen
zur Verfügung, die Sie bald nicht mehr ent-
behren möchten. Ihr SEBO ist mit einer
Mikrofiltertechnik ausgestattet, die modern- housing over them and push down until the
release button resets ( 8 ).
To lock the handle turn the handle catch ( 13 )
at the handle joint of the filter bag housing ( 6 )
forward, then slide the handle assembly (3 ) in
as far as possible and lock it with the handle
catch.
Push the black end of the hose into the
connecting tube ( 23 ) so that it clicks into place.
Insert the attachment tube (16) into the swivel
neck and push the handle (11) over the
projection (22).
The hose can be taken off by squeezing the
retaining ring (4).
IF THE MACHINE DOES NOT WORK, THEN
THE STEPS ABOVE HAVE NOT BEEN EXE-
CUTED CORRECTLY. PLEASE ENSURE THE
PARTS ARE PROPERLY PUSHED TOGETHER
sten hygienischen Ansprüchen gerecht wird.
Auspacken und Zusammensetzen
In der Verpackung befindet sich das in vier
Teile zerlegte Gerät sowie die Gebrauchs-
anweisung.
Den Gerätefuß (9) auf den Boden stellen. Das
Filtergehäuse (6) vorsichtig auf das aufrechte
Gelenk (20) und den Stützhebel (21) setzen
und nach unten drücken, bis die Entriege-
lungstaste (8) einrastet.
Für die Stielbefestigung den Exzenterhebel (13)
am Filtergehäuse (6) nach vorn drehen, Stiel (3)
in die Aufnahme im Filtergehäuse stecken bis
der Stiel im Gehäusegrund aufstößt, Exzen-
terhebel nach hinten drehen.
Das Saugrohr (16 ) erst in das Gelenk ( 20 )
einführen und dann mit dem Griff auf den
Nocken ( 22 ) am Filtergehäuse stecken. Die
passende Schlauchseite in das Saugrohr (16 )
einführen. Zum Anschließen des Schlauches
( 12 ) an das Filtergehäuse, das Ende mit der
schwarzen Buchse in die Verbindungshülse
( 23 ) einführen und ganz einschieben. Durch
zusammendrücken der Griffflächen am Siche-
rungsring ( 4 ) kann der Schlauch wieder gelöst
werden.
Wenn das Gerät nicht läuft, überprüfen, ob
die Teile richtig zusammengesteckt sind.
Universalstaubsaugers können Sie anhand
von vier Leuchtanzeigen auf dem Gerätefuß
überwachen.
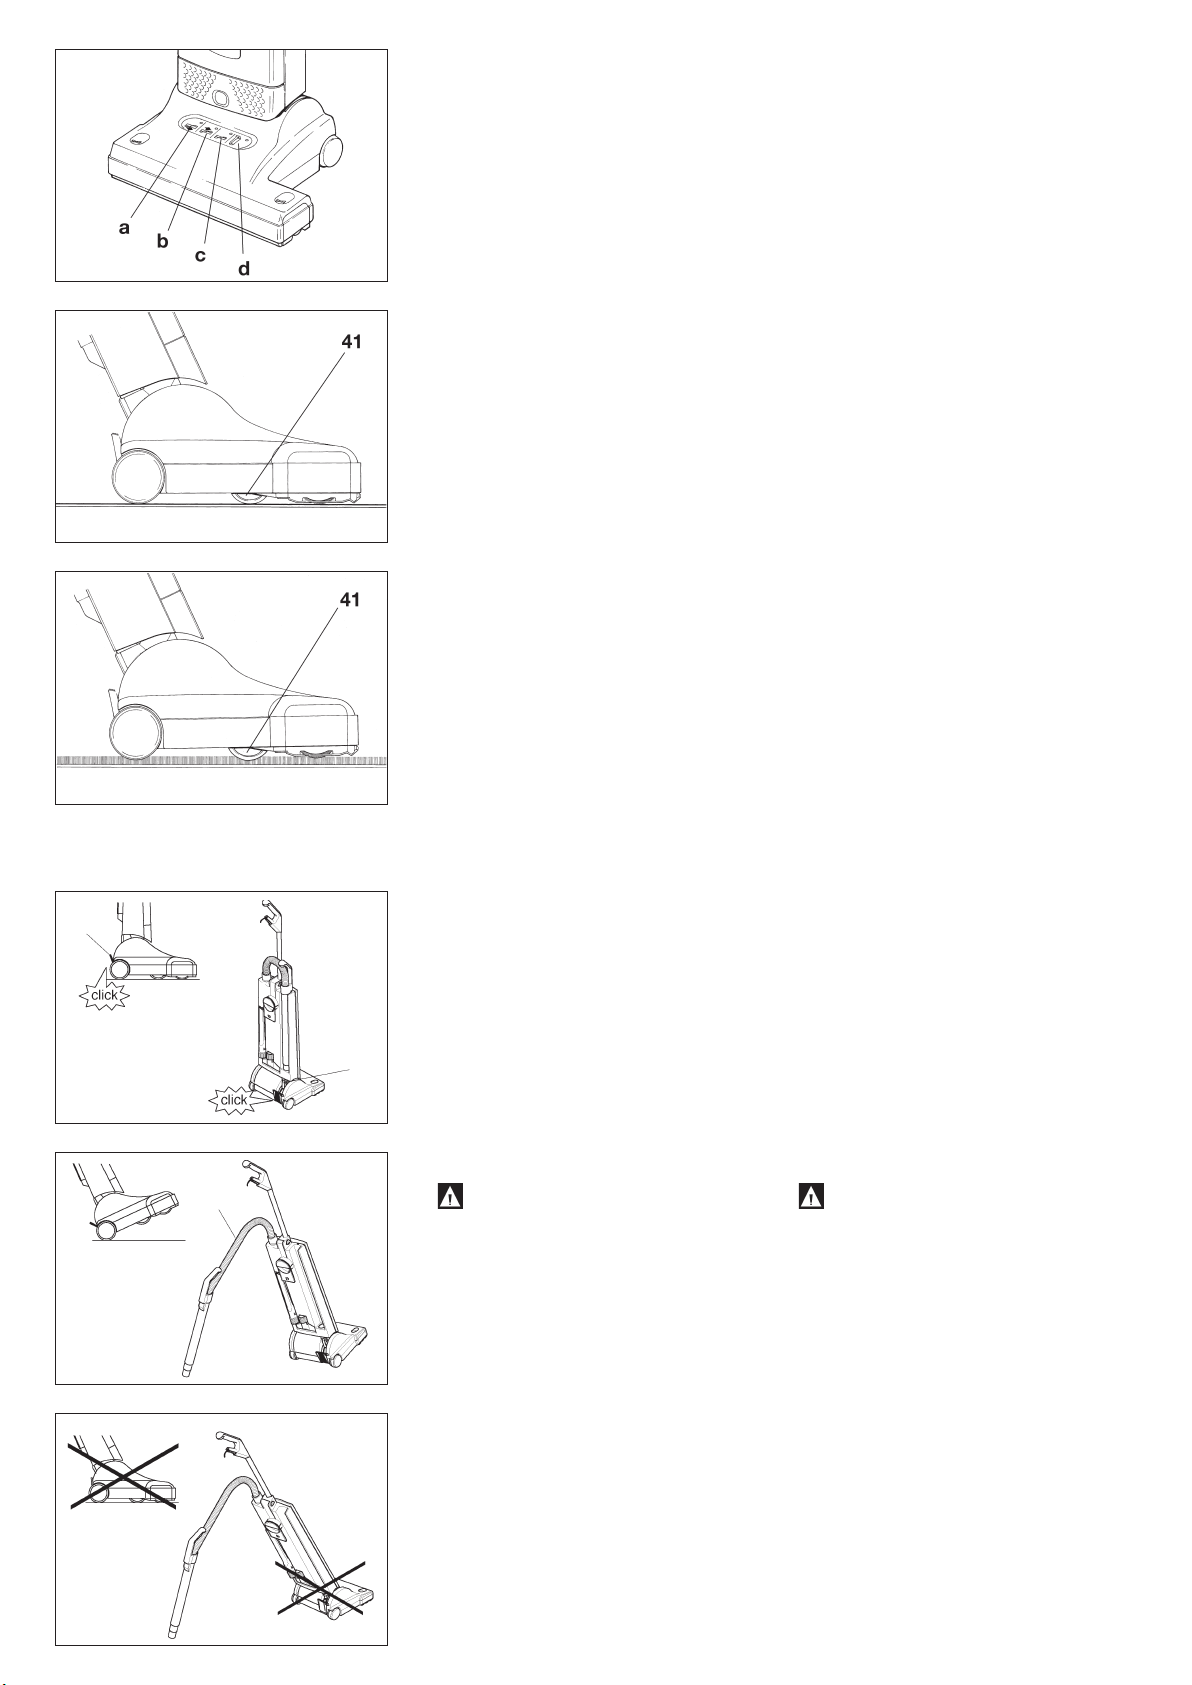
Die Automatik mißt die Leistung der Bürste
und stellt über eine Stellrolle (41) immmer die
optimale Höhe ein. Zwei grüne Anzeigen
zeigen dies an.
Steht das Gerät in der aufrechten Position,
hebt sich die Bürste vom Boden ab, wie die
Anzeige „b“ zeigt. Ist dies nicht mög-
lich, z.B. auf hochflorigem Teppich, blinkt die
Anzeige „c“, bis die Bürste manuell
angehoben wird.
Wenn das Gerät abschaltet und die rote
blinkt, ist die Bürste blockiert
oder eine Überlast registriert worden(Über-
Leuchtet die rote Anzeige „c“ dauernd , muß
die Bürste erneuert werden ( siehe Bürste ent-
rote Anzeige „d“ dauernd leuchtet,
muß entweder die Filtertüte gewechselt
werden oder das Gerät ist verstopft (siehe
Verstopfungen beseitigen ). Bei Nichtbeach-
schaltet das Gerät ab und die rote
„d“ blinkt.
Niemals bei angeschlossenem oder
laufendem Gerät an die Bürste fassen!
Die automatischen Funktionen Ihres SEBO
(a, b)
grüne
rote
Anzeige „c“
prüfen ! ).
nehmen ).
Falls die
tung
Anzeige
The machine has an information display on
the power head with four lights to monitor the
automatic functions.
The two green lights (a, b) indicate the brush
adjustments of the Active Height Control sytem.
The power head maintains the optimum brush
height continuously by activating the adjustment
wheel (41). The lights will flash intermittently as
the machine is moved over the floor. When the
machine is clicked into the upright position the
brush head automatically lifts from the floor.
The two red lights (c, d) are warning lights.
If red light “d“ is shining continously, the bag is
full, the filters require replacement, or there is a
blockage. When the light is flashing the machine
has shut off to prevent overheating
If red light ”c“is on continously the brush is
worn out. When the light flashes and the
machine has stopped, then the machine has
shut off because of a jammed brush or to
prevent carpet damage.
If the red light „c“ flashes when using the hose
with the machine in the upright position, then it
is warning that the brush is making contact with
the floor. Avoid tilting the brush head on to the
floor when using the hose.
Do not touch the brush roller while the
machine is plugged in!
19
20
12
A
B
C
Das Rastpedal ( 19 ) drücken, um das Gerät zu
schwenken. Mit dem orangefarbenen Schieber (20)
ist eine weitere Rastposition zur Überwindung von
Hindernissen und Teppichkanten einstellbar. Das
Pedal dann erneut auslösen, um flach auf den
Boden zu schwenken.
Zur Benutzung des Teleskopschlauchs (12) das
Gerät immer in die aufrechte Position stellen (A).
Dann das Saugrohr nach oben herausziehen
und den Schlauch spannen, bis er einrastet (B).
Zum Zurückstecken das Teleskoprohr erst in das
Gelenk ( 20 ) einführen und es dann mit dem Griff
auf den Nocken ( 22 ) am Filtergehäuse stecken.
Der Schlauch gleitet dann zurück und kann auch
ohne das Saugrohr benutzt werden. Die Saug-
düsen ( 17, 18 ) passen auf das Saugrohr und den
Schlauch.
ACHTUNG Hinweis zum Gebrauch:
Die Bürste im Gerätefuß ( 9) wird nur angeho-
ben, wenn das Gerät in der aufrechten Position
eingerastet ist (A). Im abgekippten Zustand
sollte das Gerät ständig in Bewegung sein.
Rotiert die Bürste längere Zeit auf einer Stelle,
kann je nach Bodenbelag die Oberfläche be-
schädigt werden. Der Teleskopschlauch (12)
sollte deshalb niemals bei abgekipptem Gerät
benutzt werden (C).
Die Bürste läuft immer mit, auch bei aufrech-
tem Gerät. Vorsicht bei Teppichfransen, An-
schlußleitungen usw. Bitte achten Sie immer
darauf, daß Teppichkanten und -ecken nicht
von der Bürste eingezogen werden.
Bei sehr empfindlichen Bodenbelägen wie z.B.
lose gewebten, extrem langflorigen Teppichen
oder sehr weichen, empfindlichen Bodenbe-
schichtungen weisen wir darauf hin, daß Ober-
flächenschäden entstehen können. Bitte benut-
zen Sie bei den oben genannten Bodenbelägen
das Saugrohr und eine der Saugdüsen aus dem
SEBO-Zubehör.
Auf unebenen Böden ist der Kontakt mit dem
Bodenblech möglich.
Das Gerät über hohe Schwellen tragen.
To release the machine from the upright posi-
tion, press the foot pedal (19) down. With the
orange slider (20) an intermediate stop positi-
on can be added to lift the brush over obsta-
cles. Then to lower the machine to the hori-
zontal position, press the foot pedal again.
To use the telescopic hose system (12), put the
machine into the upright position (A), then lift the
tube from the machine and stretch out the hose
until it locks (B). When the tube is returned to
the machine, insure it is pushed down over the
projection (22) on the housing. The hose can be
used on its own when the tube is fitted to the
housing. The attachments (17, 18) fit either to
the end of the hose or the end of the tube.
CAUTION:
Upright vacuum cleaners are fitted with
rotating brushes which can cause damage if
the machine is used incorrectly or on inap-
propriate floor surfaces.
Do not place the brush head over rug/carpet
fringes.
Do not stand the machine over rug/carpet
edges.
The brush will only get lifted if the machine is
locked in an upright position. In a titled posi-
ton you should permanently move the machi-
ne. It may cause damage to the floor if the
brush rotates on one spot for a longer time.
Therefore the hose should never be used in a
titled position (C).
Ensure machine is in upright position and the
brush is above floor level when using the hose.
For floor coverings and rugs which are un-
suitable for uprights use the attachment tube
with appropriate SEBO attachments. This
may also be necessary on uneven hard floors.
On uneven hard floors take care to prevent
contact between the floor and the bottom
plate.
Never run over the cable with the brush head.
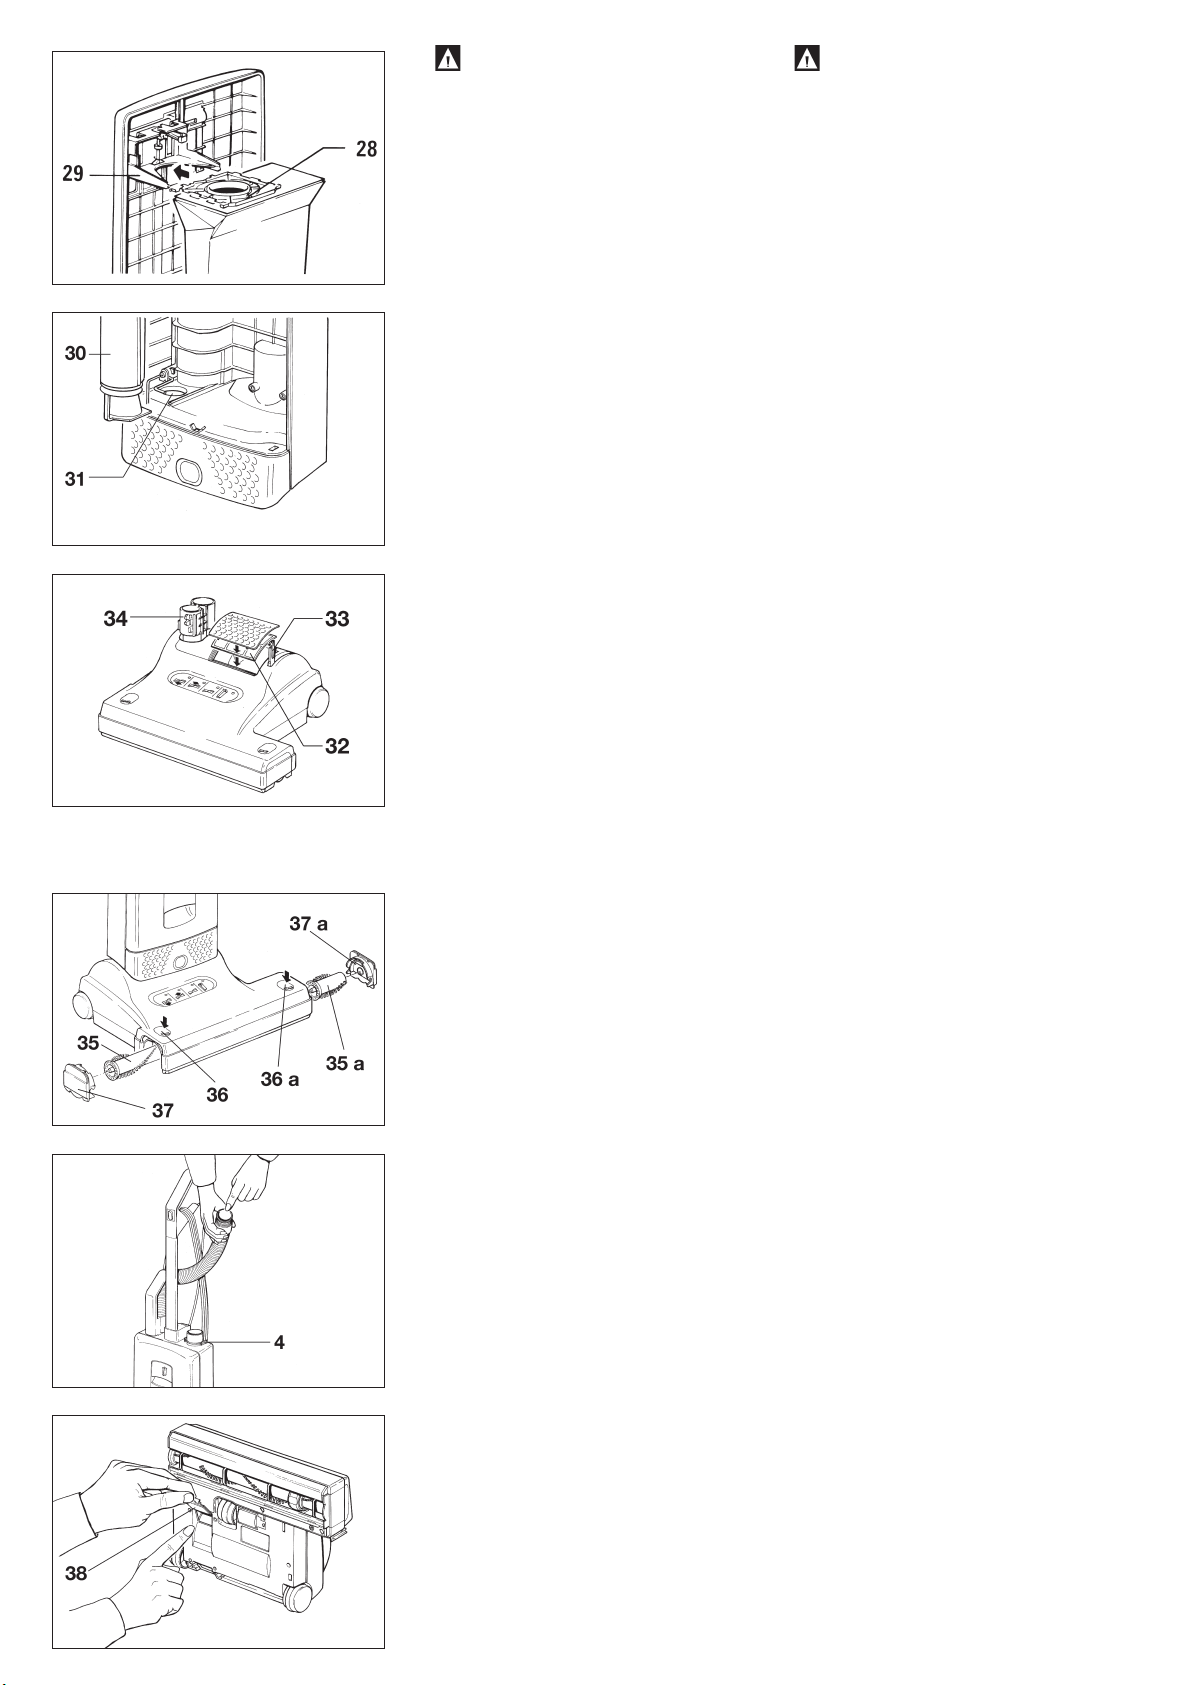
Removing the brush roller:
The brush roller consists of two parts (35, 35a).
The push buttons (36, 36a) release the two side
plates (37, 37a). Turn the brushes (35 clockwise,
35a anticlockwise) and pull them out.
To replace, slide the two brush roller parts into
the brush housing and turn them until they loca-
te into position. Push the respective button
(36,36a) and press the side plates back into
place.
We recommend vacuuming out the brush roller
ends periodically to prevent a build up of dust or
fibre. When cleaning hair, etc., from the brush
roller, do not cut into the bristles.
Replacing the hard floor strip:
Remove the side plate (37) and slide out the
strip. Slide new strip into the groove and refit
side plate.
Clearing blockages:
If the machine is not picking up, or the red bag
light “d“is on, but the bag is empty and the
filters are clean, then it is probably blocked.
First check the hose by placing your hand over
the end. If there is no, or very little suction, then
it is blocked. Take off the hose by squeezing the
retaining ring (4). Put it on the machine the
wrong way round. Place your hand over the free
end repeatedly with the machine on. Also check
that the tube is clear.
If the hose and tube are clear, check the swivel
neck (20) by looking down the neck where the
tube fits. Also check the trap door (38) under-
neath the machine. Ensure the passage bet-
ween the trap door and the exit to the tube is
clear.
CAUTION - Always unplug machine at
mains outlet before dismantling any part
of machine.
Changing the paper bag:
The red bag light “d“ on the display indicates that
there is a reduced air flow. This is caused either
by a full paper bag, dirty filters, or a blockage in
the hose (12) or base (9) of the machine. (To clear,
refer to blockage section.) The nature of the bags
contents will effect the point at which it needs
changing. Fine dust may require an earlier change
even when the bag is not filled to the top. Fluff or
hair lets the air pass through easily, so the bag
may overfill.
To change the paper bag, lift the flap (5).
Then change the bag, as illustrated on its front.
Please ensure that the bag top is located properly
on both sides of the holder (29) and pushed in
until it locks.
The used paper bag can be sealed with a cap,
which is included with each bag in the SEBO
Filterbox and Service-Box (Part.-No. 5093 ER and
5094 ER)
DO NOT RE-USE PAPER BAGS.
Changing the filters:
The SEBO automatic X has two additional filters,
the microfilter and the exhaust filter (Part.-No.
5036 ER and 5143). They are also available
together with ten paper bags in the SEBO
Service-Box (Part.-No. 5094 ER). The microfilter is
located in the dust bag compartment. The front
cover can only be closed when the filter is fitted
properly. Lift the metal bar (31) to slide the filter in.
The exhaust filter is fitted on the base (9) below a
grill (34, filter cover), To remove the grill, push
back the catch (33).
The microfilter (30) needs to be changed when it
is dirty, or before using twenty paper bags. We
recommend changing the exhaust filter (32) with
the microfilter
The filters must not be washed.
This maschine should only be operated with
genuine SEBO filter bags, filters and replacement
parts. The use of non-genuine parts will waive the
warranty for this product and could pose a
serious safety risk.
ACHTUNG - Bei allen Wartungs- und
Reinigungsarbeiten Gerät ausschalten und
Netzstecker ziehen.
Wechsel der Filtertüten
Die rote Anzeige „d“ zeigt einen reduzierten
Luftstrom an. Dies bedeutet, daß entweder
eine Verstopfung vorliegt ( siehe unten ) oder
die Filtertüte zu wechseln ist. Sehr feiner Staub
kann einen Wechsel erfordern, ohne daß die
Filtertüte bis oben gefüllt ist. Lockere Flusen
und Haare lassen die Luft leicht durchströmen
und die Filtertüte könnte überfüllt werden.
Zum Wechseln der Filtertüte das Deckelschloß
(5) öffnen. Dann die Filtertüte wechseln, wie auf
deren Vorderseite illustriert. Dabei sicherstellen,
daß die grüne Platte ( 28 ) auf beiden Seiten
richtig in die Führung des Filterhalters ( 29 )
geschoben und eingerastet ist. Gebrauchte
Filtertüten können mit Deckeln verschlossen
werden, die jeder SEBO Filterbox und Service-
Box beiliegen
( Art.-Nr. 5093 ER und 5094 ER ).
Mikrofilter und Abluftfilter wechseln
Der SEBO automatic X hat zwei zusätzliche
Filter, den Mikro-Hygienefilter und den Abluft-
filter ( Art.-Nr. 5036 ER und 5143 ). Beide sind
auch zusammen mit zehn Filtertüten in der
SEBO Service-Box erhältlich ( Art.-Nr. 5094 ER).
Der Mikro-Hygienefilter (30 ) ist im Filterge-
häuse untergebracht. Der Filterdeckel ( 7 ) kann
nur geschlossen werden, wenn der Mikro-
Hygienefilter richtig eingesetzt ist. Zum Ein-
schieben den Sicherungsbügel ( 31 ) anheben.
Der Mikro-Hygienefilter muß gewechselt werden,
wenn er stark verschmutzt ist oder spätestens
nach zwanzig Filtertüten. Gleich-zeitig sollte
auch der Abluftfilter ( 32 ) gewechselt werden.
Dieser befindet sich auf dem Gerätefuß ( 9 )
unter dem Filtergitter (34). Zum Wechseln den
Verriegelungsknopf ( 33 ) nach hinten drücken.
Die Filter nicht waschen.
Das Gerät darf nur mit original SEBO Filtertüten
und original SEBO Ersatz- und Verschleißteilen
betrieben werden. Nur die Verwendung von
Originalteilen für dieses Produkt berechtigt zu
Garantieleistungen und gewährleistet die
Betriebssicherheit des Gerätes.
Entnahme der Rundbürste
Die Rundbürste im Gerätefuß ist zweiteilig
(35, 35a). Mit den Tasten (36, 36a) lösen Sie
das Loslager (37) und die Abdeckplatte (37a).
Die große Bürste (35) im Uhrzeigersinn drehen
und herausziehen, die kleine (35a) entgegenge-
setzt drehen und entnehmen. Zum Einsetzen
die Bürste einschieben und drehen bis Sie ein-
rastet. Die jeweilige Taste drücken und das
Loslager und die Abdeck-platte aufsetzen bis
sie einrasten. Niemals das Gerät mit nur einer
Bürste oder ohne die seitlichen
Abdeckungen(37, 37a) einschalten.Die beiden
Bürsten immer zusammen austauschen .
Es empfiehlt sich, die Rundbürste regelmäßig
von aufgewickelten Fäden und Haaren zu
befreien und von den Seiten auszusaugen.
Wechsel der Dichtlippe
Die Taste (36) drücken, das Loslager (37)
entfernen und die Dichtlippe aus der Nut
herausziehen. Neue Dichtlippe einschieben
und Loslager wieder einsetzen.
Verstopfungen beseitigen
Wenn das Gerät nicht gut saugt, oder die rote
Filteranzeige „d“ leuchtet, obwohl die Filtertüte
leer ist, kann es verstopft sein.
Zuerst den Schlauch überprüfen. Wenn dort
nur eine geringe Saugwirkung spürbar ist, ist
er verstopft. Den Schlauch durch zusammen-
drücken des Sicherungsringes ( 4 ) an den
Griffflächen lösen und ihn von der anderen
Seite aussaugen. Dazu den Schlauch an der
Verstopfung dehnen und mit der flachen Hand
auf die Öffnung klopfen.
Überprüfen Sie auch das Saugrohr.
Den Schlauch niemals mit einem Stab
reinigen.
Danach das Gelenk ( 20 ) zuerst an der
Einsteckstelle des Saugrohrs überprüfen, dann
durch die Klappe (38 ) auf der
Geräteunterseite. Stellen Sie sicher, daß sich
zwischen der Klappe und der Einsteckstelle im
Gelenk keine Verstopfung befindet.
Other manuals for Automatic X5
1
Other Sebo Vacuum Cleaner manuals

Sebo
Sebo 370 comfort User manual

Sebo
Sebo duo User manual

Sebo
Sebo automatic X Series User manual

Sebo
Sebo AIRBELT C2.1 User manual

Sebo
Sebo Vacuum Cleaner User manual

Sebo
Sebo FELIX User manual

Sebo
Sebo essential G-Series Instruction manual

Sebo
Sebo airbelt K1 Owner's manual

Sebo
Sebo Airbelt K3 User manual

Sebo
Sebo FELIX User manual


