Seenergy SVD-832 User manual

SVD832 User’s Manual
1
Version 1.0.0
SVD-832 Network Video Decoder
User’s Manual
32CH Full HD Network Video Decoder
with Dual Display
05262014

2
SVD832 User’s Manual
Table of Contents
Hardware ................................................................................. 4
Overview ........................................................................................ 4
LED & Buttons Definitions .............................................................. 5
Connect to the NVD .................................................................. 6
Use Search Utility .......................................................................... 6
Access the NVD with its default IP address .................................. 11
Main/Live View ...................................................................... 13
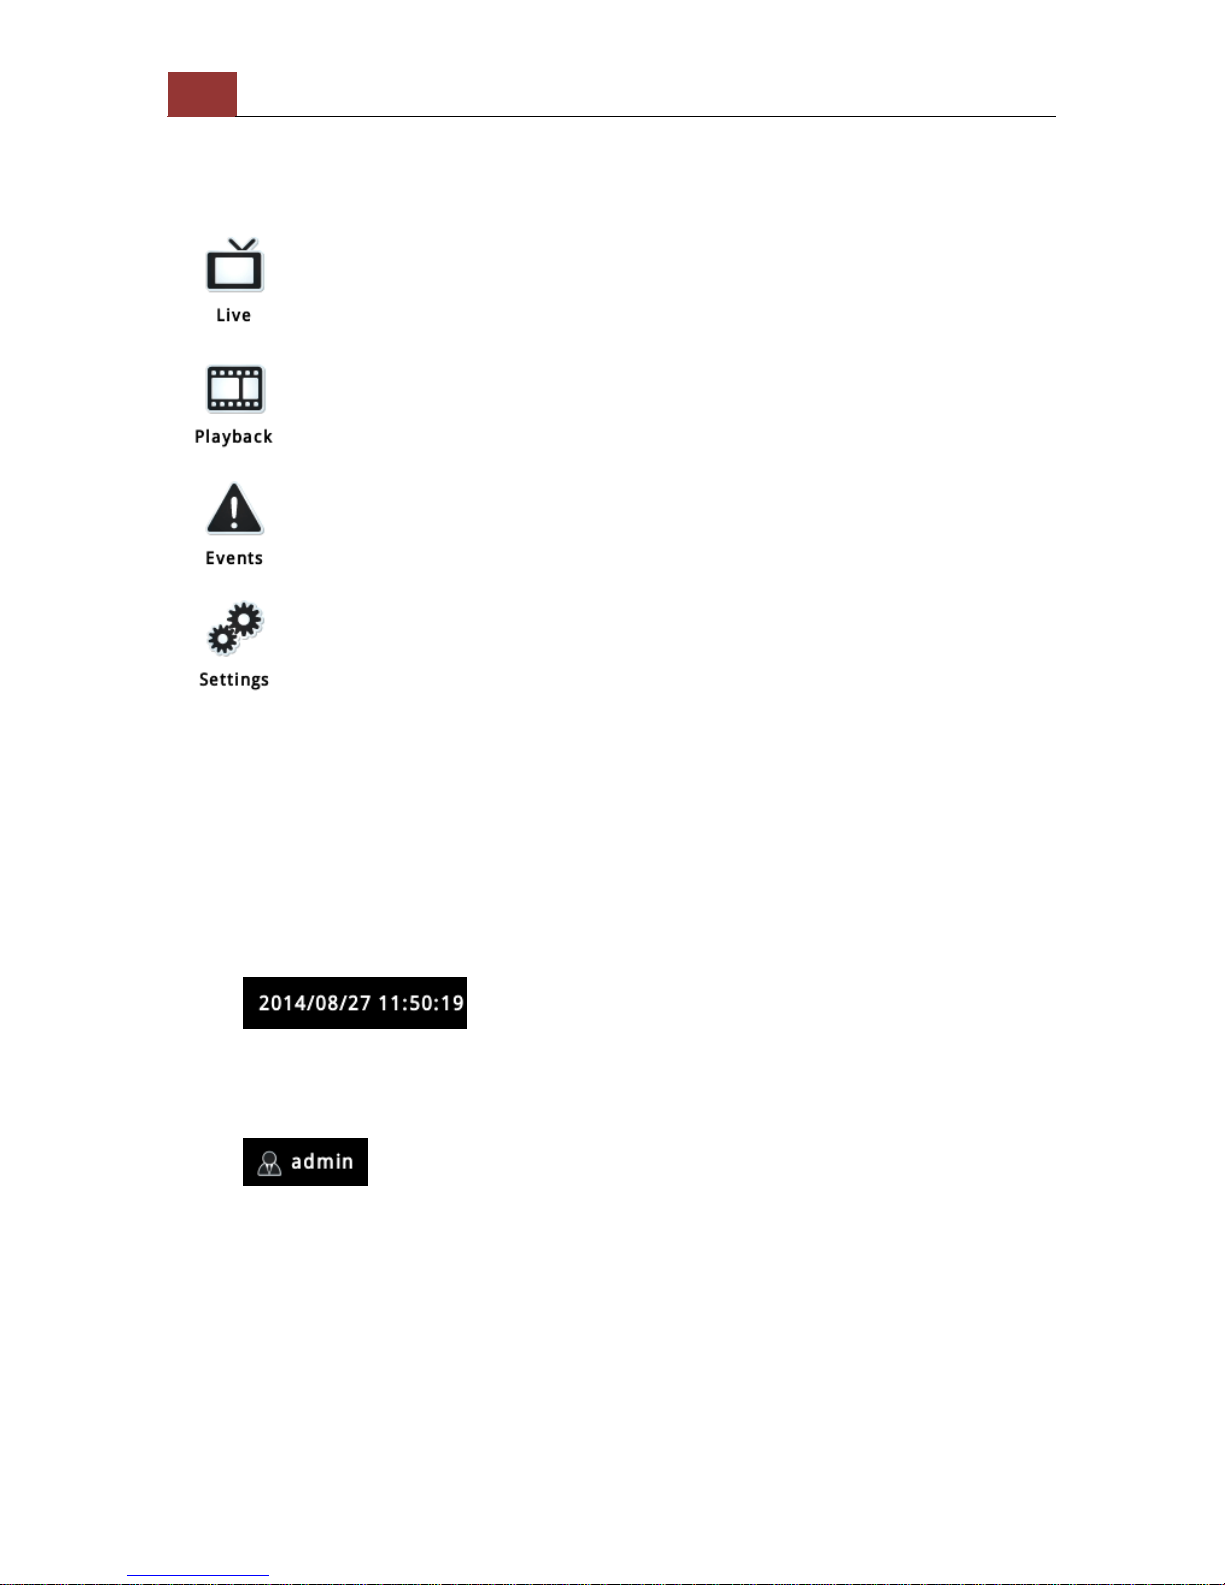
a.The UI’s 5 main functions:......................................................... 14
b. Date and Time display .............................................................. 14
c. User’s configuration.................................................................. 14
d. Hardware events notification ................................................... 15
e. Channels status ........................................................................ 15
f. Video frame............................................................................... 15
g. List view ................................................................................... 17
h.1, 4, 9, 16 Pattern view ............................................................. 18
i. Sequence view........................................................................... 18
j. Save view .................................................................................. 18
k. Saved view ............................................................................... 18
l. Digital zoom .............................................................................. 20
Playback view ........................................................................ 22
a. Zoom on a range of time ........................................................ 24
b. Minimize the bar of the playback............................................ 24
c. Certain functions you can perform to the playback video......... 24
d. Take a snapshot of a playback video ........................................ 25
Event view.............................................................................. 29
NVD Setup –Settings ............................................................. 31
Display ......................................................................................... 31
Network Settings.......................................................................... 32
Time and Date .............................................................................. 34
Users & privileges ........................................................................ 36
Add a new user ............................................................................36
Change the password of the “admin” account ...................................37
Group Privilege ............................................................................37
Camera ......................................................................................... 39
Automatic Search .........................................................................39
Add a camera manually.................................................................44
Preset Point Setting ..................................................................... 45
PTZ Preset Settings ......................................................................45
PTZ Preset Sequence ....................................................................46
OSD Settings ................................................................................ 47
Event sources & notifications ....................................................... 49
Event sources ..............................................................................50
Notifications ................................................................................50

SVD832 User’s Manual
3
Device Info ................................................................................... 52
Log ............................................................................................... 53
Maintenance ................................................................................. 54
Firmware Upgrade........................................................................54
Backup & Restore ......................................................................... 56
Video Wall Mode..................................................................... 57
NVR Media Player ................................................................... 58
Play the backup file with the NVR Media Player............................ 58
Open Event Snapshot images with NVR Media Player ................... 63

4
SVD832 User’s Manual
Hardware
Overview

SVD832 User’s Manual
5
LED & Buttons Definitions
LEDs Status Definitions
Network Green Solid green for activity on a 10/100Mbps network
Amber Solid amber for activity on a 1Gbps network
Status Green
*Shows solid green for normal operation
*Blinking green when firmware upgrade is done
Red Blinking red for failed firmware upgrade through USB disk
Amber Blinking amber during firmware upgrade
Power Green
*Solid green - Normal operation
*Slow blinking in green after press and hold the reset button for 5 seconds indicates the device will enter
the restore default process. Other LEDs remain unchanged during this state.
Red System off (power cord remains plugged in)
Amber
*Fast blinking in amber during system initializing/starting. Continous blinking when system is unable to
start properly (All other LEDs should be off when this LED is blinking in amber)
* Slow blinking indicating the system is shutting down. Other LEDs go off according the stage of the
process.
Alarm Red Blinking in red when a system/camera event occurs. Blinking should last 10 seconds for each event
None Goes off if reaches the 10-second duration, or when buzzer stop button is pressed (if buzzer is triggered)
Buttons
Power btn ON Press and hold for 2 seconds
OFF Press and hold for 2 seconds
Reset Restore default Press and hold for 5 seconds
Restart Press and hold for 2 seconds
Buzzer stop STOP Press and release should stop buzzer right away
Buzzer
Beep Complete start Beep once (indicating the system is fully started)
Initiating restart Beep once (Indicating the restart process has begun)
Initiating shutdown Beep once (Indicating users to release the Power button as the shutdown process has begun)

6
SVD832 User’s Manual
Connect to the NVD
There are various ways you can connect to the NVD and below are the
suggested methods for different network setup:
•The NVD is placed in a network with a DHCP server: Connect to
the NVD by using “ Search” Utility
•The NVD is placed in a network without DHCP server (or you are
connecting to it directly): Access the NVD with its default IP
Use Search Utility
If the NVD is placed in a corporate network or a local area network
where a DHCP server is already presented, run the “Search” utility
from a computer that is on the same network and locate the NVD with
its IP address that is assigned by the top-level DHCP server.

SVD832 User’s Manual
7
To begin, launch the “Search” utility from the CD and proceed with the
installation:

8
SVD832 User’s Manual
Once the installation is complete, check the “Launch the Search AP”
option and click “Finish”.
The search should start automatically and its status should be dis-
played.

SVD832 User’s Manual
9
The NVD should be located and its IP address should be displayed.
Double-click on an NVD and the search program should automatically
access the NVD’s web administration page from your default browser.

10
SVD832 User’s Manual
You should be prompted for the NVD’s username and password. Enter
its default username “admin” and password “admin” and then
click ”OK” to enter the system
Please make sure you are using Internet Explorer 8 or above
If you are running Windows Vista or 7, please make sure you are
running Internet Explorer with the “administrator” privilege.

SVD832 User’s Manual
11
Access the NVD with its default IP address
The NVD comes with a pre-configured static IP “192.168.101.50”.
However, it is only used when there is no DHCP server presented in
the network. To connect to the NVD, use a PC that is on the same
network over a switch or hub, or connect the PC directly to the NVD
using a crossover CAT5 Ethernet cable.
The PC that is connected directly to the NVD (or within the same local
area network) should receive an IP from the NVD. Simply access the
NVD from your web browser with its IP address

12
SVD832 User’s Manual
Again, you should be prompted for the username and password. Enter
its default username “admin” and password “admin” and then
click ”Login” to enter the system
Besides using web browser, you use local UI to operate NVD, click
to display virtual keyboard to enter user name and password.

SVD832 User’s Manual
13
Main/Live View
The main/live view is the first interface displayed once you access to
the NVD through the internet browser.
It displays the live video of all the cameras added to the NVD and
following the pattern chosen by the user. The interface has many
functions explained bellow.
The “Live View” page provides the following functions:
•Retrieve camera’s video stream
•Retrieve camera’s status
•Perform Live Sequence Viewing
•PTZ Control (Click directly on the video)
•Perform PTZ Preset Sequence viewing
•Perform manual recording
•Take snapshot - as soon as a snapshot selection is made, the
snapshots are automatically saved to x:\SnapshotFolder ("x"
represents the partition where Windows is installed, e.g: C:\)
•Receive audio of a video stream
•Send audio
•Control “Buzzer”
•Change web UI display language
14
SVD832 User’s Manual
a.The UI’s 5 main functions:
The bar displays the 4 main functions of the Web User Interface (UI).
The Live view is the main view .The other 3 views will be explained in
each chapter.
b. Date and Time display
The Date and the Time are defined by the user in the settings
section of the NVR.
c. User’s configuration
It displays the name of the current user.
If you click on the name of the user, the context menu offers the
functions bellow:
-Language settings
-User setting
-Locking the screen
-Logout function

SVD832 User’s Manual
15
d. Hardware events notification
In this section, you will receive notifications if a warning sound is
triggered or if the hard drive of the NVR failed in recording data.
e. Channels status
If you click on the icon, page tab will display the current status of
the channels added to the NVR.
It can also display the current configuration used for the event
recording or the configuration settled for the scheduled and manual
recording.
The channels status page is updated as long as the NVR’s main
user interface is open.
f. Video frame
All the camera’s videos are displayed in this frame.
-The PTZ function is available by clicking of the left button of the
mouse on the camera’s view.
-Double click on the left button of the mouse enables the zoom
function. To disable it you can click on the right button of the
mouse.
If the cursor is pointing on one of the cameras, it will show a bar
in the top.
The bar displays the channel’s number and some functions as
showed on the snapshot above.
Click to display a function manual to control camera

16
SVD832 User’s Manual
Main function: Digital PTZ, snapshot, and audio post
Lens controls: control PTZ

SVD832 User’s Manual
17
Change channel: switch channel to display on this video frame
g. List view
It displays the list of channels added to the NVR. Each channel
represents a camera with its name, the channel number and its
currents status.
The channel’s status is defined by 3 colors:
-Red: The channel is recording and the live view is available
-Blue: The channel is connected and live view is available
-Grey: The camera is disconnected

18
SVD832 User’s Manual
h.1, 4, 9, 16 Pattern view
Different patterns of live view can be displayed on the video frame.
You can display 1, 4, 9, or 16 cameras at once.
Every time you click on an “ n” pattern icon, the live video of the next
“n” cameras will be displayed.
i. Sequence view
The sequence mode will automatically switch between a single or
group of cameras every a certain period of time. You can define this
period to 1 second to 60 seconds
j. Save view
Click on the save view button and you will able to name the current
view and save it.
This will help to quickly display your configured views when needed.
k. Saved view

SVD832 User’s Manual
19
This section can display the views that you have already saved.
You can choose the views from the list you have created. You are
also able to switch between saved views every certain period of
time by clicking on the “start sequence function”.
If you check the box beside the name of the view, you can edit or
delete the view.

20
SVD832 User’s Manual
l. Digital zoom
Next, hold the mouse left button and draw a square on the video to
specify the zoom in area
Table of contents
Other Seenergy Network Hardware manuals

Seenergy
Seenergy SVR-104 User manual

Seenergy
Seenergy SVR-204 User manual

Seenergy
Seenergy NVR-304 Basic User manual

Seenergy
Seenergy SVR-116 Plus User manual

Seenergy
Seenergy SVR-632/664 User manual

Seenergy
Seenergy SVR-816 User manual

Seenergy
Seenergy SVR-104 User manual

Seenergy
Seenergy SVR-504 User manual

Seenergy
Seenergy SVR-304 Basic User manual

Seenergy
Seenergy SVR-816 User manual


Popular Network Hardware manuals by other brands


Avermedia
Avermedia Hybrid AirExpress Quick installation guide

USAVision
USAVision UA-SNVR Series quick start guide

Ericsson
Ericsson E1 quick start guide

Huawei
Huawei RRU3908 V1 installation guide

LG
LG N2B1DD1 - NAS Server Guía de usuario y manual de la instrucción

GeoVision
GeoVision GV-SNVR3203 user manual


