Sencor SCF 4740WH Repair manual

EN SMART WI-FI GLASS
CONVECTION HEATER
Translation of the original manual
SCF 4740WH / SCF 4741BK
SCF 4742RD

SCF 4740WH / SCF 4741BK
SCF 4742RD
Tento výrobek je vhodný pouze pro dobře izolované prostory nebo občasné používání.
Informace týkající se elektrických lokálních topidel dle požadavků nařízení komis EU 2015/1188 jsou uvedeny v příloze tohoto návodu.

B
10 987
6
5
4
3
2
1
C
A
1
2
3
4
6
7
8
9
5
D1
D2
522
D3
100 mm
6 mm
D4

- 1 - 03/2022
2022,
EN Smart Wi-Fi glass convection heater
Important safety instructions
READ CAREFULLY AND STORE FOR FUTURE USE.
• This appliance may be used by children 8 years of age
and older and by persons with physical, sensory or mental
impairments or by inexperienced persons, if they are
properly supervised or have been informed about how to
use the appliance in asafe manner and understand the
potential dangers.
• Children must not play with the appliance. Cleaning
and maintenance performed by the user must not be
performed by unsupervised children.
• In the event that the power cable is damaged, have it
repaired at aprofessional service centre to prevent causing
adangerous situation. It is forbidden to use the appliance if
it has adamaged power cable.
WARNING:
Do not cover. To prevent overheating, do not cover
the convection heater.
• This appliance must not be located directly underneath
apower socket.

- 2 - 03/2022
2022,
WARNING:
The appliance must not be used if the glass panel is
damaged.
• Do not use this appliance in the direct vicinity of abath,
shower or swimming pool.
• Children younger than 3 years of age should be prevented
from accessing the appliance unless they are under constant
supervision.
• Children from 3 to 8 years of age must only turn this
appliance on/off under the condition that it is located or
installed in its intended normal operating position and that
they are under supervision or were informed about the safe
operation of the appliance and understand the potential
hazards. Children from 3 to 8 years of age must not insert
the plug into the power socket, regulate or clean the
appliance or carry out maintenance performed by the user.
ATTENTION – Certain parts of this product may
become very hot and cause burns. Special attention
should be paid when children and handicapped
people are present.
• Do not use the appliance if it has fallen down.
• Do not use the appliance if it shows visible signs of
damage.
• Use the appliance on ahorizontal and stable surface,
or mounted on awall if this is recommended by the
manufacturer. When installing the appliance, follow the
instructions in this user'smanual precisely. For awall-

- 3 - 03/2022
2022,
mounted installation of the appliance, only use the
supplied screws, or screw recommended and approved by
the manufacturer.
WARNING:
Do not use this appliance in small rooms if they are
inhabited by persons that are incapable of leaving
this room on their own, unless they are under
permanent supervision.
WARNING:
To limit the risk of afire, keep textiles, curtains and
any other flammable material at adistance of at
least 1 m from the air outlet.
• This appliance is designed for household use only.
• This appliance is not intended for outdoor use or for commercial purposes such as, for example use at aconstruction site.
• Before connecting the appliance to apower socket, check that the nominal voltage on its rating label matches the voltage in the power socket to
which you wish to connect it.
• Connect the appliance only to aproperly grounded socket. Do not connect it to an extension cord or two way adapter.
• Do not handle the appliance or its power cord when you have wet hands.
• Do not use this appliance in abathroom, laundry or in rooms with an elevated level of humidity, or place it in such locations, where there is arisk of
water being poured on it or where it could come into contact with sprayed water.
• Do not locate the appliance in the vicinity of an open fire.
• Do not use the appliance in rooms with high dustiness or in locations where explosive or flammable substances are used or stored, e.g. petrol,
paints, aerosols, etc., or where explosive or toxic fumes could be present, or in industrial surroundings.
• Do not place the appliance on inclining or unstable surfaces such as carpets with very long and thick fibres, couches, etc. Only place the appliance
on ahorizontal, dry, clean, smooth and stable surface.
• Do not place any objects into the openings of the appliance. This could lead to an electrical short circuit, fire or damage to the appliance.
• During operation there needs to be sufficient free space around the appliance. Leave at least 1 m of free space in front of the appliance, and leave at
least 0.5 m free space on its sides.
• We do not recommend using this appliance in aroom measuring less than 6 m2.
• This appliance must not be used with aprogramming device, timer switch, aremote control system or any other device which switches the
appliance on automatically, because there is adanger of afire if the appliance is covered or incorrectly located.
• Pay increased attention and supervision when the appliance is used in the vicinity of animals.
• The appliance must not be left without supervision when it is in operation. Do not leave the appliance in operation when feeling sleepy or during
sleep.
• Do not use the appliance for drying clothing.
• To turn off the appliance, use the On/Off button, then set the main switch to the OFF position. Then disconnect the power cord from the power
socket.
• Always turn off the appliance and disconnect it from the power socket when not using it, when leaving it without supervision, before moving or
cleaning it and before performing maintenance. Do not move the appliance during operation. Allow the appliance to cool down before moving it,
cleaning it or before carrying out maintenance.
• Keep the appliance clean. Clean it according to the instructions in chapter Cleaning and maintenance. Do not perform any maintenance on the
appliance apart from the cleaning procedure described in chapter Cleaning and maintenance.
• To prevent potential injury by electrical shock, do not submerge this appliance or its power cord in water or in any other liquid.
• Locate the power cord in such away that it cannot be tripped over, that it is not in contact with ahot surface or sharp objects. Do not locate it under
acarpet, carpet runner, etc.
• Disconnect the appliance from the power socket by gently pulling the plug of the power cord, and not the power cord itself. Otherwise, this could
damage the power cord or the socket.
• Do not use the appliance when it is not functioning correctly or after it has fallen on the floor, been submerged in water or is damaged in any other
way. Hand it over to an authorised service centre for inspection or repair.
• Never repair the appliance yourself or make any adjustments to it. To prevent adangerous situation from arising, have all repairs performed at an
authorised service centre. By tampering with the appliance, you risk voiding your legal rights arising from unsatisfactory performance or quality
warranty.
• The manufacturer is not responsible for any damages caused by the incorrect use of this appliance.

- 4 - 03/2022
2022,
• Thank you for purchasing aSENCOR brand product and we hope that
you will be happy with it.
• Prior to using this appliance, please read the user'smanual
thoroughly, even in cases, when one has already familiarised
themselves with previous use of similar types of appliances. Only use
the appliance in the manner described in this user’smanual. Keep
this user'smanual in asafe place where it can be easily retrieved for
future use.
• We recommend saving the original cardboard box, packaging
material, purchase receipt and responsibility statement of the vendor
or warranty card for at least the duration of the legal liability for
unsatisfactory performance or quality. In the event of transportation,
we recommend that you pack the appliance in the original box from
the manufacturer.
. . . . . . . . . . . . . . . . . . . . . . . . . . . . . . . . . . . . . . . . . . . . . . . . . . . . . . . . . . . . . . . . . . . .
DESCRIPTION OF THE APPLIANCE
A1 Control panel
A2 Front glass panel
A3 Feet
A4 Main power switch
A5 Temperature sensor
A6 Outflow vents
A7 Wall mounting hooks
A8 Inflow vents
A9 Power cord
A10 Wall mounting set
(not shown)
. . . . . . . . . . . . . . . . . . . . . . . . . . . . . . . . . . . . . . . . . . . . . . . . . . . . . . . . . . . . . . . . . . . .
DESCRIPTION OF THE CONTROL PANEL
B1 Numerical display
B2 : Wi-Fi icon
B3 : High convection heater
power icon
B4 : Heating element On icon
B5 : Low convection heater
power icon
B6 : Timer icon
B7 Button -serves to turn the
convection heater on / toggle
to stand-by mode
B8 Button - serves to set the
temperature andthe timer
B9 Button - serves to set the
temperature andthe timer
B10 Button - serves to select
the convection heater function
. . . . . . . . . . . . . . . . . . . . . . . . . . . . . . . . . . . . . . . . . . . . . . . . . . . . . . . . . . . . . . . . . . . .
BEFORE FIRST USE
• Before first use, take the appliance and its accessories out of the
packaging material and remove all promotional labels and stickers.
Check that neither the appliance nor any of its parts is damaged.
. . . . . . . . . . . . . . . . . . . . . . . . . . . . . . . . . . . . . . . . . . . . . . . . . . . . . . . . . . . . . . . . . . . .
INSTALLATION
• The convection heater may be used as aportable heat source
(necessary to install the feet) or it may be mounted on awall (the feet
must be removed).
Warning:
Before any type of installation, always make sure that
the power plug is disconnected from the power socket
Installing the feet
• Put ablanket or another soft underlay on the floor. Then place the
convection heater upside down on to this blanket.
• On the underside of the convection heater there are three prepared
holes on either side. Align these holes with the holes in the feet and,
using the supplied self-tapping screws, screw them to the underside
of the convection heater – see figure C. Tighten securely. Ensure that
the feet are properly mounted on to the convection heater and are not
moving. Turn the convection heater over and place it on the ground.
Wall mounted installation
• Before mounting the convection heater on awall, it is important that
you check that the installation location has no wires, conduits, pipes,
etc. in the wall.
• Prior to installation, also check that the installation location is at
asufficient distance from the power socket.
• The convection heater must be installed at least 10 cm above the
ground and 1 m from the ceiling, and there must be aclearance
of 10cm on all sides – see figure D1. The convection heater must
always be installed horizontally. Any electrical installations must be
performed by aqualified electrician. The convection heater must not
be installed behind doors or in an outdoor environment.
Warning:
Only use the supplied set of screws and dowels for
the installation. Under no condition should dowels
and screws be used that have adifferent diameter,
different specifications and which are not approved by
the manufacturer as suitable for the installation of this
type of product.
• Drill two holes into the wall at adistance of 522 mm from each other
– see figure D2.
• Insert aplastic dowel into each of the drilled holes. Using
ascrewdriver, secure the screws and leave their heads protruding out
approximately 6 mm.
• Put the convection heater on to the wall by sliding the screw heads
into the centre of the holes on the hanging hooks – see figure D3.
Then slide the convection heater to the right by approx. 1 cm and then
downwards by about 5 mm – see figure D4.
Note:
When taking it down, first lift it up by approx. 5 mm and
then slide it by 1 cm to the left in order to get to the middle
of the hole.
. . . . . . . . . . . . . . . . . . . . . . . . . . . . . . . . . . . . . . . . . . . . . . . . . . . . . . . . . . . . . . . . . . . .
USING THE CONVECTION HEATER
Turning on / off
• Prior to first use, check that the voltage in your power socket
corresponds to the voltage on the rating label.
• Insert the power plug into apower socket.
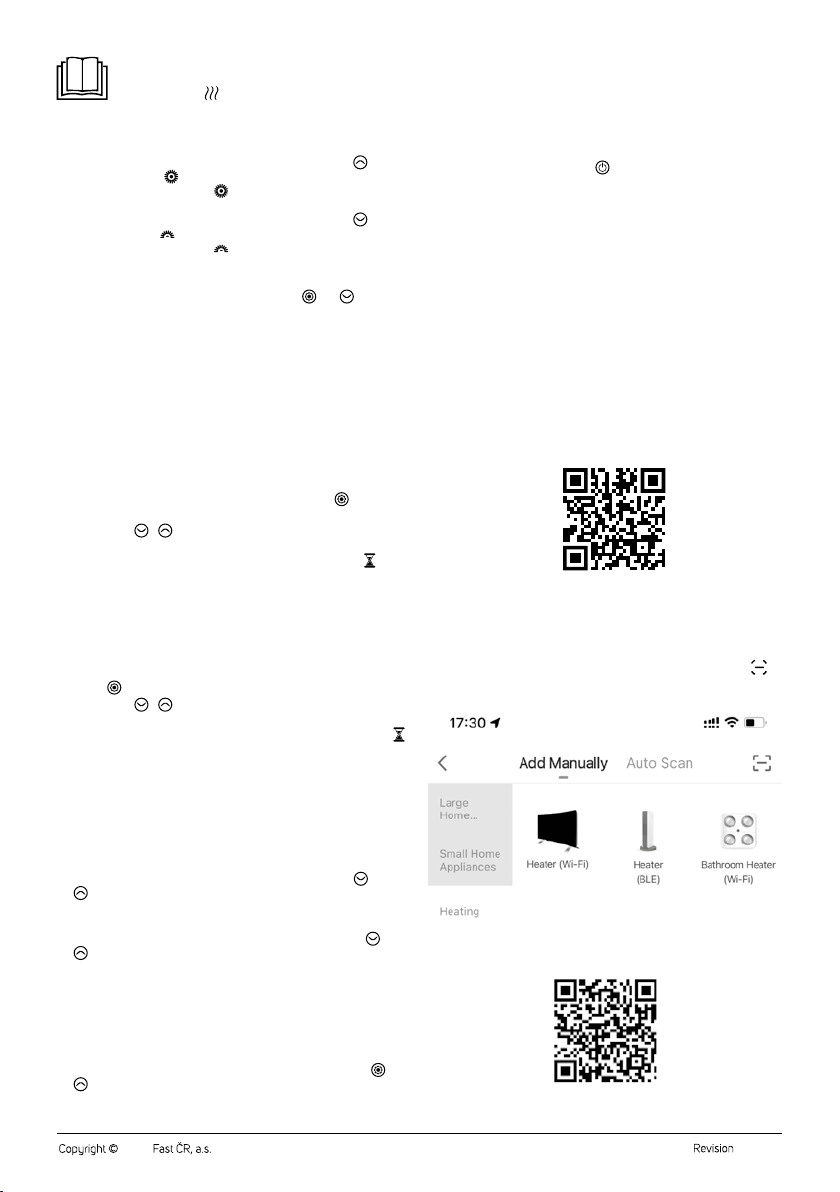
• Set the main power switch to position I(On). The convection heater
will switch to the stand-by mode and buttons , , and
will be lit.
• Press button to turn on the convection heater, and the display will
show the current room temperature.
• When you have finished using it, press button and the convection
heater will switch to the stand-by mode. To completely turn it off, set
the main power switch to position 0 (Off) and disconnect the power
plug from the power socket.
Note:
Upon first use or after it has not been used for an extended
period of time, aslight odour may be sensed or asmall
amount of smoke may be emitted from the convection
heater. This is completely normal and will quickly
disappear.
Setting the temperature
• Press button once. The numerical display will start flashing. Use
buttons / to set the desired temperature. Your settings are
saved when the temperature digits stop flashing.
• You can set the temperature in the range from 5 to 45°C.
• The heating element of the convection heater will start operating, the
display will show the current temperature and icon will be lit.
EN Smart Wi-Fi glass convection heater
User'smanual

- 5 - 03/2022
2022,
Note:
Note:
During use, icon will turn on and off depending on when
the heating element of the convection heater is turned on or
off. This is normal.
Setting the heating power of the convection heater
1. While the convection heater is in operation, press button to set
high power (icon will be lit), or to turn off the heating element of
the convection heater (icon will turn off but the convection heater
will continue to run).
2. While the convection heater is in operation, press button to set
low power (icon will be lit), or to turn off the heating element of
the convection heater (icon will turn off but the convection heater
will continue to run).
ECO functions
• At the same time, press and hold down buttons and for approx.
3 seconds to activate the ECO function. The display backlight will dim
and based on the performed settings certain icons will turn off.
• The ECO function is suitable when using the convection heater at
night. It provides greater sleep comfort as it does not disturb you with
the display light.
Setting the timer
The convection heater enables two timers to be set:
– the heating element automatically shuts off after the set time has
elapsed; and
– the heating element automatically turns on after the set time has
elapsed.
1. Automatic shut off
• While the convection heater is turned on, press button twice. The
numerical display will start flashing.
• Use buttons / to set the time after which the heating element
will turn off. Your settings are saved when the numerical digits stop
flashing. The display will show the current temperature, icon will be
lit and the countdown will start.
• The duration of the timer can be set in the range from 0 h to 24 h.
• When the set time has elapsed, the heating element of the convection
heater will automatically shut off and the convection heater will stop
heating.
2. Automatic start
• While the heating element of the convection heater is turned off, press
button twice. The numerical display will start flashing.
• Use buttons / to set the time after which the heating element
will turn itself on in high power mode. Your settings are saved when
the numerical digits stop flashing. The display will turn off, but icon
will remain lit. The countdown will start.
• The duration of the timer can be set in the range from 0 h to 24 h.
• When the set time has elapsed, the heating element of the convection
heater will automatically turn on and the convection heater will start
heating in the high power mode.
Child safety lock
• The child safety lock function enables the control panel to be locked
and prevents accidental changes to your settings.
• To activate the lock function, press and hold down buttons and
for approximately 3 seconds. The control panel will be locked and
all the control buttons will be disabled. After approx. 5 seconds the
display will show the temperature.
• To deactivate the lock function, press and hold down buttons and
for approximately 3 seconds.
Dimming the display
• While the convection heater is running, the backlit display will
automatically turn off after several minutes of inactivity. If the control
panel located underneath the numerical display is touched, the
backlight of the display will again be activated.
Toggling the temperature units
• To toggle the units from °C to °F, press and hold down buttons and
for approximately 10 seconds. To toggle the units back to °C, press
and hold down these buttons for approximately 10 seconds.
Open window detection
• The convection heater is equipped with asensor that detects and
reports an open window.
• If the temperature falls by 3 °C within 2 minutes, the open window
sensor safety switch is triggered, causing the heating element of
the convection heater to turn off and the convection heater will stop
heating. Error message "E4" will appear on the display. Turn off the
convection heater using button to reset the sensor. Then turn the
convection heater back on again.
Thermal protection
• The appliance is equipped with athermal fuse that automatically turns
it off upon overheating.
• Should such asituation occur, turn the appliance off and disconnect
it from the power socket. Then allow it to cool down for at least 15
minutes.
• Before you put the appliance back into operation, check that its vents
are not blocked.
• If you are unsuccessful putting the appliance back into operation,
please contact an authorised service centre.
. . . . . . . . . . . . . . . . . . . . . . . . . . . . . . . . . . . . . . . . . . . . . . . . . . . . . . . . . . . . . . . . . . . .
CONTROL VIA THE SENCOR HOME APPLICATION
• The convection heater can be controlled via the SENCOR HOME
application.
• Download the application to your smart phone, register yourself and
control the convection heater via the application.
If you already have the application installed, add the convection heater
to your devices.
Adding the convection heater to the device list via aQR code
The convection heater can also be added to the Sencor HOME application
using the QR code provided below. On the home screen of the application,
click on the "+" icon and on the add device screen, click on the icon in
the top right hand corner.
QR code for adding the control panel of the convection heater to the
application
Sencor HOME

- 6 - 03/2022
2022,
Manually adding the convection heater to the device list
1. On the main screen, click on "Add device" or on the "+" in the top
right hand corner.
2. Ascreen with appliance categories will appear together with alist of
appliances.
3. Click on "Heating" and from the list, select "Heating (Wi-Fi)".
4. On the next screen, you will be asked to select aWi-Fi network.
Select anetwork, enter the password and click on "Next".
5. Ensure that the convection heater is ready for pairing. It is important
that the convection heater is connect to apower source and is in
stand-by mode. The Wi-Fi icon will start quickly flashing on
the display. If the icon does not appear, hold down buttons for
3seconds until the Wi-Fi icon appears on the display and starts
to flash quickly.
In the application, confirm that the Wi-Fi icon is quickly flashing and
click on "Next".
5. The convection heater will automatically be added to the device list.
The Wi-Fi icon will be lit on the display.
7. In the device list on the main screen, click on the icon of the
convection heater to enter the convection heater control.
Wi-Fi reset
• While the convection heater is in operation, hold down button for 3
seconds. The Wi-Fi settings will be reset and the Wi-Fi indicator light
will flash quickly (twice per second).
. . . . . . . . . . . . . . . . . . . . . . . . . . . . . . . . . . . . . . . . . . . . . . . . . . . . . . . . . . . . . . . . . . . .
CLEANING AND MAINTENANCE
• Disconnect the power plug from the power socket and allow the
appliance to cool down before cleaning it.
• For cleaning, do not use cleaning products with an abrasive effect,
solvents, etc. that could damage the appliance.
Warning:
To prevent the risk of injury by electrical shock, do not
submerge the appliance, power cord or power plug in
water or any another liquid.
• Keep the appliance in aclean condition. Clean the appliance regularly
to ensure dust does not accumulate inside.
• To clean the outer surface of the of the appliance, use aclean, dry
cloth. To remove dust from the outer surface, you may also use
avacuum cleaner.
Storage
• When not using the appliance for an extended period of time,
disconnect the power plug from the power socket, allow the appliance
to cool down and clean it according to the instructions in chapter
"Cleaning and maintenance".
• Before storing it, check that the appliance is clean and dry.
• Store the appliance in adry, clean and well-ventilated location not
exposed to extreme temperatures and out of children'sreach.
. . . . . . . . . . . . . . . . . . . . . . . . . . . . . . . . . . . . . . . . . . . . . . . . . . . . . . . . . . . . . . . . . . . .
TECHNICAL SPECIFICATIONS
Rated voltage range ..............................................................................220–240 V~
Rated frequency ..........................................................................................50/60 Hz
Rated power input.................................................................. 1,200 W (low power)
.................................................................................................... 2,400 W (high power)
Temperature range ........................................................................................ 5–45 °C
Protection class ...................................................................................................... IP24
Dimensions ..............................................................................865 x 105 x 475 mm
Weight .................................................................................................................. 10.5 kg
We reserve the right to change text and technical specifications.
INSTRUCTIONS AND INFORMATION REGARDING THE DISPOSAL OF
USED PACKAGING MATERIALS
Dispose of used packaging material at asite designated for waste in your
municipality.
DISPOSAL OF USED ELECTRICALAND ELECTRONIC EQUIPMENT
This symbol on products or original documents means that
used electric or electronic products must not be added to
ordinary municipal waste. For proper disposal, renewal and
recycling, hand over these appliances to determined
collection points. Alternatively, in some European Union
states or other European countries you may return your
appliances to the local retailer when buying an equivalent
new appliance. Correct disposal of this product helps save
valuable natural resources and prevents potential negative effects on the
environment and human health, which could result from improper waste
disposal. Ask your local authorities or collection facility for more details. In
accordance with national regulations penalties may be imposed for the
incorrect disposal of this type of waste.
For business entities in European Union states
If you want to dispose of electrical or electronic equipment, ask your
retailer or supplier for the necessary information.
Disposal in other countries outside the European Union.
This symbol is valid in the European Union. If you wish to dispose of this
product, request the necessary information about the correct disposal
method from the local council or from your retailer.
This product meets all the basic requirements of EU
directives related to it.

EN ■Attachment to the user’s manual for the following product:
CZ ■Příloha knávodu kobsluze kníže uvedenému výrobku:
SK ■Príloha knávodu na použitie pre nasledovný prístroj:
HU ■Az alább feltüntetett termék használati útmutatójának a melléklete:
PL ■Aneks do instrukcji obsługi dla poniżej podanego wyrobu:
HR ■Dodatak korisničkom priručniku za dolje opisani proizvod:
GR ■Συνημμένο αρχείο του παρόντος εγχειριδίου χρήσης για το προϊόν
το οποίο περιγράφεται παρακάτω:
EN ■Information requirements for electric local space heaters
CZ ■Požadavky na informace týkající se elektrických lokálních topidel
SK ■Požiadavky na informácie pre elektrické lokálne ohrievače priestoru
HU ■Az elektromos egyedi helyiségfűtő berendezések termékinformációs
követelményei
PL ■Wymogi wzakresie informacji dotyczące elektrycznych miejscowych
ogrzewaczy pomieszczeń
HR ■Zahtjevi za informacije za električne grijalice za lokalno grijanje
prostora
GR ■Απαιτήσεις πληροφόρησης για ηλεκτρικούς τοπικούς θερμαντήρες
χώρου
03/2022
Copyright © 2022, Fast ČR, a.s.
1
EN ▪ Contact details / CZ ▪ Kontaktní údaje /
SK ▪ Kontaktné údaje / HU ▪ Kapcsolatfelvételi adatok /
PL ▪ Dane teleadresowe / HR ▪ Podaci za kontakt /
GR ▪ Στοιχεία επικοινωνίας
FAST ČR, a.s., U Sanitasu 1621, 251 01 Říčany, Czechia
SCF 4740WH / SCF 4741BK / SCF 4742RD

EN ▪ Model identifier: / CZ ▪ Identifikační značka modelu: / SK ▪ Identifikačný (-é) kód (-y) modelu: / HU ▪ Modellazonosító: / PL ▪ Identyfikator(-y)
modelu: / HR ▪ Identifikacijska(-e) oznaka(-e) modela: / GR ▪ Αναγνωριστικό(-ά) μοντέλου:
H
BK
EN ▪ Item / CZ ▪ Údaj / SK ▪ Položka /
HU ▪ Jellemző / PL ▪ Parametr /
HR ▪ Značajka /
GR ▪ Χαρακτηριστικό
EN ▪ Symbol /
CZ ▪ Značka /
SK ▪ Symbol /
HU ▪ Jel /
PL ▪ Oznaczenie /
HR ▪ Simbol /
GR ▪ Σύμβολο
EN ▪ Value /
CZ ▪ Hodnota /
SK ▪ Hodnota /
HU ▪ Érték /
PL ▪ Wartość /
HR ▪ Vrijednost /
GR ▪ Αριθμητική
τιμή
EN ▪ Unit /
CZ ▪ Jednotka /
SK ▪ Jednotka /
HU ▪ Mértékegység /
PL ▪ Jednostka /
HR ▪ Jedinica /
GR ▪ Μονάδα
EN ▪ Item / CZ ▪ Údaj / SK ▪ Položka /
HU ▪ Jellemző / PL ▪ Parametr / HR ▪ Značajka /
GR ▪ Χαρακτηριστικό
EN ▪ Unit /
CZ ▪ Jednotka /
SK ▪ Jednotka /
HU ▪ Mértékegység /
PL ▪ Jednostka /
HR ▪ Jedinica /
GR ▪ Μονάδα
EN ▪ Heat output / CZ ▪ Tepelný výkon / SK ▪ Tepelný výkon / HU ▪ Hőteljesítmény /
PL ▪ Moc cieplna / HR ▪ Toplinska snaga / GR ▪ Θερμική ισχύς
EN ▪ Type of heat output / room temperature control (select one) /
CZ ▪ Typ výdeje tepla / regulace teploty (vyberte jeden) / SK ▪ Druh
ovládania tepelného výkonu / izbovej teploty (vyberte jeden) /
HU ▪ Ateljesítmény, illetve abeltéri hőmérséklet szabályozásának
típusa (egyet kell megjelölni) / PL ▪ Rodzaj mocy cieplnej / regulacja
temperatury wpomieszczeniu (należy wybrać jedną opcję) /
HR ▪ Vrsta izlazne topline / regulacija sobne temperature (odabrati
jednu) / GR ▪ Είδος θερμικής ισχύος / ρυθμιστή θερμοκρασίας
δωματίου (να επιλεχθεί μια δυνατότητα)
EN ▪ Nominal heat output /
CZ ▪ Jmenovitý tepelný výkon /
SK ▪ Menovitý tepelný výkon /
HU ▪ Névleges hőteljesítmény /
PL ▪ Nominalna moc cieplna /
HR ▪ Nazivna toplinska snaga /
GR ▪ Ονομαστική θερμική ισχύς
Pnom 2.4kW
EN ▪ Single stage heat output and no room
temperature control / CZ ▪ Jeden stupeň
tepelného výkonu, bez regulace teploty
vmístnosti / SK ▪ Jednoúrovňový tepelný
výkon bez ovládania izbovej teploty /
HU ▪ Egyetlen állás, beltéri hőmérséklet-
szabályozás nélkül / PL ▪ Jednostopniowa
moc cieplna bez regulacji temperatury
wpomieszczeniu / HR ▪ Jednostupanjska
predaja topline ibez regulacije sobne
temperature / GR ▪ μονοβάθμια θερμική ισχύς
και χωρίς ρυθμιστή θερμοκρασίας δωματίου
no / ne / nie / nem /
nie / ne / όχι
EN ▪ Minimum heat output
(indicative) / CZ ▪ Minimální tepelný
výkon (orientační) / SK ▪ Minimálny
tepelný výkon (orientačne) /
HU ▪ Minimális hőteljesítmény
(indikatív) / PL ▪ Minimalna moc
cieplna (orientacyjna)/
HR ▪ Minimalna toplinska snaga
(referentna) / GR ▪ Ελάχιστη θερμική
ισχύς (ενδεικτική)
Pmin 1.2kW
EN ▪ Two or more manual stages, no room
temperature control / CZ ▪ Dva nebo více
ručních stupňů, bez regulace teploty
vmístnosti / SK ▪ Dve alebo viac manuálnych
úrovní bez ovládania izbovej teploty / HU ▪ Két
vagy több kézi szabályozású állás, beltéri
hőmérséklet-szabályozás nélkül / PL ▪ Co
najmniej dwa ręczne stopnie bez regulacji
temperatury wpomieszczeniu / HR ▪ Dva ili
više ručna stupnja, bez regulacije sobne
temperature / GR ▪ δύο ήπερισσότερες
χειροκίνητες βαθμίδες χωρίς ρυθμιστή
θερμοκρασίας δωματίου
no / ne / nie / nem /
nie / ne / όχι
EN ▪ Maximum continuous heat
output / CZ ▪ Maximální trvalý tepelný
výkon / SK ▪ Maximálny priebežný
tepelný výkon / HU ▪ Maximális
folyamatos hőteljesítmény /
PL ▪ Maksymalna stała moc cieplna /
HR ▪ Maksimalna kontinuirana
toplinska snaga / GR ▪ Μέγιστη
συνεχής θερμική ισχύς
Pmax, c 2.32 kW
EN ▪ With mechanic thermostat room
temperature control / CZ ▪ Smechanickým
termostatem pro regulaci teploty vmístnosti /
SK ▪ Sovládaním izbovej teploty mechanickým
termostatom / HU ▪ Mechanikus termosztátos
beltéri hőmérséklet-szabályozás /
PL ▪ Mechaniczna regulacja temperatury
wpomieszczeniu za pomocą termostatu /
HR ▪ Sregulacijom sobne temperature
mehaničkim termostatom / GR ▪ με μηχανικό
θερμοστατικό ρυθμιστή θερμοκρασίας δωματίου
EN ▪ With electronic room temperature
control / CZ ▪ Selektronickou regulací teploty
vmístnosti / SK ▪ Selektronickým ovládáním
izbovej teploty / HU ▪ Elektronikus beltéri
hőmérséklet-szabályozás / PL ▪ Elektroniczna
regulacja temperatury wpomieszczeniu /
HR ▪ Selektroničkom regulacijom sobne
temperature / GR ▪
με ηλεκτρονικό ρυθμιστή
θερμοκρασίας δωματίου
no / ne / nie / nem /
nie / ne / όχι
EN ▪ Electronic room temperature control
plus day timer / CZ ▪ Selektronickou regulací
teploty vmístnosti adenním programem /
SK ▪ Elektronické ovládanie izbovej teploty
adenný časovač / HU ▪ Elektronikus beltéri
hőmérséklet-szabályozás és napszak
szerinti szabályozás / PL ▪ Elektroniczna
regulacja temperatury wpomieszczeniu ze
sterownikiem dobowym / HR ▪ Elektronička
regulacija sobne temperature idnevni
uklopni sat / GR ▪ με ηλεκτρονικό ρυθμιστή
θερμοκρασίας δωματίου και χρονοδιακόπτη
ημέρας
no / ne / nie / nem /
nie / ne / όχι
EN ▪ Auxiliary electricity consumption / CZ ▪ Spotřeba pomocné elektrické energie /
SK ▪ Vlastná spotreba elektrickej energie / HU ▪ Kiegészítő villamosenergia-fogyasztás /
PL ▪ Zużycie energii elektrycznej na potrzeby własne / HR ▪ Potrošnja pomoćne
električne energije / GR ▪ Βοηθητική κατανάλωση ηλεκτρικής ενέργειας
EN ▪ Electronic room temperature control
plus week timer / CZ ▪ Selektronickou regulací
teploty vmístnosti atýdenním programem /
SK ▪ Elektronické ovládanie izbovej teploty
atýždenný časovač / HU ▪ Elektronikus beltéri
hőmérséklet-szabályozás és heti szabá- lyozás
/ PL ▪ Elektroniczna regulacja temperatury
wpomieszczeniu ze sterownikiem
tygodniowym / HR ▪ Elektronička regulacija
sobne temperature itjedni uklopni sat /
GR ▪ Με ηλεκτρονικό ρυθμιστή θερμοκρασίας
δωματίου και χρονοδιακόπτη εβδομάδας
yes / ano / ano / igen /
tak / da / ναι
EN ▪ At nominal heat output /
CZ ▪ Při jmenovitém tepelném výkonu /
SK ▪ Pri menovitom tepelnom výkone /
HU ▪ Anévleges hőteljesítményen /
PL ▪ Przy nominalnej mocy cieplnej /
HR ▪ Kod nazivne toplinske snage /
GR ▪ Στην ονομαστική θερμική ισχύ
elmax 2.32 kW
EN ▪ Other control options (multiple selections possible) / CZ ▪ Další
možnosti regulace (lze vybrat více možností) / SK ▪ Ďalšie možnosti
ovládania (možnosť viacnásobného výberu) / HU ▪ Más szabályozási
lehetőségek (több is megjelölhető) / PL ▪ Inne opcje regulacji
(można wybrać kilka) / HR ▪ Druge mogućnosti regulacije (moguć
odabir više opcija) / GR ▪ Άλλες δυνατότητες ρύθμισης
(επιτρέπονται πολλές επιλογές)
EN ▪ At minimal heat output /
CZ ▪ Při minimálním tepelném
výkonu / SK ▪ Pri minimálnom
tepelnom výkone / HU ▪ Aminimális
hőteljesítményen / PL ▪ Przy
minimalnej mocy cieplnej /
HR ▪ Kod minimalne toplinske snage /
GR ▪ Στην ελάχιστη θερμική ισχύ
elmin 1.165 kW
EN ▪ Room temperature control, with
presence detection / CZ ▪ Regulace teploty
vmístnosti sdetekcí přítomnosti osob /
SK ▪ Ovládanie izbovej teploty sdetekciou
prítomnosti / HU ▪ Beltéri hőmérséklet-
szabályozás jelenlét-érzékeléssel /
PL ▪ Regulacja temperatury wpomieszczeniu
zwykrywaniem obecności / HR ▪ Regulacija
sobne temperature sprepoznavanjem
prisutnosti / GR ▪ ρυθμιστής θερμοκρασίας
δωματίου με ανιχνευτή παρουσίας
no / ne / nie / nem /
nie / ne / όχι
EN ▪ In standby mode /
CZ ▪ Vpohotovostním režimu /
SK ▪ Vpohotovostnom režime /
HU ▪ Készenléti üzemmódban /
PL ▪ Wtrybie czuwania /
HR ▪ Ustanju pripravnosti /
GR ▪ σε κατάσταση αναμονής
elSB 0,0004 kW
EN ▪ Room temperature control, with open
window detection / CZ ▪ Regulace teploty
vmístnosti sdetekcí otevřeného okna /
SK ▪ Ovládanie izbovej teploty sdetekciou
otvoreného okna / HU ▪ Beltéri hőmérséklet-
szabályozás nyitottablak-érzékeléssel /
PL ▪ Regulacja temperatury wpomieszczeniu
zwykrywaniem otwartego okna /
HR ▪ Regulacija sobne temperature
sprepoznavanjem otvorenog prozora /
GR ▪ ρυθμιστής θερμοκρασίας δωματίου με
ανιχνευτή ανοιχτού παραθύρου
yes / ano / ano / igen /
tak / da / ναι
EN ▪ With distance control option /
CZ ▪ Sdálkovým ovládáním / SK ▪ Smožnosťou
diaľkového ovládania / HU ▪ Távszabályozási
lehetőség / PL ▪ Zregulacją na odległość /
HR ▪ Smogućnošću regulacije na daljinu /
GR ▪ με δυνατότητα ρύθμισης εξ αποστάσεως
yes / ano / ano / igen /
tak / da / ναι
EN ▪ With adaptive start control /
CZ ▪ Sadaptivně řízeným spouštěním /
SK ▪ Sprispôsobivým ovládaním spustenia /
HU ▪ Adaptív bekapcsolásszabályozás /
PL ▪ Zadaptacyjną regulacją startu /
HR ▪ Sprilagodljivim pokretanjem
regulacije /
GR ▪ με ρυθμιστή προσαρμοζόμενης
εκκίνησης
no / ne / nie / nem /
nie / ne / όχι
EN ▪ With working time limitation /
CZ ▪ Somezením doby činnosti /
SK ▪ Sobmedzením času prevádzky /
HU ▪ Működési idő korlátozása /
PL ▪ Zograniczeniem czasu pracy /
HR ▪ Sograničenjem vremena rada /
GR ▪ με περιορισμό διάρκειας λειτουργίας
no / ne / nie / nem /
nie / ne / όχι
EN ▪ With black bulb sensor / CZ ▪ Sčerným
kulovým čidlem / SK ▪ So snímačom
čiernej žiarovky / HU ▪ Feketegömb-
érzékelővel ellátva / PL ▪ Zczujnikiem ciepła
promieniowania / HR ▪ Sosjetnikom scrnom
žaruljom / GR ▪ με αισθητήρα θερμομέτρου
μελανής σφαίρας
yes / ano / ano / igen /
tak / da / ναι
3
2
no / ne / nie / nem / nie
/ ne / όχι
SCF 4740WH
SCF 4741BK
SCF 4742RD

EN ■Attachment to the user’s manual for the following product:
CZ ■Příloha knávodu kobsluze kníže uvedenému výrobku:
SK ■Príloha knávodu na použitie pre nasledovný prístroj:
HU ■Az alább feltüntetett termék használati útmutatójának a melléklete:
PL ■Aneks do instrukcji obsługi dla poniżej podanego wyrobu:
HR ■Dodatak korisničkom priručniku za dolje opisani proizvod:
GR ■Συνημμένο αρχείο του παρόντος εγχειριδίου χρήσης για το προϊόν
το οποίο περιγράφεται παρακάτω:
EN ■Information requirements for electric local space heaters
CZ ■Požadavky na informace týkající se elektrických lokálních topidel
SK ■Požiadavky na informácie pre elektrické lokálne ohrievače priestoru
HU ■Az elektromos egyedi helyiségfűtő berendezések termékinformációs
követelményei
PL ■Wymogi wzakresie informacji dotyczące elektrycznych miejscowych
ogrzewaczy pomieszczeń
HR ■Zahtjevi za informacije za električne grijalice za lokalno grijanje
prostora
GR ■Απαιτήσεις πληροφόρησης για ηλεκτρικούς τοπικούς θερμαντήρες
χώρου
03/2022
Copyright © 2022, Fast ČR, a.s.
1
EN ▪ Contact details / CZ ▪ Kontaktní údaje /
SK ▪ Kontaktné údaje / HU ▪ Kapcsolatfelvételi adatok /
PL ▪ Dane teleadresowe / HR ▪ Podaci za kontakt /
GR ▪ Στοιχεία επικοινωνίας
FAST ČR, a.s., U Sanitasu 1621, 251 01 Říčany, Czechia
SCF 4740WH / SCF 4741BK / SCF 4742RD


FAST ČR, a.s.
U Sanitasu 1621
CZ-251 01 Říčany
www.sencor.eu
This manual suits for next models
2
Table of contents
Other Sencor Heater manuals

Sencor
Sencor SCF 2100WH Repair manual

Sencor
Sencor SFH 7700WH Repair manual

Sencor
Sencor SCF 4200WH Repair manual

Sencor
Sencor SFH 8990BK Repair manual

Sencor
Sencor SFH 7015WH Repair manual

Sencor
Sencor SFH 7017WH User manual

Sencor
Sencor SFH 9013 User manual

Sencor
Sencor SFH 7020WH Operation instructions

Sencor
Sencor SCF 3200WH Repair manual

Sencor
Sencor SOH 2107BK User manual