SEON CHW8PD User manual

CHW8PD Wedge Camera
Installation Guide
© Seon Design Inc. | March 2016 | All rights reserved.
www.seon.com Part Number: 700-1054 R003
Installation Kit Contents
• 1 CHW8PD HD camera, with local video out adaptor cable
• 3 #10 3/4” Phillips screws
• 1 security key
• 1 Installation Guide
• 1 Drilling template
1. Choose Camera Location
1. Determine the location for mounting the camera. Select a flat
location to minimize possible moisture leakage into the vehicle.
Cameras must be installed with the cabling running inside the wall
panels.
2. Use the supplied drilling guide template to mark the cable (7/8”)
and screw (5/32”) holes on the panel.
3. Use a step-bit to drill the cable hole, and regular bits for the screw
holes.
4. Connect the extension cable’s RJ-45 connector to a HX16 POE
HD CAM port.
5. Thread the camera extension cable from the DVR to the camera
location through the panel cable hole.
2. Connect the Camera
1. Connect the camera cable and extension cable RJ45 connectors.
2. Thread the connector caps together.
3. Open the Camera
1. Using the security key supplied with the camera, loosen the
captive screws on the housing.
2. Lift the housing off of the base.
4. Install the Camera
Use the three #10×3/4" mounting screws supplied with the camera to
attach the camera to a wall or ceiling.
The mounting gaskets on the camera base seal the screw and cable
holes when mounted on a flat surface.
5. View Camera Output
1. Power on the DVR and camera.
2. Connect the supplied local video out adaptor cable’s 3.5mm audio
plug to the camera’s Local Video Out socket. See the image in
section 3.
3. Connect the
local video out
cable’s RCA end to a video monitor to
see the camera’s line of view while adjusting the camera’s rotation,
pan, and tilt positions.
INSTALL TIP: Seal the camera mounting holes
For outdoor installations, if a flat surface is not available, carefully seal
the mounting holes under the base of the camera after installation. Do
NOT apply silicone or other sealants around the base of the camera.
INSTALL TIP: Camera PCB and Wiring
While installing the camera, do not impact the printed circuit board or
wiring inside the camera with screws or screwdriver bits.
Damage to the camera can occur.
INSTALL TIP: Allow Camera Ventilation
The camera is designed to vent for proper operation. Do NOT apply
silicone or other sealants around the base of the camera.
Camera housing
Captive housing
screws
Camera lens
Local Video Out
Base
Mounting gaskets
Base
#10x3/4”
mounting
screws
*700-1054*
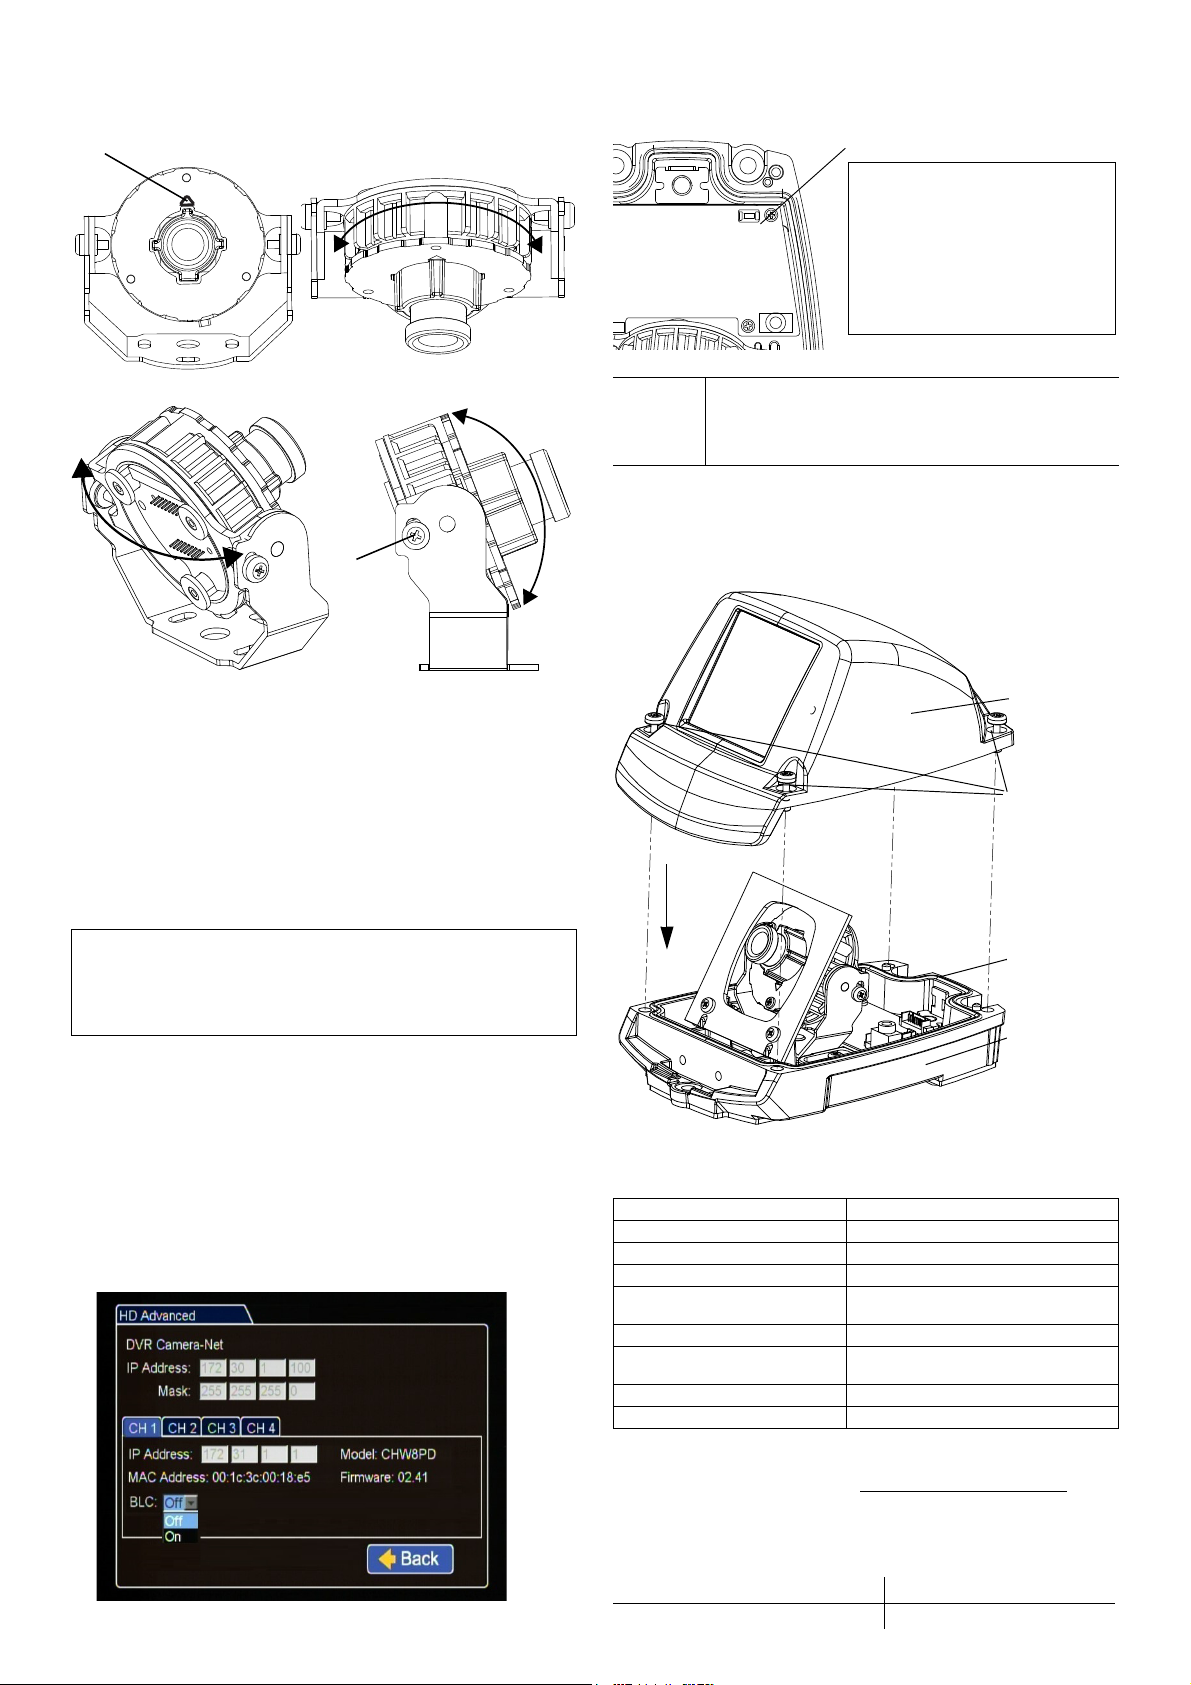
6. Aim the Camera
To get the required video image, adjust the camera‘s rotation, pan, and
tilt settings using the adjustment controls shown below.
1. Rotation: depending on how the camera is mounted, turn the
camera lens until the silver triangle on the lens face is pointed
straight up to ensure the camera shows a level view.
2. Pan: grip the camera pan adjustment U-Bracket sides and twist it
to find the required view.
3. Tilt: loosen the tilt adjustment screws on the U Bracket until the
camera can tilt.
Tighten the tilt screws after adjustments are complete. Do not
adjust tilt after tightening screws.
7. Back Light Compensation
Use these steps if enabling back light compensation is requested.
1. In the HX16 DVR on-screen display, go to Configuration , and go
to Record, Camera, HD Settings, HD Advanced,
2. In the HD Advanced menu, select the channel tab for the
CHW8PD camera.
3. In the BLC drop down menu, select On to enable back light
compensation.
8. Recovery Button Option
If required, use the recovery button to reset the camera to factory
defaults.
9. Replace Camera Housing
1. Fit the housing onto the base as shown.
2. Use the security key to tighten the captive screws.
Specifications
Warranty
For full warranty information, go to www.seon.com/warranty.html.
Information in this guide is subject to change without notice.
Customer Service Contact Information
INSTALL TIP: Do not adjust any other screws
The CHW8PD camera has been factory adjusted for lens position.
Sliding back the gimbal may result in the camera seeing parts of the
housing.
Camera Rotate Adjustment Directions
Silver Rotation Triangle
Camera Pan Adjustment Directions Camera Tilt Adjustment Directions
Tilt
adjustment
screws (2nd
not shown)
Recovery In the event of communication failure between the CHW
camera and the DVR, hold the Recovery button for 10
seconds to return the camera IP address to the factory
setting.
Power Consumption
8 W maximum
Operating Voltage Range
802.3af (powered by the DVR)
Operating Temperature Range
-40 to 122°F (-40 to 50°C)
Resolution
Explorer HX16: 720p, 1080p, 3MP
Enclosure Size, LxWxH
5.16" (131 mm) x 3.45" (88 mm) x 3"
(77 mm)
Enclosure Material
Solid aluminum alloy, powder coated
Window
Impact-resistant polycarbonate,
scratch-resistant, UV protected
Connector Cable Length
15" (39 cm)
Weight
1.2 lbs (545 g)
Toll free telephone 1-877-630-7366 Local telephone 604-941-0880
Recovery Button
SETUP TIP: Let Camera
and DVR Reconnect
After pressing and holding the
Recovery button for 10 seconds,
allow a few minutes for the camera
and DVR to re-establish
communication.
Camera housing
Captive housing
screws
Camera sealing
gasket
Base
(Do not apply
sealant around
base)
Other SEON Security Camera manuals


