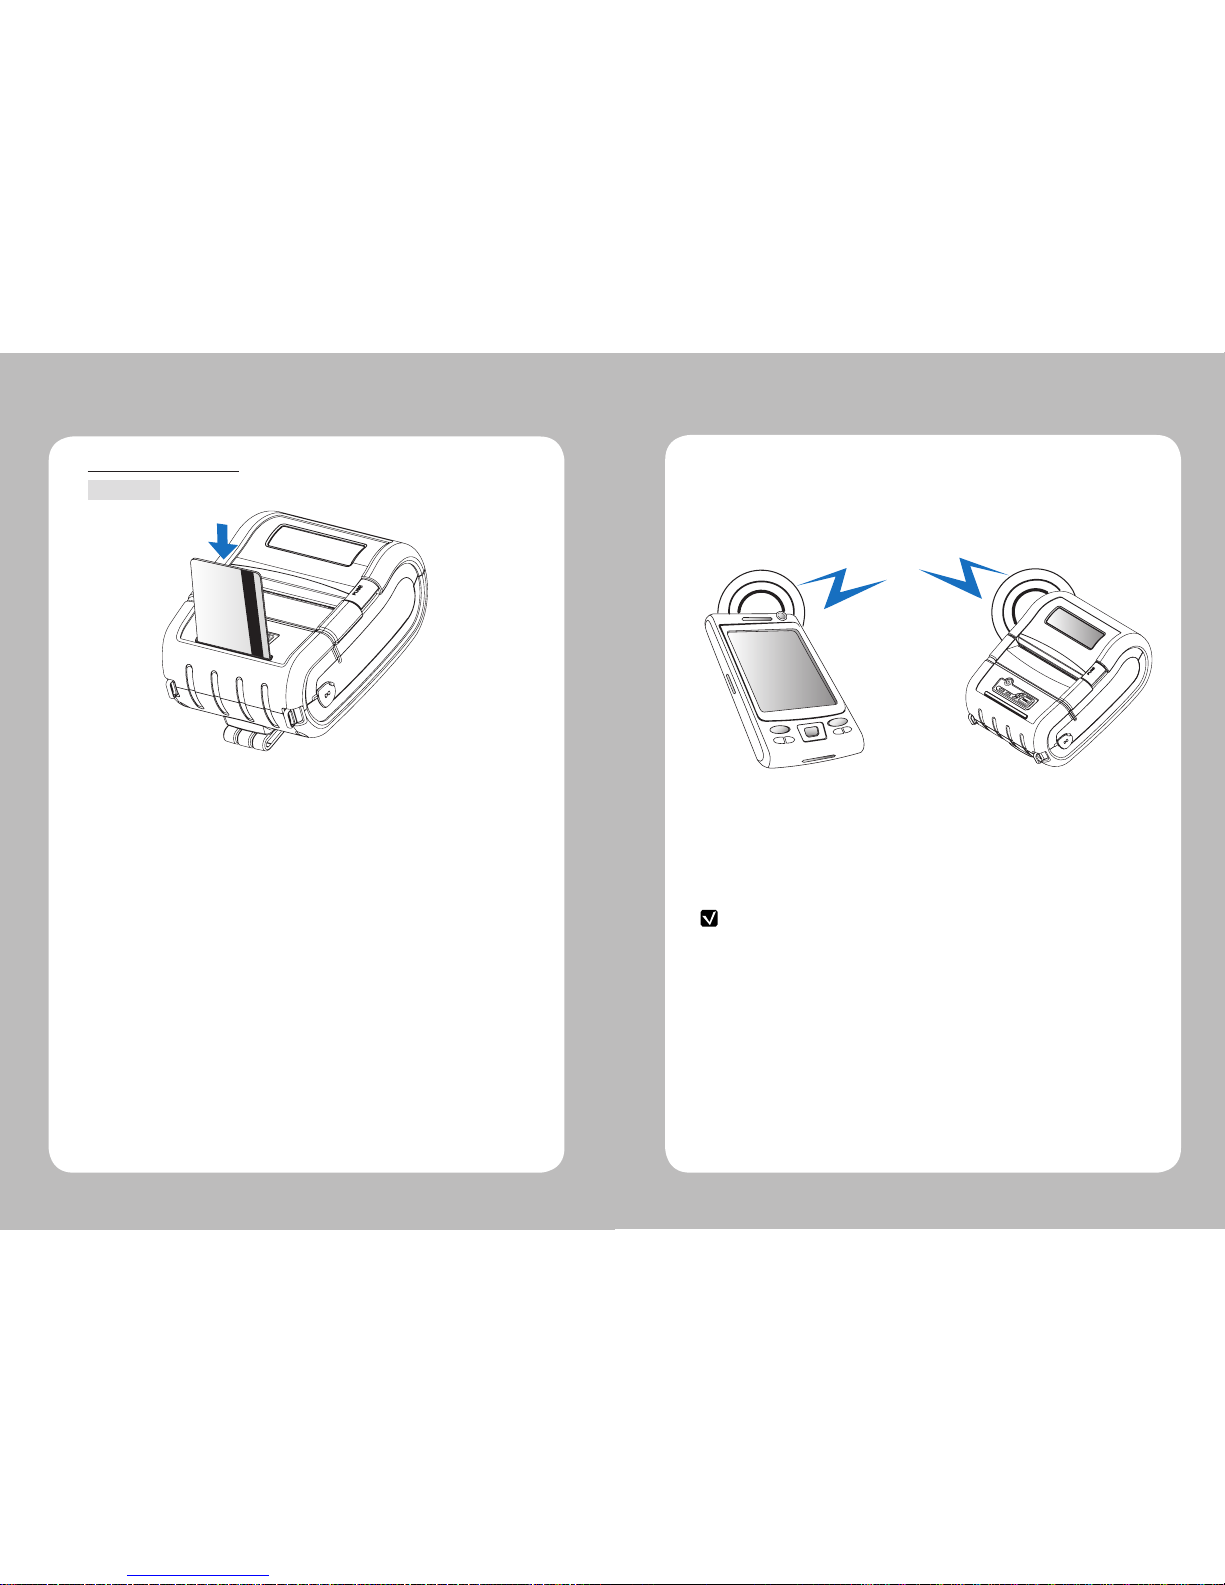
SEWOO LK-P30IIW User manual

All specifications are subject to change without notice
MOBILE PRINTER
MODEL : LK-P30ⅡW
SEWOO TECH CO.,LTD.
374-2, Gajang-dong, Osan-si, Gyeonggi-do, 447-210, Korea
TEL : +82-31-459-8200 FAX : +82-31-459-8880
www.miniprinter.com
P30ⅡW Rev. A 01/16

1

23
Table of Contents
1. Safety Caution
4
2.
Unpacking
6
3. Product overview
7
4. Usage and Installation 8
4-1. Control panel usage
9
4-2. Battery Installation
10
4-3. Battery removal
11
4-4. Battery charging
12
4-5. Battery charger usage (Optional)
13
4-6. Usage of Cigar Jack for charging (Optional)
14
4-7. Belt clip usage
15
4-8. Roll paper installation
16
4-9. Leather case usage (Optional)
17
4-10. Self test
18
4-11. MSR usage (Optional)
19
4-12. IC CARD usage (Optional)
20
5.
Peripherals connection 21
5-1. Wi-Fi(802.11b/g/n) Connection
21
5-2. Interface cable connection
22
6.
Roll media specication 23
7.
Label specication 24
8.
Black Mark 25
9.
Printer cleaning 26
10.
Printer specication 27
10-1. Specication
27
11.
CPCL Command Compatibility 29
12.
Certication 32
13.
Setting up the software 34

45
For higher reliability and safety, consider the following precautionary measures.
Read and follow the instructions carefully before running of the product.
1. Safety Caution
WARNING
Failure to follow these instructions could result in re, electric shock,
or other injuries, or property damage
Indication
Prohibition
(Potential risk of electric shock or re)
(Potential risk of electric shock or re) (Potential risk of electric shock or re)
(Potential risk of electric shock or re)
Must follow
Do not disassemble Unplug the power from the
outlet
Grounding to prevent electric
shock
Do not handle the product
with wet hands
Do not pull or touch the power plug with
wet hands.
Do not bend the wire and do not allow the
wire to be pressed by heavy object.
If a power plug is broken or a plug is cut or
worn, do not use it.
Do not overload the power plug into one
outlet.
WARNING
Failure to follow these instructions could result in re, electric shock,
or other injuries, or property damage
Failure to follow these instructions could result in re, electric shock,
or other injuries, or property damage
(Turn off the power at installation,
transportation, wiring and inspection.)
(You may get hurt and it can be broken
when it falls)
(Potential risk of re or unit malfunction)
(Potential risk of discoloration or
electric shock)
(Potential risk unit malfunction, electric
shock or re. When the product needs
to be repaired, please contact in place
where you ordered.inspection.)
Dealer
Do not pull out the power plug to turn off
the product.
Do not install the product in uneven or
inclined surface.
If the product that needs to be repaired,
please contact in place where you ordered.
Please do not give excessive shock.
Keep product away from the water and
other material.
Do not disassemble, repair or modify the
product.
CAUTION

67
2. Unpacking
Printer Battery
Serial Cable
Roll paper
Belt Buckle
USB Cable Shielded
Charger CD (Manual)
Quick Manual
Battery Holder (Cradle) Leather case
Shoulder strip
Cigar Jack Charger
Optional
Standard
3. Product overview
Paper feed
button
Open Button
Power
switch
Control
Panel
DC Power
Belt clip
hole
Battery
SERIAL
USB
Front
Rear

89
Button
Name
function
Power
button
This button is used to turn the printer on and off.
When the printer is off,press this button for approximately 3 seconds
and it will turn on the power.When you press this button in a state
that the printer is on, the printer will turn off.
Paper
Feed
Button
Paper output can be done manually by pressing this button.
Additionally, self-testing and Hexadecimal Dumping can be
processed..
1. Refer to “4-10”for self test information.
2. Refer to the service manual regarding Hexadecimal Dumping.
Battery
Status
Lamp
1. If the Batt, LED are Lit,the battery is fully charged.
2. If you can hear beeping sound and LED light is turned off, it means
that the battery is at the lowest level.
3. If the battery is not charged at all, the printer turns off
automatically.
Error
Lamp
If the red light is turned on, it means there is no paper roll or the
paper cover is open.
4. Usage and Installation
4-1 Control panel usage
1. Align battery hook as shown in the picture
2. Push the battery into the printer until it locks in place.
NOTE
As the battery is not charged at the time of your purchase, charge the
battery prior to using the printer
(Battery charger or Cradle can be used to charge)
Hook
4-2 Battery Installation
CAUTION
Risk of explosion if battery is replaced by an incorrect type.
Dispose of used batteries according to the instructions

10 11
1
2
180˚
4-3 Battery removal
NOTE
1. Unless the exclusive charger is used provided by the manufacturer, the printer
can be damaged, and the manufacturer is not liable for the consequential damage.
2. Before removing the battery, make sure that power is turned o.
3. Printer does not work in the status of being connected with charger only.
4. The battery should be installed to operate printer.
5. While charging, do not turn on the power.
6. Do not operate the print while charging the battery.
7. Do not connect the charger while the printer is operated.
4-4 Battery charging
1. Be sure that the printer is turned o
2. After open the DC JACK cover, insert DC JACK into the printer.
3. Plug the power code to electrical outlet.
Lamp
4-4-1 The status of lamp in charging
Status charging charging complete
Charging Lamp Red
Green
Rotate the belt clip as shown
Remove the battery as shown

12 13
4-5-1 The status of lamp in charging
Status charging charging complete
Charging Lamp Red
Green
NOTE
In the case the battery is not xed properly in the holder, the red lamp will be
blinking, Then, extract and reinsert the battery.
4-5 Battery charger usage
1. Insert the battery into the battery holder as shown above
2. Connect the DC JACK to the power electrical outlet.
3. Plug the power code into the electrical outlet.
4. Once the charging is completed, remove the battery from the holder.
Optional
Lamp
DC Jack
4-6 Usage of Cigar Jack Charger for charging
Optional
Connect the car cigar JACK charger into the printer or battery holder.
Printer
Battery holder
NOTE
Use the Cigar Jack oered by the manufacturer
.
Input 12 ~ 24V
8.4V 0.8 ~ 1.2A
Output

14 15
1
2
As shown in the picture, tighten the screw with a screw driver.
Insert the belt clip screw into the hole of Belt clip
4-7 Belt Clip usage
1 2
34
Press the PUSH button to open
the paper cover
Pull a short length of paper out of
the printer and close the cover.
Insert the paper in the right
direction
Tear o the additional paper using
tear bar.
4-8 Roll Paper installation

16 17
1 2
34
Open the leather case
Close the Velcro and stick the
cover.
Place the printer into the leather
case
Fasten to the belt by using the clip
at the rear of the leather case
4-9 Leather case usage
Optional
1 2
3
NOTE
Turn o the power pressing the
power button for approximately
3 seconds.
The printout is produced.
While you are pressing the FEED
button, press the power button
4-10 Self Test
1. To print ASCII pattern additionally,
press the Feed button once more
2. After printing ASCII pattern, the
self test will be nished automatically.
3. If the Feed button is not pressed
to print ASCII pattern, self test will be
nished automatically after 30 seconds.

18 19
When the printer is installed initially or
when you face a problem, you can run the
self test and check the information about
-Control Circuit, Mechanism, Print Quality,
ROM Version
After checking with self-test and no issues
are found, you can examine other
devices and software. This function is
working independent of devices and
software.
●
Motor protection from being overheated
The motor should be stopped and cooled
about more than 30 seconds after
continuous printing 1.5 meter
The sample of self test printout
Insert and swipe the card in the direction of the arrow as shown in the
picture.
4-11 MSR usage
Optional

20 21
4-12 IC CARD usage
Insert the card in the direction of the arrow as shown in the picture.
Optional
This product can communicate with other devices via Wi-Fi(802.11b/g/n)
communication and cable.
5-1 Wi-Fi(802.11b/g/n) Connection
5. Peripherals connection
1. The Printer can be connected to devices equipped with Wi-Fi(802.11b/g/n)
communication capacity (PDAs, PCs, etc.)
2. Use the Wi-Fi(802.11b/g/n) connection function supported by the device to
connect to the printer.
NOTE
Refer to the Wi-Fi(802.11b/g/n) Manual for more details on connection.

22 23
Serial
USB
5-2 Interface Cable Connection
1. Connect USB or Serial cable into the cable connector on the printer.
2. Connect the interface cable into the USB or Serial port of the device
(PDA, PC, etc.)
NOTE
Use the cable oered by the manufacturer (USB, Serial)
6. Roll media specification
Core
Diameter(A) 12.5mm +/-0.5mm
Roll
Max.diameter(B) Max. Φ56mm
Media Width (C) 25.5±0.5 mm ~ 79.5±0.5 mm
Thickness 0.06 ~ 0.16mm
Protect the media against sand, grit, and other hard particles during printing
and storage. Keep the cover closed. Even very small foreign particles may cause
severe harm to the delicate printhead.

24 25
7. Label specification 8. Black Mark
25 ~ 80 (MAX PAPER WIDTH)
20 ~ 76 2
1.8 ~ 8.31.8 ~ 8.3
14 ~ 72 (PRINT WIDTH ) 4
30 ~ 300
PAPER FEEDING DIRECTION
25 ~ 80 (MAX PAPER WIDTH)
1.8 ~ 8.3
14 ~ 72 (PRINT WIDTH ) 4
10 ~ 80
1.8 ~ 8.3
2.5
30 ~ 300
5
10.5
PAPER FEEDING DIRECTION

26 27
9. Printer cleaning
If the interior of the printer is dusty, printing quality can lowered.
In such a case, follow the instructions below to clean up the printer.
NOTE
1. Make sure to turn the printer power o prior to cleaning
2. Regarding print head cleaning, as the print head sets very hot during
printing, turn o the printer power and wait approximately 10 minute before
commencement.
3. When cleaning the print head, take care not to touch the heated portion of the
print head. The print head subject to be damaged by static electricity.
4. Take care not to allow the print head to become scratched and /or
damaged in any way.
1. Use an applicator swab moistened with an alcohol solution to clean the print
head and remove any dusts.
2. Once the cleaning is completed, insert paper roll into the printer few minutes
later and close the printer cover.
Preventing Overheating
To prevent the motor from overheating, continuous driving of the printer
should be 1.5 m or less in print length. Set the pause time for 30 seconds
or more after driving the printer.
10. Pritner Specification
10-1 Specication
Printing Method Direct Thermal
Printing Speed 100mm/sec
Resolution 203 DPI X 203 DPI
Character ESC/POS FontA(12x24), FontB(9x17), Asian Font(KOR,
JPN,CHN_GB2312,CHN_BIG5)
CPCL Font0/1/2/4/5/6/7, 24x24 Asian Font(KOR,
JPN,CHN_GB2312,CHN_BIG5), Resident TTF,
Downloadable TTF
ZPL FontA~H, FontGS,Resident TTF(Font0), Download-
able TTF
EPL Font1 ~ 8
Barcode ESC/POS 1D: EAN-8, EAN-13, Code39, ITF, UPC-A, UPC-E,
Codabar, Code93, Code128
2D: QR, PDF417
CPCL 1D: LUPC-A(+2,+5), UPC-E(+2, +5), EAN13(+2, +5),
EAN8(+2,+5), Code39 etc. (CPCL)
2D: QR, PDF417, MicroPDF417, Maxicode,
Datamatrix, Aztec, TLC39, RSS14
ZPL 1D : Code11, ITF, Code39, Planet, EAN-8, UPC-E,
Code93, Code128 etc. (ZPLII)
2D: QR, PDF417, MicroPDF417, Maxicode,
Datamatrix, Aztec, TLC39, RSS14
EPL 1D : Code39, Code93,Code128,Codabar,EAN-(+2,+5),
EAN13(+2,+5),ITF etc. (EPLII)
2D : QR, PDF417, Maxicode, Datamatrix,Aztec, RSS14
Emulation ESC/POS, CPCL, ZPL, EPL
Driver Window Printer Driver
(10, 2012, 8.0/8.1, 7, 2008,Vista, 2003, XP, 32 & 64bit),
Windows (CE 4.2 & 5.0 & 6.0 & 7.0 / Mobille 5.0 & 6.0)
Sensor Paper End Sensor , Gap Sensor , Cover Open
Sensor , Black Mark Sensor
Paper paper type Thermal Paper
width 25.5±0.5 mm ~ 79.5±0.5 mm

28 29
Printer Commands Compatibility
PRINT
○
FORM
○
JOURNAL
○
UNITS
○
Comments
○
TEXT Compatibility
TEXT
○
FONT-GROUP(FG)
○
TEXT CONCATENATION
○
MULTILINE(ML)
○
COUNT
○
SETMAG
○
SCALABLE TEXT
X
Linear Bar Codes Compatibility
BARCODE
○
BARCODE-TEXT
○
Two-Dimensional Bar Codes Compatibility
PDF417 (PORTABLE DATA FILE)
○
MAXICODE
○
QRCODE
●
DATAMATRIX
●
GS1(RSS)
●
NOTE
Compatible Partially
Compatible
Not
Compatible
○●△x
Compatible with only
commanders provided
by the manufacturer.
11. CPCL Command Compatibility
thickness 0.06mm ~ 0.16mm
External Diameter Max. Φ 56mm
Internal Diameter 12.5mm +/-0.5mm
Reliability TPH 50km
Battery Continuous Printing 36min
Standby for 19hour
Printing length: 186m
Communications standard Serial(RS-232C), USB, Wireless Lan *802.11b/g/n
Battery Charger input AC100~240V, 50/60Hz
output 8.4V , 800~1400mA
Battery Battery type Li-ion
output 7.4V, 2600mAh
Charging time 200min
MSR (Optional) Card Standard ISO7811/2, JIS
Track 1Track, 2Track, 3Track(or JIS-II)
Magnet Head Life 300,000 Passes(minimum)
IC CARD (Optional) EMV II certified smart card reader
Size W x D x H(mm) 120 x 152 x 70
W x D x H” 4.7 x 5.9 x 2.7
Weight 530g (With Battery : 640g)
Environmental sealing IP42, IP54 (With Protection case)
Temperature operation -10~50℃
storage -20~60℃
Humidity operation 10 ~ 80%
storage 10 ~ 90%

30 31
Graphics Compatibility
BOX
○
LINE
○
INVERSE-LINE
○
PATTERN
○
GRAPHICS
○
PCX
○
Advanced Commands Compatibility
CONTRAST
○
TONE
○
JUSTIFICATION
○
PAGE-WIDTH
○
PACE
○
NO-PACE
○
WAIT
○
REWIND
X
TENSION
X
SPEED
○
SETSP
○
ON-OUT-OF-PAPER
X
ON-FEED
○
PREFEED
○
POSTFEED
○
PRESENT-AT
X
COUNTRY/CODE PAGE
○
FORMAT FILES
○
BEEP
○
CUT
X
PATIAL-CUT
X
MCR
●
Line Print Mode Compatibility
SETLP
○
SETLF
○
Moving With X and Y Coordinates
○
LMARGIN
○
SETBOLD
○
SETSP
○
Special ASCII Characters
○
SETFF
○
SET-TOF
○
SETLP-TIMEOUT
○

32 33
12.Certification
FCC Information
This device complies with part 15 of the FCC Results.Operation is subject to
the following two conditions:
(1)This Device may not cause harmful interface,and
(2)This device must accept any interference received, including
interference that may cause undesired operation.
This equipment has been tested and found to comply with the limits for CLASS B
digital device, pursuant to Part 15 of FCC Rules. These limits are designed to provide
reasonable protection against harmful interference when the equipment is operated
in a commercial environment. This equipment generates, uses and can radiate radio
frequency energy and, if not installed and used in accordance with the instuctions, may
cause harmful interference to radio communications. However, there is no guarantee
that interference will not occur in a particular installation. If this equipment does cause
harmful interference to radio or television reception, which can be determined by turning
the equipment off and on,the user is encouraged to try correct the interference by one
or more of the following measures:
1.1. Reorient or relocate the receiving antenna.
1.2. Increase the separation between the equipment and receiver.
1.3. Connect the equipment into an outlet on a circuit different from
that to which receiver is connected.
1.4. Consult the dealer or experienced radio/TV technician for help.
Changes or modifications not expressly approved by the manufacturer could void the
user's authority to operate the equipment.
NOTE
WARNING
Operation is subject to the following two conditions: (1) this device may not
cause harmful interference, and (2) this device must accept any interference
received, including interference that may cause undesired operation of the
device.
This Class [B] digital apparatus complies with Canadian ICES-003.
Cet appareil numerique de la classe [B] est conforme a la norme NMB-003
du Canada.
CAUTION
Antenna shall be mounted in such a manner to minimize the potential
for human contact during normal operation. The antenna should not
be contacted during operation to avoid the possibility of exceeding the
FCC radio frequency exposure limit.
The device meets the FCC requirements for radio frequency (RF)
radiation exposure in the standard body worn configuration with no
minimum configuration. In this configuration, which applies whether
the belt clip or shoulder strap is used, the face of the printer from which
paper is transported is facing away from the user’s body. The standard
configuration must always be used when the printer is body worn.

34 35
Please refer to the programming manual included in CD.
13. Setting up the software
This manual suits for next models
1
Table of contents
Other SEWOO Printer manuals

SEWOO
SEWOO LK-TL320 User manual

SEWOO
SEWOO SLK-T12EB User manual

SEWOO
SEWOO LK-P400 User manual

SEWOO
SEWOO LK-P30B User manual

SEWOO
SEWOO LK-P11 Installation instructions

SEWOO
SEWOO LK-T12 User manual

SEWOO
SEWOO LK-P41W User manual

SEWOO
SEWOO SLK-TS400EB User manual

SEWOO
SEWOO LK-P20B User manual

SEWOO
SEWOO LK-P30 II User manual

SEWOO
SEWOO LK-T210 User manual

SEWOO
SEWOO SLK-TL100 User manual

SEWOO
SEWOO SLK-TS400 User manual

SEWOO
SEWOO LK-P30 User manual

SEWOO
SEWOO SLK-TE20 Series User manual

SEWOO
SEWOO LK-P43B User manual

SEWOO
SEWOO LK-P43 User manual

SEWOO
SEWOO LK-P34 User manual

SEWOO
SEWOO LK-P11B User manual

SEWOO
SEWOO LK-P12 User manual