Sharp CD-MPS660E User manual

03/12/19 CD-MPS660E(A)_FR.fm TINSZA040AWZZ
Thank you for purchasing this SHARP product.
To obtain the best performance from this product, please read this
manual carefully. It will guide you in operating your SHARP product.
MINI COMPONENT SYSTEM CD-MPS660E Mini Component System consisting of CD-MPS660E
(main unit) and CP-MPS660E (speaker system).
Accessories
Please confirm that the following accessories are included.
CD-MPS660E (A) TINSZA040AWZZ 1
MODEL
OPERATION MANUAL
CD-MPS660E
Note:
Only the above accessories are included.
Remote control 1 AM loop aerial 1 FM aerial 1

03/12/19 CD-MPS660E(A)1.fm
2
CD-MPS660E
TINSZA040AWZZ
Important Instruction
Special notes
Warning:
!When the ON/STAND-BY button is set at STAND-BY position,
mains voltage is still present inside the unit. When the ON/
STAND-BY button is set at STAND-BY position, the unit may be
brought into operation by the timer mode or remote control.
!This unit contains no user serviceable parts. Never remove cov-
ers unless qualified to do so. This unit contains dangerous volt-
ages, always remove mains plug from the socket before any
service operation and when not in use for a long period.
!To prevent fire or shock hazard, do not expose this appliance to
dripping or splashing. No objects filled with liquids, such as
vases, should be placed on the apparatus.
Note for users in Australia:
Copyright may exist in material you wish to record. Copying or
broadcasting such material without permission of the relevant lic-
ensees or owners of the copyright is prohibited by law. SHARP is
not in a position to authorise the copying or broadcasting of copy-
right materials and nothing in this OPERATION MANUAL should be
implied as giving that authority.
For other countries:
Audio-visual material may consist of copyrighted works which must
not be recorded without the authority of the owner of the copyright.
Please refer to the relevant laws in your country.
CAUTION
!This product is classified as a CLASS 1 LASER product.
!This product contains a low power laser device. To ensure con-
tinued safety do not remove any cover or attempt to gain access
to the inside of the product. Refer all servicing to qualified per-
sonnel.
Contents
Page
"General Information
Precautions . . . . . . . . . . . . . . . . . . . . . . . . . . . . . . . . . . . . . . . . . . 3
Controls and indicators . . . . . . . . . . . . . . . . . . . . . . . . . . . . . 4 - 7
"Preparation for Use
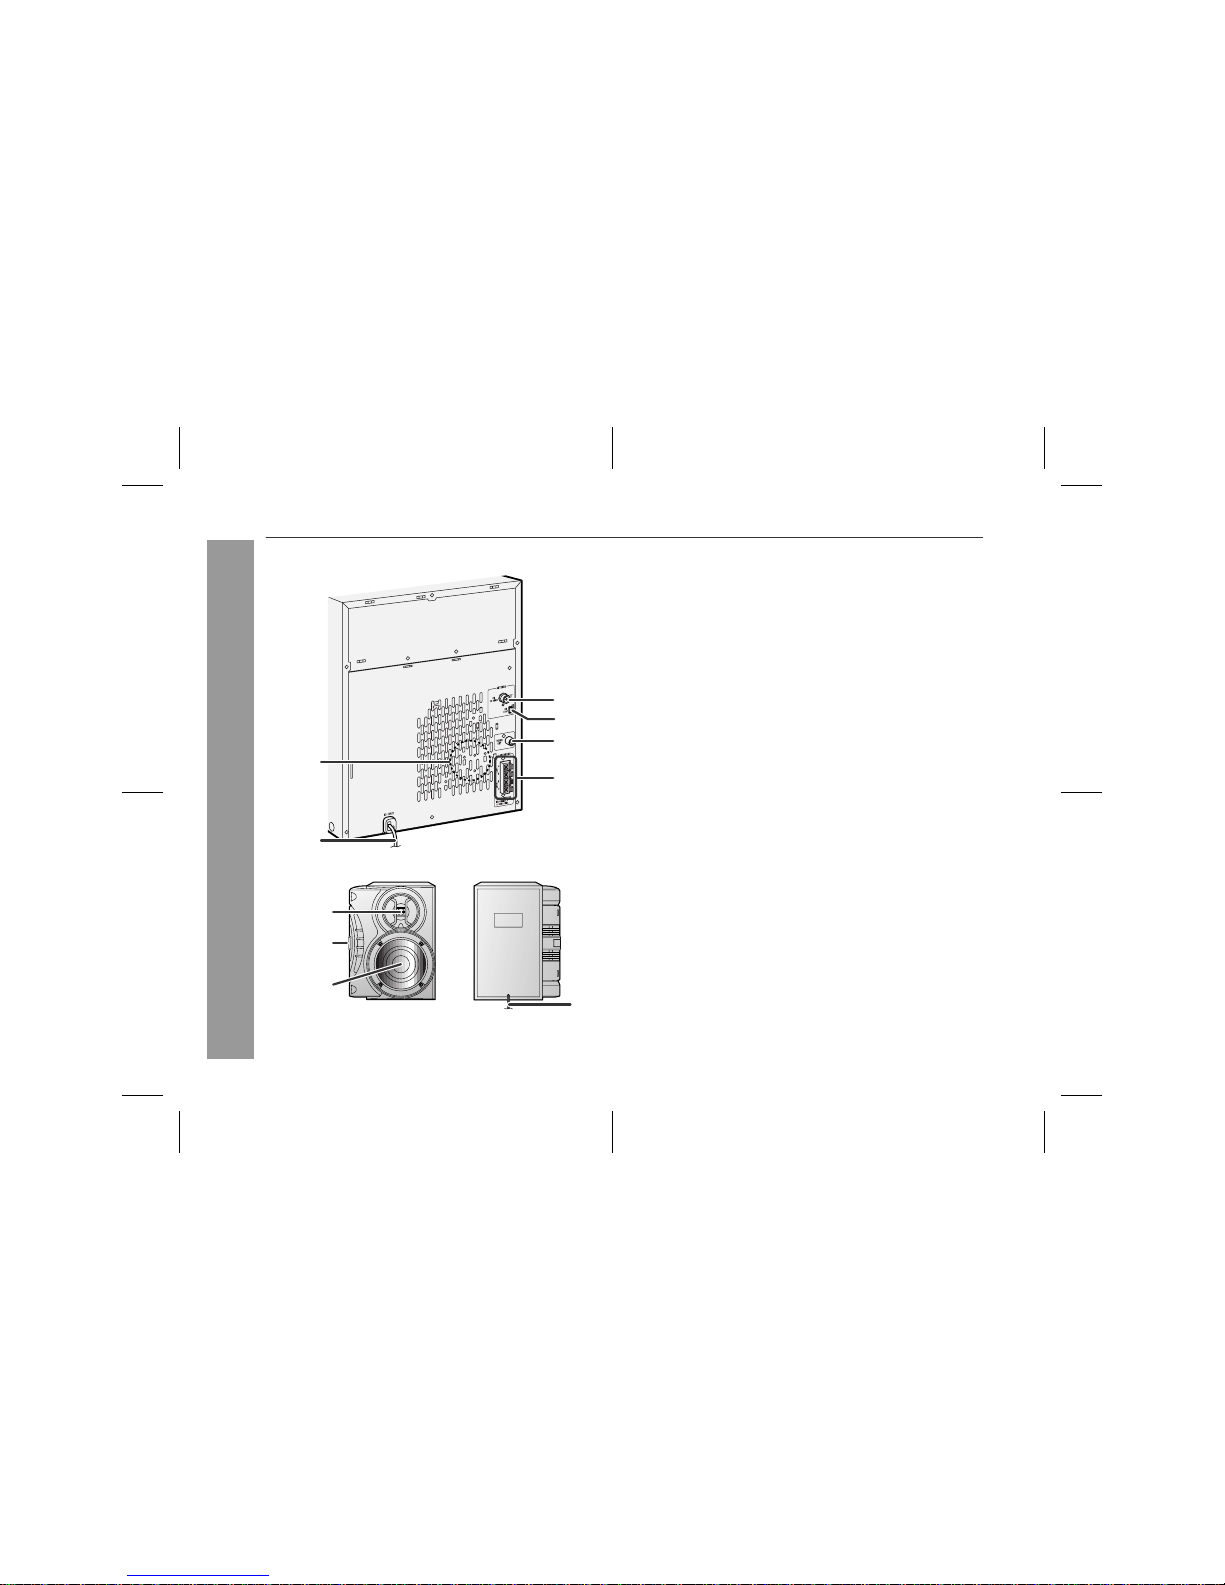
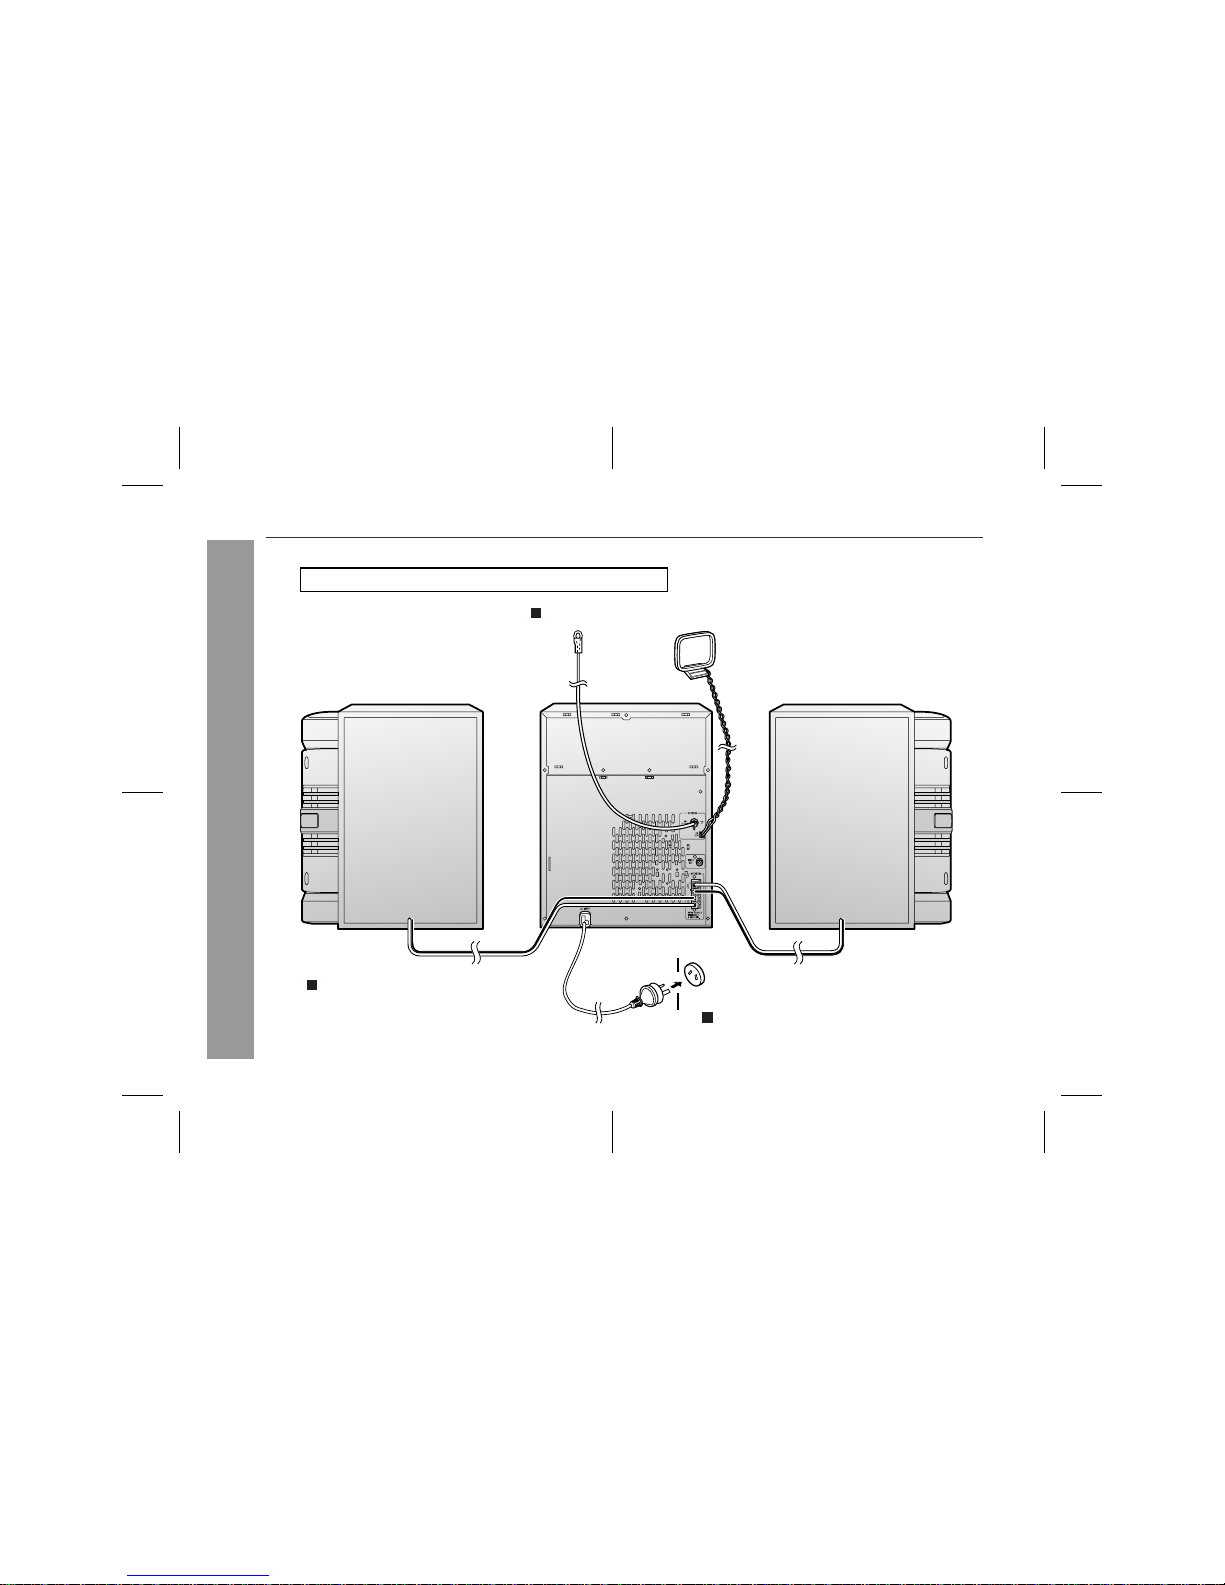
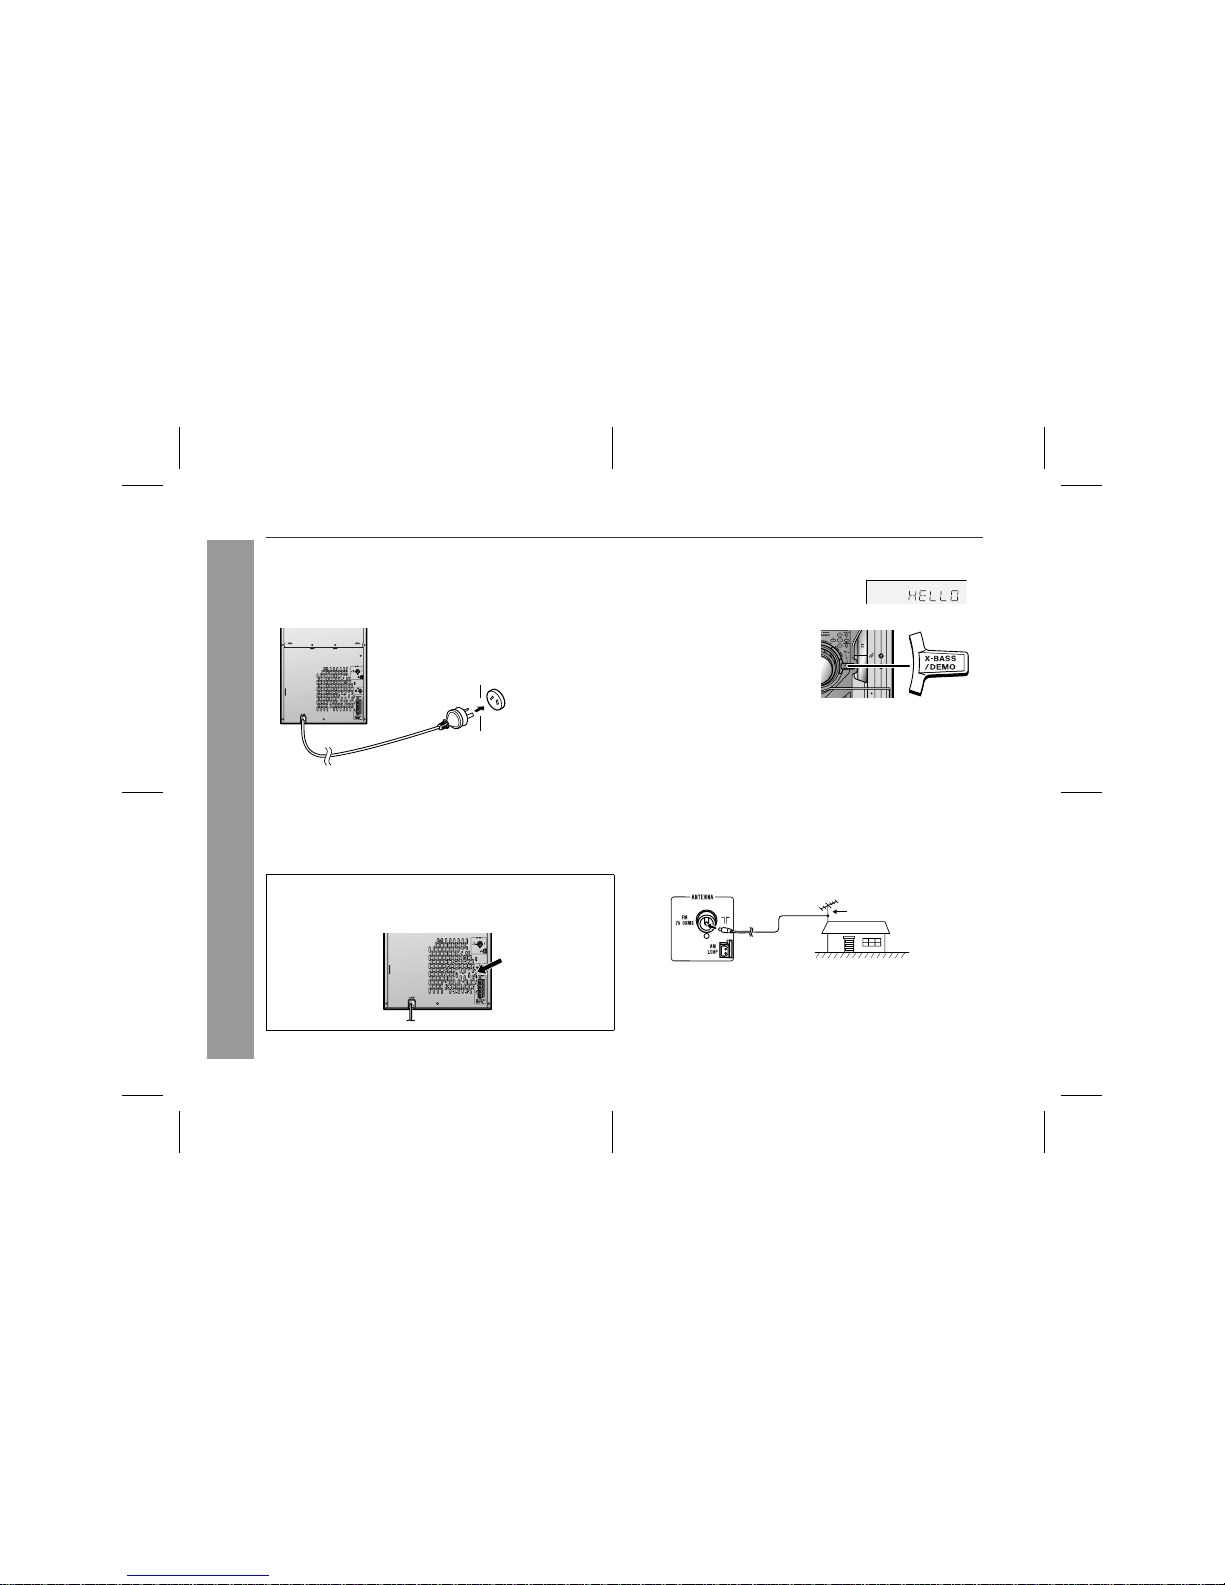
System connections . . . . . . . . . . . . . . . . . . . . . . . . . . . . . . 8 - 10
Remote control . . . . . . . . . . . . . . . . . . . . . . . . . . . . . . . . . . . . . . 11
"Basic Operation
General control . . . . . . . . . . . . . . . . . . . . . . . . . . . . . . . . . . . . . . 12
Setting the clock . . . . . . . . . . . . . . . . . . . . . . . . . . . . . . . . . . . . 13
"CD or MP3 disc Playback
Listening to a CD or MP3 disc . . . . . . . . . . . . . . . . . . . . . 14 - 16
Advanced CD or MP3 disc playback . . . . . . . . . . . . . . . . 17 - 19
MP3 navigation (only for MP3 files) . . . . . . . . . . . . . . . . . 20 - 23
"Radio
Listening to the radio . . . . . . . . . . . . . . . . . . . . . . . . . . . . . . 24, 25
"Tape Playback
Listening to a cassette tape (TAPE 1 or TAPE 2) . . . . . . . 26, 27
"Tape Recording
Recording on a cassette tape . . . . . . . . . . . . . . . . . . . . . . 27 - 29
"Advanced Features
Timer and sleep operation . . . . . . . . . . . . . . . . . . . . . . . . 30 - 33
Enhancing your system . . . . . . . . . . . . . . . . . . . . . . . . . . . . 34, 35
"References
Troubleshooting chart . . . . . . . . . . . . . . . . . . . . . . . . . . . . 35 - 37
Maintenance . . . . . . . . . . . . . . . . . . . . . . . . . . . . . . . . . . . . . . . . 37
Specifications . . . . . . . . . . . . . . . . . . . . . . . . . . . . . . . . . . . . . . . 38
WARRANTY . . . . . . . . . . . . . . . . . . . . . . . . . . End of the manual

03/12/19 CD-MPS660E(A)1.fm
3
CD-MPS660E
TINSZA040AWZZ
General Information
Precautions
"General
!Please ensure that the equipment is positioned in a well venti-
lated area and ensure that there is at least 10 cm (4") of free
space along the sides, top and back of the equipment.
!Do not place anything on top of the unit.
!Do not expose the unit to moisture, to temperatures higher than
60°C (140°F) or to extremely low temperatures.
!If your system does not work properly, disconnect the AC power
lead from the wall socket. Plug the AC power lead back in, and
then turn on your system.
!No naked flame sources, such as lighted candles, should be
placed on the apparatus.
!Attention should be drawn to the environmental aspects of bat-
tery disposal.
!This unit should only be used within the range of 5°C - 35°C
(41°F - 95°F).
Warning:
The voltage used must be the same as that specified on this unit.
Using this product with a higher voltage other than that which is
specified is dangerous and may result in a fire or other type of acci-
dent causing damage. SHARP will not be held responsible for any
damage resulting from use of this unit with a voltage other than that
which is specified.
"Volume control
The sound level at a given volume setting depends on speaker effi-
ciency, location, and various other factors. It is advisable to avoid
exposure to high volume levels. Do not turn the volume on to full at
switch on and listen to music at moderate levels.
!Use the unit on a firm,level surface free from
vibration.
!Keep the unit away from direct sunlight,
strong magnetic fields, excessive dust,
humidity and electronic/electrical equip-
ment (home computers, facsimiles, etc.)
which generate electrical noise.
!In case of an electrical storm, unplug the
unit for safety.
10 cm (4")
10 cm (4") 10 cm (4") 10 cm (4")
!Hold the AC power plug by the head when
removing it from the wall socket, as pulling
the lead can damage internal wires.
!Do not remove the outer cover, as this
may result in electric shock. Refer inter-
nal service to your local SHARP service
facility.
!The ventilation should not be impeded by
covering the ventilation openings with
items, such as newspapers, tablecloths,
curtains, etc.
1

03/12/19 CD-MPS660E(A)1.fm
4
CD-MPS660E
TINSZA040AWZZ
General Information
Controls and indicators
"Front panel Reference page
1.Disc Trays . . . . . . . . . . . . . . . . . . . . . . . . . . . . . . . . . . . . . . . 15
2.Timer Indicator . . . . . . . . . . . . . . . . . . . . . . . . . . . . . . . . . . . 31
3.On/Stand-by Button . . . . . . . . . . . . . . . . . . . . . . . . . . . . . . . 12
4.Disc Track Up or Fast Forward, Tape 2 Fast Forward,
Tuner Preset Up, Time Up Button . . . . . . . . . . . 13, 16, 25, 27
5.Clock/Timer Button . . . . . . . . . . . . . . . . . . . . . . . . . 13, 30, 33
6.Tuning Up Button . . . . . . . . . . . . . . . . . . . . . . . . . . . . . . . . . 24
7.Tuning Down Button . . . . . . . . . . . . . . . . . . . . . . . . . . . . . . 24
8.Disc Track Down or Fast Reverse, Tape 2 Rewind,
Tuner Preset Down, Time Down Button . . . . . . 13, 16, 25, 27
9.Equaliser Mode Select Button . . . . . . . . . . . . . . . . . . . . . . . 12
10.Tape 1 Cassette Compartment . . . . . . . . . . . . . . . . . . . . . . 26
11.Headphone Socket . . . . . . . . . . . . . . . . . . . . . . . . . . . . . . . . 35
12.Game/Video Input Sockets . . . . . . . . . . . . . . . . . . . . . . . . . 34
13.Disc Number Select Buttons . . . . . . . . . . . . . . . . . . . . . . . . 15
14.Disc Direct Play Button . . . . . . . . . . . . . . . . . . . . . . . . . . . . 17
15.Disc Tray Open/Close Button . . . . . . . . . . . . . . . . . . . . . . . 15
16.Character Button . . . . . . . . . . . . . . . . . . . . . . . . . . . . . . . . . 22
17.Enter Button . . . . . . . . . . . . . . . . . . . . . . . . . . . . . . . . . . . . . 21
18.Disc Play or Repeat, Tape Play Button . . . . . . . . . 15, 18, 26
19.Memory/Set Button . . . . . . . . . . . . . . . . 13, 19, 23, 25, 30, 33
20.Tape 2 Record Pause Button . . . . . . . . . . . . . . . . . . . . 28, 29
21.MP3 Disc Navigation Mode Select Button . . . . . . . . . . . . . 21
22.Disc or Tape Stop Button . . . . . . . . . . . . . . . . . . . . . . . 16, 27
23.Cursor Buttons . . . . . . . . . . . . . . . . . . . . . . . . . . . . . . . . . . . 21
24.Extra Bass/Demo Mode Button . . . . . . . . . . . . . . . . . . . 10, 12
25.Volume Control . . . . . . . . . . . . . . . . . . . . . . . . . . . . . . . . . . . 12
26.Tape 2 Cassette Compartment . . . . . . . . . . . . . . . . . . . . . . 26
27.Tuner (Band) Button . . . . . . . . . . . . . . . . . . . . . . . . . . . . . . 24
28.CD Button . . . . . . . . . . . . . . . . . . . . . . . . . . . . . . . . . . . . . . . 15
29.Tape (1 2) Button . . . . . . . . . . . . . . . . . . . . . . . . . . . . . . . 26
30.Game/Video Button . . . . . . . . . . . . . . . . . . . . . . . . . . . . . . . 34
13
15
25
17
19
23
24
2
5
6
3
1
16
22
21
26
14
20
11
12
10
7
8
9
28 29 3027
18
4

03/12/19 CD-MPS660E(A)1.fm
5
CD-MPS660E
TINSZA040AWZZ
General Information
"Display Reference page
1.Disc Number Indicators . . . . . . . . . . . . . . . . . . . . . . . . . . . . 17
2.MP3 Folder Indicator . . . . . . . . . . . . . . . . . . . . . . . . . . . . . . 20
3.MP3 Title Indicators . . . . . . . . . . . . . . . . . . . . . . . . . . . . . . . 20
4.MP3 Total Indicator . . . . . . . . . . . . . . . . . . . . . . . . . . . . . . . 21
5.Sleep Indicator . . . . . . . . . . . . . . . . . . . . . . . . . . . . . . . . . . . 33
6.Timer Play Indicator . . . . . . . . . . . . . . . . . . . . . . . . . . . . . . . 31
7.Timer Recording Indicator . . . . . . . . . . . . . . . . . . . . . . . . . 31
8.Tape 2 Record Indicator . . . . . . . . . . . . . . . . . . . . . . . . . . . 28
9.Daily Timer Indicator . . . . . . . . . . . . . . . . . . . . . . . . . . . . . . 31
10.FM Stereo Mode Indicator . . . . . . . . . . . . . . . . . . . . . . . . . . 24
11.FM Stereo Receiving Indicator . . . . . . . . . . . . . . . . . . . . . . 24
12.Tape Play Indicator . . . . . . . . . . . . . . . . . . . . . . . . . . . . . . . 26
13.Memory Indicator . . . . . . . . . . . . . . . . . . . . . . . . . . . . . . 19, 23
14.MP3 Disc Indicator . . . . . . . . . . . . . . . . . . . . . . . . . . . . . . . . 15
15.Extra Bass Indicator . . . . . . . . . . . . . . . . . . . . . . . . . . . . . . 12
16.Disc Repeat Play Indicator . . . . . . . . . . . . . . . . . . . . . . . . . 18
17.Disc Pause Indicator . . . . . . . . . . . . . . . . . . . . . . . . . . . . . . 16
18.Disc Play Indicator . . . . . . . . . . . . . . . . . . . . . . . . . . . . . . . . 15
4 532167 8
14 15 16
17 18
9
12
1110
13
1
CD-MPS660E (A) TINSZA040AWZZ 2

03/12/19 CD-MPS660E(A)1.fm
6
CD-MPS660E
TINSZA040AWZZ
General Information
Controls and indicators (continued)
"Rear panel Reference page
1.Cooling Fan . . . . . . . . . . . . . . . . . . . . . . . . . . . . . . . . . . . . . . 10
2.AC Power Lead . . . . . . . . . . . . . . . . . . . . . . . . . . . . . . . . . . . 10
3.FM 75 Ohms Aerial Socket . . . . . . . . . . . . . . . . . . . . . . . . . . 9
4.AM Loop Aerial Socket . . . . . . . . . . . . . . . . . . . . . . . . . . . . . 9
5.Video Output Socket . . . . . . . . . . . . . . . . . . . . . . . . . . . . . . 34
6.Speaker Terminals . . . . . . . . . . . . . . . . . . . . . . . . . . . . . . . . . 9
"Speaker system
1.Tweeter
2.Passive Radiator
3.Woofer
4.Speaker Wire
1
4
5
3
6
2
1
2
34

03/12/19 CD-MPS660E(A)1.fm
7
CD-MPS660E
TINSZA040AWZZ
General Information
"Remote control Reference page
1.Remote Control Transmitter . . . . . . . . . . . . . . . . . . . . . . . . 11
2.Disc Number Select Buttons . . . . . . . . . . . . . . . . . . . . . . . . 15
3.Clock/Timer Button . . . . . . . . . . . . . . . . . . . . . . . . . 13, 30, 33
4.Character Input/Disc Direct Search Buttons . . . . . . . . 17, 22
5.MP3 Disc Navigation Mode Select Button . . . . . . . . . . . . . 21
6.Enter Button . . . . . . . . . . . . . . . . . . . . . . . . . . . . . . . . . . . . . 21
7.Memory/Set Button . . . . . . . . . . . . . . . . 13, 19, 23, 25, 30, 33
8.Tape 2 Record Pause Button . . . . . . . . . . . . . . . . . . . . 28, 29
9.Disc Track Down or Fast Reverse, Tape 2 Rewind,
Tuner Preset Down, Time Down Button . . . . . 13, 16, 25, 27
10.Disc or Tape Stop Button . . . . . . . . . . . . . . . . . . . . . . . 16, 27
11.CD Button . . . . . . . . . . . . . . . . . . . . . . . . . . . . . . . . . . . . . . . 15
12.Tuner (Band) Button . . . . . . . . . . . . . . . . . . . . . . . . . . . . . . 24
13.Equaliser Mode Select Button . . . . . . . . . . . . . . . . . . . . . . 12
14.Extra Bass Button . . . . . . . . . . . . . . . . . . . . . . . . . . . . . . . . 12
15.On/Stand-by Button . . . . . . . . . . . . . . . . . . . . . . . . . . . . . . . 12
16.Disc Random Button . . . . . . . . . . . . . . . . . . . . . . . . . . . . . . 18
17.Character Button . . . . . . . . . . . . . . . . . . . . . . . . . . . . . . . . . 22
18.Cursor Buttons . . . . . . . . . . . . . . . . . . . . . . . . . . . . . . . . . . . 21
19.Disc Clear/Dimmer Button . . . . . . . . . . . . . . . . . . . . . . 12, 19
20.Disc Pause Button . . . . . . . . . . . . . . . . . . . . . . . . . . . . . . . . 16
21.Disc Track Up or Fast Forward, Tape 2 Fast Forward,
Tuner Preset Up, Time Up Button . . . . . . . . . . 13, 16, 25, 27
22.Disc Play or Repeat, Tape Play Button . . . . . . . . . 15, 18, 26
23.Tape (1 2) Button . . . . . . . . . . . . . . . . . . . . . . . . . . . . . . . 26
24.Game/Video Button . . . . . . . . . . . . . . . . . . . . . . . . . . . . . . . 34
25.MP3 Disc Display Button . . . . . . . . . . . . . . . . . . . . . . . . . . . 16
26.Volume Up and Down Buttons . . . . . . . . . . . . . . . . . . . . . . 12
1
2
3
4
5
7
9
15
16
17
18
19
24
25
26
12
13
10 21
22
23
20
14
6
8
11
1

03/12/19 CD-MPS660E(A)1.fm
8
CD-MPS660E
TINSZA040AWZZ
Preparation for Use
System connections
Left speaker
Right speaker
Speaker connection (see page 9)
Aerial connection (see page 9)
AC power connection (see page 10)
Wall socket
(AC 230 - 240V, 50 Hz)
Make sure to unplug the AC power lead before any connections.
FM aerial AM loop aerial

03/12/19 CD-MPS660E(A)1.fm
9
CD-MPS660E
TINSZA040AWZZ
Preparation for Use
!Aerial connection
Supplied FM aerial:
Connect the FM aerial wire to the FM 75 OHMS socket and position
the FM aerial wire in the direction where the strongest signal can be
received.
Supplied AM loop aerial:
Connect the AM loop aerial to the AM LOOP socket. Position the
AM loop aerial for optimum reception. Place the AM loop aerial on a
shelf, etc., or attach it to a stand or a wall with screws (not supplied).
Note:
Placing the aerial on the unit or near the AC power lead may cause
noise pickup. Place the aerial away from the unit for better recep-
tion.
Installing the AM loop aerial:
!Speaker connection
Connect the black wire to the minus (-) terminal, and the red wire to
the plus (+) terminal.
Caution:
!Placing the speaker system
The left and right speakers have individual shapes. For best perfor-
mance, place the speakers according to the diagram below.
Note:
The speaker grilles are not removable.
< Assembling > < Attaching to the wall >
Wall Screws (not supplied)
"Use speakers with an impedance of 6 ohms or more, as lower im-
pedance speakers can damage the unit.
"Do not mistake the right and the left chan-
nels.The rightspeaker isthe oneon theright
side when you face the unit.
"Do not let the bare speaker wires touch
each other.
"Donot standor sit onthe speakers. Youmay
be injured.
Incorrect
Left speaker Right speaker
Black
Red
2

03/12/19 CD-MPS660E(A)1.fm
10
CD-MPS660E
TINSZA040AWZZ
Preparation for Use
System connections (continued)
!AC power connection
After checking all the connections have been made correctly, plug
the AC power lead of this unit into the wall socket. If you plug in the
unit first, the unit will enter the demonstration mode.
Notes:
"The unit will start the tape initialisation when plugged in to the AC
socket. During this process, initialising sound will be heard and
the unit cannot be turned on. Wait until the process is finished.
"Unplug the AC power lead from the wall socket if the unit will not
be in use for a prolonged period of time.
!Demonstration mode
!External FM aerial
Use an external FM aerial if you require better reception.
Consult your dealer.
Cooling fan:
This product is equipped with a cooling fan inside, which begins to
run at a specified volume level for better heat radiation.
Wall socket
(AC 230 - 240V, 50 Hz)
The first time the unit is plugged in, the
unit will enter the demonstration mode.
You will see words scroll.
To cancel the demonstration
mode:
When the unit is in the power stand-
by mode (demonstration mode),
press the X-BASS/DEMO button.
The demonstration mode will be
cancelled and the display will disap-
pear.
To return to the demonstration mode:
When the unit is in the power stand-by mode, press the X-BASS/
DEMO button again.
Note:
When the power is on, the X-BASS/DEMO button can be used to se-
lect the extra bass mode.
External FM aerial

03/12/19 CD-MPS660E(A)2.fm
11
CD-MPS660E
TINSZA040AWZZ
Preparation for Use
Remote control
!Battery installation
Precautions for battery use:
"Replace all old batteries with new ones at the same time.
"Do not mix old and new batteries.
"Remove the batteries if the unit is not to be used for long periods
of time. This will prevent potential damage due to battery leak-
age.
Caution:
"Do not use rechargeable batteries (nickel-cadmium battery, etc.).
"Installing the batteries incorrectly may cause the unit to malfunc-
tion.
Notes concerning use:
"Replace the batteries if the operating distance is reduced or if the
operation becomes erratic.
"Periodically clean the transmitter on the remote control and the
sensor on the unit with a soft cloth.
"Exposing the sensor on the unit to strong light may interfere with
operation. Change the lighting or the direction of the unit.
"Keep the remote control away from moisture, heat, shock, and
vibrations.
!Test of the remote control
Check the remote control after checking all the connections (see
pages 8 - 10).
Point the remote control directly at the remote sensor on the unit.
The remote control can be used within the range shown below:
Press the ON/STAND-BY button. Does the power turn on? Now,
you can enjoy music.
Use 2 "AA" size batteries (UM/SUM-3, R6, HP-7 or similar).
Batteries are not included.
1 Open the battery cover.
2 Insert the batteries according to the direction indicated in
the battery compartment.
When inserting or removing the batteries, push them towards the
battery terminals.
3 Close the battery cover.
0.2 m - 6 m
(8" - 20')
Remote sensor
2

03/12/19 CD-MPS660E(A)2.fm
12
CD-MPS660E
TINSZA040AWZZ
Basic Operation
General control
!To turn the power on
Press the ON/STAND-BY button to turn the power on.
!Illumination light control
When the power is turned on, light illuminates around the display.
To turn on/off the light, hold down the CLEAR/DIMMER button on
the remote control for 2 seconds or more.
!Volume control
!Bass control (X-BASS)
!Equaliser
When the EQUALIZER (EQUALIZER MODE) button is pressed, the
current mode setting will be displayed. To change to a different
mode, press the EQUALIZER (EQUALIZER MODE) button repeat-
edly until the desired sound mode appears.
After use:
Press the ON/STAND-BY button to enter the power stand-by
mode.
Main unit operation:
When the VOLUME control is turned
clockwise, the volume will increase.
When it is turned anti-clockwise, the vol-
ume will decrease.
Remote control operation:
Press the VOLUME (+ or -) button to in-
crease or decrease the volume.
When the power is first turned on, the
unit will enter the extra bass mode which
emphasises the bass frequencies, and
"X-BASS" will appear. To cancel the ex-
trabassmode,press theX-BASS/DEMO
(X-BASS) button.
In CD/TUNER/TAPE mode In GAME/VIDEO mode
30 MAXIMUM0 .....
Bass and treble are
emphasised.
Bass and treble are
slightly emphasised.
The sound is not
modified.
Treble is cut a little.
Treble is slightly
emphasised.
FLAT
ROCK
CLASSIC
POPS
VOCAL
JAZZ
Vocals (midrange
tones) are emphasised.
Bass and treble are
emphasised more.
Vocals and treble
are emphasised.
Bass is empha-
sised.
The sound is not
modified.
ACTION
SPORTS
RACING
Bass and treble
are emphasised.
Treble is cut a
little.
FLAT
ROCK
CLASSIC

03/12/19 CD-MPS660E(A)2.fm
13
CD-MPS660E
TINSZA040AWZZ
Basic Operation
Setting the clock
In this example, the clock is set for the 24-hour (0:00) display.
To confirm the time display:
[When the unit is in the stand-by mode]
Press the CLOCK/TIMER button.
The time display will appear for about 10 seconds.
[When the power is on]
Press the CLOCK/TIMER button.
Within 10 seconds, press the or button to display the time.
The time display will appear for about 10 seconds.
Note:
The "CLOCK" will appear or time will flash to confirm the time dis-
play when the AC power supply is restored after a power failure or
unplugging the unit. If incorrect, readjust the clock as follows.
To readjust the clock:
Perform "Setting the clock" from step 1. If the "CLOCK" does not
appear in step 3, step 4 (for selecting the 24-hour or 12-hour dis-
play) will be skipped.
To change the 24-hour or 12-hour display:
Note:
The clock can also be set with the remote control.
1Press the ON/STAND-BY button to turn the power on.
2Press the CLOCK/TIMER button.
3Within 10 seconds, press the or button to se-
lect "CLOCK", and press the MEMORY/SET button.
4Press the or button to select 24-hour or 12-
hour display and then press the MEMORY/SET button.
"0:00" The 24-hour display will appear.
(0:00 - 23:59)
"AM 12:00" The 12-hour display will appear.
(AM 12:00 - PM 11:59)
"AM 0:00" The 12-hour display will appear.
(AM 0:00 - PM 11:59)
5Press the or button to adjust the hour and
then press the MEMORY/SET button.
Press the or button once to advance the time by
1 hour. Hold it down to advance continuously.
6Press the or button to adjust the minutes and
then press the MEMORY/SET button.
Press the or button once to advance the time by
1 minute. Hold it down to change the time in 5-minute intervals.
1 Clear all the programmed contents. [Refer to "Clearing all the
memory (reset)" on page 36 for details.]
2 Perform "Setting the clock" from step 1.
CD-MPS660E (A) TINSZA040AWZZ 3
3

03/12/19 CD-MPS660E(A)2.fm
14
CD-MPS660E
TINSZA040AWZZ
CD or MP3 disc Playback
Listening to a CD or MP3 disc
This system can also play audio CD-R and CD-RW discs, but can-
not record.
Some audio CD-R and CD-RW discs may not be playable due to the
state of the disc or the equipment used for recording.
MP3 is a form of compression. It is an acronym which stands
for MPEG Audio Layer 3.
MP3 is a type of audio code which is processed by significant
compression from the original audio source with very little loss
in sound quality.
Notes:
"" " indicator will light up after the unit reads information on an
MP3 disc.
"This system supports MPEG 1 Layer 3, MPEG 2 Layer 3, and
VBR files.
"During VBR file playback, time counter in the display may differ
from its actual playback time.
Auto power on function:
When you press any of the following buttons, the unit turns on.
"CD button (main unit and remote control): The unit turns on and
the "CD" function is activated.
"/ button (main unit and remote control): The unit turns on
and playback of the last function starts (CD/TAPE/TUNER/
GAME).

03/12/19 CD-MPS660E(A)2.fm
15
CD-MPS660E
TINSZA040AWZZ
CD or MP3 disc Playback
"Playback will begin from track 1 on the disc 1. After that disc fin-
ishes playing, the next disc will automatically play.
"After the last track on the fifth disc is played, the unit will stop
automatically.
"When there is no disc in one of the disc trays (1 - 5), the empty
tray will be skipped to the next tray with a disc.
To exchange other discs whilst playing a disc:
Press one of the 1 - 5 buttons for the stopped disc and within 5
seconds, press the OPEN/CLOSE button and exchange discs.
To remove the discs:
In the stop mode, press the 1 - 5 button and within 5 seconds,
press the OPEN/CLOSE button.
Caution:
"Do not place two discs in one disc tray.
"Do not play discs with special shapes (heart- or octagon-shaped)
as it may cause malfunctions.
"Do not push the disc tray whilst it is moving.
"If the power fails whilst the tray is open, wait until the power is
restored.
"If the disc tray is stopped with force, "ER-CD20" will appear on
the display for 3 seconds and the unit will not function. If this
occurs, press the ON/STAND-BY button to enter the power
stand-by mode and then turn the power on again.
"If TV or radio interference occurs during CD operation, move the
unit away from the TV or radio.
"If a disc is damaged, dirty, or loaded upside down, the disc will
skip or not play.
1Press the ON/STAND-BY button to turn the power on.
2Press the CD button.
3Press the 1 button and within 5 seconds, press the
OPEN/CLOSE button to open the disc tray 1.
4Place the disc on the disc tray 1, label side up.
Be sure to place 8 cm (3") disc in the middle of the disc trays.
5Press the OPEN/CLOSE button to close the disc tray 1.
"Due to the structure of its disc information, it takes longer to
read an MP3 disc than a normal CD (approximately 20 to 90
seconds).
6You can place discs on the trays 2 - 5 by following steps 3
- 5.
7Press the / button to start playback.
12 cm (5") 8 cm (3")
[CD]
Total number of
tracks on the disc
whose number
is flashing
Total playing
time of the disc
whose number
is flashing
Total number
of folders Total number
of files
MP3 disc indicator
[MP3]
Disc play indicator
4

03/12/19 CD-MPS660E(A)2.fm
16
CD-MPS660E
TINSZA040AWZZ
CD or MP3 disc Playback
Listening to a CD or MP3 disc (continued)
!Various disc functions Notes:
"Track up/track down is possible only within individual discs.
"The sound is heard during fast forward/fast reverse with a CD,
but not with an MP3 disc. For fast forward or fast reverse of an
MP3 disc, refer to playback time on the display.
Notes for CD:
Notes for MP3 discs:
"Fast forward/fast reverse is possible only within individual tracks.
"When the end of the track is reached during fast forward, the next
track will be played. Playback of the track will begin when its
beginning is reached during fast reverse.
!To change the display (MP3 discs only)
Function Main unit Remote
control Operation
Play Press in the stop
mode.
Stop Press in the playback
mode.
Pause Press in the playback
mode. Press the /
button to resume play-
back from the paused
point.
Track up/
Track down Press in the playback
or stop mode.
If you press the button
in the stop mode,
press the / button
to start the desired
track.
Fast for-
ward/Fast
reverse
Press and hold down
in the playback mode.
Release the button to
resume playback.
"Fast forward/fast reverse is possible only within individual discs.
"When the end of the last track is reached during fast forward, "
END" will appear on the display and CD operation will be paused.
When the beginning of the first track is reached during fast re-
verse, the unit will enter the playback mode.
( : Last track number)
Whilst a disc is playing, press the MP3 DIS-
PLAY button.
Each time the button is pressed, the display
will change as follows.
Folder name
File name
Track number Elapsed
playback time

03/12/19 CD-MPS660E(A)2.fm
17
CD-MPS660E
TINSZA040AWZZ
CD or MP3 disc Playback
Advanced CD or MP3 disc playback
!To specify a disc to play
You can play a disc by specifying the disc number.
"Playback will begin from track 1 on the chosen disc.
"After the last track on the chosen disc is played, the unit stops
automatically.
Note:
If a disc tray with no disc is selected, playback will not start and the
disc indicator will go out.
To stop playback:
Press the button.
!Direct track search
By using the direct search buttons, the desired tracks on the current
disc can be played.
If the direct search buttons are pressed whilst the disc is stopped,
press the / button to start the desired track on the current disc.
Notes:
"A track number higher than the number of tracks on the disc can-
not be selected.
"During random play, direct search is not possible.
1Press one of the 1 - 5 buttons to select the desired disc.
Selected disc number
2Within 5 seconds, press the DIRECT PLAY button on the
main unit.
Use the direct search buttons on
the remote control to select the de-
sired track whilst playing the se-
lected disc.
Selected track number
"The direct search buttons allow you to select up to number 9.
"When selecting number 10 or higher, use the "+10" button.
A. For example, to choose 13
1 Press the "+10" button once.
2 Press the "3" button.
B. For example, to choose 30
1 Press the "+10" button three times.
2 Press the "0" button.
4

03/12/19 CD-MPS660E(A)2.fm
18
CD-MPS660E
TINSZA040AWZZ
CD or MP3 disc Playback
Advanced CD or MP3 disc playback (continued)
!Repeat play
Repeat play can play all 5 discs, all tracks on a chosen disc, or a
programmed sequence continuously.
To cancel repeat play:
Press the / button again.
" " will go out.
To cancel repeat play:
Press the DIRECT PLAY button again.
" " will go out.
!Random play
The tracks on the disc(s) can be played in random order automatically.
To cancel random play:
Press the / button.
"R" will go out.
To cancel random play:
Press the DIRECT PLAY button.
"R" will go out.
Notes:
"If you press the button during random play, you can move to
the next track by the random operation. On the other hand, the
button does not allow you to move to the previous track. The
beginning of the track being played will be located.
"In random play, the unit will select and play tracks automatically.
(You cannot select the order of the tracks.)
Caution:
After performing repeat or random play, be sure to press the but-
ton. Otherwise, the disc(s) will play continuously.
To repeat all tracks on up to 5 discs:
Press the / button twice.
To repeat desired tracks:
Perform steps 1 - 6 in "Programmed play" section on page 19 and
then press the / button twice.
To repeat all tracks on the chosen disc:
1 Press one of the 1 - 5 buttons.
2 Within 5 seconds, press the DIRECT PLAY
button twice.
To random play all tracks on up to 5 discs:
Press the RANDOM button on the remote control.
To random play all tracks on the chosen disc:
1 Press one of the 1 - 5 but-
tons.
2 Within 5 seconds, press the DI-
RECT PLAY button.
3 Press the RANDOM button on
the remote control.

03/12/19 CD-MPS660E(A)2.fm
19
CD-MPS660E
TINSZA040AWZZ
CD or MP3 disc Playback
!Programmed play
You can choose up to 32 selections for playback in the order you
like.
To cancel the programmed play mode:
Whilst in the stop mode and the "MEMORY" indicator is lit, press the
CLEAR/DIMMER button on the remote control. The "MEMORY"
indicator will disappear and all the programmed contents will be
cleared.
Adding tracks to the programme:
If a programme has been previously stored, the "MEMORY" indica-
tor will be displayed. Then follow steps 1 - 6 to add tracks. The new
tracks will be stored after the last track of the original programme.
To check which tracks are programmed:
Whilst the unit is stopped in the programmed play mode, press the
or button.
Notes:
"When a disc with programmed tracks is ejected, the programme
is automatically cancelled.
"Even if you press the ON/STAND-BY button to enter the stand-by
mode or change the function from CD to another, the pro-
grammed selections will not be cleared.
"During the programme operation, random play is not possible.
"During programmed play, the DIRECT PLAY button will not work.
1Whilst in the stop mode, press
the MEMORY/SET (MEMORY)
button to enter the programming
save mode.
2Press one of the 1 - 5 buttons
to select the desired disc.
Selected disc number
3Press the direct search buttons
on the remote control to select
the desired track.
Selected track number
You can also select a track by pressing the or button.
4Press the MEMORY/SET (MEMO-
RY) button to save the track
number.
5Repeat steps 2 - 4 for other tracks. Up to 32 tracks can be
programmed.
If you make a mistake, the programmed tracks can be cleared
by pressing the CLEAR/DIMMER button.
6Press the button.
The total number of memory will ap-
pear.
7Press the / button to start playback.
To clear the programmed selections:
Press the CLEAR/DIMMER button on the re-
mote control whilst the "MEMORY" indicator
is flashing.
Eachtime thebutton ispressed, onetrack will
be cleared, beginning with the last track pro-
grammed. 4

03/12/19 CD-MPS660E(A)2.fm
20
CD-MPS660E
TINSZA040AWZZ
CD or MP3 disc Playback
MP3 navigation (only for MP3 files)
MP3 navigation:
You can search and play files by folder or title. For example, when
you assign three titles to a file, enter genre (such as jazz) as title 1,
album name as title 2, and music title as title 3 to search the file by
any title.
!You can search and play files by folder or title 1/2/3 within one
MP3 disc (see page 21).
!By entering a name, you can search files by folder or title 1/2/3
within one MP3 disc (see page 22).
!Folders or titles can be programmed within one MP3 disc (see
page 23).
When you enter file names on your PC, connect words with
hyphens. This product recognises the first word as title 1, second
one as title 2, and third one as title 3. Up to three words can be rec-
ognised.
Notes:
!MP3 files must have the extension ".mp3".
!Up to 100 folders or 300 files can be read on the unit. If either
limit is exceeded, no more folders/files are displayed.
!This unit recognises and displays up to 48 characters for folder
names, and up to 32 characters for title 1/2/3.
!All file/folder names appear in uppercase.
Example:
(File name)
(POPULAR-HITS 1-A MUSIC.mp3)
AAA
(POPULAR-HITS 2-B MUSIC.mp3)
(JAZZ-HITS 1-A MUSIC.mp3)
BBB
(JAZZ-HITS 2-B MUSIC.mp3)
(ROCK-HITS 1-A MUSIC.mp3)
CCC
(ROCK-HITS 2-B MUSIC.mp3)
(ROCK-HITS 3-C MUSIC.mp3)
(ROCK-HITS 4-D MUSIC.mp3)
Folder
Title 1 Title 2 Title 3 Folder Title 1
Title 2 Title 3
Other manuals for CD-MPS660E
1
Table of contents
Other Sharp Stereo System manuals

Sharp
Sharp XL-35H User manual

Sharp
Sharp CD-MPS660E User manual

Sharp
Sharp CD-XP300H User manual

Sharp
Sharp CD-PC3500 User manual

Sharp
Sharp XL-MP80E User manual

Sharp
Sharp CD-BA3100H User manual

Sharp
Sharp QT-MP5W User manual

Sharp
Sharp CD-BA3100 User manual

Sharp
Sharp CD-BK250W User manual

Sharp
Sharp CD-BA250H User manual

Sharp
Sharp XL-UR250H User manual

Sharp
Sharp XL-HF202PH User manual

Sharp
Sharp XL-DH229 User manual

Sharp
Sharp GF-575H User manual

Sharp
Sharp MD-M1H User manual

Sharp
Sharp CD-XP120W User manual

Sharp
Sharp CD-BA2100 User manual

Sharp
Sharp XL-505 User manual

Sharp
Sharp MD-E9000H User manual

Sharp
Sharp CD-BH10 User manual