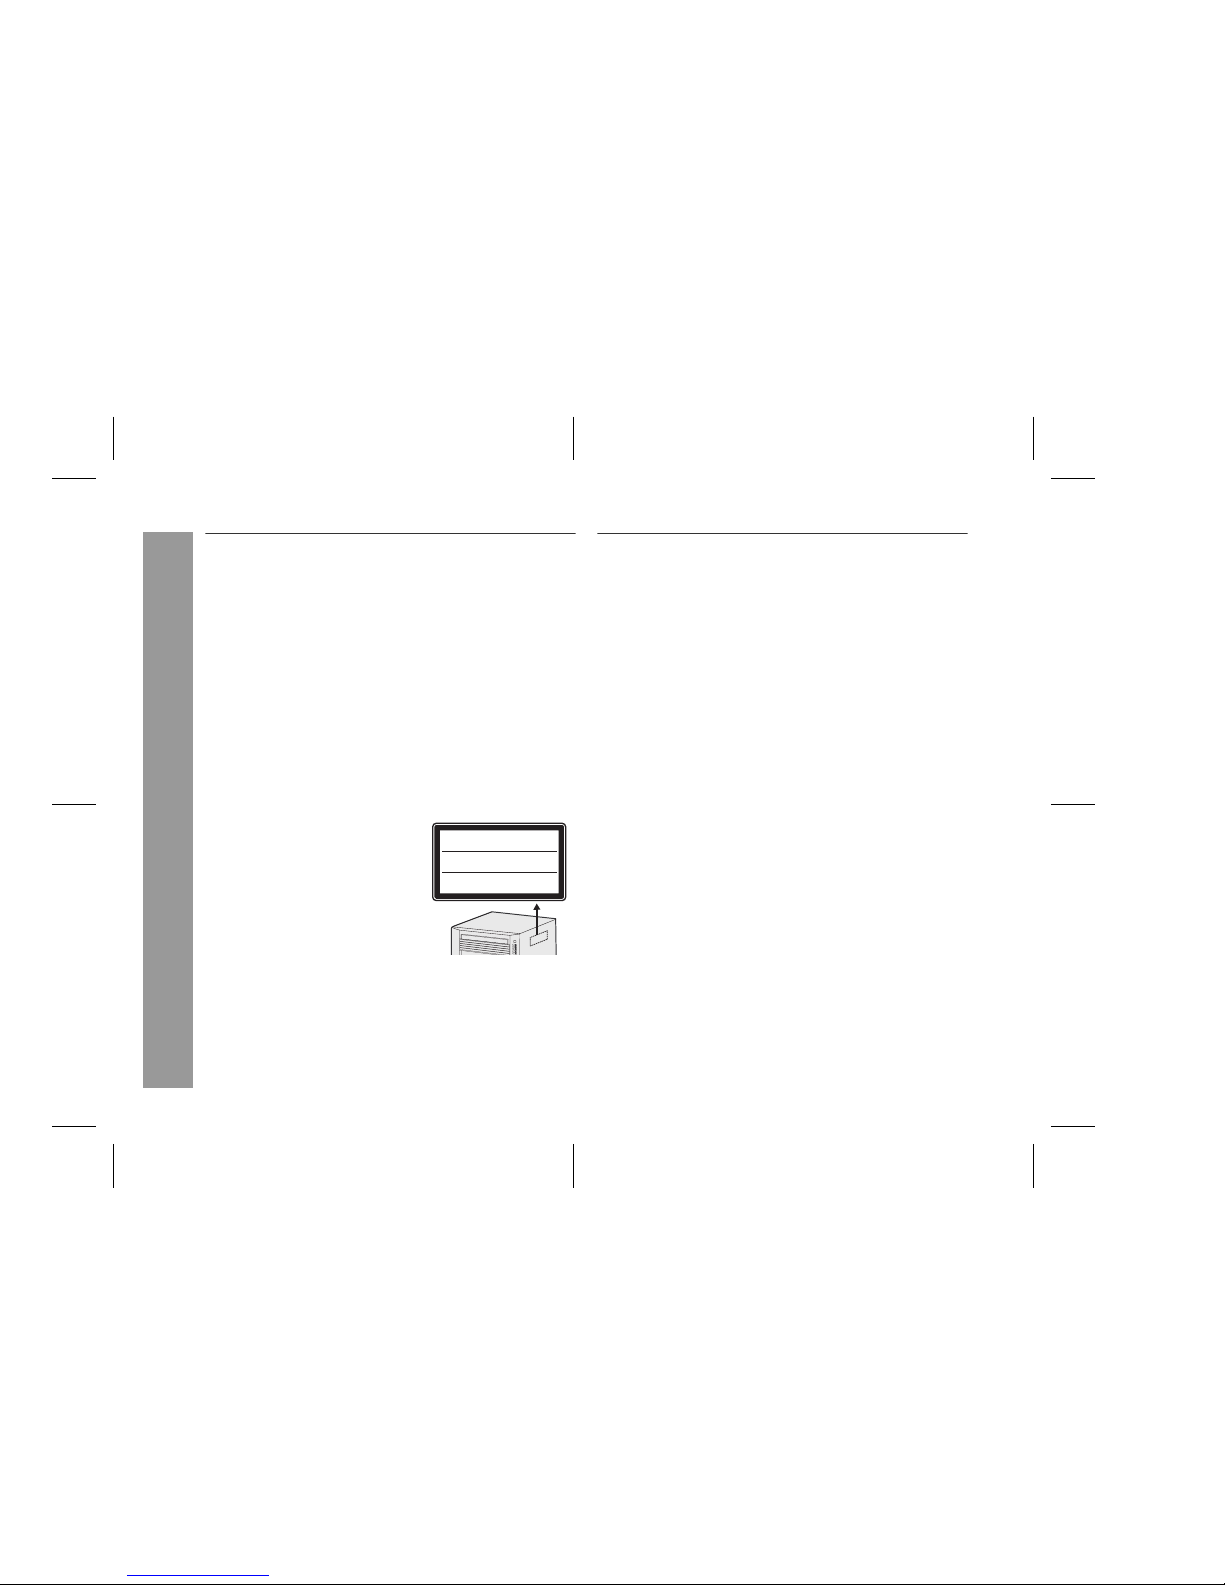
Sharp XL-MP110E User manual

03/12/17 XL-MP110E_FRONT.fm
Thank you for purchasing this SHARP product.
To obtain the best performance from this product, please read this
manual carefully. It will guide you in operating your SHARP product.
XL-MP130
MICRO COMPONENT SYSTEM XL-MP110E Micro Component System consisting of XL-MP110E (main
unit) and CP-MP110E (speaker system).
Accessories
Please confirm that the following accessories are included.
MODEL
OPERATION MANUAL
XL-MP110E
Note:
Only the above accessories are included.
Remote control 1 AM loop aerial 1 FM aerial 1

2
XL-MP110E
CAUTION-INVISIBLE LASER RADIATION WHEN OPEN.
DO NOT STARE INTO BEAM OR VIEW DIRECTLY WITH
OPTICAL INSTRUMENTS.
WARNUNG-UNSICHTBARE LASERSTRAHLUNG WENN GERÄT
GEÖFFNET. NICH IN DIE STRAHLUNG SCHAUEN ODER
DIREKT MIT OPTISCHEN HILFSMITTELN BETRACHTEN.
ATTENTION-RAYON LASER INVISIBLE EN CAS D'OUVERTURE.
NE PAS REGARDER LE FAISCEAU DIRECTEMENT OU AVEC DES
INSTRUMENTS OPTIQUES.
Important Instruction
Special notes
WARNINGS
When the ON/STAND-BY button is set at STAND-BY position,
mains voltage is still present inside the unit. When the ON/
STAND-BY button is set at STAND-BY position, the unit may be
brought into operation by the timer mode or remote control.
This unit contains no user serviceable parts. Never remove covers
unless qualified to do so. This unit contains dangerous voltages,
always remove mains plug from the socket before any service
operation and when not in use for a long period.
To prevent fire or shock hazard, do not expose this appliance to
dripping or splashing. No objects filled with liquids, such as vases,
shall be placed on the apparatus.
CAUTION
This product is classified as a CLASS 1 LASER product.
Use of controls, adjustments or performance of procedures other
than those specified herein may result in hazardous radiation
exposure.
As the laser beam used in this compact disc player is harmful to
the eyes, do not attempt to disassemble the cabinet. Refer
servicing to qualified personnel only.
Laser Diode Properties
Material: GaAIAs
Wavelength: 795 nm
Emission Duration: continuous
Laser Output: max. 0.6 mW
Note for users in Australia:
Copyright may exist in material you wish to record. Copying or broad-
casting such material without permission of the relevant licensees or
owners of the copyright is prohibited by law. SHARP is not in a posi-
tion to authorise the copying or broadcasting of copyright materials
and nothing in this OPERATION MANUAL should be implied as giv-
ing that authority.
For other countries:
Audio-visual material may consist of copyrighted works which must
not be recorded without the authority of the owner of the copyright.
Please refer to the relevant laws in your country.
Contents
Page
General Information
Precautions . . . . . . . . . . . . . . . . . . . . . . . . . . . . . . . . . . . . . . . . . . 3
Controls and indicators . . . . . . . . . . . . . . . . . . . . . . . . . . . . . 4 - 7
Preparation for Use
System connections . . . . . . . . . . . . . . . . . . . . . . . . . . . . . . 8 - 10
Remote control . . . . . . . . . . . . . . . . . . . . . . . . . . . . . . . . . . . . . . 11
Basic Operation
General control . . . . . . . . . . . . . . . . . . . . . . . . . . . . . . . . . . . . . . 12
Setting the clock . . . . . . . . . . . . . . . . . . . . . . . . . . . . . . . . . . . . 13
CD or MP3/WMA disc Playback
Listening to a CD or MP3/WMA disc . . . . . . . . . . . . . . . . 14 - 17
Advanced CD or MP3/WMA disc playback . . . . . . . . . . . 18 - 20
Radio
Listening to the radio . . . . . . . . . . . . . . . . . . . . . . . . . . . . . 21 - 22
Tape Playback
Listening to a cassette tape . . . . . . . . . . . . . . . . . . . . . . . 23 - 24
Tape Recording
Recording on a cassette tape . . . . . . . . . . . . . . . . . . . . . . 24 - 26
Advanced Features
Timer and sleep operation . . . . . . . . . . . . . . . . . . . . . . . . 27 - 30
Enhancing your system . . . . . . . . . . . . . . . . . . . . . . . . . . . 31 - 32
References
Troubleshooting chart . . . . . . . . . . . . . . . . . . . . . . . . . . . . 32 - 34
Maintenance . . . . . . . . . . . . . . . . . . . . . . . . . . . . . . . . . . . . . . . . 35
Specifications . . . . . . . . . . . . . . . . . . . . . . . . . . . . . . . . . . . . . . . 36
WARRANTY . . . . . . . . . . . . . . . . . . . . . . . . . . End of the manual

3
8
XL-MP110E
General Information
Precautions
General
Please ensure that the equipment is positioned in a well-ventilated
area and ensure that there is at least 10 cm (4") of free space
along the sides, top and back of the equipment.
Do not place anything on top of the unit.
Do not expose the unit to moisture, to temperatures higher than
60
˚
C (140
˚
F) or to extremely low temperatures.
If your system does not work properly, disconnect the AC power
lead from the wall socket. Plug the AC power lead back in, and
then turn on your system.
No naked flame sources, such as lighted candles, should be
placed on the apparatus.
Attention should be drawn to the environmental aspects of battery
disposal.
This unit should only be used within the range of 5˚C - 35˚C
(41˚F - 95˚F).
Warning:
The voltage used must be the same as that specified on this unit. Us-
ing this product with a higher voltage other than that which is speci-
fied is dangerous and may result in a fire or other type of accident
causing damage. SHARP will not be held responsible for any dam-
age resulting from use of this unit with a voltage other than that which
is specified.
Volume control
The sound level at a given volume setting depends on speaker effi-
ciency, location and various other factors. It is advisable to avoid ex-
posure to high volume levels, which occurs whilst turning the unit on
with the volume control setting up high, or whilst continually listening
at high volumes.
Use the unit on a firm, level surface free from
vibration.
Keep the unit away from direct sunlight,
strong magnetic fields, excessive dust,
humidity and electronic/electrical equip-
ment (home computers, facsimiles, etc.)
which generate electrical noise.
In case of an electrical storm, unplug the
unit for safety.
10 cm (4")10 cm (4") 10 cm (4")
10 cm (4")
/
Hold the AC power plug by the head when
removing it from the wall socket, as pulling
the lead can damage internal wires.
Do not remove the outer cover, as this
may result in electric shock. Refer inter-
nal service to your local SHARP service
facility.
The ventilation should not be impeded by
covering the ventilation openings with
items, such as newspapers, tablecloths,
curtains, etc.

4
XL-MP110E
General Information
Controls and indicators
Front panel
Reference page
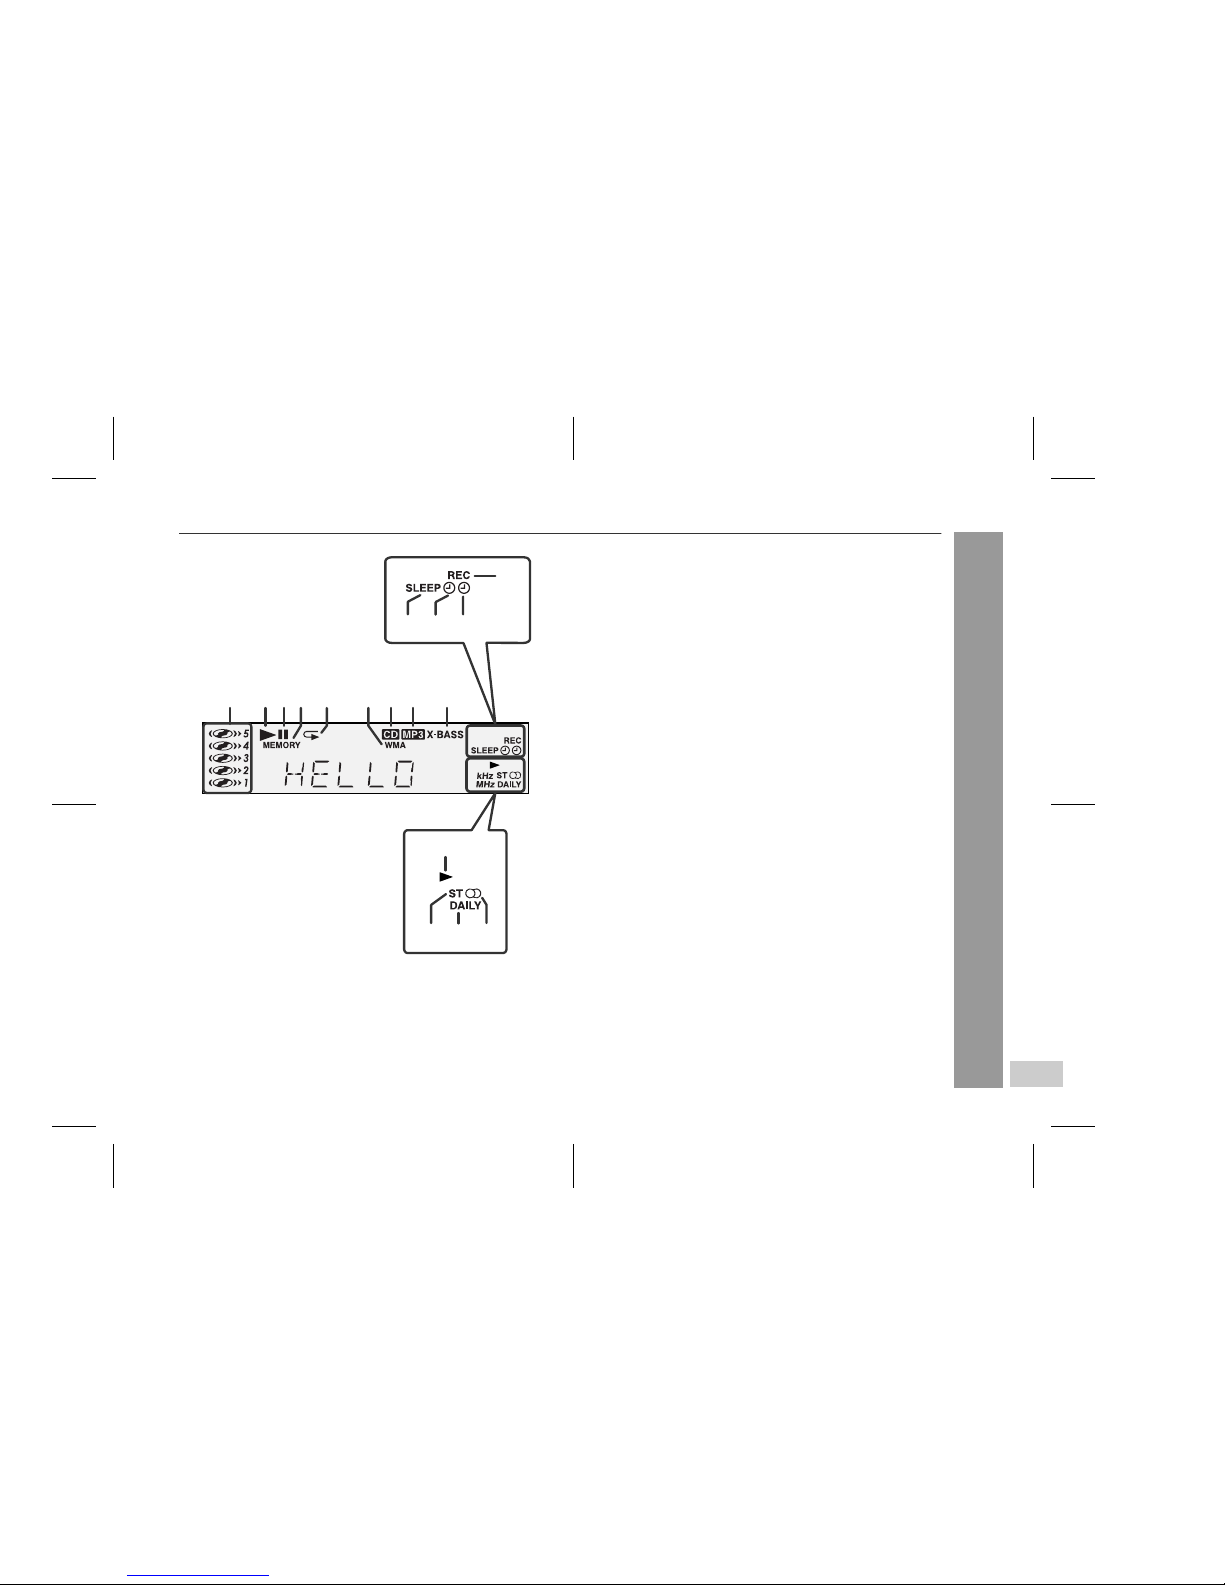
1. Disc Trays . . . . . . . . . . . . . . . . . . . . . . . . . . . . . . . . . . . . . . . 15
2. Timer Indicator . . . . . . . . . . . . . . . . . . . . . . . . . . . . . . . . . . . 28
3. On/Stand-by Button . . . . . . . . . . . . . . . . . . . . . . . . . . . . . . . 12
4. Clock/Timer Button . . . . . . . . . . . . . . . . . . . . . . . . . 13, 27, 30
5. Tape Record Pause Button . . . . . . . . . . . . . . . . . . . . . . 25, 34
6. Cassette Compartment . . . . . . . . . . . . . . . . . . . . . . . . . . . . 23
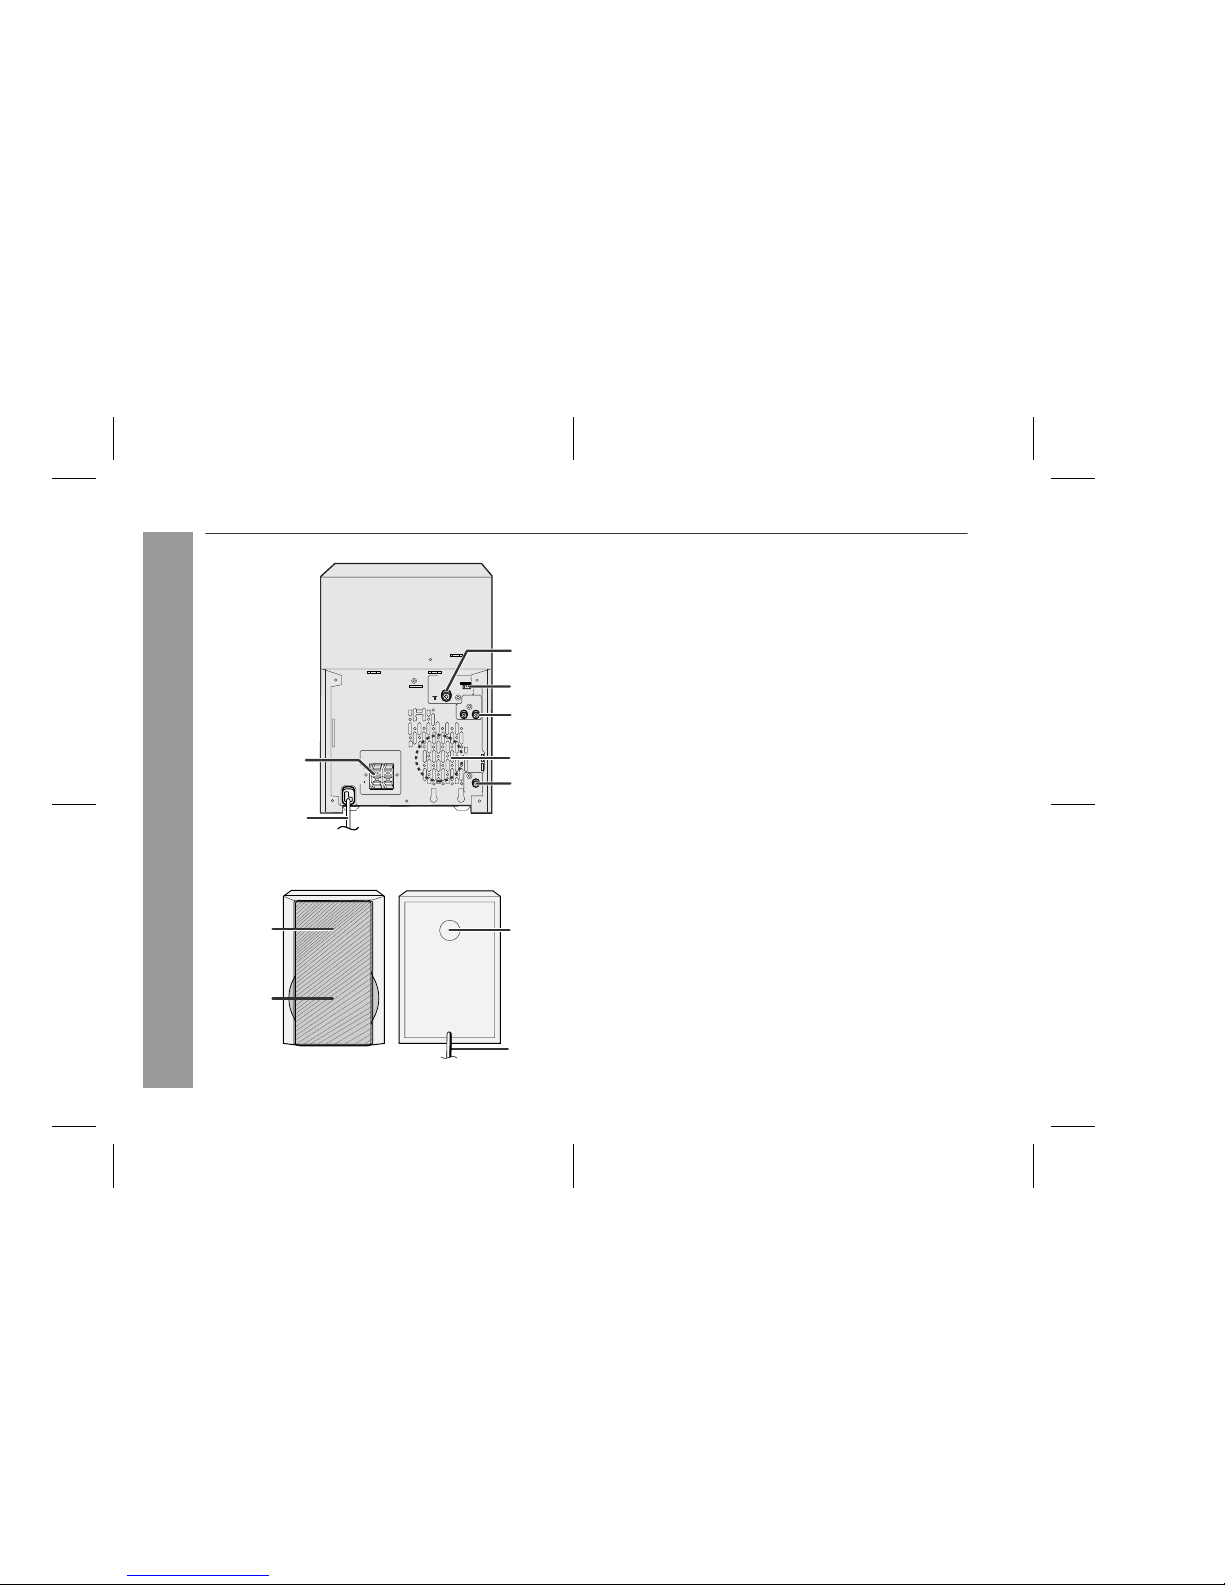
7. Headphone Socket . . . . . . . . . . . . . . . . . . . . . . . . . . . . . . . . 31
8. Disc Tray Open/Close Button . . . . . . . . . . . . . . . . . . . . . . . 14
9. Disc Number Select Buttons . . . . . . . . . . . . . . . . . . . . . . . . 14
10. CD Direct Play Button . . . . . . . . . . . . . . . . . . . . . . . . . . . . . 18
11. Remote Sensor . . . . . . . . . . . . . . . . . . . . . . . . . . . . . . . . . . . 11
12. Volume Control . . . . . . . . . . . . . . . . . . . . . . . . . . . . . . . . . . . 12
13. Memory/Set Button . . . . . . . . . . . . . . . . . . . . . . . . . . . . 13, 27
14. Equalizer Mode Select Button . . . . . . . . . . . . . . . . . . . . . . . 12
15. Extra Bass/Demo Mode Button . . . . . . . . . . . . . . . . . . . 12, 34
16. CD Button . . . . . . . . . . . . . . . . . . . . . . . . . . . . . . . . . . . . . . . 14
17. Tape Button . . . . . . . . . . . . . . . . . . . . . . . . . . . . . . . . . . . . . 23
18. Disc Track Down or Fast Reverse, Tape Rewind,
Tuner Preset Down, Time Down Button . . . 13, 16, 22, 24, 27
19. Disc Track Up or Fast Forward,Tape Fast Forward,
Tuner Preset Up, Time Up Button . . . . . . . . 13, 16, 22, 24, 27
20. Tuner (Band) Button . . . . . . . . . . . . . . . . . . . . . . . . . . . . . . 21
21. Video/Auxiliary Button . . . . . . . . . . . . . . . . . . . . . . . . . . . . . 31
22. Disc Play or Repeat, Tape Play Button . . . . . . . . . 14, 19, 24
23. Tuning Down Button . . . . . . . . . . . . . . . . . . . . . . . . . . . 21, 34
24. Tuning Up Button . . . . . . . . . . . . . . . . . . . . . . . . . . . . . . 21, 22
25. Disc or Tape Stop Button . . . . . . . . . . . . . . . . . . . . . . . . 16, 24
/
CD
25

5
8
XL-MP110E
General Information
Display
Reference page
1. Disc Number Indicators . . . . . . . . . . . . . . . . . . . . . . . . . . . . 18
2. Disc Play Indicator . . . . . . . . . . . . . . . . . . . . . . . . . . . . . . . . 15
3. Disc Pause Indicator . . . . . . . . . . . . . . . . . . . . . . . . . . . . . . 16
4. Memory Indicator . . . . . . . . . . . . . . . . . . . . . . . . . . . . . . . . . 20
5. Disc Repeat Play Indicator . . . . . . . . . . . . . . . . . . . . . . . . . 19
6. WMA Indicator . . . . . . . . . . . . . . . . . . . . . . . . . . . . . . . . . . . 15
7. CD Indicator . . . . . . . . . . . . . . . . . . . . . . . . . . . . . . . . . . . . . 15
8. MP3 Indicator . . . . . . . . . . . . . . . . . . . . . . . . . . . . . . . . . . . . 15
9. Extra Bass Indicator . . . . . . . . . . . . . . . . . . . . . . . . . . . . . . 12
10. Tape Record Indicator . . . . . . . . . . . . . . . . . . . . . . . . . . . . . 25
11. Sleep Indicator . . . . . . . . . . . . . . . . . . . . . . . . . . . . . . . . . . . 30
12. Timer Play Indicator . . . . . . . . . . . . . . . . . . . . . . . . . . . . . . . 28
13. Timer Recording Indicator . . . . . . . . . . . . . . . . . . . . . . . . . 28
14. Tape Play Indicator . . . . . . . . . . . . . . . . . . . . . . . . . . . . . . . 23
15. FM Stereo Mode Indicator . . . . . . . . . . . . . . . . . . . . . . . . . . 21
16. Daily Timer Indicator . . . . . . . . . . . . . . . . . . . . . . . . . . . . . . 28
17. FM Stereo Receiving Indicator . . . . . . . . . . . . . . . . . . . . . . 21
976 8321 4 5
12
1615 17
11
10
13
14

6
XL-MP110E
General Information
Controls and indicators (continued)
Rear panel
Reference page
1. Speaker Terminals . . . . . . . . . . . . . . . . . . . . . . . . . . . . . . . . . 9
2. AC Power Lead . . . . . . . . . . . . . . . . . . . . . . . . . . . . . . . . . . . 10
3. FM 75 Ohms Aerial Socket . . . . . . . . . . . . . . . . . . . . . . . . . 10
4. AM Loop Aerial Socket . . . . . . . . . . . . . . . . . . . . . . . . . . . . . 9
5. Video/Auxiliary (Audio Signal) Input Sockets . . . . . . . . . . 31
6. Cooling Fan . . . . . . . . . . . . . . . . . . . . . . . . . . . . . . . . . . . . . . 10
7. Subwoofer Pre-output Socket . . . . . . . . . . . . . . . . . . . . . . . 32
Speaker system
RATEDSPEAKER IMPEDANCE:
6 OHMS MIN.
AC INPUT
ANTENNA
RIGHT
RIGHT LEFT
FM
75 OHMS
AM
LOOP
VIDEO/AUX
IN
SUBWOOFER
PRE-OUT
SPEAKERS
LEFT 7
3
4
6
1
5
2
3
4
1
2
1. Tweeter
2. Woofer
3. Bass Reflex Duct
4. Speaker Wire

7
8
XL-MP110E
General Information
Remote control
Reference page
1. Remote Control Transmitter . . . . . . . . . . . . . . . . . . . . . . . . 11
2. Disc Clear/Dimmer Button . . . . . . . . . . . . . . . . . . . . . . 12, 20
3. Disc Number Select Buttons . . . . . . . . . . . . . . . . . . . . . . . . 14
4. Disc Random Button . . . . . . . . . . . . . . . . . . . . . . . . . . . . . . 19
5. Disc Stop Button . . . . . . . . . . . . . . . . . . . . . . . . . . . . . . . . . 16
6. Tape Stop Button . . . . . . . . . . . . . . . . . . . . . . . . . . . . . . . . . 24
7. Disc Track Down or Fast Reverse, Tape Rewind,
Tuner Preset Down, Time Down Button . . . . . . 13, 16, 22, 24
8. Equalizer Mode Select Button . . . . . . . . . . . . . . . . . . . . . . 12
9. Extra Bass Button . . . . . . . . . . . . . . . . . . . . . . . . . . . . . . . . 12
10. Disc Direct Search Buttons . . . . . . . . . . . . . . . . . . . . . . . . . 18
11. Memory Button . . . . . . . . . . . . . . . . . . . . . . . 13, 20, 22, 27, 30
12. On/Stand-by Button . . . . . . . . . . . . . . . . . . . . . . . . . . . . . . . 12
13. CD Button . . . . . . . . . . . . . . . . . . . . . . . . . . . . . . . . . . . . . . . 14
14. Disc Pause Button . . . . . . . . . . . . . . . . . . . . . . . . . . . . . . . . 16
15. Tuner (Band) Button . . . . . . . . . . . . . . . . . . . . . . . . . . . . . . 21
16. Disc Play or Repeat Button . . . . . . . . . . . . . . . . . . . . . . 14, 19
17. Tape Button . . . . . . . . . . . . . . . . . . . . . . . . . . . . . . . . . . . . . 23
18. Tape Play Button . . . . . . . . . . . . . . . . . . . . . . . . . . . . . . . . . 23
19. Video/Auxiliary Button . . . . . . . . . . . . . . . . . . . . . . . . . . . . 31
20. Tape Record Pause Button . . . . . . . . . . . . . . . . . . . . . . 25, 26
21. Disc Track Up or Fast Forward,Tape Fast Forward,
Tuner Preset Up, Time Up Button . . . . . . . . . . . 13, 16, 22, 24
22. Volume Up and Down Buttons . . . . . . . . . . . . . . . . . . . . . . 12
23. Clock/Timer Button . . . . . . . . . . . . . . . . . . . . . . . . . 13, 27, 30
24. MP3/WMA Display Button . . . . . . . . . . . . . . . . . . . . . . . . . . 17
21
22
23
24
14
16
18
20
8
10
7
17
19
13
15
12
9
111
6
5
4
2
3

8
XL-MP110E
Preparation for Use
System connections
RATEDSPEAKER IMPEDANCE:
6 OHMS MIN.
AC INPUT
ANTENNA
RIGHT
RIGHT LEFT
FM
75 OHMS
AM
LOOP
VIDEO/AUX
IN
SUBWOOFER
PRE-OUT
SPEAKERS
LEFT
Left speaker
Right speaker
Wall socket
(AC 230 - 240 V, 50 Hz)
Speaker connection (see page 9)
AM loop aerial
FM aerial
Make sure to unplug the AC power lead before any connections.
Aerial connection (see page 9)
AC power connection (see page 10)

9
XL-MP110E
Preparation for Use
Aerial connection
Supplied FM aerial:
Connect the FM aerial wire to the FM 75 OHMS terminal and position
the FM aerial wire in the direction where the strongest signal can be
received.
Supplied AM loop aerial:
Connect the AM loop aerial to the AM LOOP socket. Position the AM
loop aerial for optimum reception. Place the AM loop aerial on a
shelf, etc., or attach it to a stand or a wall with screws (not supplied).
Note:
Placing the aerial on the unit or near the AC power lead may cause
noise pickup. Place the aerial away from the unit for better reception.
Installing the AM loop aerial:
Speaker connection
Connect the black wire to the minus (-) terminal, and the red wire to
the plus (+) terminal.
Caution:
Speaker grilles are removable
< Assembling > < Attaching to the wall >
Wall Screws (not supplied)
RATEDSPEAKER IMPEDANCE:
6OHMS MIN.
ACINPUT
ANTENNA
RIGHT
RIGHT LEFT
FM
75OHMS
AM
LOOP
VIDEO/AUX
IN
SUBWOOFER
PRE-OUT
SPEAKERS
LEFT
FM
75 OHMS
Use speakers with an impedance of 6 ohms or more, as lower im-
pedance speakers can damage the unit.
Do not mistake the right and the left chan-
nels. The right speaker is the one on the right
side when you face the unit.
Do not let the bare speaker wires touch
each other.
Do not allow any objects to fall into or to be
placed in the bass reflex ducts.
Do not stand or sit on the speakers. You may
be injured.
Incorrect
Make sure nothing comes into contact
with the speaker diaphragm when you
remove the speaker grilles.
RATEDSPEAKER IMPEDANCE:
6OHMS MIN.
ACINPUT
ANTENNA
RIGHT
RIGHT LEFT
FM
75OHMS
AM
LOOP
VIDEO/AUX
IN
SUBWOOFER
PRE-OUT
SPEAKERS
LEFT
BlackRed

10
XL-MP110E
Preparation for Use
System connections (continued)
AC power connection
After checking all the connections have been made correctly, plug
the AC power lead of this unit into the wall socket. If you plug in the
unit first, the unit will enter the demonstration mode.
Notes:
The unit will start the tape initialisation when plugged in to the wall
socket. During this process, initialising sound will be heard and
the unit cannot be turned on. Wait until the process is finished.
Unplug the AC power lead from the wall socket if the unit will not
be in use for a prolonged period of time.
Demonstration mode
External FM aerial
Use an external FM aerial if you require better reception.
Consult your dealer.
Cooling fan:
This main unit is built with a cooling fan at the rear of the unit for
improved cooling. Please do not cover the opening of the fan with
any obstacles, as this will block proper ventilation.
RATEDSPEAKER IMPEDANCE:
6OHMS MIN.
ACINPUT
ANTENNA
RIGHT
RIGHT LEFT
FM
75OHMS
AM
LOOP
VIDEO/AUX
IN
SUBWOOFER
PRE-OUT
SPEAKERS
LEFT
Wall socket
(AC 230 - 240 V, 50 Hz)
RATEDSPEAKER IMPEDANCE:
6OHMS MIN.
AC INPUT
RIGHT
RIGHT LEFT
VIDEO/AUX
IN
SUBWOOFER
PRE-OUT
SPEAKERS
LEFT
The first time the unit is plugged in, the
unit will enter the demonstration mode.
You will see words scroll.
To cancel the demonstration mode:
When the unit is in the power stand-
by mode (demonstration mode),
press the X-BASS/DEMO button.
The unit will enter the low power
consumption mode.
To return to the demonstration mode:
When the unit is in the power stand-by mode, press the X-BASS/
DEMO button again.
Note:
When the power is on, the X-BASS/DEMO button can be used to se-
lect the extra bass mode.
ANTENNA
FM
75 OHMS
AM
LOOP
External FM aerial

11
XL-MP110E
Preparation for Use
Remote control
Battery installation
Precautions for battery use:
Replace all old batteries with new ones at the same time.
Do not mix old and new batteries.
Remove the batteries if the unit will not be used for long periods
of time. This will prevent potential damage due to battery leakage.
Caution:
Do not use rechargeable batteries (nickel-cadmium battery, etc.).
Installing the batteries incorrectly may cause the unit to malfunc-
tion.
Battery removal:
Open the battery cover and pull up the battery to take out.
Notes concerning use:
Replace the batteries if the operating distance is reduced or if the
operation becomes erratic.
Periodically clean the transmitter on the remote control and the
sensor on the unit with a soft cloth.
Exposing the sensor on the unit to strong light may interfere with
operation. Change the lighting or the direction of the unit if this
occurs.
Keep the remote control away from moisture, heat, shock, and vi-
brations.
Test of the remote control
Check the remote control after checking all the connections (see
pages 8 - 10).
Point the remote control directly at the remote sensor on the unit.
The remote control can be used within the range shown below:
Press the ON/STAND-BY button. Does the power turn on? Now, you
can enjoy music.
Use 2 "AA" size batteries (UM/SUM-3, R6, HP-7 or similar).
Batteries are not included.
1 Open the battery cover.
2 Insert the batteries according to the direction indicated in
the battery compartment (back of the battery cover).
When inserting or removing the batteries, push them towards the
battery terminals.
3 Close the cover.
/

12
XL-MP110E
Basic Operation
General control
To turn the power on
Press the ON/STAND-BY button to turn the power on.
To change the display brightness
You can switch the display brightness by pressing the CLEAR/
DIMMER button more than 2 seconds.
Volume auto fade-in
If you turn off and on the main unit with the volume set to 27 or
higher, the volume starts at 16 and fades in to the last set level.
Volume control
Main unit operation:
When the VOL +/- control is turned clockwise, the volume will
increase. When it is turned anti-clockwise, the volume will decrease.
Remote control operation:
Press the VOLUME (+ or -) button to increase or decrease the volume.
Bass control
When the power is first turned on, the unit will enter the extra bass
mode which emphasises the bass frequencies, and "X-BASS" will
appear. To cancel the extra bass mode, press the X-BASS/DEMO
(X-BASS) button.
Equalizer
When the EQUALIZER (EQUALIZER MODE) button is pressed, the
current mode setting will be displayed. To change to a different
mode, press the EQUALIZER (EQUALIZER MODE) button repeat-
edly until the desired sound mode appears.
After use:
Press the ON/STAND-BY button to enter the power stand-by
mode.
/
/
30 MAXIMUM0 .....
ROCK For rock music.
FLAT No equalisation.
CLASSIC For classical music.
POPS For pop music.
JAZZ For jazz.
VOCAL Vocals are enhanced.

13
XL-MP110E
Basic Operation
Setting the clock
In this example, the clock is set for the 24-hour (0:00) display.
To confirm the time display:
[When the unit is in the stand-by mode]
Press the CLOCK/TIMER button.
The time display will appear for about 10 seconds.
[When the power is on]
Press the CLOCK/TIMER button.
Within 10 seconds, press the or button to display the
time
.
The time display will appear for about 10 seconds.
Note:
The "CLOCK" will appear or time will flash to confirm the time dis-
play when the AC power supply is restored after a power failure or
unplugging the unit. If incorrect, readjust the clock as follows.
To readjust the clock:
Perform "Setting the clock" from step 1. If the "CLOCK" does not
appear in step 3, step 4 (for selecting the 12-hour or 24-hour dis-
play) will be skipped.
To change the 12-hour or 24-hour display:
Note:
The clock can also be set with the remote control.
1
Press the ON/STAND-BY button to turn the power on.
2
Press the CLOCK/TIMER button.
3
Within 10 seconds, press the or button to se-
lect "CLOCK", and press the MEMORY/SET button.
4
Press the or button to select 12-hour or 24-
hour display and then press the MEMORY/SET button.
"0:00" The 24-hour display will appear.
(0:00 - 23:59)
"AM 12:00" The 12-hour display will appear.
(AM 12:00 - PM 11:59)
"AM 0:00" The 12-hour display will appear.
(AM 0:00 - PM 11:59)
/
/
5
Press the or button to adjust the hour and
then press the MEMORY/SET button.
Press the or button once to advance the time by
1 hour. Hold it down to advance continuously.
6
Press the or button to adjust the minutes and
then press the MEMORY/SET button.
Press the or button once to advance the time by
1 minute. Hold it down to change the time in 5-minute intervals.
1 Clear all the programmed contents. [Refer to "Clearing all the
memory (reset)" on page 34 for details.]
2 Perform "Setting the clock" from step 1.

14
XL-MP110E
CD or MP3/WMA disc Playback
Listening to a CD or MP3/WMA disc
This system can play back a standard CD, CD-R/RW in the CD format
and CD-R/RW with MP3 or WMA files, but cannot record on them.
Some audio CD-R and CD-RW discs may not be playable due to the
state of the disc or the device that was used for recording.
MP3:
MP3 is a form of compression. It is an acronym which stands
for MPEG Audio Layer 3.
MP3 is a type of audio code which is processed by significant
compression from the original audio source with very little loss
in sound quality.
This system supports MPEG 1 Layer 3, MPEG 2 Layer 3, and
VBR files.
During VBR file playback, time counter in the display may differ
from its actual playback time.
WMA:
WMA files are Advanced System Format files that include audio
files which are compressed with Windows Media Audio codec.
WMA is developed by Microsoft as an audio format file for Win-
dows Media Player.
Notes:
"MP3" or "WMA" indicator will light up after the unit reads infor-
mation on an MP3 or WMA disc.
Auto power on function:
When you press any of the following buttons, the unit turns on.
CD button (main unit and remote control): The unit turns on and
the "CD" function is activated.
CD / button on the remote control: The unit turns on and CD
playback starts (regardless of the last function).
/ button on the main unit: The unit turns on and playback of
the last function starts (CD, TAPE, TUNER, VIDEO/AUX).
Auto power off function:
In the stop mode of CD, MP3 or WMA operation, the main unit enters
the stand-by mode after 15 minutes of inactivity.
/

15
XL-MP110E
CD or MP3/WMA disc Playback
Playback will begin from track 1 on DISC 1. After that disc fin-
ishes playing, the next disc will automatically play.
After the last track on the fifth disc is played, the unit will stop
automatically.
When there is no disc in one of the disc trays (1 - 5), the empty
tray will be skipped to the next tray with a disc.
To exchange other discs whilst playing a disc:
Press one of the 1 - 5 buttons for the stopped disc and within 5
seconds, press the OPEN/CLOSE button and exchange discs.
To remove the discs:
In the stop mode, press the 1 - 5 button and within 5 seconds,
press the OPEN/CLOSE button.
Caution:
Do not place two discs in one disc tray.
Do not play discs of special shapes (heart, octagon, etc). It may
cause malfunctions.
Do not push the disc tray whilst it is moving.
If the power fails whilst the tray is open, wait until the power is re-
stored.
If the disc tray is stopped with force, "ER-CD20" will appear on the
display for 3 seconds and the unit will not function. If this occurs,
press the ON/STAND-BY button to enter the power stand-by
mode and then turn the power on again.
If TV or radio interference occurs during CD operation, move the
unit away from the TV or radio.
If a disc is damaged, dirty, or loaded upside down, the disc will
skip or not play.
1Press the ON/STAND-BY button to turn the power on.
2Press the CD button.
3Press the 1 button and within 5 seconds, press the
OPEN/CLOSE button to open the disc tray 1.
4Place the disc on the disc tray 1, label side up.
Be sure to place 8 cm (3") disc in the middle of the disc trays.
5Press the OPEN/CLOSE button to close the disc tray 1.
Due to the structure of its disc information, it takes longer to
read an MP3/WMA disc than a normal CD (approximately 20
to 90 seconds).
6You can place discs on the trays 2 - 5 by following steps
3 - 5.
7Press the / button to start playback.
12 cm (5") 8 cm (3")
[CD]
Total number of
tracks on the disc
Total playing
time of the disc
Total number
of track
MP3 indicator
[MP3/WMA]
CD indicator
WMA indicator
Disc play indicator

16
XL-MP110E
CD or MP3/WMA disc Playback
Listening to a CD or MP3/WMA disc (continued)
Various disc functions Notes for CD:
Notes for MP3/WMA discs:
Track up/track down is possible only within individual discs.
The sound is heard during fast forward/fast reverse with a CD, but
not with an MP3/WMA disc. For fast forward or fast reverse of an
MP3/WMA disc, refer to playback time on the display.
Fast forward/fast reverse is possible only within individual tracks.
When the end of the track is reached during fast forward, the next
track will be played. Playback of the track will begin when its be-
ginning is reached during fast reverse.
Function Main unit Remote
control
Operation
Play Press in the stop
mode.
Stop Press in the playback
mode.
Pause Press in the playback
mode. Press the /
button to resume play-
back from the paused
point.
Track up/
Track down
Press in the playback
or stop mode.
If you press the button
in the stop mode,
press the / button
to start the desired
track.
Fast for-
ward/Fast
reverse
Press and hold down
in the playback mode.
Release the button to
resume playback.
Track up/track down is possible only within individual discs.
Fast forward/fast reverse is possible only within individual discs.
When the end of the last track is reached during fast forward,
"END" will appear on the display and CD operation will be paused.
When the beginning of the first track is reached during fast
reverse, the unit will enter the playback mode.

17
XL-MP110E
CD or MP3/WMA disc Playback
To change the display (MP3/WMA discs only)
Whilst in the stop mode or playback mode, press the DISPLAY
button.
Each time the button is pressed, the display will change as follows.
[When in the stop mode]
[When in the playback mode]
To select the desired folder or track by name
(MP3/WMA discs only)
Note:
After selecting a disc with one of the 1 - 5 buttons, the display
will not change even if the DISPLAY button is pressed, and neither
the folder nor track name is displayed.
Total number of tracks Folder name
Track name
Track number Elapsed playback
time Folder name
Track name
1Whilst in the stop mode, press the DISPLAY button to
display the folder name.
2
Select the desired folder by pressing the ( ) or ( )
button.
3Press the DISPLAY button to
display the track name.
4Select the desired track by pressing the ( ) or ( )
button.
5Press the / (CD / ) button
to begin playback.

18
XL-MP110E
CD or MP3/WMA disc Playback
Advanced CD or MP3/WMA disc playback
To specify a disc to play
You can play a disc by specifying the disc number.
Playback will begin from track 1 on the chosen disc.
After the last track on the chosen disc is played, the unit stops
automatically.
Note:
If a disc tray with no disc is selected, playback will not start and the
disc indicator will go out.
To stop playback:
Press the (CD ) button.
Direct track search
By using the direct search buttons, the desired tracks on the current
disc can be played.
If the direct search buttons are pressed whilst the disc is stopped,
press the / button to start the desired track on the current disc.
Notes:
A track number higher than the number of tracks on the disc can-
not be selected.
During random play, direct search is not possible.
1Press one of the 1 - 5 buttons to select the desired disc.
Selected disc number
2Within 5 seconds, press the CD DIRECT PLAY button on
the main unit.
/
Use the direct search buttons on
the remote control to select the de-
sired track whilst playing the se-
lected disc.
Selected track number
The direct search buttons allow you to select up to number 9.
When selecting number 10 or higher, use the "+10" button.
A. For example, to choose 13
1 Press the "+10" button once.
2 Press the "3" button.
B. For example, to choose 30
1 Press the "+10" button three times.
2 Press the "0" button.
MP3

19
XL-MP110E
CD or MP3/WMA disc Playback
Repeat play
Repeat play can play all 5 discs, all tracks on a chosen disc, or a
programmed sequence continuously.
To cancel repeat play:
Press the / button again.
" " will go out.
To cancel repeat play:
Press the CD DIRECT PLAY button again.
" " will go out.
Random play
The tracks on the disc(s) can be played in random order automatically.
To cancel random play:
Press the / (CD / ) button.
"NORMAL" will appear for 2 seconds.
To cancel random play:
Press the CD DIRECT PLAY button.
"NORMAL" will appear for 2 seconds.
Notes:
If you press the button during random play, you can move to
the next track by the random operation. On the other hand, the
button does not allow you to move to the previous track. The be-
ginning of the track being played will be located.
In random play, the unit will select and play tracks automatically.
(You cannot select the order of the tracks.)
Caution:
After performing repeat or random play, be sure to press the (CD
) button. Otherwise, the disc(s) will play continuously.
To repeat all tracks on up to 5 discs:
Press the / button twice.
To repeat desired tracks:
Perform steps 1 - 6 in "Programmed play" section on page 20 and
then press the / button twice.
To repeat all tracks on the chosen disc:
1 Press one of the 1 - 5 buttons.
2 Within 5 seconds, press the CD DIRECT
PLAY button twice.
To random play all tracks on up to 5 discs:
Press the RANDOM button on the remote control.
To random play all tracks on the chosen disc:
1 Press one of the 1 - 5 buttons.
2 Within 5 seconds, press the CD DI-
RECT PLAY button.
3 Press the RANDOM button on the re-
mote control.

20
XL-MP110E
CD or MP3/WMA disc Playback
Advanced CD or MP3/WMA disc playback (continued)
Programmed play
You can choose up to 32 selections for playback in the order you like.
To cancel the programmed play mode:
Whilst in the stop mode and the "MEMORY" indicator is lit, press the
CLEAR/DIMMER button on the remote control. The "MEMORY" in-
dicator will disappear and all the programmed contents will be
cleared.
Adding tracks to the programme:
If a programme has been previously stored, the "MEMORY" indicator
will be displayed. Then follow steps 1 - 6 to add tracks. The new
tracks will be stored after the last track of the original programme.
To check which tracks are programmed:
Whilst the unit is stopped in the programmed play mode, press the
or button.
Notes:
When a disc with programmed tracks is ejected, the programme
is automatically cancelled.
Even if you press the ON/STAND-BY button to enter the stand-by
mode or change the function from CD to another, the programmed
selections will not be cleared.
During the programme operation, random play is not possible.
During programmed play, the CD DIRECT PLAY button will not
work.
1
Whilst in the stop mode, press
the MEMORY/SET (MEMORY)
button to enter the programming
save mode.
2
Press one of the 1 - 5 buttons
to select the desired disc.
Selected disc number
3
Press the direct search buttons
on the remote control to select
the desired track.
Selected track number
You can also select a track by pressing the or button.
4
Press the MEMORY/SET
(MEMORY) button to save the
track number.
5
Repeat steps 2 - 4 for other tracks. Up to 32 tracks can be
programmed.
If you make a mistake, the programmed tracks can be cleared
by pressing the CLEAR/DIMMER button.
6
Press the (CD ) button.
The total number of memory will
appear.
7
Press the / button to start playback.
To clear the programmed selections:
Press the CLEAR/DIMMER button on the re-
mote control whilst the "MEMORY" indicator
is flashing.
Each time the button is pressed, one track will
be cleared, beginning with the last track pro-
grammed.
Other manuals for XL-MP110E
2
This manual suits for next models
1
Table of contents
Other Sharp Stereo System manuals

Sharp
Sharp XL-3000H User manual

Sharp
Sharp XL-MP45H User manual

Sharp
Sharp XL-HF200P Instruction Manual

Sharp
Sharp CD-BA1500H User manual

Sharp
Sharp XL-HP550E User manual

Sharp
Sharp XL-35 User manual

Sharp
Sharp SD-CX1W(BL) User manual

Sharp
Sharp CD-RW5000 User manual

Sharp
Sharp XL-HF203B User manual

Sharp
Sharp CD-XP350W User manual

Sharp
Sharp CD-CH1500H User manual

Sharp
Sharp QT-CD20H User manual

Sharp
Sharp XL-MP2H User manual

Sharp
Sharp XL-55 User manual

Sharp
Sharp CP-XP300H User manual

Sharp
Sharp QT-MP5W User manual

Sharp
Sharp XL-HF151PH(S) User manual

Sharp
Sharp CD-BP90W User manual

Sharp
Sharp XL-UR250H User manual

Sharp
Sharp XL-B710 User manual