Sharper Image Mosquito User manual

Photo button
Throttle lever
(with speed control button)
Indicator light
Power switch
Video button
Forward/backward lever
Flip button
Aileron trim (left/right)
Elevator trim (forward/backward)
- 1 -
FEATURES
• Reliable 2.4 gHz RF communication
• Built-in gyro for smooth flying
• Indoor/outdoor use
• 3 speed levels (40%, 75%, 100%)
• Shoots high definition AVI video (1280x720P)
• Shoots high-quality JPEG images
CONTROLLER COMPONENTS
SETTING UP THE CONTROLLER
1. Unscrew the battery cover.
2. Insert 2 AA batteries, making sure you follow the correct polarity (“+”
or “-”) as indicated in the battery compartment.
3. Re-attach the battery cover.
NOTE: Always use alkaline batteries. Do not mix old and new batteries.
Keep batteries out of reach of children at all times. Always have an adult
install the batteries.
• 360° flips
• Flight range: 60 ft.
• LED lights
• Charge time: approximately
50 minutes
• Flight time: approximately 5 minutes
Item No. 206003
MOSQUITO HD VIDEO DRONE WITH LED LIGHTS
User Manual
Thank you for purchasing the Sharper Image Mosquito HD Video Drone with LED Lights.
This advanced nano quadcopter is designed for all skill levels.

- 2 -
WARNING—READ BEFORE CHARGING
Lithium Polymer batteries can expand, burst or catch fired if used incorrectly, causing
personal injury and property damage. It is essential that you read and follow all
instructions and safety warnings. SharperImage.com and its affiliated companies
assume no liability for failure to comply with these safety instructions and warnings.
1. Turn off the drone.
2. If the battery has been used recently, allow it to cool before recharging.
3. Charging must be performed by an adult.
4. Use only the charging cable that came with this product. Do not use any other
charging cables.
5. Always charge the battery on a non-flammable, heat-resistant surface with non-
flammable surroundings.
6. Connect the battery to the USB charging cable by inserting the “T”-shaped battery
plug into the “T”-shaped socket. (See illustration below.) Never try to force the
connection. If the pins are bent, do not attempt to charge the battery. Consult
Sharper Image Customer Service.
7. Connect the other end of the charging cable into a COMPUTER USB PORT ONLY. Do
not use a mobile phone charging adapter.
8. The LED on the USB charging cable will light up RED when it is charging, and will
turn OFF when it is fully charged.
9. Remove the battery from the charging cable as soon as the LED turns off, or after
30 minutes, whichever comes first. DO NOT charge the Lithium Polymer battery
for more than 45 minutes. Do not continue charging the battery once the LED has
turned off. Always disconnect the USB cable after charging.
10. Lithium Polymer batteries do not last forever. If your battery becomes damaged in
a crash, or no longer charges properly, immediately replace it with a new battery.
To prolong the life of your battery, it is always best to retain a bit of charge in your
battery prior to charging it.
CHARGING YOUR MOSQUITO DRONE

- 3 -
1. Make sure the flight area is free of people, pets, obstacles, trees, power lines, etc.
2. Do not operate near streets, busy parking lots, airports, crowds, etc.
3. Although this drone is approved for indoor and outdoor flight, it should not be flown
in strong wind.
4. Maintain a safe distance of 5 feet between you and the drone at all times.
5. Children must be supervised by an adult when using this product.
SAFE FLIGHT ENVIRONMENT
1. Insert a Micro SD Memory Card (not included) until it clicks into place.
2. Once the controller and drone are paired, press the Photo button once to take
a still picture.
3. Press the Video button to begin video recording.
4. Press the Video button once more to stop recording and save your video to the
memory card.
NOTE: Accommodates memory cards up to 32GB.
SHOOTING PHOTOS AND VIDEO
1. The LED on the front of the drone will start to flash. Place the
drone down on a flat, level surface.
2. Ensure that the Up/Down lever on the controller (the LEFT stick)
is in the fully down position. Then, turn on the controller power
switch. To pair the controller and the drone, raise the Up/Down
lever on the controller all the way up to the top position, then
lower it all the way down to the bottom. The controller will
make a BEEP sound, indicating it is paired. The next time you
raise the up/down lever, the drone will lift into the air.
3. Turn off the drone power after a flight.
4. Always turn the controller off after a flight, in order to conserve battery power.
SETTING UP THE SIGNAL CONNECTION
IMPORTANT BATTERY CARE INSTRUCTIONS
If your battery ever starts to smell, change color or look
swollen, discontinue use immediately. Do not attempt
to recharge it. Be advised that the battery may be hot.
Recycle the battery in accordance with local laws.

- 4 -
• Please take time to practice the maneuvers on the controller before embarking on
your first flight.
• Place the drone on a flat surface, making sure that the LED “eyes” are facing away
from you. This ensures that you and the drone are both facing the forward direction.
• When you are just starting out, keep the LED eyes and the orange blades facing
forward at all times.
• Ignore the Spin Right / Left function until you become more skilled at flying. You can
still use the Left/Right control to fly anywhere you like.
FLIGHT CONTROL
Mosquito Drone Control Guide
Direction Drone View Instructions Controller View
Ascending
and Descending
Push up on the throttle lever
(left stick) to go up. Do this
slowly at first until you learn the
instrument’s sensitivity. When
you push down on this lever, the
drone will start to go down.
Spin Right
and Spin Left
Push left on the throttle lever to
spin the drone left. Push right to
spin the drone right.
Forward
and Backward
Push forward on the forward/
backward lever (right stick) to
send the drone forward. Pull
down on this this lever to fly
backward. Do this slowly at first
until you learn the instrument’s
sensitivity.
Left Bank
and Right Bank
Push left on the right stick to
bank left. Push right to make
the drone bank right.

Direction Drone View Instructions Controller View
If it drifts to the LEFT…
Press the Aileron trim button
(right side button) until the
drone stops drifting.
If it drifts to the RIGHT…
Press the Aileron trim button
(left side button) until the drone
stops drifting.
If it drifts BACKWARD... Press the Forward/Backward
Trim Button UP till the drone
stops flying backwards.
If it drifts FORWARD…
Press the Forward/Backward
Trim Button Down till the drone
stops flying forwards.
- 5 -
It may be necessary to adjust the trim (fine tune the controls) before a flight. When you
lift off your Mosquito Drone into the air, and don’t use any other control levers, it should
just hover in one spot. If it doesn’t, you can follow the instructions below to bring your
drone to a perfect hover.
TRIMMING YOUR MOSQUITO DRONE
Sometimes you will want to reset the Mosquito Drone back to its original factory trim
settings. There are two ways to do this.
RESETTING THE TRIM

- 6 -
Option 1: One at a time, press the trim buttons in one
direction. If you hear the beeps getting faster and
then give you a louder beep, let go of the button. You
will have reset that trim button. If you hear the beeps
getting faster and then STOP, you need to push the
trim button in the opposite direction until you hear the
louder beep. Do this with all of the trim buttons and
you will have reset this important feature back to the
original factory settings.
Option 2: Push both the left AND right levers diagonally
down to the bottom right corner and hold them there
until you see the lights on the drone start to flash.
RESETTING THE TRIM (CONT.)
1. Make sure the Mosquito Drone is at least 10 feet off the
ground, or 10 feet below a ceiling.
2. Press the Flip button once to put the drone into flip mode
(you will hear a beep).
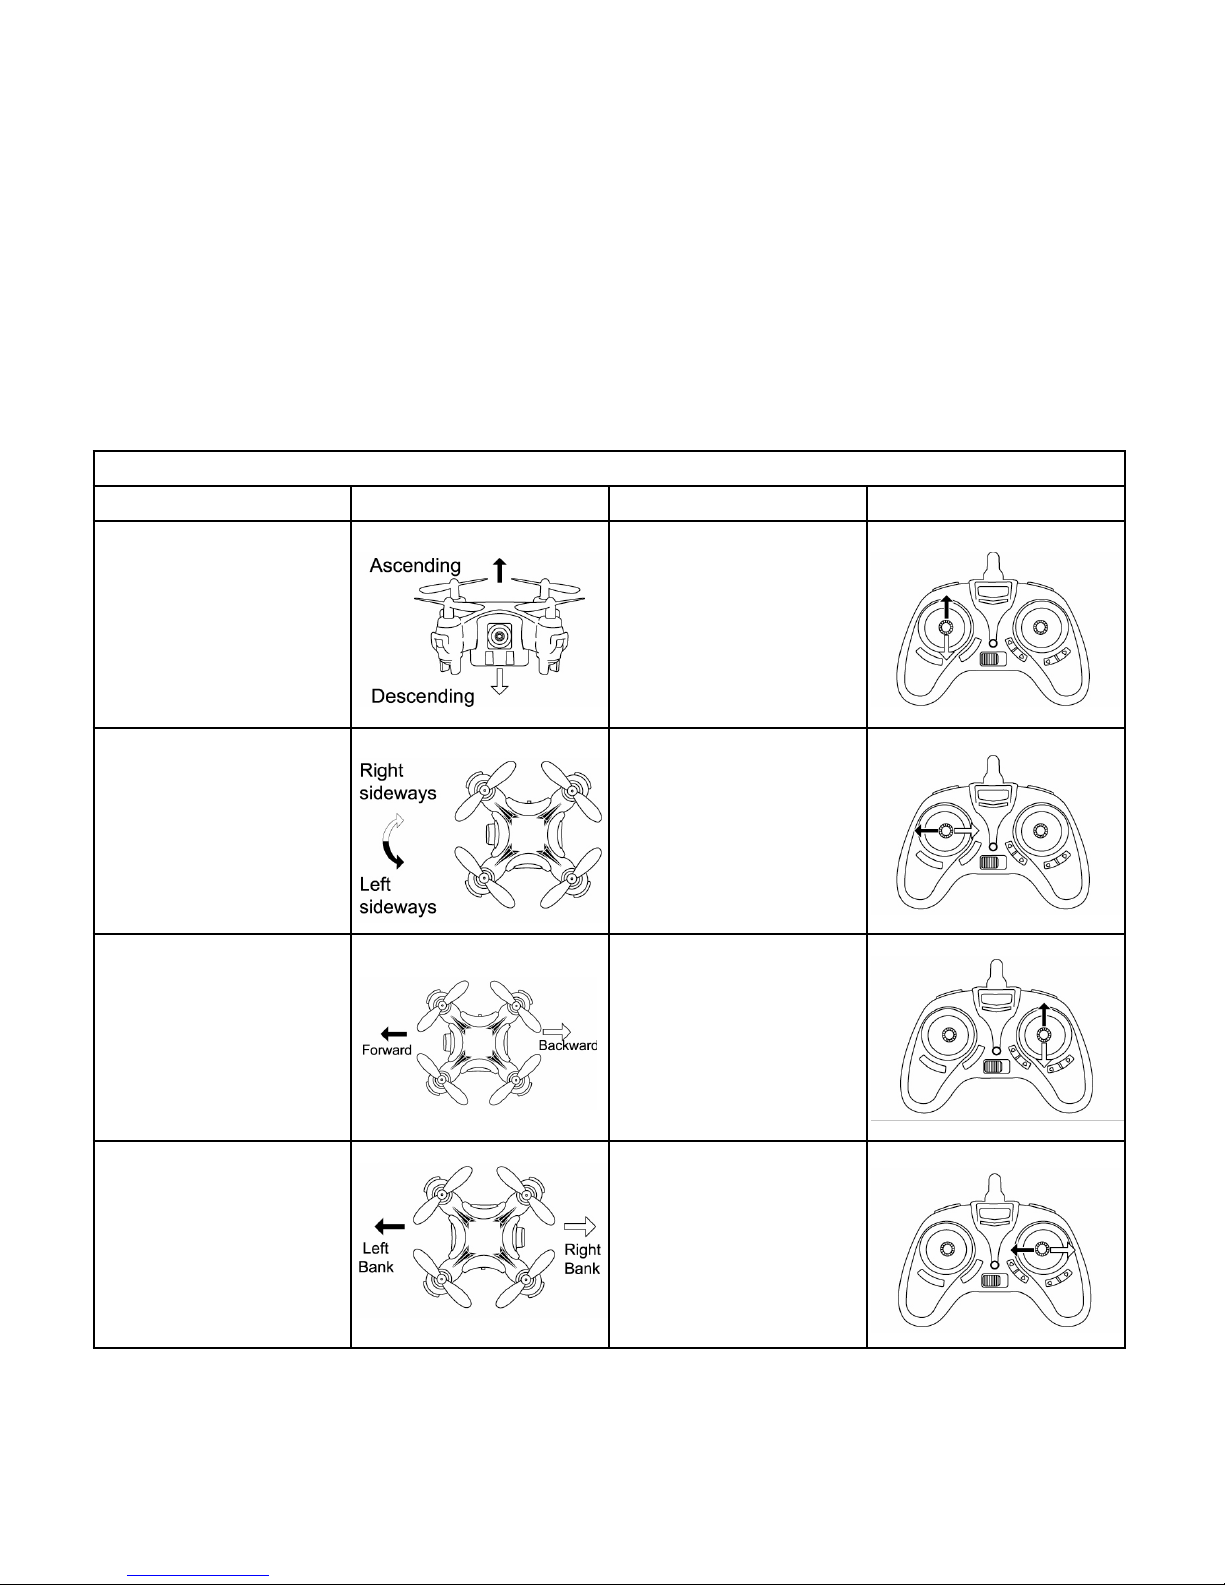
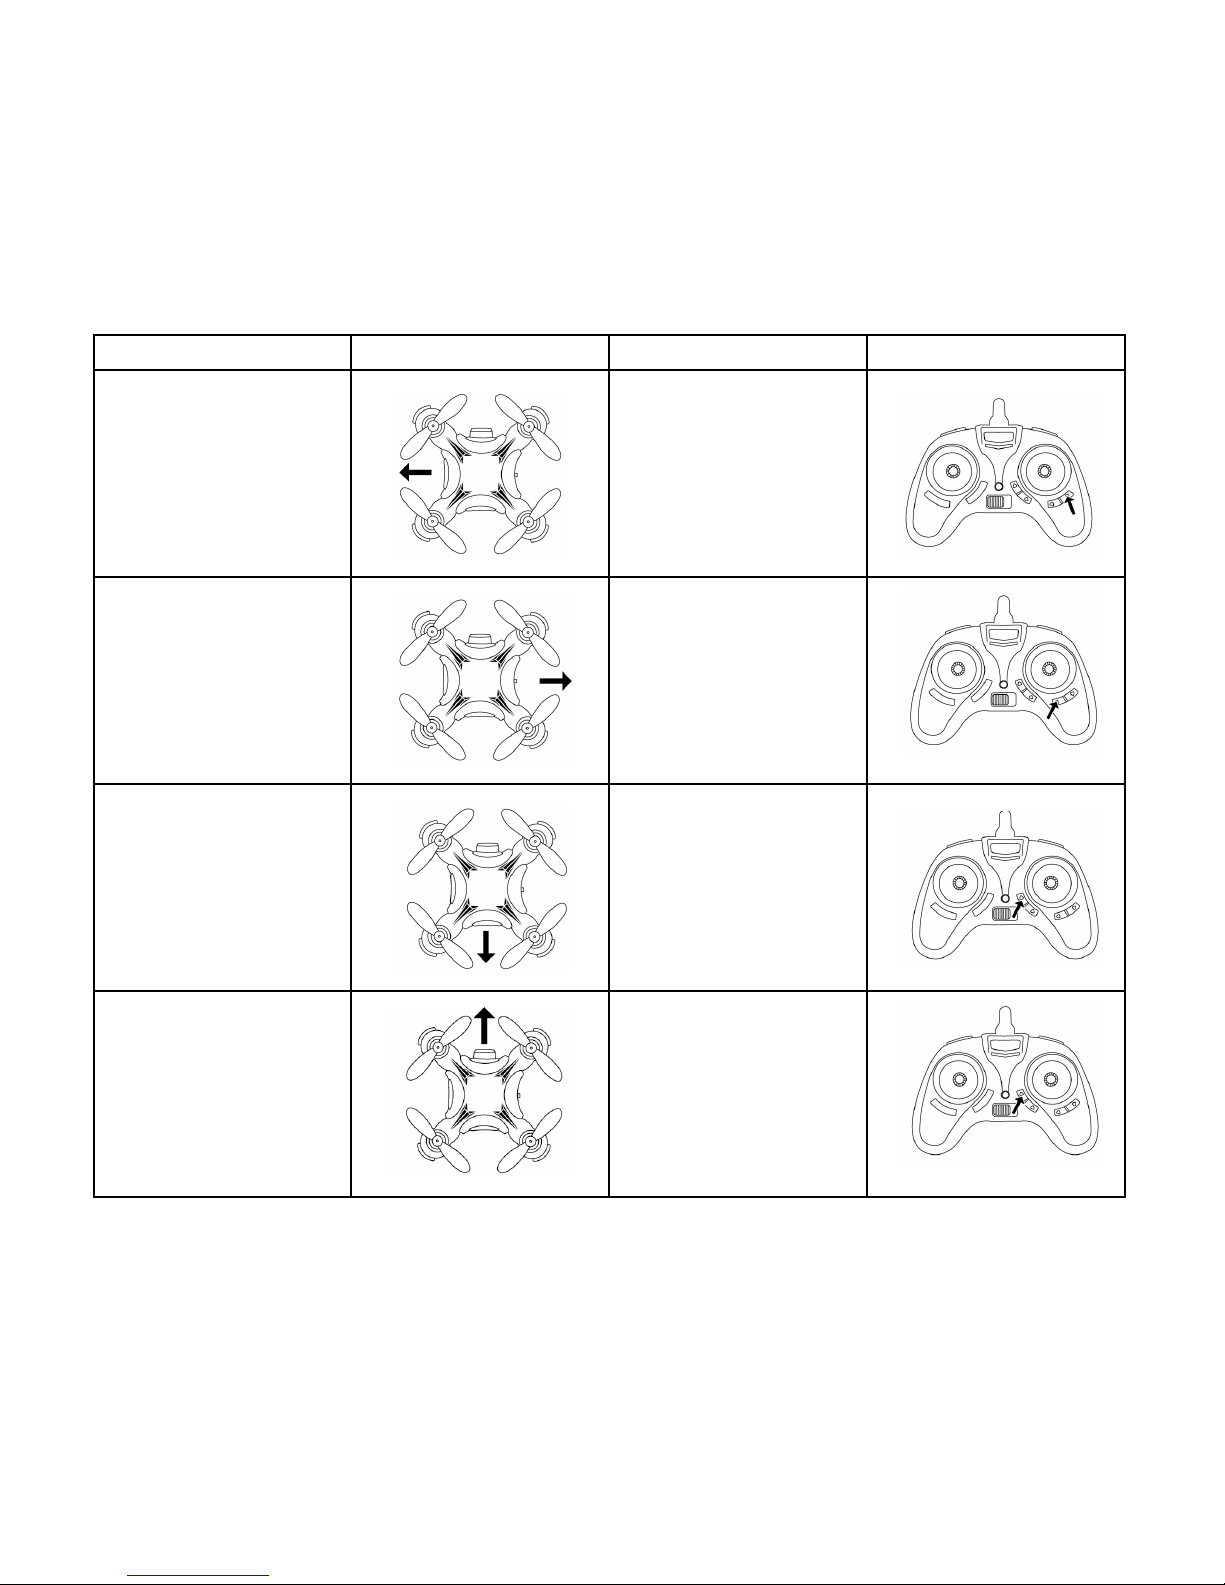
3. You can now choose the direction of the stunt flip. Using the
right stick on your controller, push up to perform a forward
flip; push down to perform a backward flip, push right to
perform a rifght flip and push left to perform a left flip.
4. After one flip, the controller reverts to normal flying mode.
HOW TO PERFORM A 360° STUNT FLIP
When you first set up your Mosquito Drone, it will automatically be set to Speed 1, which is the slowest
speed (and great for indoor flying). To change speeds, press the speed control button (that is, push
the throttle lever inward). You will hear two beeps, indicating that you are in Speed 2, which is suitable
for indoor and outdoor flying. Press a third time and you will hear three beeps, indicating that you are
in Speed 3. Speed 3 is the fastest speed mode, and should be used for outdoor flying only. Press the
speed control once more to go back to Speed 1 (you will hear one beep).
TIP: Always learn to fly at the slowest speed. You can increase the speed as you become more
proficient at flying.
SPEED CONTROL
Mosquito Drone Speed Chart
Mode Percent of Power Recommended For
Speed 1 40% Beginners or Indoor Use
Speed 2 75% Intermediates or Indoor/Outdoor Use
Speed 3 100% Experts or Outdoor Use

- 7 -
In the event of a strong crash, the blades are designed to come off to prevent serious damage to the
drone. Certain blades must be replaced on certain motors, or your Mosquito Drone will not fly properly.
• If your drone is facing AWAY from you, the blades labeled “A” must be
positioned top left and bottom right.
• If your drone is facing AWAY from you, the blades labeled “B” must be
positioned top right and bottom left.
• Sometimes the blades may have a number printed on them (i.e., “A1” or
“B2”). The number is not important, but you must make sure the correct
letter is on the appropriate motor (see illustration on the left).
REPLACING BLADES
Problem Possible Solution
Drone not lifting off or flying
in direction desired.
Check blades for hair or debris. Carefully remove blade and remove debris,
then replace blade.
Batteries need charging or replacing. Make sure the drone battery is charged and that
you have fresh batteries in the controller.
Trim buttons are out of sync. Follow instructions in this guide to reset the trim to original
factory settings, then re-trim if needed.
TROUBLESHOOTING
FCC STATEMENT
This device complies with Part 15 of the FCC Rules. Operation is subject to the following two
conditions:
(1) This device may not cause harmful interference, and
(2) This device must accept any interference received, including interference that may cause
undesired operation.
Note: This equipment has been tested and found to comply with the limits for a Class B digital device,
pursuant to part 15 of the FCC Rules. These limits are designed to provide reasonable protection
against harmful interference in a residential installation. This equipment generates, uses and can
radiate radio frequency energy and, if not installed and used in accordance with the instructions,
may cause harmful interference to radio communications. However, there is no guarantee that
interference will not occur in a particular installation. If this equipment does cause harmful interference
to radio or television reception, which can be determined by turning the equipment off and on, the user
is encouraged to try to correct the interference by one or more of the following measures:
- Reorient or relocate the receiving antenna.
- Increase the separation between the equipment and receiver.
- Connect the equipment into an outlet on a circuit different from that to which the receiver
is connected.
- Consult the dealer or an experienced radio/TV technician for help.

- 8 -
WARRANTY / CUSTOMER SERVICE
Sharper Image branded items purchased from SharperImage.com include a 1-year limited
replacement warranty. For Customer Service, please call 1 (877) 210-3449.
The SHARPER IMAGE® name and logo are registered trademarks.
©Sharper Image. All Rights Reserved.
This manual suits for next models
1
Table of contents
Other Sharper Image Drone manuals

Sharper Image
Sharper Image DX-2 User manual

Sharper Image
Sharper Image 1014342 User manual

Sharper Image
Sharper Image 204990 User manual

Sharper Image
Sharper Image DX-4 User manual

Sharper Image
Sharper Image 205112 User manual

Sharper Image
Sharper Image 206614 User manual

Sharper Image
Sharper Image DX-4 User manual

Sharper Image
Sharper Image 206083 User manual

Sharper Image
Sharper Image Drone Air Racer User manual

Sharper Image
Sharper Image 206043 User manual